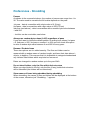
1
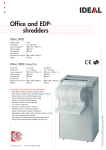
Shred
User Manual
Mac screenshot
Introduction
Shred will securely erase files, meaning that if they are ever recovered (by
specialist software) their content will be useless. For added security, data can
be overwritten up to 35 times and the name and date of the file/folder changed
to random values. These options are discussed in the Preferences section of
this manual.
Both files and folders can be added to the list to be shredded. Files will have
their content overwritten and then the file will be deleted.
Any folders will be searched and any files residing in them will be shredded.
The folder will then be deleted.
Note: You can 'ignore' folders (i.e. not have them shredded) – see
Preferences.
Commands
Right-clicking the list area (on a file or folder) will display a pop-up menu. You
can also use the main menu along the top of your screen.
Adding files and folders
Simply drag and drop files and folders to the list area on the app’s main
window, or to the app’s drop zone if it is visible.
Mac users: Due to Apple sandboxing requirements the app needs permission
to use files in your folders. When you add a file, you will be asked to confirm
access to it's parent folder. Just click "CONFIRM". You will not be asked to do
this again for that folder, but any different folders you select from might trigger
another confirmation. To prevent being asked for confirmation a lot of times,
simply select the highest level folder you can, close to the root (first) folder of
the drive/image you are using. For example, selecting your user account
folder will give the app access to all the common folders within your user
account (Pictures, Movies, Documents, Music etc).
If you encounter repeated requests to confirm folder access, despite having
already given it, reset permissions using the 'Reset permissions' option under
the File menu. You may need to do this if you delete the app and later reinstall it.
Mac users: The dock icon will display the number of items (files/folders) in the
list (excluding the items inside any folders).
Removing files and folders from the list
Select the items you want to remove and click the “Remove” button.
Shredding
To shred all the items in the list you can either right-click on the list and
choose to shred all or selected items, or click the large shredder image to
shred all items in the list.
Ensure that any files you want to shred are not in use by any other apps.
Shredding can be stopped by clicking the “Stop” button, but be warned that
the file/folder being shredded will probably corrupt and useless (it may even
have a new name if this option was selected in Preferences).
In the event that a file cannot be deleted it may have already been overwritten
and renamed/dated by Shred. Regardless, files/folders which could not be
deleted during a shredding operation will be displayed in a list to you
afterwards. From there you can decide whether to try and delete them again
by adding them to the shred list.
Go to location in Finder (or Explorer)
This will open the folder where the selected item(s) in the list reside. The
item(s) are displayed in Finder windows (or in Explorer if you’re using
Windows).
Launch
This launches or opens the selected items. For example, a document will be
opened in it's default application, a folder will be displayed in Finder (or
Explorer).
Removing non-existent items
Will remove any files or folders from the list which no longer exist in the
location they were added.
THE DROP ZONE
The drop zone is a floating window you can position anywhere on screen by
dragging it around. You can drag/drop files and folders to the drop zone, to be
shredded.
• Right-click the drop zone for a pop-up menu of useful options.
• Double-click the drop zone to display the app’s main window.
• The drop zone can float above other windows.
Preferences - General
Hide app window when app starts
When checked, keeps the app hidden in the dock whenever the application is
run.
Confirm shredding operations
When you begin shredding items, you will be asked to confirm your action.
Otherwise shredding will begin as soon as you select it from the menu or click
the "Shred" button.
Start shredding list when items are added/dropped
Use with caution! When enabled this option will being shredding anything in
the list whenever you add files or folders for shredding. When this option is
not enabled, shredding will only begin when you authorise it.
Close app window when shredding has completed
Hides the app’s window after successful shredding. This neatly puts the app
back in the dock out of sight.
Play sound when start shredding and when using drop zone
Will simply play a short sound when shredding begins or when you drop
files/folders on the drop zone.
Save the item list when application quits
This option will save the item list to your documents folder when you quit the
application, and load it when you next start the application.
Make this app start automatically when your computer starts
Follow the instructions to have Shred begin whenever you start your
computer.
Show drop zone
Shows or hides the drop zone.
Keep drop zone on top of other windows
The drop zone remains above other windows.
Small drop zone
When checked, a smaller drop zone will appear (32x32 pixels, as opposed to
the larger 48x48 one).
Note: Mac users can change the transparency of the drop zone window.
Preferences - Shredding
Passes
As shown in the screenshot above, the number of passes can range from 1 to
35. The value used to overwrite the file's data depends on the pass:
1st pass - data is overwritten with a byte value of 0 (0 hex)
2nd pass - data is overwritten with a byte value of 255 (FF hex)
3rd pass (and above) - data is overwritten with a random byte value between
1 and 254
…but this can be overridden, see below.
Always use random byte values (0-255) regardless of pass
If you don't want to follow the default pattern for writing byte values (1st pass
= 0, 2nd pass = 255, 3rd pass = random 1 to 254) you can check this option
to write a random byte value between 0 and 255 for every pass.
Rename / Re-date items
These two options are for added security. The files and folders can be
renamed with a random name of random length, and have their date altered –
all prior to deletion. This ensures that it is impossible to categorise/understand
any 'deleted' files/folders which may later be recovered.
Dates are changed to random values up to the year 2040.
Do not shred folders, only the files within their structure
When you drop folders in the list, only the files (if any) inside their structure
will be shredded (the folders will be untouched).
Show names of items being shredded during shredding
When shredding, the names of files and folders will be displayed at the bottom
of the screen, otherwise just "Shredding…" appears.
Contact
If you have any questions about this product please contact us:
Email: [email protected]
Or visit our website:
http://www.codeinventors.com