1
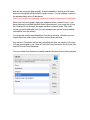
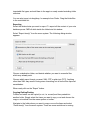
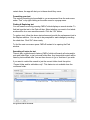
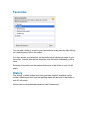
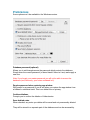
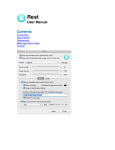
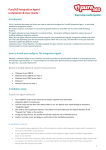
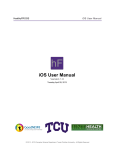
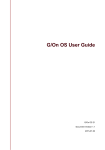
Jot
User Manual
This manual will be using screenshots from the Mac version.
Introduction
Jot is designed to help you store, organize and protect any text information or
pictures you desire.
Your data is stored in databases (called note databases) which in turn are stored
in the app’s container folder (a special folder because the app is sandboxed).
This is referred to as the Library. In the Library you can manage your note
databases (rename, delete, open, create, duplicate, backup and import).
Each note database can be password protected by a password, which means the
data will be encrypted (kept private). A slight drawback is that large note bases
which are encrypted will take slightly longer to open. You can change or remove
the password any time in Preferences.
Note: If you forget your password you will not be able to access your information.
When you first use the app a new note database will be created for you. If you
have previously used MacAppStuff Notes (discontinued), your notes will all now
be contained in one location, the app's sandbox container folder. This folder
stores your note databases, and you can manage them via the Library window
(accessible from the toolbar).
Your previous notes should available in the Library window, otherwise you can
import them from other known locations via the Library window.
Any previous 'Favourites' will not be compatible with this new version of the app.
You are encouraged to use 'Clear all' from the Favourites menu the first time you
use EACH older notes database.
You can create more libraries and swap between libraries via the Library window.
Folders
Inside each note database you can create folders to categorise your notes, and
you can re-order notes and folders in the list by cutting/copying and pasting them.
To create a folder use the buttons on the toolbar (additionally on a Mac press
SHIFT+CMD+N to create a folder and CMD+N to create a note). You can also do
these by using the toolbar and main menu, and even a popup menu available
when you right mouse click on the folder/note list.
Deleting
To delete a folder, select it (or select multiple ones), then choose “Delete” from
the toolbar.
Renaming
You can also rename a selected folder by using the menu system.
Exporting
See “Exporting” section under “Notes” below.
Copying/Cutting/Pasting
See “Copying/Cutting/Pasting” section under “Notes” below.
Notes
Create a note by using the menu system, toolbar or pressing CMD+N (Mac) .
You will be asked to provide a name for the note (the default being the current
date and time).
What you type in the editor, the content of your note, is saved automatically
whenever you view another folder/note or quit the app. You can manually save at
any time using the menu system or the short cut CMD+S (Mac) Ctrl+S
(Windows).
Attachments
You can add references to files, called attachments, to any note. Use the “Attach”
button on the toolbar to display a menu which displays your attachments. Click
on one to open it.
The menu also allows you to manage your attachments. A new window will open
where you can add files, open attachments or remove them. Any files which no
longer exist, because they have been moved, deleted, renamed or reside on an
external drive which is turned off, will appear in red (they will also appear on the
afore mentioned menu as ‘disabled’). You may remove them from the list by
clicking the “Remove non-existent” button.
If a note has any attachments a small paperclip icon will appear top right of the
note.
Deleting
To delete a note select it (or multiple notes) and choose “Delete” from the toolbar.
Renaming
You can rename a selected note by using the menu system (shortcut is CMD+R
for Mac).
Duplicating
Select the notes you want to duplicate and select “Duplicate note(s)” from the
menu system. Folders cannot be duplicated by this method, but you can use the
Copy/Paste method to duplicate them.
Importing
You can import text files (txt), rich text (rtf and rtfd) and xml files which are native
to this app (that is, were previously exported as xml from this app). Note that
“rtfd” format will only import the text.
Importing can be achieved using the “Import file(s)” and “Import folder” options.
Importing a folder will cause the app to search that folder structure for all
importable file types, and add them to the app in a newly created matching folder
structure.
You can also import via drag/drop, for example from Finder. Drag the folder/files
to the note/folder list.
Exporting
Select the folders/notes you want to export. To export all the content of your note
database press CMD+A while inside the folder/note list window.
Select “Export item(s)” from the menu system. The following dialog window
appears:
Choose a destination folder, and decide whether you want to overwrite files
which may already exist.
Choose which export format you want, XML, RTF or plain text (TXT). Anything
other than XML may result in losing some formatting, but all text will be exported
nevertheless.
When ready click on the “Export” button.
Copying/Cutting/Pasting
Folders and notes can be copied (or cut, i.e. moved) and then pasted into
another folder. Simply select the items you want to copy or cut and choose the
copy or cut method from the menu system or toolbar.
Navigate to the folder where you want to copy or move the items and select
“Paste item(s)” from the menu system. There are some restrictions to moving
certain items, the app will alert you to these should they occur.
Formatting your text
The various formatting tools available to you are accessed from the main menu
under “Text” or by right-clicking on the editor area for a popup menu.
Finding & Replacing text
You can search a note by pressing CMD+F which displays a search window. To
find text type the text in the Find edit box. Select whether you want to find whole
words and/or do a case sensitive search. Click the “OK” button.
To replace text, follow the above instructions and provide the replacement text in
the Replace edit box. You can opt to be prompted for each change by marking
the check box. Click “OK” when ready.
To find the next occurrence press CMD+G instead of re-opening the Find
window.
Searching all notes for text
There is also a global search feature (CMD+/) which will search all notes and/or
note and folder titles, or just note and folder titles. Any items which match will be
listed by last modified date. You can then choose to ‘go to’ that item if you wish.
If you want to restrict the search to just the current folder check the option
“Current folder and its subfolders only”. This feature is not available from the
root/home folder.
the global search window
Favourites
You can add a folder or a note to your favourites list at any time by right clicking
on it and choosing “Add to favourites”.
You then access your favourites via the toolbar which displays a menu of your
favourites. You can also remove favourites from this menu individually or all at
once.
Selecting a favourite from the menu will take you to that folder or note if it still
exists.
History
The ‘history’ of which folders and notes you have visited is available via the
toolbar. Selecting an item from the resulting menu will take you to that folder or
note if it still exists.
History can be saved between sessions (see Preferences).
Preferences
Some options won’t be available in the Windows version.
Database password (optional)
Allows you to set/change/remove the password which protects the database.
Simply enter the current password (or leave blank if there isn’t one) and supply a
new one.
Note: If you forget your master password you will not be able to access the
database (and, obviously, your notes contained in it).
Require password when restoring app window
Will prompt for a password (if one is set) when you restore the app window from
a hidden or minimized state. This is an added form of privacy.
Confirm deletions
Prompts you to confirm the deletion of folders/notes.
Save deleted notes
When checked, any notes you delete will be saved and not permanently deleted.
They will be stored in a separate part of the database and can be accessed by
clicking the “Manage deleted notes” button on the Preferences window.
Naturally, storing these records will increase the size of the database, and it is
your responsibility to maintain this list by permanently deleting records from it
when you're sure you no longer need them.
If this option is left unchecked, any notes you delete from the database will be
permanently deleted and not recoverable.
Clicking the Manage button displays any notes which were saved instead of
deleted. From here you can permanently delete them, or restore them. If the
original folder where the note came from no longer exists, the note will be stored
in a new folder with todays date and time. This will be true for any ‘orphaned’
notes.
The “Empty” button is a quick way to delete all ‘deleted’ notes.
Clicking on a note places cursor inside note / Place cursor at end of text
When displaying a note, the cursor will be placed in the note/editor area (and
optionally at the end of the text) otherwise the list remains focused instead of the
editor (try it and see).
Display word count
This displays the number of words in the current note. If you notice a
performance decrease simply uncheck this option.
Play sound effects
Plays a sound when deleting, moving/copying, dropping notes/folders.
Save history between sessions
If unchecked, the history will be clear each time you use the library. Otherwise
the history is saved with the library and available next time you use that library.
Editor font (size and colour)
Specify a default font, size and text colour for new notes.
Use alternate line colours for note/folder list
Simply adds alternate line colouring to the note/folder list.
Other features
Keep window on top
Available from the Window menu, this feature will allow you to keep the app window
above other windows.
Contact
If you have any questions about this product please contact us:
Email: [email protected]
Or visit our website:
http://www.codeinventors.com