1
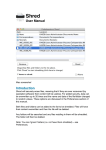
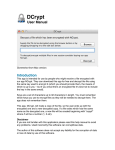
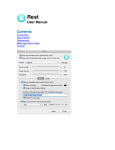
NCrypt User Manual Contents Introduction Options Preferences Contact This manual uses screen shots from the Mac version. Introduction NCrypt will encrypt (and decrypt) files. Simply add files/folders to the list (the contents of the folder will be encrypted/decrypted), supply a key to use for encryption, and click "Start". The options are discussed in detail below. Protect your own documents, pictures etc from prying eyes. You can preserve the original file or have it deleted (including secure deletion – shredding/wiping of the file content). NCrypt will encrypt any file(s) passed to it which do not have the file extension “ci_encrypted”. Once encrypted the file will have the extension “ci_encrypted” added to it (signifying it is encrypted). Any files passed to NCrypt which DO have the “ci_encrypted” extension will be decrypted, and their original file name restored. The application resides in the system tray on Windows operating systems. YOU ARE RESPONSIBLE FOR REMEMBERING THE KEY (PASSWORD) USED TO ENCRYPT DATA – THIS APP DOES NOT REMEMBER THE KEY FOR YOU !!! Disclaimer If you are not familiar with this application please read this help manual to avoid any problems. Used incorrectly this software can corrupt/lose data. The author of this software does not accept any liability for the corruption of data or loss of data by use of this software. Options You can use the main menu or right click on the list for a pop-up menu. Adding and removing files/folders Simply drag/drop files/folders onto the application window’s list area, or to the applications drop zone window. To remove files from the list, click the "Remove" button. Mac users: Due to Apple sandboxing requirements the app needs permission to use files in your folders. When you add a file, you will be asked to confirm access to it's parent folder. Just click "GRANT ACCESS". You will not be asked to do this again for that folder, but any different folders you select from might trigger another confirmation. To prevent being asked for confirmation a lot of times, simply select the highest level folder you can, close to the root (first) folder of the drive/image you are using. For example, selecting your user account folder will give the app access to all the common folders within your user account (Pictures, Movies, Documents, Music etc). If you encounter repeated requests to confirm folder access, despite having already given it, reset permissions using the 'Reset permissions' option under the File menu. You may need to do this if you delete the app and later re-install it. Original file Choose what to do with the original file(s). Keep: A new file is created containing your encrypted (or decrypted) data. The original file remains intact/untouched. Encrypted files will have the extension “ci_encrypted” attached. Decrypted files: if a file of the same name already exists, the new decrypted file’s name will be renamed to include “copy”. Send to trash: A new file is created containing your encrypted (or decrypted) data. The original file is sent to the trash. Delete: A new file is created containing your encrypted (or decrypted) data. The original file is permanently deleted. It could be recovered by file recovery software if the free space it occupies is not overwritten. However, for added security you can opt to rename and/or re-date the file prior to it’s deletion. Wipe then delete: A new file is created containing your encrypted (or decrypted) data. The original file’s content is then wiped clean (overwritten) and the file deleted. It could be recovered by file recovery software but the content would be useless as it was overwritten. This method of deletion takes longer than send to trash or a plain delete. It is included here for security reasons. For added security you can opt to rename and/or re-date the file prior to it’s deletion. Note: Aliases (shortcut files on Mac’s) will not be processed. Encryption Key This is the key used for encryption. The same key is used for decryption, so ensure you remember it. It can be up to 32 characters in length. Hide key Simply use this to toggle the visibility of the key’s characters, should someone walk in the room for example. Start/Stop Before you can encrypt or decrypt you need to provide a key (see above). To begin encrypting all items in the list click the “Start” button or select “Encrypt/decrypt all” from the menu. If you just want to encrypt/decrypt some selected items in the list, and not the others, use “Encrypt/decrypt selected” from the pop-up (right-click) or main menu. The operation can be canceled by clicking the “Stop” button. There is no ‘undo’. Encrypted files will be renamed to have the extension "ci_encrypted". Launch Opens (or runs) the selected items. For example, a document will be opened in it's default application, a folder will be displayed in Finder (Mac) or Explorer (Windows) etc. Open in Finder/Explorer Displays the file or folder in Finder (Mac) or Explorer (Windows). Removing non-existent items This is available from the "File" menu or via the pop-up menu accessed by rightclicking on the list. It will remove any files or folders from the list which no longer exist in the location they were added. Preferences Hide app window when the app starts Click on the app’s icon to show the app. On Windows, the app window is minimised. Confirm encrypt/decrypt operations When checked, you will be asked to start and stop encrypting/decrypting. Encrypt/decrypt immediately when files/folder are dropped Check checked, if you add files/folders (either by the add button, menu, drag drop) the selected operation (encrypt or decrypt) will begin IMMEDIATELY. Use with caution. If no password has been entered, you will be asked to supply one. Close app window when processing files has completed On Windows the app’s window will be minimised. On a Mac, you can click on the dock icon to restore the app's window. Play sound when processing ends A sound will be played when encryption/decryption has finished. Show drop zone Displays or hides the drop zone window, where you can drag/drop files/folders for processing. Right click on the drop zone for a pop-up menu. Keep drop zone on top of other windows Does as it says. Wiping options Specify the number of passes, meaning the number of times the files data is overwritten. You can also specify whether to use random characters as the overwrite data. For additional security you can rename and/or re-date the file prior to deleting it. Contact If you have any questions about this product please contact us: Email: [email protected] Or visit our website: http://www.codeinventors.com