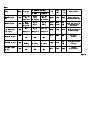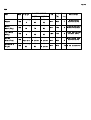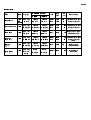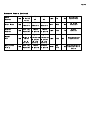
1
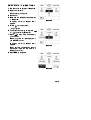
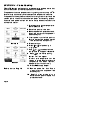
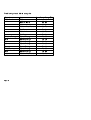
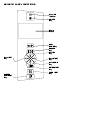
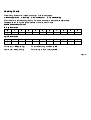
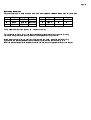
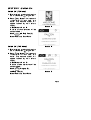
SECTION 1 - Switch On Switch ON (TC Model) 1. Ensure there is an electrical supply to the unit. Power On will glow red. 2. Press key. Screen illuminates and unit boiler will fill with clean, cold water. The welcome screen will appear followed by main default display. See Screens A and B. A choice of two alternatives will be made available :Cook and Help Line (?) Screen Defaults to Cook Mode. Switch ON (TMS Model) 1. Ensure there is an electrical supply to the unit. Power On will glow red. 2. Press key. Screen illuminates and unit boiler will fill with clean, cold water. The welcome screen will appear followed by main default display. See Screens A and C. A choice of three alternatives will be made available:Cook , Program (P), and Help Line (?) Screen Defaults to Cook Mode. Screen A Screen B Screen C Page 3 SECTION 2 - To Pre-heat 1. From Screen B or C, select Press to confirm. Screen 1 will appear. 2. Screen will default to Convection at 150 o C with Convection Mode highlighted. 3. Press keys to change mode. Three possible modes are available:Screen 1 Convection Steam Combination Screen 2 Page 4 Cooking modes default to the following temperatures Convection 150oC Steam 100oC Combination 150oC 4. Press key to select temperature. Temperature is now highlighted. 5. Press to decrease or to increase temperature. 6. Press to confirm chosen mode and temperature, the oven will now heat up. Current temperature is displayed on screen in the ACTUAL column. Also for your convenience, the time will be displayed. Screen 2 will appear. 7. Press ESC to stop the heating process when desired pre-heat temperature is reached, alarm will bleep 5 times. Food(s) may now be loaded into the oven. SECTION 3 - To Set Timer 1. Pre-heat oven as detailed in Section 2. 2. Open door carefully. Place food(s) inside oven. 3. Close door. 4. Set mode and temperature as detailed in Section 2. A display similar to Screen 3 will appear. 5. Press until time symbol is highlighted. 6. To set desired cooking time, press or to set time. (Screen 4) 7. Press to start. Time automatically counts down. Remaining time will be displayed in the ACTUAL column. A display similar to Screen 5 will appear. When set time has elapsed, heating process will stop and the alarm will bleep continuously. 8. Press ESC to stop alarm. Screen 3 Screen 4 Screen 5 Page 5 SECTION 4 - Probe Cooking TC and TMS ovens are fitted with a core temperature probe to ensure that food can be cooked to the exact specification of the Chef. The probe monitors core temperature during cooking to an accuracy of 1oC. Oven will stop automatically when selected core temperature is reached. The probe should always be handled with an oven glove and requires to be cleaned prior to insertion and also after completion of the cooking process. Insert the clean probe into food and ensure the tip reaches the core of the thickest food section. 1. Pre-heat oven to chosen temperature. (Refer to Section 2). 2. Place food product in the oven. 3. Remove probe from protective sheath. Use glove or oven cloth as probe will be extremely hot. 4. Insert probe in to the food product. Ensure the tip of the probe is located in the centre of the food product. 5. Close oven door. Screen 6 6. Press or until probe sign is highlighted. 7. Use or to set desired core temperature as displayed in Screen 6. 9. Press to commence cooking. Screen 7 will now appear. Current core temperature can be viewed on screen When pre-set core temperature has been reached, Screen 7 bleeper will sound continuously. Refer to chart on Page 16 Page 6 10. Press ESC to stop bleeper. 11. Remove probe from food. Use a glove or oven cloth as probe will be extremely hot. 12. Carefully clean probe using a bacteriacidal wipe and replace into protective sheath.. SECTION 5 - TC/TMS Ovens Changing Values whilst Cooking 1. Ensure ESC TO STOP is displayed on screen. This signifies oven is on. 2. Press and MODE, , or will highlight and flash. (Highlighter defaults to box last set.) 3. Press or to highlight box which registers value you wish to change. Screen 8 4. Press to decrease or increase values. Value will now change and can be viewed in SET column. 5. Press to confirm when choice is complete. Flashing highlighter will now cease and ESC TO STOP will be highlighted as in Screen 8. Oven Light(s) The 6 grid oven has one single light and the 10 grid has two. The light(s) are located at the left hand side of the oven. Press key to switch the lights on. The lamps will stay on until key is pressed to turn the lamps off. Stopping The Oven Press ESC to stop the cooking process. The alarm will bleep 5 times. Screen Contrast The screen resolution may be controlled by pressing the key. Opening the Door When cooking on Steam or Combi mode, please pay particular attention to safety when opening door. Open door slowly with due care. Use door as a shield from escaping steam. Page 7 Cool Down Facility The oven temperature may be cooled quickly to a lower temperature by using the cool down facility. 1. Screen display should read TO START, signifying that oven is off. The actual oven temperature will be displayed at RH side (ACTUAL). 2. Open door fully. Warning: Please take care if previous mode was steam or combi as hot steam will escape. 3. Use to set desired temperature. This will be highlighted in LH column. 4. Press fan key . Current temperature can be viewed in ACTUAL column. When the desired temperature has been reached, alarm will bleep 5 times and fan will stop. Help Menu Move to highlight ? Press to confirm. Screen 9 will appear listing several options. Screen 9 Chef's Tips/General Guidelines (Option 2) 1. Chefs Tips - Ten tips are given over a range of food products. 2. General Guidelines Always pre-heat the oven before commencing cooking. When loading oven with food, keep the door open for as little time as possible to ensure heat retention within the oven cavity. When transferring from Convection/Combi modes to Steam Mode, always use the Cool Down facility. NEVER USE STEAM MODE ABOVE 100oC. Page 8 The following chart is offered as a guide. Food Items Beef Lamb Chicken, Turkey Duck Fish Gammon Goose PateÂs/Terrines Pork Veal Page 16 State Rare Medium - Rare Medium Medium - Well Done Well Done Medium Well Done Cooked Through Cooked Through Cooked Through Cooked Through Cooked Through Cooked Through Cooked Through Medium - Well Done Core Temp. Range (oC) 50 - 55 50 - 60 60 - 65 65 - 75 75 - 85 65 - 75 75 - 85 75 - 80 70 - 75 70 - 75 75 - 80 75 - 80 75 - 80 75 - 85 70 - 75 SECTION 6 - Cleaning the Appliance Oven Interior 1. Ensure screen reads TO START. 2. Cool oven temperature to 50oC. See Cool Down Facility (Page 8). 3. Apply a mild detergent spray cleaner to all internal sections of the oven, i.e. top, base, sides, fan guard, fan, baffle plate, grid supports, grids, glass door, fat filter, door, drip tray, probe and chain. 4. Leave cleaner on sprayed surfaces for time recommended by manufacturer. 5. Set oven to steam mode at 100oC for 10 minutes as detailed in Section 3. 6. Press . Oven will steam for 10 minutes. This will aid hygienic removal of food debris and chemical cleaner. 7. Carefully open oven door as detailed on Page 7. 8. Remove grids, grid supports, fat filter and drip tray. Wash by hand in a sink. 9. Use warm water and mild detergent with a soft cloth to wash out interior. 10. Use water hose (if fitted) to spray oven interior with clean cold water. This will thoroughly rinse away any remaining food debris and cleaner. 11. Use a clean, lint-free tea towel to dry all wet areas. 12. Dry all hand washed components thoroughly and re-assemble. Oven Exterior - Clean these surfaces at regular intervals as necessary. Fingermarks of a greasy or floury nature may periodically appear on exterior surfaces including the control panel. These can be removed by following this procedure. Never use excessive water or a scourer. Wash with hot, soapy water using a soft cloth. Rinse away all soapy resdidue using a clean cloth and clean water. Polish with a dry, lint-free cloth. Cleaning Recommendations Falcon recommend that the combi oven be cleaned AT LEAST ONCE A DAY to maintain acceptable hygiene standards. We do not recommend the use of abrasive cleaning materials such as wire brushes or steel wool scourers on any part of the oven. The oven has been designed to facilitate cleaning and should not require aggressive detergents if cleaned daily as recommended. Warning! - This appliance must NEVER be cleaned with a jet of water or be steam cleaned. Page 9 SECTION 7 - Programs (TMS only) Screen 10 Screen 11 Screen 12 Screen 13 Page 10 Writing a Program 1. Press key. 2. Press to highlight P (Screen 10) 3. Press to confirm. 4. Press to select MODIFY. (Screen 11) 5. Press to confirm. 6. Enter security code using arrow keys. After each letter, press to confirm and ESC to delete letter (Screen 12). Security code must be four letters, default code is CHEF. The commissioning engineer can change this to your personal choice if requested. 7. Ensure NEW is highlighted - use if necessary. (Screen 13) 8. Press to confirm. Program screen will appear. 75 programs are available Program Number is displayed on screen. (Top LH corner) Choose programme number by using and keys. (Screen 14) 9. Press to confirm. EDIT will now highlight. (Screen 15) 10. Press to confirm. Actual column reads as Screen 16. i.e. default to Conv. 150oC on Time mode 11. Use to select mode, temperature, time and probe. The key to increase and to decrease values. 12. When complete press to save stage. Details are now transferred to Stage 1, viewed at LH side of screen. 13. If further stages are required, press to highlight Stage 2. EDIT will be highlighted. (Screen 15) 14. Repeat Steps 10-12 until all required stages have been written and saved. 15. Press to highlight SAVE. (Screen 15). Screen 16 appears if any stage is incomplete. Return to Step 14 and complete stages. 16. Press to confirm & save program. PROGRAM NAME screen now appears and EDIT is highlighted. (Screen 17) 17. Spell out chosen program name (Maximum 16 letters) by highlighting each letter using the and keys to move left and right. keys to move up and down. After each letter press to confirm. Letters chosen appear in name box. 18. When program name is completed, move to highlight SAVE. 19. Press to confirm. Screen appears, listing all written programs. 20. Press ESC once to return to programming Screen 11. Screen only shows 11 set programs at any one time. Scroll using the keys. Screen 14 Screen 15 Screen 16 Screen 17 Page 11 Screen 18 Screen 19 Screen 20 Screen 21 Page 12 Deleting A Program 1. Press key. 2. Press to highlight P . 3. Press to confirm. Program No. and DESCRIPTION Screen 18 will appear. 4. Press to select MODIFY. 5. Press to confirm. SECURITY Screen 19 appears. 6. Enter personal security code as detailed in Section 7 - Writing A Program. Program No. and DESCRIPTION screen will re-appear. 7. Press to highlight program requiring deletion. 8. Move key to highlight DEL (Screen 20). 9. Press to confirm. Program will be deleted from screen. To INSERT This facility allows the Chef to write a program and insert it within a Program List location. See Screen 21. Press key to select Program 2. Program 2 - SHORTBREAD RNDS is highlighted. Move to highlight INSERT. Press to confirm. When inserted, the new program shall appear as Program 2. SHORTBREAD RNDS will be renamed as Program 3. Deleting a Stage When a program has been written and you wish to delete a stage. If already in Programming Screen, go to Stage 8. 1. Press key. 2. Press to highlight P . 3. Press to confirm. Screen will display program number(s) and corresponding name(s). 4. Press . Highlight program to be modified. 5. Press to highlight modify. (Screen 22) 6. Press to confirm. SECURITY CODE screen appears. 7. Enter code as detailed in Section 7 WRITING A PROGRAM. Program No. and description screens will appear with EDIT highlighted. (Screen 23) 8. Press to confirm. 9. Ensure EDIT is highlighted. (Screen 24) 10. Press to select DELETE. 11. Press to select one of six stages to be deleted. 12. Press to confirm. Selected stage will be deleted. Remaining stages will be presented in numerical order. 13. Press to highlight SAVE. 14. Press to confirm. Program Name screen will appear. Screen 22 Screen 23 Screen 24 Page 13 15. Press to highlight SAVE. 16. Press to confirm. 17. Press ESC to return to Programming Screen 22 Using A Program (TMS only) 1. Press . 2. Press to highlight P . 3. Press to confirm. Screen displays program no.(s) and corresponding name(s) as shown in Screen 25. 4. Use to select program choice. 5. Ensure COOK is highlighted by using 6. Press to confirm. Program chosen now appears on screen. is highlighted. (Screen 26). Note Oven requires to be pre-heated before food(s) can be loaded. 7. Open door and place food in oven. 8. Press to start program. ESC TO STOP is now highlighted. Stopping A Program Whilst Running Press ESC. Follow on-screen instructions. i.e. ESC - NO (program continues) - YES (program ends) Page 14 Screen 25 Screen 26 Screen 27 Changing a Program Temporarily Whilst Running A program may be changed whilst running by the following: 1. Press . 2. Press to highlight mode, temperature, time or probe. 3. Press to change values as required. 4. Press to confirm changes. Program will now run on amended value. When program is complete, the original values are retained. Screen 28 Flexitime When food product(s) are placed within a pre-heated oven, the food temperature will reduce the oven temperature. Oven temperature reduction is dependent upon size and temperature of load. The TMS flexitime function is designed to take the temperature reduction into account. This will increase the cooking duration if a larger load is placed in the oven. By pressing the flexitime function, the time differential is calculated by the software. i.e. Program 1 is written for a 1/1 gastronorm tray of braised rice. If Chef requires to prepare 5 x 1/1 trays, it is not necessary to log a separate program. Simply recall Program 1 to screen and move key to highlight . Press to confirm. Page 15 GUIDE TO PANEL FUNCTIONS Power ON Indicator ON/OFF Key Display Screen COOL DOWN Key ESCAPE Key Move UP Key Move LEFT Key Move RIGHT Key Move DOWN Key ENTER/START Key SCREEN CONTRAST Key OVEN LIGHT Key Cooking Charts The following information will hopefully assist you in the following areas: Menu compilation Costing Portion Control Time Scheduling This information is provided as a guide only. Times and loads should be considered approximate. Temperatures and timings are generally based on small to medium loads. Quick Reference Conversions lb to kg Conversion lbs kg 1 0.454 2 0.91 3 1.36 4 1.82 5 2.278 6 2.73 7 3.18 8 3.64 9 4.09 10 4.54 2 4.4 3 6.6 4 8.8 5 11 6 13.2 7 15.4 8 17.6 9 19.8 10 22 kg to lb Conversion kg lbs 1 2.2 1 ounce (oz) = 28.3 grams (g) To convert lbs to kg, divide lbs by 2.2 1 pound (lb) = 454 grams (g) To convert kg to lbs, multiply kg by 2.2 Page 17 Page 18 Gastronorm Containers Tray size compliant with these models is the 1/1, dimensions 530mm x 325mm. Depth sizes vary as follows: Size 1 2 3 Depth 20mm 40mm 65mm per 6 grid per 10 grid 6 10 3 (poss. 6) 5 (poss. 10) 3 5 Size 4 5 6 Depth 100mm 150mm 200mm per 6 grid per 10 grid 3 5 2 3 1 2 This is dependent upon food product. (ie - height and nature) To illustrate the versatility of your new Falcon Combination Oven we have included the following information as a guide to the cooking times you can expect when using the oven. As the electric model is likely to heat up quicker than the gas model, we advise that when using a gas model, the pre-heat temperature should be set higher than the desired cooking time. When the pre-heat temperature has been achieved, the desired cooking temperature can then be set. Meat Food Beef Cottage Pie Beef Topside State Tray/grid MAXIMUM OUTPUT Mode 6 GRID 10 GRID 40mm tray 6 x 40 10 x 40 3kg 18kg 30kg Fresh Combi 24 portions 144 portions 240 portions Grid 3 grids 5 grids Conv. Fresh 3 pieces 27kg 45kg Combi 3kg each Temp Time (oC) (mins) Practical Tips 185 45-60 Piped potato may be brushed with beaten egg. 210 145 15 120 Roast on grid. Drip tray below. Seal pores for 15 minutes then reduce temperature. Lamb Hot Pot (individual) Fresh Grid 3 grids 10 grids Combi 6 portions 36 portions 60 portions 190 30-40 Brush sliced potatoes with melted butter. Bacon Rashers Fresh 20mm tray 6 x 20mm 10 x 20mm Conv. 16 96 160 220 3-4 Tray up close together. Steam 100 180 190 Stud cloves before cooking. Collect liquid in drip tray. 20mm tray 6 x 20mm 10 x 20mm Conv. 32 192 320 190 20-25 Lightly oil before cooking. Whole Gammon Fresh Pork Sausages (8 off) Fresh Grid 2 x 6kg 2 grids 4 x 6kg 3 grids 6 x 6kg Page 19 Page 20 Fish Tray/grid MAXIMUM OUTPUT State Kippers Fresh 20mm tray 6 x 20mm 10 x 20mm Conv. 4 24 40 200 6-7 Brush with melted butter before cooking. Salmon Steak (170g) Fresh 20mm tray 6 x 20mm 10 x 20mm Conv. 12 72 120 195 5-6 Pass steaks through flour. Brush with melted butter. Trout Whole (200g) Fresh 40mm tray 6 x 40mm 10 x 40mm Steam 8 48 80 100 7-8 Squeeze with a little citrus juice before cooking. Fish Pie (Potato Top) Fresh 40mm tray 6 x 40mm 10 x 40mm Combi 24 portions 144 portions 240 portions Conv. 185 200 20 - 25 3-4 Brush potato with melted butter before cooking. Crumbed Fish Fingers Fresh 20mm tray 6 x 20mm 10 x 20mm Conv. 30 180 240 portions 210 12 - 15 No need to spray with oil. 6 GRID 10 GRID Mode Temp Time (oC) (mins) Food Practical Tips Poultry and Game Food State Tray/grid Grid Chicken Fresh 4 x 1.5kg (Roast - Whole) MAXIMUM OUTPUT 6 GRID 10 GRID Mode 3 grids 5 grids Combi. 12 x 1.5kg 20 x 1.5kg Chicken 20mm tray 6 x 20mm 10 x 20mm Drumsticks Fresh Conv. 16 96 160 (Crumbed 100g) 40mm tray 3 x 40mm 5 x 40mm Combi Chicken 3kg Fresh 72 120 Conv. (Roast - Whole) 24 portions Chicken Liver Pate Fresh 1 x 1kg loaf tin on grid 3 grids 12 x 1kg loaves 5 grids 20 x 1kg loaves Steam Temp Time (oC) (mins) Practical Tips 165 40 - 50 Use drip tray and probe. 185 15 - 20 Season/flavour before crumbing. Lightly oil tray. 180 195 40 - 45 5 - 10 Last few minutes on Conv ensures crisp crust. 85 60 - 70 No need to use a water bain marie. Page 21 Page 22 Farinaceous Tray/grid MAXIMUM OUTPUT State Rice Pilaff Dried 65mm tray 3 x 65mm 2kg 6kg 5 x 65mm Steam 10kg 100 17 - 20 Place rice in tray with twice the volume of stock or water. Lasagne Bolognaise Fresh 65mm tray 3 x 65mm 5 x 65mm Combi 2kg 54 portions 90 portions Conv. 190 210 20 3-5 Heat thoroughly on Combi mode. Brown on Conv. Macaroni au gratin Fresh 40mm tray 6 x 40mm 10 x 40mm Combi 12 portions 72 portions 120 portions Conv. 160 205 15 - 20 3-5 Heat thoroughly on Combi mode. Brown on Conv. 6 GRID 10 GRID Mode Temp Time (oC) (mins) Food Practical Tips Vegetables Food State Tray/grid MAXIMUM OUTPUT 6 GRID 10 GRID Mode 40mm tray 6 x 40mm 10 x 40mm (perf.) Steam Asparagus 7.2kg 12kg 1.2kg 40mm tray 6 x 40mm 10 x 40mm Steam Corn on the cob Fresh (perf.) 48 ears 80 ears 8 ears Fresh 5 x 65mm 14kg Temp Time (oC) (mins) Practical Tips 95 5-6 Trim as necessary. 100 15 - 18 Trim as necessary. Braised Onions Fresh 65mm tray 3 x 65mm 2.8kg 8.4kg Conv. 165 40 - 50 Blanch onions. place in with stock. Place lid on tray. Parsnips Fresh 40mm tray 6 x 40mm 10 x 40mm Conv. 1.8kg 10.8kg 18kg 195 20 - 25 Trim to required size. Roast witha little hot oil and season as preferred. Peas Fresh 40mm tray 6 x 40mm 10 x 40mm (perf.) Steam 12kg 20kg 2kg 100 3-4 Season after cooking. Braised Tomatoes Fresh 20mm tray 6 x 20mm 10 x 20mm Combi. 3kg 18kg 30kg 180 5-6 Cross top and brush with melted butter. Page 23 Page 24 Potatoes Food State Tray/grid Baked Jacket Potatoes Fresh Dauphinoise Potatoes MAXIMUM OUTPUT Mode Temp Time (oC) (mins) Practical Tips 6 GRID 10 GRID Grid 10-12 oz 16 3 grids 48 5 grids 80 Combi 170 45 - 55 Pierce with fork. No need to individually foil potatoes. Fresh 65mm tray 3.5kg 3 trays 10.5kg 5 trays 17.5kg Combi Conv. 180 205 15 - 20 5 Heat thoroughly on Combi mode. Brown on Conv. Duchess Potatoes Fresh 20mm tray 3 trays 5 trays Conv. 18 potatoes 54 potatoes 90 potatoes 200 15 - 20 Brush with beaten egg before cooking. Fondant Potatoes Fresh 40mm tray 6 trays 5 trays Combi 40 potatoes 240 potatoes 400 potatoes Conv. 190 200 40 - 45 5 Brush with beaten egg before cooking. New Potatoes Fresh 65mm tray (perf.) 4kg 100 15 - 20 Season after cooking. 3 trays 12kg 5 trays 20kg Steam Miscellaneous Food State Eggs (boiled) Fresh Pizza Fresh Quiche Lorraine Fresh Yorkshire Pudding Fresh Toad in the hole Fresh Tray/grid 20mm tray (perf.) 50 eggs 20mm tray 8" dia. 2 pizzas 20mm tray 8" dia. 2 QL Grid 2 x 12 moulds 40mm tray 24 sausages 12 portions MAXIMUM OUTPUT Mode 6 GRID 10 GRID 6 trays 300 eggs 10 trays 500 eggs Steam 6 trays 12 pizzas 10 trays 20 pizzas 6 trays 12 QL 10 trays 20 QL Temp Time (oC) (mins) Practical Tips 100 Soft 3-4 Hard 9 - 10 For cold preparation, refresh in cold water immediately. Conv. 220 10 - 15 Lightly oil tray before cooking. Combi 165 25 - 30 Cooking time varies according to egg/cream ratio. 3 grids 5 grids Conv. 72 portions 120 portions 190 - 25 - 30 200 If preparing medium to full loads, pre-heat oven to 210oC. 3 grids 5 grids Conv. 36 portions 60 portions 190 - 25 - 30 200 If preparing medium to full loads, pre-heat oven to 210oC. Page 25 Page 26 Bakery Items Food State Tray/grid MAXIMUM OUTPUT 6 GRID 10 GRID Mode Temp Time (oC) (mins) Practical Tips Bread Rolls Fresh, 20mm tray 3 x 20mm Pre15 rolls 45 rolls proved 5 x 20mm Combi 75 rolls Conv. 195 195 12 3 Last few minutes on Conv. ensures a crisp crust. Cornish Pasties Fresh 20mm tray 3 x 20mm 10 pasties 30 pasties 5 x 20mm Combi 50 pasties Conv. 175 180 18 - 20 1-2 Last few minutes on Conv. ensures a crisp crust. Rock Buns Fresh 20mm tray 3 x 20mm 18 buns 54 buns 5 x 20mm 90 buns Conv. 210 12 - 15 Using a spoon or scoop, place mixture on tray. Sausage Rolls (4") Fresh 20mm tray 3 x 20mm 5 x 20mm Combi 20 S. Rolls 60 S. Rolls 100 S. Rolls Conv. 200 200 12 - 15 1-2 Last few minutes on Conv. ensures a crisp outer texture. Scones (1/2") Fresh 20mm tray 3 x 20mm 5 x 20mm Conv. 20 scones 60 scones 100 Scones 185 10 Brush off excess flour before baking. Soda Bread Fresh 2 x 7" dia. 200 25 - 30 Brush with milk before baking. 20mm tray loaves 3 trays 6 loaves 5 trays Combi. 10 loaves Bakery Items (continued) Victoria Sandwich Vol au Vent Cases Grid Fresh 4 x 20cm dia. tins Fresh 20mm tray (De20 frosted) 3 grids 12 tins 5 grids 20 tins Conv. 185 15 Lightly grease and lightly flour sponge tins. 3 trays 60 5 trays 100 Conv. 180 16 Fit fat filter fbefore baking. Sweets and Desserts Tray/grid MAXIMUM OUTPUT State Bakewell Tart Fresh 20mm tray 6 x 20mm 10 x 20mm Conv. 24 portions 144 portions 240 portions 180 25 - 30 Egg wash tart before baking. Bread and Butter Pudding Fresh 40mm tray 6 x 20mm 10 x 20mm Combi 24 portions 144 portions 240 portions Conv. 145 160 30 - 35 3-4 Complete baking on Conv. to brown evenly. Brush with hot apricot jam. Brandy Snap Baskets Fresh 20mm tray 6 x 20mm 10 x 20mm Conv. 4 baskets 24 baskets 40 baskets 160 4-5 Line tray(s) with silicone paper. Mould around Dariole mould on removal. 6 GRID 10 GRID Mode Temp Time (oC) (mins) Food Practical Tips Page 27 Page 28 Sweets and Desserts (Continued) Creme Caramels Choux Eclairs Poached Peaches Spotted Dick Sticky Toffee Pudding 20mm tray 3 x 20mm 5 x 20mm Steam 54 90 moulds 20mm tray 6 x 20mm 10 x 20mm Fresh Conv. 18 eclairs 108 eclairs 180 eclairs Fresh 18 Dariole Fresh 20mm tray 3 x 20mm 5 x 20mm Steam 18 peaches 108 peaches 180 peaches 75 30 - 35 No need to use water bain marie. 200 20 - 25 Line tray with silicone paper. 100 10 - 15 Poach in stock syrup. Grid 3 grids 5 grids Steamer 3 x 4 sleeves 5 x 4 sleeves Fresh sleeves Steam 100 90 180 portions 180 portions 4 x 15 (12 x 15 (20 x 15 portions portions) portions) 40mm tray 6 x 40mm 10 x 40mm Fresh Combi 165 - 70 - 80 32 peaches 192 peaches 320 peaches 170 Half to three-quarters fill steamer sleeves. Pour toffee sauce over pudding upon removal from oven. IMPORTANT! INSTALLATION and SERVICING NOTES PLEASE READ BEFORE OPERATING OVEN Installation This appliance must only be installed by a competent person in compliance with the regulations in force at the time. UK regulations are detailed on the Installation and Service Manual front. Free Commissioning Service An AFE Serviceline engineer must commission after installation and before it is used. The FREE Commissioning Service will ensure that the unit has been installed to the required standards. To inform Falcon that the unit has been installed and is ready to be commissioned please fax the card enclosed to 01438 369900 Alternatively you can contact us by phone or e-mail: Telephone: AFE Serviceline 01438 363000 e-mail: [email protected] Free Demonstration A free Chef's Demonstration is offered with every unit to ensure that the Oven's versatility and capability can be fully utilised. Following successful commissioning, the engineer will notify our Development Chef who in turn will contact one of our Demonstration Chefs. The Demonstration Chef located closest to your establishment will then contact you directly to arrange the demonstration to take place at a mutually agreed date. This will normally take place within two weeks of commissioning. Regular Servicing Servicing by a qualified engineer is recommended to ensure safe and efficient performance. Water Quality The quality of water being supplied to the boiler should be analysed to ensure that hardness is no greater than 70mg/litre. Water which does not meet this standard MUST be treated by installing a water treatment system. PLEASE NOTE: THE APPLIANCE WARRANTY DOES NOT COVER FAILURE DUE TO INADEQUATE WATER QUALITY! Page 1 Daily Drainage of Boiler During normal operation, the boiler should be drained daily to avoid sediment build up. The oven will drain automatically when switched off. If the oven is used continuously (without being switched off within a 24 hour period) we recommend that the unit be switched off for 5 minutes each day to activate the automatic drain. Safety at Work It is the responsibility of the Supervisor or equivalent person to ensure that users wear protective clothing. Attention is drawn to the fact that some parts of the equipment will, by necessity, become very hot and will cause burns if touched accidentally. WARNING: THIS APPLIANCE MUST BE EARTHED. THE UNIT WARRANTY MAY BE MADE VOID IF THE ABOVE DETAILS ARE NOT ADHERED TO. Page 2 USER MANUAL for TC/TMS Models Contents Page 1 - 2 Page 3 Page 4 Page 5 Page 6 Page 7 - 8 Page 9 Page 10 - 15 Page 16 Page 17 - 28 Page 19 Page 20 Page 21 Page 22 Page 23 Page 24 Page 25 Page 26 - 28 Installation and Servicing Notes SECTION 1 - SWITCH ON SECTION 2 - To Pre-heat SECTION 3 - To Set Timer SECTION 4 - Probe Cooking SECTION 5 - TC/TMS Oven Functions Changing Values whilst Cooking Oven Light(s) Stopping the Oven Screen Contrast Open the Door Cool Down Facility Help Menu SECTION 6 - Cleaning the Appliance SECTION 7 - Programs (TMS Only) Core Temperature Guide COOKING CHARTS Meat Fish Poultry and Game Farinaceous Vegetables Potatoes Miscellaneous Bakery Items / Sweets and Desserts