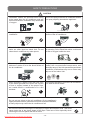
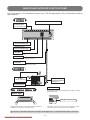
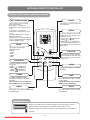
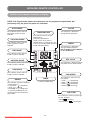
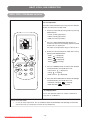
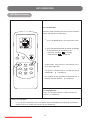
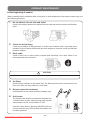
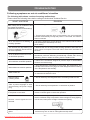
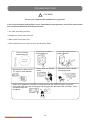
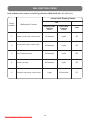
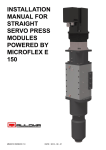
1
WALL-MOUNTED TYPE AIR CONDITIONERS
(SPLIT SYSTEMS, AIR-TO-AIR, HEAT PUMP TYPE)
USER’S MANUAL
New SMARTLine 2011
• ON/OFF Models:
HKED - HCND 261 G(-1)
HKED - HCND 351 G(-1)
HKED - HCND 531 G(-1)
A
0
1
4
R
WARNING:
please read carefully this manual before operating your new air conditioner.
Downloaded from AC-Manual.com Manuals
-1-
TERMAL S.R.L. Via della Salute, 14 -- 40132 -- Bologna -- ITALY
EN
IT
EUROPEAN REGULATIONS CONFORMITY FOR THE MODELS:
Indoor Units:
HKED 261 G(-1), HKED 351 G(-1), HKED 531 G(-1)
Outdoor Units:
HCND 261 G(-1), HCND 351 G(-1), HCND 531 G(-1)
CE
All the products are in conformity with the following European provision:
- Low Voltage Directive 73/23/EEC
- Low Voltage Directive 2006/95/EC
- Electromagnetic CompatibilitY 89/336/EEC
- Electromagnetic CompatibilitY 2004/108/EC
ROHS
The products are fulfilled with the requirements in the directive 2002/95/EEC of the
European parliament and of the council on the Restriction of the use of Certain Haz.
ardous Substances in Electrical and Electronic Equipment (EU RoHS Directive)
WEEE
In accordance with the directive 2002/96/CE of the European parliament,
herewith we inform the consumer about the disposal requirements of the
electrical and electronic products.
Downloaded from AC-Manual.com Manuals
DISPOSAL REQUIREMENTS:
Your air conditioning product is marked with this symbol. This means that electrical and electronic products
shall not be mixed with unsorted household waste.
Do not try to dismantle the system yourself: the dismantling of the air conditioning system, treatment of
the refrigerant, of oil and of other part must be done
by a qualified installer in accordance with relevant
local and national legislation. Air conditioners must be
treated at a specialized treatment facility for re-use, recycling and recovery.
By ensuring this product is disposed of correctly, you will help to prevent
potential negative consequences for the environment and human health.
Please contact the installer or local authority for more information. Battery
must be removed from the remote controller and disposed of separately in
accordance with relevant local and national legislation.
-2-
Table of Contents
GENERAL INFORMATION........................................................................................................ 4
SAFETY PRECAUTIONS.......................................................................................................... 6
INDOOR AND OUTDOOR’S UNITS OUTLINE........................................................................11
LED PANEL ON INDOOR UNIT.............................................................................................. 12
RECOMMENDED OPERATING CONDITIONS...................................................................... 12
INFRARED REMOTE CONTROLLER.................................................................................... 13
HEAT, COOL, FAN OPERATION............................................................................................ 16
DRY OPERATION................................................................................................................... 17
AUTO OPERATION................................................................................................................. 18
SLEEP OPERATION............................................................................................................... 19
TIMER FUNCTION.................................................................................................................. 20
IR REMOTE CONTROLLER INSTALLATION AND OPERATION........................................... 22
EMERGENCY OPERATION................................................................................................... 23
ADJUSTING THE AIRFLOW DIRECTION.............................................................................. 24
HINTS FOR ECONOMICAL OPERATION.............................................................................. 26
CLEANING THE AIR CONDITIONER..................................................................................... 27
ORDINARY MAINTENANCE.................................................................................................. 29
TROUBLESHOOTING............................................................................................................ 31
MALFUNCTION CODES......................................................................................................... 34
AUTOMATIC RESTART AFTER A POWER FAILURE............................................................ 35
Downloaded from AC-Manual.com Manuals
-3-
GENERAL INFORMATION
Outline of specific features
DUST FILTER
The Indoor Unit is equipped with a high-efficency filter which do grant a higher comfort and a
healthy air quality inside the room.
INFRARED REMOTE CONTROLLER
All available functions of the air conditioner must be set using the infrared remote controller,
whose LCD panel shows immediately the operating parameters.
ON TIMER / OFF TIMER
ON Timer, allows to program the air conditioner start within 24 hours. TIMER ON is set by 1
hour’s steps.
OFF Timer, allows to program the air conditioner stop within 24 hours. TIMER OFF is set 1
hour’s steps.
DRY FUNCTION
When “DRY” function is selected, the air conditioner strongly reduces humidity inside the room,
and also keeps the room temperature at a constant value.
ADVANCED CONTROL FOR INDOOR UNIT FAN
Thermostatic stops. In Heating mode, when set temperature has been reached inside the
room, the compressor stops and the indoor fan speed is lowered to avoid cold drafts.
Hot Keep. At the beginning of operation in Heating mode, the indoor fan will start only 5 minutes
later, i.e. when the temperature of indoor heat exchanger is adequate.
“SLEEP” FUNCTION (ENERGY SAVING MODE)
It consists in automatic and gradual correction of the differential between the room temperature
and the set temperature. This avoids the Unit to operate continuously at peak capacity for long
periods.
MICROCOMPUTER CONTROLLED DEFROSTING FUNCTION (HEATING MODE)
When the outdoor air temperature is very low and humidity is very high, frosting will occur to
the heat exchanger of the Outdoor Unit, which has negative impacts upon the efficiency of the
heating performance. In such case, the automatic defrosting function will come into play. The
Heating operation will be stopped for 5-10 minutes to do the defrosting.
Downloaded from AC-Manual.com Manuals
-4-
GENERAL INFORMATION
THERMOSTAT UNDER MICROCOMPUTER CONTROL
The thermostat being controlled by microcomputer allows remarkable energy saving and provides
more comfort, as the room temperature is checked with the greatest precision.
INDOOR FAN WITH LOW SOUND LEVEL
The indoor fan has been conceived and developed to grant very low values in sound level even
at the highest rotation speed.
FRONT GRILL & BACK GRILL IN METAL (OUTDOOR UNIT)
The front grill and the back grill of Outdoor Unit are both in metal; the screws and the outdoor
casing are all anti-rust.
MOTORIZED LOUVERS FOR AIRFLOW DIRECTION
The horizontal and vertical flaps can be controlled directly from the remote controller. Several
options can be selected:
• “SWING” button allows the User to move the flap up & down continuously, or to fix the flap to
a desired position. Three selections are possible:
1) natural flow: optimized air flow according to the selected operation mode
2) automatic swinging of the motorized flap
3) the motorized flap is fixed to a desired angle.
• “AIR FLOW” button is used for selection of the left/right air flow direction: whenever pressed,
the flap will swing or it can be fixed to a desired position.
DIAGNOSTIC & PROTECTION FUNCTIONS
Shown by a codified lighting of LED indicators on the Indoor Unit’s front panel, they allow to
diagnose in a quite precise way the main malfunctions which may concern the air conditioner.
AUTORESTART AFTER A POWER FAILURE
• When a power failure occurs during operation, the air conditioner stops immediately.
• When power is restored, the RUNNING indicator on Indoor Unit’s frontal panel lights up.
• In particular, the air conditioner will restart automatically after 3 minutes have elapsed since
power is restored. This means that it is not required to press the ON/OFF button on remote
controller. The settings will be the same as before the blackout.
Downloaded from AC-Manual.com Manuals
-5-
SAFETY PRECAUTIONS
Before starting the air conditioner, please read carefully the information in this "USER'S MANUAL".
The User's Manual contains very important suggestions relatied to installation, operation and
maintenance of the air conditioner and concerning your personal safety.
The Manufacturer accept no responsibility for the damages that may arise due to nonobservance of the instructions listed in this "USER'S MANUAL".
Disposal of an old air conditioner
Before disposing an old air conditioner, please
make sure it is inoperative and carry out the
disposal by adopting all safety precautions.
Unplug it from the power line in order to avoid
risks of electric shock.
Disposal of the packaging of your new air
conditioner
All the packaging materials used in the package
of your new air conditioner can be disposed
without any danger for the environment.
The cardboard may be broken or cut into small
pieces and given to a Waste Paper Disposal
Service. The wrapping bag made of polyethylene
and the polyethylene goam pads contain no
fluorochloric hydrocarbon.
Please remember that an air conditioner
contains refrigerant fluid, requiring specialized
waste disposal.
The valuable materials contained in the air
conditioner can be recycled. Contact your local
Waste Disposal Center for adequate disposal or
contact your Dealer for any question.
All these valuable materials may be taken to a
Waste Collecting Center and used again after
adequate recycling.
Please make sure that piping of your air
conditioner does not get damaged before
being picked up by the relevant Waste Disposal
Center. You can contribute to the protection of
the environment by adopting an appropriate
anti-pollution method of disposal.
Consult your local Authorities for the name
and address of the Waste Materials Collecting
Centers and Waste Paper Disposal Services
nearest to your house.
General warnings for safety
• Do not operate damaged air conditioners. In case of doubt, contact your Dealer.
• Use of air conditioner must be carried out in strict compliance with the instructions listed futher
on.
• Do not damage any parts of the air conditioner that carry refrigerant by piercing or perforating the
piping with sharp or pointed objects, by crushing or twisting the tubes or scraping off the surfaces'
coatings. If the refrigerant spurts out and gets into eyes, this may result in serious injuries.
• Do not obstruct or cover the ventilation grille of the air conditioner. Do not put fingers nor insert
objects into the inlet/outlet vent or into the motorized louver.
• Do not allow children to play with the air conditioner. Children should be never allowed to sit on
the Oudoor Unit.
• The appliance is not intended for children and disabled people. They must not operate the air
conditioner without supervision.
• Electrical works must be carried out according to the local laws. If the power cable is damaged, it
must be replaced by the Manufacturer or by qualified Personnel. Size of power cables and connecting
wires must be adequate to the characteristics of the air conditioner (current values and power input
values).
• If fuses on the PCB are blown, they must be replaced with new fuses of the same type and size.
• After installation, power plug should be properly disposed.
• Exhausted batteries (infrared remote controller) should be properly disposed.
• Always remember to unplug the air conditioner before opening the inlet grille. Never try to unplug
the air conditioner by pulling off the power cable. Always grip the power plug firmly and pull it straight
out of the power socket.
Downloaded from AC-Manual.com Manuals
-6-
SAFETY PRECAUTIONS
• Strictly observe the instructions provided in this Manual.
• The air conditioning system contains inside its refrigerant circuit the R410A gas
under pressure. Never disconnect refrigerant pipes or connection joints.
• Never perform any handling on Outdoor Unit service valves or on Indoor Unit’s
unions.
• Keep this Manual in a safe place easy to reach at any time for convenient
reference.
• In case the air conditioner is transferred and reinstalled, this User’s Manual
should always be attached to the appliance.
SAFETY INSTRUCTIONS
• Please read carefully the following Safety Instructions before operating the air conditioner.
• A strict observance of the instructions indicated in this "USER'S MANUAL" will prevent personal
hurt and incidents to the User. Moreover, correct operation and long life of the system will be
ensured.
• Depending on the seriousness of potential risks and damages, the reported Instructions are
classified in two types: "WARNING" and "CAUTION". A strict observance of the Instructions is
required to guarantee your personal safety and the safety of the environments where the Units
are installed.
• The following Instructions are related to the air conditioner's installation. They have been
reported in this "USER'S MANUAL" just to allow the User to check that installation has been
properly carried out. If an improper installation - not corresponding to the Instructions - is verified,
please contact the Dealer or the Authorized Technical Service.
The User must never attempt to repair, install or perform special maintenance by
himself.
Key to symbols
!
WARNING
This symbol points out the risk of serious injury or death.
!
CAUTION
This symbol points out the risk of injury or damage to the
property.
Prohibition. Action or procedure not allowed, with serious effects
on objects and people.
!
Obligation. Compulsory action or procedure. The missed
observance could bring serious effects on objects and people.
Downloaded from AC-Manual.com Manuals
-7-
SAFETY PRECAUTIONS
Installation
Never try to install this Unit by yourself, i.e. without the support of Tachnical Personnel. Never try to reapir
the Unit by yourself. The Unit's components can be reached only by opening or removing the covering
panels, and this involves exposure to high voltage. Even by disconnecting power supply, it is not always
possible to avoid the risk of electric shocks.
!
WARNING
• Please always contact the Dealer or the Authorized Service Center for installation.
Never attempt to install the air conditioner by yourself, because improper installation
could cause electric shock, injuries, water leakage or fire.
!
• Please always contact the Dealer or the Authorized Service Center for any servicing
operation or special maintenance.
Never try to repair or carry out special maintenance by yourself. Improper repair or
maintenance could cause electric shock, injuries, water leakage or fire.
!
Please confirm that installation has been carried out according to the following prescriptions:
!
CAUTION
• When instaling, all possible countermeasures must be taken to avoid refrigerant
leaks. If there is a high concentration of refrigerant gas in the room, oxygen lack may
occur.
!
• Do not install the air conditioner near burners, heat sources or flammable gas. This
is to avoid the risk of malfunctioning, fire or explosion.
• Ensure that a circuit breaker has been installed on the power supply line of the air
conditioner, to avoid the risk of electric shocks.
• When installing in a small room, countermeasures should be taken in case of a
refrigerant leak exceeds the proper range. Otherwise, it will cause asphyxia.
!
!
!
CAUTION
• Ensure that drain hose and drain pipe installation has been carried out correctly.
Incorrect installation or maintenance will cause water leakage.
!
• Ensure that Indoor and Outdoor Units have been properly grounded.
Defective grounding could cause electric shock.
!
• This kind of appliance needs a specific circuit breaker with proper
protective devices against overcurrents and short circuits (fuses or
automatic switches).
Downloaded from AC-Manual.com Manuals
-8-
Circuit
breaker
(specific)
!
SAFETY PRECAUTIONS
Always observe the operating precautions listed in the following tables. In this way, correct operation and
safeguard of people, animals and objects inside the air-conditioned room will be ensured.
!
WARNING
Use the correct voltage and frequency for power
supply.
220~230V, 50Hz
Do not insert the air conditioner's plug into multiple
sockets or into sockets to which other appliances
are connected. Do not use plug adapters.
!
Fully insert the plug into the power socket and
make sure the connection is secure and without
play. Otherwise, sparks and fire may occur.
Do not put heavy objects on the power supply
cord. Take care not to damage it. Do not use
supply cords which are faulty or damaged.
!
Do not pull the plug out of the power socket
by drawing the power cord. Damaging to the
power cord, to the plug or to the socket may
occur, and this could result in electric shock or
fire generation..
Never turn off the air conditioner by pulling the
power supply plug out of the socket. Thsi could
cause electric shock or fire.
Always press the "ON/OFF" button on remote
controller.
Do not use extension cords. Do not use rolled
power supply cords.
Never touch switches, sockets or power supply
plugs with wet hands. This could cause electric
shock.
If you smell soething burning, immediately turn
off the air conditioner, switch the circuit breaker
to "OFF" or "0", and contact the Authorized
Technical Service.
Do not insert any objects into the air inlet or
outlet of Indoor and Outdoor Units. Even if fans
are stopped, they could automatically start all at
once.
!
You should avoid to expose your body directly
to cool air for a long time. This may you cause
health problems to you.
Downloaded from AC-Manual.com Manuals
Do not direct the airflows towards infants, aged
or disabled people.
-9-
SAFETY PRECAUTIONS
!
CAUTION
Ventilation should be operated when using
at the same time the air conditioner and gas
burners.Insufficient ventilation may cause lack
of oxygen.
Do not use sprays near the air conditioner and do
not spray anything towards the appliance.
Do not place burners near the airflow of air
conditioner.
Do not expose plants or animals to the direct
airflow of the air conditioner.
To avoid the risk of electric shock, do not sprinkle
water nor other liquid on Indoor Unit. Do not
clean the air conditioner by water spurts.
Ventilate the room regularly while the air conditioner
is operating. Fail to follow this advice could result
in lack of oxygen inside the room.
!
!
Do not expose food, plants, animals, precision
devices or works of art to the direct airflow of
the air conditioner.
For proper performance, operate the air conditioner
under the recommended temperature and
humidity range. If the Unit operates beyond these
conditions, malfunctions may occur or dew may
drip out of the Indoor Unit.
!
When necessary, replace fuses with new ones
of the same type and size. Never use a piece
of iron or copper instead of the proper fuse,
as it could result in a malfunction or in a fire
accident.
Do not place anything in front of the air conditioner
nor obstruct the air outlet.
!
Do not put any object on the air conditioner. On the appliance's
upper part there is an air grille that must not be obstructed. Besides,
a heavy object may cause the air conditioner's fall.
Do not touch the heat exchangers' metal flaps on Indoor and Outdoor Units. This could
cause hurts due to the sharp shape of the flaps. Take care of this especially when
removing the air inlet panel and the air filters.
Downloaded from AC-Manual.com Manuals
- 10 -
INDOOR AND OUTDOOR’S UNITS OUTLINE
The Figure below is for explanation purpose only. The real appearance of the components could be
rather different.
Indoor Unit
Operational performance/indications
Air return grid
Takes in the indoor air
Left/right air flow
direction adjusting fin
Up/down air flow
direction adjusting flap
Air outlet
Air blows out from here.
Air filter
Removes dust or dirt out of the inlet air.
Drain tube
Drain the water dehumidified out of the air.
Outdoor Unit
Air inlet
at sides & rear surface
Refrigerant piping
connection, Electric
wiring cord
Air discharge vent
How to close
Unit operation section
Push down the frontal panel and then push sides of air inlet
grid at the bottom.
How to open
Emergency Operation Key
Lightly push both sides of the frontal panel at the bottom
and pull it to this side till a resistance is felt.
This button can be used as an emergency measure to turn
on/off Unit when remote controller is not available.
Note: Do not open the frontal panel at an angle over 60 degrees. Do not operate the Units with too much force.
Downloaded from AC-Manual.com Manuals
- 11 -
LED PANEL ON INDOOR UNIT
1
3
Receiver
of remote
control signal
2
1) RUNNING Indicator:
It lights up when ON/OFF button on remote controller is pressed for starting Unit’s operation.
2) SET TEMPERATURE, TIMER TIME & MALFUNCTION CODE Indicator:
This indicator may display:
• Setting Temperature, if SET TEMPERATURE buttons on remote controller are pressed.
• Timer Time, if TIMER is selected.
• Malfunction Codes, if there is a failure on Unit.
3) TIMER Indicator:
It lights up when TIMER function has been set (TIMER ON,TIMER OFF mode).
Note: On these On/Off Models, Led Panel on Indoor Unit is ON during operation.
If you press buttons on remote controller for changing settings, Led Panel strong lights up for 10
seconds.
RECOMMENDED OPERATING CONDITIONS
To obtain the best performances from the Unit, it is recommended its use under the following
conditions:
45 to 8°C
Outdoor temperature:
Indoor temperature:
COOLING OPERATION
HEATING OPERATION
16°C or more
CAUTION:
Room relative humidity should be less than 80%. If the air conditioner
operates beyond this limit, the surface of heat exchanger could get
covered with frost.
Outdoor temperature:
- 7 to 24°C
Indoor temperature:
32°C or less
Use of the air conditioner out of the above mentioned temperature ranges could cause the intervention
of built-in protective functions consequently stopping the system operation.
NOTE: If the Unit operates in rooms which are satured with oil vapors or volatile matters, harmful
substances could coat and clog the indoor unit heat exchanger. Besides, scalings of saltness could form
on the Outdoor Units installed in sea-surroundings; if not removed, they will damage the Units in a very
short time. In both cases, please contact the Technical Service to require frequent maintenance.
Downloaded from AC-Manual.com Manuals
- 12 -
INFRARED REMOTE CONTROLLER
Replacement of batteries
CLK button
For remote controller, 2 “AAA” type
batteries (1,5V) must be used.
It does not work on these Models.
•
Remove the cover of the batteries’ box by sliding it as
•
Replace used batteries with new ones. Pay attention to
•
•
indicated on the cover itself.
insert them correctly according to polarities.
RST button
This button let computer reset.
(Push the RST button with the tip
of a ball pen or with a sharped
article).
After replacing the batteries, press “RST” button (“reset”)
on remote controller.
If remote controller is not working well, you can take out
Unload the back cover.
the batteries to clear off the display. Fit in batteries again
after a few minutes.
NOTE: Please use only new batteries of the same brand and type. If you are not going to use the air conditioner
for a long period, remove the batteries from the remote controller because it could get damaged by acid leakage.
The average batteries’ life is approximately one year.
Replace the batteries when the signal from the remote controller becomes weak and the Indoor Unit can not receive
it properly, or the indications on the display screen become blurred.
Downloaded from AC-Manual.com Manuals
- 13 -
INFRARED REMOTE CONTROLLER
Outline of the remote controller’s buttons
ON/OFF
SET TEMPERATURE
These buttons are for setting
room temperature.
If you press “+” button, set
temperature increases by steps
of 1°C.
If you press “-” button, set
temperature decreases by steps
of 1°C.
The room temperature range is
from 16°C to 32°C.
(Temperature is automatically set
at 25°C and unadjustable in AUTO
mode and DRY mode).
This button is used for start and
stop operation.
SWING
Press this button to choose the
up/down air flow direction you
would like to set:
• natural flow:
is displayed.
• swing:
is flashing.
• fixed wind air: is displayed.
- It would be automatically set
at fixed wind air flow direction in
DRY mode.
MODE
This button changes the
operation mode:
• AUTO
• COOL
• DRY
• HEAT
• FAN.
AIR FLOW
MODE
FAN SPEED
SWING
FAN S
P
Press this button to change
fan speed:
• LOW (
is displayed)
• MED (
is displayed)
• HIGH (
is displayed)
• AUTO (
is flashing).
EED TIMER
TURBO
HOLD
TURBO
OW
AIR FL
This button is used for selection
of the left/right air flow direction:
whenever pressed, the flap will
swing or fix.
SLEEP
SLEEP
LAMP
This button changes to SLEEP
operation.
LAMP
In COOL and HEAT modes,
this button changes to TURBO
operation.
This function is not available on
these Models of air conditioner.
Press this button to light on/switch
off the display.
This button is not active on these
Models of air conditioner.
HOLD
TIMER
Press this button to lock or unlock
the keyboard.
This button is used to set TIMER ON
or TIMER OFF.
Transmission procedure
When each button on the remote controller is pressed with the remote
controller pointing toward the air conditioner Unit, signal is sent.
When the signal is received correctly, the receiving sound is emitted from
the Unit.
Downloaded from AC-Manual.com Manuals
- 14 -
INFRARED REMOTE CONTROLLER
Outline of the remote controller’s display
NOTE: The Figure below shows all indications for the purpose of explanation, but
practically only the pertinent parts are indicated.
AUTO MODE
This indicator shows that the
Automatic mode has been
selected.
COOLING MODE
This indicator shows that the
Cooling mode has been
selected.
SLEEP
TEMPERATURE
This indicator shows the set
temperature.
The room temperature
range is from 16°C to 32°C.
(Temperature is automatically set
at 25°C and unadjustable in AUTO
mode and DRY mode).
DRY MODE
This indicator is displayed
during SLEEP operation.
TURBO
This indicator is displayed
during TURBO operation.
Not available on these Models
of air conditioner.
This indicator shows that Dry
mode has been selected.
KEY LOCK
HEATING MODE
This indicator is displayed when
the keyboard has been locked.
This indicator shows that Heating
mode has been selected.
FAN MODE
This indicator shows that Fan
mode has been selected.
SWING
This indicator shows the up/down
air flow direction:
• natural flow:
is displayed.
• swing:
is flashing.
• fixed wind air: is displayed.
- It would be automatically set
at fixed wind air flow direction in
DRY mode.
FAN SPEED
TIMER
Indicates TIMER time.
This indicator shows the set
fan speed:
• LOW (
is displayed)
• MED (
is displayed)
• HIGH (
is displayed)
• AUTO (
is flashing).
AIR FLOW
This indicator shows the left/right
air flow direction:
• swing:
is flashing.
• fixed wind air:
is displayed.
Downloaded from AC-Manual.com Manuals
- 15 -
HEAT, COOL, FAN OPERATION
HEAT, COOL, FAN Modes selection
To start operation:
Point the remote controller at the Unit, press the ON/OFF
button and select the needed mode:
1. Select your desired operating mode by pressing
MODE button:
• COOL (Cooling operation)
• HEAT (Heating operation)
• FAN (Fan only operation).
2. Press the SET TEMPERATURE buttons to
increase or decrease the readings until the needed
temperature is displayed.
The room set temperature range is 16°C to 32°C.
2
2
5
4
1
OW
MODE
SWING
3 FAN SPEED
TIMER
SLEEP
TURBO
HOLD
LAMP
AIR FL
3. Select your desired speed for Indoor Unit's fan by
pressing FAN SPEED button:
- LOW (
is displayed)
- MED (
is displayed)
- HIGH (
is displayed)
- AUTO (
is flashing).
4. Press the SWING button to choose the up/down
air flow direction you would like to set:
• natural flow:
is displayed.
• swing:
is flashing.
• fixed wind air: is displayed.
5. Press the AIR FLOW button to choose the left/right
air flow direction you would like to set:
• automatic swinging:
is flashing.
• fixed direction:
is displayed.
To stop operation:
Press the ON/OFF button on remote controller to
stop the air conditioner.
NOTE FOR THE USER:
•
In case of close stops/starts, the air conditioner does not immediately start operating, but 3 minutes
elapse because of a protective function for the compressor.
Downloaded from AC-Manual.com Manuals
- 16 -
DRY OPERATION
DRY Mode selection
To start operation:
Point the remote controller at the Unit, press the ON/OFF
button and select the needed mode:
1. Press the MODE button and select DRY mode.
2. Press the AIR FLOW button to choose the left/right
air flow direction you would like to set:
• automatic swinging:
is flashing.
• fixed direction:
is displayed.
2
1
MODE
SWING
FAN S
P
EED TIMER
TURBO
HOLD
OW
AIR FL
SLEEP
In DRY mode, temperature is automatically set at
25°C and unadjustable.
Fan speed is automatically set at LOW speed and
unadjustable:
is displayed.
LAMP
The up/down air flow direction is automatically set at
fixed wind air flow direction:
is displayed.
To stop operation:
Press the ON/OFF button on remote controller to
stop the air conditioner.
NOTE FOR THE USER:
•
In case of close stops/starts, the air conditioner does not immediately start operating, but 3 minutes
elapse because of a protective function for the compressor.
Downloaded from AC-Manual.com Manuals
- 17 -
AUTO OPERATION
AUTO Mode selection
To start operation:
Point the remote controller at the Unit, press the ON/OFF
button and select the needed mode:
1. Press the MODE button and select AUTO mode.
2. Select your desired speed for Indoor Unit's fan by
pressing FAN SPEED button:
- LOW (
is displayed)
- MED (
is displayed)
- HIGH (
is displayed)
- AUTO (
is flashing)
4
3
1
MODE
SWING
3. Press the SWING button to choose the up/down
air flow direction you would like to set:
• natural flow:
is displayed.
• swing:
is flashing.
• fixed wind air: is displayed.
OW
AIR FL
2 FAN SPEED
TIMER
SLEEP
TURBO
HOLD
LAMP
4. Press the AIR FLOW button to choose the left/right
air flow direction you would like to set:
• automatic swinging:
is flashing.
• fixed direction:
is displayed.
In AUTO mode, temperature is automaticallly set at
25°C and unadjustable.
To stop operation:
Press the ON/OFF button on remote controller to
stop the air conditioner.
NOTE FOR THE USER:
•
In case of close stops/starts, the air conditioner does not immediately start operating, but 3 minutes
elapse because of a protective function for the compressor.
Downloaded from AC-Manual.com Manuals
- 18 -
SLEEP OPERATION
SLEEP Mode selection
SLEEP Mode can be used to reduce operation sound
when sleeping or doing a work requiring concentration.
SLEEP function is useful in COOL and HEAT operation
modes.
Press the SLEEP button, the air flow sound from the
Indoor Unit is decreased.
COOL Mode
During the operation of Cooling, the room temperature
will be raised gradually by 2°C higher than the setting
after the machine begins to operate in the Sleeping mode.
Actual temperature is higher than set temperature to
prevent the room from getting too cold: this function also
allows to save electricity.
MODE
SWING
FAN S
P
EED TIMER
TURBO
HOLD
OW
AIR FL
SLEEP
LAMP
HEAT Mode
During the operation of Heating mode, the room temperature
will be dropped gradually by 5°C lower than the setting
after the machine begins to operate in the Sleeping mode.
Actual temperature is lower than set temperature to
prevent the room from getting too hot: this function also
allows to save electricity.
To cancel Sleep function:
Press again the SLEEP button to cancel the function.
Downloaded from AC-Manual.com Manuals
- 19 -
TIMER FUNCTION
Programmed Start (TIMER ON)
TIMER ON function allows to automatically start the air
conditioner at your desired set time:
When the air conditioner is in standby mode,
press the TIMER button and the air conditioner
will enter the timed switch-on mode.
Repeatedly press the TIMER button to set the
needed time interval at the end of which the air
conditioner will automatically start operating.
Every time the button is pressed, time indication
changes by 1 hour’s steps.
The Timer can make the setting in the range from
1-24 hours.
After the setting of the timed switch-on, the digits
shown on the display screen will go down by 1
every elapsed hour. The displayed digits indicate
MODE
SWING
FAN S
P
EED TIMER
TURBO
HOLD
the remaining time prior to the time switch-on.
OW
AIR FL
At the end of set time interval, the air conditioner
SLEEP
will automatically start operation.
LAMP
Example:
in the selection shown in the Figure, the air conditioner
will automatically start after 10 hours. Every elapsed
hour, the display will show 9, 8, 7 h and so on, till
reaching the hour for automatic start.
To cancel TIMER ON function:
Repeatedly press the TIMER button till reaching
24h, then press TIMER button again to cancel
TIMER ON function.
Downloaded from AC-Manual.com Manuals
- 20 -
TIMER FUNCTION
Programmed Stop (TIMER OFF)
TIMER OFF function allows to automatically stop the air
conditioner at your desired set time:
During the operation of the air conditioner, press
the TIMER button and the air conditioner will enter
the timed switch-off mode.
Repeatedly press the TIMER button to set the
needed time interval at the end of which the air
conditioner will automatically stop operation.
Every time the button is pressed, time indication
changes by 1 hour’s steps.
The Timer can make the setting in the range from
1-24 hours.
After the setting of the timed switch-off, the digits
shown on the display screen will go down by 1
every elapsed hour. The displayed digits indicate
MODE
SWING
FAN S
P
EED TIMER
TURBO
HOLD
the remaining time prior to the time switch-off.
OW
AIR FL
At the end of set time interval, the air conditioner
will automatically stop operation.
SLEEP
Example:
in the selection shown in the Figure, the air conditioner
will automatically stop after 20 hours. Every elapsed
hour, the display will show 19, 18, 17 h and so on,
till reaching the hour for automatic stop.
LAMP
To cancel TIMER OFF function:
Repeatedly press the TIMER button till reaching
24h, then press TIMER button again to cancel
TIMER OFF function.
Downloaded from AC-Manual.com Manuals
- 21 -
IR REMOTE CONTROLLER INSTALLATION AND OPERATION
Maximum allowed distance: 8 meters
1) Make sure the 2 batteries (“AAA” type, 1.5V) are fully charged and correctly fitted in the special slot on
the remote controller, by respecting the polarity marked on the remote control itself. The average life of the
batteries is about 1 year.
2) Use the remote controller by turning it towards the Indoor Unit at no more than 8 meters from the Unit
itself.
3) The remote controller will not work properly if curtains, doors or other objects between the remote controller
and the infrared receiver on the Indoor Unit do not allow the signal transmission.
4) If the remote controller is placed sideways from the signal receiver, it will operate within a maximum angle
of 30° on the right or on the left from the receiver. If the remote controller is fixed on its wall bearing, it will
work within a side distance of 0.5 metres on the right or on the left from the receiver.
5) If the infrared receiver on Indoor Unit is exposed to direct sunlight, the remote controller (and consequently
the air conditioner) will not work properly.
6) In order to avoid interferences, keep the remote controller at least 1 meter away from Hi-Fi, TV, etc.
7) Do not wet the remote controller and prevent any liquid from falling into it.
Downloaded from AC-Manual.com Manuals
- 22 -
EMERGENCY OPERATION
Emergency Operation Key
To reach the Emergency button, lift the frontal panel
before.
• Opening the frontal panel:
Lightly push both sides of the frontal panel at the
Front panel
bottom and pull it to this side till a resistance
is felt.
Do not open the frontal panel at an angle over
60 degrees.
Emergency Operation Key
• Closing the front panel:
Push down the front panel at both ends. Close
the panel firmly.
Operation in Emergency mode:
If you have lost the remote controller or its batteries are exhausted, the air conditioner can be started
by pressing the "Emergency Operation” button behind the frontal panel.
Once you push the “Emergency Operation” button, the air conditioner will start operation.
End of operation in Emergency mode:
Press once the "Emergency Operation" button behind the front panel while the air conditioner is
operating in Emergency mode: operation will be immediately stopped.
Use the remote controller to return to normal operation.
Downloaded from AC-Manual.com Manuals
- 23 -
ADJUSTING THE AIRFLOW DIRECTION
Adjusting the vertical airflow direction
Adjust the air direction properly to obtain a higher degree in comfort and to avoid harmful drafts.
The vertical direction of the airflow can be set through the infrared remote control.
VERTICAL AIRFLOW
Setting your preferences:
Perform this setting while the air conditioner is operating.
Press the SWING button on remote controller to choose the up/down air flow direction you would
like to set:
is displayed: for setting natural flow. The air flow is automatically optimized according to the
selected operation mode.
is flashing: for setting swinging operation.
is displayed: for setting fixed wind air.
Note: The Unit is automatically set at fixed wind air flow direction in DRY mode.
Swinging operation
WARNING
• The SWING button will be disabled when the air conditioner is not operating.
• To avoid malfunctions, NEVER attempt to move the flaps by hand but always use the remote control for
doing this.
• When the air conditioner is turned on, the motorized louver will start moving 10 seconds later, as
soon as it gets under control of the inner electronics. When the air conditioner is stopped, the motorized
louver will automatically stop in closing position. If the motorized louver malfunctions, it is adviced to
turn off the air conditioner and cut the power for some minutes; then restore the power, turn the Unit
on again and check if the louver works properly.
• Do not operate the air conditioner for a long time with the airflow direction set downward in Cooling
and Dry mode; this may cause dripping from the louver inside the room.
• Open angle of the horizontal louver should not be set too small, as Cooling or Heating performance
may be impaired due to too restricted airflow area.
• Do not operate Unit with horizontal louver in closed position.
• Room temperature humidity should be less than 80%. If the air conditioner operates beyond this limit,
the surface of indoor heat exchanger could get covered with frost: in this case, adjust the louver to the
maximum open angle and select HIGH fan speed.
• When the air conditioner is connected to power (initial power), the horizontal louver may generate a
sound for 10 seconds: this is a normal operation.
Downloaded from AC-Manual.com Manuals
- 24 -
ADJUSTING THE AIRFLOW DIRECTION
Adjusting the horizontal airflow direction
Horizontal airflow direction can be adjusted by remote controller.
Setting your preferences:
Perform this setting while the air conditioner is
operating.
Vertical Grille for adjusting left/right
air flow direction
Press the AIR FLOW button on remote controller
to choose the left/right air flow direction you would
like to set:
is flashing: for setting swinging operation.
is displayed: for setting fixed direction.
Swinging operation
Left/right air flow direction can be adjusted in all
operation modes.
WARNING
• The AIR FLOW button will be disabled when the air conditioner is not operating.
• To avoid malfunctions, NEVER attempt to move the flaps by hand but always use the remote control for
doing this.
Downloaded from AC-Manual.com Manuals
- 25 -
HINTS FOR ECONOMICAL OPERATION
Too cold!
Clean the filter
Close the window
Choose an adequate temperature setting:
• When the air conditioner is operating
in Heating mode, avoid to set a too high
temperature value.
• When the air conditioner is operating in Cooling
mode, avoid to set a too low temperature value.
Clean the air filters quite frequently:
• To keep your air conditioner in good efficiency,
it is necessary to carry on a frequent cleaning
(at least every 2 weeks) of the air filters, as
it explained further on. Accumulation of dust
on the air filters reduces the air conditioner’s
performances.
Do not leave any doors or windows open:
• This would reduce the air conditioner’s
efficiency and would cause an increase in
electrical consumption. Moreover, in case of
thermic overload, the intervention of embedded
protective functions may occur, and normal
operation of the air conditioner will be interrupted.
Limit exposition of the room to sunlight:
• When the air conditioner is operating in
Cooling mode, you should screen by curtains
the windows exposed to direct sunlight during
the warmest hours of the day. In this way, you
will experience substantial increase in comfort,
and obtain remarkable money saving.
Use TIMER function according to real needs:
• Do not set periods of continuous operation
when there is no real need for it; please consider
above all the real stay of people inside that
room.
TIMER
Cooling and Drying operation
Adjust airflow direction
Downloaded from AC-Manual.com Manuals
Set the most suitable airflow direction:
• With some practice, you can evaluate by
yourself the increase in comfort obtained by
a correct setting of airflow direction. The power
consumption remains the same but comfort is
considerably increased (see pages 24-25).
- 26 -
CLEANING THE AIR CONDITIONER
Cleaning the Air Filter Screen
WARNING
Before starting the cleaning:
1 - Stop the appliance by pressing ON/OFF button on remote controller
2 - Move the circuit breaker to “OFF” or “0” position
3 - Pull the plug out of the power socket
4 - To reach the Unit, please use a stepladder or other appropriate bearing strong enough
to ensure your safety.
If the Air Filter Screen is blocked by dust or dirt, the performance of Cooling and Heating
will be affected, with the operation noise and power consumption increased.
Therefore, the Air Filter Screen should be cleaned regularly (every two weeks).
To carry on the cleaning procedure correctly, please observe carefully the following directions
or contact the Authorized Technical Service.
1) Remove the Air Filter Screen from the Unit.
• Gently push both sides of the frontal panel at the bottom
and pull it to this side till a resistance is felt (see Figure 1).
Do not open the frontal panel at an angle over 60 degrees.
Front panel
Figure 1
• Gently pull up the air filter screen and take it out in the
direction of your body (Figure 2).
CAUTION
When removing the filter, do not touch the metal parts
of the Unit. Injuries may occur when handling sharp metal
edges.
Figure 2
2) Clean the Air Filter Screen.
• Clean the Air Filter Screen with a vacuum cleaner.
If the screen is too dirty, please use lukewarm water (about
30°C) to clean it (see Figure 3).
Air dry after the cleaning.
Notes:
• Do not use boiling water to clean the screen.
• Do not bake the screen dry over a fire.
• Do not exert too much force in pulling and stretching the screen.
Figure 3
Downloaded from AC-Manual.com Manuals
3) Install the Air Filter Screen.
• To operate the air conditioner without the air filter screen
on will cause the inside of the machine dirty, which might
lead to poor perfomances or damages to the Units.
- 27 -
CLEANING THE AIR CONDITIONER
Cleaning the Indoor Unit and Remote Controller
WARNING
Before starting the cleaning:
1 - Stop the appliance by pressing ON/OFF button on remote controller
2 - Move the circuit breaker to “OFF” or “0” position
3 - Pull the plug out of the power socket
4 - To reach the Unit, please use a stepladder or other appropriate bearing strong enough
to ensure your safety.
• Use a soft and dry cloth to clean the Indoor Unit and
the Remote Controller, or use a vacuum cleaner to
clean them.
• If the Indoor Unit is very dirty, use a piece of cloth and
soak it with neutral home-use detergent to do the
cleaning. The cloth must be soaked in lukewarm water.
The use of very hot water (over 40°C) may discolour
and/or deform the plastic parts.
Rinse in clean water and dry well in the open air.
The presence of humidity on the inlet grille may cause
electric shocks.
Household
Drain
Cleaner
No
CAUTION
Do not use water to clean the inside of the air conditioner.
Exposure to water may destroy the insulation, leading
to possible electric shock.
Thinner
No
• Never use a damp cloth to clean the Remote Controller
nor use benzine, thinner, polishing powder or any
similar solvents for cleaning the Indoor Unit.
Chemical products may crack or deform the plastic
surface of the air conditioner.
NOTES:
• Never use any abrasive sponge for cleaning, to avoid scratching the Unit’s surfaces.
• If the grille is open or has been removed, do not touch the metallic flaps of the heat exchanger, as
the flaps are sharp and may hurt you.
• Do not expose the grille or the Unit to direct sunlight, to avoid discolouring or deforming them.
Outdoor Unit’s cleaning
Check regularly that the air inlet and outlet are not obstructed by dust or dirt in general.
For any other cleaning or maintenance of Outdoor Unit, always contact the Authorized Technical
Service.
Downloaded from AC-Manual.com Manuals
- 28 -
ORDINARY MAINTENANCE
At the beginning of season
When restarting the air conditioner after a long time, or at the beginning of the season, please carry out
the following procedure:
1
Do not obstruct the air inlet and outlet
2
Check the Unit's fixing
3
Earth cable
Check if any objects obstruct the airflow at the air inlet and outlet on Indoor and Outdoor
Units.
Check the condition of fixing devices on Indoor and Outdoor Units, especially those
mande of iron on Outdoor Units which are more subject to corrosion, so as to avoid their
possible collapse.
Check if there are no false electric contacts and especially if the earth cable is not
interrupted and well connected.
!
CAUTION
An incorrect or inexistent earth connection may cause the danger of electric shocks.
4
Air filters
5
Remote controller's batteries
6
Unit's start
Check if there are filters on the Indoor Unit. The filters must be clean. In case there is no
filter or the filter are dirty, reinsert or clean them.
Insert batteries in the remote controller's battery case.
The Outdoor Unit must be connected to the power line
12 hours before its start. Insert the plug into the power
socket and move the circuit breaker to "ON”.
Start the Indoor Unit by pressing ON/OFF button on
remote controller only 12 hours after the Outdoor Unit
has been powered.
Downloaded from AC-Manual.com Manuals
- 29 -
1
2
3
ORDINARY MAINTENANCE
At the end of season
At the end of the season or in case you foresee not to use the air conditioner for a long time, please
carry out the following procedure:
1
Dry the Unit
Set the temperature at 30°C and operate the appliance in FAN
~ 6 hours
mode for half a day by setting a "HIGH" fan speed.
This is for drying the Unit and preventing the forming of moulds
and/or bad smells.
Fan operation / 30°C
HIGH (fan speed)
2
Disconnect the appliance from the power supply
Stop the air conditioner by pressing ON/OFF button on remote
controller, move the circuit breaker to "OFF" or "0" and pull the plug
out of the power socket.
This is necessary as the appliance consumes a little quantity of
electricity even if it is stopped.
1
!
3
Clean and reinstall the air filter screen.
4
Clean the Indoor and Outdoor Units.
5
Remove batteries from the remote controller.
Downloaded from AC-Manual.com Manuals
- 30 -
2
3
TROUBLESHOOTING
Following symptoms are not air conditioner's troubles
The following table shows a series of seeming malfunctions.
Please check the following items before calling the Authorized Technical Service.
WHAT HAPPENS
REASON
After a stop, the air conditioner does
not restarts immediately.
(RUNNING Indicator is illuminating).
• Restart is stopped for 3 minutes after shut down to protect the Unit.
Please wait for
3 minutes.
Not operate.
• Three-minute protection timer incorporated in the microcomputer
actuates automatically. Except that power is connected, this function
does not actuate.
Air is not blown out at starting of
Heating operation.
• Air blow is stopped to prevent blowing out of cold air until the indoor
heat exchanger is warmed (2 to 5 min.).
(HOT KEEP)
The Unit will not stop blowing out
the air immediately after shut down
at COOL operation.
• Because the Unit is doing mould proofing operation and indoor fan
motor runs at Low speed. The louver will not close down until after 30
seconds.
Air is not blown out for 6 to 12 min.,
at HEATING operation.
• When outdoor temperature is low and humidity is high, the Unit
sometimes performs defrosting automatically. Please wait. During
defrosting, water or steam are raising from the Outdoor Unit.
Air is not blown out at DRY operation.
• Indoor fan is sometimes stopped to prevent vapor of dehumidified
moisture and save energy.
Mist is blown out at COOL operation.
• This phenomenon sometimes occurs when the temperature and
humidity of the room are very high, but it will disappear with the lowering
of the temperature and humidity.
Odor is sent out.
• Air blown out during operation may smell. This is the smell of tobacco
or cosmetics sticked to the Unit.
Noise is heard
cracking sound.
• This is caused by the refrigerant that is circulating inside the Unit.
Noise is heard cracking sound.
After a power stoppage or after
disconnecting the power supply
plug.
• This is caused by heat expansion or contraction of plastics.
Operation cannot be restarted even
if the power is recovered.
• The memory circuit of the microcomputer is cleared. Operate the
remote controller again to restart the operation.
Remote control signals are not
received.
Moisture may form on the air outlet
grilles.
Downloaded from AC-Manual.com Manuals
• Remote control signals may not be received when signal receiver on
the air conditioner body is exposed to direct sunlight or strong lighting.
In that case, interrupt the sunlight or darken the lighting.
• If the Unit is operated for a long period of time with the high humidity,
moisture may form on the air outlet grilles and drip down.
- 31 -
TROUBLESHOOTING
Problems and possible solutions
The following table shows a series of problems and their possible reasons and solutions.
Please carry out the following checks before contacting the Authorized Technical Service.
The air conditioner does not operate at all.
Is the power plug in
an outlet?
Is the time set to
“ON” position?
Is there a power
failure or a blown
fuse?
Poor cooling or heating performance.
Is the room temperature
setting suitable?
Are the air filters
clean (not clogged)?
Are the windows and
doors open?
suitable TEMP
Poor cooling performance.
Is direct sunlight
entering the room?
Downloaded from AC-Manual.com Manuals
Is there a heat source
in the room?
- 32 -
Are there too many
people in the room?
TROUBLESHOOTING
!
CAUTION
Never try to repair the Air Conditioner by yourself
If one of the following malfunctions occur, immediately stop operation, turn off the main switch
and contact the Authorized Technical Service:
• You smell something burning.
• Obstacles or water enter the Unit.
• Water leaks from Indoor Unit.
• Other malfunctions are observed (see the following Table).
Fuse or breaker
often breaks off.
Power plug or cable is
excessively hot.
Covering of power plug or
cable is broken.
Fuse often
breaks off.
Malfunction is observed on
TV, radio or other devices.
Switch does not actuate
surely.
Abnormal noise is heard
during operation.
When faulty operation movement is observed when the ON/OFF button is pressed.
Even after pulling out the power plug and restarting the operation after 3 minutes, faulty
movement does not
3 minutes
disappear.
go by,
but why
Downloaded from AC-Manual.com Manuals
- 33 -
MALFUNCTION CODES
Table of Malfunction Codes of On/Off Type Models HKED-HCND 261, 351, 531 G(-1).
Indoor Unit Display Status
Serial
number
Malfunction Content
LED
Running lamp
Flashing
times
Timer lamp
Flashing
times
Code
1
Indoor room temp. sensor fault.
1/8 second
Light
E2
2
Indoor tube temp. sensor fault.
2/8 second
Light
E3
3
Over heat protection.
3/8 second
Light
E8
4
Indoor fan fault.
6/8 second
Light
E5
5
Outdoor tube temp. sensor fault.
Light
4/8 second
E1
Downloaded from AC-Manual.com Manuals
- 34 -
AUTOMATIC RESTART AFTER A POWER FAILURE
• When a power failure occurs during operation, the air conditioner stops immediately.
• When power is restored, the RUNNING lamp on the Indoor Unit lights up.
• In particular, the air conditioner will restart automatically after 3 minutes have elapsed
since power is restored. This means that it is not required to press the ON/OFF button
on the remote control.
The settings will be the same as before the blackout.
However, it is necessary to program TIMER again, as in case of a blackout, TIMER
settings for automatic start/stop of the air conditioner are cancelled.
In the same way, if a power failure occurs and SLEEP function was set, it is cancelled
and needs to be set again when power is restored.
Downloaded from AC-Manual.com Manuals
- 35 -
DECLARATION OF CONFORMITY
We
Srl - 14, Via della Salute - 40132 Bologna - Italy
DECLARE UNDER OUR SOLE RESPONSIBILITY
Products
that
Indoor Units:
• HKED 261 G(-1) • HKED 351 G(-1) • HKED 531 G(-1)
Outdoor Units:
• HCND 261 G(-1) • HCND 351 G(-1) • HCND 531 G(-1)
conform to the following Directives:
• EMC Directive 89/336/EEC and its following 92/31 EEC by L.D. No. 476, dated
December 4th, 1992.
• LV Directive 73/23 EEC and applied Standards EN 60335-2-40.
Downloaded from AC-Manual.com Manuals
-
Declaration -
NOTES
Downloaded from AC-Manual.com Manuals
NOTES
Downloaded from AC-Manual.com Manuals
Indoor Unit / Unità Interna / Unité Intérieure
Unidad Interna / Innengerät / Binnenapparaat
Outdoor Unit / Unità Esterna / Unité Extérieure
Unidad Externa / Außengerät / Buitenapparaat
Water cooled / Raffreddamento ad acqua / Refroidissement par eau / Frío por agua / Wasserkühlung / Watergekoeld
Air cooled / Raffreddamento ad aria / Refroidissement par air / Frío por aire / Luftkühlung / Luchtgekoeld
Cooling/heating / Raffreddamento/riscaldamento / Refroidissement/chauffage / Frío/Calor / Kühlfunktion/Heizfunktion / Koeling/Verwarming
Cooling only / Solo raffreddamento / Refroidissement seulement / Sólo Frío / Køling / Alleen koeling
Energy efficiency class on a scale of A (more efficent) to G (less efficient)
Classe di efficienza energetica su una scala da A (bassi consumi) a G (alti consumi)
Classement selon son efficacité énergétique sur une échelle allant de A (économe) à G (peu économe)
Clase de eficiencia energética en una escala desde A (bajo consumo) hasta G (alto consumo)
Energieeffizienzklasse auf einer Skala von A (niedriger Verbrauch) bis G (hoher Verbrauch)
Energieefficiëntieklasse op een Schaal van A (efficiënt) tot G (inefficiënt)
Heating / Riscaldamento / Chauffage / Calor / Heizfunktion / Verwarming
Heat output (kW) / Potenza di riscaldamento (kW) / Puissance de chauffage (kW)
Potencia de Calor (kW) / Heizleistung (kW) / Verwarming-svermogen
Type
Tipo
Type
Tipo
Typ
Type
A
2.96
3.21
2.68
Cooling output (kW) / Potenza refrigerante (kW) / Puissance frigorifique (kW)
Potencia refrigerante (kW) / Kühlleistung (kW) / Koelvermogen (kW)
Energy efficiency ratio (EER) at full load
Indice di efficienza energetica (EER) a pieno regime
Niveau de rendement énergétique (EER) à pleine charge
Índice de eficiencia energética (EER) a pleno rendimiento
Energie-Effizienz-Schlüssel (EER) bei Vollast-Nutzung
Energie-Efficiëntie-Verhouding (EER) volle belastingSchlüssel
418
A
HKED 261 D(-1)
HCND 261 D(-1)
Annual energy consumption (kWh) in cooling mode
Consumo annuo di energia (kWh) in modalità raffreddamento
Consommation annuelle d'énergie (kWh) en mode refroidissement
Consumo anual de energía (kWh) en modo Frío
Jährlicher Energieverbrauch (kWh) im Kühlbetrieb
Jaarlijks Energieverbruik (kWh) in Koelstand
Energy efficiency class on a scale of A (more efficent) to G (less efficient)
Classe di efficienza energetica su una scala da A (bassi consumi) a G (alti consumi)
Classement selon son efficacité énergétique sur une échelle allant de A (économe) à G (peu économe)
Clase de eficiencia energética en una escala desde A (bajo consumo) hasta G (alto consumo)
Energieeffizienzklasse auf einer Skala von A (niedriger Verbrauch) bis G (hoher Verbrauch)
Energieefficiëntieklasse op een Schaal van A (efficiënt) tot G (inefficiënt)
Cooling / Raffreddamento / Refroidissement / Frío / Køling / Alleen koeling
Model
Modello
Modèle
Modelo
Modell
Modell
Manufacturer / Costruttore / Fabricant / Fabricante / Hersteller / Fabrikant
Downloaded from AC-Manual.com Manuals
A
3.95
3.21
3.50
545
A
HKED 351 D(-1)
HCND 351 D(-1)
A
5.85
3.21
5.30
825
A
HKED 531 D(-1)
HCND 531 D(-1)
ESLAT AS
Välja 35a, Tallinn 10616, Estonia
Tel.: (+372) 6 567 894
Fax: (+372) 6 567 896
Skype: eslat.as
E-mail: [email protected]
Website: www.eslat.ee
Due to on-going technological development of the Products by the Manufacturer, we
reserve the right to vary the technical specifications at any time and without notice.
Downloaded from AC-Manual.com Manuals