1
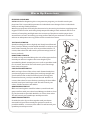
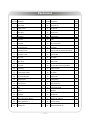
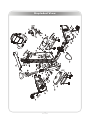
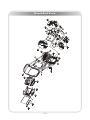
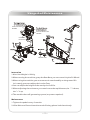
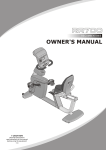
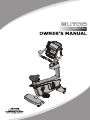
RU700
UPRIGHT BIKE
11X
! CAUTION
Read all precautions and instructions in this manual before using this
equipment.
Table Of Contents
Important Safety Information -------------------------------------------------------------------- 3
Warm Up Exercises ---------------------------------------------------------------------------------- 4
Parts List ----------------------------------------------------------------------------------------------- 5
Exploded View --------------------------------------------------------------------------------------- 7
Usage And Maintenance -------------------------------------------------------------------------- 9
Console Panel Functions ------------------------------------------------------------------------- 10
Troubleshooting Guide -------------------------------------------------------------------------- 15
Impor tant Safety Instructions
Warning
The safety of the product can be maintained only if it is examined regularly for
damage and wear. See preventive maintenance section for details.
Location
1. Keep the area around the product clear of any obstructions, including
walls and furniture. Provide at least three feet of clearance behind
the unit.
2. Do not use the product outdoors, near swimming pools, or in areas of
high humidity.
3. Do not allow other people to interfere in any way with the user or
equipment during workout.
4. Supervise closely any children or disabled persons using the product.
Operation
1. Always follow the console instructions for proper operation.
2. Do not reach into, or underneath, the unit; and do not tip the unit on its
side during operation.
3. Never insert objects into any opening of the Bike. If any object fall into
this equipment, carefully retrieve it while the unit is not in use. If the
object can't be reached, please contact customer services.
4. Never place any containers filled with liquids on the unit, except in
the accessory tray or water bottle holder. Containers should be covered
with lids.
5. Wear shoes with rubber or high-traction soles. Do not wear shoes with
high heels, leather shoes, slippers, or spikes. Make sure no sharp stuff is
embedded in the soles.
6. Do not use the bike with bare feet.
7. Keep all loose clothing, shoelaces, and towels away from moving parts.
8. Take extra caution when stepping on or off the bike.
9. Never face backward while using the bike.
Save these instructions for future reference
─3─
War m Up Exercises
EXERCISE GUIDELINES
WARNING! Before beginning this or any exercise program, you should consult your
physician. This is especially important for individuals over the age of 35 or individuals
with pre-existing health problems.
Warming up prepares the body for the exercise by increasing circulation, supplying more
oxygen to the muscles and raising body temperature. Begin each workout with 5 to 10
minutes of stretching and light exercise to warm up. The photos on this page show
several forms of basic stretching you may perform before your workouts. In order to
achieve an adequate warm-up, perform each stretch three times.
TOE TOUCH STRETCH
Stand, bending your knees slightly and slowly bend forward
from your hips. Allow your back and shoulders to relax as you
reach down toward your toes as far as possible. Hold for 15
counts, then relax. This will stretch your hamstrings, back of
knees, and back.
HAMSTRING STRETCH
Sit with one leg extended. Bring the sole of the opposite foot
toward you and rest it against the inner thigh of your
extended leg. Reach toward your toes as far as possible. Hold
for 15 counts, then relax. This will stretch your hamstrings,
lower back, and groin.
CALF/ACHILLES STRETCH
With one leg in front of the other, reach forward and place
your hands against a wall. Keep your back leg straight and
your back foot flat on the floor. Bend your front leg, lean
forward and move your hips toward the wall. Hold for 15
counts, then relax. To cause further stretching of the achilles
tendon, bend your back leg as well. This will stretch your
calves, achilles tendons, and ankles.
QUADRICEPS STRETCH
With one hand against a wall for balance, reach back and
grasp one foot with your other hand. Bring your heel as close
to your buttocks as possible. Hold for 15 counts, then relax.
This will stretch your quadriceps and hip muscles.
INNER THIGH STRETCH
Sit with the soles of your feet together and your knees
outward. Pull your feet toward your groin area as far as
possible. Hold for 15 counts, then relax. This will stretch your
quadriceps and hip muscles.
─4─
Par ts List
Item No. Description
QTY Item No. Description
QTY
1
Main Frame
1
24
Screw M5*12
19
2
Upright Frame
1
25
Hex Nut M6
1
3
Front Base
1
27
Leveler Foot
5
4
Rear Base
1
28
Bearing 6204
2
5
Seat Post
1
29
Shaft
1
6
Handlebar
1
30
Ring-Shield Φ20
2
7
Console Bracket
1
31
Belt Pulley
1
8
Front Base Cover
1
32
Socket Head Shoulder Screw M6*20
6
9
Rear Base Cover
1
33
Lock Nut M6
4
10
Left Cover
1
34
Left Crank
1
11
Right Cover
1
35
Right Crank
1
12
Top Cover
1
36
Hexagon Bolt with Flange M8*25
2
13
Crank Ring
2
37
Plug For Crank
2
14
Waster Bottle Holder
1
38
Left Pedal
1
15
Cup Holder Bracket
1
39
Right Pedal
1
16
Tightening Nut
1
40
Bearing 6203
2
17
Plastic Sleeve
1
41
Ring-Shield Φ17
1
18
Seat
1
42
Poly-V Belt 420J8
1
19
Pull-Pin
1
43
Tightener
1
20
PU Wheel
2
44
Hex Nut M8
1
21
Button Head Screw M8*45
2
45
Washer Φ6.6*Φ15*2
5
22
Washer Φ9*Φ16*1.6
14
46
Tension Spring
1
23
Lock Nut M8
2
47
Hex Head Bolt M8*70
1
─5─
Par ts List
Item No. Description
QTY Item No. Description
QTY
48
Spacer For Tightening
3
E6
Screw M4*10
4
49
Screw ST4.2*16
12
E7
Screw ST2.9*9.5
17
50
Hex Head Bolt M10*25
8
E8
Front Scarf
1
51
U Nut M5
8
E9
Rear Scarf
1
52
Hex Nut M10
5
E13
Hex Head Bolt M8*20
5
53
Socket Head Shoulder Screw M5*15
3
E14
Assy,Hand Pulse
2
54
Bearing End Cover
2
E15
Assy,Hand Pulse
1
56
Spacer
1
E16
Assy,Hand Pulse
1
57
Screw ST4.2*9.5
8
E17
PCB
1
58
Washer Φ5.5*Φ10*1
8
E18
Hand Pulse Circuitry Board
1
61
Spring Washer Φ10
8
E19
Hand Pulse Cable To Console
1
62
Spring Washer Φ8
8
E20
Upper Harness
1
63
Spring Washer Φ6
4
E21
Hand Pulse Cable
1
64
Screw M6*15
10
E22
Wireless Receiver
1
65
Washer Φ17.2*Φ23*0.35
2
E23
Switching Cable
1
66
Socket Head Shoulder Screw M8*55
2
E24
Magnet Cord
3
67
Socket Head Shoulder Screw M8*20
7
E25
Console Overlay
1
E1
Console Top Cover
1
E30
Resistance Cable
1
E2
Console Bottom Cover
1
E31
Consollor PCB
1
E3
Display Cabinet
1
E32
Console Cable
1
E4
Circuit Board Frame
1
E33
Control Cable
1
E5
Support Pillar
4
E34
Hybird
1
─6─
Exploded View
─7─
Exploded View
─8─
Usage And Maintenance
Contact Heartrate
Handle
Contact Heartrate
Handle
Contact
Heartrate
Leveler Foot
Instruction
1. Max. User Weight is 180 Kg.
2. When moving the machine, grasp the Rear Base, you can move it by the PU Wheel.
3. When using the machine, you must ensure it stand steadily on the ground. If it
isn't steady, you must adjust the Leveler Foot.
4. You can adjust the height of the seat by the Pull-Pin.
5. When adjusting the resistance, you can also use the rapid button, the "-" is down,
the "+" is up.
6. The machine has self-generating system (no power required).
Maintenance
1. Tighten the pedals every 3 months.
2. If the Bolts and Screws have the trend of losing, please lock them timely.
─9─
Console Panel Functions
─ 10 ─
Console Panel Functions
CONSOLE PANEL FUNCTIONS
1. CALORIES WINDOW
Indicates estimated calories burned, based on user's weight, speed, resistance,
and time.
2. WATT WINDOW
Indicates user's current power ( Watt).
3. DISTANCE WINDOW
Indicates Kilometers or Miles traveled in 0.01 increments up to 9.99 and 0.1
increments starting at 10.0 (Range 0.01---999).
4. SPEED WINDOW
Indicates workout laps per minute on pedal.
5. TIME WINDOW
Indicates elapsed time after press Start in minutes and seconds (0-99minutes,
0-59seconds).
6. HEART RATE WINDOW
Indicates user's current heart rate (BPM).
7. RESISTANCE WINDOW
Indicates workout in degree of force L1—L20 in 1 increments.
8. DOT MATRIX
8.1 Indicates Welcome message when turn on power.
8.2 Indicates message when enter value.
8.3 Indicates workout curve in Program mode.
8.4 Indicates workout 400m track when manual.
CONSOLE BUTTONS
1. START
This button is used to start the current program.
2. RESET
This button is used to stop the current program.
3. + and These buttons are used to adjust the degree of Resistance of the machine during
workout.
These buttons are also used to adjust the values when setting up your workout.
─ 11 ─
Console Panel Functions
4. COOL DOWN
This button is used to select workout "cool down mode".
5. NUMERIC KEYPAD
These buttons are used to enter values.
6. OK
This button is used to confirm user seletion.
7. SELECTION BUTTON
This button is used to delete value entered.
8. MANUAL ONE TOUCH
This button is used to select workout "manual mode".
9. INTERVAL ONE TOUCH
This button is used to select workout "interval mode".
10. FAT BURN ONE TOUCH
This button is used to select workout "fat burn mode".
11. CARDIO ONE TOUCH
This button is used to select workout "cardio mode".
12. WEIGHT LOSS ONE TOUCH
This button is used to select workout "weight loss mode".
13. HEART RATE ONE TOUCH
This button is used to select workout "heart rate mode".
CONSOLE OPERATION
1. QUICK START/MANUAL MODE
1.1 Start pedaling
1.2 Indicates "PRESS QUICKSTART OR SELECT PROGRAM", "ENTER WEIGHT" in
dot matrix, '68' will flash in degree of force window. Use degree of force +
or – button to adjust user's weight.
1.3 Press "OK", indicates "PRESS QUICK START OR SELECT PROGRAM" in dot matrix.
(1) If press QUICK START button through manual mode;
(2) If press FAT BURN button through fat burn mode;
(3) If press INTERVAL button through interval mode;
(4) If press CARDIO button through cardio mode;
(5) If press HEART RATE button through heart rate mode;
(6) If press WEIGHT LOSS button through weight loss mode.
1.4 If press RESET button will be reset.
─ 12 ─
Console Panel Functions
2. PROGRAM MODE
2.4 PROGRAM
2.4.1 FAT BURN
Press FAT BURN button
(1) Indicates FAT BURN MODE in dot matrix, Time window will flash "30:00”.
Use degree + or – button to adjust value;
(2) Indicates workout curve in dot matrix after 5 seconds;
(3) Indicates ENTER TIME in dot matrix after 5 seconds;
(4) Indicates PRESS QUICK START in dot matrix after press OK button.
2.4.2 INTERVAL
Press INTERVAL button
(1) Indicates INTERVAL MODE in dot matrix, Time window will flash "30:00”.
Use degree + or – button to adjust value;
(2) Indicates workout curve in dot matrix after 5 seconds;
(3) Indicates ENTER TIME in dot matrix after 5 seconds;
(4) Indicates PRESS QUICK START in dot matrix after press OK button.
2.4.3 CARDIO
Press CARDIO button
(1) Indicates CARDIO MODE in dot matrix, Time window will flash "30:00”. Use
degree + or – button to adjust value;
(2) Indicates workout curve in dot matrix after 5 seconds;
(3) Indicates ENTER TIME in dot matrix after 5 seconds;
(4) Indicates PRESS QUICK START in dot matrix after press OK button.
2.4.4 HEART RATE
User must wear chest belt when through HEART RATE mode;
HR1: Target pulse is 65% of Max. pulse;
HR2: Target pulse is 75% of Max. pulse;
HR3: Target pulse is 85% of Max. Pulse.
─ 13 ─
Console Panel Functions
2.4.4.1 HEART RATE 1
Press HEART RATE button to cycle through HEART RATE 1, HEART RATE 2, HEART
RATE 3
(1) Indicates HEART RATE 1 in dot matrix, Time window will flash "30:00”. Use
degree + or – button to adjust value;
(2) Indicates ENTER TIME in dot matrix after 5 seconds;
(3) Indicates ENTER AGE in dot matrix after press OK button, Pulse window will
show target pulse;
(4) Indicates PRESS QUICK START after press OK button.
2.4.4.2 HEART RATE 2 - HEART RATE 3
Press HEART RATE button to cycle through HR2, HR3, the same with HR1.
2.4.5 WEIGHT LOSS
Press WEIGHT LOSS button
(1) Indicates WEIGHT LOSS PROGRAM in dot matrix, Time window will flash
“30:00”. Use degree + or – button to adjust value;
(2) Indicates workout curve after 5 seconds;
(3) Indicates ENTER TIME after 5 seconds;
(4) Indicates PRESS QUICK START in dot matrix after press OK button.
─ 14 ─
Troubleshooting Guide
Malfunction
Probable Cause
Corrective Action
Belt transmitter electrodes are not
wet enough to pick up accurate
heart rate readings.
Wet the belt transmitter electrodes.
Belt transmitter electrodes are not
laying flat against the skin.
Ensure the belt transmitter
electrodes are laying flat against the
skin.
Heart rate
reading is
Belt transmitter needs cleaning.
erratic or
absent entirely
Belt transmitter is not within 3 feet
(one meter) of the heart rate
receiver.
Chest strap battery is depleted.
Wash the belt transmitter with mild
soap and water.
Make sure the chest strap
transmitter is within three feet (one
meter) of the heart rate receiver.
Contact Customer Support Services
for instructions on how to have the
chest strap replaced.
Electromagnetic interference from
cell phones.
Electromagnetic interference from
computers.
Electromagnetic interference from
cars.
Abnormally
elevated heart
Electromagnetic interference from
rate readings
high voltage power lines.
Electromagnetic interference from
motor driven exercise equipment.
Electromagnetic interference from
another heart rate transmitter within
three feet (one meter).
─ 15 ─
Move the bike a few inches away
from the probable cause, or move
the probable cause a few inches
away from the bike, until the heart
rate readings are accurate.