1
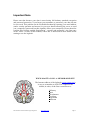
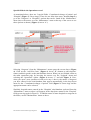
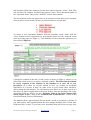
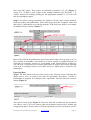
A TUTORIAL
0107.1.0
2
CONTENTS
IMPORTANT NOTE.............................................................................................................................5
GETTING STARTED............................................................................................................................7
ADDING A NEW RECORD TO YOUR LOGBOOK ......................................................................................7
SPECIALTIES AND OPERATIONS ............................................................................................................8
SPECIAL FIELDS IN THE OPERATION RECORD ........................................................................................9
THE NOTES FIELD AND PPOSSUM SCORING ......................................................................................10
PRINTING OUT AN OPERATION NOTE ..................................................................................................10
EXPORTING DATA ..............................................................................................................................12
NOTES ..................................................................................................................................................14
REGISTRATION – SECURITY AND ANONYMITY ....................................................................................14
LAPAROSCOPIC OPERATIONS ..............................................................................................................14
COLONOSCOPY ...................................................................................................................................14
DAYCASE SURGERY ............................................................................................................................14
BILATERAL OPERATIONS ....................................................................................................................15
FASTER DATA ENTRY ..........................................................................................................................15
DATA PROTECTION .............................................................................................................................15
MEMORABLE SITE...............................................................................................................................15
LOG OUT MENU .................................................................................................................................15
PRINTING OUT OPERATION NOTES......................................................................................................15
OPERATION NOTE TEMPLATES ............................................................................................................16
HANDWRITTEN NOTES ........................................................................................................................16
CONTACT US .......................................................................................................................................16
FREQUENTLY ASKED QUESTIONS (FAQ) .................................................................................17
WHAT DO I DO IF I FORGET MY USERNAME OR PASSWORD? ................................................................17
WHAT DO I DO IF I WANT TO ENTER AN OPERATION THAT DOES NOT APPEAR IN ANY OF THE
SPECIALITY LISTS? .............................................................................................................................17
CAN I UPLOAD OPERATIONS FROM MY PREVIOUS (OLD) LOGBOOK? ...................................................17
PROBLEMS AND TROUBLESHOOTER ........................................................................................19
PROBLEM: WHEN I ENTER MY LOGBOOK, I CAN NOT SEE ANY OPERATIONS OR AN OPERATIONS TABLE
...........................................................................................................................................................19
PROBLEM: THE OPERATIONS TABLE ONLY SHOWS MY MOST RECENT OPERATIONS .............................19
PROBLEM: NOTHING APPEARS TO HAPPEN WHEN I CLICK THE ‘SAVE’ BUTTON ..................................19
PROBLEM: THE AUTOMATIC DIVIDERS DO NOT APPEAR WHEN I ENTER A DATE OR TIME ....................19
PROBLEM: I ENTERED AN OPERATION BUT WHEN I LOOKED FOR IT LATER IT WAS NOT THERE............19
PROBLEM: WHAT IS THE DELETE BUTTON (RED ARROW, FIGURE 6) FOR? ..........................................20
PROBLEM: WHY IS THE “PRINT” BUTTON NOT WORKING? ..................................................................20
FINALLY… ..........................................................................................................................................20
The OOOTTA secure Internet surgical logbook
www.oootta.com
Page 3
4
Important Note
Please note that because your data is stored using full industry standard encryption
and password protection, if you forget your username or password, your data can not
be recovered. This problem can be avoided beforehand by entering your email address
(and a security question and answer) in your user details allowing the server to send
you a temporary password but this arguably affects your anonymity. Please therefore
read the brief section entitled ‘Registration – security and anonymity’ (the first entry
in the ‘Notes’ section of this booklet) where this is discussed in more detail before
starting to use the logbook.
WWW.OOOTTA.COM - A MEMORABLE SITE
The Internet address of the logbook (www.oootta.com)
is easy to remember as OOOTTA comprises the
initials, in order, of the first 6 cranial nerves:
Olfactory
Optic
Occulomotor
Trochlear
Trigeminal
Abducent
The OOOTTA secure Internet surgical logbook
www.oootta.com
Page 5
6
Getting started
Getting started with the OOOTTA internet-based, secure surgical logbook
Welcome to the OOOTTA internet-based, secure surgical logbook. After logging in,
the first screen you will see is (Figure 1):
Adding a New Record to your Logbook
Step 1: Click ‘Add New’ button to open a new operation record (Figure 2):
The OOOTTA secure Internet surgical logbook
www.oootta.com
Page 7
(Since this tutorial was first written, the appearance of the operation record has changed slightly from
that shown in Figure 2 with the addition of several new fields (e.g. for the names of surgeons and
anaesthetists involved in the procedure), a “Print” button and a slightly different layout. This new
appearance obviously does not affect the general principles for use described here).
Use the mouse or the ‘tab’ button to move from field to field and enter data as
required. The only mandatory fields are ‘Date’, ‘Speciality’ and ‘Operation’. (If you
do not enter data in these fields, the save button will not work). The other fields can
be left blank if wished. (Note that there are 2 special fields: ‘Consultant-in-charge of
patient’ and ‘Hospital’ (Figure 2: Green rings). These do not allow direct data entry
but their use is discussed below in Step 2).
Specialties and Operations
Operations are divided into ‘Specialties’ (e.g. colorectal operations are listed under
‘Coloproctology’, endoscopic procedures are listed under ‘Endoscopy’ etc). Select a
specialty from the ‘Speciality’ field drop down menu (Figure 2: Arrow ‘A’). The
operations for that specialty will now appear in the ‘Operation’ field (Figure 2:
Arrow ‘B’). (There may be a brief delay while the ‘Operation’ field menu repopulates
itself and the screen redraws). You can now pick an operation from the drop down
menu. If you don’t find the operation you want, you may have to choose another
specialty (and wait for the page/menu to refresh again). Square brackets [like these]
after the name of an operation imply that the operation appears in the specialty list
mentioned within the square brackets and it might be preferable to use that specialty.
To help you identify the best place to find (or the most appropriate way to code) a
given operation, the full list of specialties and their operations can be seen by
selecting ‘User Manual’ from the ‘Home’ menu as shown (Figure 3) and then
scrolling down the resulting page.
If you still can’t find a given operation anywhere on the available lists then please see
the “What do I do if I want to enter an operation that does not appear in any of
the Speciality lists?” entry in the “Frequently Asked Questions” section of this
tutorial document.
The OOOTTA secure Internet surgical logbook
www.oootta.com
Page 8
Special fields in the Operation record
As mentioned above, there are 2 special fields: ‘Consultant-in-charge of patient’ and
‘Hospital’ (Figure 2: Green rings). These do not allow data entry. Instead (Step 2:)
go to the ‘Surgeons’ or ‘Hospitals’ options that can be found in the ‘Maintenance’
menu (hover the mouse over the ‘Maintenance’ menu at the top of the screen to see
these options as shown) (Figure 4, Arrow ‘A’):
Selecting ‘Surgeons’ from the ‘Maintenance’ menu opens the screen above (Figure
4). Click on the ‘Add New Item’ (Figure 4: Arrow ‘B’) button to add surgeons’
names (and their grades) to the mini-database shown. When you are finished, return to
the main operations page by hovering the mouse over the ‘Logbook’ menu and
selecting the ‘Operations’ option. (Figure 4: Arrow ‘C’ and also Figure 1). Now,
when you open a new operation record (as in step 1 above), the names of surgeons
you have entered in the mini-database then appear automatically in the drop down
menu for the: ‘Consultant-in-charge of patient’ field (Figure 2: Green ring) and the
appropriate name can be selected.
Similarly, hospital names entered in the ‘Hospitals’ mini-database (selected from the
‘Maintenance’ menu as above) will appear in the drop down menu for the ‘Hospital’
field (green ring again in Figure 2). To add the names of more hospitals or surgeons in
the future, use the ‘Maintenance’ menu as above.
The OOOTTA secure Internet surgical logbook
www.oootta.com
Page 9
The Notes field and pPOSSUM scoring
Step 3: Open a new operation record (step 1 above). If needed, now scroll down the
page to see the other fields. The ‘Notes’ field can be seen which will accept an almost
unlimited amount of text for any notes you want to add (Figure 5). Text entered in the
‘Notes’ field appears in the printed version of the operation note.
Click on the ‘Show pPossum’ button (Figure 5: Arrow ‘D’) to show the pPossum
scoring fields. If you fill these in (optional) from the drop down menus, when you
press the ‘Save’ button, the pPossum morbidity and mortality will be calculated and
displayed in the fields outlined in green above (you may have to scroll down again to
see the fields).
(pPossum score: A well recognised scoring system which shows the percentage chance of the patient
having complications (morbidity) or dying (mortality) as a result of the procedure. E.g. if ‘43.5’
appears in the Morbidity field and ‘5’ appears in the Mortality field, the patient has a 43.5% chance of
suffering a complication and a 5% chance of dying as a result of the procedure).
Step 4: Once you have filled in the operation record press the ‘save’ button. (Always
do this before leaving an operation record e.g. for another screen or you will lose the
data you have just entered into that record). If you want to save it and add another
record immediately, use the ‘Save&New’ button (Figure 5).
Once you have saved one record, when you open a new record, some of the fields
(e.g. ‘Hospital’, ‘Speciality’, ‘Operating surgeon(s)’ etc) will default to the values in
the previously saved record in order to save time in typing in data. These values can
be left (if correct) or simply changed or deleted as required.
Printing out an Operation Note
Saving a record also activates the “Print” button. Clicking this produces a printed
operation record that consists of data from various of the patient, surgeon, anaesthetist
The OOOTTA secure Internet surgical logbook
www.oootta.com
Page 10
and operation fields plus whatever text has been entered into the “Notes” field. This
note can then, for example, be filed in the patient’s notes. This is discussed further in
the “Operation Notes” entry in the “NOTES” section of this tutorial.
The arrow buttons at the top right corner of an operations record allow you to navigate
from record to record (when you have saved more than one record) thus:
To return to your operations database from an operation record, either click the
‘Close’ button or select ‘Operations’ by hovering the mouse over the ‘Logbook’ menu
at the top of the page (see Figure 1). Your database will now show the operations you
have entered (Figure 6):
Clicking the symbols at the end of each record, as shown in Figure 6, allows you to
delete that record (scissors) or edit it (clipboard symbol). The delete function should
be rarely required as the function of the database is to store all of your
procedures. (It is there for records entered in error e.g. perhaps an accidental
duplication of a record). If there are other errors in your record, these should be
altered using the edit function. The edit function also allows you to alter records at a
later date e.g. add a complication to the notes field or insert the discharge date in the
appropriate field etc. (Please see the “Problem: What is the delete button (Red
arrow, Figure 6) for?” entry in the “Problems and Troubleshooter” section of this
tutorial document for more information).
The database shows approximately the last month’s worth of operations by default. If
you want to show more operations than this, then change the dates in the ‘search’ date
fields and click “search”. If you have more operations than will fit on one page, they
The OOOTTA secure Internet surgical logbook
www.oootta.com
Page 11
flow onto other pages. These pages are indicated by numbers (1,2,3,4) (Figure 6:
Arrow ‘E’). (As there is only 1 page in this example database, only the figure ‘1’ is
visible). Instead of scrolling, clicking on the appropriate numbers (1,2,3,4 etc) will
take you through the pages.
Step 5: As well as storing operations, the logbook will also store courses attended,
minor procedures and publications. Select these pages from the ‘Logbook’ menu and
add courses / publications etc as shown using the ‘Add New Item’ button. An example
for adding courses is shown (Figure 7):
Most of the fields in the publications and courses menus allow free text entry so if you
give a lecture or undertake a local audit etc. it can be entered as a publication but you
could put (for example) ‘Lecture’ or ‘Local Audit’ in the journal field etc. In this way
you can keep a record not just of formal publications or courses but of more informal
work such as teaching, lectures, local audit work etc. which may be useful for job
planning etc.
Exporting Data
Step 6: The final menu at the top of the screen is the ‘Reports’ menu. Selecting this
allows you to view (or export) your data for Operations, Procedures, Courses or
Publications as required. For example select ‘Operations’ from the ‘Reports’ menu as
shown (Figure 8):
The reports screen opens (Figure 9). Insert the start and end dates for the operations
you want to view (e.g. If you want to print out operations from the last 2 months, put
in appropriate dates. If you want to see all the operations you have performed, put in a
The OOOTTA secure Internet surgical logbook
www.oootta.com
Page 12
start date earlier than the first operation you performed – e.g. 01/01/1945!). (Figure 9:
Arrow ‘A’).
You can now list your selected operations to screen but it is probably better to click
the ‘Export to Excel’ button (Figure 9: Arrow ‘B’). After a short pause for
downloading, the operations you selected will now appear in an Excel spreadsheet.
You can then adjust the columns, re-order the data, search it, export it to other
applications and print it out as you would for any standard Excel spreadsheet. Use the
Excel print function regularly to ensure you always have an up-to-date, hard copy of
your logbook. You can also use the Excel save function to save your spreadsheet with
all your data in it to your PC. (Select ‘save’ from the Excel ‘file’ menu as normal but
in the ‘save’ dialogue box that opens, it is probably more useful to save it as an Excel
workbook rather than the default option of an Internet page). (NB Read the section on
data protection / ensure your computer is password protected (easily set up in
Windows menus) as saving to your PC means you now have unencrypted, identifiable
patient data on your PC).
Similarly, download your courses, procedures and publications data and print it out or
save it to your PC by selecting the appropriate option from the ‘Reports’ menu (see
Figure 8).
Important Advice:
Remember to always save a record after entering it and before navigating away from the page or
your data will not be saved and you will need to enter it again. (See the “Problem: I entered an
operation but when I looked for it later it was not there” entry in the “Problems and
Troubleshooter” section of this tutorial document).
Please remember to export all your data to Excel as above and print out the spreadsheet
regularly so that you always have an up to date, hard copy of your logbook. A web based server
is backed up and much more reliable than a home PC but the message for all electronic material
is to always ensure that you have backed it up appropriately both electronically and as a hard
copy.
The OOOTTA secure Internet surgical logbook
www.oootta.com
Page 13
NOTES
Registration – security and anonymity
The most important factors in this logbook (apart from the convenience of using it
from any PC at any time without needing to carry a computer around with you) are
security and anonymity. You can therefore register entirely anonymously by using a
made up user name and password. However, because your data is stored on the
server in an encrypted and password protected form, if you forget your
username and password, you can no longer access your data and will have lost
your logbook. We have therefore included an option allowing you enter your email
address and a security question and answer of your own choosing. If this has been
done beforehand and you forget your password in the future, you can then click on
the ‘I have forgotten my password’ option on the log-in screen and (once you answer
your security question correctly) the server will send a password to your email address
so you can regain access to your logbook. If you want to take advantage of this
procedure, please enter your email address and a security question and answer either
when you register or later, in the ‘Change Details’ section of the ‘Maintenance’ menu
(Figure 4). Obviously this has to have been done before you have forgotten your
password (as without your password you can’t get into your logbook to add your
email address and question and it would be insecure to allow you to request your
password otherwise). Adding these details is entirely optional but they are stored
encrypted and we undertake to use them responsibly and not release them to any third
party. If you chose not to submit an email address (and question), please make sure
that you choose a user name and password that you won’t forget and use the ‘Export
to Excel’ function to back up your logbook regularly so you don’t lose your data if
you do forget your username or password. All data (on patients, operations and your
user details) are sent and stored using industry standard encryption technology.
Laparoscopic operations
The logbook is set up for laparoscopic operations. For example, there is no
‘laparoscopic cholecystectomy’ only ‘cholecystectomy’. You then select the type of
operation from the ‘Technique’ field (“laparoscopic”, “laparoscopically assisted”,
“laparoscopic with hand port”, “laparoscopic converted to open” or “open”
technique). Thus ANY operation can be coded for laparoscopic or open techniques
(e.g. anterior resection – laparoscopic with hand port etc).
Colonoscopy
The ‘Endoscopy’ option in the ‘Speciality’ field includes a range of endoscopic
procedures and (for colonoscopy) the same procedures repeated but with the word
‘incomplete’ added. Using ‘Search’ to find all colonoscopy procedures thus shows
complete and incomplete entries allowing an easy audit of colonoscopy completion
rates. (Reasons for non completion can of course be entered in the “Notes” section)
Daycase surgery
Day case procedures can be labelled by entering the word ‘DAYCASE’ to the ‘Ward /
Room’ field. Downloading to Excel and then searching for ‘DAYCASE’ (or ordering
your procedures by ‘Ward/Room’ field) then brings all your daycase procedures
together.
The OOOTTA secure Internet surgical logbook
www.oootta.com
Page 14
Bilateral Operations
These can be entered twice (possibly using a different start time for the second
operation). Alternatively, you can just write ‘Bilateral’ in the notes field although if
you do that, a search for a given operation will return fewer procedures than you have
performed (as some records will be bilateral but not entered twice).
Back up copies of your data
Please back up your data regularly by exporting to Excel etc (Step 6 / Figure 9) and
saving/printing out your logbook to ensure there is no risk of losing your data.
Faster data entry
You can use the mouse and drop down menus to enter data. If you find it faster using
the keyboard then use the ‘tab’ key to move from field to field. Entering the first letter
of the data you want to type into the field (e.g. ‘M’ for ‘Male’) will bring that data up.
If several options in the drop down menu start with the same letter, press the letter
again and the next menu item will appear. Some fields in a new record default to the
values used in the last record to try and help speed data entry up further.
Data Protection
All data is sent and stored in an encrypted fashion. However please read the ‘Data
Protection’ section in the ‘Home’ menu (Figure 3) with regard to the requirements of
the Data Protection Act / storing patients’ data and act accordingly.
Memorable site
The Internet address of the logbook (www.oootta.com) is easy to remember as
OOOTTA comprises the initials, in order, of the first 6 cranial nerves.
Log Out Menu
Once you have finished adding data, click the ‘Log Out’ button (far right hand button
of the menus at the top of the page). This logs you out of your logbook so that the
next user of the computer you were using (for example if you are using a computer in
your hospital or in theatres that others also use) can’t accidentally add details to your
logbook or see your (or patients’) confidential data.
Printing out Operation Notes
Clearly, entering a record into the OOOTTA logbook takes a little time and this can
be in short supply during an operating list. The print function allows the time
normally spent writing an operation note after a procedure to instead be used to enter
an OOOTTA record. This can then be printed out giving a (legible!) operation note
that can be filed in the patients notes allowing both updating of your logbook and
production of an operation note to be accomplished in one step.
The “Print” button is only activated when a record has been saved (to prevent a user
entering a record, printing it out and then forgetting to save it) hence if the Print
button appears inactive, click the ‘Save’ button first. The “Print” button produces a
printed operation record that consists of data from various of the patient, surgeon,
anaesthetist and operation fields plus whatever text has been entered into the “Notes”
field. The ‘Notes’ field will accept a large amount of text (certainly around 1000
The OOOTTA secure Internet surgical logbook
www.oootta.com
Page 15
words) and therefore, although it is not possible to format the text within the field - for
example the field will not accept a “return” (i.e. new line or paragraph) command - it
is possible to type an entire operation note into the field and hence all your operation
notes can be stored on line. Storing operation notes in this way is a useful way of
reminding you of the actual operative procedure you performed and the “Print” button
allows a copy to be printed out for the patient’s notes which may save time as
described above. When the “Print” button is clicked, a print window opens to show a
preview of the printed page and your printer dialogue box should open. After printing
the operation note, click to close the preview window.
Operation note templates
Most surgeons will have a collection of operations which are performed frequently
and in a “standard” fashion resulting in a generic operation note. A generic note (or
“template”) for each of these operations could therefore be written and saved (eg as a
text document for each operation) on the computer that is used to access OOOTTA
from. This would allow the generic operation note for that procedure to be copied
(from the text document) and pasted into the “Notes” field saving a user from typing
out the same procedure repeatedly and hence speeding up entry of operation records
as well as production of an operation note. (Alternatively the procedure could be
copied from a previous record in the logbook and pasted in (and edited as appropriate)
before printing it out).
Many users access OOOTTA from a network (eg their hospital computer network).
Saving their generic templates in (say) the “Drafts” folder of their email programme
means that the templates would be available from any computer on the network (as
their email programme is usually available on a network wide basis).
Obviously those who use the “Notes” field to save other data (for example personal
audit data or comments) that they do not wish to appear in an operation note, can
achieve this by simply adding the extra data to the field after printing an operation
note (but before closing the record) and then saving the record again.
(We have obviously considered including a template function within OOOTTA itself
but as we are also considering alternative approaches to the production of operation
notes, for the present we hope the above suggestions are of help).
Handwritten notes
For those users who find typing a note or altering a template takes too long, it is of
course possible to save the record before anything is entered in the ‘notes’ field.
Pressing the “Print” button will then produce a printed sheet including all of the
patient, anaesthetist(s), surgeon(s) and operative details plus the heading “Notes”
under which the operation can be written in by hand. The disadvantage is that the
operation note itself is not saved on line and therefore can’t be referred back to at a
later date, but it does allow quick entry of the patient record into the users logbook
and produces a formatted operation sheet with legible patient details that will stand
out / be easily found in the patient’s notes.
Contact us
If you have any comments please use the ‘Contact Us’ section in the home menu.
The OOOTTA secure Internet surgical logbook
www.oootta.com
Page 16
FREQUENTLY ASKED QUESTIONS (FAQ)
What do I do if I forget my username or password?
Because the data is held fully encrypted and password protected, if you forget your
username or password, you can no longer access your data. There is an option to add
your email address and a security question and answer to your details so that should
this happen, the server can send you a temporary password to allow you to regain
access to your data. (Obviously you need to have added your email address previously
– i.e. before you have forgotten your password!). Please read the “Registration –
security and anonymity” paragraph at the start of the “Notes” section for further
details and always ensure you have an up to date, hard copy back up of your logbook.
What do I do if I want to enter an operation that does not appear in any of the
Speciality lists?
Check the ‘User Manual’ from the ‘Home’ menu (Figure 3) and scroll down the page
to the list of all specialties and operations that the logbook includes. (Alternatively
select each specialty in turn in an operation record and look at the available
operations. This takes longer but will reflect the latest changes to the operation list).
Some operations may appear in different menus – e.g. if an operation you want to
enter does not appear under a specific specialty, try looking under alternative
specialties such as “General” or “Emergency”. Looking through all the operations in
this way, you should find the operation that you want to enter (or something very
close to it which you can supplement by adding an explanatory note in the ‘Notes’
field).
If, despite searching as above, none of the procedures or operations available are close
enough to the one you wish to enter, then in the ‘Speciality’ menu select the option
‘See notes’ (and the only operation in this specialty, also named ‘See notes’) and then
type the operation as free text into the ‘Notes’ field. You should do this as rarely as
possible as databases are designed to work best with defined entries in each field
which makes searching much more efficient. Using the ‘See notes’ option and
entering your operation using free text rather than a defined procedure too often
means that it will be much harder to search and organise your data in the future. If you
regularly need to enter an operation (or operations) that we don’t include, please
contact us via the website we will consider adding it/them to the database/‘Speciality’
menu.
Can I upload operations from my previous (old) logbook?
We are afraid that it is not possible to import old data. The only way to get operations
into the OOOTTA logbook is to type them in. There are various reasons for this - for
example the OOOTTA logbook has specific fields (e.g. laparoscopic, lap hand port,
BMI etc) that are useful but that other logbooks don't have / would have labelled
differently and it is this different labelling that means the data would import wrongly.
It might be theoretically possible for you to alter all your data (rename fields etc) in
your present logbook so that they exactly matched the oootta fields allowing
importing to work but the work taken to do this would probably be as much as just
The OOOTTA secure Internet surgical logbook
www.oootta.com
Page 17
typing your ops in by hand (data homogenisation can be quite frustrating/time
consuming). There are alternatives though:
1) Type in your old data manually into oootta – boring but at least one person
typed in over 500 operations in 1 evening to have his entire logbook as oootta
format. (At a rate of 2 operations entered per minute, 500 operations would
take just over 4 hours to enter!) One of the logbook authors retrospectively
typed in all his laparoscopic data from old logbooks in order to have access to
any laparoscopic work performed years ago.
2) Print out your old logbook and store it for reference (store it electronically e.g.
CD / DVD too) and use OOOTTA from now on. As time goes by, you will not
need to use your old logbook information but it is still there so that if you want
to know how many anterior resections you have EVER done, you can search
OOOTTA for the recent figures then go through your old logbook for the rest.
3) OOOTTA can download all your operative data into an Excel file (select the
‘Reports’ option to do so). So, enter an operation into oootta and then
download it as an Excel spreadsheet. This will just contain the operation you
entered but you will see in the spreadsheet all the fields (patient name,
number, operation etc) as columns. Open your old logbook separately and then
copy and paste the data, column by column, from your old logbook across to
the Excel spreadsheet downloaded from OOOTTA and then save it. You now
have all your old logbook data in an Excel spreadsheet which can be easily
explored (using Excel search/order functions) yet it is in the OOOTTA format
(i.e. OOOTTA fields and column order) so that you can regularly download
new OOOTTA data and paste it directly into your Excel spreadsheet to add to
your previous ops. (I.e. in summary you can use an Excel spreadsheet to
amalgamate your old and new data).
The OOOTTA secure Internet surgical logbook
www.oootta.com
Page 18
PROBLEMS AND TROUBLESHOOTER
Problem: When I enter my logbook, I can not see any operations or an
operations table
You may not have entered any operations yet! On your first visit click the ‘Add New’
button and add an operation. Once operations have been added, you will see them in
the operations table.
If you have added operations previously but they are not appearing in the operations
table then check the date range (Green oval, Figure 6). By default, the operations table
shows operations in the last 15 days or so. If you have been away and not used oootta
for longer than this, the operations table will therefore appear empty. Changing the
start date to an earlier date will show earlier procedures.
Problem: The operations table only shows my most recent operations
By default the operations table only shows operations from (on average) the past 15
days or so. (If it showed all the operations you have ever done, the table would be too
large). If you wish to see more procedures (or all your procedures) change the date in
the start date field (Green oval, Figure 6) to an earlier date. However if you wish to
view all your operations it is much more efficient to go to the ‘Reports’ page (via the
menu at the top of the screen), fill in the appropriate dates there and then select
‘export to Excel’ or ‘view on screen’ (Figure 9).
Problem: Nothing appears to happen when I click the ‘Save’ button
The date, speciality and operation fields are mandatory (i.e. must contain data) in
order to save a record. If they are empty (or have incorrect characters) the record will
not save and nothing appears to happen. If you look at these fields should this occur,
you will see an alert appear over the field(s) that is incorrect, prompting you to enter
data / correct it before pressing ‘Save’ again.
Problem: The automatic dividers do not appear when I enter a date or time
Date and time fields automatically add dividers (e.g. If you enter 04122004 or 0830
they will appear as 04/12/2004 and 08:30 respectively). If this is not happening (and –
as described above - the logbook may refuse to save your record if the date isn’t
added correctly), please use the number keys that run along the top row of your
keyboard (rather than the other methods of entering numbers such as the numerical
keypad found on enlarged keyboards or by using the number lock). For some
(presently unknown) reason, entering numbers using the alternative methods
mentioned may not work, the dividers in the time field may not appear and the
database may then refuse to save your record as it doesn’t recognise the entry in the
(mandatory) date field. However, using the standard number keys at the top of the
keyboard should work fine.
Problem: I entered an operation but when I looked for it later it was not there.
Always click the ‘save’ button after entering operation data. If you navigate away
from the data entry page without clicking save, you will not have saved the record and
will have to enter it again. (Remember, as described above, an operation will not save
unless you have entered the mandatory fields: date, specialty and operation). Once
you have finished entering (and saving) your records, clicking ‘Close’ takes you back
The OOOTTA secure Internet surgical logbook
www.oootta.com
Page 19
to the operations main page and you should see all the operations you have just
entered in the operations table. Once you have entered the three mandatory fields, the
record can be saved no matter how otherwise incomplete it is and you can then
navigate away from the data entry page. You can always re open the record and finish
filling it in later by clicking its edit button (clipboard symbol) in the operations table
(Red arrow, Figure 6).
Problem: What is the delete button (Red arrow, Figure 6) for?
You should not delete records as the function of the database is to save a record of
every operation you have performed. If an operation has incorrect details in it then
they can be corrected using the ‘edit’ button rather than the delete button. The delete
button is therefore only for an operation that was entered in error which is unusual
(e.g. an operation accidentally entered twice for example).
If you want to hide specific operations then don’t delete them. Instead, download your
database to Excel and sort out / delete operations there. Manipulating downloaded
operations in Excel in this way obviously does not affect the operations saved on your
logbook in the server which will still hold a record of all of the operations you have
ever entered.
Problem: Why is the “Print” button not working?
The “Print” button is only activated when a record has been saved (to prevent users
printing out a record and then forgetting to save it to their logbook). Clicking on the
“Save” button will then make the “Print” button active. (If you then make any further
changes to the record, the “Print” button will once again become inactivated until the
record has been saved once more). In summary, if the “Print” button appears faint and
is unavailable at any time then click “Save” and the print operation note function
should then become available.
Finally…
That’s it! To register and start using your own personal, secure, easily accessible,
internet-based logbook, please click on the registration button on the first page of the
website and enter your details as described in ‘Registration’ above. We hope you
enjoy using the surgical logbook
The OOOTTA secure Internet surgical logbook
www.oootta.com
Page 20
The OOOTTA secure Internet surgical logbook
www.oootta.com
v0107.1.0.0
21