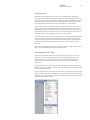
1
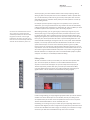
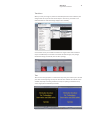
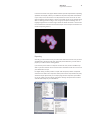
Digital Video in Medicine How to capture, edit, and share video of surgeries and other medical procedures By Patrick Reardon, M.D. Director, Advanced Minimally Invasive Surgery Training Program The Methodist Hospital, Houston White Paper Digital Video in Medicine Contents Page 3 Introduction Page 4 Why Record Surgeries? For Yourself To Train Others To Educate Referring Physicians Page 6 Digital Video Options Scenario A: Good Scenario B: Better Scenario C: Best Other Options Page 13 Capturing and Editing Video: Step by Step Planning Your Movie Capturing Video Importing Video from Tape Editing Video Transitions Text Audio Compositing Exporting Sharing Your Movies Page 22 Conclusion Page 23 For More Information Page 24 Appendix: Apple Video Production Software iMovie and iDVD Final Cut Express Mac OS X Server Final Cut Studio Final Cut Server Xsan 2 White Paper Digital Video in Medicine 3 Introduction In my career as a surgeon, I’ve seen firsthand how recording surgeries has helped improve my technique—and how effective video can be as an education tool for others, from new doctors to longtime practitioners. Thanks to advances in video technology, we can now record just about anything we can see, including both open and endoscopic surgeries. Even raw, unedited videos provide valuable documentation of our work; editing and annotating them turns them into outstanding educational tools. The ability to capture and edit video footage of surgeries and other medical procedures is now within the grasp of the physician. Endoscopes, both flexible and rigid, now routinely have video output capability. A rigid endoscope may be used in both laparo scopic and open procedures. Consumer-grade camcorders may also be used during open surgeries. A rigid endoscope, such as those utilized for laparoscopy, can be securely mounted in a sterile fashion into an open operative field. This has advantages over a camcorder. The recording source may be placed directly into the operative field, near the subject to be recorded. The view will not be blocked by the surgeon’s head, and it also brings its own light into the operative field. By adding an Apple MacBook Pro notebook (which includes the iMovie application for basic movie editing), or a Mac Pro desktop system with Apple’s Final Cut software, you can quickly and easily build a first-rate system for creating compelling surgical videos. In this white paper, I’ll explain the benefits to today’s physicians of capturing videos of their work. Then I’ll outline the equipment you will need and discuss how you can edit and share your video using Apple hardware and software. I invite you to learn more about this exceptional way to keep your own practice up to date and to share your expertise with other physicians. White Paper Digital Video in Medicine 4 Why Record Surgeries? I believe that physicians who perform surgeries and other medical procedures can help themselves, their students, and their colleagues by making videos of their work. And with today’s technology, it’s easy. Here are a few reasons to consider filming your work. For Yourself A personal recollection At one point in my career as a surgeon, I felt that I was beginning to mature in my technique. Then I looked back at some of my old laparoscopic 360-degree fundoplication videos. I realized that I had not been as good a surgeon as I thought I was at the time. What this taught me was that no matter how good you think you are at performing medical procedures, there is usually still room for improvement. As professionals, physicians are expected to engage in lifelong learning and self-improvement. Recording and viewing our own procedures is an excellent way to help us do so. Reviewing your own surgeries or other procedures with a critical eye toward your tech nique can be very beneficial. In fact, Practice-based Learning and Improvement is one of the six “core competencies” defined by the American Board of Medical Specialties. For physicians who perform procedures, there is no better way to put that guideline into practice than to record and review your work. Organizations such as the American College of Surgeons and the Society of American Gastrointestinal and Endoscopic Surgeons (SAGES) already make available peer-reviewed videos on various procedures that have been created by experts in their respective fields. Other practitioners can compare these videos to their own techniques to ensure that they are exercising their skills at a high level. Even the very act of planning to record a procedure can improve your performance. Before the operation, you’ll want to decide which parts of it are critical and worthy of recording and how you’ll perform those steps during the operation in order to create the most useful video. Thinking about an operation you have done many times before in this new way can be very instructive for you as a surgeon. To Train Others There is no better way to train residents, fellows, and other individuals in how to carry out a videoendoscopic surgery or other procedure than by recording digital video of the procedure and then editing and annotating it for maximum educational effectiveness. If you write an article about how you perform a certain procedure, other physicians may be able to duplicate your approach with some degree of accuracy. If you illustrate the steps with medical drawings or photographs, people may follow your example even more accurately. However, because humans are so visually oriented, the ultimate teaching tool is a well-edited video. A video that depicts the critical steps of a procedure with clear images and highquality voiceover narration becomes an “expert in a can” instructional video that can train physicians no matter where they practice. Such videos can reside on your own computer, a local server, a distant server via the Internet, a CD, a DVD, an iPod touch, or an iPhone. White Paper Digital Video in Medicine Why learn video editing yourself? You could pay others to edit your surgical videos for you. However, you would still have to review the entire unedited video first, choosing the relevant segments and not ing their beginning and ending times. You would then have to take the time to review “rough cuts” at various stages of the editing process. And most important, you would have to trust the editing service to edit the operation just right, to clearly depict the relevant scenes, and to make your work look its best. Without an understanding of the editing process yourself, it would be difficult to know what to ask for from the editor or whether the final product was all that it could have been. On the other hand, if you have editing skills yourself, then you have two good options for creating effective videos. You can choose to edit your videos yourself, particularly if you find the creative process enjoyable. Or you can knowledgeably engage others to do the work for you, confident that you’ll be giving them the instructions they need to do the best possible job. 5 For example, videos can be distributed throughout the medical school of a university or among the hospitals of a far-flung hospital system. Many journals now offer videos on their websites that supplement the information provided in the print version of the journal. Clearly, the potential value of these educational resources is immense. As I mentioned in the previous section, the very act of creating a procedure video can be a self-improvement process in itself. Preparing to record a procedure for educational purposes forces you to critically evaluate your technique. Creating a training video for other physicians can therefore benefit you, too. To Educate Referring Physicians Many physicians mistakenly believe that procedure videos are useful only in academic environments or to show at national meetings within their own specialty. In fact, such videos can be important outside of your immediate medical community. A well-edited video of one of your procedures, presented at a local or regional meeting, allows potential referring physicians to see your skills firsthand. Many times, these doctors have no other way to assess the quality of procedure-performing physicians. All proceduralists say they do a great job, and the physicians who are competing with you for referrals are not likely to speak on your behalf. So how can a potential referrer select the best proceduralist for each situation? Video allows you to record and carefully edit your best work for presentation to this important group of referring physicians. Many new physicians send out brochures announcing the opening of their practice and touting their skills. A CD or DVD with actual videos of your work could have much greater impact. Let me give you a demonstration of that impact from my own experience. Several years ago, I presented an interesting case at a meeting attended by all physicians who treat gastrointestinal disease at The Methodist Hospital. I showed a video of a laparoscopic right hemicolectomy at a time when many doctors felt this might not be a good operation for colon cancer. Visually, the patient was an ideal case to present. Her tumor had been “tattooed” with India ink to highlight its location in the colon. The ink had spread throughout the lymphatic drainage bed of her right colon, so ink-stained lymphatics, as well as arteries and veins, were easily visible and laid out as though they were illustrations in an anatomy book. As the video progressed, I described each phase of the operation. When the lights came back up, an oncologist raised his hand. He declared that prior to seeing my video, he had refused to send colon cancer patients to surgeons who might attempt a laparoscopic resection, because he believed the operation to be inferior from an oncologic standpoint. He had assumed that sacrifices to standard oncologic principles would be necessary in order to do the operation laparoscopically. He then stated that he had just witnessed as good an oncologic procedure as could be per formed in any manner and that he intended to refer patients for this type of surgery henceforth. Not only did that particular oncologist send me his cases, but so did other doctors in the room who were influenced by his unprompted remarks. Previously, my attempts to convince them that this surgery was a good oncologic procedure had fallen on deaf ears. Once they were able to see it for themselves, their thinking changed 180 degrees. This was a great example of using a simple, well edited video to convince referring physicians of the value of a particular procedure. White Paper Digital Video in Medicine 6 Digital Video Options The workflow of creating surgical videos is straightforward: • Capture the video. • If you are not capturing it directly, transfer the video to a computer. • Edit the raw video down to the most important parts. • Add text, voice, and graphics, as appropriate, to improve the educational value of the video and give it a finished look. The equipment you will need to carry out these tasks depends on the type of surgery or procedure you’re doing, the intended use of the video, and what resources you want to devote to the project. In this section, I’ll describe three typical systems in good, better, and best scenarios. Scenario A: Good First, I’ll describe a simple setup for getting started with digital video on an open surgery. You can get your feet wet with your personal camcorder, an Apple notebook, and Apple’s iMovie software. USB Digital Camcorder MacBook Pro iMovie Capture With an open surgery, the easiest capture method is to set up a camcorder on a tripod. Of course, you must place the tripod where it will not interfere with the surgical team, and it may be difficult to find a location where the surgeon and assistant will not block the camera’s view. But camcorders can’t be beat for price: If you don’t already own one, models that support the popular MiniDV tape format can be purchased for only $200–$300. High-definition (HD) camcorders currently start at several hundred dollars, but they provide a level of detail that can be valuable in analyzing the minute details of an organ. Be sure to check out camcorders that support HDV or AVCHD, the latest highdefinition formats. White Paper Digital Video in Medicine 7 A better solution for open surgeries, if you have access to the necessary equipment, is a laparoscope, laparoscopic camera, and recording device. We currently use Karl Storz products at The Methodist Hospital. With a table-mounted holder, you can bring a sterile laparoscope right into the operative field. And unlike a traditional video camera, an angled laparoscope can get a good view of the operation without obscuring the surgeon’s view. The light source that’s part of the laparoscope even has the benefit of improving the lighting of the operative field. My colleagues and I have used this technique to film aortic valve replacements, Whipple procedures, open hernia repairs, and other open procedures. It’s a great tool that should be in every video educator’s armamentarium. Head-mounted cameras are another option for capturing video of an open surgery. See Apple’s profile of London’s Great Ormond Street Hospital (www.apple.com/science/ profiles/gosh/) for a great example of that method. If your procedure is apt to last longer than the capacity of a single tape, you may want to capture video directly to a hard drive rather than having to change tapes midway. You can use a regular camcorder with a large, high-speed peripheral drive. (I use a 500GB FireWire 800 drive that’s powered by the device it is plugged into.) Video files require large amounts of hard drive space and rapidly consume the free space on the main hard drive of your computer. External drives are easier to carry from place to place, and they eliminate the need to bring the computer itself into the operating theater. You will assemble your final movie on your computer’s own hard drive later. As an alternative, you can use an AVCHD system that records to an internal hard drive or to flash memory. For example, an AVCHD camcorder with a 120GB internal drive can store about 10 hours of HD-quality video. Transfer and store Camcorders offer a selection of interfaces that allow you to transfer your video to a computer. Look for a USB or FireWire connection. (You may see the terms i.Link or IEEE 1394 instead of FireWire.) All Apple computers have at least one USB 2.0 port, and almost all have at least one FireWire port. You can use any of Apple’s video editing applications (such as iMovie, described in the following section) to transfer the footage from the camcorder to the computer. How you should store your video depends on how much video you collect and how you intend to use it. If you simply want to document certain surgeries, then storing the tapes or memory cards from your camcorder in a safe place may suffice. If, however, you want to build a library of video from which you can develop presentation or curriculum materials, then you’ll want to transfer your videos to a hard drive. In that case, an external drive will prevent you from filling up your computer’s built-in drive and make it easy for you to take the drive wherever you need it (such as between the office and home). As you’ll see later, once you have selected specific segments of your video for use in a movie, the storage space needed will be much less, and you can keep those files right on the computer you’re using for editing. Note that if your camcorder only has analog output, you’ll need to research your options for converting the video to a digital format for use by the computer. If you discover that making videos of your work is valuable and you decide to keep doing it, you should consider moving to a recording device other than the camcorder. White Paper Digital Video in Medicine 8 Edit and annotate A MacBook Pro notebook provides editing power and the added benefit of portability, so I recommend it as your initial video editing platform. Apple’s iMovie software (part of the iLife suite that comes on every new Mac) is ideal for physicians who want to begin recording and editing procedures. It helps you quickly and easily import your video; select the parts you want; and add transitions, text, graphics, and voiceover narration. iMovie supports both HD and standard-definition (SD) video. I have a portable system that consists of a MacBook Pro (with a power adapter) and two bus-powered 500GB hard drives in a wheeled carry-on bag. It’s a simple but invaluable system that I can take anywhere to record surgeries from laparoscopic cameras and edit the resulting video. If you’ll be recording surgeries where you can’t capture video directly from a medical imaging device, you’ll also want to carry a camcorder and a tripod. Scenario B: Better If you decide to make movies on a regular basis, you’ll want to consider more sophisticated capture solutions, as well as more powerful hardware and software for editing your video. Endoscope DVCAM tape deck Interface device Final Cut Express Mac Pro Capture In this scenario, you could still capture video with a camcorder mounted on a tripod. But let’s assume that you’re now capturing it directly from medical imaging equipment, such as a laparoscope or a flexible endoscope. Flexible and rigid endoscopes of many different types and from many different vendors (Karl Storz, Olympus, Fuji, Stryker, and so on) can be used to capture video for later editing. One option for capturing video is to connect a camcorder to the endoscope via FireWire. Karl Storz sells endoscopes that support FireWire, and many HDV camcorders support it as well. (You’ll see the FireWire interface, called i.LINK, on Sony products.) You can then start and stop the recording directly from the device control module in your hand. Even better than recording to a camcorder would be having your endoscopic camera feed a video tape recorder. An HDV tape deck connected to a medical imaging device will give you excellent video to work with. White Paper Digital Video in Medicine 9 You can also use video capture hardware to save the incoming video directly from the medical imaging equipment to your Mac. In this situation, you’ll need an interface device to convert the video format (“codec”) coming from the camera into a format compatible with video editing software. Here are two recommended options for such a device: • AIDA is a standalone image management system from Karl Storz Imaging. After it captures and translates video from your laparoscopic camera, you can transfer the video file to your Mac for editing. • AJA’s Kona cards can capture both SD and HD video from laparoscopic equipment directly onto a Mac Pro computer. Transfer and store In this “better” scenario, we’ll stay with the external disk drive I recommended as a storage solution in the “good” scenario. Of course, depending on how long your surgeries last and whether you want to record them in SD or HD, you may need more than one disk drive for a single operation. One interesting and versatile option at this level is to set up a video capture kiosk in each operating room consisting of a MacBook Pro with Apple’s Final Cut Express application. Doctors then bring their own removable drive for each operation, hooking up both to the MacBook Pro and using Final Cut Express to control the camcorder and send the resulting video to the external drive. Edit and annotate Final Cut Express software is a great option for those who don’t need the full capabilities of the Final Cut Studio 2 suite. It offers nearly all the same editing capabilities without the additional software to create more advanced animations, audio editing, and so on. Final Cut Express will run just fine on a MacBook Pro notebook—as many professional moviemakers can attest. However, at this level of video production, a Mac Pro desktop system might meet your needs better. Scenario C: Best Our “best” example builds on the previous system. As before, it involves capturing video directly from medical imaging equipment. But this scenario uses larger and more sophisticated solutions that would likely be affordable only by hospitals or groups of physicians rather than individuals. Below is a diagram of a system that would allow a hospital to capture and store video from multiple procedure rooms. Deploying such a versatile system would provide doc tors with a wealth of video footage from which they could create compelling learning aids. This example system includes: • A Mac Pro computer in each procedure room to capture HD video from the endoscope (via an AJA Kona card). OsiriX software may also be added to view DICOM images. • A centralized editing station consisting of a Mac Pro with Final Cut Pro software and its own Promise RAID storage. • A data storage room containing a Promise RAID picture archiving and communications system (PACS), plus an Apple Xsan collaboration server that communicates with Xsan client software on the Mac Pro systems in the endoscopy rooms. White Paper Digital Video in Medicine 10 Endoscopy/procedure room Endoscope Interface device Mac Pro Final Cut Express Fibre Channel Editing suite and primary storage room 30-inch Apple Cinema Display Promise RAID Mac Pro Final Cut Studio SAN Central storage Primary metadata controller Promise RAID Secondary metadata controller Promise RAID picture archiving and communications system (PACS) Apple Xsan collaboration server Capture As in the previous scenario, the image source may be a flexible or a rigid endoscope. In addition, moving digital images can be captured from the cardiac catheterization suite, the digital angiography suite, laryngoscopy equipment, or even radiology scanning equipment such as CT scans or MRIs. (The open source OsiriX software allows you to process DICOM images on a Mac system.) On the back end, capture options would include HDV decks, hard drive recording solutions such as AIDA or AJA, and network-based capture solutions such as Apple’s Final Cut Server. You may also want to use an AJA Io HD box, which makes it easy to connect your Mac to external video sources. The Io HD supports Apple’s ProRes 422 codecs, allowing you to do production-quality HD editing even on a notebook such as a MacBook Pro. White Paper Digital Video in Medicine 11 Transfer and store In this scenario, unlike the camcorder tapes we used in the first example, data transfer and storage are already part of the capture solution. But particularly with large HD video files, storage becomes a critical point to consider. As I mentioned in the previous scenario, if you plan to capture video directly to a hard drive, I recommend that at minimum you use a large, high-speed peripheral drive. Depending on the length of the procedure and whether you’re recording in HD or SD, you may need more than one drive. An ideal setup would be a Mac Pro with at least 4TB of disk storage in each operating theater. However, a system that is truly the “best” wouldn’t rely on locally attached disk drives. If you want to maximize the educational value of your surgeries, you’ll want maximum flexibility to access and edit the video. That means implementing a video storage solution that allows access to the video files from any computer with editing software. Therefore, I recommend that you connect the Mac Pro systems in your surgical suites to a centralized Promise RAID disk array over a Fibre Channel network. Another excellent addition to your campuswide system would be Apple’s Xsan software. Xsan is a 64-bit cluster file system that enables multiple Mac computers to share RAID storage volumes over a Fibre Channel network. Xsan allows each client to read and write directly to the centralized file system, so it makes workgroup collaboration fast and efficient. We’ve tested Xsan at The Methodist Hospital and I’m impressed with how quickly I can retrieve video files on whatever Mac I’m using, no matter where I’m physically located. Edit and annotate For editing and annotating surgical videos, I use Apple’s Final Cut Pro software, which is part of the Final Cut Studio suite. If you need a lower cost editing solution, I recom mend Final Cut Express, which has most of the same functions as Final Cut Pro. In the next section of this paper, I’ll give you an example of how I used Final Cut Pro to turn raw video into a movie fit for presentation at national conventions. The best editing system would run Final Cut Studio on at least one Mac Pro in each department. Each Mac Pro would have access to Final Cut Server for managing and editing the digital assets stored on the RAID disk array. Final Cut Server acts as a system to gather and store digital assets from across the enterprise. It then serves as an asset manager, allowing access to the assets though an easy-to-use interface that Mac users expect. At The Methodist Hospital, we use Final Cut Server. This asset manager goes well beyond simply managing digital video and still images; it allows us to store our captured digital assets from different capture devices to a centralized location using our network. Customized metadata tags can be used to search for a video or a still image using keywords. The software then automatically generates a small, rapidly viewable “proxy” video that users can quickly play or “scrub” to verify if it’s the same video that they searched for. The quality of these proxies is so good that when this software was demonstrated to some of our physicians, they incorrectly thought they were viewing the actual video file. Final Cut Server is Java based and can be used by both Mac computers and PCs. Each user can have “preferences” so that Final Cut Server delivers video in just about any codec for editing on either a Mac or a PC. The software even notifies physicians by email when their video is ready for download in the requested format. This is a great feature for busy physicians, allowing them to maximize the use of their limited time. White Paper Digital Video in Medicine 12 Other Options The equipment described in the preceding scenarios only skims the surface of the options available to make impressive videos of your surgeries and other procedures. As you’ve seen, suitable recording devices range from low-cost consumer products to high-end professional equipment. In addition to camcorders and video-equipped medical instruments, your choices include HD videotape recorders, DVD or Blu-ray Disc recorders, standalone USB or FireWire drives, the internal disk drives on your computer, and RAID storage systems. You may also want software that renders DICOM volumes. DICOM (Digital Imaging and Communications in Medicine) is a standard for distributing and viewing data (still and moving) produced by medical imaging devices. OsiriX is an open source image-processing application that enables Mac users to view and manipulate DICOM (.dcm) images. For example, OsiriX can be used to repurpose volumetric radiology studies (such as CT scans and MRI images) to improve their teaching and diagnostic value, including use as reference materials during surgeries. White Paper Digital Video in Medicine 13 Capturing and Editing Video: Step by Step This section gives an overview of an effective process for capturing and editing video of your surgeries. The steps in this section refer to Apple’s Final Cut Pro software. Most of the same functions are built into Final Cut Express, and many are also available in iMovie. Refer to the websites listed at the end of this paper for more information on all of Apple’s video editing solutions. Planning Your Movie If you’ve decided to record a surgery for educational purposes, preoperative planning is just as important for your video as it is for your patient. Consider which steps of the operation are most critical, how you want to perform them, and how you want to depict them in your video. It may help to think about how you would describe this surgery to residents or during your oral board exams. Plan ahead to record the most important details at the time of the surgery, and you will have the best starting point for editing. Check the recording equipment the day before the procedure to ensure that it is in good working order. This gives you time to repair any problems or come up with an alternative method of recording. Bring enough tapes to cover the longest period of time that the operation could possibly take—then add one or two more. If you will be capturing the video directly to a portable hard drive, make sure that you have it ready. When you capture surgical video that will be used to educate other physicians, it’s vital that you select your team members carefully. It is important for every member of the operating team to know the planned procedure, its important steps, and what you want to achieve by recording it. For example, the person running the camera needs to know how to follow the action smoothly and how to use an angled laparoscope with facility. To create more powerful images, we even teach our camera drivers the “rule of thirds,” a rule for pleasing image composition that is familiar to both still and film/ video photographers. SAGES has published its own set of video production guidelines. These guidelines are somewhat dated now in their discussion of available formats, connection types, and peripherals, but they still provide good suggestions for improving the quality of your video capture in the operating room. For example, no amount of digital editing will make up for video that doesn’t capture the essential steps of the procedure or for shaky camera work or a blood-smeared lens. The SAGES guidelines are available online at www.sages.org/publication/id/VID/. White Paper Digital Video in Medicine 14 Capturing Video Before the operation begins, make sure that your “cinematographer” understands the proper technique. The arm holding the camera should be held tightly against the person’s trunk to shorten the “lever arm” distance between the stable platform and the camera. This helps keep the image steady. (Incidentally, both iMovie and Final Cut Pro have stabilization capabilities that can reduce the shaking in a video image.) Leave the tape recorder or hard drive running from skin cut to skin closure to ensure that you don’t miss any important portions of the operation. There is nothing more frustrating than missing a superb example of a surgical procedure because you turned off the recording device to save tape or drive space and then forgot to turn it back on. Recordings of rare clinical findings only happen if you are prepared. To give an example, I was once able to videotape two cases of true leftsided gallbladder in a 45day period. The odds of finding the gallbladder located under segment III of the liver are one in ten thousand. I was able to record both of these cases for posterity because our operating room facilities are always ready to capture what we see on the screen. By the way, during the operation, make sure that you capture a good example of each step—even if that sometimes means doing another “take.” Importing Video from Tape Once you’ve captured the video of the surgery or other procedure, you’re ready to import it to your Mac editing application. If you’ve already stored the video on an external hard drive or a network server, you can call up the files directly from that device. But if you are importing video from a camcorder, you would follow the steps below. To import the video, you can connect your camcorder directly to your Mac (through a FireWire connection, if available; otherwise, with USB), and then control playback of the tape with the software itself. If you’re editing with Final Cut Express or Final Cut Pro, I recommend using the Log and Capture import option, because it allows you to capture only the video that you deem important, which saves storage space on your drive. This method also lets you give each individual clip a descriptive name. White Paper Digital Video in Medicine 15 As the tape plays, you tell the software when to start and stop capturing video by setting “in points” and “out points.” Each in/out combination creates a separate video clip. I recommend that you take time to give each clip a descriptive name. Choose a name that will help you remember exactly which part of the operation is in that clip just by reading the title. For multiple clips that represent a single part of an operation, such as a particular anastomosis, you can log and name the first clip, and then let Final Cut automatically number subsequent clips (anastomosis 01, anastomosis 02, and so on). When you move to a different portion of the operation, start a new naming sequence. One of the most useful features of Final Cut Server is that users can have their video automatically rendered, into the format that they prefer to work with. I use the Apple ProRes format, but even if users edit on a PC, Final Cut Server can automatically render their video files into the format they wish to use. When editing with tape, you can go through your entire tape, assign all of your in and out points, log your clips and give them names, and then instruct Final Cut Pro to capture those clips. Final Cut will then go from one end of the tape to the other, digitizing the segments you selected. This process may take a while, because the tape has to play at its normal speed while the video is captured and digitized. This is one of the tremendous advantages of using the Final Cut Server system. At The Methodist Hospital, I can send my captured video from the AIDA device to the Final Cut Server system with a few taps on a touchscreen monitor. By the time I get to my office, Final Cut Server has converted my video into Apple ProRes files, based on my own set of preferences. Users can choose the file type for their converted video. Final Cut Server also creates a highresolution thumbnail video, which I can preview. Using the Gigabit Ethernet backbone at our hospital, the video can be downloaded rapidly to my office computer. Once there, it is immediately available for editing. Editing Video The Final Cut Timeline is where you assemble your movie from the captured video clips. As its name implies, the Timeline is a linear window that determines the sequence in which events will happen. For your first simple Final Cut project, the Timeline will primarily contain video clips, plus audio clips and transition effects, if you like. Advanced Final Cut projects can contain hundreds of compositing and graphics effects—but the Timeline is still what holds everything together. In order to begin editing, you simply drag the appropriate video clips into the Timeline window. Once all the desired clips are in the Timeline, most of your editing can be accomplished with just two tools in the Tool palette: the arrow to select a clip in the Timeline and the Razor Blade to cut out unwanted parts of it. Incidentally, you can bring in any of your video clips (plus supporting media such as still photos and diagrams) to create a single Final Cut project; the clips don’t have to be from the same file folder of the same surgery. For example, you could show in a single movie how you dealt with several different tricky colon cancer resections. White Paper Digital Video in Medicine 16 Transitions When you view your rough cut, where the unwanted parts have been edited out, the changes from one clip to the next will be abrupt. In most cases, you’ll want to use Video Transitions to make the changes happen more smoothly. Cross Dissolve can be your workhorse transition for surgical videos. Other transitions may be used effectively to transition to and from textbased images, Xray images, introduction images, and the like, but use them sparingly. Text Text can serve many purposes in a video. At the very least, you’ll want to put a title and your name at the beginning. You may also want to have credits at the end. Text is also valuable (especially in teaching situations) to clarify the spelling of unfamiliar terms, such as organ parts and medical procedures. White Paper Digital Video in Medicine 17 All of Apple’s video editing applications make it easy to add text. You can set your preferred font, color, size, and other aspects of the text, and place it wherever you want it on the image. Final Cut Pro and Final Cut Express even include text generators that allow text to crawl horizontally across the screen, scroll up the screen, or display other attributes. iMovie also offers scrolling text and a number of other textanimation options. Audio Unless you plan to present your video in person, it’s useful to add an audio commentary. In fact, it’s a good idea to add one anyway; you can always mute the audio on playback if you’re on hand to describe the procedure. All of Apple’s video editing solutions (iMovie, Final Cut Express, and Final Cut Pro) include the ability to add voiceovers and other audio elements. A great operative video can be rendered forgettable by poor narration. In fact, the quality of the voiceover may determine whether your video is accepted for presentation at a professional meeting or for use at a medical school. The competition for presenta tion time and teaching selection is fierce, so any aspect of your video that can help it stand out is critically important. You may also wish to use a short musical soundtrack during the opening titles of the video and during any closing credits. However, music behind video of the actual opera tion is distracting and should be avoided. Voiceover equipment You have several options for recording voiceover audio: • Built-in microphone. A simple and inexpensive way to add audio to your video record ings is to use the microphone built into all MacBook and MacBook Pro notebooks. • USB microphone. For higher quality audio recording, connect a USB microphone to your Mac. Many USB microphones are designed specifically for recording voice. Check the Music & Audio section of the Macintosh Products Guide (guide.apple.com) or the Music Creation section of the Apple Store (store.apple.com) for information on Mac compatible USB microphones. • Recording studio. For optimum audio quality, record your annotations in a sound booth. Many universities already have such a facility, or you can rent time at a commer cial recording facility. When you schedule a recording session, be sure to inquire about your options for taking home the finished audio, such as on a tape or flash drive. Several vendors offer sound booths that are affordable even for small medical practices. White Paper Digital Video in Medicine 18 Creating your narration After you have finished editing your video and have added text to it, play it through in its entirety. As the video proceeds, make notes of what you want to say for each portion. Then flesh out your rough draft into a typed, doublespaced script with large, easyto read type. Be sure your script has a conversational tone—not an academic one. When narrating your video, it’s important to speak clearly, in a conversational manner, using normal, lively inflections. Don’t succumb to the temptation to read the script in a monotone. If you make an error or stumble, simply stop speaking briefly so that you leave an audio gap, and then say the line again. If you want to add commentary in a language other than your native language, consider finding a narrator who can speak the desired language more naturally. Again, this can make the difference in having your video accepted for use at a meeting or medical institution. If you have the Final Cut Studio suite, you can use the included Soundtrack Pro software to remove unwanted background noise and otherwise clean up your audio track. Compositing Compositing is the combining of visual elements from different sources into a single video image. In the final composited image, it will appear as though all of the elements were a part of the same scene. Understanding and mastering compositing can allow your videos to stand out visually—and that will make them more effective teaching tools. When people find your video visually interesting, they will stay focused on it. When they stay focused on it, they are more likely to assimilate the information contained in it. White Paper Digital Video in Medicine 19 In the Final Cut Studio suite, Apple’s Motion software provides sophisticated compositing capabilities. For example, it allows you to add arrows to point to important visual elements in your video, such as the location of a small, hardtosee lesion. Your arrow can even rotate around the point of interest or move up and down on the screen. Another handy effect is “masking” part of an image—such as a group of suspiciouslooking cells—to highlight it against the rest of the image. Consult the SAGES document or the Final Cut Pro User Manual for instructions on those techniques. Final Cut Express and iMovie also include compositing features. Exporting Generally, you don’t want to show your video from within Final Cut Pro. Once you have assembled all its elements (video, text, and audio) in their final form, you will want to prepare your video for other viewing options. If you want to put the video on a tape for someone to view, connect a FireWire tape deck to your Mac and then use the “Print to Video” command in Final Cut Pro to record your edited video on tape. For digital media, your final product is output with Compressor, another component of the Final Cut Studio suite. Compressor offers presets for the web, iPod devices, DVDs, and other output options that you can simply drag into the Compressor job window. Or you can create your own custom compression settings. Compressor then creates a video file that’s ready for your intended use. White Paper Digital Video in Medicine 20 Sharing Your Movies Once you have created a video, it can be repurposed for many different uses. Here are a few ideas on how to share your completed movies. Meetings and courses Try out a new video first at local meetings or grand rounds. Then, after any tweaking prompted by feedback from those presentations, submit it to a national event, such as the SAGES annual meeting or the American College of Surgeons Clinical Congress. You can use your videos in courses you teach at your own institution or health system; as a guest lecturer at another site; or at a regional, national, or international medical conference. As a Mac user, you have excellent solutions available for presenting your finished videos to audiences. • Keynote ’09, the latest version of Apple’s powerful presentation software, helps you tell your story effectively and dramatically. More than 35 Apple-designed themes let you create a cinema-quality presentation in minutes, with coordinated fonts, textures, and layouts for different types of slides. The Slide Navigator and Light Table make it easy to organize your presentation, and using the built-in Media Browser, you can quickly find and add the videos you need. Keynote is part of Apple’s iWork ’09 applica tion suite, which also gives you word processing and spreadsheet tools that let you create professional-quality results with the legendary Mac ease of use. • QuickTime Pro is an upgrade that adds features to QuickTime Player, including the ability to create podcasts. The “Movie to iPod” option makes it a snap to convert your video for use on iPod. You can also save videos in the optimum formats for iPhone and other devices. • Podcast Producer is an end-to-end solution for encoding, publishing, and distributing high-quality podcasts. Ideal for presentations, university lectures, and distance learning, Podcast Producer simplifies the process of recording content, encoding video, and publishing podcasts for playback in iTunes and on iPod, iPhone, and Apple TV. Podcast Producer is included with Mac OS X Server (v10.5 Leopard). • iDVD (part of iLife) and DVD Studio Pro (part of Final Cut Studio) are Apple’s DVD authoring programs. DVDs offer an inexpensive, widely supported way to distribute video content. For example, they make a great handout at conferences. You can prepare your videos for DVD with any of Apple’s video editing programs, and then send the files to iDVD or DVD Studio Pro to create and burn DVDs. White Paper Digital Video in Medicine 21 Websites Websites are a great way to share your videos because web browser applications come with new computers, so people don’t have to obtain any special software to view your videos. • Personal website. If you have your own website (on Apple’s MobileMe or another hosting service) and an Internet account that gives you sufficient monthly bandwidth, you can host your surgical videos there. • Medical websites. As medical journals and associations recognize the value of educational videos, they are increasingly adding them to their websites, either accompanying an article or as standalone offerings. Many institutions (such as medical schools) are doing the same. In the commercial arena, the WebSurg site (www.websurg.com) is devoted to laparoscopic surgery education. It features hundreds of surgeries, lectures, and other videos, which can be viewed on a desktop computer, iPhone, or video-capable iPod. • iWeb, part of the iLife suite that comes on every new Mac, helps you quickly and easily design web pages, including images and videos. Then with a click, you can upload the finished pages to your MobileMe account or other website. • Wiki Server, which is built into Mac OS X Server, enables you and your colleagues to collaborate and share information about your surgical movies. When you post movies, slides, papers, or other content, it can be tagged with relevant keywords. Subscribers to specific topics will automatically be notified about new material via RSS. Users can also add comments about the movies. Wiki Server can even act as a repository for email discussions about a particular case or department. • iDisk. One of the MobileMe online tools, iDisk allows you and your colleagues to access your shared files from any web browser running on any type of computer, wherever and whenever you need them. iDisk gives you plenty of storage space, so even large medical video files are no problem. And with its familiar, intuitive interface, uploading and organizing files is as simple as drag and drop. If you allow it, your colleagues can also post their own files to your MobileMe iDisk. • iTunes U. iTunes U is an innovative service that places the power of the iTunes Store in the hands of hundreds of colleges, universities, and cultural institutions, making their educational content available free to students and educators.* Search the Medicine and Health category in iTunes U to find a wide variety of medical courses, lectures, and procedure videos—all available for viewing and downloading for free on a Mac, a PC, or an iPod. All content on iTunes U is available free to anyone who has iTunes. White Paper Digital Video in Medicine 22 Conclusion Creating digital videos for those in the medical profession is all about education: • Educating colleagues and trainees on how to perform procedures and operations • Educating referring doctors about how you can help their patients • Educating yourself on exactly what you’re doing in the operating room and how you might improve it No one understands your operation and what you want to convey about it better than you do. And no one cares more about presenting your work positively than you do. Today’s powerful yet easy-to-use video editing applications free your creativity by simplifying basic editing tasks. If you’re serious about creating educational videos, it’s well worth your time to acquire editing skills yourself. Even if you later decide to let someone else produce your videos, having a good knowledge base enables you to work with a professional editor more effectively and to judge whether the final product shows your work in the best light. You can also read more about editing and sharing surgical videos on Apple’s website at www.apple.com/science/medicine/videosurgery/. I look forward to seeing your videos at upcoming meetings. White Paper Digital Video in Medicine 23 For More Information For more information on using Apple products in medicine and clinical practice, please visit www.apple.com/medicine. Here are some specific Apple products that can assist you with creating and publishing professional-quality medical procedure videos: • Final Cut Studio (www.apple.com/finalcutstudio) • Final Cut Express (www.apple.com/finalcutexpress) • iMovie, iWeb, and iDVD (www.apple.com/ilife) • Final Cut Server (www.apple.com/finalcutserver) • Xsan (www.apple.com/xsan) • Mac Pro, Mac mini, iMac, and MacBook (www.apple.com/mac) • Mac OS X Server (www.apple.com/server/macosx) • Podcast Producer (www.apple.com/server/macosx/features/podcasts.html) • iTunes U (www.apple.com/education/mobile-learning/) Apple has created a number of video capture, editing, and sharing tutorials that you can view on the Apple website. They include: • iMovie (www.apple.com/ilife/tutorials/#imovie) • iDVD (www.apple.com/ilife/tutorials/#idvd) • iWeb (www.apple.com/ilife/tutorials/#iweb) • Final Cut Express (www.apple.com/finalcutexpress/tutorials/) • Final Cut Studio (www.apple.com/finalcutstudio/tutorials/) Peachpit Press (www.peachpit.com) offers a wide selection of books about creating movies with Apple software. Here are a few titles you may want to consider: • Apple Training Series: iLife ’09 • Final Cut Express 4: Visual QuickStart Guide • Apple Pro Training Series: Final Cut Express 4 • Final Cut Pro 6: Visual QuickPro Guide • Final Cut Pro Basic Editing: Video QuickStart • Apple Pro Training Series: Final Cut Pro 6 • Edit Well: Final Cut Studio Techniques from the Pros The Methodist Institute for Technology, Innovation and Education (MITIE) is a comprehensive, state-of-the-art education and research center at The Methodist Hospital in Houston, Texas. White Paper Digital Video in Medicine 24 Appendix: Apple Video Production Software Whether you want to learn about movie editing by using software that comes on every Mac computer, set up a departmentwide video workflow system, or anything in between, Apple has software to meet your needs. iMovie and iDVD iMovie makes viewing, editing, and sharing video intuitive. First, review the video of your medical procedure to select and extract the sections you want. Drag your selec tions into the project area and arrange them as you wish. Then add text annotations, transitions, and, if you like, a voiceover narration. In just a few more steps, you can upload your movie to a website, create versions for iPod and iPhone devices, or send the file to iDVD to create ready-to-view DVDs. iDVD lets you incorporate sophisticated features such as scene selection menus on your DVDs. iMovie and iDVD come with every Mac. They’re part of the iLife ’09 suite, which also includes applications to help you organize photos, design web pages, and more. Final Cut Express For more advanced video editing, Final Cut Express delivers a powerful, professional toolset that’s great for editing raw footage or putting the final touches on an iMovie project. Use it to capture the most popular formats from a camcorder, including DVD and HDV. You can even mix different video formats in the same movie. Final Cut Express also lets you add dynamic animated text, sophisticated transitions, and other professional-quality effects. Mac OS X Server Apple’s powerful operating system offers the reliability, stability, and performance you need for the most demanding services and applications. Its multiple built-in collabora tion technologies include full-featured web hosting, wiki, distributed computing, email, IM, file sharing, and directory capabilities. And its Podcast Producer software lets users capture, encode, publish, and distribute podcasts. White Paper Digital Video in Medicine 25 Final Cut Studio Apple’s flagship video editing suite, Final Cut Studio, includes six postproduction applications that work together seamlessly. The heart of the suite is Final Cut Pro, which lets you edit quickly and accurately. The first choice of professional editors worldwide, Final Cut Pro delivers highperformance digital nonlinear editing, native support for virtually any video format, and facilityclass extensibility and interoperability. Final Cut Pro integrates with Motion for stunning 2D and 3D motion graphics, Soundtrack Pro to create the perfect soundtrack for your video, and other applications for color grading, highquality video compression, and DVD authoring in either HD or SD. DVD Studio Pro is a professionalquality DVD authoring program. Final Cut Server Final Cut Server is Apple’s media asset management and workflow automation software for collaborative video production. It helps you and your colleagues find assets instantly, share work seamlessly, and automate routine tasks so that you can focus on being creative. Xsan Xsan offers the best way to share, manage, and use data on your network. Specifically designed for computing environments that demand the highest level of data availability, this powerful 64bit cluster file system enables multiple Mac desktop and Xserve systems to share RAID storage volumes over a highspeed Fibre Channel network. Each client can read and write directly to the centralized file system, accelerating user productivity while improving workgroup collaboration. *iTunes U is a free service available to qualifying institutions entering a service agreement with Apple. Individuals looking to contribute content via iTunes U must do so through an iTunes U content provider. © 2009 Apple Inc. All rights reserved. Apple, the Apple logo, Apple Cinema Display, Apple TV, DVD Studio Pro, Final Cut, Final Cut Pro, Final Cut Studio, FireWire, iDVD, iLife, iMac, iMovie, iPod, iPod touch, iTunes, iWork, Keynote, Leopard, Mac, Mac OS, MacBook, Macintosh Products Guide, QuickTime, Soundtrack, Xsan, and Xserve are trademarks of Apple Inc., registered in the U.S. and other countries. iPhone and iWeb are trademarks of Apple Inc. iTunes Store is a service mark of Apple Inc., registered in the U.S. and other countries. iDisk and MobileMe are service marks of Apple Inc. Other product and company names mentioned herein may be trademarks of their respective companies. May 2009 L404777A