1
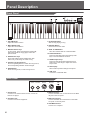
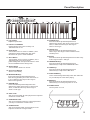
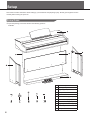
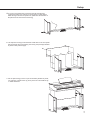
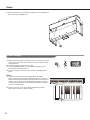
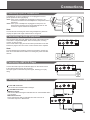
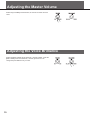
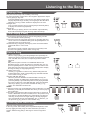
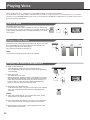
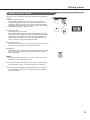
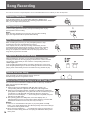
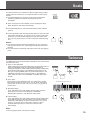
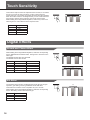
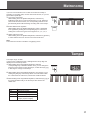
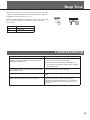
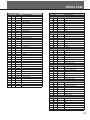
DIGITAL
STN-5000
PIANO
DIGITAL
PIANO
digital piano
User’s Manual
INFORMATION FOR YOUR SAFETY!
THE FCC REGULATION WARNING (for USA)
This equipment has been tested and found to comply with
the limits for a Class B digital device, pursuant to Part 15 of
the FCC Rules.
These limits are designed to provide reasonable protection
against harmful interference in a residential installation. This
equipment generates, uses, and can radiate radio frequency
energy and, if not installed and used in accordance with the
instructions, may cause harmful interference to radio
communications. However, there is no guarantee that
interference will not occur in a particular installation.
If this equipment does cause harmful interference to radio or
television reception, which can be determined by turning the
equipment off and on, the user is encouraged to try to
correct the interference by one or more of the following
measures:
Reorient or relocate the receiving antenna.
Increase the separation between the equipment and
receiver.
Connect the equipment into an outlet on a circuit
different from that to which the receiver is connected.
Consult the dealer or an experienced radio/TV technician
for help.
Unauthorized changes or modification to this system can
void the user's authority to operate this equipment.
CAUTION
The normal function of the product may be disturbed by
Strong Electro Magnetic Interference. If so, simply reset
the product to resume normal operation by following the
owner's manual. In case the function could not resume,
please use the product in other location.
PRECAUTIONS
PLEASE READ CAREFULLY BEFORE PROCEEDING
Please keep this manual in a safe place for future reference.
Power Supply
When removing the electric plug from an outlet, always hold
the plug itself and not the cord.
Do not connect the instrument to an electrical outlet using a
multiple-connector or an AC outlet of voltage other than that
for which your instrument is intended.
Remove the electric plug from the outlet when the
instrument is not to be used for extended periods of time, or
during electrical storms.
Connections
Before connecting the instrument to other devices, turn off
the power to all units. This will help prevent malfunction and
/ or damage to other devices.
Location
Do not expose the instrument to the following conditions to
avoid deformation, discoloration, or more serious damage:
Direct sunlight
Extreme temperature or humidity
Excessive dusty or dirty location
Strong vibrations or shocks
Close to magnetic fields
Interference with other electrical devices
Radios and televisions placed nearby may experience
reception interference. Operate this unit at a suitable
distance from radios and televisions.
Cleaning
Clean only with a soft, dry cloth.
Do not use paint thinners, solvents, cleaning fluids, or
chemical-impregnated wiping cloths.
Handling
Do not apply excessive force to the switches or controls.
Do not let paper, metallic, or other objects into the
instrument. If this happens, remove the electric plug from
the outlet. Then have the instrument inspected by qualified
service personnel.
Disconnect all cables before moving the instrument.
2
AW_DP70_Manual_G08_130920
Contents
Panel Description
Front Panel..................................................................4
Rear Panel..................................................................4
Setup
Setup Guide................................................................6
Power Supply..............................................................8
Connections
Connecting a pair of Headphones..............................9
Connecting an Audio Equipment................................9
Connecting a MP3/CD Player.....................................9
Connecting a Computer..............................................9
Scale.......................................................................15
Twinova.................................................................15
Touch Sensitivity...............................................16
Digital Effects.....................................................16
Reverb and Chorus Effect.........................................16
EQ Effect...................................................................16
Metronome...........................................................17
Tempo....................................................................17
Adjusting the Master Volume.......................10
Transpose.............................................................18
Adjusting the Voice Brilliance.....................10
Tune........................................................................18
Listening to the Song
Playing a Song..........................................................11
Stop Playing a Song..................................................11
Select a Song............................................................11
Practicing with Preset Songs.....................................11
Playing Voice
Select a Voice...........................................................12
Playing a Voice Demo...............................................12
Playing Two Voices Simultaneously..........................12
Playing a Lower Voice...............................................13
Beep Tone............................................................19
Troubleshooting................................................19
Specifications.....................................................20
Appendices
Voice List...................................................................21
Song List...................................................................23
MIDI Implementation List..........................................24
Song Recording
100
95
Prepare Recording....................................................14
Start Recording.........................................................14
Stop Recording.........................................................14
Playback the Recorded Song...................................14
Delete the User Song................................................14
Save the Recorded Song to a USB Flash Disk.......14
75
25
5
0
3
AW_DP70_Manual_G08_130920
Panel Description
Front Panel
VOLUME
5
BRILLIANCE
SONG
MIN
4
3
1
MAX
MELLOW
2
6
BRIGHT
12
PRESET
USER
USB
PLAY / STOP
7
8
REC
SAVE TO
USB
9
FUNCTION
10
11
13
1. VOLUME Knob
Adjust the master volume.
7. PLAY/STOP Button
Start or stop playing a song.
2. BRILLIANCE Knob
Adjust the voice brilliance.
8. RECORD Button
Enter into the record mode.
3. MELODY Select Keys
In song mode, press and hold the [FUNCTION]
button then strike the key [L]/[R] to select the
practice hand.
9. SAVE TO USB Button
Save the recorded data to a USB flash disk.
10. FUNCTION Button
Press and hold this button then strike special
keys to execute different functions.
4. SONG Select Keys
Press and hold the [FUNCTION] button then
strike a key in this range to select a song.
11. TEMPO Adjust Keys
Press and hold the [FUNCTION] button then
strike a key in this range to adjust the current
tempo value.
5. Indicators of Song Sources
Press the [SONG] button to switch the song source,
the corresponding indicator will be changed.
12. LED Display
Show all the important settings of the piano.
6. SONG Button
Enter the song mode, or switch song source.
13. USB Jack
Connect to a USB flash disk.
Rear Panel
AUX IN
AUX OUT
MIDI IN
MIDI OUT
USB
1
2
3
4
5
1. AUX IN Jack
Connect to an external sound source, such as an
MP3 or CD player.
3. MIDI IN Interface
Connect the MIDI OUT of other device to the MIDI
IN jack on the rear panel.
2. AUX OUT Jack
Connect to the audio equipment.
4. MIDI OUT Interface
Connect the MIDI IN of other device to the MIDI
OUT jack on the rear panel.
5. USB-MIDI Interface
Connect to a computer.
4
AW_DP70_Manual_G08_130920
Panel Description
15
14
TWINOVA
SPLIT
ACCORDION
NYLON
GUITAR
16
GRAND
PIANO
MUSIC
BOX
20
DRAWBAR
ORGAN
OCTAVE
DUAL
17
21
SCALE
18
STEREO
STR.
CHOIR
AAHS
SWEET
TRUMPET
SOPRANO
SAX
ACOUS.
BASS
22
19
TOUCH
OFF
1
23
2
EQ
3
1
2
24
25
TRANSPOSE
3
26
TUNE
27
VOICE
DEMO
28
BEEP
29
14. [+]/[-] Button
Adjust the parameters.
15. Indicator of TWINOVA
Indicate whether the system currently is in
TWINOVA mode or not.
16. DUAL Button
Turn the dual voice on and off. In addition, press
and hold the [FUNCTION] button then press
this button can open or close TWINOVA.
17. SPLIT Button
Turn the lower voice on and off. In addition, in the
TWINOVA mode, press and hold the
[FUNCTION] button then press this button to enter
into the TWINOVA octave setting mode.
18. SCALE Button
Turn the SCALE function on and off.
19. Voice Select Buttons
Select a voice directly.
20. METRONOME Keys
Press and hold the [FUNCTION] button then
strike the key [ON/OFF] to turn the metronome on
or off, or strike the other keys in this range to
select a time signature.
21. REVERB Keys
Press and hold the [FUNCTION] button then
strike the key [OFF] in this range to close reverb
effect, or strike the other keys in this range to
select a reverb type.
22. CHORUS Keys
Press and hold the [FUNCTION] button then
strike the key [OFF] in this range to close chorus
effect, or strike the other keys in this range to
select a chorus type.
23. TOUCH Keys
Press and hold the [FUNCTION] button then
strike a key in this range to select a different touch
sensitivity level.
24. EQ Key
Press and hold the [FUNCTION] button then strike a key
in this range to select a EQ type.
25. TRANSPOSE Keys
Press and hold the [FUNCTION] button then
strike this keys to adjust the TRANSPOSE value.
26. TUNE Keys
Press and hold the [FUNCTION] button then
strike this keys to adjust the TUNE value.
27. VOICE DEMO Key
Press and hold the [FUNCTION] button then strike this
key to start/stop the voice demo playing.
28. BEEP Key
Press and hold the [FUNCTION] button then
strike this key to turn the prompt tone on or off.
29. POWER Switch
Turn the power on or off.
30. SOFT Pedal
Step on the soft pedal, all notes played on the keyboard
would have a softer effect.
31. SOSTENUTO Pedal
Step on the sostenuto pedal, the notes played before
you step on would have a sustain effect.
30
31
32
32. SUSTAIN Pedal
Step on the sustain pedal, all notes played on the
keyboard would have a longer sustain.
5
AW_DP70_Manual_G08_130920
Setup
This section contains information about setting up your instrument and preparing to play. Please go through this section
carefully before turning the power on.
Setup Guide
1. Open the package, and check whether the following parts are
available.
1
3
5
11
2
4
6
AW_DP70_Manual_G08_130920
1
Piano body
2
Left leg component
3
Right leg component
4
Foot pedal
5
Rear board
6
Screws M6x18(2pcs)
7
Hand screws (2pcs)
8
Screws M6x40(4pcs)
9
Tapping screw 4x15(8pcs)
10
Screw caps
11
Foot pedal cable
Setup
2. A. Put the foot pedal unit(4) in between the left and right legs
components (2&3), use 4 pieces of screws (8)(2 on each side) to
stable the legs onto the foot pedal unit. (Make sure the direction of
the placement is correct before screwing)
B. Use 8 pieces screw(9), make the Rear board fixed on the Foot pedal
unit(4) and right leg component(3), the left leg component(2) finished
in part A on the previous page.
C. Put the piano body(1) on the top of the assembly finished in part B,
use 2 pieces of hand screws (7) and 2 pieces of screws M6x12 (6)
to stable afterward.
100
95
75
25
5
0
7
AW_DP70_Manual_G08_130920
Setup
D. After the initial set-up, connect pedal cable(11) in the foot pedal unit
to the bottom-panel PEDAL jack.
Power Supply
1. Make sure that the piano is turned off. Before you switch your piano
2.
3.
4.
on or off, turn down the volume of piano and any connected audio
equipments first.
Connect the power cable to the AC outlet.
Press the [POWER] button, the LED display will lights up, that
indicates the piano has power on.
If you are ready to turn off the piano, press the [POWER] switch
again.
Notes:
1. In order to save energy, we have designed the “Automatic
Power Off” function to the piano. With this function, the keyboard
will be powered off automatically when being idle for more than 30
minutes. If you want to temporary disable this function, just press
and hold the first white key on the left from keyboard and turn the
power on simultaneously.
2. When the piano is not in use or during thunderstorm, please
disconnect the power for safety purpose.
8
AW_DP70_Manual_G08_130920
Connections
Connecting a pair of Headphones
A standard pair of stereo headphones can be plugged in here for
private practice or late-night playing.
Jack1: when a pair of headphones is plugged into the jack 1, the
sound can be heard from both headphones and speakers of the
instrument.
Jack2: when a pair of headphones is plugged into the jack 2, the
internal stereo speaker system is automatically shut off. The
sound can only be heard from headphones.
Jack 1
Jack 2
Note:
To avoid the risk of hearing loss when using headphones, please do
not play the piano with a high volume level for a long time.
Connecting an Audio Equipment
The rear-panel AUX OUT jack delivers the output of the instrument for
connection to a keyboard amplifier, stereo sound system, a mixing
console, or tape recorder.
Use an audio cable to plug into the AUX OUT jack located on the rear
board then plug the other end of the cord into AUX IN of the amplifier.
AUX IN
AUX OUT
MIDI IN
MIDI OUT
USB
Note:
To avoid damaging the speakers, please ensure that the volume has
been set to the minimum level before connecting the power and other
devices.
Connecting a MP3/CD Player
AUX IN
AUX OUT
MIDI IN
MIDI OUT
USB
AUX IN
AUX OUT
MIDI IN
MIDI OUT
USB
Connect the audio output of an MP3/CD player or other audio source
to the stereo AUX IN jack on the rear panel.
The input signal is mixed with the piano signal, allowing you to play
along.
Connecting a Computer
Via the USB Connector
This receives and transmits MIDI messages.
Via the MIDI Connectors
MIDI IN Connector
This receives MIDI messages transmitted from an external MIDI device
or a computer.
MIDI OUT Connector
Piano performance data is transmitted from this connector to
connected computer or MIDI device.
AUX IN
AUX OUT
MIDI IN
MIDI OUT
USB
9
AW_DP70_Manual_G08_130920
Adjusting the Master Volume
Rotate the [VOLUME] knob clockwise, the volume increases and vice
versa.
Adjusting the Voice Brilliance
Rotate the [BRILLIANCE] knob clockwise, it sounds brighter; rotate the
[BRILLIANCE] knob anti-clockwise, it sounds gloomier. You can
change the piano brilliance as you wish.
10
AW_DP70_Manual_G08_130920
Listening to the Song
Playing a Song
This piano has 61 songs in all, including 1 user song.
For more information, please refer to the song list in Appendices chapter.
1. Song playing in big circle
Press the [SONG] button to enter into the song playing mode and it
will play all preset songs circularly. The song flag on the LED will be
lightened. The song number will also be displayed on the LED.
2. Single circle
Once you start playing a song by pressing the [PLAY/STOP] button,
it will play the current song repeatedly.
3. Beat tips
When the song is playing, the two-color indicator of [PLAY/STOP]
button will be flashing along with the song rhythm and tempo.
Stop Playing a Song
1. Press the [PLAY/STOP] button to stop the song playing, and the
two-color indicator will stop flashing.
2. When the piano only has preset song (have no recording data and
do not connect to an USB flash disk), press the [SONG] button can
stop playing the current preset song.
3. While the song is stopped, pressing any of the Voice Direct Select
buttons will return to voice mode.
Tips:
The keyboard can play normally and pronounce accurately in the
process of song playing and the status of song stop.
Select a Song
1. Select song source
When a song is playing, press the [SONG] button repeatedly can
switch song source, the song source will be changed among Preset,
User and USB. At this time, the corresponding indicator will be
lightened.
Tips:
Only when the piano connects to an USB flash disk and it is
identified correctly, or when the piano has recording data, you can
press the [SONG] button to switch the song source to USB or User.
If the piano has only preset song, press the [SONG] button will play
all songs circularly, or stop playing the song.
2. Select preset song
Use the [+] or [-] button to select a song. While holding down the
[FUNCTION] button, strike corresponding keys in SONG selection
area to select a song you want.
3. Select USB flash disk song
When the piano has identified an USB flash disk correctly, the
indicator of [SAVE TO USB] button will be lightened, now you can
press the [SONG] or [PLAY/STOP] button to start playing the MIDI
file at the root directory in the USB flash disk, when the USB flash
disk song is playing, you can select the MIDI file with [+] or [-]
button. The default file number is 001.
Notes:
100
95
75
25
5
0
1. Since the system only reads MIDI files at the root directory of a USB
flash disk, you should place the MIDI files which you want to play at
the root directory.
2. This piano only support the MIDI song that less than or equal to 32
tracks. If MIDI file is more than 32 tracks, then in the process of big
loop playing, it will skip this MIDI song automatically, and play the
next song. In the process of single circling, it will stop playing the
song automatically and the LED will display “Err”, at this time, you
can press the [+] or [-] button to select another song.
Practicing with Preset Songs
All the 60 songs could be used for practicing.
In the song mode, while holding down the [FUNCTION] button, strike
the keys [L]/[R] in melody range to select which hand you want to
practice. Strike the key [OFF] in this range to exit the song lesson
mode.
11
Playing Voice
There are 40 panel voices, 128 GM voices and 9 additional drum sets built-in the instrument.
For the 40 panel voices, they could be selected via the voice buttons on the front panel. To use the other voices, you should
send the corresponding MIDI bank/program events to the instrument from MIDI IN or USB interface. For details, please refer to
the Voice List in the appendices.
Select a Voice
The default upper voice is 001.
Press Voice Direct Select button to select the voice you want to play.
In the voice mode, you also can use the [+] or [-] button to select voice.
At this moment, LED lightens the voice flag and displays the current
voice number.
Playing a Voice Demo
In the voice mode, holding down the [FUNCTION] button, then strike
the VOICE DEMO key can start the demo for the selected voice.
Do it again to stop the voice demo playing.
This instrument contains 40 voice demos.
Note:
In voice demo mode,the keyboard will be not available.
Playing Two Voices Simultaneously
1. Open or close dual voice
Press the [DUAL] button can open or close dual voice.
The corresponding indicator of [DUAL] button will be lightened or
off accordingly.
2. Select dual voice
The default dual voice is 007.
While holding down the [DUAL] button, LED displays the current
dual voice number temporarily, at this time press the Voice Direct
Select button to select the dual voice you want and press [+] or
[-] button also can select dual voice. While released [DUAL]
button, it returns to upper voice selection mode.
3. Playing two voice simultaneously
In the dual voice mode, if you have chosen upper voice and dual
voice, two voices will sound simultaneously while playing the
keyboard.
Notes:
1. If the dual indicator was off, you can select dual voice, but the
keyboard does not respond dual voice.
2. If the dual indicator was lightened, not only you can select dual
voice, but also the piano can respond dual voice in real-time.
3. When the lower voice is open, only the right-hand area of the
keyboard has the dual voice.
12
TUNE
VOICE
DEMO
BEEP
Playing voices
Playing a Lower Voice
The lower voice can make the right hand and left hand play different
voices.
1. Open or close lower voice
Press the [SPLIT] button can open or close lower voice. The
corresponding indicator of [SPLIT] button will be lightened or off
accordingly. When the lower voice is open, the keyboard will be
divided into two separate areas, the notes you play with your right
and left hands sound two different voices.
2. Select lower voice
The default lower voice is 007.
While holding down the [SPLIT] button, LED displays the current
lower voice number temporarily, at this time press the Voice Direct
Select button to select the lower voice you want and press [+] or
[-] button also can select lower voice. While released [SPLIT]
button, it returns to upper voice selection mode.
3. Playing lower voice
In the lower voice mode, if you have chosen upper voice and lower
voice, you can play different voices with both hands.
4. Split point
While holding down the [SPLIT] button, strike keyboard to set split
point to any key you want. Release [SPLIT] button to exit split
point setting mode.
Notes:
1. If the lower indicator was off, you can select lower voice, but the
keyboard does not respond lower voice.
2. If the lower indicator was lightened, not only you can select lower
voice, but also the piano can respond lower voice in real-time.
3. The point on the keyboard that separates lower voice and upper
voice is called the “split point”. The split point is set to F#3(34) at
the default setting.
13
AW_DP70_Manual_G08_130920
Song Recording
You can record a user song in the piano. the recorded data will not be lost when you turn off the power.
Prepare Recording
Press the [REC] button, the corresponding indicator is blinking, that
indicates the piano has entered into the recording preparation status, in this
state, you can adjust some parameters.
REC
Start Recording
In the recording preparation status, press [PLAY/STOP] button or play
the keyboard to start recording.
Note:
When the piano already have a user song, and you start recording
again, the original data will be replaced automatically.
Stop Recording
When recording is in process, you can press [REC] button to stop
recording and store the recorded data into memory.
If the capacity was full, it will stop recording automatically, and the
recorded data will be stored into the memory, in the process of storing,
the indicator will be flashing rapidly, LED displays "FUL". when the
storage is completed, the indicator will be off, then play back the user
song which you just have recorded.
REC
Playback the Recorded Song
When recording is in process, you can press the [REC] button to stop
recording and enter into the song playing mode, then the current recorded
song will play automatically in circle. Now the corresponding indicator of
USER is lightened.
In the recording preparation status, if the piano already have a user song,
press the [REC] button again, it will exit recording mode and enter into song
playing mode automatically, then the recorded user song will start to play.
Delete the User Song
Press and hold [+]/[-] button together and turn power on
simultaneously, the user song will be erased.
Save the Recorded Song to a USB Flash Disk
You can save the recorded data to USB flash disk root directory as MIDI file
which can be played on MIDI player.
Save practice
1. When the piano has identified the USB flash disk correctly, the
corresponding indicator of [SAVE TO USB] button will be lightened.
2. When the corresponding indicator of [SAVE TO USB] button is lightened,
press [SAVE TO USB] button, the system will save the recorded song to the
root directory in USB flash disk automatically. When the storing is in
process, the LED will display "---", when storage has completed, this piano
will return to the idle mode.
3. After pressing [SAVE TO USB] button, if the LED displays “Err”, it
indicates that the process of saving data is failed, please try another USB
flash disk or format the current one, then retry from step 1.
Notes:
1. If there is no recorded data in this piano, if you press [SAVE TO USB]
button, “noF” will be displayed on the LED temporarily, that means nothing is
recorded and nothing will be saved.
2. When the LED is displaying “- - -“, it indicates the system is saving data, at
this time, for data safety, please do not unplug the USB flash disk or power
off the piano.
14
AW_DP70_Manual_G08_130920
REC
Scale
This function allows you to experience different scales when you play
certain genres of music that is not composed based on twelve equal
interval.
1. Press [SCALE] button to enter into scale mode and the button
indicator is lightened; the default stretched tuning is 001
Pythagoras.
SCALE
2. There are 6 types of scale available, such as Pythagoras, Major,
Minor, Meantone, Werckmei, and Kirnberg.
3. Press [SCALE] button to exit scale mode and the button indicator
goes off.
4. In the scale status, hold down the [SCALE] button to enter into scale
select status. At this time, you can use [+] or [-] button to select the
scale type, the scale number displayed on LED, and at the same
time, you can play the keys in C7~B7 to select the stretched tuning
root.
Notes:
1. Only when the button indicator was lightened, can you choose the
scale type and SCALE root, and the keyboard will respond scale in
real-time.
2. The scale will exit automatically if the piano enters into song playing
mode.
Twinova
In TWINOVA mode, the keyboard will be divided into two areas with the
same pitch and voice.
1. Open or close TWINOVA
While holding down the [FUNCTION] button, press [DUAL] button to
enter into TWINOVA mode, the corresponding indicator of
TWINOVA is lightened. While holding down the [FUNCTION] button,
press [DUAL] button again to exit TWINOVA, the indicator is off.
Also you can press [SONG] button or [PLAY/STOP] button to exit
TWINOVA and enter into song playing mode. In the TWINOVA
mode, DUAL and SPLIT are unavailable, the default split point is
E3 (32).
2. Voice select
Before enter into the TWINOVA mode , the default voice of righthand and left-hand is the upper voice. You can press Voice Direct
Select button to choose voice, also you can use [+] or [-] button to
choose voice.
The default split point is E3 32
3. Split point setting
In the TWINOVA mode, while holding down the [SPLIT] button,
press keys from C3~C6 to set split point of TWINOVA.
Release [SPLIT] button to exit split point setting mode.
4. Octave setting
In the TWINOVA mode, while holding down the [FUNCTION] button,
press [SPLIT] button to enter into setting octave mode of twinova
temporarily, LED displays the twinova octave value, now you can
press [+] or [-] button to set octave value of twinova. After 3
seconds without operation, it will return to twinova mode
automatically.
Note:
In the song playing mode, the twinova is invalid.
15
AW_DP70_Manual_G08_130920
Touch Sensitivity
This function helps to enrich the expressiveness of music, it can reflect
the force you exert to each note when you play. That means the
greater the force you exerted, the greater the sound from the speakers
when the master volume is unchanged. After you turn off this feature to
play with any intensity to the keyboard, the sound was the same.
While holding down the [FUNCTION] button, strike a key in the touch
selecting area to select different touch response level.
Parameters
OFF
1
2
3
Specification
soft
medium
hard
Digital Effects
Reverb and Chorus Effect
While holding down the [FUNCTION] button, strike the corresponding
keys in REVERB and CHORUS effect setting area to select the voice
effect type.
The default Reverb value is 2 small hall.
The default Chorus value is OFF.
OFF
1
2
3
4
Reverb value
Chorus value
room
small hall
large hall
stadium
light chorus
medium chorus
deep chorus
flanger
EQ Effect
The equalizer is the function of adjusting the sound value of the gain
spectrum, gain setting can bring a different sound field effect.
This instrument contains 3 sets of equalizer for you to choose.
While holding down the [FUNCTION] button, strike the corresponding
keys in EQ setting area to select the EQ type.
Parameters
1
2
3
16
Specification
Standard
Classical
Modern
EQ
1
2
3
Metronome
If you are concerned about can not take on the beat accurately in
practicing or recording mode, use the metronome function, so you can
get the beat-specific tips.
1. Turn on the metronome
While holding down the [FUNCTION] button, strike the key
[ON/OFF] in this range to turn the metronome on or off. While the
metronome function turned on, the corresponding indicator to the
[PLAY/STOP] button will be flashing according with current tempo.
2. Select different time signature
While holding down the [FUNCTION] button, select a demanded
time signature by striking the corresponding keys in metronome
setting area. There are 6 types of time signature: 0, 2, 3, 4, 5, 6.
3. Select metronome voice
While holding down the [FUNCTION] button, strike the key [VOCAL]
to select metronome voice: human voice and normal voice.
Note:
The metronome function is invalid in song playing mode.
Tempo
The tempo range: 30~280.
In the process of adjusting tempo, LED lightens the tempo flag and
displays the current tempo value.
1. While holding down the [FUNCTION] button, strike the
corresponding keys in TEMPO selection area, you can change the
tempo by input number or using tap tempo, or strike the keys [+]/[-]
in this range to change current tempo.
2. While holding down the [FUNCTION] button, the numbers of your
striking the [TAP] key continuously within 3 seconds which match
the current beats of metronome, metronome would be started.
3. While holding down the [FUNCTION] button, strike the keys [+]/[-] in
this range simultaneously to set the tempo value back to the
default 120.
Parameters
TAP
TEMPO+
TEMPO0~9
Specification
Set tempo quickly
Increase tempo by 1 unit
Decrease tempo by 1 unit
Input the value of the specified
tempo (equal to 3 digits)
17
AW_DP70_Manual_G08_130920
Transpose
This function helps you adjust the pitch of the keyboard, and allows
you to play different music without changing the way you performed
before.
While holding down the [FUNCTION] button, strike the keys [+]/[-] in
this range to adjust the transpose value from -12 to 12 semitones.
Note:
Strike the keys [+]/[-] in this range simultaneously to reset the
transpose as default(0 semitone).
Tune
This function is used to adjust the pitch in a very subtle.
While holding down the [FUNCTION] button, strike the keys [+]/[-] in
this range to adjust the tune value from -50 to 50 (stand for -100 to 100
cents).
Note:
Strike the keys [+]/[-] in this range simultaneously to reset the tune as
default(0 cent).
Parameters
TUNE+
TUNE-
18
Specification
Increase tune by 1 unit
Decrease tune by 1 unit
Beep Tone
This function is used to turn on or turn off the prompt tone. The default
setting is on. While holding down the [FUNCTION] button, strike the
key [BEEP] to turn the beep tone on or off.
While the [FUNCTION] button is held down, and you turn on the beep
tone, you can hear a beep sound when you strike an available
functional key
Parameters
OFF
ON
Specification
Close Beep
Open Beep
Troubleshooting
Problem
If a USB flash disk is connected, but can not be
identified, and also the indicator of button [SAVE TO
USB] does not lightened.
Possible Cause and Solution
1. Check the interface between USB flash disk and the
piano, have it been connected reliably.
2. Please make sure the USB flash disk works, you
can reformat it on computer and try again, or replace
the USB flash disk.
The speakers produce a “pop” sound when the power
is turned ON or OFF.
This is normal and is no cause for alarm.
No sound when the keyboard is played.
Make sure the voice volume are set to an appropriate
level.
When using a mobile phone, noise is produced.
Using a mobile phone in close proximity to the
instrument may produce interference. To prevent this,
turn off the mobile phone or use it far away from the
instrument.
19
AW_DP70_Manual_G08_130920
Specifications
Keyboard
88 Hammer-Action Keys
Polyphony
128
Voice
40
GM Voice
128 Voices and 9 Drum Sets
Voice Demo
40
Song
60
Tempo
30-280
Control Button
Function, Song, Play/Stop, Rec, Voice Direct Select, Save to USB, +/-, Dual, Lower, Power On/Off switch, Volume, Brilliance,
SCALE.
Control Key
Tempo Tap, Tempo +/-, Tempo select keys, Metronome Vocal, Metronome On/Off, Metronome select keys, Reverb On/Off,
Reverb Type Select Keys, Chorus On/Off, Chorus Type Select Keys, Touch On/Off, Touch Select Keys, Transpose, Tune, Beep,
Melody off, Melody +/-, Song+/-, Song select keys EQ Type Select Keys, Voice Demo.
Connectors
Headphones (2 standard. ¼” phone), AUX IN, AUX OUT, USB, MIDI IN, MIDI OUT, Pedals (Sustain, Soft, Sostenuto)
Power Supply
AC 220~240V, 50Hz, 60W
Speaker
8Ω 20W X 2
8Ω 25W X 2
Dimensions
1398(W) x 514(D) x 908(H)mm
Weight
58KG
20
AW_DP70_Manual_G08_130920
Voice List
Panel Voice List
No.
1
2
3
4
5
6
7
8
9
10
11
12
13
14
15
16
17
18
19
20
21
22
23
24
25
26
27
28
29
30
31
32
33
34
35
36
37
38
39
40
Pro.
0
1
4
5
6
6
7
10
11
12
16
17
19
19
18
18
21
22
24
25
27
40
42
48
49
50
51
52
53
56
61
64
66
71
68
73
75
32
33
36
Bank
100
100
1
100
100
1
1
1
100
1
1
1
100
1
1
100
1
1
1
1
1
1
1
100
100
1
1
1
1
100
1
100
1
1
100
1
1
1
1
1
English Name
Grand Piano
Grand Piano 2
Ele. Piano
Ele. Piano 2
Harpsichord
Harpsichord (with key off)
Clavichord
Music Box
Vibraphone
Marimba
Drawbar Organ
Percussive Organ
Church Organ
Church Organ 2
Reed Organ
Rock Organ
Accordion
Harmonica
Acoustic Guitar (nylon)
Acoustic Guitar (steel)
Electric Guitar (clean)
Violin
Cello
Stereo Strings
Stereo Strings 2
Synth Strings
Synth Strings 2
Choir Aahs
Voice Oohs
Sweet Trumpet
Brass
Soprano Sax
Tenor Sax
Clarinet
Sweet Oboe
Sweet Flute
Pan Flute
Acoustic Bass
Ele. Bass
Slap Bass
GM Voice List
No. Pro.
English Name
Bank
Piano
1
Acoustic Grand Piano
0
0
2
Bright Acoustic Piano
1
0
3
Electric Grand Piano
2
0
4
Honky-tonk Piano
3
0
5
Electric Piano 1
4
0
6
Electric Piano 2
5
0
7
Harpsichord
6
0
8
Clavi
7
0
Chromatic Percussion
9
Celesta
8
0
10
Glockenspiel
9
0
11
Music Box
10
0
12
Vibraphone
11
0
13
Marimba
12
0
14
Xylophone
13
0
15
Tubular Bells
14
0
16
Dulcimer
15
0
Organ
17
Drawbar Organ
16
0
18
Percussive Organ
17
0
19
Rock Organ
18
0
20
Church Organ
19
0
21
Reed Organ
20
0
22
Accordion
21
0
23
Harmonica
22
0
24
Tango Accordion
23
0
Guitar
25
Acoustic Guitar (nylon)
24
0
26
Acoustic Guitar (steel)
25
0
27
Electric Guitar (jazz)
26
0
28
Electric Guitar (clean)
27
0
29
Electric Guitar (muted)
28
0
30
Overdriven Guitar
29
0
31
Distortion Guitar
30
0
32
Guitar Harmonics
31
0
Bass
Acoustic Bass
33
32
0
34
Electric Bass (finger)
33
0
Electric Bass (pick)
35
34
0
36
Fretless Bass
35
0
Slap Bass 1
37
36
0
Slap Bass 2
38
37
0
39
Synth Bass 1
38
0
40
Synth Bass 2
39
0
Strings & Orchestral Instruments
Violin
41
40
0
Viola
42
41
0
Cello
43
42
0
Contrabass
44
43
0
Tremolo Strings
45
44
0
Pizzicato Strings
46
45
0
Orchestral Harp
47
46
0
21
Voice List
48
47
Ensemble
49
48
50
49
51
50
52
51
53
52
54
53
55
54
56
55
Brass
57
56
58
57
59
58
60
59
61
60
62
61
63
62
64
63
Reed
65
64
66
65
67
66
68
67
69
68
70
69
71
70
72
71
Pipe
73
72
74
73
75
74
76
75
77
76
78
77
79
78
80
79
Synth Lead
81
80
81
82
83
82
83
84
84
85
85
86
87
86
88
87
Synth Pad
88
89
89
90
90
91
91
92
92
93
93
94
94
95
95
96
22
0
Timpani
0
0
0
0
0
0
0
0
String Ensembles 1
String Ensembles 2
Synth Strings 1
Synth Strings 2
Choir Aahs
Voice Oohs
Synth Voice
Orchestra Hit
0
0
0
0
0
0
0
0
Trumpet
Trombone
Tuba
Muted Trumpet
French Horn
Brass Section
Synth Brass 1
Synth Brass 2
0
0
0
0
0
0
0
0
Soprano Sax
Alto Sax
Tenor Sax
Baritone Sax
Oboe
English Horn
Bassoon
Clarinet
0
0
0
0
0
0
0
0
Piccolo
Flute
Recorder
Pan Flute
Blown Bottle
Shakuhachi
Whistle
Ocarina
0
0
0
0
0
0
0
0
Lead 1 (square)
Lead 2 (sawtooth)
Lead 3 (calliope)
Lead 4 (chiff)
Lead 5 (charang)
Lead 6 (voice)
Lead 7 (fifths)
Lead 8 (bass + lead)
0
0
0
0
0
0
0
0
Pad 1 (new age)
Pad 2 (warm)
Pad 3 (polysynth)
Pad 4 (choir)
Pad 5 (bowed)
Pad 6 (metallic)
Pad 7 (halo)
Pad 8 (sweep)
Synth SFX
97
96
0
98
97
0
99
98
0
100
99
0
101
100 0
102
101 0
103
102 0
104
103 0
Ethnic Misc.
105
104 0
106
105 0
107
106 0
108
107 0
109
108 0
110
109 0
111
110 0
112
111 0
Percussive
113
112 0
114
113 0
115
114 0
116
115 0
117
116 0
118
117 0
119
118 0
120
119 0
SFX
121
120 0
122
121 0
123
122 0
124
123 0
125
124 0
126
125 0
127
126 0
128
127 0
Drums
129
0
N\A
130
8
N\A
131
16
N\A
132
24
N\A
133
25
N\A
134
32
N\A
135
40
N\A
136
48
N\A
137
56
N\A
FX 1 (rain)
FX 2 (soundtrack)
FX 3 (crystal)
FX 4 (atmosphere)
FX 5 (brightness)
FX 6 (goblins)
FX 7 (echoes)
FX 8 (sci-fi)
Sitar
Banjo
Shamisen
Koto
Kalimba
Bag Pipe
Fiddle
Shanai
Tinkle Bell
Agogo
Steel Drums
Woodblock
Taiko Drum
Melodic Tom
Synth Drum
Reverse Cymbal
Guitar Fret Noise
Breath Noise
Seashore
Bird Tweet
Telephone Ring
Helicopter
Applause
Gunshot
Standard Set
Room Set
Power Set
Electronic Set
Analog Set
Jazz Set
Brush Set
Orchestra Set
SFX Set
Song List
NO. English Name
Waltz in A Flat Op.39, No.15
1
31
Mazurka
32
Minuet 1
2
The Happy Farmer
33
Minuet 2
3
Etude
34
Minuet 3
4
Dance Of The Four Swans From “Swan Lake”
35
Minuet In G
5
Carmen Suite No.2 Habanera
36
Neapolitan Song
6
A Little Polish Dance
37
Prelude
7
Jesus Saviour Pilot Me
38
Salut D' Amour
8
Old Macdonald Had A Farm
39
Pizzicato Polka
9
O Sole Mio
40
Piano Sonata No.11 in A major K331 I. Andante grazioso
10
Wedding March From “Lohengrin”
41
Songs Without Words Op30 No .6 F sharp minor Venetian
11
2-Part Invention No.13 In A Minor BWV 784
12
Turkish March
42
Duke Aria From “The Rigoletto”
13
Italian Polka
43
Burgmuller Op.100 No.15 - Ballade
14
Musette
44
Spinning Song
15
Bourree
45
In The Theatre
16
To A Wild Rose
46
Alfredo and Violetta Column Tower Duet
17
Away In A Manger
47
Come Back To Sorrento
18
Fur Elise
48
Piano Sonatina In F Major
19
Marriage Of Figaro
49
Tchaikovsky Waltz
20
Angels We Have Heard On High
50
Military March No.1 In D Major
21
Waltz
51
Als Die Alte Mutter Mich Noch lehrte Singen
22
America The Beautiful
52
Etude on Leger Lines 1
23
Did You Ever See A Lassie
53
Etude on Leger Lines 2
24
Arabesque
54
At the Ball
25
Old France
55
Dancing Raindrops
26
Santa Claus Is Coming To Town
56
From a Story Book
27
Music Box Dancer
57
Comin' 'Round the Mountain
28
Symphony No.9 In E Minor Large From “The New World”
58
Song of the Brook
29
Larghetto
59
Puck
30
French Suites
60
Cotton-pickin' Fingers
Gondola Song
23
MIDI Implementation List
DP70_G08
AW_DP70_Manual_G08_130920
2013�
�
9�
�
22�
�
�20�2��55


![Overture 2 Owner`s Manual [US]](http://vs1.manualzilla.com/store/data/005690862_1-0f7bb48baaf3473aa086657512069e12-150x150.png)