1
t
il
T
Ro D,UCf rcn, ;'f
,1r",r, 1.'. :r.'f i,.;:,.i-
r"
cOtiiTENT$.'OF .RETATI.BOX
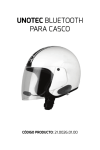
Thank you for having chosen the V1 or V2 Bluetooth
headset for bikers. This Manual will help you operate
the headset ,but you should first familiarize yourself
*.ith the Bluetooth functionality of your cellular phone
and/or GPS device before using the headset.
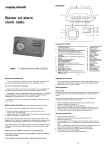
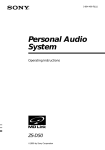
Headset
Volume Up
Charging
Jack
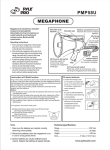
The retail box of the V1 or V2 contains one headset unit.
When paired with another Vf or V2,the headsets can be
used as an intercom at a rang of up to 1 00m(Vl ) or
Volume
--Power On,Power Off,
--Intercom call
500m(V2).
Vl or V2 offers the following uses:
The
1. Bluetooth headset for mobile phone communication,
supporting headset*and Handsfree + profiles(10m range)
2.
Down
CTRL-Control B
MC Multi- Connection
-
--Radio On/Off
--Answer/Call End/
Last Number Redialing
Helmet clamp
Bike-to-Bike lntercom Communication with
another V1 or V2 unit(up to I 00m or 500m range)in Full
Duplext +mode purchased separately]
I
3.
Turn-by-Turn GPS Navigation instructions
Left Spe.ker
and
Streaming Audio from compatible Bluetooth devices
4. FM Radio - built in FM radio receiver
5. Bluetooth stereo - enjoy stereo music from yourA2DP
enabled device (like cell phone ).
6. MP3 jack- As the speakers ofyour MP3/GPS,just connect to
your MP3 or GPS with audio cable.
The V1 or V2 can establish an audio connection with one Bluetooth
device at a time. Please read the section "Using the Headset" to see
how you can switch the audio connection betrveen the paired devices.
*Mobile phones that do not support the Bluetooth handsfree profile
may prevent you from using the Redial and Call Reject features.
++full duplex calls allow you to speak and hear the other party speak
simultaneously
\ote:The V0 device do not support intercom communication.
NOTE:
j
The use of two speakers may be illegal in certain
urisdictions.
Please check the local regulations and act accordingly.
I
i,
-2-
s ET', U,F, AN
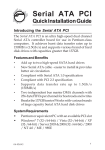
WallCharger
D'Co'H
lcu*Efio*
AIlen Wrench
Ridor-ro:Pa,ss.eng6l
Fuil Duplex
Inlercam
Connectian
I
i-
,i
-._
r*'
V.I arV2
Il€adse,
MP3 Audio Cable
Microphone Sponges
User Guide
erate rain or snow conditions. However,the headset is not waterproof and should not be used under severe weather conditions.
The cover tongue protecting the Charging Jack should be kept tightly
closed at all times to prevent moisture from entering the device.
STEPl
SET UP FOR BIKE-TO-BIKE INTERCOM: PAIRING
The V1 or V2 can be paired with up to two other headsets for intercom
communication.
Make sure that the headset is fully charged for at least five hours
before initial use.
' I .Connect the wall charger to the headset's Charging
Jack(located between the two Volume Buttons).
2.While charging ,the Red Light turns on. When charging is
complete, the Red Light will turn off.
3
Pairing is a one time process. Once the headsets are paired
during this Setup Procedure, they will remain paired and
automatically recognize each other whenever they are within
range.
NOTE:
The
Vl orV2
Buddy headerset at
a
allows youto speake viaintercomto one
time.
4-
BUDDY PAIRIG(requires two
Vl
or V2 headsets)
Ifeitherheadset is turned OFF, press andhold the CTRL
Button until the Red/Blue light flashes alternately.
2. Short press CTRL button, it will search the other one which in
pairing state and try to pair with it.
3. Within a few seconds, both headsets will turn off Red tight,
and then begin flashing slowly in Blue, thus pairing is
finished.
4. To pair with another headset, repeat above steps.
1.
NOTE: If the Pairing process is not completed within one minute the
headset
4.After a few seconds the phone will list the V1(V2) as a discovered device. Select it and follow your phone's instructions ro
accept the pairing.
5.When prompted enter 0000 (four zeros) as your PIN or
passkey.
6.Your phone will confirm that pairing has succeeded and the
headset will begin flashing slowly in Blue.
With some mobile phone, you may need to tap the CTRL button to connect the headset to the phone after pairing is complete. The V1 (V2)
headset will automatically connect to the last phone connected to the
headset.
will return to Standby mode.
STEP 3:
STEP 2
SET UP FOR BLUETOOTH GPS DEVICE:PAIRING
SET UP FOR MOBILE PHONE CALLS: PAIRING
Ifyou have a Bluetooth enabled mobile phone and would like to make
and receive phone calls using the Vl (V2), you must first pair your
headset to the mobile phone.
Pairing is a once time process. Once the headset is paired to a specific
mobile phone during this Setup Procedure, they wilI remain paired
and automatically recognize each other whenever they are within
range. Ifthe connection between the phone and headset is lost, tap the
CTRL button to reconnect the devices.
TO PAtR THE V1(V2) TO A BLUETOOTH MOBTLE
PHONE
l. Tune on your phone
and make sure its Bluetooth function is
activated.
2.With the V1(V2) headset turned off, press and hold the CTRL
' Bluetooth for at least six seconds until the Red and Blue Light
begin rapidly alternating.
3.Search for Bluetooth devices on your phone by following the
phone's instructions. Please consult yourphone's User Manual
for more information.
Ifyou have a Bluetooth enabled
GPS device and would like to transmit
navigation instructions and sounds from the GPS device through the
headset's speakers, you must first pair your headset to the GPS device .
N OTE: Not all Btuetooth enabled GPS devices allow connecrions to
Bluetooth headsets like the V1(V2).Please consult your GPS device's
User Manual for more information.
TO PArR THE V1(V2) TO A BLUETOOTH GpS
DEVICE:
l. Turn on your GPS device.
2. With the Vl(V2) headset turned off, press and hold the CTRL
Button for at least six seconds until the Blue light begin rapidly alternating.
3. Search for Bluetooth headsets on your GPS device by following the device's instructions. Please consult your GPS device's
4.
User Manual for more information.
Ifyour GPS device prompts for a PIN or Passkey enter
0000(four zeros).
5.Your GPS device will confirm that pairing has succeeded. The
headset will begin flashing slowly in Blue.
6.If you wish to use a Bluetooth mobile phone to make and
receive calls through the headset, you must now pair your
mobile phone to your GPS device by following your GPS
and/or mobile phone's instructions.
Glue plate method
You have the option to glue the Helmet Clamp onto your helmet, when
the above standard method cannot be used, or in case you prefer to
secure the Helmet Clamp with adhesive glue. This option has been
successfully used for a range ofhigh end helmets.
1
MOUNTING THE HEADSETON THE HELMET
x
ATTACHING THE CLAMP TO THE HELMET
The microphone/speaker clamp must be mounted onto the left parts
the helmet. Once mounted ,the headset unit can be attached or detached from the microphone/speaker clamp at any time.
There are two methods that can be used in order to attach the clamp
onto the helmet.
Standard method :Recommended for most helmet typcs.
Glue plate method: Recommended for
helmets to which the standard method
cannot be applied ,using the Glue Plate
included in the box.
Standard method
Allen Wrench to loosen
the two screws on the Back Plate.
I . Use the enclosed
2. Slide the Back Plate between the internal
of
NOTE: While we have no reason to believe thatthe gluing option
might negatively affect any helmet, we do not assume any
responsibility to that affect, irrespective ofits nature and
circumstances. The Glue Plate is offered as a free option that you may
choose to use at your own risk and subject to renouncement ofany
future claims.
Caution:
This process can be done only once!
1. Use the
[g
2. Determine the location on the helmet where the Helmet Clamp
must be attached.
3.
Adjust the Helmet Clamp's location on the Helmet so that the
microphone is Iocated opposite the center of your mouth. You
may need to reposition the Clamp repeatedly until you identify
the best spot. The microphone must be positioned vertically and
not horizontally (Be sure to clean the selected area prior to the
gluing process).
pa.
4. Peel the
ternal shell ofthe helmet.
Adjust the clamp's location so
that the microphone is located
opposite the center of your mouth,
- and then tighten the screws. You
may need to reposition the Clamp
enclosedAllen Wrench to remove both Allen screws
and release the Helmet Clamp's back plate.
3.
1
)
foil cover from the Glue Plates'adhesive pad.
5. Place the Glue Plate into position according to #3.Press
1 5 seconds on all 3 parts of the Glue Plate.
6. The adhesive pad bonds to full strength over the next 24 hours.
Therefore it is recommended to not use the headset during this
24 hour period.
7. Fasten the Clamp to the Glue Plate using the
were previously removed.
-7
-
firmly
8
Allen screws that
ATTACH!fi.eANE,REflIfiVI
H
EAtr
N
G.THE.
ET':iF&:Off .tHfifiIE:LfiJ[ET
C
.
LAM P
ATTAGHING:
u,8 .HGITH,E ngnO,'Srr
GENERAL USAGE
GENERAL FUNCTIONS
sliding panel until
Slide the headset downwards along the
a clicking sound
Indicates that the headset is locked in place
DESIRED RESULT: REQUIRED ACTION
REMOVING:
TUrn on the
headset
Your headset can be removed for
charging and str.rrage by pressing
your finger gently against the tab
Press CTRL Button steadily for at least
three seconds
Turn off the
headset
Press CTRL Button steadily for at least
six seconds
the other hand.
lncrease the
volume
We recommend that you remove the
headset from the helmet when not in use.
Decrease the
and sliding the headset up
FEA#iERS]A
with
H
"
in
Button
AUDIO SOURCES AND PRIORITIES
The different Audio Sources that are connected to the V1 (V2) are
prioritized
Velcro pads.
Lowest
9-
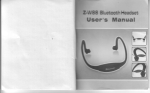
Dress the Volume Down
wind noise.
Attach the speakers to the velcro inside
your helmet opposite your ears (short
speaker cord for left ear [A] and the
long speaker cord [B] for the right ear).
You may wantto use the supplied
Using two speakers inside the helmet may
be prohibited in certainjurisdictions. If
this is the case,You should tuck away the
long corded speaker underneath the
helmet padding as follows: Lead the
speaker [B] alongside the rim ofthe
padding to the right side and then back to
the left side,near speaker [A] . Then place
the speaker [B] underneath the padding.
Lons
,;
The microphone must be positioned vertically, not horizontally,
front of the center of the moulh.
Long press the Volume Up Button
Volume will automatically increase according to the
U,'ntlCnOP H O'NE
r'
i'r'
FoSIT{iO$t.1616 '''"' :'" 'r" i" r 'i
S
volume
:
as
follows:
Highest l.MobilephoneAudio
(Incomingioutgoingcalls)
2. Buddy Audio
3. GPS device
4. FMRadio
A high priority Audio Source
Audio Source.
will always interrupt any lower priority
- 10 -
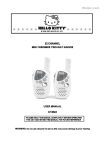
USING THE ll'ITEReOM
Making lntercom Galls
To
l
nltnffiruc eNo ngcEtvlllc reoerl-e
PHONE CALLS
start a Buddy lntercom callwith the last Buddy while the
headset is on Standby you can Single tap the CTRL Button, A
Buddy Intercom call will be established. To end the Buddy Intercom
cal[, single tap the CTRL Button again.
To start a Buddy lntercom call with the another Buddy while
the headset is on Standby:
Press CTRL button steadily for 2 seconds,
A Buddy Intercom call will be established.
To end the Buddy Intercom call, single
tap the CTRL Button again.
CTRL Button
Recon necti n g the I ntercom : rf the vl (v2) and its
Intercom Buddy headset go out ofrange and disconnect from each
other, You can manually reconnect at any time by short tapping the
CTRL Button.
Short press the MC Button
Rejectacall
Terminate a call
Redial
Short press the MC Button.
Vo
ice
d ia
I
LongpresstheMCButton for2seconds
Press and hold the MC Button for two seconds.
Double p ress Vol+ Button
. (This function used onty
the user mobile phone supports the voice dial function)
N OTE: If your Bluetooth mobile phone is paired to a Bluetooth
GPS device, not directly to the Vl (V2), some ofthe above phone
functions may not be compatible.When the headset is on an active
phone call, any Buddy Intercom call request will be rejected
automatically.Once the phone call audio link drops, you can initiate
and accept Buddy Intercom calls.
TTS ( Text To Speech ) FUNCTION
Receiving Intercom calls
Ifyou
PHONE FUNCTIONS
Answer a call
are not speaking with any one, once the other party tries to
a Buddy Intercom call, the call will begin immediately.
initiate
Vl
headset has TTS function , it can speak the number ofincoming
caller in English. This function is the default, you can close it by
pressing VOL+ and VOL- button together for 3 seconds.
To Resume Factory Default Mode
Press and hold "VOL+" and "VOL-" key together for 3 seconds to
resume factory default mode, all bluetooth device will be cancelled
BLUETOOTH AV DEVICE OPERATION
1
.
IfAV not connected, short
press
MC Button to connect last
Bluetooth AV device.
MC Button to play or pause playback.
andholdMC Button for 1.5S to stopplayback.
2. Short press
3. Press
4. Short press
backward.
-11-
"VOL+"
or
"VOL-" button to skip forward or skip
-12-
Turning the FM Radio Off
None
Headset is off
flashes
short flash every 3 seconds
long flash every 3 seconds
Alternating Red/Blue
Pairing mode
Blue
Blue
connecting unavailable
connecting available
Red flash every 3
seconds
Battery is low
Solidred
Your headset is equipped with
Headset is beinq charqed
a
While the radio is turned on, double press MC button to turn the Radio
off.
Searching for a new FM Radio Station
While the Radio is on, short press Volume Up or Volume.Down Button
to search the next station on your headset.
Pressing Volume Up will search upwards(higher frequency).Pressing
Volume Down will search downwards(lower frequency).Once a
station is found, searching stops and you can hear the station.
high-quality FM Radio receiver.
Vl (V2) enables you to listen to FM Radio while you are not
receiving audio from another audio source.
The
While listening to the radio, you do not have to worry about missing
any calls, as the headset automatically mutes the FM Radio and
switches to Bluetooth headset operation when an incoming call is
received, or when you decide to initiate a call. When the conversation
is over, the headset automatically tunes back to the FM Radio.
Turning the FM Radio On
While no call is on the headset (either mobile phone cal I or Intercom
call), doublepress MC Buttonon yourheadset' to turn onthe radio.
The radio tunes in to the last radio station you were listening to. With
some phones you should wait a few seconds after ending a call before
turning on the Radio.
13
lollows
l. Power
on the headset to have
it on Standby mode , flashing slowly
in Blue.
2. Connect one side ofthe Mp3 cable to
your Mp3 player/audio device's jack
and the other side to the Helmet
Clamp's jack.
3. Operate the Mp3 Player/audio
device by using its
Buttons (FF/REW/PLAY/PAUSE).
'14 -