1
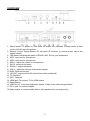
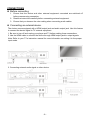
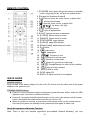
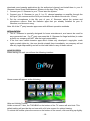
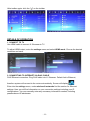
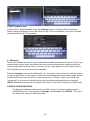
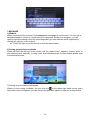
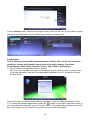
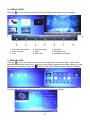
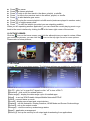
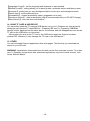
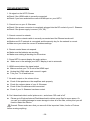
ANDROID TV BOX Instruction Manual IP – 2020 Thank you for your purchase of this product. Please read this manual carefully before using this product to ensure proper use. TABLE OF CONTENTS SAFETY PRECAUTION 3 PRODUCT FEATURES 6 PACKAGE CONTENTS 6 OVERVIEW 7 CONNECTIONS 8 REMOTE CONTROL 9 QUICK GUIDE DETAILS OF OPERATION 9 11 Connect to TV 11 Connect to internet via cable 11 Wi-Fi connection 12 PPPoE configuration 12 Bluetooth 12 Portable hotspot 13 Browser 14 Applications 15 File management 16 Video player 17 Picture viewer 18 Settings 18 Using TF card &USB device 19 Other 19 TROUBLESHOOTING 20 SPECIFICATIONS 21 INSTALLATION CHART 22 -2- Thank you for choosing our X- Streamer. Before you begin to use this device, please read this manual thoroughly and keep it available for future reference. This manual will present you with the exciting features provided by our Entertainment System, which allow you to enjoy an unbelievably amazing visual experience. SAFETY PRECAUTION • Keep away from water, moisture, and dusty areas. • Ambient Temperature is 0-40°C. Never store in extreme heat or cold. • Avoid dropping the unit or exposing it to strong impacts. • Do not try to open the case without technical support. • Only use attachments/accessories specified by the manufacturer. • Do not place liquid filled objects on apparatus. • The ventilation should not be impeded with items such as newspaper, table-cloths, curtains etc. • No flame sources should be placed on or near the apparatus. • Battery should not be exposed to excessive heat Caution: There is danger of explosion if battery is incorrectly replaced. Replace only with an equivalent type. Warning: To reduce the risk of fire or electric shock, do not expose to rain, moisture, dripping or splashing liquids. 1. READ INSTRUCTIONS All the safety and operating instructions should be read before the unit is operated. 2. RETAIN INSTRUCTIONS The safety and operating instructions should be retained for future reference. 3. HEED WARNINGS All warnings on the unit and in the operating instructions should be adhered to. 4. FOLLOW INSTRUCTIONS -3- All operating and use instructions should be followed. 5. CLEANING Unplug this unit from the wall outlet before cleaning. Do not use liquid cleaners or aerosol cleaners. Use a damp cloth for cleaning the exterior cabinet only. 6. ATTACHMENTS The manufacturer of this unit does not recommend any attachments, as they may cause hazards. 7. WATER AND MOISTURE Do not use this unit near water. For example, near a bathtub, washbowl, kitchen sink, laundry tub, in a wet basement, or near a swimming pool. 8. VENTILATION Slots and openings in the cabinet back or bottom are provided for ventilation to ensure reliable operation of the unit, and to protect it from overheating. These openings must not be blocked or covered. The openings should never be blocked by placing the unit on a bed, sofa, rug, or other similar surface. This unit should never be placed near or over a heat source. This unit should not be placed in a built-in installation such as a bookcase or rack unless proper ventilation is provided. 9. POWER SOURCE This unit should be operated only from the type of power source indicated on the rating plate. If you are not sure of the type of power supply to your home, consult your appliance dealer or local power company. For units intended to operate from battery power, or other sources, refer to the respective pages in this Owner's Manual for their operating instructions. 10. POWER-CORD PROTECTION Power-supply cords should be routed so that they are not likely to be walked on or pinched by items placed upon or against them, paying particular attention to cords at plugs, convenience receptacles, and the point where they exit from the appliance. 11. POWER LINES An outside antenna system should not be located in the vicinity of overhead power lines or other electric light or power circuits, or where it can fall onto or against such power lines or circuits. When installing an outside antenna system, extreme care should be taken to keep from touching such power lines or circuits, as contact with them might be fatal. 12. OVERLOADING Do not overload wall outlets or extension cords, as this can result in a risk of fire or electric shock. 13. OBJECT AND LIQUID ENTRY Do not push objects through any openings in this unit, as they may touch dangerous voltage points or short out parts that could result in fire or electric shock. Never spill or spray any type of liquid into the unit. -4- 14. SERVICING Do not attempt to service this unit yourself as opening or removing covers may expose you to dangerous voltage or other hazards. Refer all servicing to qualified service personnel. 15. DAMAGE REQUIRING SERVICE Unplug this unit from the wall outlet and refer servicing to qualified service personnel under the following conditions: A. When the power-supply cord or plug is damaged. B. If liquid has been spilled, or objects have fallen into the unit. C. If the unit has been exposed to water. D. If the unit does not operate normally by following the operating instructions. Adjust only those controls that are covered by the operating instructions, as an improper adjustment of other controls may result in damage and will often require extensive work by a qualified technician to restore the unit to its normal operation. E. If the unit has been dropped or the cabinet has been damaged. F. When the unit exhibits a distinct change in performance. 16. REPLACEMENT PARTS When replacement parts are required, be sure the service technician uses replacement parts specified by the manufacturer or those that have the same characteristics as the original part. Unauthorized substitutions may result in fire, electric shock or other hazards. 17. SAFETY CHECK Upon completion of any service or repairs to this unit, ask the service technician to perform safety checks to determine that the unit is in proper operating condition. 18. HEAT The product should be situated away from heat sources such as radiators, heat registers, stoves, or other products (including amplifiers) that produce heat. -5- PRODUCT FEATURES X- Streamer is an internet connected television platform, combining TV, PC, internet, and applications. Furthermore, it comes with a karaoke function where the user can sing at home streaming music directly from the device. X- Streamer brings a new experience into your life. Android 4.1 OS: Surf and search the entire web as well as a great variety of Android applications. Android OS is flexible and intuitive, which allows the users to install and uninstall the applications to meet their individual needs. Online entertainment: enjoy online music, pictures, games and more. Users can watch high-definition videos, and listen to the newest and hottest music online. Supports both Wi-Fi and RJ45 network port. HDMI output (supports up to 1080p) Easy to use: X- Streamer can be controlled by remote control as well as wired or wireless keyboard and mouse. Video playback: HD theatre support FLV, 3GP, MOV, MP4,MKV,H.264 formats. Music playback: support OGG, MP2, M4A, MID, MP3, WAV, AMR, WMA formats. High resolution pictures: X- Streamer supports BMP, JPG, PNG, GIF formats and brings you stunningly clear images. Expandable memory: Supports TF cards for increased storage space. PACKAGE CONTENTS X- Streamer 12V Power adaptor AV Cable -6- Remote control HDMI cable 2 Microphones OVERVIEW 1. Power Button: To power on, hold down the button for 5 seconds. In sleep mode, a short (quick) click will start the system. 2. Remote Control Signal Sensor: Do not block IR receiver, to ensure proper use of the remote control. 3. LED panel: indicating the status of ECHO+,MIC, EQ for your adjustment. 4. MIC1: input port for microphone 5. MIC2: input port for microphone 6. MIC+/-: adjust the volume of microphones 7. AUX 2: input port for audio 8. ECHO+/-: adjust the reverb 9. VOL+/-: adjust the volume of the whole system 10. RJ45: External Lan port 11. L/R OUT: output port for Mic and device audio (combined) 12. TF Card Slot 13. Wi-Fi Antenna 14. HDMI port: To connect TV for HDMI output 15. Reset Button 16. USB Port (2): to connect keyboard, mouse, U-disk or the other storage device. 17. DC-in jack: to connect adaptor 18. Audio output: to connect audio device, like speakers (for mic output only) -7- CONNECTIONS Before connecting 1. Ensure that the device and other external equipment connected are switched off before commencing connection. 2. Read the instructions carefully before connecting external equipment. 3. Ensure that you observe the color coding when connecting audio cables. Connecting an external device. The device comes equipped with a HDMI output jack and audio output jack. Use this feature to connect the device signal to TV external equipment. 1. Be sure to turn off and unplug your player and TV before making these connections. 2. Use the HDMI cable to connect the device through HDMI output jack to output signals. Note: Refer to your TV’s instruction manual for more information on setting it to the proper input mode. 3. Connecting external audio signal or other device. -8- REMOTE CONTROL 1.【POWER】Short press will put the system in standby mode, long press (hold), will shut the system down. 2.【Keypad for Numbers &Letters】 3.【 】Play or pause the video, music, or photo files. 4.【 】access web browser 5.【 】Stop the video, music, or photo files 6.【 \ \ \ 】up, down, left, right 7.【OK】confirm the move 8.【 】open all applications 9.【VOL】Volume increase or decrease 10.【VIDEO】Shortcut key for video 11.【MUSIC】Shortcut key for audio 12.【EXPLORER】open explorer 13.【APK.M】open APK Installer 14.【Bass/Treble】adjust bass and treble 15.【 】Mute 16.【 】main menu 17. 【 】backspace 18. 【 / 】Previous or next 19. 【 】Shortcut for set up menu 20. 【 】Switch to mouse mode 21. 【 】Shortcut to go back to main page 22. 【 / 】Enlarge/Narrow for video, photo, website 23. 【 】Return to last interface 24. 【AUX】Shift to audio 25.【EQ】adjust EQ 26.【MIC+/-】adjust volume of microphone QUICK GUIDE POWER SUPPLY Plug one end of the power adaptor into the unit’s DC socket, and the other end of the power adaptor to the power source. TURNING ON/OFF device Power on: Once the power supply is connected, press the power button; when the LED lights turn from red to blue, release the button. Power off: long press (hold) the power button on the unit or the remote control’s power button, disconnect the power source and the unit will turn off. When the system is running, a quick press of the power button on the remote control will enter the system into standby mode; press the button again to wake it up. About the operation of Karaoke Function Note: There is only one karaoke application pre-installed (Android Karaoke); you may -9- download more karaoke applications by the authorized channel and install them in your XStreamer Home Smart Entertainment System via the App “Play” Store. 1. Connect your X- Streamer to your TV and start the system. 2. Connect your X- Streamer to your 2.1 or 5.1 channel speakers or amplifier through the AUX port. (We recommend the AUX port located on the back of the device- 3.5mm) 3. Put the microphones in the Mic port of your X- Streamer, adjust the system and microphone volume. Start the Karaoke apps that you already installed on your XStreamer, and choose a song. Note: All of the 3rd party karaoke apps come with different operation methods. DECLARATION 1. This X- Streamer is specially designed for home entertainment, and cannot be used for any commercial use. If a 3rd party user uses this X- Streamer for illegal activities (to make a profit) our company will NOT take the legal responsibility. 2. If the end user installs karaoke apps which violate any developer’s copyrights, audio rights, portrait rights etc., the user should uninstall them immediately; our company will not take any legal responsibility and will not be held liable for any of these actions. HOME SCREEN When starting the unit, you will see the following interface Home screen will appear as the following: Hide and Unhide Toolbar: Unlike a normal TV box, the TOOLBAR on the bottom of the TV screen will auto hide. This default setting will provide the end user with a full size screen for optimal viewing. To unhide the toolbar: place the mouse on the bottom of the screen, click and drag up slightly. - 10 - Hide toolbar again: click the on the toolbar. DETAILS OF OPERATION 1. CONNECT TO TV Use HDMI cable to connect X- Streamer to TV. To adjust HDMI output, enter the settings menu and select HDMI mode. Choose the desired resolution and save. 2. CONNECTING TO INTERNET VIA RJ45 CABLE RJ45 Ethernet connection: Plug RJ45 cable into X- Streamer. Default link is Ethernet; therefore system will connect to the router automatically. Screen will display Enter into the settings menu, under wireless & networks find the section for Ethernet settings. Here you will find information on your connection settings including your IP configurations. You can manually enter any necessary information needed, including passwords and IP addresses: - 11 - 3. WI-FI CONNECTION If there is Wi-Fi signal available, enter the settings menu to configure Wi-Fi connection. Signal strength will show on menu bar when the Wi-Fi links successfully. Here you can enter your password for Wi-Fi if necessary: 4. Bluetooth This function allows the user to connect Bluetooth enabled speakers to the device. This is just another way to enjoy music and videos from your current entertainment system without the need for bulky and confusing wiring. This way you can enjoy apps such as Pandora, Spotify and YouTube and move around with the speaker. Enter the settings menu and turn Bluetooth “on”, then click on the “search for devices” button on the top right corner of the screen, it will list all of the Bluetooth devices within range. Select the Bluetooth device you would like to use and put it into “Pairing” mode, you will see it as “connecting” on the screen. Now the device and your Bluetooth speakers are connected. NOTE: Sound that comes from the karaoke Mic inputs 1 and 2 will not transmit via Bluetooth. 5.PPPOE CONFIGURATIONS: If a dial-up broadband modem (such as a DSL modem) is needed, please connect RJ45 Ethernet first. Then go back to settings, choose more, then PPPoE. Fill in all of the data in the column to finish the setup, - 12 - If connection is successful, there will be an icon on the bottom right of the menu bar. Notice: Be sure to obtain the correct user name and password from your Broadband supplier. 6. PORTABLE HOTSPOT When the device is directly connected by RJ45 cable (LAN) to the internet, you can also use it as a Hotspot via Wi-Fi. All of your other mobile internet devices, such as smart phone or tablet will be able to connect to internet via the Wi-Fi connection (Hotspot) of this X- Streamer. To set up the Hotspot: go to settings >more > portable hotspots > portable Wi-Fi hotspot and now you are ready start using this function. After it successfully set up, the icon on the bottom right of menu bar will show. - 13 - 7.BROWSER 1) Website When connected to the internet, Click Internet on homepage to surf the web. You can use a wireless keyboard, mouse or remote control for operation. Similar to a computer, you will need to input the website using the virtual keyboard (you can hide the virtual keyboard by clicking the right key of the mouse) Press the right key of the mouse to exit the web browser. 2) Saving pictures from a website Press and hold the left key of the mouse until the “select menu” appears, choose “save” to your memory card. Normally, it saves under local disk/download, for more details please refer to the below pictures. 3) Setting up you browser preferences When you are surfing a website, you can click the in the upper right hand corner, and a drop down menu will appear, you can choose the preferred option for internet as seen below - 14 - Choose settings, and it will show the regular menu, here you can set up your search engine and browsing preferences. When finished press confirm as seen below: 8. Application This X- Streamer comes with a customized User Interface (UI), and the end users can classify all of their applications and put them in the right category. It includes Entertainment, Video, Game, Network, Picture, Video, Music, and Settings. 1) How to classify the application (add or delete) Go to the main interface, and choose the category by your remote control or your mouse. Click “add application” and all of the applications installed in your X- Streamer will show, as seen below: Choose the ones you want to add or delete, and select it with the , press submit to finish. 2) To check the installed applications: press the symbol in the lower right-hand corner to go to the application interface, you can choose any one of the applications and press the “OK” key of the remote control or the left key of the mouse, to start the program. - 15 - To shut down the application, press the button in the lower left-hand corner, and all of the running applications will show up. Click the left button on the mouse and “remove” it to shut down the application. 9. FILE MANAGEMENT Click EXPLORER > File Manager to enter into file management interface. The INTERNAL FLASH/SD CARD/USB/ SATA /UPNP/NETWORK PLACES will display on screen, select the desired option. To access a memory card use the remote control or mouse to click the item for this interface. Under the sub-menu mode, you can edit these files. Note: Do not attempt to edit the system files; this may damage the system from working. Instruction for route files saved on device: System files: saved under internal flash/Android. APK files: saved under internal flash/subdirectory. E.g. karaoke apps: internal flash/audiocnkalaok Files downloaded from the internet: saved under internal flash/download 1. HOME: Return to file menu home 2. LEVELUP: Return to previous menu6. 3. MULTI: view multiple files or files folder 4. EDITOR: Edit files or file folders 5. BACK: Return to menu 6. NEXT: next menu 7. EXIT: Exit files management interface - 16 - 10. VIDEO PLAYER Click the icon on the home screen, and the following video album screen appears. 1. Decrease the volume 4. Play or pause 7. Exit 2. Add bookmark 5. Next 8. More info 3. Previous 6. Display choice 9.Increase the volume 11.MUSIC PLAYER Click the icon on the Home screen, and the music library screen will open. This screen contains tabs that you can click to view your music library organized by artists, albums, songs, playlists or now playing. Press the button on the lower left-hand corner for more options. For the music interface screen, the uses of the buttons are seen below: - 17 - Press for pause Press to resume playback. Press to skip to the next track in the album, playlist, or shuffle. Press to skip to the previous track in the album, playlist, or shuffle. Press to start balance gear menu Press to play the current playlist in shuffle mode (tracks are played in random order) Press to toggle repeat mode Press to start the subtitle (provided you are outputting subtitle) When you are operating another application, you can check the current playing music or go back to the music interface by clicking the in the lower right corner of the screen. 12.PICTURE VIEWER Click the icon on the home screen, and click the album/picture you want to review. When you review the pictures, you can click the icon on the top right corner for more options. Please refer to below pictures, 13. SETTINGS Click the icon on your home screen. The following settings are available for configuration: 【Wi-Fi】: click “on” to scan Wi-Fi signal or click “off” to turn off Wi-Fi 【Ethernet】: click on/off for related options 【Data usage】: display the data usage cycle of installed apps 【More】: to set up VPN/Portable Hotspot/Mobile Networks/PPPoE 【USB】: connect status or mode 【Sound】: display sound input and output devices 【Display】: set the Animation, Display Interface, HDMI Mode and Screen Scale settings. 【Screen】: set up the output screen 【Storage】: view the memory cards storage status 【Apps】: application management 【Security】: set up the security for all output and downloading from applications - 18 - 【Language & input】: set the language and keyboard or input method. 【Backup & reset】: setting allows you to back up data, automatic restore and factory reset 【Accounts】: setting lets you sync background data or auto-sync and manage accounts 【Date & time】: set the date and time 【Accessibility】: related accessibility option (suggested not to use) 【Developer options】: data for developer (Highly recommended that you DO NOT change) 【About device】: view the device information. 14. USING TF CARD & USB DEVICE You can safely insert the TF card and USB device into your X- Streamer any time by gently sliding the card into the TF card/USB slot. “Preparing SD card” or “Preparing USB Mass storage” will be displayed on the status bar for one second, and will disappear as soon as the TF card or the USB device is connected. (We suggest you remove the TF card or the USB device when the System has been powered off, otherwise, it may damage the TF card or the USB device.) 15. OTHER You can download files and applications from web pages. The files that you download are stored on your SD card. WARNING: Applications downloaded from the web can be from unknown sources. To protect your X- Streamer and personal data, download applications only from trusted sources, such as the Android Market. T - 19 - TROUBLESHOOTING 1. No signal on the HDTV Screen Check if the HDMI cable is correctly connected. Check if you have selected the correct HDMI input on your HDTV. 2. Cannot turn on your X- Streamer Check if the power connector is completely plugged into the DC socket of your X- Streamer Check if the power supply is correct (12V, 2A). 3. Cannot connect to network Make sure the network cable is correctly connected and the Ethernet works well. Make sure Wi-Fi network is connected and the security key for the network is correct. Make sure you select the correct IP address settings. 4. Remote control does not respond. Make sure the batteries are working Make sure nothing is blocking the IR receiver 5. Some HDTVs cannot display the entire picture. Make sure in the settings your HDTV display is set to automatic 6. HDMI cannot detect the signal output Make sure that your TV is set to the HDMI input. Unplug the HDMI cable, and connect it again. Turn your TV off and back on 7. No audio output or the volume is low Check if the speakers or the amplifiers work properly. Check the volume status of your X- Streamer Check if the AV cables are well connected. Check if your X- Streamer has been muted. 8. Can’t download video/ audio/ pictures etc., and shows “SD card is full” Please go to Explorer/internal Flash/download to delete some files for more space. Or you can go to setting/storage to erase storage to clear all of the files, at this point you will need to restart the Device Remark: Please make sure that you save all of the important Video, Audio or Pictures before erasing anything. - 20 - SPECIFICATIONS System Product type Main chipset Processor Main Frequency RAM Memory Expandable memory OS Main features and functions Android applications Internet browser HD video support Media player Online video Online audio Firmware upgrading Connectors and Ports USB port SD card slot RJ45 network port Computer and TV combined CORTEX-A9 1.6 GHz DDR3-1024MB NAND 4GB Insert TF card or connect USB hard drive Android 4.1.1 A great variety of Android applications and games Browse the web 1080p, 720p, 480p Play local HD videos, music and view photos Connect to internet and watch video online Connect to internet and listen to music online Upgrade the firmware via USB drive/TF card HDMI port 2 x USB host ports 1 x TF card slot Can connect to network by plugging network cable into RJ45 network port Can connect to HDTV Others Unit size Remote Control Power voltage 198mm(L)x 125mm(W)x 35 mm(D) Support 2.4G wireless remote control 12V DC adaptor We reserve the rights for the design and technical modifications - 21 - - 22 -