1
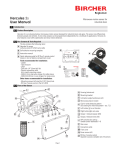
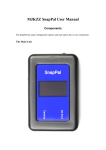
Fastec Imaging TS3 / TS4 Quick Start Guide
Equipment
Unpack the camera and assemble the following equipment:
1. TS3 or TS4 camera
2. Camera power adapter with AC power cord, or charged battery inserted in the camera. (Battery is fully
charged when the TS3 is shipped from the factory.)
3. Lens
Figure 1: Camera Views
1. Power LED
1
2
3
4
5
6
7
8
9
10
11
2. Network Activity LED
3. Storage Activity LED
4. Camera Status LED
5. Sync Activity LED
6. Battery Status LED
7. Power ON/OFF Button
8. Arm Button
9. Display Button
10. Menu Button
11. D-Pad
1. USB OTG (Micro A/B connector)
1
2
2. SDHC (SD-Card slot)
3. GigE Port (RJ45 connector)
4. Sync I/O, Trigger (Lemo connector)
5. HDMI Port (Type A connector)
3
4
6. DC Power In (Lemo connector)
5
6
1. Trigger Button
1
2
3
4
5
6
7
8
2. Power Button
3. USB port
4. Top Mount 1/4 -20
5. Camera Strap Attachment
6. 1/4-20 Tripod Mount
7. Hand Strap Attachment Point
8. Battery Door
1
Controls and Buttons
1. On/Off Button. This button powers the camera on and off. If the battery is installed and the power adapter is attached, the
battery charging dialog will appear (see the section on Power, below).
2. Display Button. The Display Button controls the LCD display on the back of the camera. Pressing the button toggles the Display
through several modes: Display on, Display on with Histogram, and Display off. When reviewing clips, it also turns playback
controls and per frame metadata on and off.
3. Menu Button. The Menu Button toggles the on screen menus on and off. While navigating menus, the Menu Button is used to go
backward through levels of the menu. (When touch-enabled the icon in the upper left of the screen has the same function.)
4. Directional Pad (D-Pad) . The D-Pad has 5 actuation points consisting of 4 arrows for navigating the menu and an OK Button in
the center to select.
5. Arm Button. When the Arm Button is pressed the camera locks in its configuration settings and begins to store pre-trigger
images in internal memory. (If Low Light has been selected for live viewing, the camera will now revert to its selected exposure.)
6. Trigger Button. When the camera has been armed and is recording, pushing the Trigger Button prompts the camera to record
the Trigger frame (frame 0) and any post-trigger frames to complete the recording and stop.
7. Touch Control. With touch enabled you can move through the menus and dialog boxes simply by touching the display. If Touch
is not enabled, navigate to the System menu and down to “Touchscreen” using the D-Pad. Click on the “Disabled” button. The
display will go blank except for a small icon in the upper left corner. Touch that icon to display the menus.
Power
•
•
•
•
•
Turn the camera on by pressing the Power Button.
If the DC power adapter is attached and the battery is installed, the battery charge dialog will appear on the screen. By default,
the camera will begin charging the battery if it is not already fully charged.
From the charging dialog, the user must select “Camera On” to boot the camera.
When the camera boots up it will use the same settings it had when it was last powered down “politely.” If the camera was
powered down by removing power or by holding down the power button, the settings are not saved.
The camera battery does not charge while the camera is in use. With the camera powered on and attached to the DC power
adapter, press the Power Button once to open the Camera charging dialog. While the camera is charging, the Battery LED will
blink. When the battery is completely charged the camera will fully power down. This may take up to 5 hours.
Record
1. Navigate to the Record Settings Sub-Menu and set the resolution and speed desired.
2. Navigate to the Record Shutter Speed Sub-Menu and set the desired exposure.
3. Navigate to the Control Menu, Trigger Position Sub-Menu and set the desired Trigger point. Setting the trigger point divides the
internal memory into two sections: 1) a circular buffer reserved for pre-trigger frames; 2) a second buffer for post-trigger frames.
The images recorded before the trigger are given negative frame numbers (oldest is most negative, the newest is -1), the image
taken at the time of the trigger is “frame 0,” and all frames taken after the trigger are given positive numbers. Note that with an
“End” trigger, all frames will have negative numbers except for frame 0, which will be the last frame. With a “Start Trigger” the
recording will begin at frame “0” and all subsequent frames will have positive numbers.
4. Press the Arm Button to begin recording pre-trigger frames. The camera settings will be locked in. If you wish to abort the
recording to change settings, press the Arm Button again. Note the camera may remain Armed for an indefinite period of time
because it is overwriting its circular buffer, it never runs out of space, but only retains the newest images.
5. Trigger the camera via the Trigger Button or a Trigger Signal to the Sync I/O port to complete the recording. The TS3 will now
enter Review Mode, unless it is set to AutoSave, in which case the camera will download the recording, then revert to Armed
Mode.
2
Long Record Selection for TS4
The TS4 may be used in its “basic” mode, in which it is recording
relatively short clips into its internal high-speed memory, or in
“Long Recording Mode,” in which it is recording potentially much
longer clips directly into its built-in SSD.
To Select Long Recording Mode:
1. Open “User Preferences” in the “Configuration” menu
under “System.”
2. Click on the check box to select Long Recording Mode.
3. Click OK.
The camera will now restart in Long Recording Mode.
To Exit Long Recording Mode:
1. Return to “User Preferences.”
2. De-select Long Recording Mode. Note: in order to have access to the SSD after returning from Long Recording mode, the drive
must be formatted.
Review a Video on the Camera Display
Use the playback icons to play forward, backward, or jump to points of interest in the movie. Use the Cut In and Cut Out icons to
select a portion of the movie to review or save.
Live
Pause
Skip Back
Cut In
Beginning
Play Bkwd
Cut Out
Skip Fwd
Play
End
Save
Trigger
Saving Video from Image Memory
1. Select the Save Icon from the playback controls. This will bring up a dialog that allows selection of the following:
• Start and Stop points of the clip (these points can also be changed using Cut In/Out buttons on the playback controls).
• Destination—where the movie clip is to be saved. Choices include the built-in SSD, (an option), an SD card or a USB drive.
• The file Format desired—CAP (proprietary raw format), AVI video, or DNG, BMP, JPEG, or TIFF stack.
• File name prefix, which may optionally include the camera name or user-defined tag..
2. When the movie clip is set up as desired, press the Save icon on the Save dialog. A new dialog will open with the heading Copy in
Progress. This dialog indicates the status of the file save operation.
3. When the file save is complete, the dialog will display a message indicating Copy completed successfully. Press the OK icon to set
the camera back into Review Mode. Click on the Live button to put the camera back into Live Mode.
Save Images to a Host PC
There a several methods available to permanently save images:
• Load FasMotion software on a computer (PC or MAC). FasMotion has utilities for saving images from camera memory to any
camera media or to any media connected to the PC. This is the fastest method of operation. Please refer to the TS3 User Manual
for details.
• Download images from the image memory to an SD card installed in the SD port in the camera. View or transfer the images using
an SD card reader or by inserting the SD card into a built-in SD port in the desired PC.
Contact Information
Fastec Imaging Corporation
17150 Via Del Campo, Ste.301, San Diego, CA 92127
+1-858-592-2342
[email protected]
3