1
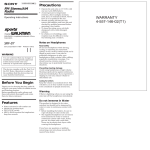
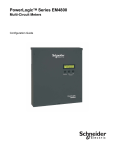
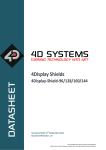
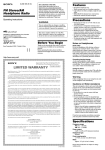
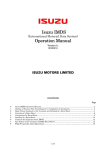
User Manual
Quattro
Updated 08/25/2015
Table of Contents
Introduction.....................................................................................................................4
Features...................................................................................................................................... 4
Pedal Sensing Technology.......................................................................................................... 4
Supported Pedal Types............................................................................................................... 4
Colors.......................................................................................................................................... 4
On-Board LED............................................................................................................................. 4
Parameter Feedback................................................................................................................... 5
Value Persistence........................................................................................................................ 5
Default Settings........................................................................................................................... 6
Expression Control Application............................................................................................7
Standalone vs. Plugin Mode........................................................................................................ 7
Device and Input Selector............................................................................................................ 8
(A) Settings Panel................................................................................................................... 8
(B) Input Selector.................................................................................................................... 8
(C) Device Selector.................................................................................................................8
Preset Panel................................................................................................................................ 9
Settings for Expression and Hihat Pedal Types.........................................................................10
(A) Input Polarity Switch........................................................................................................10
(B) Mode Selector................................................................................................................. 10
(C-D) Channel and Control Change......................................................................................10
(E) Expression Curve............................................................................................................ 10
(F) Invert............................................................................................................................... 11
(G) Smoothing....................................................................................................................... 11
(H) Calibrate.......................................................................................................................... 11
Modes for Expression Pedals and Hihat Controllers..................................................................12
(A) Control Change............................................................................................................... 16
(B) Pedal Note....................................................................................................................... 16
(C) Splash Note..................................................................................................................... 16
(D – E) Range Controls......................................................................................................... 16
Settings for Sustain Pedals and Footswitches...........................................................................18
(A) Input Type....................................................................................................................... 18
(B) Mode Selector................................................................................................................. 18
(C) Invert............................................................................................................................... 18
(D) Toggle............................................................................................................................. 18
(E-H) Channel and Control Change......................................................................................18
Modes for Sustain Pedals and Footswitches.............................................................................19
Control Change..................................................................................................................... 19
Program Change................................................................................................................... 19
Note On / Off......................................................................................................................... 19
Inc / Dec Modes.................................................................................................................... 19
Dual CC Mode....................................................................................................................... 19
Updating the Firmware............................................................................................................... 20
Wiring Diagrams..............................................................................................................21
MIDI Expression Manual
page 2 / 15
Introduction
If you've purchased a MIDI Expression device, thank you for your support and I hope you enjoy
using it.
This manual gives you a good look at how MIDI Expression devices and the MIDI Expression
Control application work. While they are both easy and intuitive to use, this manual is worth
reading to familiarize yourself with their features and to discover aspects of their use that are not
so obvious.
Features
•
•
•
•
•
•
•
•
•
Pedal Sensing Technology.
Reversible input polarity.
Adjustable response curves.
Class Compliant Driverless implementation.
Powerful preset editor.
Advanced modes.
On-Board LED.
Parameter Feedback.
Value Persistence.
Pedal Sensing Technology
All MIDI Expression devices are designed with the ability auto detect the type of pedal plugged into
them. They can detect expression pedals, sustain pedals, and hihat controllers. The pedal sensing
feature automatically loads an associated preset based on the type of pedal plugged in.
While MIDI Expression supports dual footswitches, its pedal sensing feature cannot automatically
detect them. To use a dual footswitch with MIDI Expression, you will need to select the footswitch
pedal type in the Expression Control Application. Doing so disables pedal sensing and locks the
device into 'Footswitch' mode.
Supported Pedal Types
MIDI Expression devices support expression pedals, hihat controllers, sustain pedals, and both
momentary and latch style footswitch pedals. It's polarity reversible inputs ensure compatibility with
predals from all manufactures. Take a look in the appendix for wiring diagrams for each pedal
type.
Class Compliant
MIDI Expression devices will run on virtually and system that supports USB including Windows,
OSX, Linux, iOS, and android without the need to install drivers.
MIDI Expression Manual
page 3 / 15
Colors
MIDI Expression devices come in six different colors and each color has a unique MIDI port name.
This makes it easy to distinguish multiple MIDI Expressions plugged into the same computer. The
'color' of a device can be changed by clicking on the firmware version indicator in the Control
application.
On-Board LED
Each MIDI Expression has an internal LED that provides visual feedback. The black and blue
devices have opaque encloses, so the LED is only visible by looking through the jack. For all other
colors, the LED is visible through the enclosures. The LED can be turned off via the Settings
Panel of the Control Application.
Parameter Feedback
MIDI Expression monitors its MIDI IN port and updates its values accordingly, allowing it to stay in
sync with your music software.
Value Persistence
MIDI Expression devices remember their toggle positions and current patch values even after
being unplugged, ensuring that your device is always in the exact state as you last left it in.
Default Settings
Expression
Sustain
Hihat
Footswitch
Input 1
CC
Chan: 1 CC: 7
CC
Chan: 1 CC: 64
CC
Chan: 10 CC: 4
CC
Chan: 1 CC: 1
Chan: 1 CC: 2
MIDI Expression Manual
Input 2
CC
Chan: 2 CC: 7
CC
Chan: 2 CC: 64
CC
Chan: 10 CC: 4
CC
Chan: 2 CC: 1
Chan: 2 CC: 2
Input 3
CC
Chan: 3 CC: 7
CC
Chan: 3 CC: 64
CC
Chan: 10 CC: 4
CC
Chan: 3 CC: 1
Chan: 3 CC: 2
Input 4
CC
Chan: 4 CC: 7
CC
Chan: 4 CC: 64
CC
Chan: 10 CC: 4
CC
Chan: 4 CC: 1
Chan: 4 CC: 2
page 4 / 15
Expression Control Application
As MIDI Expression devices have no physical buttons, any changes you want to make to the
presets need to be done using the MIDI Expression Control application. The window of the
application is scalable, so you can adjust the size of best suit the resolution of your display.
Standalone vs. Plugin Mode
The MIDI Expression Control application comes in two varieties—a standalone version and also a
plugin version. While both varieties work in pretty much the same way, there is one major
difference between them. When you make changes using the standalone version, your changes
are saved directly to the memory in the device itself. However, when you make changes using the
plugin version, the settings are saved in the plugin's own memory and not the device.
When using the plugin version, settings saved in the plugin are uploaded to the device when the
plugin is loaded. When the plugin is unloaded, the settings from the plugin are offloaded and the
settings stored in the device (via the standalone version) are restored. This behavior not only
allows you to have different configurations loaded for each project, but also allows the two versions
of the application to be complementary to each other.
The instructions for the rest of this section are assuming you're using the standalone version. For
the most part they also apply to the plugin version, just remember that the plugin version does
NOT save any settings to the device itself and the settings are offloaded once the plugin version is
closed.
MIDI Expression Manual
page 5 / 15
Device and Input Selector
The topmost part of the MIDI Expression control application is reserved for selecting the device
and input you want to edit. If you have more that one MIDI Expression connected, they will show
up on the right.
A
B
C
(A) Settings Panel
The Settings Panel is revealed when you press the settings button.
The LED setting turns on and off the LED for the currently selected device. When the LED
is set to 'off', the device LED will not light when pedals are pressed.
The Auto Select setting automatically selects inputs for editing. It essentially causes the
editor to follow whichever pedal is currently being moved.
The Always on Top setting causes the application to remain up front even when another
application is selected. This option is not available in OSX or the plugin version.
This button launches the Firmware Updater.
This button opens the Manual.
(B) Input Selector
When using a MIDI Expression Quattro the Input Selector allows you to select which input you
would like to edit. Conveniently, it also displays what preset is currently in use and also any pedal
activity. If no pedal is plugged into an input, then no pedal image is displayed.
(C) Device Selector
If you have more than one MIDI Expression connected, the Device Selector becomes visible and
allows you to select the device you want to edit. The control application supports editing up to four
devices at one time.
MIDI Expression Manual
page 6 / 15
Preset Panel
The Pedal Panel comprises a SENSE switch, four Pedal Type images representing the four internal
presets of the selected input, and a RESET button
The SENSE button is used to engage the Pedal Sensing feature. When enabled, presets are
automatically loaded in accordance with the type of pedal plugged into MIDI Expression.
You can override the pedal sensing by manually selecting the Pedal Type preset you want to use.
When manually selecting a Pedal Type, the Pedal Sensing feature is turned off.
With Pedal Sensing off, the input will remain configured for the selected pedal type even after
plugging in a different type of pedal or unplugged the device. To restore the pedal sensing feature
for that input, you will need to ensure that SENSE is switched back on.
The RESET button returns the settings for each of the presets for the currently selected input to
their default values and reactivates the Pedal Sensing feature. If you are using a device with more
than one input, the other inputs will not be affected.
MIDI Expression Manual
page 7 / 15
Settings for Expression and Hihat Pedal Types
A
E
B
F
G
C
D
H
(A) Input Polarity Switch
Expression pedals can be wired in different ways. In order to support pedals from all
manufacturers, the polarity of individual MIDI Expression inputs can be reversed.
Most pedals are supported with the 'straight' polarity. However, if you're using a pedal from
Yamaha, Kawai, or Korg, you will likely need to use the 'reversed' polarity setting for optimal
performance.
(B) Mode Selector
Clicking the Mode Selector allows you to change the type of message the device outputs. See the
following section for detailed information.
(C-D) Channel and Control Change
The values in these boxes can be adjusted in a variety of ways. Firstly, you can drag the values up
or down with your mouse. For more precision, hold down the SHIFT key while you drag. Values
can also be manually entered by double clicking on the box. Lastly, the values can be incremented
and decremented using the up and down arrows.
(E) Expression Curve
The Expression Curve control allows you to customize the response curve of your pedal. It gives
you advanced control of the MIDI output including the minimum and maximum value, as well as the
transition between these values. A typical usage scenario of the Expression Curve would be to
make a log type pot (volume pedal) respond like a linear one (expression pedal) and vise versa.
When you adjust the min, max, or curve, the thick border of the control lights up indicating that it is
on. Clicking anywhere in the background will turn it off again, or more precisely will toggle between
on and off.
MIDI Expression Manual
page 8 / 15
Here are a few pics showing how the Expression Curve might be used.
(F) Invert
The invert control is pretty straight forward. If you get a value of 127 with the pedal pressed down
and 0 with it up, checking INVERT will give 127 with the pedal up and 0 when pressed down.
(G) Smoothing
This function simply applies a filter to a pedal's input to prevent large jumps
or abrupt changes in the measured value. This is particularly useful in combination with the
expression curve control.
(H) Calibrate
If you find your pedal will not output values all the way down to zero or all the way up to 127, then
you need to calibrate. When calibrating, the switch calibrate indicator will flash and an indicator
representing your pedal's voltage range appears. Take the pedal through its full range of a motion,
pressing it all the way up and down a few times. After you are done, click the calibrate switch
again and the setting will be stored in the device.
While calibrating, the calibration can be overridden by dragging either side of the green voltage
range indicator.
MIDI Expression Manual
page 9 / 15
Modes for Expression Pedals and Hihat Controllers
MIDI Expession devices are capable running in several different modes and produce many
different types of MIDI messages.
Control Change messages send out a value corresponding to the position of the pedal. This type of
message is typically used to control knobs or faders.
Pitch Bend is often used with synthesizers to slightly vary the tuning of a note.
Note Mode and Hihat Mode are much more poweful modes and are descirbed in greater detail.
They allow an expression pedal or hihat controller to trigger velocity sensitive MIDI notes. The two
modes function pretty much the same, however Hihat mode not only triggers notes, but also
transmits control change messages to represent the current position of the pedal.
These modes function just like the hihat pedal on an electric drum kit. And like most electric drum
kits, it allows a pedal to trigger two different notes—one when the pedal is quickly pressed down,
and another when the pedal is pressed down and then quickly released. These notes are labeled
‘PDL’ and ‘SPL’ respectively.
MIDI Expression Manual
page 10 / 15
(A) Control Change
This is the Control Change value that the pedal ouputs as it moves up and down. If you simply
want to trigger notes, use Note Mode and these messages will not be transmitted. If however you
want the pedal to function as a hihat controller, then you will likely need to set this to 4.
(B) Pedal Note
This is the note value that is output when the pedal is pressed down quickly.
(C) Splash Note
If you are using a hihat controller, you will also be able to trigger a second note by releasing the
pedal very quickly after triggering a pedal note.
(D – E) Range Controls
Below the two note controls are two range controls that work together to adjust the dynamics of the
triggered notes.
The MIN RANGE control acts a threshold that determines how quickly the pedal needs to be
pressed before a note is generated. You would typically keep this at zero. If, however, you intend
use your MIDI Expression as a hihat controller, then you will likely want to increase this value
slightly to avoid unwanted pedal notes.
THE MAX RANGE should be adjusted so that the indicator lines up with the peaks of your hardest
hits. Setting it lower causes the velocity of your notes to increase and clip and setting it higher
causes the velocity of the notes to decrease and never reach maximum.
Using the two range controls, you should be able to get your pedal to respond in a nice linear
fashion with great dynamics. If however, you would like to further tweak the response of your
pedal, you can use the expression curve on the right side of the interface. When in ‘Note Mode’
the expression curve controls the velocity of the notes and not the CC.
MIDI Expression Manual
page 11 / 15
Settings for Sustain Pedals and Footswitches
A
C
B
D
E
F
G
H
(A) Input Type
This is used to tell MIDI Expression the type of switch your pedal uses. A latch style switch is one
that switches between two values, 'on' or 'off' every time it is pressed, much like a light switch in
your home. A momentary switch, on the other hand, is like a button. It switches to 'on' when
pressed, and back to the 'off' when released. Select the style to match your pedal.
(B) Mode Selector
Sustain pedals and footswitches are capable sending out several different kinds of messages and
operating in different modes. See the following section for more information.
(C) Invert
The invert control is pretty straight forward. If you get a value of 127 with the pedal pressed down
and 0 with it up, checking INVERT will give 127 with the pedal up and 0 when pressed down.
(D) Toggle
Using TOGGLE, you can simulate a latching style switch which sends out only one value each time
the pedal is pressed. The toggle mode is displayed for sustain pedals and footswitches that are set
up as momentary switches.
(E-H) Channel and Control Change
The values in these boxes can be adjusted in a variety of ways. Firstly, you can drag the values up
or down with your mouse. For more precision, hold down the SHIFT key while you drag. Values
can also be manually entered by double clicking on the box. Lastly, the values can be incremented
and decremented using the up and down arrows.
MIDI Expression Manual
page 12 / 15
Modes for Sustain Pedals and Footswitches
Control Change
Control change messages are useful for toggling On / Off parameters in DAWs and virtual
instruments. If using momentary style switch, you'll likely want to use this in combination with the
TOGGLE switch.
Program Change
Program Changes messages are typically used to swap between two different presets in a virtual
instrument of plugin host.
Note On / Off
Note On / Off messages can be used to trigger samples.
Inc / Dec Modes
With MIDI Expression, sustain pedals and footswitches can be used to cycle though a range of
Program Change or Control Change values. You can access this functionality by selecting the
mode 'Control Chance Inc / Dec' or 'Program Change Inc / Dec'. These modes can be very useful
for auditioning instrument presets, for example.
If your pedal is a momentary type, you'll be able to cycle both upwards and downwards. By quickly
pressing the pedal, the value will increment (go up) by one. By pressing and holding for half a
second, the value will decrement (go down) by one. It you cycle past the upper limit, the value will
wrap around to the lower limit and vice versa. Note that there is no way to decrement the value for
latch type footswitches, so only incrementing the value is supported.
Dual CC Mode
Dual CC Mode is designed to allow users to scroll though presets in virtual instruments using a
single sustain pedal or footswitch. The mode works by sending out two different CC values
depending on how long the pedal is pressed. Pressing the pedal quickly sends out one CC and
pressing and holding for half a second (actually it's 300 ms) sends out the other value.
MIDI Expression Manual
page 13 / 15
Updating the Firmware
The MIDI Expression firmware is periodically updated to add new features or fix bugs. It can be
updated or changed by clicking on the Firmware Update button from the Settings Panel.
You might also want to change the color of firmware in order to change the name of the MIDI port
in case you have more than one MIDI Expression of the same color and you need to be able to
distinguish their ports. To change the name of the MIDI port, select a different color using the Color
Chooser in the bottom right hand corner.
MIDI Expression Manual
page 14 / 15
Wiring Diagrams
Most commercially available pedals should work fine with MIDI Expression. The wiring diagrams
below are included for DIY enthusiasts who intend to build their own controllers.
MIDI Expression Manual
page 15 / 15