1
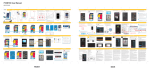
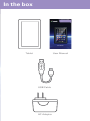
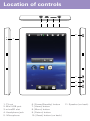
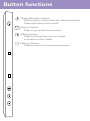
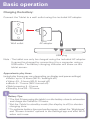
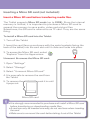
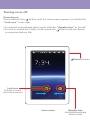
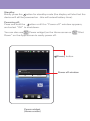
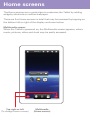
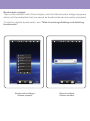
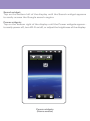
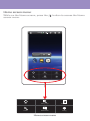
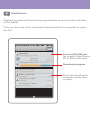
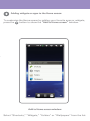
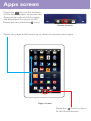
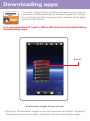
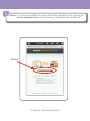
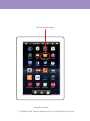
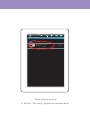
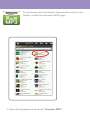
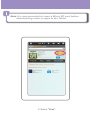
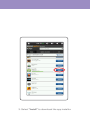
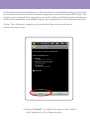
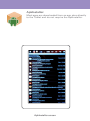
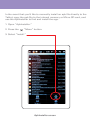
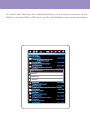
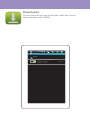
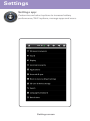
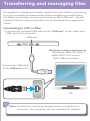
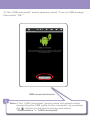
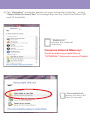
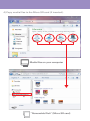
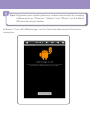
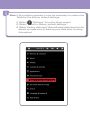
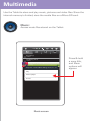
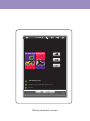
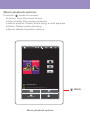
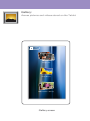
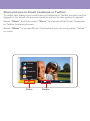
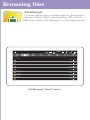
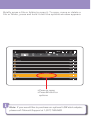
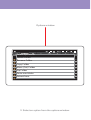
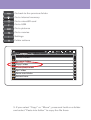
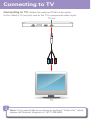
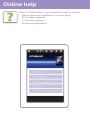
7” Internet Tablet Wi-Fi & Touch Screen PMID701C User Manual In the box 7” Internet Tablet Wi-Fi & Touch Screen PTAB7200 User Manual Tablet User Manual USB Cable AC Adapter Location of controls 1 2 3 4 6 MIC 5 Deep in Space Eighteen Live Music Gallery Clock 7 8 9 1. TV out 2. Mini USB port 3. microSD slot 4. Headphone jack 5. Microphone 6. [Power/Standby] button 7. [Home] button 8. [Menu] button 9. [Return] button 10. [Reset] button (on back) 11. Speaker (on back) Button functions [Power/Standby] button: Quick press to lock/unlock the Tablet (standby); Press and hold to turn on/off [Home] button: Press to go to the home screen [Menu] button: Press to access the menus of apps or screens of the Tablet [Return] button: Press to return to the previous screen Basic operation Charging the battery: Connect the Tablet to a wall outlet using the included AC adapter. Wall outlet AC adapter USB plug Note : The tablet can only be charged using the included AC adapter. It cannot be charged by connecting it to a computer using a USB cable. The battery charging indicator will show on the tablet screen. Approximate play times (actual play times may vary depending on display and power settings) • Music: up to 10 hours (Wi-Fi / backlight off) • Video: 4.5 - 5 hours (Wi-Fi turned off) • eBook: 6 - 7 hours (Wi-Fi turned off) • Web browsing: 5 - 6 hours • Standby time: 60 - 70 hours Battery Tips: * The first 3 times using the tablet, run the battery close to exhaustion and charge the Tablet for 12 hours. * Set the Tablet to standby mode (the display is off) to shorten charging time. * To optimize battery time and performance, adjust the "Brightness" and "Screen timeout" options in the Settings app and shut Wi-Fi when not in use. Inserting a Micro SD card (not included): Insert a Micro SD card before transferring media files. The Tablet supports Micro SD cards (up to 32GB). Since the internal memory is limited, it is important to purchase a Micro SD card to expand the memory to save audio, video and picture files. Sometimes, the SD card is referred to as TF card. They are the same thing. To install a Micro SD card into the Tablet: 1. Turn off the Tablet. 2. Insert the card (face up as shown with the metal contacts facing the back of the tablet) into the card slot until it clicks and locks into place. @ 3. To access the Micro SD card, select "Explorer" from the Apps screen. Unmount & remove the Micro SD card: 1. Open “Settings” 2. Select “Storage” 3. Select “Unmount Micro SD card” 4. It is now safe to remove the card from the Tablet. 5. To remove the card, gently push it in until it pops out. Micro SD card • It is strongly recommended to purchase and install a Micro SD card before transferring or downloading media files. • A card can only be inserted one way; do not use force when inserting the card. • Make sure to unmount the card before taking it out of the Tablet. Turning on or off: Powering on: Press and hold the button until the lock screen appears, and slide the ”Lock icon” to the right. • To activate or deactivate silent mode, slide the ”Speaker icon” to the left. • To lock or unlock the Tablet, briefly press the button (Lock the device to conserve battery life). [Power] button Lock icon Unlock to enter the Home screen Lock screen Speaker icon Activate/deactivate silent mode Standby: Briefly press the button for standby mode (the display will shut but the device will still be powered on - this will extend battery time). Powering off: Press and hold the button until the “Power off” window appears, and select “OK” to shutdown. You can also use (Power widget) on the Home screen or Down” on the Apps screen to easily power off. “Shut [Power] button Power off Power off window Your device will shut down. OK Cancel Power widget (Home screen) Connecting to Wi-Fi To browse web sites, use e-mail and download apps, you must first connect the Tablet to the internet. Follow the instructions below to set up Wi-Fi on the Tablet. 1. Select “Wi-Fi” on the Apps screen and select ”Turn on Wi-Fi”. 2. Select “Wi-Fi settings”. 3. Make sure that “Network notification” is checked. 4. Select a network, and if required enter the correct password. 5. When the Tablet is connected to a network, the Wi-Fi icon will appear on the top info bar and “Connected” will appear under the selected network. Wi-Fi icon Music Clock Calculator Email Settings Gallery Recording Browser Wi-Fi Facebook Twitter Weatherbug NYTimes AOL SoundHound TuneIn Radio Kayak Kobo Downloads Online Help Adobe Reader Moviefone App Manager Power Apps screen To conserve battery life, turn off Wi-Fi when not connected to a network. Home screens The Home screens are a great place to customize the Tablet by adding widgets, shortcuts or custom wallpaper. There are five Home screens in total that may be accessed by tapping on the bottom left or right of the display as shown below. Multimedia screen: When the Tablet is powered on, the Multimedia screen appears, where music, pictures, video and clock may be easily accessed. Deep in Space Eighteen Deep in Live Space Eighteen Live Music Tap right or left (To change Home screens) Gallery Clock Multimedia (Home screen) Bookmarks widget: Tap on the bottom left of the display until the Bookmarks widget appears where all the websites that are saved as bookmarks can be easily accessed. To add or delete bookmarks, see "Web browsing>Adding and deleting bookmarks". Appstore Appstore Google Wikipedia NY Times Picasa Bookmarks widget (Home screen) Search widget (Home screen) Search widget: Tap on the bottom left of the display until the Search widget appears to easily access the Google search engine. Power widgets: Tap on the bottom right of the display until the Power widgets appear to easily power off, turn Wi-Fi on/off, or adjust the brightness of the display. Power widgets (Home screen) Home screen menu: While on the Home screen, press the screen menu. button to access the Home 12:00 Deep in Space Eighteen Deep in Live Space Eighteen Live Music Gallery Clock Add Manage apps Wallpaper Search Notifications Setting Add Manage apps Wallpaper Search Notifications Setting Home screen menu Notifications: Displays the status of items being downloaded as well as other activities of the Tablet. Once an item has been completely downloaded it is possible to open the file. September 21, 2011 Clear Ongoing USB connected Select to copy files to/from your computer. 71’F Brooklyn, NY 10:32 AM 40% Chance of Rain 73’F/67’F Amazon_Appstore-release-1.apk amaznadsi.hs.llnwd.net 80% Turn on/off USB port (to transfer files from/to PC or Micro SD card) Download progress Notifications Micro SD card safe to remove You can safely remove Micro SD card PMID700_User_Manual.pdf Download complete 9/20/11 FBAndorid-1.6.3_preload.apk Download complete 9/20/11 Kobo downloads: 2 completed Click to go to your Reading list. 10:32 AM Once the download is complete, press here to open. Adding widgets or apps to the Home screen: To customize the Home screen by adding your favorite apps or widgets, press the button to show the “Add to Home screen” window. o Deep in Space Eighteen Live Music Gallery Clock Add to Home screen window Select “Shortcuts,” “Widgets,” “Folders” or “Wallpapers” from the list. Shortcut list (Add apps to the Home screen) Wallpaper list (Change wallpaper on the Home screen) Widget list (Add widgets to the Home screen) Removing widgets or apps from the Home screen Press and hold the widget or app icon you want to remove from the Home screen until the Trash icon appears on the bottom of the display, and drag it into the Trash icon to remove it from the Home screen. Wallpaper: You can also change the wallpaper by pressing the the Home screen menu. button from Apps screen Press the icon on the bottom of the Home screen to access the Apps screen where all the apps are displayed (to return to the Home screen press the icon). Home screen When the page is full scroll up or down to access more apps. Music Clock Calculator Email Settings Gallery Recording Browser Wi-Fi Facebook Twitter Weatherbug NYTimes AOL SoundHound TuneIn Radio Kayak Kobo Engadget Slacker Adobe Reader Moviefone App Manager Power @ Explorer Online Help Apps screen Press the icon to return to the Home screen Setting up e-mail Select “Email” on the Home or Apps screen and follow the instructions to set up your email account on the Tablet. (You must connect to Wi-Fi before accessing or setting up email accounts). Web browsing Select “Browser” on the Home or Apps screen (You must connect to Wi-Fi before accessing the web). Viewing web pages: Use the Zoom buttons which appear at the bottom right of the page (when scrolling up or down) to zoom in or out. 12:00 12:00 Zoom buttons Adding and deleting bookmarks: 1. Press the “Bookmarks button”. 2. Select “Add bookmark” to add the current website. Bookmarks button Bookmarks (access saved bookmarks) MENU New window Bookmarks Windows Refresh Forward More 3. While using the web browser, press the button and select “Bookmarks” or use the Bookmarks widget on the Home screen to access your favorite, saved websites. 4. To delete a bookmark, press and hold the bookmark you wish to delete, and select “Delete bookmark” on the screen that appears. Bookmarks 12:00 Bookmarks Add bookmark Most visited History Add Fire Fox Health Care Google Images Note: When you add or delete a website to or from “Bookmarks”, it will also be adjusted on the "Bookmarks" widget of the Home screen. Downloading apps To access a large library of free/paid apps and games, we recommend downloading the Amazon Appstore - follow the instructions below to download it directly to the Apps screen of the Tablet: It is recommended to insert a Micro SD card (not included) before downloading apps. Select Appstore Appstore Google Wikipedia NY Times Picasa Bookmarks widget (Home screen) 1. Go to the “Bookmarks” widget on the Home screen, and select “Appstore” (2 Appstore links are provided - both go to the same download page). Note: It is also possible to download the appstore by going to www.amazon.com, and selecting “Appstore for Android”. Select 2. Select “Download now” Downloads app Music Clock Calculator Email Settings Gallery Downloads Browser Wi-Fi Facebook Twitter Weatherbug NYTimes AOL SoundHound TuneIn Radio Kayak Kobo Engadget Slacker Adobe Reader Moviefone App Manager Power Apps screen 3. Select the Downloads app on the Apps screen. 12:00 Micro SD Card Today Amazon_Appstore-release.apk amazndsl-a.akamalhd.net Complete 1.31 MB 10:14 AM Downloads screen 4. Select “Amazon_Appstore-release.apk”. 5. Select “Install” to install the Appstore on the Tablet. Music Clock Calculator Email Settings Gallery Downloads Browser Wi-Fi Facebook Twitter Weatherbug NYTimes AOL SoundHound TuneIn Radio Kayak Kobo Engadget Slacker Adobe Reader Appstore App Manager Power 6. The Appstore appears on the Apps screen. Downloading and installing apps: After downloading the Amazon Appstore, it is possible to download and install apps directly to the Tablet - these apps will appear on the Apps screen. Select "Appstore" on the Apps screen and create an Amazon account (setting up the account is free). Once an account is created, it is easy to purchase, download and install apps directly to the Tablet. Note: Apps compatibility / games: There are many apps available on the Amazon Appstore, but unfortunately not all will be compatible with the Tablet. This is because some of the apps are designed for mobile phones and require functions or specifications that are not supported by the Tablet. We recommend always searching for the free or "Lite" version of an app and testing it before purchasing the paid app. *Avoid apps that require camera or GPS as these apps will not be supported by the Tablet. The Tablet supports many game apps - although we recommend always testing the free version (if available) before purchasing. To purchase and wirelessly download music to the Tablet, install the Amazon MP3 app. 1. Open the Appstore and select “Amazon MP3”. Note: It is recommended to insert a Micro SD card before downloading music or apps to the Tablet. 2. Select “Free”. 3. Select “Install” to download the app installer. Polaroid and the manufacturer of this tablet are not affiliated with, connected to, or sponsored by Amazon, Amazon appstore, and the Amazon MP3 app - we simply recommend their app store over the other available options because of the wide selection of available apps, user experience, and customer service. Note: The Amazon appstore is available free to download at www.amazon.com 4. Select “Install” to install the app on the Tablet, it will appear on the Apps screen. eBooks Kobo app: Access over 2 million books (over 1million free eBooks) with the included Kobo app. Managing apps App Manager: Use the App Manager to optimize the performance of the Tablet by freeing up internal memory, uninstalling and terminating running apps. Download All On TF Card Running Download: Displays all the downloaded apps (these apps may be uninstalled or moved to the Micro SD card). All: Displays all apps installed on the Tablet (it is not possible to delete or move pre-installed apps). On TF Card: Displays the apps that are able to be moved to the Micro SD card (the apps that are checked have already been moved). Running: Displays currently running apps. Moving apps to the Micro SD card: As the applications you've installed occupy the internal memory of the Tablet, it is necessary to free the internal memory by using the “Move to TF Card” option. 1) Insert a Micro SD card into the Tablet. 2) Open the App Manager and select “On TF Card” 3) Select an app that is not checked (the apps that have check-marks are already moved to the Micro SD card). 4) Select “Move to TF Card”. On TF Card 12:00 Download All On TF Card Running Micro SC Card storage 8.0KB used 3.7GB free Force stop Quit an app that is not functioning or responding properly. Uninstall Uninstall an app or use this option to reinstall an app that is not functioning properly. Clear data Use this option for apps that are not functioning properly (data related to the app such as username/password may be deleted). Move to SD Card Clear up space on the internal memory. 12:00 Amazon MP3 version release-1.08 Force stop Uninstall Storage Total 2.40MB Application 2.30MB Data 104KB Clear data Move to TF Card Cache Cache 0.00B Clear cache Launch by default No defaults set. Clear defaults Permissions This application can access the following on your device: Storage modify/delete SD card contents Network communication full Internet access Phone calls read phone state and identity App Manager screen ApkInstaller: Most apps are downloaded from an app store directly to the Tablet and do not require the ApkInstaller. ApkInstaller screen In the event that you’d like to manually install an apk file directly to the Tablet, copy the apk file to the internal memory or Micro SD card, and use the ApkInstaller to find and install the app. 1. Open “ApkInstaller.” 2. Press the “Menu” button. 3. Select “Install.” ApkInstaller screen To install apk files that are copied directly to the internal memory of the Tablet or inserted Micro SD card, use the ApkInstaller app as shown below. ApplicationDelete Folder Install Remove Cancel Downloads: Use the Downloads app to find files that have been downloaded to the Tablet. 12:00 Micro SD Card Today Amazon_Appstore-release.apk amazndsl-a.akamalhd.net Complete 1.31 MB 10:14 AM Settings Settings app: Customize and select options to increase battery performance, Wi-Fi options, manage apps and more. Settings screen Transferring and managing files It is possible to manage and transfer media files to the Tablet by connecting it to your computer as shown below. Before transferring media files to the Tablet, we strongly recommend inserting a Micro SD card - this will conserve internal memory and allow you to download more apps to the Tablet. Connecting to a PC or Mac: 1) Connect the included USB cable to the "USB port" of the Tablet and USB port of the computer. USB port Minimum system requirements: • Windows: 2000, XP, Vista, 7 • Mac OS X: 10.5 or later (with USB connection) Connect the USB cable to the USB port on PC USB PC Note: The tablet is not being charged when connected to a computer. For charging, use the included AC adapter. 2) The "USB connected" screen appears, select "Turn on USB storage," then select “OK.” USB connected screen Note: If the "USB connected" screen does not appear when connecting the USB cable to the computer, try pressing the button on the Home screen and select "Notifications" > "USB connected". 3) The "Autoplay" windows appear on your computer's display - select "Open folder to view Files" to manage files on the Tablet and Micro SD card (if inserted). PMID701C “PMID701C” access the internal memory Conserve Internal Memory! Avoid transferring media files in “INTERNAL” (internal memory/Tablet) “Removable Disk” access the Micro SD card (if inserted) Tips: Transfer and store media files such as music, pictures and video on to a Micro SD card and avoid placing these types of files in the internal memory of the Tablet - this will conserve the internal memory, and allow you to download more apps. Conserve Internal Memory! Transfer media files to “Removable Disk” (Micro SD card) 4) Copy media files to the Micro SD card (if inserted). Media files on your computer PMID701C “Removable Disk” (Micro SD card) Tips: Organize your media (pictures, videos and music) by creating folders such as “Pictures”, Videos” and “Music” on the Micro SD card as shown below. 5) Select "Turn off USB storage" on the Tablet to disconnect it from the computer. Resetting In the event that the Tablet freezes or does not function properly, try correcting the problem by pressing the RESET button located on the back panel (shown below). RESET RESET Use a paper clip or the tip of a stylus to press the RESET button. Data stored on the Tablet will not be affected by using the RESET button. Note: If the problem persists it may be necessary to restore the Tablet to the factory default settings: 1) Select "Settings" from the Apps screen. 2) Select "Reset to factory default settings". 3) Select "Factory data reset" (this will erase data stored on the device so make sure to back up your data prior to using this option). Multimedia Use the Tablet to store and play music, pictures and video files. Since the internal memory is limited, store the media files on a Micro SD card. Music: Access music files stored on the Tablet. 12:00 Artists Albums Songs Playlists Royal Bangs 1 album The Rolling Stones 1 album Jump Back - The Best Of The Rolling Stones, ‘71 1 song Jump Back - The Best Of The Rolling Stones, ‘71 - ’93 Play Add to playlist Delete Music screen Press & hold a song title, and these options will appear 12:00 The Rolling Stones Jump Back - The Best of The Rolling Stones, ‘71 - ’93 Miss You 4:48 4:48 Music playback screen Music playback options: Press the button to access: • Library: View the music library • Party shuffle: Play songs randomly • Add to playlist: Create, add a song, or edit playlists • Delete: Delete a selected song • Sound effects: Equalizer options 12:00 The Rolling Stones Jump Back - The Best of The Rolling Stones, ‘71 - ’93 MENU Miss You Library Party shuffle Add to playlist Delete 4:48 Music playback options Gallery: Access pictures and videos stored on the Tablet. Gallery Images (59) Drop Box (1) 2008 camera ...otos (2) Gallery screen Viewing pictures: Use the Zoom buttons which appear at the bottom right of the display to zoom in or out of pictures. 1/3 Menu Slideshow Slideshow: Tap the display to show the options below. 1/3 Slideshow Slideshow Menu Menu (Press for more options) Share pictures to Email, Facebook or Twitter: To utilize this feature you must have a Facebook or Twitter account and be logged in, for Email, an account must be set up for this option to appear. Select “Menu” and then select “Share” to choose either Email, Facebook, or Twitter to share pictures. Select “More” to access Photo Tools where you can crop, paste, “set as” or more. Twitter Picasa Facebook Email Share Share Delete Delete More Watching videos: Tap the display while playing a video, and the video controller appears, tap the display again to hide the controller. 00:00:03 Press the 00:04:01 button to go back to the previous screen, and exit video mode. Streaming videos: To wirelessly stream movies and television to the Tablet, install the Netflix™ app. 1. Open the Amazon App Store and search for “Netflix.” 2. Select “Netflix.” 3. Select “Free.” 4. Select “Install.” Polaroid and the manufacturer of this tablet are not affiliated with, connected to, or sponsored by Netflix - we simply recommend their app over the other available options. Games Sometimes, while playing games, the g-sensor on the Tablet does not function correctly. This results in games not being controllable. To correct this problem, follow these steps: 1. Open “Settings.” 2. Select “Display.” 3. Select “Accelerometer Coordinate System.” 4. The default setting is “Default Coordinate System.” This setting should work for most games. 5. In the case that your game is not functioning properly, follow the above steps and select “Special coordinate system to support some other games.” Browsing files File Manager: To view, open, copy or delete files on the internal memory of the Tablet, inserted Micro SD card or USB stick, select "File Manager" on the Apps screen. 02:11 + SD /mnt/sdcard slacker 7 items -drw 1 items -drw 1 items -drw 5 items -drw 4 items -drw 0 items -drw 1 items -drw gameloft download QQReader Kobo LOST.DIR DCIM File Manager “Home” screen Briefly press a file or folder to open it. To copy, move or delete a file or folder, press and hold it until the options window appears. 02:11 + SD /mnt/sdcard slacker 7 items -drw 1 items -drw 1 items -drw 5 items -drw 4 items -drw 0 items -drw 1 items -drw gameloft download QQReader Kobo LOST.DIR DCIM • Press to open • Press & hold for options Note: If you would like to purchase an optional USB stick adapter, please call Polaroid Support at 1 (877) 768-8483 Options window 02:11 + SD Folder operations Delete Folder Rename Folder Copy Folder Move (Cut) Folder Zip Folder Paste into folder Extract here /mnt/sdcard slacker 7 items -drw 1 items -drw 1 items -drw 5 items -drw 4 items -drw 0 items -drw 1 items -drw gameloft download QQReader Kobo LOST.DIR DCIM 2. Select an option from the options window. Go back to the previous folder Go to internal memory SD Go to microSD card Go to USB Go to pictures Go to movies Settings Folder actions 02:11 + SD Folder operations Delete Folder Rename Folder Copy Folder Move (Cut) Folder Zip Folder Paste into folder Extract here /mnt/sdcard slacker 7 items -drw 1 items -drw 1 items -drw 5 items -drw 4 items -drw 0 items -drw 1 items -drw gameloft download QQReader Kobo LOST.DIR DCIM 3. If you select “Copy” or “Move”, press and hold on a folder and select “Paste into folder” to copy the file there. Connecting to TV Connecting to TV: Attach the optional YPbPr video cable to the Tablet’s TV out port, and to the TV’s component video input. TV out TV Note: If you would like to purchase an optional “Video Out” cable, please call Polaroid Support at 1 (877) 768-8483 Online help Select “Online Help” on the Apps screen to access: • New apps and updates for current apps • Firmware updates • Technical support • Product registration Legal information FCC Part 15: This equipment has been tested and found to comply with the requirements for a Class B digital device under Part 15 of the Federal Communications Commission (FCC) rules. These requirements are intended to provide reasonable protection against harmful interference in a residential installation. This equipment generates, uses and can radiate radio frequency energy and, if not installed and used in accordance with the instructions, may cause harmful interference to radio communications. However, there is no guarantee that interference will not occur in a particular installation. If this equipment does cause harmful interference to radio or television reception, which can be determined by turning the equipment off and on, the user is encouraged to try to correct the interference by one or more of the following measures: ● Re-orient or relocate the receiving antenna. ● Increase the separation between the equipment and receiver. ● Connect the equipment into an outlet on a circuit different from that to which the receiver is connected. ● Consult the dealer or an experienced radio/TV technician for help. Do not attempt to repair or modify this equipment. Warning: Changes or modifications to this equipment not expressly approved by the party responsible for compliance could void the user’s authority to operate the equipment. “This device complies with Part 15 of the FCC Rules. Operation is subject to the following two conditions: (1) this device may not cause harmful interference, and (2) this device must accept any interference received, including interference that may cause undesired operation.” Shielded USB cables must be used with this unit to ensure compliance with the Class B FCC limits. PLR IP Holdings, LLC, its licensees and affiliates, fully support all electronic waste initiatives. As responsible stewards of the environment, and to avoid violating established laws, you should properly dispose of this product in compliance with all applicable regulations, directives or other governances in the area where you reside. Please check with local authorities or the retailer where you purchased this product to determine a location where you can appropriately dispose of the product. You may also go to HYPERLINK "http://www.polaroid.com" www.polaroid.com and reference About / Electronic Recycling to learn more about the specific laws in your area and to locate a collection facility near your home. If your electronic device has internal memory on which personal or other confidential data may be stored, you may want to perform a data sanitization process before you dispose of your device to assure another party cannot access your personal data. Data sanitization varies by the type of product and its software, and you may want to research the best sanitization process for your device before disposal. You may also check with your local recycling facility to determine their data sanitization procedures during the recycling process. Limited Warranty This product as supplied and distributed new by AIT, Inc. (“AIT”) to the original consumer purchaser is warranted by AIT against defects in material and workmanship for a period of one year from your date of purchase (“Warranty”). In the unlikely event that this product is defective, or does not perform properly, you may within one year from your original date of purchase return it to the authorized service center for repair or exchange. TO OBTAIN WARRANTY SERVICE: • Provide proof of the date of purchase within the package (Dated bill of sale). • Prepay all shipping costs to the authorized service center, and remember to insure your return. • Include a return shipping address (no P.O. Boxes), a telephone contact number, and the defective unit within the package. • Describe the defect or reason you are returning the product. Your product will be repaired or replaced, at our option, for the same or similar model of equal value if examination by the service center determines this product is defective. Products received damaged as a result of shipping, will require you to file a claim with the carrier. The shipping address of the authorized service center is: AIT, Inc. Attention: Customer Service (2nd Floor) 14-C 53rd Street Brooklyn, NY 11232 IN NO EVENT WILL AIT, ITS MANUFACTURERS, DISTRIBUTORS OR PLR IP HOLDINGS, LLC BE LIABLE FOR ANY INCIDENTAL, DIRECT, INDIRECT, SPECIAL, PUNITIVE OR CONSEQUENTIAL DAMAGES (SUCH AS, BUT NOT LIMITED TO, DAMAGES FOR LOSS OF PROFITS, BUSINESS, SAVINGS, DATA OR RECORDS) RELATED TO THIS PRODUCT. EXCEPT AS STATED HEREIN, NO OTHER WARRANTIES SHALL APPLY. Should you have any questions or problems concerning this product, please contact our customer service department at: Customer Support: 1-877-768-8481 (Toll Free) [email protected] Monday - Thursday: 9AM - 5PM (EST) Friday: 9AM - 3PM (EST)


![[PMID700] User Guide [FINAL] 2010916](http://vs1.manualzilla.com/store/data/005963519_1-cd8961e58477068a277bbaaaede13ec4-150x150.png)
![[PMID703C] User Manual [FINAL] 20121101](http://vs1.manualzilla.com/store/data/005666959_1-067077325a260bbbb3ca6efa56d2ba06-150x150.png)