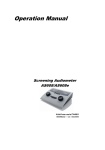
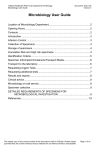
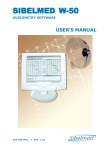
1
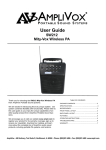
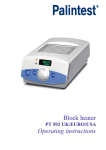
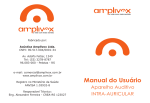
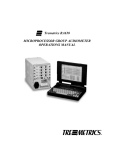
Amplivox Otosure Automatic Audiometer Operating Manual (Desktop Version) (Audibase Software Version 5.4) (Applies from serial number 58000 onwards) Amplivox Ltd 29-30 Station Approach Kidlington Oxford OX5 1JD UK Tel: +44 (0)1865 842411 Fax: +44 (0)1865 841853 [email protected] www.amplivox.ltd.uk Contents 1 1.1 1.2 1.3 1.4 1.5 Introduction............................................................................................................................ 3 Warranty Card (UK customers only) ....................................................................................... 3 Unpacking Instructions ............................................................................................................ 3 Standard Contents .................................................................................................................... 3 Optional Accessories ............................................................................................................... 3 Audiometer Type ..................................................................................................................... 3 2 2.1 2.2 2.3 2.4 Important Safety Instructions .............................................................................................. 4 Precautions ............................................................................................................................... 4 Electromagnetic Compatibility (EMC) Considerations ........................................................... 4 Audiometer Connections ......................................................................................................... 4 Connection to a Computer ....................................................................................................... 5 3 3.1 3.2 3.3 Test Types Available.............................................................................................................. 5 Manual Testing ........................................................................................................................ 5 Computer Testing .................................................................................................................... 5 Mixed-mode Testing ................................................................................................................ 6 4 4.1 4.2 4.3 4.4 4.5 4.6 4.7 Performing a Test .................................................................................................................. 6 Equipment preparation............................................................................................................. 6 Audiometry preparation ........................................................................................................... 6 Initiating a Test ........................................................................................................................ 7 Manual Testing ........................................................................................................................ 7 Computer Testing .................................................................................................................... 9 Single-frequency Testing ....................................................................................................... 10 Mixed-mode Testing .............................................................................................................. 10 5 5.1 5.2 5.3 Options Available to Set-up & Control a Test .................................................................. 10 Menu Commands ................................................................................................................... 10 Control Buttons - Otosure Window ....................................................................................... 11 Control Buttons - PC Keyboard and Mouse .......................................................................... 12 6 6.1 6.2 6.3 6.4 6.5 6.6 Error Handling & Troubleshooting ................................................................................... 12 No Instrument Found ............................................................................................................. 12 No Response from Patient ..................................................................................................... 13 Response Switch Held On ..................................................................................................... 14 Erratic Patient Response ........................................................................................................ 14 Exit Otosure With No Results ............................................................................................... 15 USB Lead Disconnected ........................................................................................................ 15 7 7.1 7.2 7.3 7.4 7.5 7.6 Technical Information & Specification ............................................................................. 16 Input/Output ........................................................................................................................... 16 Audiometric ........................................................................................................................... 16 Earphone Sound Attenuation Characteristics ........................................................................ 16 Physical & environmental ...................................................................................................... 16 Equipment classification ........................................................................................................ 16 Standards................................................................................................................................ 17 8 Symbols Used ....................................................................................................................... 17 9 9.1 9.2 Routine Maintenance........................................................................................................... 17 Audiometer maintenance ....................................................................................................... 17 Headset maintenance ............................................................................................................. 17 10 Calibration and Repair of the Instrument ........................................................................ 18 OM022-2 Amplivox Otosure Desktop Operating Manual Page 1 11 Guarantee ............................................................................................................................. 18 12 Ordering Consumables and Accessories ........................................................................... 18 13 Disposal Information ........................................................................................................... 19 Appendix 1: Installation & Operational Check ............................................................................ 20 Appendix 2: EMC Guidance and Manufacturer’s Declaration .................................................. 22 Appendix 3: Use with Non-medical Electrical Equipment .......................................................... 25 OM022-2 Amplivox Otosure Desktop Operating Manual Page 2 1 Introduction Thank you for purchasing an Amplivox audiometer. The Otosure is a compact, automatic air-conduction screening audiometer, driven and controlled by a computer (PC). It provides a cost-effective solution for today's health care environment. The Otosure is used with the Amplivox Audibase software, which allows electronic storage of audiometric test records on a PC, application of audiogram categorisation schemes, printing of audiograms and data exchange with other PC applications. This operator's manual enables you to take full and safe advantage of the features offered by the Otosure audiometer. Therefore, PLEASE READ IT THOROUGHLY before using the audiometer. 1.1 Warranty Card (UK customers only) Please complete the enclosed warranty registration card and return it to Amplivox. This will enable us to register your purchase, to deal with any enquiries you have and assist us in providing you with technical support. We will also be able to send you details of updates to your product and information about new products and services. 1.2 Unpacking Instructions Open the shipping carton and carefully remove all the equipment. Check against the delivery note that all the accessories ordered have been included with your audiometer. If anything is missing, please contact Amplivox Customer Support on +44(0)1865 842411, email: [email protected]. If you have purchased from a distributor you should contact them directly. Please retain the shipping carton as the audiometer will need calibrating on an annual basis and should be returned to Amplivox in its original shipping carton. 1.3 Standard Contents Otosure audiometer Audiometric headset & leads Patient response switch Software installation disk 1.4 Optional Accessories Audiocups (noise excluding headset) 1.5 Operating manual Calibration certificate USB cable (to connect to PC) Carrying case Spare USB cable Audiometer Type The Otosure is a Type 4 Audiometer (screening/monitoring) according the categorisations provided in BS/EN/IEC 60645-1:2001. It is designed to be operated by healthcare professionals qualified in the field of audiometry. OM022-2 Amplivox Otosure Desktop Operating Manual Page 3 2 Important Safety Instructions The Otosure instrument must be used only by practitioners qualified to perform audiometric tests. It is intended for use as a screening tool. 2.1 Precautions READ THIS OPERATING MANUAL BEFORE ATTEMPTING TO USE THE INSTRUMENT The audiometer is for indoor use only and should be used only as described in this manual. The earphones supplied with the audiometer are specifically calibrated with it; if these transducers are changed calibration will be required. Do not immerse the unit in any fluids. See Section 9 of this manual for the proper cleaning procedure for the instrument and its accessories. Do not use the instrument in an oxygen-rich environment or in the presence of a flammable anaesthetic mixture or other flammable agents. Do not drop or otherwise impact this instrument. If the instrument is dropped or damaged, return it to the manufacturer for repair and/or calibration. Do not use the instrument if any damage is suspected. The instrument must be stored and used within the specified temperature, pressure and humidity ranges, see Section 7. Do not attempt to open, modify or service the instrument. Return the instrument to the manufacturer or distributor for all servicing requirements. Opening the instrument will void the warranty. 2.2 Electromagnetic Compatibility (EMC) Considerations Medical electrical equipment needs special precautions regarding EMC and needs to be installed and put into service according to the EMC information provided in Appendix 2. This provides guidance on the electromagnetic environment in which to operate the instrument. Portable and mobile radio-frequency (RF) communications equipment can affect medical electrical equipment. The instrument should not be used adjacent to or stacked with other equipment; if this is unavoidable the instrument should be observed to verify normal operation. 2.3 Audiometer Connections The accessory terminals and connections are labelled to ensure correct identification and connection as follows:- OM022-2 Amplivox Otosure Desktop Operating Manual Page 4 Socket Type 6.3mm jack 6.3mm jack 6.3mm jack USB Connector Colour Code Blue Red Black N/a Connected Part Air conduction headset (Left) * Air conduction headset (Right) * Patient response Switch * Computer (via USB port) Notes See 2.4 The relevant part numbers are indicated in Section 12. For connected parts marked * only connect the accessories supplied with the instrument or supplied by Amplivox or an Amplivox distributor. These parts have been tested for use with the Otosure Audiometer for compliance with the standards IEC 60601-1 and IEC 60601-1-2. The use of accessories other than those specified may compromise compliance with these standards. 2.4 Connection to a Computer Refer to Appendix 3 for important information regarding the connection of non-medical electrical equipment to medical electrical equipment. The audiometer is powered and controlled by a computer (PC) using software supplied for this purpose. This software must be installed before the audiometer is connected to the PC. All other connections should be made before connecting the audiometer to the PC. A USB cable is provided to connect the Otosure to a PC. The connected port on the PC must be to USB specification 1.0 or 2.0. Important Note: Please refer to Appendix 1 for instructions on how to install the software and drivers, how to carry out the first-time connection to a PC, and how to undertake a basic operational check to ensure the audiometer is functioning correctly. 3 Test Types Available 3.1 Manual Testing This allows the operator to use the Otosure to record hearing level thresholds using the computer’s keyboard and mouse (see Section 4.4). The resulting audiometric data may then be transferred to the Audibase application. 3.2 Computer Testing This is a method of automatic audiometry based on the Hughson and Westlake method and undertaken automatically by the instrument. The level is increased in 5dB steps until a response is obtained from the patient and decreased in 10 dB steps until no response occurs. The process is repeated until, depending upon the criteria selected for recording a threshold (see Section 5.1), the instrument will record a threshold at that particular frequency. The Otosure then continues to the next test frequency and so on to complete the test on both ears (see Section 4.5). OM022-2 Amplivox Otosure Desktop Operating Manual Page 5 The Otosure provides the facility to run this test at specified single frequencies and add the results into the overall audiogram result (see Section 4.6). This feature is useful for situations where one particular frequency has proved problematic. 3.3 Mixed-mode Testing This is typically used when the automatic test has been unable to yield a threshold at one or more frequencies. It is possible to perform a manual test (normally at just a few selected frequencies) to complete an audiogram by adding thresholds to those already established (see Section 4.7). 4 Performing a Test 4.1 Equipment preparation Connect the headset and the patient response switch to the Otosure and then make the connection from the Otosure to the PC. No specific warm-up time is required although the device registration to the PC might take a short time to complete. Check operation as described in Appendix 1. 4.2 Audiometry preparation Refer to the various audiometric standards and other relevant publications for guidance on audiometric testing. Ambient Conditions Audiometric testing should always be performed in quiet conditions (e.g. a quiet room or an acoustic booth). The optional Audiocups can provide an additional level of isolation from ambient noise. For further explanation on permissible ambient noise levels, please refer to the audiometry standard ISO6189. Test System Arrangement The schematic diagram below shows a typical example of the use of audiometric test equipment. The audiometer is located on the desk of a seated operator as shown. Computer (e.g. Tablet/Laptop) Patient, wearing headset Operator Headset lead Response switch & lead Otosure Audiometer The patient is seated in front of the desk facing away from the operator. The patient wears a headset (see below) and responds to test stimuli by use of a hand-held switch which is also connected to the instrument. OM022-2 Amplivox Otosure Desktop Operating Manual Page 6 Headset The headset must be fitted by a qualified person to ensure a proper seal and comfortable fit. The leads from the headset are connected to the instrument and the headset is then fitted to the patient. Patient Instructions The patient is given the following instructions: “Press and then release the response switch when a tone is heard” 4.3 Initiating a Test Start the Audibase application, and with reference to the user manual either establish a new a patient, or access and display details of an existing patient. Use the left mouse button to click on the Launch Test icon in the Audibase toolbar. Alternatively use the “Test > Launch Test” drop-down menu selection at the top of the Audibase window. A new window will open for the Otosure software. If the patient has more than one set of audiometric results stored in Audibase the most recent audiogram is transferred and displayed in the Otosure window. The serial number and calibration date of the connected Otosure audiometer is shown at the bottom right of the Otosure window along with the test type currently selected. The test type last used is remembered; if this was a manual test the procedures described in Section 4.4 may be followed; if this was an automatic test the following dialogue box will be displayed: To run the same automatic test using the same options (as last used) simply click the “Start test” button and the test will commence (refer to Section 4.5). If a manual test is required, or if the test options are to be modified click the “Modify” button which will close the dialogue box. Refer to Sections 4.4 to 4.7 and Section 5 as appropriate for additional guidance. 4.4 Manual Testing Click the Manual test button (the button will then be highlighted) Alternatively use the “Test > Manual” drop-down menu selection at the top of the Otosure window. The following screen is displayed: OM022-2 Amplivox Otosure Desktop Operating Manual Page 7 Note the cursor positioned in left ear audiogram area indicating the current frequency and dBHL value (also displayed at the bottom centre of the Otosure window). Moving the mouse over the “Present” icon will sound the prescribed tone at this level and frequency from the left earphone, and the “Present” icon will change to . If the patient presses the response switch the “Response” icon will change from a dark green colour to a light green colour . To change the level of the presented tone, use the and arrow keys on the PC keyboard. When confident that a consistent response has been elicited at a particular level the threshold may be plotted on the screen by clicking the right mouse button. The numerical value of the threshold is added to the appropriate text box above the audiogram. If an error has been made, simply plotting a different threshold at the selected frequency will override any previous threshold. To clear all thresholds from the audiogram use the “Test > Clear readings …” drop-down menu selection and select the appropriate items to clear. To change the frequency of the presented tone, use the and arrow keys on the PC keyboard. Continue plotting thresholds until all desired frequencies have been tested. To select the right ear use the “R” key on the PC keyboard, and to return to the left ear use the “L” key. OM022-2 Amplivox Otosure Desktop Operating Manual Page 8 Use the controls described above to build up a complete audiogram for the patient. Once satisfactorily completed, click on “Exit” at the top of the Otosure window and confirm to exit Otosure. The Otosure window will close and the Audibase window will display the test results. Refer to the Audibase user manual for additional options, but it should be noted that the results must be saved in Audibase to be retained in the database. 4.5 Computer Testing Click the Computer test button (the button will then be highlighted) Alternatively use the “Test > Computer” drop-down menu selection at the top of the Otosure window. A screen similar to that shown in Section 4.4 is displayed but with the “Present” icon and cursor removed. To run a full Computer test on both ears simply click the “Run selected test” button. Alternatively use the “Test” drop-down menu option to select either a full test or a restricted test (for example, limited to a single ear). The Computer test will run according to the test options selected (see Section 5.1) with the test status indicated at the bottom left of the Otosure window. The “Present” icon will re-appear and indicate when tones are presented, and the “Response” icon will change to light green when a patient response is made. To view the traces of the presented tones select the “Show test detail” button: Alternatively use the “View > Detail” drop-down menu option. To view the audiogram thresholds select the “Show Audiogram” button: Alternatively use the “View > Audiogram” drop-down menu option. The order of frequencies tested, assuming that all frequencies are selected, are 1kHz, 1.5kHz, 2kHz, 3kHz, 4kHz, 6kHz, 8kHz, 500Hz, 250Hz and 125Hz. The time available for the patient to respond is from the point the tone is presented to the beginning of the next presented tone (approximately 2.3 seconds maximum). If a response is made within this time period a random delay is then added to the time until the next tone is presented. Once the test has been completed successfully the following dialogue box will be displayed: OM022-2 Amplivox Otosure Desktop Operating Manual Page 9 If the test has not been completed successfully the following dialogue box will be displayed: To accept the results and transfer them to Audibase click on the “Accept” button. The Otosure window will close and the Audibase window will be displayed. Refer to the Audibase user manual for additional options, but it should be noted that the results must be saved in Audibase to be retained in the database. To continue testing click on the “Continue” option. The dialogue box will close and the operator may continue testing as described in these sub-sections. 4.6 Single-frequency Testing In Computer test mode it is possible to run a test at a single frequency. For example, the operator might have noticed that the patient response at a particular frequency was erratic, or the automatic test was unable to establish a response at a particular frequency. The “Test > One freq. test” drop-down menu option may be used to select a single frequency for a particular ear. Clicking on the required option for frequency and ear initiates a test which will override any audiometric data already established for that frequency. At the end of the test the option to “Continue” or “Accept” is presented as described in Section 4.5. 4.7 Mixed-mode Testing This allows an audiogram to be completed by performing tests (typically at a few selected frequencies) using an alternative test type. For example, this facility could be used to perform a manual test if the automatic test option was unable to establish a threshold at a particular frequency). The legend “Mixed” is displayed at the bottom right of the Otosure window. 5 Options Available to Set-up & Control a Test The Otosure software stores the most recent test configuration and will initially use this to run any subsequent tests. However, there are a number of options available for setting up, modifying and controlling a test. These are summarised below - please refer to the operating window of the Otosure Software. 5.1 Menu Commands Exit: this closes the Otosure window and transfers any audiometric thresholds found plus other test detail to Audibase, if the user acknowledges the confirmation. Test: this provides access to a number of controls as follows: OM022-2 Amplivox Otosure Desktop Operating Manual Page 10 Run full test (tests each ear in turn using the current automatic test type) Left test (tests the left ear only using the current automatic test type) Right test (tests the right ear only using the current automatic test type) One freq. test (tests the selected ear & frequency combination using the current automatic test type) Stop test (displays a further option to confirm or cancel the ‘Stop test’ command; the test continues until a response is made; if ‘Stop test’ is confirmed any thresholds found are retained) Clear readings (clears all audiogram & threshold data, or only the data for the left or right ear) Computer (sets Computer to be the current automatic test type) Manual (sets the audiometer into the manual test mode) View: this allows either test “Detail” (graphical representation of presented tones and patient responses), or “Audiogram” (plots of thresholds found) to be selected Options: this opens a dialogue box, which provides access to the following options: Frequencies – include or exclude 125Hz, 250Hz, 1.5kHz or 8kHz to/from the test regime Computer test - controls to allow: the selection of either 2 out of 3, or 3 out of 5 consistent responses to generate a valid threshold a retest of the 1kHz frequency to be omitted (including this function can prove useful in correlating test results) Tone response - controls to determine the action to be taken on error: the number of times a frequency is repeated (0, 1, 2 or 3 times) if an error in testing occurs (for example, if there is an erratic response from the patient) and then the action to be taken if the error continues (skip the frequency or pause the test) Start level - specify a start level of either 20dBHL, 30 dBHL or 40 dBHL for a test, and for all frequencies 1kHz and lower for a Computer test Start with familiarisation - a familiarisation at 1kHz prior to the test Beep on finish - produces an audible tone to alert the operator that the test has finished Pause: immediately pauses the test and displays furthers options to abort the test, retry the current frequency being tested or ignore the current frequency and skip to the next one (skip not for a manual test); if the test is aborted any thresholds found are retained About: displays the version of the Otosure software installed on the PC 5.2 Control Buttons - Otosure Window starts the selected automatic test selects Computer test type selects Manual test mode selects test detail display OM022-2 Amplivox Otosure Desktop Operating Manual Page 11 selects audiogram display sounds a test tone in Manual test mode when the mouse pointer is moved over this icon; there is no need to click the mouse button the icon changes to this format while a tone is being presented Note that the present icon will also be displayed during automatic testing, although use of the mouse as described above will have no effect when automatic testing is performed. patient response indicator, displayed like this when the patient has not made a response the icon changes to this format when a response is made 5.3 Control Buttons - PC Keyboard and Mouse Keyboard, “L” key: Keyboard, “R” key: Keyboard, key: Keyboard, key: Keyboard, key: Keyboard, key: Mouse, pointer: Mouse, left button: Mouse, right button: selects left ear in Manual test mode selects right ear in Manual test mode increases the sound level in Manual test mode decreases the sound level in Manual test mode selects a lower tone frequency in Manual test mode selects a higher tone frequency in Manual test mode sounds the test tone when positioned over the present icon in Manual test mode selects Windows-based options as normal in manual test mode only, plots a threshold 6 Error Handling & Troubleshooting The Otosure is straightforward to use with an intuitive user interface, and if the instructions given in Sections 4 & 5 are followed the testing process should be performed easily. The product has been designed to detect and report a number of errors that could be encountered while performing audiometric testing and these are described below. 6.1 No Instrument Found If the audiometer has not been connected when a test is requested from Audibase the Otosure software will not start and the following warning dialogue box will be displayed: OM022-2 Amplivox Otosure Desktop Operating Manual Page 12 Clicking OK will return to Audibase. Use the “Edit > Cancel Insert/Edit” option or cancel toolbar button to cancel the insert operation. The Otosure may then be connected and Audibase operations continued. 6.2 No Response from Patient If the audiometer detects that no response to the test tone is made by the patient during an automatic test the tone level will increase to maximum and then the test will pause with the following message displayed on the PC screen: Depending on circumstances the operator may choose to abort the test, retry the frequency, or ignore the error (and proceed to testing of the next frequency). For a single frequency test, the tone level will also increase to maximum and then the test will pause with the following message displayed on the PC screen: Depending on circumstances the operator may choose to retry the single frequency, or cancel the single frequency test. Check that the patient fully understands the instructions previously given regarding use of the response switch (see Section 4.2). Check also that the response switch is connected and operating and that tones are being output from the headphones (see Appendix 1). OM022-2 Amplivox Otosure Desktop Operating Manual Page 13 6.3 Response Switch Held On If the audiometer detects that the response switch is not released by the patient during an automatic test the tone level will decrease to minimum and then the test will pause with the following message displayed on the PC screen: Depending on circumstances the operator may choose to abort the test, retry the frequency, or ignore the error (and proceed to testing of the next frequency). For a single frequency test, the tone level will decrease to minimum and then the test will pause with the following message displayed on the PC screen: Depending on circumstances the operator may choose to retry the single frequency, or cancel the single frequency test. Check that the patient fully understands the instructions previously given regarding use of the response switch (see Section 4.2). Check also that the response switch is connected and operating and that tones are being output from the headphones (see Appendix 1). 6.4 Erratic Patient Response If the patient is not consistent in making responses during an automatic test it will not be possible for a threshold to be established. In these circumstances, and depending on the test options selected (see ‘Options’ in Section 5.1) the test may be paused or the next test frequency may be presented. If pause is selected, the test will pause with the following message displayed on the PC screen: ) Note: this message will not be displayed for a single frequency test, but rather the test will complete but with errors (see below). OM022-2 Amplivox Otosure Desktop Operating Manual Page 14 If the audiometer manages to establish some but not all thresholds during an automatic test the following dialogue box will be displayed at the end of the testing process: This alerts the operator to the fact that errors in testing have occurred, and allows either: further testing to be continued (e.g. as described in Sections 4.6 or 4.7) or the thresholds that were established to be accepted and transferred to Audibase 6.5 Exit Otosure With No Results If the Otosure Software is closed without obtaining any test results the following warning will be displayed in Audibase: Click OK and then use the “Edit > Cancel Insert/Edit” option or cancel toolbar button to cancel the operation. 6.6 USB Lead Disconnected If the USB cable connecting the Otosure becomes disconnected any automatic test running will immediately cease, and the following message will be displayed: Once the message has been acknowledged, it will be possible to select control buttons and menu options in the Otosure window on the PC but these will have no effect. If the Otosure cable becomes disconnected, the recommended course of action is for the operator to close the Otosure window and return to Audibase. Then use the “Edit > Cancel Insert/Edit” option or cancel toolbar button to remove any data, and close Audibase. The Otosure may then be reconnected and Audibase started as usual. When the Otosure window is closed any thresholds found or plotted will be transferred into Audibase and care should therefore be taken with the use of this data. OM022-2 Amplivox Otosure Desktop Operating Manual Page 15 Please also refer to Appendix 3 for important information regarding the connection of nonmedical electrical equipment to medical electrical equipment. 7 Technical Information & Specification 7.1 Input/Output Connection to PC: Left and Right Outputs: Patient Response Switch: Maximum voltage at any output: 7.2 Audiometric Audiometer type: Frequencies, Hz: Type 4 (IEC 60645-1:2001 & ANSI S3.6:2004) 125Hz, 250Hz, 500Hz, 1kHz, 1.5kHz, 2kHz, 3kHz, 4kHz, 6kHz, 8kHz <1% <2% -10dB to 100dBHL (80dBHL at 125Hz) 5dB Within 3dB 4.5N Frequency accuracy: Distortion: Output level range: Output level steps: Output level accuracy: Headset static force: 7.3 Earphone Sound Attenuation Characteristics Frequency, Hz Attenuation, dB 7.4 USB (version 1.0 or 2.0); type B connector 6.3mm Jack Socket 6.3mm Jack Socket 5V peak 125 2 250 5 500 7 2000 25 4000 31 8000 23 Physical & environmental Audiometer Dimensions: Audiometer Weight: Operating temperature: Storage/transport temperature: Humidity (operating): Humidity (storage/transport): Atmospheric Pressure (operating): Atmospheric Pressure (storage/transport): 7.5 1000 15 120mm (L) x 85mm (W) x 30mm (H) 150gm +15oC to +35oC -20oC to +70oC 30% to 90% (non-condensing) 10% to 90% (non-condensing) 700hPa to 1060hPa 500hPa to 1060hPa Equipment classification Degree of protection against electric shock: Degree of protection against ingress of water: Mode of operation: Equipment mobility: Type B applied part Not protected Continuous operation Portable The Otosure audiometer is classified as a Class IIa device under Annex IX (Section 1) of the Medical Devices Directive. It is intended for transient use as a screening hearing test instrument. OM022-2 Amplivox Otosure Desktop Operating Manual Page 16 7.6 Standards The Otosure Audiometer complies with the relevant parts of following standards: BS/EN/IEC 60601-1: Medical Electrical Equipment – General requirements for basic safety and essential performance BS/EN/IEC 60601-1-2: Medical Electrical Equipment – Electromagnetic Compatibility: Requirements and Tests BS/EN/IEC 60645-1: Electroacoustics – Audiological Equipment – Part1: Pure-tone Audiometers 8 Symbols Used The following symbols appear on the audiometer: Definition: refer to instruction manual (mandatory) Definition: Type B equipment – equipment providing a particular degree of protection against shock, particularly regarding allowable leakage current and reliability of the protective earth connection (if present). The applied parts are the left & right earphones, patient response switch and the associated cables. 9 Routine Maintenance 9.1 Audiometer maintenance The Otosure audiometer is a precision instrument. Handle it carefully in order to ensure its continued accuracy and service. When cleaning the instrument, use a soft damp cloth and mild detergent to clean the instrument panel. Refer to ISO 8253-1 for additional guidance. 9.2 Headset maintenance Before use check the headset cables and connectors for signs of wear and/or damage. If you find any, please replace the item immediately by contacting Amplivox or your Amplivox distributor, requesting the relevant part number (see Section 12). Handle the audiometric headset (and audiocups) with care. For these parts that are in direct contact with the patient it is recommended that they are subjected to a standard disinfecting procedure between patients. This includes physically cleaning and use of a recognised disinfectant. The specific manufacturer's instructions should be followed for use of this disinfecting agent to provide an appropriate level of cleanliness. Clean the ear cushions (including those on the Audiocups, if used) with a recognised disinfectant, e.g. a “Mediswab”. OM022-2 Amplivox Otosure Desktop Operating Manual Page 17 Important note: During the cleaning process do not allow moisture to enter the earphone. 10 Calibration and Repair of the Instrument Amplivox recommend that this audiometer should be calibrated on an annual basis. Please contact Amplivox or the designated distributor for further details of calibration services. The instrument should be returned to the manufacturer for service & repair. There are no user-serviceable parts within it. When packing the instrument for shipping, please use the original shipping carton and packing materials. Please also ensure that the headset leads are not wrapped around the headband of the headset. 11 Guarantee All Amplivox instruments are guaranteed against faulty materials and manufacture. The instrument will be replaced free of charge for a period of one year from the date of despatch if returned, carriage paid, to the Amplivox service department. Return carriage is free of charge for customers in the UK and chargeable for overseas customers. Important Note: The following exceptions apply: The earphones may go out of calibration due to rough handling or impact (dropping). The life of the leads is also dependent upon conditions of use. These parts are only guaranteed against faulty materials or manufacture. 12 Ordering Consumables and Accessories To order consumables, additional accessories and to replace detachable parts that have been damaged, please contact Amplivox Ltd for current prices and delivery charges. The items available are listed below: Stock No. Description A022 AC1042 AC1047 AC1048 A023 A026 A032 A030 B132 A085 A073 MANOTODESK F07 Audiocups (noise reducing headset enclosures) Audiocup ear cushion Audiocup headband Audiocup headband cover Headband (standard headphone) Earphone cushion Earphones DD45 * Headset lead Carrying case Patient response switch Booth Leads Amplivox Otosure operating manual - desktop (OM022) USB Cable, 1.8m OM022-2 Amplivox Otosure Desktop Operating Manual Page 18 Accessories marked * require calibration with the specific audiometer to be used. Do not attempt to use these accessories until the audiometer has been calibrated to match their characteristics. Shipping documentation will reference the stock number quoted above, and images of the parts alongside the relevant stock number are available on the Amplivox website (www.amplivox.ltd.uk). The required fitting instructions are supplied with each part. 13 Disposal Information Amplivox Limited is fully compliant with the WEEE (Waste Electrical and Electronic Equipment) Regulations. Our PRN (Producer Registration Number) is WEE/GA0116XU and we are registered with the approved WEEE Compliance Scheme, B2B Compliance, approval number WEE/MP3338PT/SCH. The main purpose of the WEEE Regulations is to encourage the segregation of waste electrical items from the general waste stream and into reuse, recovery and recycling routes. Therefore for any waste electrical units purchased from Amplivox that either: bear the crossed out wheeled bin symbol with black bar underneath, or have been replaced with new Amplivox products on a like-for-like basis please contact our WEEE Compliance Scheme, B2B Compliance, using the details below. B2B Compliance will be able to provide further information on how to recycle your waste electrical units and answer any queries you may have. B2B Compliance Tel: +44 (0) 1691 676 124 (Option 2) Email: [email protected] OM022-2 Amplivox Otosure Desktop Operating Manual Page 19 Appendix 1: Installation & Operational Check This section describes the procedure for installing the Otosure operating software & associated device drivers, undertaking the first-time connection of the Otosure audiometer and performing a basic operational check to ensure that the instrument is working. A1.1 Installation A1.1.1 Overview Installation is a two-stage process (please ensure both are completed): Install the Otosure software on the PC Install the device drivers to enable USB communication between the PC and the Otosure audiometer A1.1.2 Install the Amplivox Otosure Software The installation of the Otosure software is seamless and is installed as part of Audibase. Please refer to the Audibase5.4 user guide for step by step installation instructions. A1.1.3 Install the USB Device Drivers Before commencing this installation ensure that the Otosure program is not running. Connect the USB port on the Otosure audiometer to a spare USB port on the PC using the supplied USB lead. Windows will detect the new hardware, and begin the installation process. Please refer to the Audibase5.4 user guide for step by step instructions to install the USB Device Drivers. A1.2 Uninstalling the Otosure Program Uninstalling the Otosure program is achieved simply by navigating to the location where the software was originally installed and deleting the file named “Otosure.exe”. There is no need to use the “Add or Remove Programs” utility. This will leave Audibase installed. For instructions on how to uninstall Audibase please refer to the Audibase5.4 user guide. A1.3 Operational Check Connect the headphones and patient response switch to the Otosure audiometer, and connect the Otosure audiometer to the PC via a USB cable. Start the Audibase application on the PC and enter new patient details (refer to the Audibase user manual). Start a test using the Launch Test button in the Audibase toolbar: Close any dialogue boxes in the Otosure window and select the Manual Test option: Move the mouse pointer over the “Present” icon in the Otosure window and ensure a tone is heard from an earphone. Use the arrow keys on the PC keyboard to change the level and frequency of the tone. Use the “L” and “R” keys on the PC keyboard to switch between earphones. OM022-2 Amplivox Otosure Desktop Operating Manual Page 20 Press the patient response switch and ensure that the “Response” icon in the Otosure window changes colour to light green and returns to dark green when the switch is released. The above will demonstrate the basic functionality of the audiometer; for more detailed checks refer to Sections 4 & 5. When closing the Otosure window remember to use the “Edit > Cancel Insert/Edit” option or cancel toolbar button in Audibase to cancel the test operation. OM022-2 Amplivox Otosure Desktop Operating Manual Page 21 Appendix 2: EMC Guidance and Manufacturer’s Declaration Guidance and manufacturer’s declaration – electromagnetic emissions The Otosure Audiometer is intended for use in the electromagnetic environment specified below. The customer or user of the Otosure Audiometer should assure that it is used in such an environment. Emissions test Compliance Electromagnetic environment – guidance RF emissions Group 1 The Otosure Audiometer uses RF energy only for its internal function. Therefore, its CISPR 11 RF emissions are very low and are not likely to cause interference in nearby electronic equipment. RF emissions Class A The Otosure Audiometer is suitable for use in all establishments, including domestic CISPR 11 establishments and those directly Harmonic emissions Not applicable connected to the public low-voltage power supply network that supplies buildings used for domestic purposes. IEC 61000-3-2 Voltage fluctuations/flicker Not applicable emissions IEC 61000-3-3 Guidance and manufacturer’s declaration – electromagnetic immunity The Otosure Audiometer is intended for use in the electromagnetic environment specified below. The customer or user of the Otosure Audiometer should assure that it is used in such an environment. Immunity test IEC 60601 test Compliance Electromagnetic level level environment – guidance Electrostatic ±6 kV contact ±6 kV contact Floors should be wood, Discharge (ESD) concrete or ceramic tile. If ±8 kV air ±8 kV air floors are covered with IEC 61000-4-2 synthetic material, the relative humidity should be at least 30% Electrical fast ±2 kV for power Not applicable Mains power quality should transient/burst supply lines be that of a typical IEC 61000-4-4 ±1 kV for commercial or hospital input/output lines environment. Surge ±1 kV differential Not applicable Mains power quality should mode be that of a typical IEC 61000-4-5 ±2 kV common commercial or hospital mode environment. Voltage dips, short <5% UT Not applicable Mains power quality should interruptions and (>95% dip in UT) be that of a typical voltage variations for 0.5 cycle commercial or hospital on power supply environment. If the user of input lines 40% UT the Otosure Audiometer (60% dip in UT) requires continued IEC 61000-4-11 for 5 cycles operation during power mains interruptions, it is OM022-2 Amplivox Otosure Desktop Operating Manual Page 22 70% UT (30% dip in UT) for 25 cycles Power frequency (50/60 Hz) magnetic field <5% UT (>95% dip in UT) for 5 sec 3 A/m recommended that the Otosure Audiometer be powered from an uninterruptible power supply or a battery. 3 A/m Power frequency magnetic fields should be at levels characteristic of a typical location in a typical IEC 61000-4-8 commercial or hospital environment. NOTE UT is the a.c. mains voltage prior to the application of the test level Guidance and manufacturer’s declaration – electromagnetic immunity The Otosure Audiometer is intended for use in the electromagnetic environment specified below. The customer or user of the Otosure Audiometer should assure that it is used in such an environment. Immunity IEC 60601 Compliance Electromagnetic environment – guidance test test level level Portable and mobile RF communications equipment should be used no closer to any part of the Otosure Audiometer, including cables, than the recommended separation distance calculated from the equation applicable to the frequency of the transmitter. Recommended separation distance Conducted RF IEC 610004-6 3 Vrms 150kHz to 80MHz Radiated RF IEC 610004-3 3 V/m 80MHz to 2.5GHz 3 Vrms d = 1.2√P d = 1.2√P 80MHz to 800MHz 3 V/m d = 2.3√P 800MHz to 2.5GHz where P is the maximum output power rating of the transmitter in Watts (W) according to the transmitter manufacturer and d is the recommended separation distance in metres (m). Field strengths from fixed RF transmitters, as determined by an electromagnetic site survey, a should be less than the compliance level in each frequency range. b Interference may occur in the vicinity of equipment marked with the following symbol: OM022-2 Amplivox Otosure Desktop Operating Manual Page 23 NOTE 1: At 80MHz and 800MHz, the higher frequency range applies. NOTE 2: These guidelines may not apply in all situations. Electromagnetic propagation is affected by absorption and reflection from structures, objects and people a Field strengths from fixed transmitters, such as base stations for radio (cellular/cordless) telephones and land mobile radios, amateur radio, AM and FM radio broadcast and TV broadcast cannot be predicted theoretically with accuracy. To assess the electromagnetic environment due to fixed RF transmitters, an electromagnetic site survey should be considered. If the measured field strength in the location in which the Otosure Audiometer is used exceeds the applicable RF compliance level above, the Otosure Audiometer should be observed to verify normal operation. If abnormal performance is observed, additional measures may be necessary, such as re-orienting or relocating the Otosure Audiometer. b Over the frequency range 150 kHz to 80 MHz, field strengths should be less than 3 V/m. Recommended separation distances between portable and mobile RF communications equipment and the Otosure Audiometer The Otosure Audiometer is intended for use in an electromagnetic environment in which radiated RF disturbances are controlled. The customer or the user of the Otosure Audiometer can help prevent electromagnetic interference by maintaining a minimum distance between portable and mobile RF communications equipment (transmitters) and the Otosure Audiometer as recommended below, according to the maximum output power of the communications equipment. Rated maximum Separation distance according to frequency of transmitter output power of transmitter m 150 kHz to 80 80 MHz to 800 800 MHz to 2.5 GHz W MHz MHz d = 1.2√P d = 1.2√P d = 2.3√P 0.01 0.12 0.12 0.23 0.1 0.38 0.38 0.73 1 1.2 1.2 2.3 10 3.8 3.8 7.3 100 12 12 23 For transmitters rated at a maximum output power not listed above, the recommended separation distance d in metres (m) can be estimated using the equation applicable to the frequency of the transmitter, where P is the maximum output power rating of the transmitter in Watts (W) according to the transmitter manufacturer. NOTE 1: At 80MHz and 800MHz, the separation distance for the higher frequency range applies. NOTE 2: These guidelines may not apply in all situations. Electromagnetic propagation is affected by absorption and reflection from structures, objects and people. OM022-2 Amplivox Otosure Desktop Operating Manual Page 24 Appendix 3: Use with Non-medical Electrical Equipment Any person who connects external equipment to signal input, signal output or other connectors has created a medical electrical system and is therefore responsible for the system complying with the requirements of clause 16 of IEC 60601-1:2005 (General requirements for basic safety and essential performance). If connections are made to standard equipment such as printers and computers, special precautions must be taken in order to maintain medical safety. The following notes are provided for guidance in making such connections to ensure that the general requirements of clause 16 of IEC 60601-1:2005 are met The following signal inputs and outputs on the Amplivox Otosure audiometer are electrically isolated to the requirements of IEC 60601-1 in order to reduce any potential hazard associated with the use of connected mains-powered equipment: Socket Label Socket Type USB Connector Typical Connection Computer External equipment intended for connection to signal input, signal output or other connectors, shall comply with the relevant IEC or international standards (e.g. IEC 60950, CISPR 22 & CISPR 24 for IT equipment, and the IEC 60601 series for medical electrical equipment). Equipment not complying with IEC 60601 shall be kept outside the patient environment, as defined in IEC 60601-1 (at least 1.5m from the patient). The operator must not touch the connected equipment and the patient at the same time as this would result in an unacceptable hazard. Please refer to the diagram below for a typical configuration of a connected computer. Otosure used with a PC via a USB connection Otosure Audiometer Mains Outlet PC via USB Socket PC Power Supply OM022-2 Amplivox Otosure Desktop Operating Manual Page 25