1
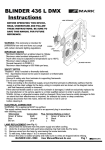
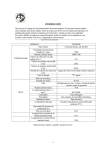
Equipson, S.A.
www.equipson.es
[email protected]
BLINDER 464 DMX
User Manual / Instrucciones de Usuario
MONTAJE Y AJUSTE
BLINDER 464 DMX
Instructions
AVISO - La temp. Máxima es de 180º C - Esta luminaria no es adecuada para montar en superficies
inflamables.
La unidad incorpora un asa de montaje con un agujero de 12.7 mm de diámetro que permite colocar
una garra para montar en truss, etc. Usando el asa, es posible cambiar la orientación del giro.
LAMP RETAINING
BEFORE OPERATING THIS DEVICE,
READ, UNDERSTAND AND FOLLOW
THESE INSTRUCTIONS. BE SURE TO
SAVE THIS MANUAL FOR FUTURE
REFERENCE.
Tipo
PAR 64 GY 9.5
YOKE
Voltios
230 V
Watios
500 w
Use lámpara de igual voltage y potencia en el
mismo circuito.
INSTRUCCIONES DE FUNCIONAMIENTO
WARNING -This lumin aire is intended for
professional use onlyand does not comply
with certain domestic lighting regulations.
La unidad dispone de un sólo modo.
SCREW
LAMP
TERMINAL
IMPORTANT NOTES
˙Minimum distance from a lighted object is 1Meter.
˙Maximum rated ambient temperature is 45°C.
˙Input cable may be subjected to temperatures up to 180°C.
˙Maximum rated voltage is 240V.
˙Normal frequency is 50/60 H z.
˙Maximum rated wattage is 500 Watts per lamp.
Modo DMX, le permite interconexionar una
serie de unidad es en una cadena, usando un
cable estéreo XLR con conector de 3 pines.
Así puede controlarlo con una consola
estandard DMX.
BLINDER 464 DMX
SAFETY NOTES
˙Replace l amp if cracked or thermally deformed.
˙The Spot Banks should not be used in explosive orinflammable
environments.
˙Always fit safety wire from luminaire to supporting framework.
˙Do not over voltage luminaire.
˙ Whe
n connecting to the electrical supply, ensure that the luminaire is effectively earthed, that the
supply is at the rated voltage for the lamp, wiring is complete and as shown on the diagram below
and that thecorrect polarity is observed.
˙If the exte rnal flexible cable or cord of this luminaire is damaged, it shall be exclusively replaced by
the manufacturer or his service agentor a s imilar qualified person in order to avoid a hazard.
˙Shields, lenses or ultraviolet screens shall be changed if they have become visibly damaged to filch
an extent that their effectiveness is impaired, for example by cracks or deep screeches.
˙Always disconnect from the mains, when the device is not in user or
before cleaning it.
Direccionamiento DMX
1
2
3
4
Fig 2
This symbol on the product or on its packaging indicates that this product
shall not be trated as household waste. Instead it shall be handed over to
the applicable collection point for the recycling of electrical an electronic
equipment. By ensuring this product is disposed of correctly, you will help
prevent potential negative consequences for the environment and human
health, which could otherwise be caused by inappropriate waste handling
of this product. The recycling of amterials will help to conserve natural
resources. For more detailed information sabout recycling of this product,
please contact your local city office, your household waste disposal service
or the shop where you purchased the product.
LAMP REPLACEMENT (see Fig 1.)
1) Disconnect the luminaire from the power supply and allow cooling.
2) Undo the 2 screws that hold each lamp-retaining ring that holds the Par lamp.
3) Remove wires from the lamp by unscrewing the screw terminals.
4) To refit lamp, follow steps 1 to 3 in reverse order.
5) Ensure the lamp is seated properly and make sure no wires are trapped before refixing.
User Manual/Manual de uso
DMX IN
Configure la dirección DMX con los dip 1-9.
El dip 10 no tiene uso. Este efecto utiliza 4
canales de control DMX: El canal 1 controla
el brillo de la lámpara 1, los canales 2, 3 y 4
controlan el brillo de las lámpara 2, 3 y 4.
Cuando el valor DMX es “0” el brillo es el
mínimo, el brillo se incrementa con el valor
DMX. Cuando el valor es “255” el brillo es
máximo. (Ver figura 2)
ELECTRICAL CONNECTION
WARNING -Thi s appliance MUST be earthed.
The supply cables should be connected to an approved plug in accordance
with following code:
Wire Colour
Conne ction
Plug Terminal Marking or Colour
Green & Yellow
Earth
E
Green & Yellow or
Blue
Neutral
N
Black
Bro wn
Liv e
L
Red
BLINDER 464 DMX
DMX OUT
Pag 1
BLINDER 464 DMX
User Manual/Manual de uso
Pag 4
BLINDER 464 DMX
Instrucciones
MOUNTING AND ADJUSTMENT
WARNING-Max Temp=180°C -Th is luminaire is not suitable for mounting on flammable surfaces.
The luminai re is supplied with a yoke with a 12.7mm diameter hole allowing the luminaire to be fitted
with a hook clamps in order that it can be mounted on a 5cm tube. Using the “T” bar on the side, the
tilt angle can be adjusted.
ARO DE RETENCION
ANTES DE OPERAR CON EL
DISPOSITIVO, LEA, COMPRENDA
Y SIGUA ESTAS INSTRUCCIONES
CONSERVE EL MANUAL PARA
FUTURAS REFERENCIAS.
AVISO Esta luminaria ha sido diseñada
para uso profesional y no cumple ciertas
regulaciones de iluminación doméstica.
LAMP TYPES
Standard lamp types are shown in the box below.
ASA
Type
Voltage
Wattage
PAR 64 GY 9,5
230 V
500 W
N.B. Always use bulbs of identical Voltage and
Wattage in the same circuit.
TORNILLO
TERMINAL
NOTAS IMPORTANTES
- Mínima distancia al objeto iluminado: 1 m
- Máxima temperatura amiente: 45º C
- El cable de red debe soportar hasta 180º C
- Máximo voltaje: 240 V
- Frecuencia de uso: 50/60 Hz
- Máxima potencia por lámpara: 500 W
Operating instruction
BLINDER 464 DMX
NOTAS DE SEGURIDAD
- Sustituya la lámpara en caso de rotura o deformación por calor.
- La unidad no debe ser usada en ambiente inflamable o explosivos.
- Coloque un cable de seguridad para soportar la unidad.
- No sobrealimente de tensión la unidad
- Cuando conecte la alimentación, asegúrese que está conectada a tierra y que el valor de tensión
es el correcto. Cablee la unidad de acuerdo al diagrama inferior, observando la polaridad.
- Si el cable externo se daña, debe ser sustituido exclusivamente por el fabricante o su servicio
técnico para evitar riesgos.
- Pantallas, lentes, etc deben ser sustituidas cuando se aprecien daños visibles o pérdida de eficacia
, por ejemplo con rayaduras o golpes.
- Desconecte siempre la alimentación si no va usar el dispositivo.
There is only one mode to operate this luminaire.
DMX MODE
DMX mode allow to link serial unites into a chain with DMX
linking cable-stereo cable with 3-pin XLR-plug and
connnector. Then you can control them with a standard
DMX controller.
Set DMX address via DIP 1~9 switches. DIP 10 is invalid.
This luminare use 4 channells to control lamps’ brightness.
Channel 1 control the lamp1 brightness,channel2,3,4
control the lamp2,3,4’s brightness as well. When DMX value
is “0”,lamps’ brightness are min. . The brightness is increased
when the DMX value is increased. When DMXvalue is “255”,
lamps’ bright are max..(See Fig 2)
CONEXION ELECTRICA
AVISO - Esta unidad debe ser conectada a tierra
Los cables de alimentación deben ser conectados de la siguiente manera:
Color del cable
Amarillo / Verde
Azul
Marrón
Conexión
Tierra
Neutro
Fase
Marca en el terminal o color
Amarillo / Verde
E
Azul
N
Marrón
L
1. Desconecte la unidad de la red y deje que se enfríe.
2. Destornille los dos tornillos que retienen cada lámpara.
3. Retire los cables, destornillando cada terminal de la lámpara.
4. Para colocar la lámpara sigua los pasos 1 a 3 en orden inverso
5. Asegúrese que la lámpara está bien colocada y los cables no están pinzados.
User Manual/Manual de uso
1
2
3
4
Fig 2
SUSTITUCION DE LA LAMPARA (Ver Fig. 1)
BLINDER 464 DMX
DMX Address
Pag 3
Este símbolo en su equipo o embalaje, indica que el presente producto
no puede ser tratado como residuos domésticos normales, sino que deben
entregarse en el correspondiente punto de recogida de equipos electrónicos
y eléctricos. Asegurándose de que este producto es desechado
correctamente, Ud. está ayudando a prevenir las consecuencias negativas
para el medio ambiente y la salud humana que podrían derivarse de la
incorrecta manipulación de este producto. EL reciclaje de materiales
ayuda a conservar las reservas naturales. Para recibir más información,
sobre el reciclaje de este producto, contacte con su ayuntamiento, su
punto de recogida más cercano o el distribuidor donde adquirió el producto.
BLINDER 464 DMX
User Manual/Manual de uso
Pag 2