1
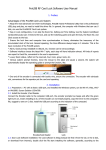
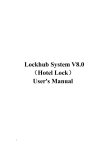
Instruction Manual
VHA30
VHA30N
16
1
2
15
INSTALLATION
VHA30 Wiring Diagram
Red-power
DC inputŁ +12V - +24V
Black-power AC inputŁ~ 12V - 24V
Brown-door status detecting
Orange-unlocking button 1
Yellow-unlocking button 2
Green-GND
Blue-NO 2
Purple-COM 2
Gray-NC 2
White-NO 1
Pink-COM 1
Aqua-NC 1
Shielded ground
NOTICE
1. Please remove the cover carefully following the manual. Not
permitted to remove with sudden force.
2. Before remove the cover, push up the front cover a few
millimeters, then follow Picture 3, lift the lower cover for less
than 200and remove the front cover gently.
Shift the
front cover up
DC inputŁ +12V - +24V
AC inputŁ~ 12V - 24V
Door
bell
Pay attention for
right polar connection
20
Door lock
o
Shielded ground
Picture 1
14
Picture 2
Picture 3
3
INSTALLATION
Before installation, position the location where the controller unit is
mounted. Please operate it according to the following steps:
1. Open the controller by loosening and removing the back case
screw at the bottom with the spline tool.
2. Use the provided drilling template to accurately locate and drill
the required holes. The four drilling holes are marked "B".
3. Use the screws provided to mount the back case on the wall. Be
sure to draw the wiring through the large centre hole in back
case, and keep level.
4. Connected accurately the system wiring following the label
enclosed on the rear.
5. Put the unit back and screw it on by using the spline tool.
VHA30N RS-485 Wiring Diagram
Red-power
DC inputŁ +12V - +24V
Black-power AC inputŁ~ 12V - 24V
Brown-door status detecting
Orange-unlocking button 1
Yellow-unlocking button 2
Green-GND
Blue-NO 2
Purple-COM 2
Gray-NC 2
White-NO 1
Pink-COM 1
Aqua-NC 1
Black+white-485Brown+white-485+
Shielded ground
DC inputŁ +12V - +24V
AC inputŁ~ 12V - 24V
Door
bell
Pay attention for
right polar connection
Door lock
Black+White 485Brown+White 485+
Shielded ground
4
13
Group cards added in ZONE 1
In the setting mode:
Press the button and , the yellow LED indicator will be flashing,
then press the button
and
, a sound "BI" as reminder. Then input
three-figure 000 to 999 data storage units as start added unit, and input
3 digits number indicates the cards quantity you want to add in. For
example:
1. Input 005 060--means the cards added in storage units starting
from 005, and the quantity of the whole cards added in are 60.
2. Input 060 150--means the cards added in storage units starting
from 060, and the quantity of the whole cards added in are 150.
After adding cards, a sound "BI" as reminder. Swipe the first added
card or input the first added card serial number(8 digits), a sound "BI"
as reminder, means added in successfully.
Press the button
to quit setting mode.
Working conditions:
o
o
temperature: -20 C ~ +50 C
RH: ˇ95%
Current and voltage requirements:
DC input:
+12V - +24V
AC input: ~ 12V - 24V
standby current: ˇ80mA
working current: ˇ110mA
Applicable card mode:
EM ID card(Default)
T5557/T5567 card(Setting required)
Effective distance: 5cm
Capacity:
ZONE 1: up to 1000 passwords & card holders
ZONE 2: up to 10 passwords OR card holders
Modify the user code of ZONE 1
In the setting mode:
Press the button and , the yellow LED indicator will be flashing,
then press the button
and
, a sound "BI" as reminder. Then input
three-figure 000 to 999 data storage units and input correlative passwords
(The length of relative passwords should as same as admin code).
to quit setting mode.
Press the button
Setting access control ID ( for RS-485 model VHA30N )
In the setting mode:
Press the button and , the yellow LED indicator will be flashing,
then press the button
and
, a sound "BI" as reminder. Then input
6 digits ID number, and a sound "BI" as reminder, means ID setting
successfully.
to quit setting mode.
Press the button
12
1. With internal EM reader.
2. Frequency: 125KHz.
3. Effective distance: 5cm.
4. ZONE 1: up to 1000 passwords & card holders.
ZONE 2: up to 10 passwords OR card holders..
5. Card access, code access and combined access.
6. Digital keypad operation.
7. Built-in pickproof function.
8. Watchdog timer, powerful reboot and self-recovery watchdog can
connect with the external unlock button.
9. Dual relay outputs.
10. Unlock output delay time: 0~99s.
11. IP rating: 65.
12. Dimension: 120*76*28mm.
13. Dual relay outputs for door opening, door status detecting, open door
by button. The function of door status detecting is for ZONE 1 only.
5
OPERATION
1. ZONE 1 and 2 relays can be programmed for opening the lock, up to
1000 user cards and correlative codes can be stored into ZONE 1, 10
user cards or codes can be stored into ZONE 2 . In addition, ZONE 1
can be programmed for 3 modes to open the lock: card access(use card
only), card and code access(use either card or code), and combined
access(use card and code together). ZONE 2 could be programmed for
.
door bell.
2. Default code is 1234.
3. Input the admin default code twice (1234+1234). But
a. If the admin default code you set is two digits, please input 12 12
b. If the admin default code you set is three digits, please input 123 123
c. If the admin default code you set is five digits, please input 12345
12345
The rest may be deduced by analogy...... The admin codes is max 6 digits.
After you enter in the setting mode, the yellow LED will be on.
Turn on/off the door bell
In the setting mode:
Press the button
and
(mode indicator will flash yellow), follow
with the
and
, a long beep will be heard whilst the mode indicator
will turn yellow, the function of door bell is turned off.
Press the button
and
(mode indicator will flash yellow), follow
with the
and
, a long beep will be heard whilst the mode indicator
will turn yellow, the function of door bell is turned on.
Press the button
to quit the setting mode.
NOTICE: The relay in ZONE 2 for door bell is available if the function of
door bell is turned on but the function or door lock is inactive. Press the
button
in standby mode, the relay contacts one time, the door bell
ringing is triggered.
Add the master card(only for ZONE 1)
In the setting mode:
Press the button
and
, the mode indicator will flash green, it
indicates there is no master card stored, if the indicator turns red, it
indicates there is already data existed, press the button twice to clean
up the data, and then indicator will flash green, swipe the master card,
a long beep will be heard, it indicates that adding successfully.
Press the button
to quit the setting mode.
Using the master card enter the setting mode
Access mode setting
In the setting mode:
Press the button and , the mode indicator will flash yellow, follow
the button
twice, the mode indicator will turn yellow, a long beep will
be heard. It indicates that only the card access is available.
Press the button and , the mode indicator will flash yellow, follow
the button and , the mode indicator will turn yellow, a long beep will
be heard, it indicates that both the card and code access are available.
Press the button
and
, the mode indicator will flash yellow,
follow the button and , the mode indicator will turn yellow and a long
beep will be heard, it indicates that card and code access combined is
available.
Press the button
to quit the setting mode.
6
Swipe the master card, the indicator will flash yellow whilst a long
"BI" will be heard, enter the setting mode. Swipe the master card again,
the indicator will turn green whilst three times rapid beep sound will be
.
heard-exit the setting mode.
The access control will be locked for 60s if the mistaken code
continuously input or swipe the invalid card for 5 times( both the keypad
operating and the card swiping is not available during the 60 seconds).
Detect the door status: when someone opens the door and comes in,
the door is closed, the system will automatically detect the door status
and lock the door even though it is still in delay period(For ZONE 1 only) .
NOTICE
The user code must be different from the administration code.
The code of ZONE 1 must be different from that of ZONE 2.
11
OPERATION
1. ZONE 1 and 2 relays can be programmed for opening the lock, up to
1000 user cards and correlative codes can be stored into ZONE 1, 10
user cards or codes can be stored into ZONE 2 . In addition, ZONE 1
can be programmed for 3 modes to open the lock: card access(use card
only), card and code access(use either card or code), and combined
access(use card and code together). ZONE 2 could be programmed for
.
door bell.
2. Default code is 1234.
3. Input the admin default code twice (1234+1234). But
a. If the admin default code you set is two digits, please input 12 12
b. If the admin default code you set is three digits, please input 123 123
c. If the admin default code you set is five digits, please input 12345
12345
The rest may be deduced by analogy...... The admin codes is max 6 digits.
After you enter in the setting mode, the yellow LED will be on.
Set the length of passwords
In the setting mode:
Press the button
and yellow LED indicator will be flashing, then
4 and a sound "BI" as reminder, then input X(X=2,3,4,
press the button
5,6):
2--Stands for the password/code digit length is 2(00-99)
3--Stands for the password/code digit length is 3(000-999)
The rest may be deduced by analogy, and the maximum is 6.
A sound "BI" as reminder, means digit length setting successfully. If the
sound is "BI BI BI", means digit length is as same as the existence, and new
setting is not permitted.
Press the button
to quit setting mode.
NOTICE
Once the digit length changed, all added
cards and passwords will be cleared.
Add the user card and code ( ZONE 1 )
Access mode setting
In the setting mode:
Press the button and , the mode indicator will flash yellow, follow
the button
twice, the mode indicator will turn yellow, a long beep will
be heard. It indicates that only the card access is available.
Press the button and , the mode indicator will flash yellow, follow
the button and , the mode indicator will turn yellow, a long beep will
be heard, it indicates that both the card and code access are available.
Press the button
and
, the mode indicator will flash yellow,
follow the button and , the mode indicator will turn yellow and a long
beep will be heard, it indicates that card and code access combined is
available.
Press the button
to quit the setting mode.
10
In the setting mode:
Enter one set number(3 digits) from 000 to 999 data storage units,
yellow LED indicator will be flashing:
1. If red LED indicator is on, means there is data stored in this set of unit,
press the button
twice to clean up;
2. If green LED indicator is on, means this number data storage unit can
be added card and passwords in.
Add card and passwords steps:
1. Enter in setting mode, and the yellow LED indicator will be flashing.
2. Input three-figure from 000 to 999 data storage units, and the green
LED indicator lighting.
3. Swipe card, and a sound "BI" means added in. Then input the correlative
passwords(correlative for the card just added in this data storage unit).
The length of passwords should be the same as admin code. For
example, the admin code is 12 (two is the length), herein should
setting two digits passwords, you can set 00-99 as your passwords.
If the admin code is 123 (three is the length), herein should setting
three digits passwords, you can set 000-999 as your passwords. The
rest may be deduced by analogyˇˇ After the sound "BI", means
card added in and passwords setting successfully.
Press the button
to quit setting mode.
7
Delete the user card and code ( ZONE 1 )
In the setting mode:
Enter one set number(3 digits) from 000 to 999 data storage units,
if red LED indicator is on, means there is data stored in this set of unit, press
the button
twice to delete the card and code.
Add the user card or code ( ZONE 2 )
In the setting mode:
Press the button
and
, the yellow LED indicator will be flashing,
input two-figure from 00 to 09 data storage units, yellow LED indicator will
be flashing;
1. But if red LED indicator light is on, it means there is data stored in
this set of unit.
storage unit existed data, press the button
twice to clean up;
2. If green LED indicator light is on, it means this number data storage
unit can be added card or password in.
Add card or passwords steps:
Swipe card, and a sound "BI" means added in; OR input the correlative
passwords (correlative for the card just added in this data storage unit)
the length of passwords should be as same as admin code. For
example, the admin code is 12 ( two is the length ), herein should
setting two digits passwords, you can set 00-99 as your password.
The admin code is 123(three is the length), herein should setting three
digits passwords, you can set 000-999 as your passwords. The rest
may be deduced by analogy...... After the sound "BI", means card
added in or passwords setting successfully.
Press the button
to quit the setting mode.
Delete the user card or code ( ZONE 2 )
In the setting mode:
Press the button
and
, the yellow LED indicator will be flashing,
input two-figure from 00 to 09 data storage units, if red LED indicator light
is on, it means there is data stored in this set of unit, press the button
twice to delete the card or code.
8
Set the unlocking time for ZONE 1
In the setting mode:
Press the button
and
, the mode indicator will flash yellow,
enter the number from 00 to 99, the mode indicator will turn yellow in
the mean time a long beep will be heard, it indicates a success of
delay time setting. 00-99 means the delay time, eg. 05 means the
unlocking time is 5s delayed. If setting lock-time as 00 means: swipe
card or input password once to open the door, swipe card or input
password again to close the door.
Press the button
to quit the setting mode.
Set the unlocking time for ZONE 2
In the setting mode:
Press the button
and , the mode indicator will flash yellow, enter
the number from 00 to 99, the mode indicator will turn yellow in the mean
time a long beep will be heard, it indicates a success of delay time setting.
00-99 means the delay time, eg. 05 means the unlocking time is 5s delayed.
If setting lock-time as 00 means: swipe card or input password once to
open the door, swipe card or input password again to close the door.
Press the button
to quit the setting mode.
Clean all user cards and codes, restores to factory defaults
In the setting mode:
Press the button
and
(mode indicator will flash yellow), follow
the button
twice, (a continuous beep will be heard and mode indicator
will turn yellow), it indicates all user cards and codes have been cleaned
out successfully.
Press the button
and
(mode indicator will flash yellow), follow
the button
twice, (a continuous beep will be heard and mode indicator
will turn yellow), it indicates it restores to factory defaults.
Press the button
to quit the setting mode and standby.
If enter wrong information, it will imply as BI.BI. sounds. The device would
turn back without actions in 30 seconds automatically accompany with BI.
BI. sounds. If it is not in the setting mode and press incomplete numbers,
and if unlock door by card and password (combined) but only one action
is done, then it will turn back in 5s automatically accompany with BI.BI.
sounds.
9