1
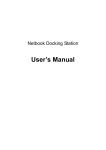
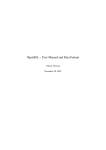
Studio PRODimmer
2,000 WATT PRECISION AC DIMMER + DMX
INSTRUCTION MANUAL
McIntire Enterprises, Inc.
12986 Mapleleaf Ct. NE. Aurora, OR 97002-8418
Phone: 503-678-6236
www.magicgadgets.com
[email protected]
Studio PRODimmer
Jan.2015 REV.A
TABLE OF CONTENTS
INTRODUCTION
Pg.2 - Description
Pg.3
Safety instructions
Pg.4
Control layout & function
Pg.5
Connections & enclosure features
GETTING STARTED / INSTALLATION
Pg.6
Quick setup
Pg.6-7 Modes of operation
Pg.8-10 Additional features
TROUBLESHOOTING
Pg.10
Frequently Asked Questions
Pg.11
Warranty
1|Page
Studio PRODimmer
INTRODUCTION
Thank you for purchasing a Magic Gadgets product! Every unit is
hand assembled to ensure a quality build that will last for years. The use of
high end components on the inside makes a big difference; outlasting
other products many times over. Our company does not participate in
mass marketed ad campaigns; we instead rely on the customer (that’s
you), to let everyone know how cool this gadget really is!
The Studio PRODimmer is an inline device designed for portable
use and/or permanent/semi-permanent installations. Use the convenient
chassis loops to hang it or use the universal mounting bracket securely
attaching the unit on lighting stands, trusses, grids, etc.
Using intelligent digital dimming we keep noise to a minimum
without bulky and heavy isolation transformers; and our convection
cooling allows you operate in silence. We’ve added smart forced air
cooling via PWM circuitry for quiet reliable operation in hot environments.
With 2,000 Watts of power handling, standalone local dimming
controls, remote DMX functionality & user friendly features; those other so
called “dimmer packs” can’t compare! Compact size at 4.5” x 5.62” x 4”
and weighing only 2.4 lbs. We feel this is the lightest, smallest, most
powerful, feature packed dimmer available today.
Magic Gadgets devices have always be plug & play, the controls
are straight forward and easy to use (as they should be).
2|Page
Studio PRODimmer
Jan.2015 REV.A
SAFETY FIRST!
WARNING - TO REDUCE RISK OF FIRE OR ELECTRICAL SHOCK, DO NOT EXPOSE
THIS EQUIPMENT TO RAIN OR MOISTURE. DO NOT REMOVE COVER. NO USERSERVICEABLE PARTS INSIDE. REFER SERVICING TO QUALIFIED TECHNICIAN.
DO NOT EXPOSE UNIT TO DIRECT SUNLIGHT OR EXTREME TEMPERATURES.
REMOVE FROM POWER BEFORE CLEANING & ONLY WITH A DRY OR SLIGHTLY
DAMP CLOTH. A MILD SOLVENT (SUCH AS ISOPROPYL ALCOHOL) MAY BE USED
TO REMOVE HEAVY DEPOSITS.
DO NOT BLOCK ANY VENTILATION OPENINGS. MAITAIN A SIX INCH (152.4mm)
CLEARANCE FROM ANY ITEMS THAT COULD IMPEDE COOLING.
DO NOT MODIFY THE PLUG OR SOCKET IN ANY WAY. THE GROUND PINS ARE
PRIVIDED FOR YOUR SAFETY. CONSULT AN ELECTRITIAN TO REPLACE AN
INADEQUATE WALL OUTLET OR WALL BOX.
CONNECT AC POWER ONLY TO A MAINS SOCKET WITH A PROTECTIVE EARTHING
CONNECTION & SUPPLY CIRCUIT PROTECTION I.E. CIRCUIT BREAKER, FUSE, ETC.
UNPLUG DURING LIGHTNING STORMS OR WHEN NOT BEING USED FOR A LONG
PERIOD OF TIME.
ONLY USE EXTENSION CABLES THAT ARE CAPABLE OF HANDLING CURRENT
REQUIRED FOR YOUR PARTICULAR APPLICATION. PROTECT POWER CORDS
FROM BEING WALKED ON OR PINCHED. AVOID THE USE OF UNGROUNDED
POLARIZED PLUGS, DAMAGE TO THE UNIT MAY RESULT.
3|Page
Studio PRODimmer
CONTROL LAYOUT AND FUNCTION
1. Main dimmer dial (controls unit output from 0-100%)
2. Preheat + trimmer (pre-sets dimmer dial output from 0-60%)
3. Mode (selects unit operational mode)
4. Green & Red buttons (turns unit ON & OFF/Standby respectively)
5. Fan (sets fan to off or auto temperature sense mode)
6. Always on (disables on/off function)
7. BLF type HT fuse block with fuse puller & 20A fuse installed
8. Preheat + (Turns on/off the pre-heat function)
9. NEON output indicator (glows orange with output level)
10. Ground fault indicator (Green when OK, RED indicates fault)
11. DMX signal (flashes blue when receiving DMX signal)
12. Unit channel address (sets DMX address from 001-512)
13. Real-Time status (displays unit information in real time)
FIG. A
4|Page
Studio PRODimmer
Jan.2015 REV.A
CONNECTIONS & ENCLOSURE FEATURES
1. AC INPUT (Edison type male plug for incoming AC power)
2. OUTPUT (Edison type female socket for lamp connection)
3. Chassis loops for rigging with rope, chain, steel cable, etc.
4. Fan exhaust (pushes HOT air out, DO NOT BLOCK!)
5. DMX I/O (2x5 Pin XLR for DMX signal & pass-thru)
6. Heat sink (power device cooling, DO NOT BLOCK!)
7. Air intake (Cool air GOOD!)
FIG. B
FIG. C
5|Page
Studio PRODimmer
GETTING STARTED & INSTALLATION
QUICK SETUP
Plug a load up to 2,400 Watts into the output (fig. B)
Make sure dimmer dial is at ZERO, unit is in LOCAL mode and Always ON
is switched OFF (fig. A)
Using the proper gauge cable apply power to the input. (fig. B)
Press the ON button & use main dimmer dial to set desired level. (fig. A)
MODES OF OPERATION
LOCAL
1. Make sure the load or output (that’s your 2k lamp) is connected first, and
the main dimmer knob is at (0) zero and ALWAYS ON is disabled.
2. Set mode switch to Local, and then apply power to the input.
3. Press ON button to turn on the output then use main dimmer dial to set
level.
4. Press OFF to put the unit in standby mode.
5. The Pre-heat + controls allow you to pre-set a level greater than zero.
High power lamps take longer to dim up from zero volts then at 2, 5, 7 etc.
so we recommend using the Pre-heat + to provide a more desirable
dimming control experience.
NOTE: The dimmer knob will operate above the Pre-heat level.
DMX
1. Make sure the load or output (that’s your 2k lamp) is connected,
switched OFF & ALWAYS ON is disabled (main dimmer knob & ON/OFF
push buttons are disabled in DMX mode.
2. Set mode switch to DMX, and then apply power to the input.
6|Page
Studio PRODimmer
Jan.2015 REV.A
3. Termination is required at end of the DMX chain.
4. The 3 rotary switches are used to set unit DMX channel from (001-512)
any values beyond these are ignored.
5. Plug a 5pin XLR cable from the DMX board to Studio PRO DMX input.
DMX signal LED should be lit / blinking.
LOCAL & DMX OPERATION
1. Make sure the load or output (that’s your 2k lamp) is connected first, and
the main dimmer dial is at (0) zero and ALWAYS ON is disabled.
2. Set mode switch to LOCAL & DMX, and then apply power to the input.
3. Termination is required at end of the DMX chain.
4. The 3 rotary switches are used to set unit DMX channel from (001-512)
any values beyond these are ignored.
5. Plug a 5pin XLR cable from the DMX board to the units input. DMX signal
LED should be lit / blinking.
6. Press ON button and use main dimmer dial to set level. Or adjust level
from DMX control board by resetting fader to (0) zero.
The OFF button turns unit off local dimmer setting, however DMX level will
remain.
7. When using LOCAL & DMX mode the Studio PRO gives you the option to
set a low level of your choosing while being able to dim from the DMX
board or locally on the dimmer itself. Dimming one will only go above the
other, so an increase can be made from either location.
Or use the Pre-heat + control to pre-set a level greater than zero. Using
both will not damage the unit one will just override the other.
7|Page
Studio PRODimmer
MOUNTING BRACKET INSTALL
The bracket can be installed on the StudioPRO for vertical or horizontal
mounting; there is a single hole in the center and 2 dimples to secure the
bracket at 0 & 90 degrees. Use only the supplied Stainless Steel ¼ 20 x 3/8”
screw. NOTE: DO NOT USE LONGER LENGTH SCREWS YOU MAY
DAMAGE INTERNAL COMPONENTS! Position clamp around stand or truss
with one screw, then install other screw and tighten wing nuts securely. DO
NOT OVERTIGHTEN! Our reusable cable wraps (or yours) will help prevent
excessive stress to the connectors, using them is recommended.
ADDITIONAL FEATURES
LEVEL-LOC
After you’ve turned the unit on and selected a desired
dimmer level, simply press & hold the green ON button for approx. 3
seconds to lock the dimmer knob, avoiding accidental or unwanted
changes.
If you try turning the dimmer knob the display will show the code below!
loc = dimmer knob locked
Press the OFF button to unlock the dimmer & again to turn the unit OFF.
SELECTABLE DIMMER CURVES
The default dimmer curve is
a standard “Linear Curve” you may select a “Modified Linear Curve” which
increases the output more quickly at the low end. Simply press and hold
the Red OFF button to switch between the two modes.
dcA = Linear curve
dcb = Modified Linear curve
NOTE the selected curve will remain until changed, even when power is
removed.
ALWAYS ON w/SOFT-ON
(Functional in all modes) Unexpected
power loss from mains or power outages can mean a trip around the studio
8|Page
Studio PRODimmer
Jan.2015 REV.A
to reset everything; but with Always-on enabled the unit will be restored to
pre-power loss condition (regardless of dimmer knob setting). Dimmer
level can be changed after power is re-applied.
By default the unit resets to normally OFF when removed from power.
SOFT-ON: Cold starting your Tungsten filament globe can dramatically
shorten its lifespan. However, Soft-on has a 3 second dim up to pre-power
loss level helping to extend filament life.
RELAY MODE ON/OFF
Studio PRODimmer can be used as an
ON/OFF switch. When in DMX mode, simply press and hold the Green ON
button for 3 seconds to activate, the real-time display will show rly. To
deactivate simply press and hold the Red OFF button for 3 seconds, rly will
blink twice and go out.
DMX fader function: 0 to 50% (0 to 128) = OFF, 50 to 100% (128 to 256) = ON
REAL-TIME DISPLAY The LED display alternates between incoming
line voltage & unit temperature by default; however when an adjustment is
made to output levels or DMX address the display shows you in real-time. It
will also display selected function modes.
lcl = Local only mode
l-d = Local & DMX mode
d-o = DMX only mode
rly = Relay mode
dcA = Linear dimmer curve
dcb = Modified Linear dimmer curve
loc = (blinking) dimmer knob locked
9|Page
Studio PRODimmer
PWM FAN CONTROL
When in auto fan mode the unit will
automatically determine speed based on internal temperatures even
turning off when it’s not needed. We recommend using the fan at all times,
but especially when using in HOT environments (ambient air temps are
above 80°Fahrenheit) at the maximum rated output of 2,000 Watts. If you
are consistently using smaller loads (1.5kW, 1kW, .5kW) or if you desire
silent operation please set fan mode switch OFF.
HIGH TEMPERATURE SHUTDOWN
The
unit
will
automatically shut down if temperature levels exceed 80°Celcius
(176°Fahrenheit) and will remain off until a temperature of 70°Celcius is
reached.
TROUBLESHOOTING
FREQUENTLY ASKED QUESTIONS
Q. Is there a minimum load?
A. No minimum load is necessary for proper operation.
Q. Will my dimmer work with other loads like LED, Fluorescent, ETC?
A. Although the StudioPRO was not designed for use with these
types of loads; their use will not harm the dimmer, and my work
depending on the application.
Q. Why is the “output” indicator on? I have no load connected.
A. This feature is telling you that no load or an open circuit is
present.
Q. I have the XLR plugged in and the DMX signal led is not lit.
A. The Studio PRO’s DMX system does not function in LOCAL
mode, make sure you are in either DMX or LOCAL/DMX mode.
A. Check you cables and/or the signal polarity coming out of the
DMX board.
10 | P a g e
Studio PRODimmer
Jan.2015 REV.A
Q. I keep blowing fuses! What’s wrong?
A. This is happening because there is a short in the electrical
connection, either before or after the unit. Check your cables,
lamps, ETC. You also may be drawing too much current by using
inadequate cabling, check the cord length & capacity chart on
pg.3
NOTE: 25-30A FUSE MAY BE USED IF NECESSARY!
Q. I can’t get the dimmer to respond, what’s wrong?
A. This could be one of many issues; we recommend resetting the
unit before sending it in for repair. To do this turn Main Dimmer &
Pre-Heat pots to zero, switch Always On, Fan & Pre-Heat switches
to OFF or down; and switch to Local mode and remove the DMX
cables (if applicable). Then unplug the unit and wait approx. 30
seconds to 1 minute. Then re-apply power and try using the
dimmer in local mode only.
If you are still having trouble with your Studio PRODimmer please contact
us via e-mail or over the phone. All contact info is at magicgadgets.com
11 | P a g e
Studio PRODimmer
THE LIMITED LIFETIME WARRANY
Our products will be warranted for the lifetime of the unit & shall be free of any
Manufacturer defects. *The Warranty card must be returned within (30) thirty days to
participate in the program.
PLEASE KEEP THIS PAGE INTACT FOR YOUR RECORDS
Our products are warranted for a period of one (1) year from the date of
delivery, to the original purchaser or lessee, to be free from defects in materials or
workmanship. *We will, at our option, extend this warranty beyond one year. The
warranty terms stated here MUST BE KEPT to validate this extension.
The sole and exclusive remedy for breach of any warranty concerning the
products shall be repair or replacement of defective parts at no charge to the
original purchaser or lessee, at the discretion of McIntire Enterprises, Inc.
These products are designed and intended for use by competent
professionals only. The individual user should determine before use whether these
devices are suitable, adequate, or safe for the use intended. Because individual
applications are subject to great variation, the manufacturer makes no
representation or warranty as to the suitability or fitness of these devices for any
specific application. Direct, incidental, special or consequential damages or losses
resulting from the use, or misuse, of these devices shall be the sole responsibility or
the purchaser or lessee.
(Some states do not allow the exclusion or limitation of incidental or consequential
damages, so the above limitation or exclusion may not apply to you.)
Subjecting the units to excessively rough handling, moisture, high
voltages, overloading the output, operating the unit without proper ventilation,
improper packaging for shipping, damage incurred during shipping, any improper
or negligent use, or any attempt to open & repair or modify the unit, or removal or
obscuring of the serial number label will void the warranty. Warranty may be
limited to original purchaser as shown on original invoice.
PLEASE TAKE A MOMENT AND FILL THIS OUT, YOU MAY NEED IT LATER!
NAME: ______________________________________________
SERIAL #: _______________ DATE: ______________________
12 | P a g e