1
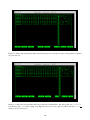
OpenSSL – User Manual and Data Format
Vittorio Giovara
December 20, 2007
Chapter 1
Introduction to OpenSSL
1.1
What is OpenSSL
OpenSSL is an open source implementation of the SSL and TSL protocol for secure communication, providing
many cryptographic operations like encryption and decryption of data, digest creation and verification, public
and private key pairs computation and certificate handling.
This program is available for almost any operating systems and its own API functions are available for
developing secure applications. Since version 0.9.7 it supports external crypto hardware engines for enhancing
performance of cryptographic algorithms.
1.2
Main Functions
This document focuses mainly on digest and symmetric encryption topics, but it first gives a brief overview on
other fuctions of the OpenSSL program.
benchmark reports some performance data for every cypher algorithm or for a selected one;
certificates provides creation of self-signed (and CA-signed) X509 certificates and consequent verification;
digest enalbes data integrity for files;
public and private keys performs private and public key pair generator using RSA, DSA and elliptic curve
algorithms;
digital signature autheticates formally the author of the data;
symmetric encryption provides fast and secure encryption method;
prime numbers checks if a given number is prime;
random data outputs random values to a file.
1.3
Assumptions
In this document is also presented command syntax and format for certain options. To avoid confusion or
ambiguities the following assumptions will be valid through all the document.
• the italics commands represent optional parameters;
• the [square brackets] inform of the presence of different options;
• the standard format indicates mandatory arguments.
1
Chapter 2
Digest
A digest is a fingerprint of a file which needs integrity protection. Usually digests are computed with hash
functions, as they must be very fast to compute, nearly impossible to invert and have little probability of creating
collisions. Digest algorithms perform independently on the data, always producing a fixed-length result.
There are many hash functions available, but most of them are obsolete or unsecure. For instance, MD2 and
MD4 should be avoided completely, while MD5 and SHA1 are generally suited for general purpose operations
(like checking files downloaded from internet); for high-security applications however only SHA-224 to SHA256 should be used.
2.1
Syntax
In order to create a digest, the user must use the dgst command of OpenSSL followed by some parameters.
The sintax of the command follows:
$ openssl dgst [hash function] [display options] -out file.dgst file.input
hash function is the name of the hash function which the file is computed with. Default algorithm is MD5, but
SHA1 and other high-security hashes are also present; in order to know the available algorithms installed
it is possible to run this command:
$ openssl list-message-digest-commands
display options formats the output in different ways:
-hex outputs an hexadecimal string (default);
-c splits the hexadecimal string in groups of two digist separated by colons;
-binary encodes the output in binary form (disabling -c option).
-out file.dgst is the destination file where to store the digest. Default is standard output;
file.input is the file to compute the digest on. Default is standard input.
2.2
File Format
The output file is a clear text file in which is clearly stated
• the hash function used
• the original file name
• the actual digest string
2
The file is formatted in this form:
hash function(filename)= digest string
If the file was output in the binary format, the file is no more a text file and is readable only through a
hexeditor. In this case only the digest string is actually stored into the file, obviously encoded in binary format.
2.3
Digest Creation
As said before, OpenSSL offers many digest hash functions, in particular MD5, SHA1 (and its high-security
evolutions) and RIPEMD160, for creating robust digest files. To create a digest, it is sufficient to select the hash
functions, the input file (where there is the data to protect) and optionally the output file (where the digest will
be stored).
For example, if we wanted to compute the digest of the file file.txt with the MD5 hash function and
see the result to screen, we should invoke this command:
$ openssl dgst -md5 file.txt
MD5(file.txt)= d41d8cd98f00b204e9800998ecf8427e
It is possible to modify the ouput with options -c, -hex, -binary and see debug messages regarding I/O
operations with -d.
For example, if we wanted to compute the digest of the file file.txt with the SHA1 hash function and
see the result into file.SHA1 column separated, we should invoke the following command and print the
result to screen (for example with cat):
$ openssl dgst -sha1 -c -out file.sha1 file.txt
$ cat file.SHA1
SHA1(file.txt)= da:39:a3:ee:5e:6b:4b:0d:[· · ·]:60:18:90:af:d8:07:09
2.4
Digest Verification
Since digest hashes are fixed-length operations, it is quick and easy to generate a new digest even for very
large quantity of data. So digest verification is done simply by comparison, confronting the received digest and
the one recomputed form the correspoding received file. A very simple sequence of shell commands like the
following can perform this operation:
$ openssl dgst -md5 file.txt | cmp file.md5
If no output is displayed, it means that the file has not been modified.
2.5
Digital Signature
Digests are commonly used for providing integrity for transmitted files, but they also offer authentication and
non repudiation properties for any kind of data through digital signature.
A digest encrypted with the private key of the author of the related file is the very equivalent of the digital
signature of the file; others can verify the digest of the file using the public key of the author.
For a short introduction about how to generate private and public keys used in examples below with
OpenSSL, please refer to appendix A.
2.5.1
Advanced Syntax
When dealing with digital signature, OpenSSL offers more specific options for signing and verifying digests.
Clearly format options are no loger present, as the output is encrypted and not viewable; moreover the
sintax differs for signing and verification process. So the sintax becomes respectively:
3
$ openssl dgst [hash function] -sign private.key -out file.sign file.input
$ openssl dgst [hash function] -verify public.key -signature file.sign file.input
hash function is, as above, the name of the algorithm for computing the digest. Default is always MD5:
-sign private.key encodes the digest computed from the input file with the private key of the author;
-verify public.key decodes the signature with the public key and compares the output digest it with the one
obtained from the input file;
-signature file.sign is the source for verifiy the digital signature of the input file;
-out file.sign is the destination file where to store the signature of the input file. Default is standard output;
file.input is the file to digitally sign or to verify.
2.5.2
Signing a digest with a private key
For better comprehension, an example is provided.
Let’s consider that we need to digitally sign the file called file.txt with the key contained in private.key;
OpenSSL allows creation of signed digests with this command:
$ openssl dgst -sha1 -sign private.key -out file.sign file.txt
The digest file created is a binary file unreadable if the public key is not available.
2.5.3
Checking a digest with a public key
So if we want to verify the file file.txt with its signature (file.sign), we need the related public key
(public.key) and file in the same form of the original form of when the digest was computed (that is, if the
digest was computed on an encrypted file, it must be validated on the encrypted file, not on the decrypted one).
We can then run the following program and see the result:
$ openssl dgst -sha1 -verify public.key -signature file.sign file.txt
Verified OK
The output can only be Verified OK or Verification Failure as no other info is either necessary or available.
4
Chapter 3
Symmetric Encryption
Even though symmetric encryption lacks of many security properties like integrity (which is provided by digests) or authentication (which is privided by digital signature), it is very quick and requires very low computational power and thus it is suited for dealing with large quantity of data.
3.1
Available Ciphers
OpenSSL allows symmetric encryption of data through a number of ciphers and their variants.
To obtain the list of available ciphers installed (they may vary according to compilation parameters), we
can run this command:
$ openssl list-cipher-commands
The common name format for these ciphers is:
name-keylength-blockoption
name is the base name of the algorithm;
keylength is the length of the key used in the algorithm;
blockoption is how block algorithms behave when they are applied to data quantity different from the algorithm block size.
The latter two attributes are not always present, as it is possible to encode with the base algorithm; the
presence of the keylength doesn’t depend on the presence of the blockoption and viceversa. Only for the AES
cipher all the attributes are always specified.
3.2
Syntax
For encryption operations the enc command of OpenSSL is used. Almost all the arguments require one option
either passed to command line or read from file. The general syntax is:
$ openssl enc [operation] [cipher] -in file.input -out file.enc [key field] [salt field] [minor options]
operation switches between encoding (-e) and decoding (-d) operation. The default function selected is
encoding;
cipher selects the cipher to use for encryption. If none is chosen the program exits with no error messages;
-in file.input is the file to encode. Default is standard input;
-out file.enc is the result of the encryption. Default is standard output;
5
When hexadecimal strings are required in any parameter, if the length of the string is too short, the string
is filled up with 0s up to the correct length which varies according to the type of argument and type of cipher
(shown in figure 3.4); on the other hand if the length of string is twice as long as the nominal default string
length or more, the string is rejected and the program exits, while if it is less, then the string is just truncated to
the correct length. This was discovered by pratical tests performed during the writing of this document. .
3.2.1
Key Field
Every symmetric algorithm requires a key for processing data; in OpenSSL this value can be either derived
from a password (prompted at the user) or passed via command line.
Key derivation is performed by the EVP BytesToKey() function included in openssl/evp.c. Key
and Initial Vector are derived from the salt (see §3.2.2) and passphrase.
Basic Options
-k password skips password prompting and uses the password argument for key derivation. Beware that this
operation is highly unsecure as the password is printed in cleartext and can be sniffed or fetched from the
bash history or other Unix utilities.
-kfile password.file reads the password from the first line of the file password.file. Slightly more secure than
above as no information is printed in cleartext;
-K key selects the actual key to use and avoids key derivation; it must be a hexadecimal string. If this option
is selected, also the Initial Vector must be specified, unless a password is provided that is used for iv
derivation.
Passphrase Option
Both -k and -kfile commands are mantained for compatibility issues among different versions of OpenSSL
and they are now superseded by the -pass argument (called Passphase command) which collects and improves
these functionalities.
This command has its own argument format of this kind:
operation:parameter
Having said tht, the options for the -pass argument are:
pass:password receives password from command line (has the same drawbacks of the -k option);
env:var uses an environment varible as a password for key derivation;
file:path reads the password from a file (exactly like the -kfile option);
fd:number reads the password from a file descriptor (used in network and pipe lines);
stdin prompts the password from standard input.
Other options
There are two final parameters that are involved in key derivation:
-iv initialvector species the intilial vector used in block algorithms to avoid known-plaintext attacks; it must be
an hexadecimal string. It is mandatory when -K option is specified, unless a password is also provided.
In that case the key is actually used as main key for the cipher, while the password is used for initial vector
derivation. If it is used in combination with a stream algorithm (like RC4), this parameter is ignored;
-md hash selects the message digest used for key derivation; MD5 and SHA1 are both available. This is an
undocumented feature of OpenSSL.
6
3.2.2
Salt Field
This is an important feature of OpenSSL: with this option the file encrypted is “salted” in sense that the key
generation process is randomized with high entropy values. It is very important to include this parameter always
as it drammatically enhances security against bruteforce and dictionary attacks: every bit of salt doubles the
storage amount and computational power required for this kind of attacks. Since salt is used for derivation of
both the key and the initial vector, in order to avoid an inconsistent command, when the -K and -iv arguments
are defined, the salt option is completely ignored and salt is initialized with random values.
The salt has a fixed length 8 bytes and it is included in the encrypted file, preceeded by the special string
Salted (8 bytes), making the file 16 bytes bigger than the non-salted version.
There are basically three kind of salt commands:
-salt enables salt insertion on the key generation process;
-S salt specifies the actual salt to use rather than letting OpenSSL derive it from the password; the argument
salt can only be a hexadecimal string;
-nosalt used only for compatibility issues, it disables the production of the salt. Very unsecure as non-salted
data is often easy victim of dictionary attacks.
3.2.3
Minor Options
There are some final possibile commands that selects other encryption details:
-base64 encodes the file in base64 format after encoding; useful for sending data on email channels where
the seventh bit may be cut off:
-nopad disables standard padding techinque In this case the input data must be a multiple of the cipher block
length, otherwise it will be not possible to decrypt the file correctly;
-p prints to screen the salt, the key and the initial vector used by the cipher in hexadecimal form;
-P runs the command in “pretend” mode, no files are written, only the salt, key and initial vector are displayed
in hexadecimal form;
-buffer size defines the buffer size for I/O operations;
-debug shows debug information for I/O operations (eg. open file etc.).
3.3
Encoding Examples
With OpenSSL it is possible to use the cryptographic algorithms of above to perform encryption of data.
If we want to encrypt the file file.txt via the Advanced Encryption Standard with 192 bits long key
and Electronic Code Block, we need to run this command:
$ openssl enc -aes-192-ecb -in file.txt -out file.enc
enter aes-192-ecb encryption password:
A more advanced approach example could be this one: if we want to encode the file file.txt through
Triple DES with Cipher Block Chaining passing the key from the file key.txt (stored in the same directory)
and skip salt insertion we would call:
$ openssl enc -des-ede3-cfb -nosalt -in file.txt -pass file:key.txt -out file.enc
An even more detailed encryption metod can be this: if we want to encode and send via email the file
file.txt with standard IDEA, using key 12576A1 and initial vector 8946512 and see the details on screen,
we would run:
7
$ openssl enc -idea -base64 -in file.txt -out file.enc -K 12576A1 -iv 89B46D512 -p
salt=70992000CAC10B00
key=12576A10000000000000000000000000
iv =89B46D5120000000
3.4
Decoding
In order to decode a ciphered file we need to know all the encoding details that were selected during the
encryption process. Otherwise the encoded file is processed with wrong parameters and the output file is just
an unreadable binary file. The following details are required:
• the cipher used;
• the password or the key plus the initial vector;
• if the file was salted (and the salt string if no key was provided);
• the format (eg. encoded with -base64) and the padding.
Then we can call the OpenSSL program enc with the -d option, select the encoded file as inupt and choose
an output. Let’s suppose we want to decode the file file.enc created in the last example of §3.3; we would
run
$ openss enc -d -idea - base64 -in file.enc -out file.dec -K 12576A1 -iv 89B46D512
If just one parameter is set wrong, the whole decoding procedure fails even if there is no error message and
a file is createted nevertheless. That is correct because OpenSSL decoding feature blindly processes the byte
stream of the encoded file, applying mathematical algorithms with given parameters and it cannot detected if
they are wrong. In conclusion, the only way for correctly decoding a file is by knowing all the encoding details
from the very beginning.
3.5
File Format
The output file contains the data of the original file encoded according to the algorithm used. Obviously no
decrypting information is stored in the file, not even in encrypted form, as it may result in a decrease in the
security level.
The only information contained in the file, besides encrypted data, is the salt value. When the file is salted
the file contains a special string of 8 bytes followed by the salt value itself (8 bytes) for a total of 16 bytes; then
the encoded data is appended to the file. So in a salted file we would read:
Salted
saltvalue
data
This operation is useful because the salt value is used derive the key and initial vector in the decoding
process.
One final note about the output file size. As long as the size is a multiple of algorithm block size, the
dimension of the encrypted file corresponds to the original unencrypted file; if it is not, all block algorithms
add one final byte to the encoded file for parllelism with the data block size (that is, every block has the same
dimesion) as shown in figure 3.2.
3.5.1
Example
Here is an example to witness what has been stated before.
The text file file.txt was encoded with Triple Des three times, first without salt, then with salt enabled
and finally with the salt string passed via command line.
8
Figure 3.1: This is the text file used in this example
Figure 3.2: This is the encrypted file with no salt; the dimension of the file has grown of 4 bytes, because of the
premises expained in §3.5
9
Figure 3.3: This is the encrypted file with salt; the file has grown of 16 bytes, because of the premises expained
in §3.2.2 and §3.5
Figure 3.4: This is the encrypted file with salt passed from command line. The string value was 12345678,
was filled up with 0s to create a string of 16 digits (8 bytes) (as in §3.2), and it is visible next the Salted
string (as in §3.2.2 and §3.5)
10
Appendix A
Key generation
OpenSSL allows creation of private and public key pairs with the command genrsa.and rsa. In this short
appendix only the practical commands for generating the key pair will be showed.
To create a private key of 1024 bits long using the RSA algorithm, we can use this command:
$ openssl genrsa -out private.key 1024
Generating RSA private key, 1024 bit long modulus
It is also possible to encrypt the private key with DES, DES3 or IDEA algorithms before outputting it. In
this way any operation involving the private key will always require a password before proceding, while leaving
public key operations unaffected.
For example if we wanted to cypher the 1024 RSA key of before with a DES3 alogorithm, we would need
to enter a password (a key for the symmetric algorithm) before obtaining the key:
$ openssl genrsa -des3 -out private.key.enc 1024
Enter passphrase for private.key.enc:
Verifying - Enter pass phrase for private.key.enc:
For public key generation we just need the private key first and then we can run this command:
$ openssl rsa -in private.key -out public.key -pubout
writing RSA key
In conclusion we have created two files, one for the private key (file private.key) and one for the public
key (file public.key).
11
Contents
1
Introduction to OpenSSL
1.1 What is OpenSSL . . . . . . . . . . . . . . . . . . . . . . . . . . . . . . . . . . . . . . . . .
1.2 Main Functions . . . . . . . . . . . . . . . . . . . . . . . . . . . . . . . . . . . . . . . . . .
1.3 Assumptions . . . . . . . . . . . . . . . . . . . . . . . . . . . . . . . . . . . . . . . . . . .
1
1
1
1
2
Digest
2.1 Syntax . . . . . . . . . . . . . . . . . . . .
2.2 File Format . . . . . . . . . . . . . . . . .
2.3 Digest Creation . . . . . . . . . . . . . . .
2.4 Digest Verification . . . . . . . . . . . . .
2.5 Digital Signature . . . . . . . . . . . . . .
2.5.1 Advanced Syntax . . . . . . . . . .
2.5.2 Signing a digest with a private key .
2.5.3 Checking a digest with a public key
.
.
.
.
.
.
.
.
.
.
.
.
.
.
.
.
.
.
.
.
.
.
.
.
.
.
.
.
.
.
.
.
.
.
.
.
.
.
.
.
.
.
.
.
.
.
.
.
.
.
.
.
.
.
.
.
.
.
.
.
.
.
.
.
.
.
.
.
.
.
.
.
.
.
.
.
.
.
.
.
.
.
.
.
.
.
.
.
.
.
.
.
.
.
.
.
.
.
.
.
.
.
.
.
.
.
.
.
.
.
.
.
.
.
.
.
.
.
.
.
.
.
.
.
.
.
.
.
.
.
.
.
.
.
.
.
.
.
.
.
.
.
.
.
.
.
.
.
.
.
.
.
.
.
.
.
.
.
.
.
.
.
.
.
.
.
.
.
.
.
.
.
.
.
.
.
.
.
.
.
.
.
.
.
.
.
.
.
.
.
.
.
.
.
.
.
.
.
.
.
.
.
.
.
.
.
.
.
.
.
.
.
.
.
.
.
2
2
2
3
3
3
3
4
4
Symmetric Encryption
3.1 Available Ciphers . . .
3.2 Syntax . . . . . . . . .
3.2.1 Key Field . . .
3.2.2 Salt Field . . .
3.2.3 Minor Options
3.3 Encoding Examples . .
3.4 Decoding . . . . . . .
3.5 File Format . . . . . .
3.5.1 Example . . .
.
.
.
.
.
.
.
.
.
.
.
.
.
.
.
.
.
.
.
.
.
.
.
.
.
.
.
.
.
.
.
.
.
.
.
.
.
.
.
.
.
.
.
.
.
.
.
.
.
.
.
.
.
.
.
.
.
.
.
.
.
.
.
.
.
.
.
.
.
.
.
.
.
.
.
.
.
.
.
.
.
.
.
.
.
.
.
.
.
.
.
.
.
.
.
.
.
.
.
.
.
.
.
.
.
.
.
.
.
.
.
.
.
.
.
.
.
.
.
.
.
.
.
.
.
.
.
.
.
.
.
.
.
.
.
.
.
.
.
.
.
.
.
.
.
.
.
.
.
.
.
.
.
.
.
.
.
.
.
.
.
.
.
.
.
.
.
.
.
.
.
.
.
.
.
.
.
.
.
.
.
.
.
.
.
.
.
.
.
.
.
.
.
.
.
.
.
.
.
.
.
.
.
.
.
.
.
.
.
.
.
.
.
.
.
.
.
.
.
.
.
.
.
.
.
.
.
.
.
.
.
.
.
.
.
.
.
.
.
.
.
.
.
5
5
5
6
7
7
7
8
8
8
3
.
.
.
.
.
.
.
.
.
.
.
.
.
.
.
.
.
.
.
.
.
.
.
.
.
.
.
.
.
.
.
.
.
.
.
.
.
.
.
.
.
.
.
.
.
.
.
.
.
.
.
.
.
.
.
.
.
.
.
.
.
.
.
.
.
.
.
.
.
.
.
.
.
.
.
.
.
.
.
.
.
.
.
.
.
.
.
.
.
.
.
.
.
.
.
.
.
.
.
A Key generation
11
12