1
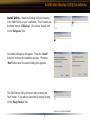
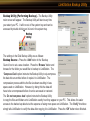
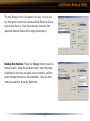
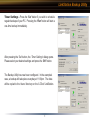
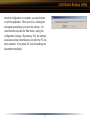
User Manual
LinkStation
Backup Utility
The Backup Utility is a simple utility that allows a user to backup their data onto the LinkStation.
Backups are recommended for any user who cannot afford to lose their data. If a computer failure
happens on your computer, you have a backup copy on the LinkStation. The Backup Utility
includes a scheduler and a restore feature.
www.buffalotech.com
LinkStation Backup Utility Installation
Install Utility – Install the Backup Utility by browsing
to the ‘Info’ folder on your LinkStation. Then, browse into
the folder named ‘LSBackup’. Once there, double click
on the ‘Setup.exe’ icon.
An installer dialog box will appear. Press the ‘Install’
button to continue the installation process. Press the
‘Next’ button when the second dialog box appears.
The Disk Backup Utility will launch after pressing the
‘Next’ button. It can also be launched by double clicking
on the ‘Easy Backup’ icon.
2
LinkStation Backup Utility
Backup Utility (Performing Backup) – The Backup Utility
main screen will appear. The Backup Utility will start every time
you restart your PC. It will run out of the system tray and can be
accessed by double clicking on its icon in the system tray.
The settings in the Disk Backup Utility are as follows:
Backup Source - Press the ‘Add’ button in the ‘Backup
Source’ box to set a save location. Press the ‘Browse’ button and
browse for the folder you would like to backup to LinkStation. The
‘Compress Data’ option instructs the Backup Utility to zip-compress
the data into an archive before it copies it to LinkStation. The
compression process shrinks the file size down resulting in less
space used on LinkStation. However, by doing this the data will
have to be uncompressed before it can be accessed or restored.
The ‘Do not compress data’ option instructs the Backup Utility
to copy the files and folders onto LinkStation exactly how they appear on your PC. This allows for easier
access to the backed up data but at the expense of using more space on LinkStation. The ‘Verify’ checkbox
simply tells LinkStation to verify the data after copying it to LinkStation. Press the ‘OK’ button when finished.
3
LinkStation Backup Utility
The new ‘Backup Source’ will appear in the box. You can use
the ‘Add’ button to add more sources and the ‘Delete’ to remove
sources from the box. Once they have been removed, their
respective files and folders will no longer be backed up.
Backup Destination - Press the ‘Change’ button to select a
backup location. Using the pull down menus, select the proper
LinkStation (if more then one exists on your network), and then
select the target directory on that LinkStation. Once you have
made your selection, press the ‘Set’ button.
4
LinkStation Backup Utility
Timer Settings - Press the ‘Set’ button if you wish to schedule
regular backups of your PC. Pressing the ‘Run’ button will start a
one-time backup immediately.
After pressing the ‘Set’ button, the ‘Timer Settings’ dialog opens.
Please select your desired settings and press the ‘OK’ button.
The Backup Utility has now been configured. In the example’s
case, a backup will take place everyday at 11:00pm. The data
will be copied to the ‘share’ directory on the ‘LSTest’ LinkStation.
5
LinkStation Backup Utility
Now that configuration is complete, you can minimize
or exit the application. When you do so, a dialog box
will appear prompting you to save the settings. It is
recommended to press the ‘Yes’ button, saving the
configuration changes. By pressing ‘Yes’, the settings
are saved and are remembered, even after the PC has
been restarted. If you press ‘No’, then the settings are
discarded immediately.
6
LinkStation Backup Utility
Restore Backup File - To restore a backup file, use the pull
down menu, select ‘Settings’ and press the ‘Expand/Delete
Backup File’ option.
Press the ‘+’ icon to expand the backup selections. If more then
one backup has occurred, then multiple file lists will appear. In
this case, select the proper list and press the ‘+’ button. Once
expanded, click on the proper date. This date represents when
the backup occurred. It is represented in YEAR / MONTH / DAY
followed by the time the backup occurred.
Collapse - The ‘Collapse’ button deletes the backup archive. Once it has been deleted it cannot be
restored. This does not delete the original data, just the backup image of the data.
Expand - The ‘Expand’ button restores the backup archive. Once pressed, you will be required to select
the path to restore the data to. It can be placed in any folder. Please verify that the proper folder is selected
and press the ‘OK’ button. A status window will appear during the restore process. Once complete, press
the ‘Close’ button to return to the main application. Your data has now been restored.
7
LinkStation Backup Utility
Advanced Options - There are advanced options available from
the pull-down menu:
Settings - The settings pull down menu references the same
settings from the buttons discussed on earlier pages. However,
the option ‘Delete All Backup Source Folders’ provides the ability
to delete all of the folders specified for backup. This will remove
all of the entries from the backup source box. This is an
alternative to selecting each entry individually and pressing the
‘Delete’ button.
Tools - The tools pull down gives four options.
- The ‘Run Backup’ option is the same as the ‘Run’ button.
- The ‘Run Backup and Shutdown Computer’ option runs a
backup and then shuts the computer down. This is an ideal setting
to choose if the backup is to be ran after you leave work or go to
sleep for the evening.
- The ‘View Logs’ option brings up the log text file.
- The ‘Clear Logs’ option erases the log text file.
8
LinkStation Backup Utility
Advanced Users - Advanced users can browse the backed up
data on LinkStation. Folders that start with ‘Backup...’ contain backup
archives. If a compressed backup was set, then a zip file will be inside
the folder. If a non-compressed backup was set, then the folder that
was backed up will be inside the folder.
NOTE: If the saved archives are modified, it may result in improper
behavior in the Backup Utility’s Restore File Wizard. However, the data
can always be restored manually by copying or moving the archived
backup’s data to the proper destination.
The compression format used is ZIP. Thus, the Backup Utility is not
required to uncompress backups.
9
LinkStation Backup Utility Uninstallation
Uninstalling Utility – To uninstall the Disk Backup
Utility, click on the ‘Uninstaller’ program in the ‘LinkStation’
program group folder.
The Uninstaller dialog box will appear. Press the
‘UNINSTALL’ button to begin the uninstallation process.
Another Uninstaller dialog box will appear. Press the ‘Quit’
button to finish the process.
10