1
LinkStation 500
User Manual
www.buffalo-technology.com
35020844-02
2015.06
Contents
Chapter 1 Getting Started..............................................5
Diagrams............................................................................................5
Accessing Shared Folders.................................................................6
Turning the LinkStation On and Off................................................6
Chapter 2 Configuration.................................................9
Opening Settings..............................................................................9
Restoring Administrator Password to the Factory Default...................10
Navigating the Main Menu............................................................ 10
The Home Screen......................................................................................10
Launcher....................................................................................................11
Customizing the Home Screen...................................................... 11
Adding New Shortcuts..............................................................................11
Deleting Shortcuts....................................................................................11
Restoring Shortcuts..................................................................................11
Arranging and Sorting Icons....................................................................12
Changing Icons.........................................................................................12
Launcher Options.....................................................................................12
Display Options.........................................................................................13
Wallpaper Options....................................................................................13
Changing System Languages...................................................................14
Chapter 3 My LinkStation............................................ 16
Adding Folders............................................................................... 17
Downloading Files......................................................................... 18
1
Sharing Files and Folders with Local Users.................................. 18
Chapter 4 Media Player................................................ 20
Creating Playlists........................................................................... 21
Adding Media Files........................................................................ 21
Playing Files.................................................................................... 22
Chapter 5 Disk Manager.............................................. 23
Automatic Drive Management...................................................... 23
Customizing Drive Settings........................................................... 23
Working with RAID Arrays............................................................. 24
Changing the RAID Mode.........................................................................24
Adding an External Hard Drive..................................................... 27
Enabling External Drive Access...............................................................27
Dismounting an External Drive..................................................... 29
Formatting Partitions.................................................................... 29
Hard Drive Replacement............................................................... 30
Step 1 - Replacing a Hard Drive...............................................................31
Step 2 - Rebuilding the RAID Array..........................................................33
Chapter 6 System Information.................................... 36
Server Info...................................................................................... 36
System Log..................................................................................... 36
Firmware......................................................................................... 37
Online Update...........................................................................................37
Manual Update..........................................................................................37
2
System Backup............................................................................... 39
Backing Up from LinkStation...................................................................39
Backing Up Your Mac with Time Machine...............................................42
Copying from a USB Device......................................................................44
Chapter 7 Services........................................................ 45
SHARED........................................................................................... 45
Adding Shared Folders.............................................................................45
Samba............................................................................................. 46
AFP.................................................................................................. 47
FTP................................................................................................... 48
Media Server.................................................................................. 50
Playing Files..............................................................................................51
iTunes.............................................................................................. 51
Downloader.................................................................................... 52
Enabling Downloader Service.................................................................52
Opening the Download Manager............................................................53
Downloading Files....................................................................................54
Chapter 8 System.......................................................... 56
Accounts......................................................................................... 56
Creating Users...........................................................................................56
Changing Passwords................................................................................57
Deleting Users...........................................................................................58
Network.......................................................................................... 58
Changing the Hostname..........................................................................58
Changing the IP Address..........................................................................59
Wake-on-LAN............................................................................................60
3
Date & Time..................................................................................... 61
Changing Date and Time..........................................................................61
Changing Time Zone.................................................................................62
Power Management....................................................................... 63
Drive Spin Down.......................................................................................63
Sleep Mode................................................................................................64
Restore............................................................................................ 65
Initializing from Settings.........................................................................65
Initializing with the Function Button......................................................66
Chapter 9 Utilities......................................................... 67
NAS Navigator2 for Windows........................................................ 67
Changing the IP Address..........................................................................69
NAS Navigator2 for Mac OS........................................................... 70
Changing the IP Address..........................................................................71
NovaBACKUP.................................................................................. 71
Chapter 10 Appendix................................................... 72
When the Power LED Blinks........................................................... 72
White..........................................................................................................72
Red.............................................................................................................72
Amber........................................................................................................73
Default Settings............................................................................. 73
Specifications................................................................................. 73
Chapter 11 Regulatory Compliance Information....... 75
For Customers in Europe............................................................... 75
4
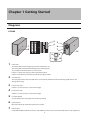
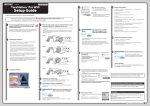
Chapter 1 Getting Started
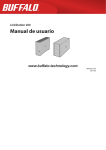
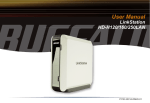
Diagrams
LS520D
3
4
1
2
1
5
6
7
12
9
8
11
10
Power LED
The white power LED will light up while the LinkStation is on.
The white power LED blinks while booting or shutting down.
The red power LED blinks when an error occurs.
If there is a status message, the power LED blinks amber.
If there is new firmware available, the power LED glows amber.
2
Function LED
This LED glows white while the USB device is connected, and blinks white dismounting USB devices and
during Direct Copy.
3
Drive 1 Error LED
If there is an error on drive 1, this LED will light.
4
Drive 2 Error LED
If there is an error on drive 2, this LED will light.
5
Function Button
Use this button for Direct Copy and initializing settings.
6
Power Switch
Move the switch up and down to power on and off.
7
USB 3.0 Port
Compatible Buffalo USB 3.0 hard drives and USB flash drives can be connected. USB hubs are not supported.
5
8
LAN Port
Connect to a router, hub, or switch on your Ethernet network with the included Ethernet cable.
9
Link and Activity LED
This LED shows network activity. It blinks green when the LinkStation is accessed over the network.
10Power Connector
Use the included power cable to connect to a surge protector or outlet.
11Power Status LED
The LED glows green when the power cable is connected.
12Anti-Theft Security Slot
Use this slot to secure your LinkStation with a cable lock (not included).
Accessing Shared Folders
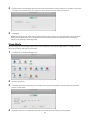
1
Double-click the
2
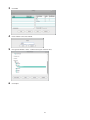
In NAS Navigator2, double-click your LinkStation's icon.
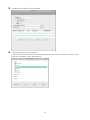
3
When the following screen is displayed, enter the username and password.
4
icon to start NAS Navigator2.
The Explorer will open with a list of shared folders. For Mac OS, the LinkStation is mounted as a drive icon on
the desktop or it is displayed in the sidebar of the Finder.
Note: 15 GB in each RAID array or partition have been reserved for the system area in the LinkStation, so they
cannot be used when accessing via SMB connection.
Turning the LinkStation On and Off
Move the power switch on the back of the LinkStation to the "on" position to turn it on. To turn it off, move the
switch to the "off" position and wait for the unit to fully shut down before unplugging it. Never unplug the AC
adapter without properly shutting down the LinkStation first.
When all the LEDs on the front of the LinkStation turn off, the shutdown process is complete.
6
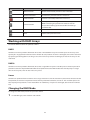
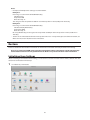
Restarting from Settings
You can also restart the LinkStation remotely from Settings. To restarting from Settings, follow the procedure below.
1
2
3
Double-click the
icon to start NAS Navigator2.
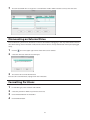
Right-click on your LinkStation's icon and choose Settings. For Mac OS, click your LinkStation's icon while
holding down the control key, then select Settings.
Enter a username and password, then press the Enter key or click the
7
icon to log in.
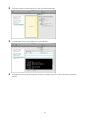
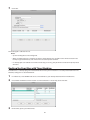
4
Settings will open.
5
Click
6
Click Restart again.
at the top-left of Settings and choose Restart.
8
Chapter 2 Configuration
Configure and manage your LinkStation using the Settings interface, accessible from a browser window. Open the
interface using the procedure below or type the LinkStation's IP address in the URL field of your browser.
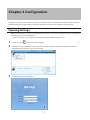
Opening Settings
Note: Internet Explorer 9, Firefox 18, Google Chrome 24, Safari 8, and later are supported. If you have difficulty
viewing Settings, check the following:
• If you have a proxy server enabled in the browser settings, disable the proxy server.
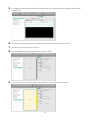
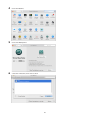
1
2
3
Double-click the
icon to start NAS Navigator2.
Right-click on your LinkStation's icon and choose Settings. For Mac OS, click your LinkStation's icon while
holding down the control key, then select Settings.
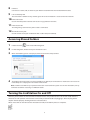
The Settings login screen will open.
9
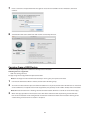
4
Enter a username and password, then press the Enter key or click the
icon to log in.
The default username and password are "admin" and "password".
Note: To log out from Settings, close the browser.
Restoring Administrator Password to the Factory Default
If you forget the admin password and cannot log in to Settings, you can initialize it with the function button. Follow
the procedure below to initialize the password.
1
Turn off the LinkStation.
2
Turn the LinkStation on while holding down the function button until the power LED flashes amber.
3
Initialization will start. Do not power down the LinkStation while the power LED is blinking.
4
When the power LED glows a steady white, initialization is finished.
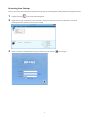
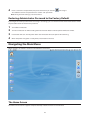
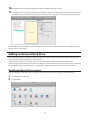
Navigating the Main Menu
When you log in to Settings, you will see the following screen first.
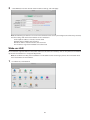
The Home Screen
The home screen acts like a typical computer desktop. Default shortcuts are listed below:
10
Item
My LinkStation
My Photos
My Music
My Videos
Applications
Recycle Bin
Description
Accesses all stored files and folders and all LinkStation functions, including creating new
shared folders.
Shortcuts of folders that are in My LinkStation.
Contains programs built in to the LinkStation, as well as default shortcuts to system
settings.
Stores deleted files. If a file is accidentally deleted, you can restore it from this folder. To
empty the recycle bin, right-click the recycle bin icon, then select Clear.
Note: The recycle bin will only store files deleted from Settings.
Launcher
The launcher provides instant access to applications and settings of your choice. Even with other windows open
in the LinkStation, the launcher will always stay on top for easy access. You can adjust the launcher size, screen
position, orientation, or even hide it completely, depending on what is convenient for you.
Default launcher shortcuts are listed below:
Item
Description
The same as My LinkStation.
My LinkStation
Plays audio or video files stored in the LinkStation.
Media Player
Manages internal and external drives connected to the LinkStation.
Disk Manager
Configures optional advanced settings.
Preferences
Customizing the Home Screen
You can customize the home screen desktop to your specifications.
Adding New Shortcuts
To add a new desktop shortcut for an application, drag the application from the "Applications" folder to the desktop.
To add a desktop shortcut for a file or folder, drag the file or folder from its location to the desktop.
Deleting Shortcuts
To delete a shortcut, you can either right-click on the shortcut and select Delete.
Alternatively, you can drag and drop the shortcut into the recycle bin, then click OK from the dialog window.
Restoring Shortcuts
To restore desktop shortcuts to the default ones, right-click anywhere on the desktop and select Restore Desktop
Icons.
11
Arranging and Sorting Icons
To re-arrange the icons, simply drag them to your preferred location on the desktop. To sort desktop shortcuts,
right-click anywhere on the desktop and select Sort Desktop Icons. All the shortcuts will be re-arranged starting from
the top left corner.
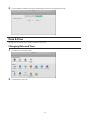
Changing Icons
You can change replace an icon image with an image file on your LinkStation.
1
Right-click on a shortcut icon and select Change Icon.
2
Click Change and select the image you want.
3
Click Close.
Launcher Options
You can remove or restore launcher shortcuts just as you would with desktop shortcuts.
In addition to removing applications, you can also change the location and size of the launcher.
• Click and drag on the gray handle to re-position the launcher.
• Click on the double arrows in the gray handle to minimize the launcher.
• Click on the single arrow in the gray handle to flip the orientation from vertical to horizontal or vise verse.
• Click and drag the triangle in the corner of the launcher to resize it.
12
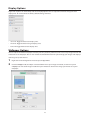
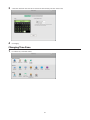
Display Options
Right-click anywhere on the desktop and select Display Options. You can adjust the sliders to change the item
display sizes. To revert back to the factory default setting, click Reset.
• Icon Size: Toggle between icon display sizes.
• Grid Size: Toggle between icon grid display sizes.
• Text Size: Toggle between text display sizes.
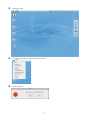
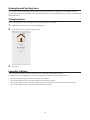
Wallpaper Options
You can replace the default wallpaper to match your own personal preferences. You can set any image stored on the
LinkStation as the wallpaper. You can also enable the slideshow function to cycle through your images and display a
new image at a preset interval.
1
2
Right-click on the background and select System Appearance.
Click the Wallpaper tab, then Open. Select the folder where your images are stored, or click View system
wallpapers to view stock images included on your LinkStation. Click on the image you want to set as your
wallpaper.
13
3
From the "Position" drop-down, select how the image will be displayed.
•
•
•
•
•
4
5
Stretch: Stretch the wallpaper to desktop size.
Center: Places the wallpaper in the center of the desktop.
Tile: Displays the wallpaper in a tile-like pattern.
Fill: Make the wallpaper fill the desktop and cut any overflow.
Fit: Make the wallpaper fit the desktop without overflow.
If you enable "Slideshow", you can set an interval in seconds to cycle through images in the selected folder as
the background.
If you don't want to use an image as the wallpaper, you can set the background as a solid color and enable the
"No Image" option.
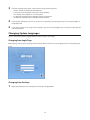
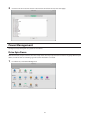
Changing System Languages
You can change the system language before or after you log in to Settings.
Changing from Login Page
Open Settings and select the language from the drop-down menu. The system language will be changed after you
log in.
Changing from Desktop
1
Right-click anywhere on the desktop and select System Appearance.
14
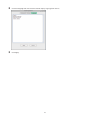
2
Click the Language tab and select the desired display language from the list.
3
Click Apply.
15
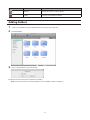
Chapter 3 My LinkStation
My LinkStation is an application that manages files and folders stored on the LinkStation. To open My LinkStation,
double-click the
icon from the home screen.
In the My LinkStation window, the following tabs will be displayed on the left as a directory:
• Home: This shows subfolders in the user area that will be automatically created when creating a user. If you log in
to Settings as the administrator, this will display all folders in the "admin" folder.
• Download: This is a folder that stores downloaded files.
• Public: This is a folder that any user can access.
• Devices: All shared and subfolders that are created in the LinkStation will be displayed.
Note: "Download" and "Devices" folders can only be accessed by the administrator user.
Icons
Name
Descriptions
Back
Return to the previous screen.
Refresh
Refresh the screen.
Open
Open a file or folder.
Download
Download a selected file to your local computer.
Publish
Share the selected folders or files with a link.
New Folder
Create a new folder.
Copy
Create a copy of the selected file or folder, either on the
current directory or another that is available to the user.
Cut
Cut the selected file or folder.
Paste
Paste the selected file or folder to the new location.
16
Icons
Name
Descriptions
Rename
Change the name of a file or folder.
Delete
Delete the selected file or folder.
Adding Folders
1
Select a shared folder to add a subfolder from the directory list at the left.
2
Click New Folder.
3
Enter a desired folder name and click OK.
The folder will be created in the selected shared folder.
Note: If you want to add a new shared folder, see the "SHARED" section in chapter 7.
17
Downloading Files
Select a file to download to your computer and click Download. The selected file will be downloaded to your
computer.
Sharing Files and Folders with Local Users
You can create a temporary shared link to share files or folders with other users on the same local network.
Note: The shared file or folder cannot be accessed via the Internet.
1
Select a folder or file from the main window and click Publish.
18
2
3
4
Click Generate. The temporary shared link will be generated.
By default, the privilege will be set to "Read Only" and the expiration date will be one month from the day the
shared link is created. To change these settings, click the icon in the window. When you finish editing, click
the icon to apply changes.
You can send the link by copying and pasting it into an email or messaging application.
Notes:
• No other folder or file on the LinkStation can be accessed from the shared link.
• Shared files can only be viewed or downloaded if the privilege is not changed from the default setting, "Read
Only".
When the privilege is changed to "Read & Write", shared files can then be copied, edited, or deleted.
• Expired links cannot be accessed.
• If you delete a shared file or folder via the shared link, it will be removed completely, not placed into the
recycle bin.
19
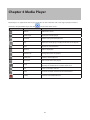
Chapter 4 Media Player
Media Player is an application that can play media files on the LinkStation and create original playlists with the
media files. To open Media Player, click the
Icons
Name
icon from the home screen.
Descriptions
Refresh
Refresh the screen.
Show Player
Displays the media player.
Previous
Return to the previous media file.
Play
Opens the media player and play media files in the playlist.
Next
Skip to the next media file.
Add List
Add a new playlist.
Rename List
Change the name of a playlist.
Delete List
Delete a selected playlist.
Add Items
Add a media file to the playlist.
Copy
Create a copy of the selected media file, either on the current
directory or another that is available to the user.
Cut
Cut the selected media file.
Paste
Paste the selected media file to the new location.
Delete
Delete the selected media file.
20
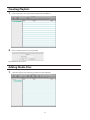
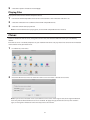
Creating Playlists
1
Select "PLAYLISTS" at the left of the window and click Add List.
2
Enter a desired playlist name and click OK.
New playlist will be created.
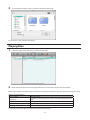
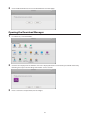
Adding Media Files
1
Select the playlist at the left of the window and click Add Items.
21
2
The dialog box will open. Select a media file to add and click Open.
The media file is now added to the playlist.
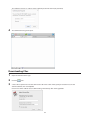
Playing Files
1
Select the playlist at the left of the window and click Play.
2
Media Player will open and start playing media files. To return to the playlist, click Show Player.
Media Player supports the following file extensions to play from the browser. To play files from the browser, certain
plug-ins may be required.
Plug-In Name
File Extensions
aif, aiff, aac, au, bmp, gsm, mov, mid, midi, mpg, mpeg, mp4, m4a,
QuickTime®
psd
Flash®
flv, mp3, swf
Windows Media Player®
avi, asx, asf, wma, wmv
RealPlayer®
ra, ram, rm, rpm, rv, smi, smil
If a file type is not listed above, that file will be downloaded instead.
22
Chapter 5 Disk Manager
Disk Manager is an application that manages RAID arrays and partitions of internal or external drives. To open Disk
Manager, click the
icon from the home screen.
Automatic Drive Management
If you are not familiar with drives or partitions, use "Auto" settings. This will help you configure drive settings easily
and mount the partitions automatically.
If you choose "Auto" settings, the wizard will create a RAID 1 array with 2 drives.
Customizing Drive Settings
If you select "Custom" in the Disk Manager window, you can customize the drive settings however you want. When
you click OK in the following screen, the Disk Manager window will open.
Note: This option is for advanced users only.
Icons
Name
Descriptions
Info
Display the drive information.
Erase Device
S.M.A.R.T. Info
Delete all drive partitions on the LinkStation.
Note: Erasing the device will delete all data on the
LinkStation. Backing up the data before erasing device is
recommended.
S.M.A.R.T. (Self-Monitoring, Analysis, and Reporting
Technology) monitors hard drives to detect and report
various indicators of stability, in hopes of anticipating
failures. When S.M.A.R.T. anticipates a drive failure, the user
may choose to replace the drive to avoid outages and data
loss.
23
Icons
Name
Descriptions
Mount Partition
Mount the formatted partition to the LinkStation.
Unmount Partition
Unmount the partition from the LinkStation.
Delete Partition
Delete the selected partition if it's not in use.
Format Partition
Format partition to change to the different file systems.
Note: Formatting the partition will delete all data on
the partition. Backing up the data before formatting is
recommended.
Refresh
Refresh the screen.
Back
Return to the previous screen.
Working with RAID Arrays
The default RAID mode for this product is RAID 1.
RAID 1
Combines 2 or more partitions from hard drives into a mirrored RAID array. The available space in the array is the
capacity of a single partition. Identical data is written to each partition. If a drive is damaged, data can be recovered
by replacing the damaged drive. As long as one drive in the array remains undamaged, all data in the array can be
recovered.
RAID 0
Combines 2 or more partitions from hard drives into a single RAID array. The available space is the total space of all
partitions used. This simple RAID mode offers faster performance than RAID modes that include parity. If a single
drive in the array fails, then all data in the array is lost.
Linear
Combines all partitions from hard drives into a single virtual drive. For this virtual drive, data will be written onto the
first partition, then to the next partition when the first partition becomes full, and so on. The available space is the
total capacity of all partitions. Linear mode offers no redundancy. If any drive is damaged, data on the drive will be
lost.
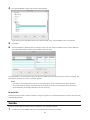
Changing the RAID Mode
To change the RAID mode, follow the procedure below.
1
In Disk Manager, select "Custom" and click OK.
24
2
Select the partition under the RAID array and click Unmount Partition.
3
Select the RAID array, click the RAID tab, and click Remove.
4
Two different warnings will be displayed. Read them carefully and click Yes twice. The RAID array will be
deleted.
25
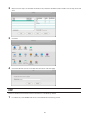
5
In the RAID tab, select the RAID mode from the drop-down list and drag and drop the partitions to be used for
the RAID array.
6
Click Create. Two different warnings will be displayed. Read them carefully and click Yes twice.
7
The RAID array is created. Click "Free Space".
8
Click the Partition tab, specify the partition size, and click Create.
9
Select the partition, enter a desired label name (optional), and select "EXT4". Click Format.
26
10Two different warnings will be displayed. Read them carefully and click Yes twice.
11In the "Partition" tab, select the RAID array partition to be mounted and check "Mount as Home Partition", then
click Mount. If you have mounted at least one home partition already, you can enter the desired mount point.
Once the RAID array is configured, create shared folders on the array to use them. Refer to the "SHARED" section in
chapter 7 for the instructions.
Adding an External Hard Drive
The LinkStation includes a USB port and you can connect an external drive or USB storage device to this port. For
external drives, Buffalo USB drives are recommended.
Connect only one device to a USB port. Some external drives with automatic power-on doesn't turn on
automatically when connected to the LinkStation. Use their manual switch to turn them on. Be sure to connect only
one bus-powered drive at a time. If there is insufficient bus power for your USB drive, connect its AC adapter.
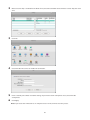
Enabling External Drive Access
After connecting the USB drive to the LinkStation, enable access to the drive. Follow the procedure below.
1
In Settings, click Preferences.
2
Click SHARED.
27
3
Click Add.
4
Enter a folder name and click OK.
5
Navigate to DEVICES - home - USB and select your external drive.
6
Click Open.
28
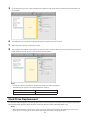
7
The connected USB drive is assigned as a shared folder. Enable "SMB" and other services, then click Save.
Dismounting an External Drive
If the LinkStation is powered on, dismount an external drive before unplugging it. You may dismount the external
drive from Settings. If the LinkStation is off, then the external drive is already dismounted and may be unplugged
safely.
1
Click the
2
Select the device to dismount and click Eject.
3
The external drive will be dismounted.
icon at the upper right corner of the home screen toolbar.
Once the drive is dismounted, unplug it from the LinkStation.
Formatting Partitions
1
In Disk Manager, select "Custom" and click OK.
2
Select the partition or RAID array from the device list.
3
Click Unmount Partition in the toolbar.
4
Click Format Partition.
29
5
In the "Partition" tab, enter a desired label name (optional) and select the file system from the drop-down list.
Click Format.
6
Two different warnings will be displayed. Read them carefully and click Yes twice.
7
When the format finishes, click OK, then Close.
8
The partition is formatted. Check "Mount as Home Partition" and click Mount. If you have mounted at least one
home partition already, you can enter the desired mount point.
Notes:
• Do not turn off the LinkStation or disconnect a hard drive while formatting.
• The following file systems can be formatted from Settings.
Internal Hard Drive
External Hard Drive
ext4
ext3, ext4, exFAT
Hard Drive Replacement
If a drive fails, NAS Navigator2 and Settings will show an error message. The hard drive will need to be replaced for
the unit to function properly. After the drive is replaced, you will need to rebuild the RAID array.
Notes:
• While the LinkStation is powered on, never unplug or remove drives without dismounting them first, and
never replace a running drive. Power down the LinkStation before changing the drive.
30
• For the replacement drive, use a Buffalo OP-HDBST series drive. The new drive should be the same size or
larger as the replaced drive. If a larger drive is used, the extra space will not be usable in a RAID array.
• If there is existing data on the replacement drive, back it up as all data on the drive will be lost during the
replacement process.
• If sending a defective drive to Buffalo for replacement, please keep the cartridge as Buffalo will only replace
the hard drive and not the cartridge.
• To avoid damaging the LinkStation with static electricity, ground yourself by touching something made of
metal before handling any sensitive electronic parts.
• Do not change the order of the hard drives in the LinkStation. For example, pulling out drive 1 and replacing
it with drive 2 may cause data to be corrupted or lost.
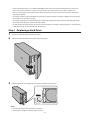
Step 1 - Replacing a Hard Drive
1
Turn the LinkStation off and remove all cables.
2
Squeeze the left side of the front panel and swing it open.
3
Push the failed drive's cartridge up and remove it from the LinkStation.
Notes:
• Do not press hard on the top of the LinkStation.
• Pull the drive straight out the front of the chassis.
31
4
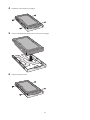
Remove the drive from the cartridge.
5
Install a new Buffalo OP-HDBST series drive in the cartridge.
6
Replace the four screws.
32
7
Insert the new drive into the empty slot.
8
Close the front panel.
1
2
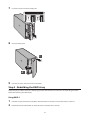
9
Connect all cables, then turn on the LinkStation.
Step 2 - Rebuilding the RAID Array
Depending on your RAID mode, the rebuilding procedure will be different. Follow the corresponding procedure
below that matches your RAID mode.
Using RAID 1
1
Follow the replacement drive procedure described above and replace a failed drive with a new drive.
2
Hold down the function button on the back of the LinkStation for 3 seconds.
33
3
The LinkStation will start rebuilding the RAID array. After a few minutes, the I18 message will be displayed in
NAS Navigator2. Wait until the drive finishes rebuilding; the I18 message will be extinguished.
Using RAID 0 or Linear
1
Follow the drive replacement procedure described above and replace a failed drive with a new drive.
2
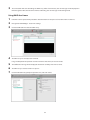
Navigate to Disk Manager - Custom in Settings.
3
Click the RAID tab and select the RAID array.
4
The RAID array has already been removed.
Drag and drop both the partition and the new drive into the list, then click Create.
5
Two different warnings will be displayed. Read them carefully and click Yes twice.
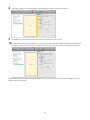
6
The RAID array is created. Click "Free Space".
7
Click the Partition tab, specify the partition size, and click Create.
34
8
Select the partition, enter a desired label name (optional), and select "EXT4". Click Format.
9
Two different warnings will be displayed. Read them carefully and click Yes twice.
10In the "Partition" tab, select the RAID array partition to be mounted and check "Mount as Home Partition", then
click Mount. If you have mounted at least one home partition already, you can enter the desired mount point.
Once the RAID array is configured, create shared folders on the array to use them. Refer to the "SHARED" section in
chapter 7 for the instructions.
35
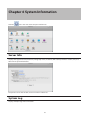
Chapter 6 System Information
Click the
icon in the main menu to open "Preferences".
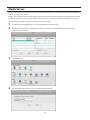
Server Info
Displays the registered name, hostname, workgroup name, IP address, MAC address, firmware version, time, and
other minor system information.
To open the Server Info window, click Server Info in Preferences.
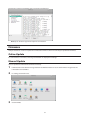
System Log
Displays multiple logs of the LinkStation.
36
To open the System Log window, click System Log in Preferences.
Note: Up to 10 latest logs will be kept in the LinkStation.
Firmware
Verify the firmware version or update the LinkStation's firmware. There are two ways to update the firmware.
Online Update
If a new firmware is available, a message and button are displayed in Settings.
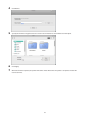
Manual Update
You can update the LinkStation's firmware manually.
1
Download the latest firmware image file from the Buffalo website and save the firmware image file to the
LinkStation's shared folder.
2
In Settings, click Preferences.
3
Click Firmware.
37
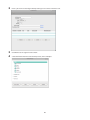
4
Click Browse.
5
Specify the firmware image file that was saved in the LinkStation's shared folder and click Open.
6
Click Apply.
7
While the firmware updates, the power LED blinks amber. Wait until the update is complete and the LED
returns to white.
38
System Backup
Backs up the data in the LinkStation to another location to avoid unexpected data failure.
Backing Up from LinkStation
You can back up a LinkStation folder to:
• A different folder on the LinkStation
• A USB device connected to the LinkStation
To create a backup job, follow the procedure below.
1
In Preferences, click System Backup.
39
2
Enter a job name and configure backup settings such as date and time to run.
3
Click Browse to the right of "Source Path".
4
Select the folder that will be the backup source, then click Open.
40
5
Click Browse to the right of "Destination Path".
6
Select the backup target and click Open.
If you want to select the USB device as the backup target, select the USB device hostname under the "USB"
folder. The "USB" folder is not in the USB device.
41
7
Click Save.
The backup job is added to the list.
Notes:
• Up to 8 backup jobs can be configured.
• When a backup job starts, a folder that contains the backup date in its folder name will be created in the
backup target automatically and all data will be backed up to that folder.
• If a backup job is scheduled to run while Direct Copy is running, the job will be canceled. The prior process
will work.
Backing Up Your Mac with Time Machine
Time Machine is a backup program included with OS X. To use your LinkStation as a backup destination for Time
Machine, configure it as described below.
1
In Preferences, click SHARED and select a shared folder as your backup destination for Time Machine.
2
Check both checkboxes under "Enable" and "Time Machine" next to "afp", then click Save.
3
On the Mac, open System Preferences.
42
4
Click Time Machine.
5
Click Select Backup Disk.
6
Select the LinkStation, then click Use Disk.
43
7
8
Enter a username and password with the rights to access the shared folder on the LinkStation, then click
Connect.
Time Machine will count down from 120 seconds and backup will start.
Copying from a USB Device
Use Direct Copy to copy from a USB device directly to the LinkStation.
Following device is supported:
• USB mass storage devices
To copy using Direct Copy, follow the procedure below.
Note: Direct Copy will not work while the backup is running. The prior process will work.
1
2
Connect the USB device. When it mounts, the function LED will light up.
You now have 60 seconds to press the function button once. If you do, the function LED will flash as all the files
on the USB device are copied to the Direct Copy folder ("usb_backup" under "Public" folder) of the LinkStation.
Note: While the function LED is flashing, hold the function button down for 3 seconds to cancel Direct Copy.
3
When the copy operation is finished, the access LED of the USB device will stop flashing and the function
LED on the LinkStation will be extinguished. Dismount the USB device from the LinkStation referring to the
"Dismounting an External Drive" section in chapter 5.
44
Chapter 7 Services
SHARED
Create or delete shared folders in the LinkStation and enable or disable protocol services.
Adding Shared Folders
1
In Preferences, click SHARED.
2
Click Add.
3
Enter a folder name and click OK.
45
4
Navigate to DEVICES - home and select the shared folder.
If you want to add a new folder to the list, click New Folder, enter a desired folder name, and click OK.
5
6
Click Open.
The shared folder is added to the list. From this screen, you can enable or disable services such as SMB, FTP,
AFP, and DLNA protocols. Check in the checkbox under "Enable".
The shared folder is now created. To access the folder via SMB, FTP, or AFP, make sure if the service is enabled. The
procedure to enable each service is describing below.
Notes:
• If creating a shared folder fails, verify at least one partition or array is mounted as the home partition.
• Even if you delete the folder name from the list, the folder that exists in the home partition will not be
deleted. Remove it from My LinkStation if it's not necessary.
Recycle Bin
To protect your data from accidental deletion, using the recycle bin is recommended. The recycle bin will only work
with SMB connections.
Samba
Enable or disable SMB connections for the LinkStation. It is enabled by default.
1
In Preferences, click SHARED and select a shared folder for connecting via SMB.
46
2
Make sure that "smb" is enabled for the folder. If not, check the checkbox under "Enable" next to "smb", then
click Save.
3
Click Samba.
4
Check "Enable Samba service" to enable SMB connection and click Apply.
AFP
Enable or disable AFP connections for the LinkStation. It is disabled by default.
1
In Preferences, click SHARED and select a shared folder for connecting via AFP.
47
2
Make sure that "afp" is enabled for the folder. If not, check the checkbox under "Enable" next to "afp", then click
Save.
3
Click AFP.
4
Check "Enable AFP service" to enable AFP connection and click Apply.
FTP
Enable or disable FTP connection of the LinkStation. It is disabled by default.
1
In Preferences, click SHARED and select a shared folder for connecting via FTP.
48
2
Make sure that "ftp" is enabled for the folder. If not, check the checkbox under "Enable" next to "ftp", then click
Save.
3
Click FTP.
4
Check "Enable FTP service" to enable FTP connection.
5
6
Enter a desired port number and other settings. If you want to allow anonymous access, check "Enable
anonymous".
Click Apply.
Note: If you access the LinkStation as an anonymous user via FTP, it will be read-only access.
49
Media Server
Enable or disable DLNA. If enabled, you can view or play files stored in the LinkStation from the DLNA-compatible
devices. It is enabled by default.
DLNA is a set of guidelines for sharing digital media. The LinkStation includes a DLNA server compliant with DLNA
guidelines. Movies, photos, and music saved on the LinkStation can be played on DLNA-compatible TVs, stereo
equipment, game consoles, and other devices on the local network.
1
2
In Preferences, click SHARED and select a shared folder for the DLNA server.
Make sure that "minidlna" is enabled for the folder. If not, check the checkbox under "Enable" next to
"minidlna", then click Save.
3
Click Media Server.
4
Check "Enable media server service" to enable DLNA connection.
50
5
Select other options if needed and click Apply.
Playing Files
To play back content from a DLNA-compatible device:
1
Connect the DLNA-compatible device to the same network as the LinkStation and turn it on.
2
Select the LinkStation in the software of the DLNA-compatible device.
3
Select the content to be played back.
Note: For more information on playing files, see the DLNA-compatible devices' manuals.
iTunes
Enable or disable the iTunes server, change the server name, and select the folder for sharing. It is disabled by
default.
If the iTunes server is enabled, computers on your network with iTunes can play music files stored on the LinkStation
and transfer them to your iOS devices.
1
In Preferences, click iTunes.
2
Check "Enable iTunes service" to enable the iTunes server and enter a desired service name.
Note: If you use the LinkStation name as the default service name and change it later, the changed LinkStation
name may not be affected while the service is enabled. To apply changes, disable the service, then enable it
again, or change the LinkStation name manually in the screen above.
51
3
Click Browse and select the folder to use for iTunes, then click Open.
4
Click Apply.
Downloader
Enable or disable BitTorrent. It is disabled by default.
BitTorrent is a protocol for distributing large amounts of data efficiently. The information in this section is for users
who are familiar with BitTorrent.
Enabling Downloader Service
1
In Preferences, click Downloader.
52
2
Click "Enable download service" to enable BitTorrent and click Apply.
Opening the Download Manager
1
2
3
In Preferences, click Downloader.
Click the icon displayed in the window. If no icon is displayed like the screen below, you should enable it by
following the steps in the "Enabling Downloader Service" section.
Enter a username and password, then click Log In.
53
The default username is "admin" and the default password is blank (no password).
4
The download manager will open.
Downloading Files
1
Open the download manager.
2
Click the
3
icon.
Select a file to upload or enter the URL into the "Or enter a URL:" field, specify the location to save the
downloaded file, then click Upload.
Check "Start when added" to start downloading immediately after clicking Upload.
54
Note: By default, the downloaded file will be saved in the "incoming" folder in the personal folder. To change the
download folder, click the
icon at the left bottom corner and change the directory at "Download to:".
4
The download will start.
To cancel downloading, click
, then Remove. Click
to pause the download. Click
55
or
to resume.
Chapter 8 System
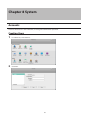
Accounts
Create or delete users in the LinkStation, or change the administrator password.
Creating Users
1
In Preferences, click Accounts.
2
Click New.
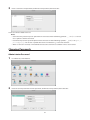
56
3
Enter a username and password, confirm the new password, then click Save.
A new user will be added to the list.
Notes:
• Usernames may contain up to 32 alphanumeric characters and the following symbols: - _ . ! # + $ ^ %. Do not
use a symbol as the first character.
• Passwords may contain up to 20 alphanumeric characters and the following symbols: - _ @ ! # $ % & ' ( ) * + , . /
; < > = ? " [ ] ^ { } | ~. Do not use a symbol other than an underscore (_) as the first character.
• When a new user is created, a shared folder that uses the username as its folder name is also created.
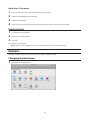
Changing Passwords
Administrator Password
1
In Preferences, click Accounts.
2
Enter the current password and new password, confirm the new password, then click Save.
57
Other Users' Passwords
1
Log in to Settings as a user who want to change its password.
2
Double-click Applications at the desktop.
3
Double-click Password.
4
Enter the current username and new password, confirm the new password, then click Apply.
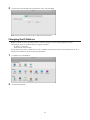
Deleting Users
1
In Preferences, click Accounts.
2
Select a user and click Delete.
3
Click OK.
The selected user is deleted.
Note: Even if the user is deleted, that user's shared folder will remain. Delete it manually.
Network
Configure network settings such as a hostname, IP address, or Wake-on-LAN.
Changing the Hostname
1
In Preferences, click Network.
58
2
Click the Host tab, configure the LinkStation's name, and click Apply.
Note: A hostname may contain up to 15 alphanumeric characters.
Changing the IP Address
Note: If no DHCP server is available and the IP address settings are set to acquiring from the server
automatically, then an IP address will be assigned as follows:
IP address: 192.168.0.9
Subnet mask: 255.255.255.0
Do not place two or more LS520D units in such a network environment because of this specification. Their IP
addresses will conflict and cause unexpected behavior.
1
In Preferences, click Network.
2
Click the Network tab.
59
3
Select Manual, enter the desired network address settings, and click Apply.
Note: The following IP addresses are reserved and should not be used. If you configure one of them by accident,
initialize settings with the function button on the LinkStation.
Local loopback address: 127.0.0.1, 255.255.255.0
Network address: 0.0.0.0, 255.255.255.0
Broadcast address: 255.255.255.255, 255.255.255.0
The IP address range from 224.0.0.0 to 255.255.255.0
Wake-on-LAN
The LinkStation supports Wake-on-LAN, which allows it to be turned on remotely. You can only wake the LinkStation
up when the LinkStation is in sleep (standby) mode.
Note: To use Wake-on-LAN, you'll need Wake-on-LAN software that sends magic packets. The LinkStation does
not include Wake-on-LAN software.
1
In Preferences, click Network.
60
2
Click the Wake-on-LAN tab and check "Enable Wake-on-LAN" to enable Wake-on-LAN.
Date & Time
Configures time settings such as date and time or time zone.
Changing Date and Time
1
In Preferences, click Date & Time.
2
Click the Date & Time tab.
61
3
Select the date from the calendar and enter the time directly into the "Time" field.
4
Click Apply.
Changing Time Zone
1
In Preferences, click Date & Time.
62
2
Click the Time Zone tab and select the desired time zone from the list, then click Apply.
Power Management
Configures sleep settings for the system or hard drives.
Drive Spin Down
With this function, only hard drives will enter sleep mode. This may help maintain hard drive longevity. While in spin
down, hard drives will start working again once the LinkStation is accessed.
1
In Preferences, click Power Management.
63
2
3
Click the Disk tab and configure the time interval when the hard drive will spin down. For example, if you select
5 minutes as the standby time, the hard drive will spin down 5 minutes after no drive access.
Click Apply.
Note: If you configure spin down settings after formatting internal drives or creating the RAID array with "Auto"
settings from Disk Manager, drive spin down will not occur during specific periods because the formatting
process is still working in the background.
Sleep Mode
To save energy, you can configure a timer to have the LinkStation enter sleep (standby) mode at a designated time,
where all hard drives and LEDs are turned off.
1
In Preferences, click Power Management.
2
Click the System tab.
3
4
Select the timer interval from "Daily" or "Weekly", time to go into sleep mode, and how long the LinkStation
will be in sleep mode.
Click Save. If you want to make the LinkStation enter sleep mode immediately, click Sleep Now.
64
Notes:
• Examples of multiple timer settings are shown below.
Example 1:
If running at a current time of 10:00 Wednesday
Schedule: Daily
Sleep Hour: 0:00
Hours of Sleep: 12
The unit goes into sleep mode at 0:00 am and wake up after 12 hours, 0:00 pm on Thursday.
Example 2:
If running at a current time of 10:00 Wednesday
Schedule: Weekly Wednesday
Sleep Hour: 20:00
Hours of Sleep: 12
On every Wednesday, the unit goes into sleep mode at 8:00 pm and wake up after 12 hours, 8:00 am on
Thursday.
• To turn on the LinkStation before the wake-up time when it is in sleep mode, press the function button, use
Wake-on-LAN, or turn off, then on the LinkStation.
Restore
Enable or disable function button initialization or initialize the LinkStation to factory defaults from Settings.
Note: If you change the RAID mode manually and initialize settings, all partitions will be automatically
dismounted because the mount path will be reset. Make sure you remount them after initialization.
Initializing from Settings
When initializing the LinkStation from Settings, all values will be erased and restored to its factory default. The data
stored in the LinkStation will be kept.
1
In Preferences, click Restore.
65
2
Click Initialize.
3
Read the confirmation and click Yes.
4
The LinkStation will be restored to its factory default settings.
Initializing with the Function Button
You can also initialize the admin password and IP address with the function button. The IP address will only be
restored from manual to DHCP.
Note: To enable or disable the function button reset, navigate to Preferences - Restore and check or uncheck
"Enable restoring admin password and DHCP settings to their factory defaults". If this is unchecked and you lose
your admin password, you will not be able to reset it.
1
Turn off the LinkStation.
2
Turn the LinkStation on while holding down the function button until the power LED flashes amber.
3
Initialization will start. Do not power down the LinkStation while the power LED is blinking.
4
When the power LED glows a steady white, initialization is finished.
66
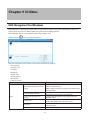
Chapter 9 Utilities
NAS Navigator2 for Windows
NAS Navigator2 is a utility program that makes it easy to display Settings, change the LinkStation's IP address, or
check its hard drive. You can download NAS Navigator2 from the Buffalo website.
NAS Navigator2 will run in the system tray when the computer is on.
Double-click the
icon to start NAS Navigator2.
Click your LinkStation's icon to open a share on the LinkStation and display:
• Total capacity
• Capacity in use
• IP address
• Workgroup
• Subnet mask
• Default gateway
• MAC address
• Firmware version
Name
Description
Assigns all the LinkStations' or TeraStations' shared
Map All Remote Shares to Drive folders as network drives.
Letters
Note: LS520D cannot be assigned as the network drive
with this option.
Creates a desktop shortcut to the selected
Create Desktop Shortcut*
LinkStation's or TeraStation's shared folders.
Launch NAS Navigator2 on
Launches NAS Navigator2 in the system tray when
Menu
Startup
Windows boots.
If an error occurs, an error message will pop up from
Display Errors
the NAS Navigator2 icon in the system tray.
Opens the selected LinkStation's or TeraStation's
Properties*
properties page.
Close
Closes NAS Navigator2.
67
Name
Description
Icons: Displays icons.
Details: Displays the hostname, product name,
workgroup, IP address, subnet mask, and default
gateway.
If you have multiple LinkStations and TeraStations on
the network, you may choose to display them in order
of hostname, product name, workgroup, IP address,
subnet mask, or default gateway.
Opens the selected LinkStation's or TeraStation's
shared folders.
Searches for NAS devices on the network again.
Opens the selected LinkStation's or TeraStation's
shared folders.
Opens Settings for the selected LinkStation or
TeraStation.
Opens the selected LinkStation's or TeraStation's
properties page.
Creates a desktop shortcut to the selected
LinkStation's or TeraStation's shared folders.
View
View
Sort by
Browse*
Refresh
Browse Shares
Displays when you
right-click a device's
icon.
Settings
Properties
Create Desktop Shortcut
*Click on the selected LinkStation's or TeraStation's icon to display these options.
When NAS Navigator2 is minimized, right-click on the NAS Navigator2 icon in the system tray for the following
options.
Name
Description
Opens the selected LinkStation's or TeraStation's
shared folders.
Opens Settings for the selected LinkStation or
TeraStation.
Opens the selected LinkStation's or TeraStation's
properties page.
Creates a desktop shortcut to the selected
LinkStation's or TeraStation's shared folders.
Refreshes list of NAS devices.
Displays NAS Navigator2 window.
Exits NAS Navigator2.
Browse Shares
Settings
NAS Name
Properties
Create Shortcut
Refresh
Browse Shares
Exit
68
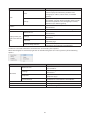
The following tasks may be performed from the properties page.
Name
Configuration
IP Address
Description
Click Settings to open the configuration interface.
Check Use DHCP to assign an IP address from the DHCP server automatically. If
there is no DHCP server in the network, you cannot use this function.
Check Renew IP address to obtain an IP address from the DHCP server.
You can manually enter an IP address, subnet mask, and default gateway.
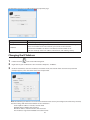
Changing the IP Address
1
Double-click the
2
Right-click on your LinkStation's icon and choose Properties - IP Address.
3
icon to start NAS Navigator2.
Uncheck "Use DHCP", enter the IP address and subnet mask, and click OK. If the username and password
prompts appears, enter the admin username and password.
Note: The following IP addresses are reserved and should not be used. If you configure one of them by accident,
initialize settings with the function button on the LinkStation.
Local loopback address: 127.0.0.1, 255.255.255.0
Network address: 0.0.0.0, 255.255.255.0
Broadcast address: 255.255.255.255, 255.255.255.0
The IP address range from 224.0.0.0 to 255.255.255.255
69
NAS Navigator2 for Mac OS
NAS Navigator2 is a utility that makes it easy to display Settings, change the LinkStation's IP address, or check its
hard drive. You can download NAS Navigator2 from the Buffalo website.
Click the
icon in the Dock to start NAS Navigator2.
Click your LinkStation's icon to open a share on the LinkStation and display:
• Total capacity
• Capacity in use
• IP address
• Workgroup
• Subnet mask
• Default gateway
• MAC address
• Firmware version
Name
Description
Opens the default shared folder for a selected
Open
LinkStation or TeraStation.
Refresh
Searches for NAS devices on the network again.
Opens Settings for the selected LinkStation or
Settings
TeraStation.
Opens a window that lets you configure the NAS's IP
Configure
address or open Settings.
Label Color
Selects the color of the name displayed below the icon.
View Options
Lets you choose icon size, position, and view mode.
Auto power mode can turn supported TeraStations and
Auto Power Mode
LinkStations on the network on and off automatically.
Opens the selected LinkStation's or TeraStation's shared
Open Folder
folder.
To display these options,
Opens Settings for the selected LinkStation or
Settings
hold down the control
TeraStation.
key and click a device's
Opens a window that lets you configure the NAS's IP
icon.
Configure
address or open Settings.
Label Color
Selects the color of the name displayed below the icon.
70
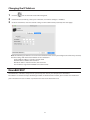
Changing the IP Address
1
Click the
2
Hold down the control key, select your LinkStation, and choose Configure - IP Address.
3
Uncheck "Use DHCP", enter the desired settings and the administrator password, then click Apply.
icon in the Dock to start NAS Navigator2.
Note: The following IP addresses are reserved and should not be used. If you configure one of them by accident,
initialize settings with the function button on the LinkStation.
Local loopback address: 127.0.0.1, 255.255.255.0
Network address: 0.0.0.0, 255.255.255.0
Broadcast address: 255.255.255.255, 255.255.255.0
The IP address range from 224.0.0.0 to 255.255.255.255
NovaBACKUP
NovaBACKUP is a Windows utility that lets you back up the data on your computer or LinkStations.
The software is available at http://d.buffalo.jp/LS520D/. To download the installer, you need the serial number of
your LinkStation. The serial number is printed on the label at the back of the unit.
71
Chapter 10 Appendix
When the Power LED Blinks
White
The power LED will blink white during bootup or shutdown.
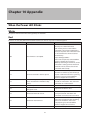
Red
If there is an error, the power LED will blink red. You can also see any errors in NAS Navigator2.
Error Code
Description
Corrective Action
Save the firmware file to the root
directory of a FAT32-formatted
USB memory device. Power off the
LinkStation, connect the USB memory
device, then power the LinkStation back
on. The firmware file will be restored
automatically.
E04
The firmware is corrupted.
http://86886.jp/ls500-r/
If the error still present, contact Buffalo
technical support for assistance.
Note: By recovering the firmware, all the
LinkStation's settings will be initialized
to default values, but the data on the
LinkStation will be kept.
Check the fan. Use compressed air or
tweezers to remove any dust or foreign
E11
An error occurred in the fan speed.
objects. Confirm that the fan is spinning
normally. If it is not, contact Buffalo
technical support for assistance.
A rise in the system temperature may
Do not place objects in the area
E12
have exceeded the allowable safety
around the LinkStation. Also, move the
value.
LinkStation to a cool location.
E14
RAID array X cannot be mounted.
Run the RAID array disk check in Settings.
The bad sectors have reached a
E15
Replace the defective drive.
dangerous level.
Hard drive X may be disconnected
E16
Unable to find hard drive X.
or may have failed. Shut down the
LinkStation and reinstall the hard drive.
Format the hard drive. After formatting,
if the error still appears after rebooting,
E22
Unable to mount drive X.
replace the hard drive. If the error
is displayed again, contact Buffalo
technical support for assistance.
E30
A hard drive error occurred.
Replace the faulty drive.
72
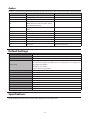
Amber
If there is a status message, the power LED will blink amber. You can also see any status messages in NAS Navigator2.
Information Code
Description
Corrective Action
I12
Operating in degraded mode.
I13
Formatting RAID array X.
I16
Creating RAID array X.
Rebuilding RAID array X.
I18
Note: Transfer speeds are slower during
the rebuilding process.
Writing 0s to RAID array X, erasing all
I19
data.
I20
Formatting hard drive X.
Don't turn off the LinkStation.
I21
Checking hard drive X.
Don't turn off the LinkStation.
I22
Erasing the data for hard drive X.
I23
System is being initialized.
I25
Updating the LinkStation firmware.
I28
Formatting USB hard drive.
Don't turn off the LinkStation.
A new firmware version has been
I52
Update the firmware.
released.
Default Settings
Administrator's Name
Password
Shared Folders
DHCP Client
Microsoft Network Group Setting
SMB
AFP
FTP
NTP
DLNA
iTunes Server
BitTorrent
Wake-on-LAN
RAID Mode
admin
password
"Public" and "admin" (for both Windows and Mac computers).
Normally, the LinkStation will get its IP address automatically from a DHCP
server on the network. If no DHCP server is available, then an IP address will
be assigned as follows:
IP address: 192.168.0.9
Subnet mask: 255.255.255.0
WORKGROUP
Enabled
Disabled
Disabled
Enabled
Enabled
Disabled
Disabled
Enabled
RAID 1
Specifications
Check the Buffalo website for the latest product information and specifications.
73
IEEE 802.3ab (1000BASE-T)
IEEE 802.3u (100BASE-TX)
IEEE 802.3 (10BASE-T)
1000 Mbps full duplex (auto-negotiation)
100 Mbps full duplex/half duplex (auto-negotiation)
10 Mbps full duplex/half duplex (auto-negotiation)
1 port (supports Auto-MDIX)
RJ-45 8-pin
TCP/IP
CSMA/CD
SMB/CIFS, AFP, FTP, HTTP
HTTP
Interface
Transfer Speed
LAN Port
USB Port
Internal Hard Drive
Power Supply
Dimensions (W x H x D)
Weight
Power Consumption
(Max.)
Operating Environment
Compatible Devices and
OS
Number of Ports
Connector Type
Protocol
Access Method
File Sharing
Management
USB 3.0 Port (Series A) x 1
If a hard drive in your LS520D malfunctions, replace it with a Buffalo OP-HDBST series
of the same or more capacity, available from the Buffalo website.
AC 100–240 V, 50/60 Hz
87 x 128 x 205 mm; 3.4 x 5.0 x 8.1 in
Approx. 2.5 kg; 5.5 lb
36 W
Temperature: 5–35°C; 41–95°F
Environment humidity: 20–80% (no condensation)
• Windows computers with Ethernet interface (both 32-bit and 64-bit)
Windows 8.1, Windows 8, Windows 7, Windows Vista
• Intel Mac computers with Ethernet interface
OS X 10.10, 10.9, 10.8, 10.7
Note: The LinkStation requires an Ethernet connection with your computer for
operation. It cannot be connected via USB. To use with mobile devices, Wi-Fi
connection is required.
74
Chapter 11 Regulatory Compliance
Information
For Customers in Europe
EU Declaration of Conformity
Dansk
Brug ikke USB-kabler, der er 3 meter eller længere for at tilslutte USB enheder til denne LinkStation serie.
Der må kun bruges de kabler og det tilbehør der er inkluderet i pakken. Der må ikke bruges andet tilbehør eller
kabler, medmindre det er udtrykkeligt beskrevet i dokumentationen.
Deutsch
Verwenden Sie keine USB-Kabel, die 3 Meter lang oder länger sind, um USB-Geräte an LinkStations dieser Serie
anzuschließen.
Verwenden Sie ausschließlich die Kabel und Zubehörteile, die im Lieferumfang enthalten sind. Andere Zubehörteile
oder Kabel dürfen nur dann verwendet werden, wenn dies in der Dokumentation ausdrücklich vorgeschrieben ist.
English
Do not use USB cables that are 3 meters or longer to connect USB devices to this LinkStation series.
Only use the cables and accessories that are included in the package. Don't use other accessories or cables unless
specifically instructed to in the documentation.
Español
Utilice cables de una longitud inferior a 3 metros para conectar los dispositivos USB a este tipo de LinkStation.
Utilice únicamente los cables y accesorios incluidos en el paquete. No utilice otros accesorios ni cables a menos que
así se indique en la documentación.
Français
Utilisez des câbles d'une longueur de moins 3 mètres pour connecter les périphériques USB à ce type de
LinkStation.
Utilisez uniquement les câbles et accessoires inclus dans ce package. N’utilisez aucun autre accessoire ou câble sauf
instruction spécifique de la documentation.
Italiano
Non utilizzare cavi USB lunghi 3 metri o più per collegare dispositivi USB a questa LinkStation.
Utilizzare esclusivamente i cavi e gli accessori inclusi nell’imballaggio. Non utilizzare altri accessori o cavi a meno che
non sia specificamente indicato nella documentazione.
75
Nederlands
Gebruik geen USB-kabels die 3 meter of langer zijn om USB-apparaten met deze LinkStation series te verbinden.
Gebruik alleen de kabels en toebehoren die zich in de verpakking bevinden. Gebruik geen ander toebehoren of
kabels tenzij dit uitdrukkelijk in de handleiding wordt aangegeven.
Norsk
Bruk ikke USB-kabler på tre meter eller mer for å koble USB-enheter til denne LinkStation-serien.
Bruk kun kabler og tilbehør som er inkludert i pakken. Ikke bruk annet tilbehør eller kabler med mindre spesielt
instruert til å gjøre det i dokumentasjonen.
Português
Não usar cabos USB de 3 metros ou mais para ligar dispositivos USB a esta série LinkStation.
Utilizar apenas cabos e acessórios incluídos na embalagem. Não utilizar outros acessórios ou cabos, salvo se
especificamente indicado na documentação.
Suomi
Älä käytä 3m tai pitempiä USB-kaapeleita USB-laitteiden liittämiseen näille LinkStation-sarjoille.
Käytä ainoastaan pakkauksen mukana toimitettuja kaapeleita ja varusteita. Älä käytä muita varusteita tai kaapeleita
ellei näin ole erityisesti ohjeistettu asiakirjoissa.
Svensk
Använd inte USB-kablar som är 3 meter eller längre för att ansluta USB-enheter till den här LinkStation-serien.
Använd bara kablar och tillbehör som ingår i förpackningen. Använd inte andra tillbehör eller kablar om du inte får
uttryckliga instruktioner om det i dokumentationen.
Türk
USB aygıtları bu LinkStation serisine bağlamak için 3 metre ve daha uzun USB kabloları kullanmayın.
Yalnızca pakette bulunan kablo ve aksesuarları kullanın. Belgelerde özellikle belirtilmedikçe başka aksesuar ve
kablolar kullanmayın.
AC Adapter
EU
Asian Power Devices Inc. WA-36A12
76