1
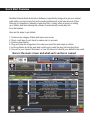
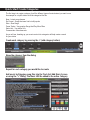
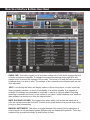
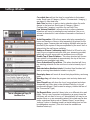
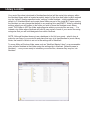
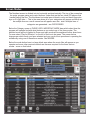
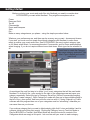
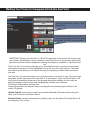
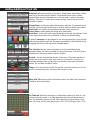
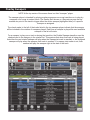
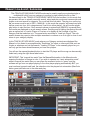
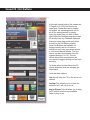
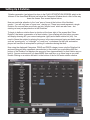
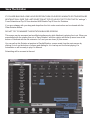
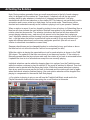
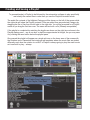
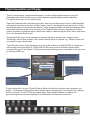
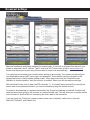
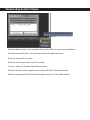
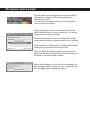
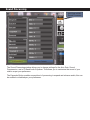
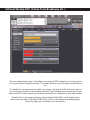
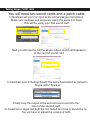
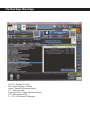
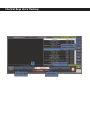
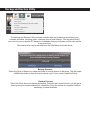
User Manual
v 1.1
Index
?
Quick Start Overview................................................................
?
Quick Start Create Categories.................................................
?
Quick Start Create Rotation.....................................................
?
Downloading..............................................................................
?
Installation.................................................................................
?
Software Overview....................................................................
?
Installation Considerations......................................................
?
A Word About Audio Files........................................................
?
Main User Interface Buttons Described..................................
?
Settings Window........................................................................
?
Library Location / Software Updates.......................................
?
Library Location........................................................................
?
Screen Modes............................................................................
?
Getting Started..........................................................................
?
Adding Music Files to The Categories....................................
?
Marking Your Tracks for Sweepers/Intro/Outro Next Start....
?
Adding Additional Track Info....................................................
?
Overlay Sweepers.....................................................................
?
Manual / Live Assist / Automated............................................
?
Sound FX / Hot Buttons............................................................
?
Automation Operation..............................................................
?
Setting Up A Rotation...............................................................
?
Save The Rotation....................................................................
?
Activating the Rotation.............................................................
?
Creating and Saving a Playlist.................................................
?
Playlist Generation and Playing...............................................
?
VoiceTracking............................................................................
?
Scheduler...................................................................................
?
Broadcast Settings...................................................................
?
Simulcasting Another Stream..................................................
?
Microphone and Line Input......................................................
?
Sound Processing.....................................................................
?
External Winamp DSP ( Stereo Tools, Breakaway etc..)........
?
View Statistics...........................................................................
?
Remote Voice Tracking and Management...............................
?
Taking Skype / VOIP calls.........................................................
?
Shortcut Keys Main Page.........................................................
?
Shortcut Keys Voice Tracking..................................................
?
Backup and Restore Utility.......................................................
?
EULA 'End User License Agreement.......................................
?
Thank You!.................................................................................
3
4
5
6
6
7
8
9
10
11
12
13
14
15
16
17
18
19
20
21
22
23
24
25
26
27
28
29
30
31
32
33
34
35
36
37
38
39
40
41
42
Quick Start Overview
NextKast Internet Radio Automation Software is specifically designed to get your internet
radio station up and running fast and sounding professional in the least amount of time.
Although it is possible to manually create play lists, it mainly offers a system of setting
up a rotation and then allowing the software to automatically create play lists
from that rotation.
Here are the steps to get started:
1. Create music category folders and import your music
2. Check .mp3 tags of each track to make sure it is accurate
3. Create a new rotation
4. Drag and drop the categories in the order you would like and create a rotation
5. Let the software do all the work and continuously create the play lists and play them
6. Connect to your Icecast, Shoutcast, or Live 365 server to transmit your station to the world.
Here is the main screen and what each section is named
Broadcast Settings
Category Folders
Add Category Button
Assignable Samples
Rotation List
Play List
Rotation/Playlist Select
New Rotation Button
Quick Start Create Categories
Downloading
The first step is to create a category for all the different types of music/content you want to use.
An example for a top40 station would be categories like this
New – Latest song releases
Re-Current - Songs that were hits but still popular
Slow - Slow Songs
Power Tracks - Very popular Songs that Play More Often
Sation Id’s - Your station Id’s
Commercials- Advertisements
As you will see, breaking up your music content into categories will help create a sound
for your station
.
Create each category by pressing the ‘+’ (add category button)
Add Category Button
Name the category from the dialog
Repeat for each category you would like to create
Add music by Dragging song files into the Track list/ Add Music Screen
or using the “+” Dialog. The Music Will Be added to the active Category
Or Drag Music files Here
.
Add Music From Dialog
Quick Start Create Rotation
Downloading
Final Step is to check the .mp3 tags by selecting each song, update any in-accurate
information by re-entering correct information and pressing the ‘update mp3 tag’
button. This step is not mandatory but will help make sure song separation works
properly. Only Song Name, Artist name, And Album are important.
Press the new rotation Button
Create Rotation Button
In the Dialog name the rotation.
We now have a blank rotation. Drag the categories from the top and create a rotation
by placing the categories in a list of how the songs/content need to be picked.
Drag each category in the
order to play. List at least 10
categories, it is ok to repeat
New Rotation Button
Once the list is complete, press the Rotation.rot (or the new one you created) icon and
the automation will start. Nextkast will now automatically pick music in the categories listed.
To broadcast, go to the broadcast settings screen and input your server information.
Downloading
The software is downloaded for free from www.nextkast.com
The download is a fully functional version which has a built in time down-count which will
require registration and payment prior to the down-counter reaching zero. The free trial is for
2000 minutes for full featured operation. Registration is accomplished through the website
www.nextkast.com
Even through this is a fully functional trial version, updates to the software are available via a
button in the user interface screen and via the same process after registration. Updates will
not affect the trial down counter. (see section “UPDATES”)
Installation
The software can be installed on any Windows platform by executing the downloaded file and
following the prompts. The installation must always be carried out on C local drive and the
installer will put the program in a folder below the C drive“program” folder called “nextkast”.
The user can change slightly the folder name of where the program will reside during
installation if desired but it is strongly recommended to install in the default folder C:\nextkast.
NOTE:
The music library that this program will use can be placed on any accessible
drive by options available within the program once it is opened. (see section LIBRARY)
NOTE: The actual program must remain on the C Drive.
Software Overview
Nextkast internet radio operation software can be run as a fully automatic play out system
supporting pre-determined “rotations” which are made up of music categories, promos, id’s,
spots, jingles etc at the design of the user at initial startup or later additions as individually
required by the user. Also the software supports the generation of predetermined play lists for
various periods of time (1 hour to 30 days) which, during those play lists, the user can do
advance “voice-tracking” within the software once a play list has been generated. Standard
.pls play list files are available by import as well. Rotations and play lists can be advance
scheduled by through optional use of the “scheduler” within the software. (see SCHEDULER)
There are hot button carts on the right of the air screen as well as a quick voice recorder
available at the bottom of the hot buttons. There is a secondary audio output which can be
used as an off air cue player (“preview”) set in options and the entire system is capable of
being operated in the “live assist” mode which is referred to as “manual” to allow live air talent
to operate during their program, fully manually regarding the music players, song selections,
commercials, id’s etc.
The software contains smooth fade transition settings available to the user to setup to their
preference as well as “post” identification (start of vocal part of the song) by the user on a one
time per song basis and also selectable fade and crossover points of the music on a one per
song basis. Many and most times the default settings of the software will crossfade more
than adequately for most users.
There is NO database involved allowing for a much cleaner more reliable setup. Instead
music files will be brought into the software under various user defined “categories” and
stored in category folders in the windows directory structure under multiple library folders
whose drive and folder locations are determined by the user at the program initial setup time
and can be modified or completely changed as required at any time. All category folders will
be built by the software on the drive and under the windows folder as directed by the user at
setup time and can be modified, added to or deleted or replaced as required later using the
“settings” button.
The software uses data in the mp3 tag of mp3 music files and also supports wave file format.
There is a software adjustable crossfade time whereby the music will crossfade upon
detection of Nextstart marker or a preset adjustable by the user (auto Trim) so that there is no
dead air. Sweeps can be tagged to particular files if desired or played sequentially through a
third sweep only player in the software.
There are controllable inputs for “line” and “microphone”. Streaming to any one or more
stream provider like Shoutcast, IceCast, Live365, etc is configurable from within the program
(broadcast) settings quickly and easily. There is a search for items in library and drag and
drop is supported on selections as well as a manual individual “repick” on rotation and play
list selections. Last date and time played for any selection is displayed.
Top of hour id or break can be configured to occur exactly at top of hour if required and
additionally the software has a “skimmer” recorder that allows recording a show or segment of
any item at the discretion of the operator.
This automation software is by far the simplest to install and operate as well as easy learn
with most every user up and running in less than an hour! The key to this is that almost every
part of the software is present on the one HOME screen display so the user does not need to
hunt for screens and modules to accomplish most of their desired items.
Installation Considerations
Installation of the program software will by default take place in the C\nextkast folder which
will be generated if it does not already exist. Initially the software install will make a few
required folders under the Nextkast folder by default on installation. The user can change
these sub folders to reside on another drive or location by setting the location inside the
program under SETTINGS at any point after the install is completed.. Wherever the “music”
library and other files are placed is fine but the program itself must remain under
C:\nextkast\nextkast.exe. There are about 2 dozen internally required files there at that
default location that are part of the software to operate.
Once the location of the audio files are determined then the folder layout would typically be as
follows:
X:\My Nextkast Library - where X is any drive and folder name is user chosen
X:\My Nextkast Library\Music – Make many catagories to contain your music
X:\My Nextkast Library\Playlist – Playlists are stored when generated by the user
X:\My Nextkast Library\Rotations – Rotations are stored when user generates
X:\My Nextkast Library\Sweeps – Sweeps are kept here for the software to use
PLEASE NOTE; The designated library location drive (folder) MUST be available to NextKast
as NextKast is started or library will show as blank or default to the contents under
C:\nextkast\music. Refreshing the library after NextKast is opened will not find a library that
was unavailable at program start. NextKast plays all selections directly from the file in the
library location as specified in NextKast under the “settings” tab.
ALSO If you use a library location other than the default then once you set that location folder
in “settings” then re-start NextKast…it will automatically generate the subfolders Music,
Playlist, Rotations, and Sweeps under that new Libray Folder that you specified in settings,
thus making it easy to set your music files into catagorties under the music subfolder either
via Nextkast or by using Windows to copy your mp3 files into the Music subfolder.
Typical categories might be Male, Female, Instrumental, Country etc. The number of
catagories is almost limitless so you can have whatever you wish for better program control
especially in automation mode. (See Part II)
Note: One of the Category folders must be called “advertiser” if an external log traffic
software such as “Natural Log” is used.
A Word About Audio Files
NextKast supports the playing of wav files as well is ideally suited to play mp3 files. As music
files are brought into the NextKast Library, if they are mp3 files, then NextKast will use the
information (artist and title) as found in the mp3 file tag. IF there is no file tag on the mp3 file
(many sometimes do not have tags) then NextKast will use the artist and title information from
the Windows filename.
For example most libraries of audio files use the ARTIST space – space TITLE naming
convention for windows audio files. That is how Nextkast will display that audio file as song
title and artist. However if that audio file contains an ID3 tag of whatever version, then
Nextkast will use the artist and title information in that tag to display artist and title. Most
stations copy the Windows mp3 filename information (artist – title) into the ID3 tag for
standardization. This can be done in mass using the free utility mp3tag software which can be
downloaded free at
http://www.mp3tag.de/en/download.html
However Nextkast will operate with or without tags but tag use is recommended.
Main User Interface Buttons Described
RADIO CMP: This button toggles on off and when orange color is on which engages the built
in limiter-compressor-expander. To change the compressor settings simply right click this
orange button to access the settings of the sounds. The button is off and the audio processor
bypassed when it is white in color. The settings of the compressor are defaulted and are also
user adjustable.
HELP: Left clicking this button will display options to Send a bug report, or open some help
videos regarding nextkast, or check for availability of a version upgrade. If an upgrade is
available it is strongly recommended to download it, execute it using all defaults including
restarting of nextkast at the end. (on an update do not check “make a desktop icon” because
there already is a desktop icon from the original install.)
MUTE PLAYBACK SOUND: This toggle button when white is not muted and when red in
color the system sound card is muted. (Careful as this might be the on-air sound when using
your pc to feed a transmitter)
MANUAL-AUTOMATED: This button is toggled between fully manual (red) programmer at
console mode, to fully automated (green) software play out unattended operation. These two
modes will be covered individually in detail further on here.
Settings Window
Crossfade time will set the time for crossfades in Automated
mode. Each type of Category ( Music / Commercials / Imaging )
can have it’s own fade time.
Auto Trim functions to end or start a selection when it’s audio
decays to the level set. Each type of Category ( Music /
Commercials / Imaging ) can have it’s own Auto Trim.
Low Volume Detection will ensure that no silence between
selections will occur by starting the next selection if low or no
volume is detected for a set number of seconds or fractions of
seconds.
Artist Separation Will enforce same artist play separation by
hours and fractions of hours. Artist separation is ignored for the
category types Commercials and Imaging. Multiple artist can be
checked by the system if they are separated by the word ‘feat’ or
entered into the mp3 tag as multiples.
Audience Pleaser (streaming only) Default is Off and is only
used if tune out specs are known from your streaming provider,
which will only pick songs with set audience tune out levels.
Enable Top of Hour Rotations This when checked will force a
new rotation in Automated at approximately the top of the hour
when the next available track ends.
Force Schedule at Top of Hour This when checked will force
any existing schedule for the next hour to start at exactly top of
hour.
Autostart when Nextkast starts If checked then Nextkast will
start up running the scheduled rotation or play list.
Reset play times will reset all stored last-played history and song
order
View App Log will show the program start and stop dates and
times
View Played Log will show the log of songs played and when.
A separate log is also ketp in the nextkast Directory to log all
commercials played ( files located in category folders that are of
the ‘Commercial’ Type)
Set Remote Drive permits Library to be on a different drive and
folder. This is a very important consideration as many times the
full library will not want to be on a C drive(default) but may be on
another drive or on an accessible network drive and may be also
under a windows folder such as “Master Library” as set using
“settings” button in Nextkast usually at install-setup time but can
be changed as required. (This drive must be available as
Nextkast starts up)
Library Location / Software Updates
NOTE: The named drive file location for the library MUST be available to Nextkast when
NextKast is started (opened ) or else that library cannot be found by NextKast and will come
up blank. Also on initial installation NextKast will default the library automatically to
C:\NextKast\music\ but you can change this using “settings” button to point to any available
drive and folder and a restart of NextKast will recognize the revised location and build
NextKast’s subfolders there.
INSTALLATION after download or update is best accomplished using the default values
including “start NextKast after finish”
UPDATES
SOFTWARE UPDATES are triggered by the white HELP button sub-menu “check for
update”and will install the new version if required right over the old version with all settings
intact. Again take the defaults on any update and the program will operate with the new
version and all settings that the old version had. This update operation can be done with
Nextkast running and the installation-update will close the program as part of that process
and then optionally start it up again as the update completes with the original program
settings all intact. (on an update do not check for a desktop icon because it already exists
from the original install)
LIBRARY suggestions
To make any radio automation playout system perform properly, some advance thinking and
decisions need to be taken in advance to layout the music files that the software will play
either manually or in automation. With Nextkast you can use any of your existing (mp3/wav)
music files from their current locations on your hard drive BUT organizing the files in Windows
folders based on your category preferences will allow Nextkast to play them in a more
organized and controllable fashion. For example having your library of music under a
Windows folder called, say “Music Library” on any accessible drive and all of your music and
other audio files in Windows subfolders under Music Library folder will prove much easier to
configure but is not a requirement of Nextkast.
Library Location
Your music files when introduced to Nextkast(see below) will be copied into category within
the Nextkast library which is located as earlier stated, by the drive and folder location entered
into the “default” location specified under “settings” inside Nextkast. Initial installation will
default to C:\Nextkast\Music and create those folders as part of the install BUT upon opening
the Nextkast you can change that default to any existing drive and EMPTY folder by selecting
settings where you will browse to the folder you wish to place the Nextkast music library
under. THIS folder is NOT the folder and catagories where your music files are now..….it is
instead a top folder where Nextkast will build its own copies of each of your music files using
categories that you will build-designate from within Nextkast.
NOTE: Although Nextkast does not use a database to find it’s/your music…what it does is
make its own copy of your music file and place that copy in its own(Nextkast’s) music library
folder, the location of which is set out in the settings tab of NextKast.
To recap; Make a Windows folder name such as “NextKast Master Libray” on an accessable
drive and aim Nextkast at that folder using the settings tab in Nextkast. (default browse in
Nextkast)…..now you are ready to introduce your music files, wherever they may be, into
Nextkast.
Screen Modes
The Nextkast screen is divided into six horizontal sections basically. The top of the screen has
the major program setup and control buttons. Under that are the two virtual CD players that
handle playing the files. The third down horizontal area is black in color and has a large plus
sign on it’s right side + . This is the area where all of your categories will appear and there can
be multiple lines so a scroll mouse bar will appear near the + side if multiple lines of
categories are generated…see CATEGORIES.
Below the Category space is THREE VERY IMPORTANT MODE bars which select how the
program will operate and with what features as you select one of the three modes. The
selected mode will be hi-lighted in Green and each mode will be explained further down here.
For now select “Play list Rotation” on the left of the line to be green. The screen below
changes per which mode you have selected and you can do most operations in operating the
software by using one of these three modes. See MODES.
Below the mode button bars is a large black area where the music files will appear as you
operate and some other required controls are there as required for the three various
modes…more on that below.
Mode Bars switches
operational screen
Getting Started
Before you bring your music and audio files into Nextkast you need to consider what
CATEGORIES you want within Nextkast. They might be examples such as
Power
Recurrent Gold
Top 40
Commercials
Drops and Sweepers
Slow
Etc....
Make as many categories as you please…using the simple procedure below.
Whatever your preferences are, and there can be as many as you want…dozens and dozens
if you wish, you must now first create those blank categories with Nextkast to make them
ready to receive your music audio files. See CATEGORIES. Be sure to select category type,
so for Music select Music, for commercials select Commercials, and for Drops and sweepers
select Imaging. If you do not require different cross fade times, Music type can be selected for
all.
Press here to create the Category
Then name category and select Type
Music Type is default and can be
used for all
CATEGORIES:
As mentioned the next first step is to define “your” music categories that will be used inside
Nextkast. To do this hit the + plus symbol to the right of the categories area and name your
category repeatedly. Select the type of Category this will be ( Music/Commercials/Imaging)
Then press “create category”. Each Category so made will show up in the scrollable space to
the left of the + plus symbol. And have a music note icon with it. If using “Natural Log” traffic
software with this program then one of your categories must be “advertising” otherwise you
can name them as you choose.
If you make a category that you want to delete simply right click it’s icon and delete it and its
contents (which are at this point empty). Clicking the Category Icons in Track list Mode or
Play list BUILDER or Tracklist / Add Music Mode will show the music file content of the
Categories which are empty at this point…but now lets add your music to each category.
Adding Music Files to The Categories
Press here to create add
tracks to active Category.
You Can Also Drag and
Drop Files into List
To add music to any of the created Catagories you need to be in the TRACKLIST/ADD
MUSIC Mode:
There are several ways to add one or many music files to any Category. (note as previously
mentioned..using an outside program such as the free MP3TAG.exe to make sure that all
your music mp3 files have a valid mp3 tag is highly recommended prior to adding those files
to Nextkast.
First select one/any of the catagories that you made above in Nextkast by clicking it’s icon to
light it up blue. (will later appear as white hilite) This is one of the categories that your music
files will go into.
There is a large + symbol to the lower right of the large black music file box in this mode.
Clicking this + will open a Windows file browse window to allow you to select a folder on your
disk where you keep your music files and open it to show those files. By windows selecting
(hi-lighting) one, some or all of those files shown and clicking open then those files will be
added to the Nextcast music library in that category. If preferred you can simply open a
windows explore folder window and directly drop and drag(left mouse) music files from a
Windows folder right into the black Nextkast Box and those file or files will be added to
(copied into) the hilited category and displayed in the Nextkast box.
You can add the same audio file to as many catagories as you require AND if you try to add it
to the same category more than once the program will know and will just overwrite the file so
you will not get duplicates within a category.
Removing a song from a category you simply select the song in the Nextkast box and right
click it and delete…NOTE it will only remove it from the Nextkast music library folder…it will
still exist in your own original music folder on your drive.
Marking Your Tracks for Sweepers/Intro/Outro Next Start
Track Info, Additional Cue Info, Time
Restrictions
if Desired Set markers for track here
Press preview song and click the mark
as desired. Left Click to reset marker
IMPORTANT Please note that there is a BLUE Progress Bar at the bottom left of the screen
and it shows that Nextkast is busy updating or importing files so do not proceed with further
operations until the blue bar disappears showing the program is available to edit further files
etc.
There is a line of four buttons allowing you to add additional artist, cue and more comment
information to the tag info to the highlighted song in the song list totally optional. The fourth
time button option allows you to prevent the song from playing at certain hours and days if
you wish.
The next line of four buttons allows you to specify sweep in, intro time to post, the outro begin
time(fade) and the start point of the next item IF in automation. These can be left blank in all
but the most demanding situations as the program has default settings for this under the
settings heading at top of screen and that generally handles most situations.
The bottom three buttons are important:
Preview Song allows the selected song to be played in the preview player (neither of the
virtual CD players)
Update Tag Info would only be used if you entered additional information above using the
artist, cue, more and time buttons above.
Refresh Library can be used anytime to update to right now the state of the audio files in all
the categories. Use it often.
Adding Additional Track Info
Artist Info allows the editing of the Artist, Song Name, and Album. Genre
and Song Year can also be added. The alternate send option (when
checked) will send an alternate text to the encoder to what is currently
playing. This can be useful when certain strings need to be sent to ad
insertions system.
Sweep Start - is the point when the sweeper will play. If a sweeper is not
marked, it will play right at the start of a track, when enabled in a rotation.
Intro Until- is a marker that indicates the start of the song body
Outro Starts- marks when the songs body has ended
Next Start - is the mark that marks when the next track should start, if this
is not marked and auto trim is enabled, it will be set automatically.
A specific sweeper can be marked to the song by selecting it from the list
and pressing update mp3 tag. Sweepers get added to the available list by
dragging the file into the top center sweeper player.
The Cue Info tab has other information from the track that will be
displayed when the track is loaded into an active player. The End Type is
displayed on the player when a track is loaded.
Gender - this will indicate the gender of the track. Only mark gender for
tracks you do not want to play concurrently, for instance, if you do not
want two female tracks to play after one another, then mark all female
tracks, Do not Mark the Male Tracks.
Tempo - this also works just like the gender, only mark tracks you do not
want to concurrently play - like two slow songs in a row.
More Info Tab contains other information about this track like Composer,
Publisher and record label.
The Time tab allows the restriction of either daily and hourly time for the
system to play the track, or a date range that the track will be allowed to
play. The illustration shows a track that is allowed to play all days of the
week, all hours, but will only play August 13th, 2015 to August 14th, 2015.
Overlay Sweepers
NOTE At the top center of the screen there is a third “sweeper” player.
The sweeper player is intended for playing overlay sweepers over song transitions or to play dry
sweepers over songs at marked times. The Sweep Start shown on the previous page can be
marked at a point in the track to trigger either the active sweeper(highlighted blue) or a specific
sweeper as assigned.
The check marks to the left of the tracks listed in the top sweeper player indicate that the sweeper
will be included in the rotation of sweepers played. Each time a sweeper is played the next available
sweeper in the list will rotate.
For a sweeper to play over a track or during the transition, the Enable Sweeper transition must be
checked next to the category in the rotation list. This ensures that when that track is being played
that either the next rotated sweeper will play when the Sweep start mark is reached, or the assigned
sweeper will play when the sweeper start mark is reached. If no sweep start maker is set, then
nextkast will play the sweeper right at the start of the track.
Sweeper
Player
Sweeper
Enable For Transition
Manual / Live Assist / Automated
This TRACKLIST/ADD MUSIC MODE mode can be used to easily move tracks single or
multiple(shift click) from one category to another by right clicking the file or files….
We have stayed in the TRACKLIST/ADD MUSIC MODE thus far because it is this mode that
an operator will use to actually manually search, select and play music and commercials and
jingles on air and search for requests. You could call this live assist. The play icon on the top
bar on screen must be set to RED – MANUAL. In this mode the operator will search and pick
his/her music etc from ALL categories and “load it into either player”. He will use the player
play button to start the item. Once a search phrase is entered and SEARCH is pressed then
the results are displayed on a sub-search screen. Scrolling and hi-lighting the desired line will
give an option box to Load to Player or Preview or to display all the contents of just the
category that that selection is in. The usual action would be to “Load Into Player” The subsearch screen stay open to allow multiple searches to continue or an X at right to close it and
return to your category display.
In this TRACK LIST/ADD MUSIC mode where your Category contents are displayed the
Manual or Live Assist is accomplished by “Searching” for music or other audio files such as
Jingles or whatever and via that search, “Loading To Player” to be manually played so you
can only get two items ahead because you have two players.
You will use the manual playback button to start the CD player and the song can be manually
faded early using the right arrow fade button.
IMPORTANT: This “manual live assist” has the Manual/Automation in the Manual mode
meaning the button is Orange in color. If you wish to operate in a “semi automation mode”
while in manual live assist then you can place the man/auto button to “green” and the
software will go from one player playing to the other player playing automatically BUT you
must continue to search and load the selections into the players but automation (Man/Auto
button green)will fade one to the other and play.
drop manual
tracks here
Sound FX / Hot Buttons
On the right vertical side of the screen are
10 Pages of 10 (100) Hot Buttons for
instant play. These also can be loaded
with jingles, ids, advertisements etc for
use in live assist(manual) by simply
finding the audio item you wish to load
either within the Nextkast program screen
OR directly from any Windows displayed
folder and using drag and drop to place
the audio in the Hot Button position.
These Hot Buttons are available for
playing instantly and do not fade or
overlap but are a very convenient source
for Live assist-Manual effects. The Hot
buttons can also be activated from the
keyboard buttons f1 to f10. The hot
buttons also will be recorded into the
voice tracks if triggred during a voice track
recording.
The three option buttons above the FX
buttons determine how the samples get
played back.
There are three options:
Live: this will play the FX on the air as it is
pressed
Preview: This will allow you to hear the
sample/fx but it will not go on air.
Drag to Player: This will allow you to drag
the FX button onto the next available
Player to play on air.
Automation Operation
Automated playout of the software requires at this point that a music library exists that
Nextkast knows of it’s location and that it contains audio files (likely mp3) that are organized
into some or many categories.
Nextkast works on PLAYLISTS and is fully compatible with play list files from Winamp (.pls)
as well as allows users to generate their own play lists (preferred) within Nextkast.
Automation is turned ON by clicking the Manual/Automation button on the top left of the
screen.
IF you are operating in Live Assist mode you may operate “semi automation” under the
Tracklist/Add Music green mode whereby the players will fade one to the other providing you
manually drag and drop and eject the selections from the track list BUT real Automation mode
occurs when you are in the Playlist/Rotation Screen with the Automation button green. To do
this you must prepare the music library to generate Rotations or Playlists which we shall now
cover.
ROTATION is a listing of categories within the software that is built once by the user and
instructs the automation playout what music categories to pick each selection for one or more
hours of unattended automated playout. (Voice tracks are covered later may be optionally part
of any rotation) Many refer to rotation as a “clock” that keeps the automation playout picking
music, voice tracks, advertisements, station breaks etc on it’s own but following the user rules
of the rotation. A rotation can be many hours long or just one hour.
To supply the automation with guidance you must set up the rotations ahead of time BUT
once set up the same rotations can be used over and over indefinitely so they are usually just
set up initially but can be modified or replaced if desired.
So, assuming that you have a “Library” of songs etc set up in Categories within Nextkast a let
us now look at defining the Rotation(s) that automation will use to select a variety of songs to
playout each time it is invoked.
Setting Up A Rotation
Rotation generation (and playout) is done in the PLAYLIST/ROTATION SCREEN which is the
leftmost of the three Mode Buttons just below the Catagories Window about a third of the way
down the screen. See screen capture below;
Now pay particular attention to the “new” area of icons at the bottom of the Nextkast
screen….you will only have a “home icon “ starting out. These icons each represent a single
Rotation for now and later we will also get into “playlist icons” which are also here…but
starting out now just pay attention to the Rotations.
To begin to define a rotation there is a button at the lower right of the screen titled “New
Rotation” that starts a generation of a fixed rotation. Upon starting with this button a screen
will display showing ALL your current categories (right) and a blank rotation list (left). You
need to Name the rotation by placing the cursor in the name area and typing a suitable name
such as “morning only” or “overnight” or “lunch hour” or whatever fits that your automation
playout will use this as a template for picking it’s selections during that time.
Now using the displayed Categories, DRAG and DROP category icons onto the Rotation List
and each drag and drop represents one selection in the rotation you are building AND the
bottom of the Rotation List displays the amount of time (approximately) for that rotation as you
build it. You can continue until you have MORE than one hour or go on as long as you wish.
Double Clicking on a rotation will add it to the bottom of the list for faster rotation creation.
New Rotation Button
Save The Rotation
IF YOU ARE BUILDING A ONE HOUR ROTATION THEN GO OVER BY A MINUTE OR TWO BECAUSE
NEXTKAST WILL FADE THE LAST SELECTION AT TOP OF HOUR IF SET TO DO THAT IN “settings” –
Force Schedules at Top Of Hour checked AND Enable Top Of Hour for Rotations
If you are unhappy with your drag and drops then the List under construction can be cleared with the
Clear Rotation button.
DO NOT TRY TO MINIMIZE THIS ROTATION BUILDER SCREEN!
This screen can be accessed and modified simultaneously while Nextkast is playing live to air. When you
are satisfied with the rotation then do a “Save Rotation” and this rotation will show up as an icon at the
bottom of Nextkast with the file extension “rot” and you can close (X) this screen.
You can call up this Rotation at anytime in Playlist/Rotation screen mode from the main screen by
clicking it’s icon on the bottom of screen and waiting for it to load up and it will start playing if in
Automation or will be ready to play if in Manual.
Scheduling will be covered at the end.
Name Rotation
Save Rotation
Rotations and
Playlists Appear
Here
Activating the Rotation
Note: During rotation generation there are small square boxes to the left of each category
after it is dragged into the rotation list. These boxes, if checked, will call the top center
auxiliary player to play whatever is loaded into it (dragged) and selected. It will play
simultaneous with the next selection on the rotation list. This feature is not particularly used in
automation and is more suited as a third player for live assist mode. These boxes can be
checked and unchecked manually as the rotation is playing to air by an operator if desired.
When a rotation is saved, it can be played by picking its icon at bottom (or Scheduling) then a
blue bar will show indicate the next selection that has been picked by the software using the
rotation rules laid down earlier. The selection just above the blue bar will show where the
current playing selection was…and since it has moved out to the player that is playing a
“next” substitute selection will be showing from the same category because the rotation is just
that…a list that when the bottom is reached will cycle around to its top and continue over
again with different selections from the same categories specified. (this will not occur if
rotation is scheduled via scheduler covered later)
Sweeper check boxes can be changed(checked or unchecked) at any spot below or above
the blue bar but not at the blue bar as it will not be recognized (too late)
While the rotation is playing the expected time to air for each selection is shown in the TIME
ON column. The squares in that time on column do not have any function. IF the rotation is
Manually paused then the time column waits until the rotation is put back in automated before
it updates the time to air of all selections except the one currently playing.
Individual selections can be added by dropping them into a player from the Tracklist screen
while the rotation continues to play its selection IF the mode is switched to Manual. Then that
selection can be started with the player play button. While that manual selection is playing
then at any point the mouse can be put back to Automate and the rotation will start up again
when the manual selection finishes playing. (the next rotation selection will be dropped from
playing to compensate for the manual track that played)
>>If a rotation is playing to air you can still use the Tracklist Add Music mode and/or the
Playlist/Voicetrack mode without interrupting the on air Rotation in Automate.
Click the rotation here to make is
Active and start automation
Creating and Saving a Playlist
To generate(make) a Playlist to be followed by the automation software to play specifically
and exactly the named files in order then you use the Playlist/Voicetrack mode.
The audio file contents of the hilighted Category will be shown on the left of the screen while
the right side will show the Playlist contents. Files are added from any selected Category by
dragging the file or files from the left side to the right side. You will be prompted for a Playlist
name as you drag the first item over. The name will end with .m3u (Winamp compatable)
If the playlist is completed by watching the lengths as shown on the right time columns in the
Playlist display pane….say a one hour or half hour approximate list length, the you may save
it by clicking the save button below the playlist pane.
Once saved the playlist will appear as a single pls icon on the lower area of the screen with
the Rotation icons. Remember that rotations are templates where the music files are picked
differently each time the rotation is run BUT a Playlist is always going to play the exact music
as it was built to play….always.
Drag Tracks From Category List
Into Playlist, Then Save
Playlist Generation and Playing
There is a second way (recommended method ) to build multiple playlists here by using the
Generate button which will allow you to make separate playlists playing random selections
For specific hours up to 24 for specific days.
Press the Generate button and select start date, start hour and how many hours to create NextKast
will generate the hours in the form of Date Folders ( date for the playlist to play) and hours 1-24.pls
that indicate what hour the playlist should play. These generated playlist will start automatically when
the Enable Schedule check box is checked on the Playlist/Rotation Screen. Nextkast will use the
rotation schedule to determine which rotations are used to create the playlist. More will be said about
this in the Scheduler Section later.
Advertising/Traffic logs can be merged, but requires the logs to be saved in a category name
‘Advertising’ with the files as dates. We currently accept files from ‘Natural Log’. Please contact us if
you need to merge other formats.
Once Genrated ,these hours will appear on the icon bar at bottom as SUB-ICONS of a single icon
with the day month year digits ID. These SUB-ICONS can be used in Scheduler which will be
covered at the end of this manual. If Sub-icons are being displayed you can get back to the top icons
by clicking HOME icon.
Select the Date for the
playtlist to be created
Select the start hour, and
how many hours to create a
playlist for.
Generate Button
Create Playlist for
Future Dates
Enable Merging of merging
External traffic
logs/ commercials
To play the playlist to air go to Playlist/Rotation Mode click the Icon at bottom that represents your
playlist…it will appear in the playbox with a playlist sign to indicates that it is a playlist that is playing
and not a rotation. If in AUTO then the playlist plays. When enable Schdule is checked, the
generated playlist will start automatically on the date and hour they were created for.
VoiceTracking
The value of voice tracking is in being able to insert your voice clips into a Playlist and thus
announce the music selections and make it appear the the program is live. This is done as an
option in the Playlist Builder/Voicetrack Mode.
After building your play list as shown on previous page you can then voicetrack your
generated playlist between any, all, or no selections.
Make sure your MIC intput is selected in the Mic Settings on the main page and you have set
your MicFX/ Attenuation etc. before starting to voice track.
Clicking any selection in the playlist just built or loaded and the Voicetrack dialog appears at
the bottom of the screen. You will see the outgoing songs’ end and the incoming song
beginning and a space between where your voice recording will be recorded.
Press the LEFT PLAY button to hear the last few seconds of the ending song and when ready
to talk open the Mic with the “Press here to Record” in red in the center….talk……when ready
to start your next song hit the middle white bar titled “Mark Next Start” this will start the new
selection and you recording will continue which will go over the new song beginning as an
intro…when done hit the now green center bar to stop the recording and press the far right
now STOP button to end the session.
Note: You can play sample/FX buttons when voicetracking, this will record a background to
your voicetrack if needed.
As soon as the VoiceTrack recording is stopped Nextkast will re-load the tracks, and playback
the voicetrack with the cue point as recorded with the outgoing and incoming tracks. Keep in
mind you can re-mark the voictrack start and next start if you press the “R” button before you
preview. To Delete the voicetrack highlight it in the playlist, and press the delete key or right
click and select delete.
To make the process quicker there are keyboard shortcuts defined at the end of this manual,
that will help speed up the process.
Scheduler
The Scheduler screen allows the scheduling of rotations/ Playlist / Or LineIn events by the Hour or
by the Minute. Keep in Mind if you are generating playlist from NextKast with the Playlist
Generator, they will be automatically scheduled by Nextkast.
All changes will occur as close to the top of the hour when ‘Top of the hour’ is checked in settings
screen. If you need the change to fade out current programing and occur immediately please
check the ‘Force Schedule changes’ in the settings screen.
The most common task using the scheduler is to schedule different rotations for different days and
hours. For instance your daytime rotation may be different than your nighttime rotation and you
would want to schedule them accordingly.
Note: The playlist generator will use the schedule of rotations to generate playlist from rotations
that are scheduled, if no rotations are schedule it will always pick the first one in the list.
To schedule a rotationor custom playlist simply pick the rotation on the top list view and click on
the hours you would like this rotation to be active. If minute changes are required, first select the
hour, then click on the minute, a clock icon will appear in any hour that has a minute schedule
assigned.
To delete an assignment simply right click on the hour or minute.
This schedule can also be put in Audience pleaser mode(by clicking the Schedule Mode Button),
to allow the scheduling of different audience pleaser amounts per day/week/hour. See settings
page for more information on Audience pleaser.
Broadcast Settings
Click to View
Broadcast settings
Because Nextkast is specifically designed for internet radio, it has built in encoders that will push your
stream to shoucast1 and 2, IceCast 1 and 2, and Live 365. There is also a built in www.tunein.com
section that allows you to push song title and artist to tunein.com automatically.
It is crucial you set encoder type correctly when setting up an encoder. Your stream provider will give
you details about server path, server type, and password. These details need to be entered in the
appropriate boxes in the broadcast setting screen. When done make sure the ‘Enable Encoder
checkbox is checked and the “auto Re-connect’ is enabled. Select your bit rate and encode type.
With shoutcast2 make sure to enter the SID (normally ‘1’). In Icecast2 and shoutcast2 only modify the
source and source password boxes if you are not connecting using the default account.
For stations broadcasting to a separate transmitter, the ‘Output to broadcast soundcard’ checkbox will
send the same audio going to the encoder to a second sound card. This will allow you to preview tracks
and voicetrack in studio while not interrupting the audio feed to the transmitter.
If you are using the TuneIn Api ( please contact tunein.com for details), make sure to enter the
StationID, PartnerID, and Partner Key.
Simulcasting Another Stream
press the Simulcast Button Here
Nextkast Makes it easy to set up playlist that contain URL’s of streams to re-broadcast.
Press the simulcast button, the Simulcast window will appear as above.
Enter the stream URL to create
Press the test Stream button to test the stream.
If correct, press the ‘Create Playlist Stream’ button
Nextkast will then create a playlist that contains the URL of the tested stream.
Name the playlist and then Schedule the playlist (stream) to Plat when needed.
Microphone and Line Input
The Mic and LineIn settings buttons can be viewed by
clicking the LI settings or Mic Settings buttons as
illustrated to the left.
The Volume levels above each controls the Windows
Level for the active device.
Select the Microphone from the available list and the
select Master Volume. You can refresh list if you are unpluggin and re-pluging the device.
The audio Attenuation Level can be adjusted, this will
lower whatever element is playing when the mic is active
When checked, the Microphone FX enhances the audio
coming from the microphone to sound fuller.
When the Mute Mic Monitor checkbox is checked the
audio from the Mic will go directly to the encoder and not
feedback to the audio output in studio.
Select the Microphone or Line IN from the available list
and the select Master Volume. You can refresh list if you
are un-pluggin and re-pluging the device.
Sound Processing
Left Click to Edit
Sound Processor
The Sound Precessing window allows you to change settings for the Auto Gain, Sound
Compression, and a 10 Band Audio Equalizer. This allows you to customize the sound of your
station as per your preference.
The Expander Button enables a special set of processing to expand and enhance audio, this can
be enabled or disabled per your preference.
Extrenal Winamp DSP ( Stereo Tools,Breakaway etc..)
We have implemented a way for NextKast to use external DSP software to run inline instead
of using our internal Signal processing. This allows the inline use of Winamp compatible plug
ins.
For Nextkast to recognize and the ability use a plugin, that plug in .dll file will need to placed
into the /plugins directory in the NextKast directory. Some software also requires that it know
where the dll is located, meaning the software will need to be configured to work with nextkast
Once the dll is in the plugins directory, simply disable Radio CMP, top left button shown
above, and right click on the Radio CMP button. A list box will display all available plugins.
Check the plugin you would like to use and that is it.
View Statistics
At the top of the music file box just below the three mode buttons is the
Search line. Enter any partial search criteria in the white area and click search. A global search will be
done through ALL categories and the results displayed.This is used for requests as once the song is
displayed after search the search result, then it can be previewed or loaded to player for airing just by
lighting it up with the mouse which displays an option menu of what to do with the song.
There is a View Statistics button which will bring up a different screen which allows you to check off one
or more categories and display play history and listening stats of those tunes.
The View statistics screen will allow the user to move tracks and use the tune-out ratio to
order tracks by popularity. Check the categories you would like to observe/move tracks in,
then press the Process Report. Right Clicking on a track or tracks moves the tracks from
category to category. This report is useful to move music for online stations because it gives
you the tune-in/out popularity of each track sorted in a list.
Search
view
statistics button
sort by play count
or tune-out ratio
Remote Voice Tracking and Management
1. Create a “nextKastRemote” (name is up to you) directory on your C:// Drive of your
Broadcast machine
2. If you have already been running NextKast then copy these Folders from
broadcast machines c:/nextkast directory to the newly
created “nextKastRemote” Folder:
/Music
/Playlist
/Rotations
/Samples
/Station Drops
/Sweepers
3. Once all folders have been copied, Load a drive sharing app like oneDrive, Google Drive,
Dropbox, or the one WE RECOMMEND (Mega Sync)
4. Change folder location of your drive sync app to the “nextKastRemote”
directory you created and coped folders to
and start the sync process.
5. Once your Sync is complete you will set the broadcast machines system
drive in the settings window of nextkast to the “nextKastRemote” folder.
You will have to restart NextKast for this to take effect.
6. On the Voice Track Machine then create the “nextKastRemote” folder on the c drive
as was done on the broadcast machine
7. Install your Folder Sync App as before on Voice Track Machine :
Change folder location of your drive sync app to the “nextKastRemote”
directory you created and coped folders to
and start the sync process.
8. On Voice Track machine set the remote drive to
“nextKastRemote” in the Settings Window of Nextkast.
9. Anytime you work on the VT machine make sure to pause
Sync Software, when done resume Syncing.
10. All actions like generating playlists, Recording Voicetracks, Moving Tracks, etc
will be reflected on both Broadcast and VT Machine
Taking Skype / VOIP calls
You will need two sound cards and a patch cable
In Nextkast set your mic input to the primary/skype microphone
Make sure nextkast and skype are using the same mic Input
This will be using your first sound card
Next you will need to set the skype output sound card(speaker)
to the second sound card
In NextKast Line In Setting Select The same Soundcard as picked in
Skype under Speaker
Finally loop the output of the second sound card into the
input of the second card
To broadcast a skype call both the mic button and Line in should be on.
You will have to adjust the volume of both
Shortcut Keys Main Page
F12
End
Home
F11
PageUp/PageDown
F1- F10
Ctrl & D - Disable Tool Tips
End - Mute Playback in Studio
Home - Manual or Automatic Mode
F11 - Start next track
Page Up/ Down - Toggle Operation Screen
F12 - Microphone on/off
F1 - F10 - Hot Button FX/Samples
Shortcut Keys Voice Tracking
Arrow up/Down
‘Delete’ to delete
‘R’
‘P’ or Left Shift
‘M’ or Right Shift
Space Bar
Backup and Restore Utility
The Backup and Restore Utility provides a trouble free way to back up and restore your
software and state, including music, rotations, play list and settings. This will ensure that if
you need to move to another PC because of hardware failure your system will be back up like
it was in no time.
The backup utility can be activate from the Help Menu as shown above
Backup Process:
Select the Drive to Backup to, make sure there is enough space on that drive. This will create
a NKBackup folder on that drive and make a copy of your current NextKast Setup
Restore Process:
Select the Drive where you saved the backup. Press the start restore button, you will get a
warning that your current state will be overwritten. Once the restore is complete it may be
necessary to restart Nextkast.
EULA 'End User License Agreement'
EULA 'End User License Agreement'
COPYRIGHTS:
Copyright 2015 Axis Entertainment Inc. All Rights Reserved.
The 'NextKast Radio Automation Software Standard' and 'NextKast Radio Automation Software Pro' software is Copyright
2015 Axis Entertainment Inc. All rights reserved. This software may not, in whole or in any part, be copied, reproduced,
transmitted, translated (into any language, natural or computer), stored in a retrieval system, reduced to any electronic
medium or machine readable format, or by any other form or means without prior consent, in writing, from Axis Entertainment
Inc.
You are granted a limited license to use this software. The software may be used or copied only in accordance with the terms
of that license, which is described in the following paragraphs.
TRADEMARKS:
NextKast Internet Radio Automation Software
NextKast Internet Radio Automation Software Standard
NextKast Internet Radio Automation Software Pro
LICENSE:
"THE SOFTWARE" SHALL BE TAKEN TO MEAN THE SOFTWARE CONTAINED IN THIS PACKAGE AND ANY
SUBSEQUENT VERSIONS OR UPGRADES RECEIVED AS A RESULT OF HAVING PURCHASED THIS PACKAGE.
"BUYER" SHALL BE TAKEN AS THE ORIGINAL PURCHASER OF THE SOFTWARE.
BUYER HAS THE NON-EXCLUSIVE RIGHT TO USE THE
SOFTWARE ONLY ON A SINGLE COMPUTER. BUYER MAY NOT ELECTRONICALLY TRANSFER THE PROGRAM
FROM ONE COMPUTER TO ANOTHER OVER ANY TYPE OF NETWORK. BUYER MAY NOT DISTRIBUTE COPIES OF
THE SOFTWARE OR THE ACCOMPANYING DOCUMENTATION TO OTHERS EITHER FOR A FEE OR WITHOUT
CHARGE. BUYER MAY NOT MODIFY OR TRANSLATE THE PROGRAM OR DOCUMENTATION. USER MAY NOT
DISASSEMBLE THE PROGRAM OR ALLOW IT TO BE DISASSEMBLED INTO ITS CONSTITUENT SOURCE CODE.
BUYER'S USE OF THE SOFTWARE INDICATES HIS/HER ACCEPTANCE OF THESE TERMS AND CONDITIONS. IF
BUYER DOES NOT AGREE TO THESE CONDITIONS, RETURN THE DISTRIBUTION MEDIA, DOCUMENTATION, AND
ASSOCIATED MATERIALS TO THE VENDOR FROM WHOM THE SOFTWARE WAS PURCHASED, AND ERASE THE
SOFTWARE FROM ANY AND ALL STORAGE DEVICES UPON WHICH IT MAY HAVE BEEN INSTALLED.
THIS LICENSE AGREEMENT SHALL BE GOVERNED BY THE
LAWS OF THE UNITED STATES OF AMERICA, TEXAS , USA AND SHALL INURE TO THE BENEFIT OF AXIS
ENTERTAINMENT INC. OR ITS ASSIGNS.
DISCLAIMER / LIMITATION OF LIABILITY:
BUYER ACKNOWLEDGES THAT THE SOFTWARE MAY NOT BE FREE FROM DEFECTS AND MAY NOT SATISFY ALL
OF BUYER'S NEEDS. THE SOFTWARE AND ANY ACCOMPANYING WRITTEN MATERIALS ARE LICENSED "AS IS". IN
NO EVENT WILL AXIS ENTERTAINMENT INC BE LIABLE FOR DIRECT, INDIRECT, INCIDENTAL OR CONSEQUENTIAL
DAMAGE OR DAMAGES RESULTING FROM LOSS OF USE, OR LOSS OF ANTICIPATED PROFITS RESULTING FROM
ANY DEFECT IN THE PROGRAM, EVEN IF IT HAS BEEN ADVISED OF THE POSSIBILITY OF SUCH DAMAGE. SOME
LAWS DO NOT ALLOW THE EXCLUSION OR LIMITATION OF IMPLIED WARRANTIES OR LIABILITIES FOR
INCIDENTAL OR CONSEQUENTIAL DAMAGES, SO THE ABOVE LIMITATIONS OR EXCLUSION MAY NOT APPLY.
SPECIFIC RESTRICTIONS:
IN ACCORDANCE WITH THE COMPUTER SOFTWARE RENTAL ACT OF 1990, THIS SOFTWARE MAY NOT BE
RENTED, LENT OR LEASED
Thank You!
Thank you for being a Customer, Please send Comments, Questions or Emails to:
[email protected]
Video Tutorials are available from http://www.nextkast.com/help.html
NextKast Internet Radio Automation is a Trademark of
Axis Entertainment Inc / Winston Potgieter
This manual covers help associated With NextKast Pro Version,
Some of the features mentioned here
are NOT available in our Standard version.
NextKast ® Internet Radio Automation Software
Axis Entertainment Inc, All Rights Reserved
© 2015