1
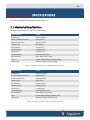
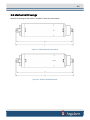
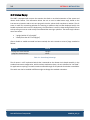
PUSH OFF RELEASE TRANSPONDER (Low Frequency) USER HARDWARE MANUAL 0008595_REV_D September 2015 EdgeTech 4 Little Brook Road West Wareham, MA 02576 Tel: (508) 291-0057 Fax: (508) 291-2491 www.EdgeTech.com ii The information, figures, and specifications in this manual are proprietary and are issued in strict confidence on condition that they not be copied, reprinted, or disclosed to a third party, either wholly or in part, without the prior, written consent of EdgeTech. Any reproduction of EdgeTech supplied software or file sharing is strictly prohibited. ©Copyright 2015 by EdgeTech. All rights reserved. Push Off Release Transponder 0008595_REV_D iii ATTENTION – READ THIS FIRST! All personnel involved with the installation, operation, or maintenance of the equipment described in this manual should read and understand the warnings and cautions provided below. CAUTION! This equipment contains devices that are extremely sensitive to static electricity. Therefore, extreme care should be taken when handling them. Normal handling precautions involve the use of anti-static protection materials and grounding straps for personnel. WARNING! High Voltage may be present in all parts of the system. Therefore, use caution when the electronics are removed from their containers for servicing. CAUTION! Operation with improper line voltage may cause serious damage to the equipment. Always ensure that the proper line voltage is used. iv HARDWARE VARIATIONS AND COMPATIBILITY The Push Off Release Transponder contains both standard and proprietary hardware. At times, EdgeTech may change the standard components due to their availability or performance improvements. Although the component manufacturers—along with their models and styles—may change from unit to unit, replacement parts will generally be interchangeable. EdgeTech will make every effort to see that replacement components are interchangeable and use the same software drivers (if applicable). At times, however, direct replacements may not exist. When this happens, EdgeTech will provide the necessary drivers with the replacement part, if applicable. EdgeTech may also change certain hardware per customer requirements. Therefore, portions of this manual, such as parts lists and test features, are subject to change. These sections should be used for reference only. When changes are made that affect system operation, they will be explicitly noted. Also, some options and features may not be active in the customer’s unit at time of delivery. Upgrades will be made available when these features are implemented. Contact EdgeTech Customer Service with any questions relating to compatibility. Push Off Release Transponder 0008595_REV_D v ABOUT THIS DOCUMENT We, the employees at EdgeTech, would like to thank you for purchasing Push Off Release Transponder— Low Frequency (PORT-LF). At EdgeTech, it is our policy to provide high-quality, cost-effective products and support services that meet or exceed your requirements. We also strive to deliver them on-time, and to continuously look for ways to improve them. We take pride in the products we manufacture, and want you to be entirely satisfied with your equipment. Purpose of this Manual The purpose of this manual is to provide the user with information on the setup and use of EdgeTech’s PORT-LF. Although this manual encompasses the latest operational features of the PORT-LF, some features may be periodically upgraded. Therefore, the information in this manual is subject to change and should be used for reference only. Liability EdgeTech has made every effort to document the PORT-LF in this manual accurately and completely. However, EdgeTech assumes no liability for errors or for any damages that result from the use of this manual or the equipment it documents. EdgeTech reserves the right to upgrade features of this equipment, and to make changes to this manual, without notice at any time. Warnings, Cautions, and Notes Where applicable, warnings, cautions, and notes are provided in this manual as follows: WARNING! Identifies a potential hazard that could cause injury or death. CAUTION! Identifies a potential hazard that could damage equipment or data. NOTE: Recommendations or general information that is particular to the material being presented. vi WARRANTY STATEMENT All equipment manufactured by EdgeTech is warranted against defective components and workmanship for a period of one year after shipment. Warranty repair will be done by EdgeTech free of charge. Shipping costs are to be borne by the customer. Malfunction due to improper use is not covered in the warranty, and EdgeTech disclaims any liability for consequential damage resulting from defects in the performance of the equipment. No product is warranted as being fit for a particular purpose, and there is no warranty of merchantability. This warranty applies only if: i. The items are used solely under the operating conditions and in the manner recommended in Seller's instruction manual, specifications, or other literature. ii. The items have not been misused or abused in any manner, nor have repairs been attempted thereon without the approval of EdgeTech Customer Service. iii. Written notice of the failure within the warranty period is forwarded to Seller and the directions received for properly identifying items returned under warranty are followed. iv. The return notice authorizes Seller to examine and disassemble returned products to the extent Seller deems necessary to ascertain the cause for failure. The warranties expressed herein are exclusive. There are no other warranties, either expressed or implied, beyond those set forth herein, and Seller does not assume any other obligation or liability in connection with the sale or use of said products. Any product or service repaired under this warranty shall be warranted for the remaining portion of the original warranty period only. Equipment not manufactured by EdgeTech is supported only to the extent of the original manufacturer's warranties. Push Off Release Transponder 0008595_REV_D vii RETURNED MATERIAL AUTHORI ZATION Prior to returning any equipment to EdgeTech, a Returned Material Authorization (RMA) number must be obtained. The RMA will help us identify your equipment when it arrives at our receiving dock and track the equipment while it is at our facility. The material should be shipped to the address provided in the EdgeTech Customer Service section. Please refer to the RMA number on all documents and correspondences as well. All returned materials must be shipped prepaid. Freight collect shipments will not be accepted. EdgeTech will pay freight charges on materials going back to the customer after they have been evaluated and/or repaired. The following steps apply only to material being returned from outside the Continental United States. Follow them carefully to prevent delays and additional costs. 1. All shipments must be accompanied by three copies of your proforma invoice, showing the value of the material and the reason for its return. If the reason is for repair, it must be clearly stated in order to move through customs quickly and without duties being charged. Whenever possible, please send copies of original export shipping documents with the consignment. 2. If the value of the equipment is over $1000, the following Shipper's oath must be sent with the invoice. This oath can be typed on the invoice, or on a separate letterhead: "I, ______________________________, declare that the articles herein specified are the growth, produce, or manufacture of the United States; that they were exported from the United States from the port of _____________________, on or about _______________; that they are returned without having been advanced in value or improved in condition by any process of manufacture or any other means; and that no drawback, or allowance has been paid or admitted hereof." Signed ______________________________ 3. If there is more than one item per consignment, a packing list must accompany the shipment. It is acceptable to combine the proforma invoice and packing list as long as the contents of each carton are clearly numbered and identified on the invoice. 4. Small items can be shipped prepaid directly to EdgeTech by FedEx, DHL, UPS, Airborne, etc. 5. If the equipment is the property of EdgeTech (formerly EG&G Marine Instruments Division), please insure for full value. 6. Fax one invoice, packing list, and a copy of the airway bill to EdgeTech upon shipment. viii CUSTOMER SERVICE Customer service personnel at EdgeTech are always eager to hear from users of our products. Your feedback is welcome, and is a valuable source of information which we use to continually improve these products. Therefore we encourage you to contact EdgeTech Customer Service to offer any suggestions or to request technical support: NOTE: Please have your system Serial Number available when contacting Customer Service. E-mail: [email protected] Mail: 4 Little Brook Road West Wareham, MA 02576 Telephone: (508) 291-0057 Facsimile: (508) 291-2491 24-Hour Emergency Technical Support Line: (508) 942-8043 For more information please go to www.EdgeTech.com. Push Off Release Transponder 0008595_REV_D ix COMPANY BACKGROUND EdgeTech (formerly EG&G Marine Instruments) traces its history in underwater data acquisition and processing back to 1966. EdgeTech has designed, developed, and manufactured products, instruments, and systems—for the acquisition of underwater data, including marine, estuarine, and coastal applications—for over 45 years. The company has responded to the needs of the scientific, Naval, and offshore communities by providing equipment—such as sub-bottom profilers, side scan sonar, acoustic releases, USBL positioning systems, and bathymetric systems—that have become standards in the industry. EdgeTech has also consistently anticipated and responded to future needs through an active research and development program. Current efforts are focused on the application of cutting-edge CHIRP and acoustic technology. x TABLE OF CONTENTS ATTENTION – READ THIS FIRST! ......................................................................................................... iii HARDWARE VARIATIONS AND COMPATIBILITY .................................................................................. iv ABOUT THIS DOCUMENT .................................................................................................................... v Purpose of this Manual ............................................................................................................................. v Liability ...................................................................................................................................................... v Warnings, Cautions, and Notes................................................................................................................. v WARRANTY STATEMENT ................................................................................................................... vi RETURNED MATERIAL AUTHORIZATION ........................................................................................... vii CUSTOMER SERVICE ........................................................................................................................ viii COMPANY BACKGROUND ................................................................................................................. ix TABLE OF CONTENTS .......................................................................................................................... x LIST OF FIGURES............................................................................................................................... xii LIST OF TABLES ............................................................................................................................... xiii SECTION 1: OVERVIEW ..............................................................................................................1-1 SECTION 2: SPECIFICATIONS ......................................................................................................2-1 2.1 Mechanical Specifications ................................................................................................................ 2-1 2.2 Printed Circuit Board (PCB) .............................................................................................................. 2-2 2.3 Acoustic Specifications..................................................................................................................... 2-2 2.3.1 Command Receiver ................................................................................................................... 2-2 2.3.2 BACS Command Structure ........................................................................................................ 2-3 2.3.3 BACS Command Coding ............................................................................................................ 2-3 2.3.4 Standard Command Functions.................................................................................................. 2-3 2.3.5 Transponder Specifications ....................................................................................................... 2-4 2.4 Power Supply Specifications ............................................................................................................ 2-4 2.5 Environmental Specifications........................................................................................................... 2-4 2.6 Mechanical Drawings ....................................................................................................................... 2-5 SECTION 3: Installation ..............................................................................................................3-1 3.1 Acoustic ............................................................................................................................................ 3-1 3.2 Mechanical ....................................................................................................................................... 3-1 Push Off Release Transponder 0008595_REV_D xi 3.2.1 Bio-Fouling Prevention.............................................................................................................. 3-1 3.3 Status Reply...................................................................................................................................... 3-2 SECTION 4: Operating Instructions .............................................................................................4-1 4.1 Turning on the Unit .......................................................................................................................... 4-1 4.1.1 Opening the Housing ................................................................................................................ 4-1 4.1.2 Applying Power ......................................................................................................................... 4-2 4.1.3 Closing the Housing................................................................................................................... 4-2 4.1.4 Leak Detection and Condensation Prevention ......................................................................... 4-3 4.2 Arming the Instrument .................................................................................................................... 4-4 4.3 Acoustic Air Testing .......................................................................................................................... 4-4 4.3.1 Setup ......................................................................................................................................... 4-4 4.3.2 Tests .......................................................................................................................................... 4-4 4.4 Post Deployment.............................................................................................................................. 4-5 SECTION 5: BACS SERIES CODING ...............................................................................................5-1 SECTION 6: MAINTENANCE ........................................................................................................6-1 6.1 Battery Replacement ....................................................................................................................... 6-1 6.1.1 Battery Replacement Procedure............................................................................................... 6-1 6.1.2 O-Ring Considerations............................................................................................................... 6-2 6.1.3 Additional O-Rings .................................................................................................................... 6-2 6.2 General Cleaning and Inspection ..................................................................................................... 6-2 6.2.1 Inspection Particulars................................................................................................................ 6-3 6.3 Common Spares ............................................................................................................................... 6-3 xii LIST OF FIGURES Figure 2-1: PCB Connectors ....................................................................................................................... 2-2 Figure 2-2: PORT Mechanical (standard) ................................................................................................... 2-5 Figure 2-3: PORT-LF DEEP Mechanical ....................................................................................................... 2-5 Push Off Release Transponder 0008595_REV_D xiii LIST OF TABLES Table 2-1: Standard Instrument—Mechanical Specifications ................................................................... 2-1 Table 2-2: Deep Instrument—Mechanical Specifications.......................................................................... 2-1 Table 2-3: Command Receiver Specifications ............................................................................................ 2-2 Table 2-4: BACS Command Coding ............................................................................................................ 2-3 Table 2-5: Standard Command Functions.................................................................................................. 2-3 Table 2-6: Transponder Specifications....................................................................................................... 2-4 Table 2-7: Power Supply Specifications ..................................................................................................... 2-4 Table 2-8: Environmental Specifications—Temperature ........................................................................... 2-4 Table 3-1: Status Reply Meanings .............................................................................................................. 3-2 Table 6-1: Common Spares ........................................................................................................................ 6-3 1-1 OVERVIEW This manual describes the EdgeTech low frequency Push Off Acoustic Release/Transponder (PORT-LF). This model is a lightweight, robust, and easily deployable instrument. It can function both as an acoustic release and/or transponder at depths up to 3500 meters, and with release loads up to 350 Kg. The PORT has been designed for use as an instrument location and recovery system on oceanographic moorings and platforms. Additionally, the precision, high-output power transponder feature makes this instrument ideal for use in long baseline (LBL) positioning and navigation systems. The PORT uses a version of the EdgeTech’s field-proven, Binary Acoustic Command System (BACS) code structure. This makes the POR-TLF compatible with the 8011, 8011A, 8011M, AMD200R, and PACS deck units available from EdgeTech. The BACS coding structure provides 12,000 possible secure command codes. Each release is factoryprogrammed with its own unique command set, including ENABLE, DISABLE, and a RELEASE command. Whenever the instrument receives a Disable or Enable command, it responds with a status reply message that indicates the orientation of the instrument (tilted or not tilted). The transponder function can be turned on or off with the ENABLE and DISABLE commands. There is also an Auto disable function that will disable the transponder function after 512 pings. This prevents running the batteries down if it is left enabled by mistake. The ping counter is reset to zero each time it is enabled. When disabled the transponder will not reply when interrogated. This ensures that the unit will not interfere with nearby instruments and that no battery energy will be wasted replying to spurious noise sources during the deployment. The transponder Enable / Disable command has no effect on the Release command. The RELEASE command causes the mechanism on the instrument to rotate and to push off the threaded release link. While releasing, the PORT will ping once for every rotation of the release shaft. This provides confirmation that the shaft is turning and the release link is being pushed off. Once the threaded link is completely pushed out, the instrument is free. The RELEASE command is not affected by the state of the transponder function (enabled or disabled). 2-1 SPECIFICATIONS This section describes the specifications for the PORT-LF. 2.1 Mechanical Specifications Mechanical specifications for the PORT are as follows: SPECIFICATION VALUE Depth Rating 3,500 m (8200 ft) Maximum Release Threshold 350 kg (770 lb) Maximum Static Load 750 kg (1,650 lb) Overall Length 66 cm (26 in) Main Diameter 12.7 cm (5 in) Weight in Water 4.85 kg (10.7 lb) Weight in Air 11.3 kg (25 lb) Housing Material Hard-coated Aluminum Other Materials Delrin, Nylon, Kynar, Ultem Finish Hard-anodized and Epoxy-painted (Yellow) Release Type Mechanical (motor-driven push off) Table 2-1: Standard Instrument—Mechanical Specifications SPECIFICATION VALUE Depth Rating 4,000 m (13,100 ft) Maximum Release Threshold 350 kg (550 lb) Maximum Static Load 750 kg (1,650 lb) Overall Length 66 cm (26 in) Main Diameter 13.6 cm (5.38 in) Weight in Water 4.96 kg (10.9 lb) Weight in Air 13.6 kg (30 lb) Housing Material Hard-coated Aluminum Other Materials Delrin, Nylon, Kynar, Ultem Finish Hard-anodized and Epoxy-painted (Green Release Type Mechanical (motor-driven push off) Table 2-2: Deep Instrument—Mechanical Specifications 2-2 SECTION 2: SPECIFICATIONS 2.2 Printed Circuit Board (PCB) A photo of the PCB connectors on the PORT-LF’s board are shown in Figure 2-1: Figure 2-1: PCB Connectors 2.3 Acoustic Specifications The acoustic specifications for the PORT-LF unit are described in the following sub-sections. 2.3.1 Command Receiver Specifications for the command receiver are as follows: SPECIFICATION VALUE Sensitivity 78 dB re 1 µPa Receiver Type Multi-stage band pass with hard-limited output (2,000 Hz / 300 Hz Bandwidths) Pulse Width 22 ms Period 250 ms Total Command Time 9 seconds Total Lock Out Time 14 s re beginning Commands Per Tone Pair 2,000 Table 2-3: Command Receiver Specifications Push Off Release Transponder 0008595_REV_D 2-3 2.3.2 BACS Command Structure The BACS command structure consists of two 8-bit words separated by a 5-sec interval. Each word is comprised of 8 bits from a 16-bit command. The 16-bit command is a 15 bit, 11 block cyclic code with an overall parity bit appended to the end to form a 16-bit code with a minimum Hamming distance of 4 bits. Additionally, two transitions are required within each word, and no repetitions of words are allowed in a command. 2.3.3 BACS Command Coding BACS command coding is described in the following table: PAIR NUMBER “0” “1” 1 9.5 kHz 9.9 kHz 2 9.5 kHz 10.3 kHz 3 9.5 kHz 10.7 kHz 4 9.9 kHz 10.3 kHz 5 9.9 kHz 10.7 kHz 6 10.3 kHz 10.7 kHz Table 2-4: BACS Command Coding 2.3.4 Standard Command Functions Functions for the three standard commands are given in the table below: COMMAND FUNCTION ENABLE Enable Transponder DISABLE Disable Transponder RELEASE Activate mechanical release Table 2-5: Standard Command Functions 2-4 SECTION 2: SPECIFICATIONS 2.3.5 Transponder Specifications Specifications for the transponder are given below: SPECIFICATION VALUE Sensitivity 80 dB re 1 µPa RCV Detection Jitter < 0.1 ms Interrogate Frequency 9 or 11 kHz standard (others are optional) Post-Filter Bandwidth 330 Hz Minimum Interrogate Pulse Width 5 ms Reply Frequency 12 kHz standard (other frequencies available) Reply Pulse Width 10 ms Reply Source Level 192 dB re 1 µPa @ 1 m Turnaround Time 12.5 ms Lockout Time 1 second Table 2-6: Transponder Specifications 2.4 Power Supply Specifications The PORT-LF uses a welded alkaline battery pack as a power supply. Specifications for this battery pack are shown in the following table: SPECIFICATION VALUE Design Life (@ 0° C) 2 years Design Life (@ 0° C) 20,000 replies @ 10 ms Table 2-7: Power Supply Specifications 2.5 Environmental Specifications The environmental specifications for the PORT-LF unit are concerned with temperature as shown below: TEMPERATURE VALUE Operating -10° C to + 40° C (14° F to 104° F) Storage (Batteries Removed) --20° C to + 60° C (-4° F to 140° C) Table 2-8: Environmental Specifications—Temperature Push Off Release Transponder 0008595_REV_D 2-5 2.6 Mechanical Drawings Mechanical drawings for the PORT-LF and PORT-LF Deep are shown below: Figure 2-2: PORT Mechanical (standard) Figure 2-3: PORT-LF DEEP Mechanical 3-1 INSTALLATION This section contains the information relative to the basic set up of EdgeTech’s Push Off Release Transponder (PORT-LF) including important details concerning the orientation of the unit on a mooring structure. Note that the transponder will operate in any orientation. However, specifics of the intended deployment will mandate special installation concerns. 3.1 Acoustic Efforts should be made to ensure that there is a clear acoustic path between the PORT-LF transducer and the source (typically a dunking transducer from a deck unit). Structural elements of a mooring system which have significantly different acoustic impedance than that of seawater will cause absorption or reflection of acoustic signals, which will degrade the operation of the unit. Floatation, including glass spheres, syntactic foam and plastic floats are particularly problematic. A float placed physically close to the transducer can create a blind area in the transducers beam pattern. 3.2 Mechanical The release load is held through the top pad eye, housing, and release link. There are isolation shoulder washers on the top pad eye to prevent electrical contact with the mooring. In some installations (such as a trawl resistant bottom mooring) the unit needs to be secured to the structure. It is important to verify that the release link is not obstructed in its motion, which could prevent it from disengaging. The release mechanism is designed for in-line loads; side loading will severely degrade performance. Generally, the release link is treated as a disposable item. It is used to electrically isolate the release from the rest of the mooring. The release link is fabricated from “Ultem”, a very high strength plastic. Arbitrary choice of an alternate release link could result in jamming, galvanic corrosion, or mooring failure due to insufficient strength. 3.2.1 Bio-Fouling Prevention Anti-fouling paint can be used to prevent bio-fouling on the housing and other external parts. However, note that the system is made of aluminum, so do not use paints that will react with it. Copper-based paints should not be used. Tin based paints may be used. Furthermore, using plenty of grease is an important consideration for instruments deployed for long periods. Apply grease to the threaded release shaft. EdgeTech recommends using a silicone-based grease. 3-2 SECTION 3: INSTALLATION 3.3 Status Reply The PORT is equipped with sensors that monitor the tilted or not tilted orientation of the system and release shaft rotation. This information allows the unit to send a coded status reply, based on the instruments orientation and to emit one ping each time the release shaft completes a rotation. The tilt status is useful for ascertaining whether the mooring or platform that has been deployed and/or has landed as planned. At the end of a deployment, the information is useful in determining whether forces such as strong currents or trawl activity have affected the mooring or platform. The status reply indicates one of two states: "upright (within 45° of upright)" "tilted (more than 45° from upright)" After a disable or enable command has been received, the unit transmits a series of pings encoded as follows: PATTERN STATUS 15 pings at 2 second intervals “upright” 7 pings at 2 second intervals “tilted” Table 3-1: Status Reply Meanings The tilt sensor is a 45° mechanical switch that is mounted on the release circuit board assembly. In the standard instrument configuration, with the release mechanism down, the unit is defined as “not tilted”. For applications requiring a narrower maximum allowable angle of tilt optional tilt switches are available. The switch can also be installed at different angles to change the standard orientation. Push Off Release Transponder 0008595_REV_D 4-1 OPERATING INSTRUCTIONS This section of the manual covers instructions for normal operations, including turning on the instrument, opening and closing the housing, air acoustic tests, and post deployment considerations. 4.1 Turning on the Unit Push Off Release Transponders (PORT) are carefully tested and shipped from the factory with a new battery pack installed (battery packs are disconnected unless otherwise requested). To use the PORT, all that is required is opening the housing, plugging in the battery (which is JP3 on the electronics board), and then closing and purging the housing. 4.1.1 Opening the Housing To open the housing: 1. Remove the anti-rotation block from the release end of the instrument (Black Delrin block that keeps the release link from turning) by unscrewing the two nylon screws that hold it in place. 2. Pull the purge port plug out of the end cap (under the anti-rotation block). 3. Remove the Kynar retaining rod (white plastic rod) from the transducer end of the housing. (Simply pull the rod out and away from the housing). 4. Gently pull the transducer end cap free from the housing. You may need to work it side-to-side to get it started, but once the initial resistance is overcome, the transducer should slide out easily. 5. The main electronics and battery pack assembly is connected to the transducer end cap. Carefully slide the assembly out enough to plug the connector from the battery pack into the electronics board if you are turning the system on. 6. If you are servicing o-rings, or you simply wish to inspect the release end, then slide the transducer and electronics assembly out enough to disconnect the cable from (JP2) which goes to the motor. 7. To remove the release end cap, pull the Kynar rod from the release end of the housing and then gently pull the end cap off. 4-2 SECTION 4: OPERATING INSTRUCTIONS 4.1.2 Applying Power The electronics assembly and battery pack are mounted to an aluminum plate that is attached to the transducer end cap. 1. If the transducer cable (JP1) has been disconnected from the electronics assembly, plug it back into its header on the circuit board. 2. The battery pack has a lead wire with a connector on it; simply plug this connector into the header (JP3) on the circuit board. The PORT will ping once after it has powered up and the transponder will be enabled. 4.1.3 Closing the Housing To close the housing: 1. Make certain that the O-rings and O-ring surfaces are clean and lightly greased (use only silicone grease). 2. As the O-ring enters the housing bore, firm but gentle pressure must be applied to seat the end cap fully against the housing. 3. Gently guide the release end cap and motor assembly back into the housing, taking care not to damage the sealing surface of the housing or pinch any cables. Be sure to align the orientation key while inserting it. While holding the end cap in place insert the Kynar retaining rod back into the slot. Continue inserting the rod until it comes out the other end of the slot. 4. After connecting the motor cable gently guide the electronics assembly back into the housing, taking care not to damage the sealing surface of the housing or pinch any cables. Be sure to align the orientation key to the housing. While holding the end cap in place insert the Kynar retaining rod back into the slot. Continue inserting the rod until it comes out the other end of the slot. 5. Install the release link (Ultem plastic threaded link) by threading it on to the shaft. The shaft should have a light coating of silicone grease applied, the release link should be screwed on all the way, then backed off 1/8 to ½ a turn. At this point it is good practice to perform an air acoustic test of the system by running through the command set for the PORT-LF (See section 3.3). 6. Replace the purge port plug and the anti-rotation block using the two nylon screws. 7. Purge the instrument as per the following section. Push Off Release Transponder 0008595_REV_D 4-3 4.1.4 Leak Detection and Condensation Prevention EdgeTech’s releases are provided with a 3/8-inch diameter purging port on the bottom (release end) end cap. The recommended procedure for preparation of the instruments atmosphere is as follows. The procedure assumes that the user has a vacuum pump, dry nitrogen gas cylinder and compound pressure/vacuum gauge all arranged on a manifold setup. 1. Verifying that all other (other than the purge port) o-ring seals have been cleaned, lubricated and assembled. 2. Prepare the purge port plug for installation by cleaning and greasing it, the plug must be ready for immediate insertion. 3. Insert a purge port adaptor and draw a -3 PSIG vacuum, do not exceed -3 PSI. 4. Close the manifold valve to the instrument and allow the instrument to sit of for 15 minutes. Check the gauge afterwards and verify that the vacuum did not change. This step is done to detect gross o-ring problems (cut or missing). 5. Open the valve to the instruments purge port and: a. Backfill the housing with dry nitrogen gas, do not exceed +5 PSIG. b. Draw a -3 PSIG vacuum on the instrument, do not exceed -5PSIG. c. In humid environments you should repeat this process up to four times. d. After drawing the final vacuum in this process, quickly insert the purging plug before the -3 PSIG vacuum is lost. 6. Secure the purge plug with the anti-rotation block and nylon screws. CAUTION! When purging the instrument, be careful not to draw more than -5 PSIG vacuum. Exceeding this figure can damage the batteries which in turn can result in instrument failure. If a purging set up is not available, then place a desiccant pack inside the housing to help reduce moisture. 4-4 SECTION 4: OPERATING INSTRUCTIONS 4.2 Arming the Instrument The release mechanism is easily armed. Items required for arming are one release link, silicone grease, and a flat blade screwdriver. 1. Make certain that the release shaft is free of debris and is not damaged. 2. Grease the threads on the shaft and inside the link with silicone grease. 3. Thread the release link on to the shaft until it bottoms out, then unscrew it ¼ turn. 4. Install the anti-rotation block using two nylon screws. 5. If you wish to test the release then send the release command. When the unit receives this command it will rotate the release shaft and push off the link. 4.3 Acoustic Air Testing This section describes the acoustic air testing to ensure proper function of the unit before deployment. 4.3.1 Setup The specific acoustic impedance of air is quite different from that of seawater, which renders the transducer a far less efficient receiver when out of water. For this reason, it is necessary to place the source (deck unit transducer or speaker) within a meter or two of the PORT transducer, with no obstructions to the acoustic path. Depending on the environment, some experimentation may be necessary to find a suitable location. 4.3.2 Tests For the following tests, it will be necessary to have the proper six digit commands unique to the unit being tested. If it appears that commands are not getting through, verify that the serial number of the unit being tested matches that on the sheet of command codes. 1. Using a deck unit, ascertain whether the PORT is enabled or disabled by interrogating it if the unit has just be powered up it will be enabled. Unless otherwise specified, the PORT will be shipped from EdgeTech, with the interrogate frequency tuned to 11 kHz and the reply frequency set to 12 kHz. 2. Using the deck unit, send the ENABLE command. The instrument should reply with a series of pings based on the orientation (tilt) in the electronics assembly. 3. Next, send the RELEASE command and the shaft should rotate through seven rotations and send 1 ping for each complete rotation. During a successful release cycle the system will transmit 7 Push Off Release Transponder 0008595_REV_D 4-5 pings. The system does not send status for the release command. If the shaft fails to turn 7 times or the cycle is somehow interrupted then the system will send the standard status message. 4. Interrogate the instrument using the deck unit set at the appropriate interrogate frequency and tuned to the proper reply frequency. It is unlikely that the deck unit will display a valid range because of the proximity of the two transducers, but you should be able to verify that the instrument transmits a reply pulse by listening to the alarm on the front panel. 5. Next, send the DISABLE command. The instrument should reply with the appropriate series of pings to indicate tilt status. 6. Now range on the instrument again with the deck unit. This time the unit should not transmit a reply pulse. 7. It is a good practice to finish up by sending the ENABLE command, so that during deployment the instrument will reply to range interrogations. If the PORT is being shipped or stored it should be disabled to conserve battery life. The PORT should also be left disabled while deployed to conserve battery life. If the system is left enabled and it pings 512 times, it will disable itself to save battery life. Simply send the ENABLE command to use it again. 4.4 Post Deployment After recovery, the unit should be cleaned and rinsed with fresh water to avoid salt buildup and deterioration of mechanical parts. A visual check of the housing and release mechanism should be performed to detect any signs of damage, excessive wear, corrosion, etc. If the PORT is not to be used again soon, the unit should be turned off (follow procedure described in sub-section 4.1). If the unit is to be stored for a long period of time, the batteries should be removed. See Maintenance procedures in SECTION 6:MAINTENANCE. 5-1 BACS SERIES CODING BACS codes are 16 bits long with 11 bits of information. Specifically each code is referred to as a 15, 11 block cyclic code with an overall even parity bit appended to the end. The information bits occupy the first 11 bit positions, the cyclic parity or redundant bits occupy the four positions after the information bits, and the overall parity bit occupies the last position. This particular code has good mathematical structure. The parity bits are easily calculated and a minimum Hamming distance of four bits exists between any two codes. The command timing is as follows: 1. 8 bits are sent with a period of roughly 250 ms and a pulse width of 22 ms 2. A word decode interval is 2.718 seconds 3. Following the first decode interval, a 40 ms detection window is open 4. If a detection occurs in the window, a second word decode interval occurs 5. During any of the sample gate intervals, if both "D0" and "D1" are present or if neither one is present then a command abort will occur and the command will not go through. From the 11 information bits there are approximately 2000 unique commands for each tone pair employed. Commands composed of equal or repeated words are excluded, as are some containing very few transitions. Since there are six tone pairs available (refer to Table 2-4), over 12,000 unique commands exist. Certain ranges of these codes, which are rich in transitions, are designated as "guarded" commands; these are used for critical functions such as release 6-1 MAINTENANCE The PORT requires minimal maintenance. Pre-deployment preparations and checks, and post-deployment cleaning will fulfill most of the maintenance requirements. The important tasks are battery replacement, 'O' ring care and maintenance, and general cleaning, inspection, and lubrication of operational elements. 6.1 Battery Replacement The PORT uses a welded battery pack made up of standard “AA” alkaline batteries. 6.1.1 Battery Replacement Procedure WARNING! If the underwater unit has been deployed, there is the possibility of internal pressurization. Exercise extreme caution when opening the unit. To replace the batteries: 1. Open the instrument, referring to sub-section 4.1.1. 2. Separate the transducer end from the housing by gently pulling them apart. Be careful not to scratch the housing throat when pulling the assembly from the tube. 3. Disconnect the motor cable from the electronics assembly (JP2). 4. Remove the two screws that hold each of the battery pack retaining brackets. 5. Remove the old battery pack and properly dispose of it. 6. Insert new battery pack on the plate and install the retaining brackets. 7. Be sure to include the small pattern flat and lock washers on the screws. 8. Assemble the instrument, refer to sub-section 4.1.3. 6-2 SECTION 6: MAINTENANCE 6.1.2 O-Ring Considerations The end cap assemblies of the PORT use a standard o-ring to provide watertight integrity to the electronics housing. Under normal usage, proper care, and lubrication, the o-ring should provide several years of usage. However, like the batteries, the o-ring is an inexpensive component, which is absolutely critical to the successful operation of the entire system. It is good practice to replace the o-rings periodically, depending on frequency of use. It is essential to inspect the o-rings and sealing surfaces before and after each deployment. Prepare the sealing surfaces for assembly by cleaning with a lint-free towel or swab, moistened if needed with alcohol. Inspect for scratches or nicks which could impair the o-ring’s ability to provide a seal. Apply a light coat of o-ring lubricant (typically silicone-based grease) to the housing bore and o-ring to facilitate insertion of the end cap. Make sure the lubricant is compatible with Nitrile rubber. Inspect the o-ring for damage such as tears, dimples, or other defects in the rubber. Replace any o-ring that is questionable or old. Lightly coat the o-ring with lubricant. Protect o-rings when stretching them over large diameters (i.e., cover diameter with plastic sleeve if needed). CAUTION Applying too much lubricant to the o-ring can compromise the seal. 6.1.3 Additional O-Rings There are additional o-rings that provide the watertight integrity to the housing. These are located on the purge port and release shaft. Check and replace these o-rings periodically as well. 6.2 General Cleaning and Inspection Whenever the unit has been recovered from a deployment, the unit should be cleaned and rinsed with fresh water to avoid salt buildup and deterioration of mechanical parts. A visual check of the housing and release mechanism should be performed to detect any signs of damage, excessive wear, corrosion, etc. Push Off Release Transponder 0008595_REV_D 6-3 6.2.1 Inspection Particulars Check the condition of the threaded release shaft, particularly in the area of contact with the release link. Check for wear, corrosion or distortion of the top pad eye (lifting eye). Check for corrosion of the purge plug. Check and replace if needed all o-rings. Check and replace if needed the two zinc anodes. Check the housing for signs of corrosion or damage to the hard coat. 6.3 Common Spares Common spares for the PORT-LF unit are listed below along with their EdgeTech part numbers: QTY DESCRIPTION EDGETECH PART # 2 Screw, 10-32 x 1”, PH, Nylon 0005381 1 Block, anti-rotation 0003301 2 Anode, zinc, 1” diameter ¼ - 20 0007318 1 Link, release 0005844 1 Battery, Alkaline, PORT-LF 0008591 2 O-ring, 2-240, N70 0005947 2 Back-up ring, 8-240, N90 0003242 1 O-ring, 10 x 14 x 2 mm, N70 0005952 2 O-ring, 2-008, N70 0005920 1 Plug, purge, Aluminum 0006350 2 Closure strip, Kynar 0008593 1 Adaptor, assembly, purge port 0002332 1 Purge port adaptor O-ring 0005920 Table 6-1: Common Spares