1
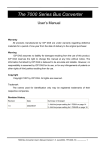
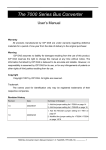
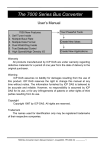
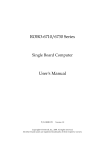
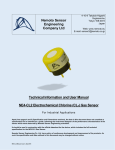
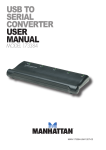
3.1 I-7560 Pin Assignment and Specifications:
Introduction
The I-7560 adds a Windows serial Com port via its
USB connection and is compatible with new &
legacy RS-232 devices. USB Plug and Play allows
easy serial port expansion and requires no IRQ,
DMA, or I/O port resources.
I-7560 features a full set of RS-232 modem data and
control signals (TxD, RxD, RTS, CTS, DSR, DTR,
DCD, RI, and GND) on its PC compatible DB9 male
connector. It also features a high-speed 115.2 Kb/s
transmission rate. So you can download program to
I-8000 series, and supports various O.S. No external
power supply is required as I-7560 takes its power
from the USB bus.
I-7560 comes complete with drivers for Microsoft
Windows '98, Windows ME, Windows 2000 and
Windows XP. Drivers are also available for Linux.
Specifications
Compatibility: USB 1.1 standard.
Input port: USB
Output port: 9-wire RS-232
Cable: USB type A connector (Type A to Type B cable provided).
RS-232 Signals: TxD, RxD, RTS, CTS, DSR, DTR, DCD, RI, and GND
Power consumption: 1.5 W max.
Operating temperature: -25℃ to +75℃
Storage temperature: -25℃ to +80℃
Humidity: 5~ 95%
Driver Supported: Windows 98/ME/2000/XP, Linux
7000 Bus Converter User’s Manual (Version 1.5 June/2004, 7PH-006-15) --------------- 25
3.1.1 The I-7560 System Network Configuration:
3.1.2 Block Diagram:
7000 Bus Converter User’s Manual (Version 1.5 June/2004, 7PH-006-15) --------------- 26
3.1.3 I-7560 Driver Installation
Installing the Device
This section will guide you on how to install the I-7560 USB to RS-232
converter under Windows XP, Windows 2000, Windows ME, and
Windows 98 operating systems. (No support for WinNT). Download driver
files from
1. Package CD, \Napdos\7000\756x\7560
2. ftp://ftp.icpdas.com/pub/cd/8000cd/napdos/7000/756x/7560
The following steps will show how to install the device under Windows
2000. Basically, the procedures are also somewhat the same for other
Windows operating systems.
1. Power on your computer and boot to Windows.
2. Locate the USB port of your computer and plug in the I-7560.
3. Windows will detect the new device and will initiate the Found New
Hardware Wizard prompting you to install the software for the detected
USB Device. Select to install from a list or specific location. Click Next
to continue.
7000 Bus Converter User’s Manual (Version 1.5 June/2004, 7PH-006-15) --------------- 27
4. An “Install Hardware Device Drivers” window is shown. Click “Next” to
initiate a search for a suitable driver for your device.
5. Select the “Specify a location” optional search locations. If the
“CD-ROM drives” checkbox is selected, please insert the driver CD.
Click “Next” to start the search.
7000 Bus Converter User’s Manual (Version 1.5 June/2004, 7PH-006-15) --------------- 28
6. If the “Specify a location” is selected, you much choose the correct
path. Enter E:\Napdos\7000\756x\7560(The ‘E’ is the Disk that
Package CD put in). Click “OK” to start the search.
7. Once Windows finds the correct driver, click “Next” to install the driver.
7000 Bus Converter User’s Manual (Version 1.5 June/2004, 7PH-006-15) --------------- 29
8. Windows will then install the driver for the USB-to-Serial COM Port.
Once installation is complete, Windows will notify you that it has
finished installing the software. Click “Finish” to continue.
7000 Bus Converter User’s Manual (Version 1.5 June/2004, 7PH-006-15) --------------- 30
3.1.4 Verifying the Installation:
This section will show you on how to verify whether the I-7560 was
properly installed. You will also need to determine the COM port
assignment made by Windows for the USB to RS-232 converter.
Note: Before you connect the I-7560 for the first time, ensure that you do
not attach any serial devices to the converter. You must only connect the
I-7560 itself.
To verify whether the device is properly installed and determine the COM
port assignment for the device:
1. Click “Start”
“Settings”
“Control Panel”, then double click on the
“System” icon. Once the System Properties window is display, click on
” Hardware” tab and then click on the “Device Manager” button. Doubleclick on Ports (COM & LPT). If the device was correctly installed, you
should now see the I-7560 USB-to-RS232 (COM3) device listing. This
also means that Windows has assigned the device to the COM3 port.
7000 Bus Converter User’s Manual (Version 1.5 June/2004, 7PH-006-15) --------------- 31
2. If you need to reassign the COM Port name to another Port number,
you can double-click on the device (I-7560 USB-to-RS232) to view the
properties. (The I-7561 cannot reassign the COM Port name to another
Port number under Win98 and Win98SE.)
3. Once the properties window opens click on the Port Settings tab. Then
click on the advanced button.
7000 Bus Converter User’s Manual (Version 1.5 June/2004, 7PH-006-15) --------------- 32
4. The Advanced Settings dialog box will now be displayed. Click on the
COM Port Number drop down box to check what other port numbers are
available. If, for instance, Windows has assigned COM5 to the device, you
may try to reassign it to a lower unused port number. Click OK when
finished. Try running HyperTerminal to test whether the new port number
is OK.
Note: Some software programs may only support Ports up to COM4 and
may not work if the port is assigned to COM5 or higher.
5. Once you have verified that the device has been properly installed, you
may now proceed to use the USB-to-RS232 Converter to connect to serial
devices. Attach the serial device to the serial port of the adapter and then
connect the USB connector to the USB port of your computer. Use the
supplied driver for the serial device if needed.
7000 Bus Converter User’s Manual (Version 1.5 June/2004, 7PH-006-15) --------------- 33
3.1.5 Uninstalling the Device Driver
It is easy to uninstall the USB to Serial device driver:
1. Run the DRemover98_2K.exe Uninstall program which can be found on
the Package CD, \Napdos\7000\756x\7560 or at
ftp://ftp.icpdas.com/pub/cd/8000cd/napdos/7000/756x/7560
2. The uninstall program will then prompt you whether you want to remove
the utility program. Click “ OK “ to continue.
3. After the uninstall is complete, the program will prompt you to restart
Windows. Click “ Yes ” to continue.
4. Windows will show a dialog box to notify you that the driver was
removed successfully. Wait for Windows to restart your computer.
7000 Bus Converter User’s Manual (Version 1.5 June/2004, 7PH-006-15) --------------- 34
3.2 I-7561 Pin Assignment and Specifications
Introduction
The I-7561 is a cost-effective module for transfer
serial data over USB. It allows you to connect your
serial devices to systems using a USB interface.
Connecting the I-7561 to a PC, you get one extra
high-speed RS-232/422/485 ports. Like our I-7520A,
the I-7561 contains “ Self Tuner “ This chip auto-tunes
the baud rate and data format to the RS-485 network.
The I-7561 module derives the power from the USB
port and doesn’t need any power adapter (when you
use I-7561, you should connect power ground to other
modules). It also features a high-speed 115.2 Kb/s
transmission rate, and supports various O.S.
independent RS-232/422/485 Ports.
Specifications
Full compatibility with USB 1.1 specifications.
Input Port: USB.
Cable: USB type “A” connector (Type “A” to type “B” cable provided).
Output Port: 3-wire RS-232, RS-422, RS-485
Speed: “Self Tuner” inside
3000 V DC Isolation protections provided.
Photo-coupler isolation: 2500V rms
256 modules max. In one RS-485 network without repeater.
Repeater request: 4,000 feet or over 256 modules.
Parity Bit : odd, even, none
Data Bit : 5,6,7,8
Stop Bit :1, 1.5, 2
Power requirements: Voltage support by USB interface of the Host-PC
Operating temperature: -25℃ to +75℃
Storage temperature: -25℃ to +80℃
Humidity: 5~ 95%
Driver Supported: Windows 98/ME/2000/XP, Linux
7000 Bus Converter User’s Manual (Version 1.5 June/2004, 7PH-006-15) --------------- 35
3.2.1 The I-7561 System Network Configuration:
• Multiple Baud Rate
• Multiple Data Format
3.2.2 The I-7561 Block Diagram:
7000 Bus Converter User’s Manual (Version 1.5 June/2004, 7PH-006-15) --------------- 36
3.2.3 I-7561 has four different output types.
Selecting the I-7561 output type.
NOTE: The RS-232, RS-422 and RS-485 output types couldn’t be used
simultaneously, which means that you can only select 1 type to output.
Type 1: 1-channel RS-485 output.
Type 2: 1-channel RS-422 output.
Type 3: 2-channel RS-485 output. (Support star network)
Type 4: 1-channel RS-232 output.
RS422/485 Output Jumpers settings:
For type 1: Set the JP3 jumper to positions 2 and 3.
For type 2: Set the JP3 jumper to positions 2 and 3.
For type 3: Set the JP3 jumper to positions 1 and 2.
1
2
3
1
2
3
Types 1 and 2:
Default setting
RS-422 or RS-485
JP3
Type 3:
2-channel RS-485
JP3
Pin Assignment For type1 and type2:
RS-485 Pin define:
DATA+ and DATARS-422 Pin define:
TX+, TX-, RX+ and RXPin Assignment For type3:
Channel one Pin define:
DATA1+ and DATA1Channel two Pin define:
DATA2+ and DATA2-
7000 Bus Converter User’s Manual (Version 1.5 June/2004, 7PH-006-15) --------------- 37
3.2.4 I-7561 Driver Installation
Installing the Device
This section will guide you on how to install the I-7561 USB to
RS-232/422/485 converter under Windows XP, Windows 2000, Windows
ME, and Windows 98 operating systems. (No support for WinNT).
Download driver files from
1. Package CD, \Napdos\7000\756x\7561
2. ftp://ftp.icpdas.com/pub/cd/8000cd/napdos/7000/756x/7561
The following steps will show how to install the device under Windows
2000. Basically, the procedures are also somewhat the same for other
Windows operating systems.
1. Power on your computer and boot to Windows.
2. Locate the USB port of your computer and plug in the I-7561.
3. Windows will detect the new device and will initiate the Found New
Hardware Wizard prompting you to install the software for the detected
USB Device. Select to install from a list or specific location. Click Next
to continue.
7000 Bus Converter User’s Manual (Version 1.5 June/2004, 7PH-006-15) --------------- 38
4. An “Install Hardware Device Drivers” window is shown. Click “Next” to
initiate a search for a suitable driver for your device.
5. Select the “Specify a location” optional search locations. If the
“CD-ROM drives” checkbox is selected, please insert the driver CD.
Click “Next” to start the search.
7000 Bus Converter User’s Manual (Version 1.5 June/2004, 7PH-006-15) --------------- 39
6. If the “Specify a location” is selected, you much choose the correct
path. Enter E:\Napdos\7000\756x\7561(The ‘E’ is the Disk that
Package CD put in). Click “OK” to start the search.
7. Once Windows finds the correct driver, click “Next” to install the driver.
7000 Bus Converter User’s Manual (Version 1.5 June/2004, 7PH-006-15) --------------- 40
8. Windows will then install the driver for the USB-to-RS232/422/485.
Once installation is complete, Windows will notify you that it has
finished installing the software. Click “Finish” to continue.
7000 Bus Converter User’s Manual (Version 1.5 June/2004, 7PH-006-15) --------------- 41
3.2.5 Verifying the Installation:
This section will show you on how to verify whether the I-7561 was
properly installed. You will also need to determine the COM port
assignment made by Windows for the USB to RS-232/422/485 converter.
Note: Before you connect the I-7561 for the first time, ensure that you do
not attach any serial devices to the converter. You must only connect the
I-7561 itself.
To verify whether the device is properly installed and determine the COM
port assignment for the device:
1. Click “Start”
“Settings”
“Control Panel”, then double click on the
“System” icon. Once the System Properties window is display, click on
”Hardware” tab and then click on the “Device Manager” button. Doubleclick on Ports (COM & LPT). If the device was correctly installed, you
should now see the I-7561 USB-to-RS232/422/485 (COM4) device
listing. This also means that Windows has assigned the device to the
COM4 port.
7000 Bus Converter User’s Manual (Version 1.5 June/2004, 7PH-006-15) --------------- 42
2. If you need to reassign the COM Port name to another Port number,
you can double-click on the device (I-7561 USB-to-RS232/422/485) to
view the properties. (The I-7561 cannot reassign the COM Port name to
another Port number under Win98 and Win98SE.)
3. Once the properties window opens click on the Port Settings tab. Then
click on the advanced button.
7000 Bus Converter User’s Manual (Version 1.5 June/2004, 7PH-006-15) --------------- 43
4. The Advanced Settings dialog box will now be displayed. Click on the
COM Port Number drop down box to check what other port numbers are
available. If, for instance, Windows has assigned COM5 to the device, you
may try to reassign it to a lower unused port number. Click OK when
finished. Try running HyperTerminal to test whether the new port number
is OK.
Note: Some software programs may only support Ports up to COM4 and
may not work if the port is assigned to COM5 or higher.
5. Once you have verified that the device has been properly installed, you
may now proceed to use the USB-to-RS232/422/485 Converter to
connect to serial devices. Attach the serial device to the serial port of the
adapter and then connect the USB connector to the USB port of your
computer. Use the supplied driver for the serial device if needed.
7000 Bus Converter User’s Manual (Version 1.5 June/2004, 7PH-006-15) --------------- 44
3.2.6 Uninstalling the Device Driver
It is easy to uninstall the USB to Serial device driver:
1. Run the DRemover98_2K.exe Uninstall program which can be found on
the Package CD, \Napdos\7000\756x\7561 or at
ftp://ftp.icpdas.com/pub/cd/8000cd/napdos/7000/756x/7561
2. The uninstall program will then prompt you whether you want to remove
the utility program. Click OK to continue.
3. After the uninstall is complete, the program will prompt you to restart
Windows. Click “Yes” to continue.
4. Windows will show a dialog box to notify you that the driver was
removed successfully. Wait for Windows to restart your computer.
7000 Bus Converter User’s Manual (Version 1.5 June/2004, 7PH-006-15) --------------- 45
3.3 I-7563 Pin Assignment and Specifications:
Introduction
The I-7563 is a cost-effective module for transfer
serial data over USB. It allows you to connect
your serial devices to systems using a USB
interface. Connecting the I-7563 to a PC, The I7563 contains “ Self Tuner “ This chip auto-tunes
the baud rate and data format to the Rs-485
network. The I-7563 module derives the power
from the USB port and doesn’t need any power
adapter. It also features a high-speed 115.2 Kb/s
transmission rate, and supports various O.S.
( USB )
I-7563
USB to 3 Ports RS-485 Hub
Converter
Variable Baud Rate
300,..9600,..115.2K
Variable Rate Format
( CH 3 )
( CH 2 )
( CH 1 )
Do you have any RS-485 wiring problems? The
I-7563 is USB to three ports RS-485 Hub. Each
channel has its own RS-485 driver IC on it, so it
can support star-shaped wiring.
Specifications
Full compatibility with USB 1.1 specifications.
Input Port: USB.
Output Port: Three RS-485.
Speed: “Self Tuner” inside
3000 V DC Isolation protections provided.
Photo-coupler isolation: 2500V rms
256 modules max. In three channels
RS-485 network without repeater.
2048 modules max. In three channels
RS-485 network with repeater.
Repeater request: 4,000 feet or over 256 modules.
Parity Bit : odd, even, none
Data Bit : 5,6,7,8
Stop Bit :1, 1.5, 2
Operating temperature: -25℃ to +75℃
Storage temperature: -25℃ to +80℃
Humidity: 5~ 95%
Driver Supported: Windows 98/ME/2000/XP, Linux
7000 Bus Converter User’s Manual (Version 1.5 June/2004, 7PH-006-15) --------------- 46
3.3.1 The I-7563 System Network Configuration:
• Multiple Baud Rate
• Multiple Data Format
3.3.2 The I-7563 Block Diagram:
7000 Bus Converter User’s Manual (Version 1.5 June/2004, 7PH-006-15) --------------- 47
3.3.3 I-7563 Driver Installation
This section will guide you on how to install the I-7563 USB to 3 Ports
RS-485 Hub under Windows XP, Windows 2000, Windows ME, and
Windows 98 operating systems. (No support for WinNT). Download driver
files from
1. Package CD, \Napdos\7000\756x\7563
2. ftp://ftp.icpdas.com/pub/cd/8000cd/napdos/7000/756x/7563
The following steps will show how to install the device under Windows
2000. Basically, the procedures are also somewhat the same for other
Windows operating systems.
1. Power on your computer and boot to Windows.
2. Locate the USB port of your computer and plug in the I-7563.
3. Windows will detect the new device and will initiate the Found New
Hardware Wizard prompting you to install the software for the detected
USB Device. Select to install from a list or specific location. Click Next
to continue.
7000 Bus Converter User’s Manual (Version 1.5 June/2004, 7PH-006-15) --------------- 48
4. An “Install Hardware Device Drivers” window is shown. Click “Next” to
initiate a search for a suitable driver for your device.
5. Select the “Specify a location” optional search locations. If the
“CD-ROM drives” checkbox is selected, please insert the driver CD.
Click “Next” to start the search.
7000 Bus Converter User’s Manual (Version 1.5 June/2004, 7PH-006-15) --------------- 49
6. If the “Specify a location” is selected, you much choose the correct
path. Enter E:\Napdos\7000\756x\7563(The ‘E’ is the Disk that
Package CD put in). Click “OK” to start the search.
7. Once Windows finds the correct driver, click “Next” to install the driver.
7000 Bus Converter User’s Manual (Version 1.5 June/2004, 7PH-006-15) --------------- 50
8. Windows will then install the driver for the USB-to-3 Ports. Once
installation is complete, Windows will notify you that it has finished
installing the software. Click “Finish” to continue.
7000 Bus Converter User’s Manual (Version 1.5 June/2004, 7PH-006-15) --------------- 51
3.3.4 Verifying the Installation:
This section will show you on how to verify whether the I-7563 was
properly installed. You will also need to determine the COM port
assignment made by Windows for the USB to 3 Ports RS-485 Hub.
Note: Before you connect the I-7563 for the first time, ensure that you do
not attach any serial devices to the converter. You must only connect the
I-7560 itself.
To verify whether the device is properly installed and determine the COM
port assignment for the device:
1. Click “Start”
“Settings”
“Control Panel”, then double click on the
“System” icon. Once the System Properties window is display, click on
” Hardware” tab and then click on the “Device Manager” button. Doubleclick on Ports (COM & LPT). If the device was correctly installed, you
should now see the I-7563 USB-to-3 Ports RS485 Hub (COM3) device
listing. This also means that Windows has assigned the device to the
COM3 port.
7000 Bus Converter User’s Manual (Version 1.5 June/2004, 7PH-006-15) --------------- 52
2. If you need to assign the COM Port name to another Port number, you
can double-click on the device (I-7563 USB-to-RS485 Hub) to view the
properties. (The I-7561 cannot reassign the COM Port name to another
Port number under Win98 and Win98SE.)
3. Once the properties window opens click on the Port Settings tab. Then
click on the advanced button.
7000 Bus Converter User’s Manual (Version 1.5 June/2004, 7PH-006-15) --------------- 53
4. The Advanced Settings dialog box will now be displayed. Click on the
COM Port Number drop down box to check what other port numbers are
available. If, for instance, Windows has assigned COM5 to the device, you
may try to reassign it to a lower unused port number. Click OK when
finished. Try running HyperTerminal to test whether the new port number
is OK.
Note: Some software programs may only support Ports up to COM4 and
may not work if the port is assigned to COM5 or higher.
5. Once you have verified that the device has been properly installed, you
may now proceed to use the USB-to-3 Ports RS485 Hub to connect to
serial devices. Attach the serial device to the serial port of the adapter and
then connect the USB connector to the USB port of your computer. Use
the supplied driver for the serial device if needed.
7000 Bus Converter User’s Manual (Version 1.5 June/2004, 7PH-006-15) --------------- 54
3.3.5 Uninstalling the Device Driver
It is easy to uninstall the USB to Serial device driver:
1. Run the DRemover98_2K.exe Uninstall program which can be found on
the Package CD, \Napdos\7000\756x\7563 or at
ftp://ftp.icpdas.com/pub/cd/8000cd/napdos/7000/756x/7563
2. The uninstall program will then prompt you if you want to remove the
utility program. Click OK to continue.
3. After the uninstall is complete, the program will prompt you to restart
Windows. Click “Yes” to continue.
4. Windows will show a dialog box to notify you that the driver was
removed successfully. Wait for Windows to restart your computer.
7000 Bus Converter User’s Manual (Version 1.5 June/2004, 7PH-006-15) --------------- 55