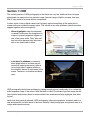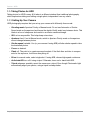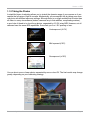
1
Photomatix Light 1.0 User Manual
Table of Contents
Introduction.................................................................................................................................... iii
Section 1: HDR...............................................................................................................................1
1.1 Taking Photos for HDR..........................................................................................................2
1.1.1 Setting Up Your Camera.................................................................................................2
1.1.2 Taking the Photos...........................................................................................................3
Section 2: Using Photomatix Light.................................................................................................5
2.1 Loading and Managing Photos (Step 1)...............................................................................5
2.2 Adjusting the Image with Fusion or Tone Mapping (Step 2)..................................................9
2.2.1 Details Enhancer Presets and Settings........................................................................11
2.2.2 Exposure Fusion Settings.............................................................................................13
Section 3: Glossary......................................................................................................................14
Introduction
Introduction
Photomatix Light processes multiple, exposure bracketed photos into a single image by either
fusing the exposures together or through a process known as HDR tone mapping.
This manual is organized into three major areas. The first is a general description of HDR photography and how to shoot it. The second is a more detailed tutorial on how to use Photomatix
Light. The third section is a glossary of some of the terms associated with HDR.
Photomatix Light User Manual
Page iii
Section 1: HDR
Section 1: HDR
The central premise of HDR photography is that there are very few situations where a single
photograph can capture the true dynamic range (the total range of light in a scene, from very
little to very much) of a scene without compromise.
In other words, today’s digital camera can’t properly expose everything at the same time in
scenes with even moderate contrast ratios. This results in two main problems (which sometime
happen together in the same photo):
• Blown highlights: when the exposure
is raised to make sure the foreground or
subject is properly exposed, brighter areas of the scene suffer. They “blow out”
and turn white because they have very
little or no usable data in them.
• Lost detail in shadows: conversely,
when bright areas of a scene are protected (by lowering exposure), there is
not enough light to register details on
the camera’s sensor in dark areas of the
scene. These turn to shadow and blackness.
HDR photography limits these problems by taking enough photos (traditionally 3) to contain the
entire exposure range of the scene. With that data in hand, Photomatix Light can merge the different photos and process them to rescue details from shadows and keep highlights from blowing out.
Aside from that practical rationale, HDR photography offers photographers and photo editors a
new and powerful tool with which to take and “develop” their photographs and present them in a
unique and inspirational way.
Photomatix Light User Manual
Page 1
Section 1: HDR
1.1: Taking Photos for HDR
Taking photos for HDR is easy. All it takes is a different mindset than traditional photography,
which emphasizes taking and editing a single photo, independent from any others.
1.1.1 Setting Up Your Camera
HDR photography requires that you set up your camera a bit differently than normal:
• Shooting mode: Aperture Priority or Manual mode. Do not use Automatic or Shutter
Speed mode as the aperture (and hence the depth of field) would vary between shots. This
leads to a loss of sharpness and results in an inferior combined image.
• ISO: as low as possible. This helps keep noise down.
• Aperture: fixed. If not in Manual mode, switch to Aperture Priority mode so the aperture
cannot change between photos.
• Shutter speed: variable. You (or your camera if using AEB) will alter shutter speed to take
the bracketed photos.
• Focus: as desired.
• Flash: off. The point is to create exposure brackets. If the flash fires and tries to compensate for the exposure, it will throw everything off.
• Drive: for manual mode, select single shot. If using AEB, choose high-speed continuous.
• Anti-shake/VR: turn off if using a tripod. Otherwise, leave on for hand-held HDR.
• Tripod: whenever possible, mount the camera on a tripod. Even though Photomatix Light
automatically aligns your photos, using a tripod is always better.
Page 2
Photomatix Light User Manual
Section 1: HDR
1.1.2 Taking the Photos
In simplified terms, bracketing allows you to stretch the dynamic range of your camera so it can
capture the full range of light in a scene. Mechanically, you accomplish this by taking more than
one photo with different exposure settings. Although there is no single method that is better than
all others in every circumstance (indeed, cameras vary in their abilities, complicating matters),
a good rule of thumb is to shoot three photos, separated by 2.0 EV using AEB. However, not all
cameras have the same AEB capabilities. Some limit you to a 1 EV spacing or less.
Underexposed (-2 EV)
Well exposed (0 EV)
Overexposed (+2 EV)
You can shoot more or fewer photos separated by more or less EV. The final results may change
greatly, depending on your bracketing strategy.
Photomatix Light User Manual
Page 3
Section 1: HDR
Auto Exposure Bracketing (AEB) simplifies your job as a photographer greatly. After setting up
and composing the shot, all you need to do is:
1. Configure number of brackets you want to take. Three is a good starting point. Choose
more for higher contrast scenes.
2. Configure EV spacing. +/- 2.0 EV (if available) is a common spacing that provides you a
good overall range if you take three photos.
3. Shoot the photos. The camera will take the bracketed photos in the proper sequence
(which can often be changed in the camera’s settings).
Of course, different cameras implement AEB differently. Consult your camera’s manual to determine the specific number of shots and the EV spacing you have available to you.
Nikon D200 configured for an AEB sequence of 5 exposures at +/- 1.0 EV.
Manual Bracketing requires more work. You must manually adjust the exposure between each
shot by altering shutter speed. Note that using a tripod will be required in this case.
Page 4
Photomatix Light User Manual
Section 2: Using Photomatix Light
Section 2: Using Photomatix Light
Photomatix Light is composed of two main steps:
1. Loading your bracketed photos into Photomatix Light where you can work with them.
2. Adjusting the combined image to your liking, then processing and saving it.
You may choose to use JPEGs downloaded from your camera, files converted from raw photos (normally TIFFs, but you can also convert to JPEG), or the raw files themselves. When you
have taken raw files, we recommend that you convert your raw files to JPEG or TIFFs in your
favorite raw converter before loading them into Photomatix Light. This makes use of the specific
strengths of raw conversion software and will give you better image quality as a result.
Ease and Convenience
JPEG
JPEG
Raw
3rd-party
Raw editor
TIFF
Best Quality
2.1 Loading and Managing Photos (Step 1)
To use Photomatix Light, first select the photo or photos you want to use and load them into the
program. There are two ways to accomplish this:
• Drag and drop: Drag the photos from a folder on your computer and drop them onto Photomatix Light.
• Browse: Use the Open dialog box to identify the and load the source photos into Photomatix Light.
Note: It is possible to select a single photo if you like. Click on the “Can I use a single photo?”
link for more details.
Photomatix Light User Manual
Page 5
Section 2: Using Photomatix Light
Dragging and Dropping
To drag one or more photos into Photomatix Light, follow these steps:
1. Launch Photomatix Light.
2. Open the folder on your computer that contains the photo or photos you want to work with.
3. Arrange the folder and Photomatix Light so you can drag files from the folder and drop
them on Photomatix Light.
4. Select the files as you would normally.
5. Drag and drop the photos to Photomatix Light. You can drag and drop file individually or in
groups.
Page 6
Photomatix Light User Manual
Section 2: Using Photomatix Light
Browsing
To browse to one or more photos using a file selection dialog box, follow these steps:
1. Launch Photomatix Light.
2. Choose Browse.
3. Navigate to the folder on your system where the photo(s) are stored.
4. Select the files as you would normally.
5. Choose OK (Windows) or Select (Macintosh).
Regardless of the method you choose, you can go back and add photos. Drag and drop additional photos or choose Browse again to choose more files.
You may mix and match these two methods.
Photomatix Light User Manual
Page 7
Section 2: Using Photomatix Light
Managing Photos
Once you load your photos into Photomatix Light, you should notice a few things in the interface.
First, each photo is displayed as a thumbnail. This makes it easy to verify the photos are of the
same subject and see their relative exposure compared to their bracketed companions. Additionally, there is a combined thumbnail that shows the result of processing the photos.
Finally, there is a checkbox beside each photo’s thumbnail (that is checked by default unless
you loaded only one photo). A checked box signifies that the photo is included in the process.
Uncheck a photo to take it out of the process. You’ll see the combined thumbnail update to show
the effect. Check the photo to put it back into the mix.
Starting Over or Continuing
To start over, select Reset & Start Again. You’ll jump back to a clean interface and be ready to
select new bracketed photos.
To continue with these photos, select Next.
Page 8
Photomatix Light User Manual
Section 2: Using Photomatix Light
2.2 Adjusting the Image with Fusion or Tone Mapping (Step 2)
The heart of Photomatix Light is Step 2, where you choose a method to process your bracketed
photos. The two methods you can choose from are:
• Exposure Fusion: combines your bracketed photos in such a way that bright details (highlights) are taken from the underexposed photos and dark details (shadows) from the overexposed ones. The result is a more “natural” look with less noise than tone mapping. Note
that this method requires more than one exposure and is thus not available when you have
chosen to load a single photo.
• Details Enhancer Tone Mapping: processes the HDR image merged from your bracketed
photos, revealing its details in highlights and shadows. This method excels at creating the
classic HDR look—enhanced contrast and accentuated details. If you tone down the settings you can also achieve “natural” looking results.
Photomatix Light User Manual
Page 9
Section 2: Using Photomatix Light
Follow these steps when you are presented with Step 2:
1. Select the method (Exposure Fusion or the Details Enhancer) that gives you the result you
prefer. If you change your mind, simply select the other method. If you select Details Enhancer Tone Mapping, you can also choose a preset, “Default”, “Painterly” or “Grunge”.
2. Adjust the sliders to get the effect you want.
3. When satisfied, select Process & Save.
4. Enter a new file name, if desired, and select a file type:
• TIFF 16-bit: This is the highest quality output
available and is the best format if you plan on
processing the image further in an image editor.
• JPEG: JPEGs are the best options if you want
to go straight to the Web or other medium with
no further processing.
5. If you want to automatically open the processed image in an image editor, select Open
saved image with, then choose an image editor.
6. Choose OK (Windows) or Save (Macintosh). Photomatix Light aligns your photos and processes them with either exposure fusion or HDR merge followed by tone mapping.
Page 10
Photomatix Light User Manual
Section 2: Using Photomatix Light
2.2.1 Details Enhancer Presets and Settings
The Details Enhancer has three main presets. Select a preset from the list to see the effect it
has on your HDR image:
• Default: Contains fairly neutral settings
designed to achieve a reasonably realistic result.
• Painterly: A more artistic preset, Painterly recreates the appearance of a painting.
• Grunge: Grunge is a dramatic preset
that accentuates contrast and color.
• Custom: This activates when you modify
an existing preset to make a custom setting. The settings are explained next.
Photomatix Light User Manual
Page 11
Section 2: Using Photomatix Light
Strength
Controls the strength of contrast enhancements to the image.
Color Saturation
Raises or lowers the color intensity, or saturation, of the resulting image. Greater values intensify
color and lower values produce a subdued effect. A value of 0 removes all color, resulting in a
grayscale image.
Luminosity
Controls how much the tonal range is compressed, which then affects the overall brightness.
Increasing Luminosity increases shadow details and brightens the image. Lowering the setting
decreases shadow details and results in a more natural-looking image.
Microcontrast
Controls how much local details are amplified. Higher values give a sharper, more contrasted
look at the expense of brightness. Lower values brighten the image while reducing contrast.
Smoothing
This is one of the most important settings because it has a significant effect on the final appearance of your image. Smoothing, as the name suggests, smoothes variations in contrast throughout the image. Greater amounts of smoothing result in a more natural look while less smoothing
produce a more artistic interpretation of the scene. There are two smoothing modes:
• Slider mode: makes use of a slider that provides fine control over more or less smoothing. Slider mode often produces smoother and more realistic results than Light mode. If the
slider is not visible, make sure to uncheck Light mode.
• Light mode: Check Light mode to enter. Select one of the three levels: Min, Low, or Mid.
Use Light mode if you want less smoothing than possible from Slider mode, resulting in a
more artistic scene.
Page 12
Photomatix Light User Manual
Section 2: Using Photomatix Light
2.2.2 Exposure Fusion Settings
Exposure Fusion has no presets. Work the sliders to achieve the desired effect.
Accentuation
Adjusts the strength of the overall effect.
Color Saturation
Adjusts the saturation of the color channels. The greater the saturation, the more intense the
colors. A value of 0 produces a grayscale image.
Blending Point
Adjusts how much weight to give the underexposed or overexposed images. When you move
the slider to the right, the overexposed images are favored, which tends to brighten the resulting
image. The reverse happens when you move the slider to the left.
Shadows
Adjusts the brightness of the shadows while leaving midtones and highlights alone.
Midtones Contrast
Increases or decreases contrast in the midtones of the image. Raising it brightens the image but
reduces the overall contrast. Lowering it darkens the image while increasing contrast.
Photomatix Light User Manual
Page 13
Section 3: Glossary
Section 3: Glossary
• Bit Depth: How many bits a file type uses to represent a pixel’s color and location in an image. JPEGs use 8 bits per color channel to encode this information while 16-bit TIFFs use
16 bits. Camera Raw files are usually 12 to 14 bits per color channel.
• Brackets: A group of exposure-bracketed photos, i.e. of photos of the same scene taken
with different exposures.
• Contrast ratio: Another way to describe the dynamic range of a scene, it is the ratio between the darkest and brightest areas.
• Details Enhancer: The tone mapping method available in Photomatix Light that processes
the merged HDR image by accentuating contrast and details.
• dSLR: Digital Single Lens Reflex camera.
• Dynamic range: In the context of HDR photography, the total range of light in a scene,
from the deepest shadows to the brightest highlights. It is commonly expressed in EV or
stops of exposure.
• Exposure: How much light enters a camera for the length of time the shutter is open. Exposure depends on aperture and shutter speed, as well as the camera’s sensitivity to light
(controlled by the ISO). An exposure is also shorthand for a photograph, or frame (which is
a throwback to a frame of film).
• Exposure Fusion: Directly combines exposure information from bracketed photos.
• EV (Exposure Value): A measure of exposure which is the equivalent of a stop. EV is
often used for different reasons. In an absolute sense, EV is defined as the exposure from
a photo taken at 1 second, f/1, and ISO 100. In a relative sense, the correct exposure is
normally 0 EV and any deviation is measured in positive or negative EV from that mark.
• HDR: High Dynamic Range.
• HDR image: Properly speaking, an HDR image is an interim stage between the bracketed
photos and the final output. An HDR image contains the result of merging the bracketed
photos and is stored in 32 bits per color channel. The 32-bit HDR image needs to be processed with tone mapping for proper display on standard monitors..
• JPEG: A common image file format, whose two primary strengths are a relatively small file
size and universal compatibility. JPEGs use a lossy compression scheme and should not
be edited and re-saved.
• Raw File: A file containing the raw data from the camera sensor. Raw files do not have a
color profile or other stylistic preferences permanently applied.
• TIFF: A comprehensive image format that offers lossless compression schemes to keep file
sizes down yet quality up. This is a format suitable for editing and printing but not publishing on the Web.
• Tone Mapping: Processing a 32-bit HDR image into an image that can be properly viewed
on monitors and prints.
Page 14
Photomatix Light User Manual
For more information on HDR and Photomatix Light, visit www.hdrsoft.com. In addition, there are
many books and Internet resources devoted to the subject that, along with your own experience,
will help deepen your understanding of it.
Photomatix Light User Manual
Page 15
www.hdrsoft.com