1
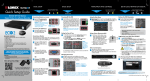
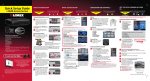
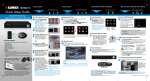
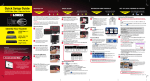
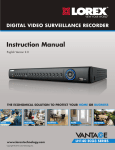
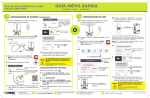
Quick Networking Guide
ECO Blackbox+ LH010H Series
Digital Video Surveillance Recorder
2 Local Connection
This guide will show you how to set up your new Lorex system for connection over the Internet
using a PC, Mac, Smartphone, or Tablet.
PC
Before You Start:
a
Make sure you have:
• A router and high-speed Internet access (not included).
• Connected your DVR to your router using an Ethernet cable. (See the Quick
Connection Guide for details).
• A PC or Mac connected to the same router as your DVR.
Except where noted, the instructions are the same for PC and Mac users.
Install Lorex Client Software for PC from the
CD or from www.lorextechnology.com.
b
Double-click on the Lorex Client 11
icon on your desktop.
c
Enter the following information:
a
b
1 Find Your IP and MAC Address
IP ADDRESS:
.
MAC ADDRESS:
-
-
-
d
-
IP Address
HTTP Port
(Default: 80)
c
Client Port: By default, this is 9000.
d
Click Download to download the plug-in for Safari.
Colon
Click the Downloads button
Right-click
SurveillanceClient.dmg
and click Open
DVR IP
.
-
Enter the IP Address of your DVR into the address bar as shown.
http://192.168.1.100:80
Password: By default, the password is left blank.
), then System>Info.
.
Open Safari.
IP Address: Enter the IP Address of your DVR.
9000
Record your information below:
Mac
http://
User Name: The default user name is admin.
Right-click and click the Main Menu button (
60 Minutes
e
f
g
Click Login to access your DVR. Lorex Client 11 connects
to your DVR and streams live video from your cameras.
Double-click SurveillanceClient to install.
After installation, right-click the Safari icon in the dock and select
Quit and then restart Safari.
Re-enter the IP Address of your DVR, the same way as in Step b.
Enter the DVR User Name and Password and click Login.
By default, the User Name is admin and the Password is
left blank.
Congratulations! You can now view & playback video on your system via LAN. Continue the setup to enable Internet remote access.
3 Port Forwarding Easy Connect Wizard (PC Only)
You must have the following before using the software:
1. Your router’s model and version numbers
2. Your router’s user name and password
3. Your Lorex device’s IP address (recorded in Step 1)
a
b
c
Install the Lorex Easy Connect Wizard software
from the CD or from www.lorextechnology.com and
double-click the Desktop icon to open.
The Easy Connect Wizard automatically detects routers on your
network. Click the Next button.
NOTE: If more than one router is detected, additional setup steps
may be required. See the Easy Connect Manual on CD for details.
Under the Router drop-down list, select the model of your router OR
click the Search button to enter the name of your router model.
Linksys or Netgear Routers: Click Try to Auto Detect (works
with most models).
d
e
Under Username and Password, enter the
router’s username and password.
f
Under IP, enter the IP address of your Lorex
device recorded in step 1.
g
Under Port, enter the system port number(s).
By default: 80, 9000, and 1025.
h
i
Click Next to continue.
OR
Manual Port Forwarding
DVR IP
80
9000
1025
Manually forward ports 80, 9000 and 1025 to your
DVR’s IP address.
All routers are different. To port forward your router, please
refer to your router’s user manual.
An example of a port forwarding screen is shown for
illustration purposes.
Click Update Router.
The program updates the router settings.
This may take around 30 seconds.
You may need to manually save the
router settings after the program makes
the required changes.
Close the update window once the update is finished.
EXAMPLE
HTTP
80
80
12
Client
9000
9000
12
Mobile
1025
1025
12
Under Router IP, click the Detect Router IP button. The router’s
IP address is filled in.
LH010H ECO Blackbox+ Series Quick Network Guide - English - R1
Quick Networking Guide
4 Register for Lorex DDNS
a
Open your web browser and go to:
http://www.lorexddns.net
b
Click Step 1 and create a new My Lorex account or sign in with
an existing account.
c
Click Warranties and click Activate Warranties. Fill in the registration form and click Save
Warranty. Check the sticker under your DVR for the Product Model Number and Serial Number.
Digital Video Surveillance Recorder
Quick Reference
a
Default passwords:
Click on Main Menu
from the menu bar,
.
b
Click the DDNS tab.
c
Select Enable in the DDNS drop-down menu.
d
Enter the following into the DDNS Setup menu (as recorded in step 4g):
Click Set Up a New DDNS
f
Product Warranty: Select the product warranty you
created in the previous steps.
Select Enable
Domain Name: Enter
Domain Name/URL Request
MAC Address: Enter the MAC address of your Lorex
system recorded in Step 1.
URL Request: Enter the web site address that will be
used to connect to your Lorex system. (e.g. tomsmith)
User Name: Enter DDNS
User Name
Click Save to register your product for DDNS.
Click Apply to save your settings.
Domain Name/URL Request:
DDNS User Name:
DDNS Device Password:
6 Connect Over the Internet
PC
a
Install and run the Lorex Client 11 software.
See Step 2 for details.
b
Enter the following information:
a
9000
iPhone / iPad
HTTP Port
(Default: 80)
http://tomsmith.lorexddns.net:80
Password: By default, the password is left blank.
tomsmith.lorexddns.net
7 Mobile Connection
Open Safari and enter the DVR’s DDNS
address into the address bar as shown below.
http:// URL Request
IP Address: Enter the URL Request followed
by .lorexddns.net. For example, if your URL
Request is tomsmith, enter tomsmith.lorexddns.net
Client Port: By default, this is 9000.
Please allow 10~15 minutes for the DDNS servers to update with your new
DDNS address before proceeding to Step 6.
Mac
User Name: The default user name is admin.
c
Password: Enter DDNS
Device Password
An automated REGISTRATION CONFIRMATION E-MAIL will be sent to your email.
Print and save this confirmation. You will need to enter it into your system to enable remote access.
Record your
information here:
User Name
Password
Local System Access
• admin
• 000000
Remote Connection
(PC & Mac)
• admin
• left blank
Mobile Connection
(Smartphone & Tablet)
• admin
• 0000
Default system ports:
Fill out the My DDNS form:
Device Name: Enter a name for your device of your choice.
g
60 Minutes
5 Enable DDNS on your DVR
then click Network
d
ECO Blackbox+ LH010H Series
a
b
c
Download the free Lorex Mobile ECO
app from the App Store.
d
Enter the following:
If you have not done so, install the plug-in (see
Step 2) and then re-enter the DDNS address after
restarting Safari.
Enter the DVR User Name and Password and
click Login.
By default, the User Name is admin and
the password is left blank.
Click Login to access your DVR. Lorex Client
11 connects to your DVR and streams live video
from your cameras.
Congratulations! You can now connect over the Internet to view and playback
video. See Step 7 to connect to your DVR on your mobile phone or tablet.
Touch
to open the Device List
menu and touch Add.
e
f
Touch OK then Back.
Touch +
Touch the name of your
DVR and select the channel
you would like to display in
the selected space. Repeat
to view additional channels.
All ports must be port forwarded to enable access to the
system over the Internet. See Step 3 for details.
Troubleshooting
Error
Possible Causes
Cannot connect to • Ports not forwarded
the DVR over the
Internet
• DDNS Setup not
completed
Note: You must complete ALL previous steps before connecting
using a mobile device. See the Instruction Manual on
the CD for other mobile platforms.
Android
a
b
c
Download the free Lorex Mobile ECO
app from the Google Play Store.
d
Enter the following:
Tap the Lorex Mobile ECO icon.
Touch
to open the Device List
menu and touch Add.
DVR Title: Give your system a
name of your choice
Server: Enter the URL Request,
followed by .lorexddns.net
(e.g. tomsmith.lorexddns.net)
Port: Enter the Mobile Port number
of the DVR (by default, port 1025)
User ID: Enter the DVR’s user
name (default: admin).
Password: Enter the DVR’s mobile
access password (default: 0000)
Max Channel: Enter the DVR’s
number of channels (4, 8, or 16).
Device Name: Give your system
a name of your choice
Address: Enter the URL Request,
followed by .lorexddns.net
(e.g. tomsmith.lorexddns.net)
Port: Enter the Mobile Port number
of the DVR (by default, port 1025)
User ID: Enter the DVR’s user
name (default: admin).
Password: Enter the DVR’s mobile
access password (default: 0000)
Max Channel: Enter the DVR’s
number of channels (4, 8, or 16).
.lorexddns.net Colon
b
Tap the Lorex Mobile ECO icon.
• HTTP Port: 80
• Client Port: 9000
• Mobile Port: 1025
e
f
Solutions
• Port forward the ports shown above.
See Step 3 for details.
• Complete Steps 4 & 5 to register
your DVR for DDNS.
• Ports are blocked
by Internet Service
Provider (ISP)
• Some ISP’s block port 80. Reassign
the HTTP port to anything above
1026. Re-complete Step 3 with the
new port number. If this does not
work, contact your ISP for assistance.
• Multiple routers
installed in local
network
• If you have multiple routers,
additional setup may be required.
See the Easy Connect Manual on the
CD for details.
Could connect to
system previously,
but no longer can
• DVR internal IP
• This can occur if your router resets
address has changed
due to power failure. Set up a fixed
IP address for your DVR. See the
Instruction Manual on the CD for details.
Cannot connect
to the DVR using
a smartphone or
tablet
• IP address used from • Use the DDNS address to connect to
outside local network
the DVR using a mobile application.
See Step 7.
• Router is blocking
• Turn off WiFi connection and
DDNS connection
attempt to connect using 3G or
from internal network
mobile network
Need Help?
See the complete Instruction Manual on the CD.
OR
Visit www.lorextechnology.com/support
Touch OK then Back.
Touch +
Touch the name of your
DVR and select the channel
you would like to display in
the selected space. Repeat
to view additional channels.
Congratulations! You can now view video from your cameras on your smartphone or tablet.
It’s all on the Web
w w w. l or e xt e ch n ol og y. com
Information in this document is subject to change without notice. As our products are subject to continuous
improvement, Lorex Technology Inc. and our subsidiaries reserve the right to modify product design, specifications
and prices, without notice and without incurring any obligation. E&OE © 2013 LOREX. All rights reserved.
LH010H ECO Blackbox+ Series Quick Network Guide - English - R1
1-05022013