1
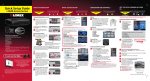
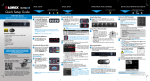
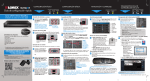
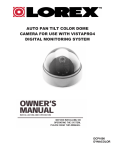
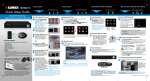
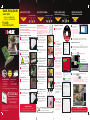
Time Time Quick Setup Guide QLR460 SERIES BASIC SETUP: PCI CARD Hand Tools Time: 20 Minutes STEP 1 under 15 minutes over 60 minutes under 60 minutes Hardware Hi Speed BASIC SETUP: CAMERAS Hand Tools Skill Level Hardware Installation Skills - Moderate Hardware Router Intermediate Remove the computer’s cover panel 1 Time: 20 Minutes Refer to your computer’s owner’s manual for instructions on how to remove the case cover if you are unsure of how to do so. under 15 minutes advanced under 30 minutes Hand Tools Hand Tools under 60 minutes Hardware over 60 minutes Hardware Skill Level easy over 60 minutes Hi Speed (DRIVER AND LOCAL SOFTWARE) STEP 3 Intermediate easy advanced advanced TIP Make sure your cameras are fully functional before mounting them in the final location. 1 2 1 2 Remove the PCI slot’s metal plate at the back of the system. Be careful of sharp edges while removing the metal plate. Connect the camera’s BNC connector into the extension cable’s BNC connector. The connection should be snug and secure. 32 & 64-bit Compatible 2 • PACKAGE CONTENTS: QLR464 also includes: 4 x Cameras 1 x PCI Capture Card 4 x 60ft Extension Cables 1 x User’s Manual 1 x 4-in-1 Power Adaptor 1 x Quick Start Guide 1 x Software CD *1 x 16-in-1 BNC multi-channel cable (included with QLR1670 only) It’s all on the Web 4 Secure the PCI Card by tightening the screw with a screw driver. Replace the computer’s cover panel 5 Slide the computer cover panel back on and secure it with screws using a screw driver. Information in this document is subject to change without notice. As our products are subject to continuous improvement, Lorex Technology INC. and our subsidiaries reserve the right to modify product design, specifications and prices, without notice and without incurring any obligation. E&OE © 2010 LOREX. All rights reserved. ENGLISH REVISION # R2 EXPRESS INSTALLATION (DRIVER AND LOCAL SOFTWARE) Hi Speed Router STEP 3 Skill Level Intermediate advanced 6 Insert the installation disc into your computer’s CD/DVD drive. 4 Connect the 4-in-1 12V DC power adaptor to the power connector end of the extension cable. You will be asked to select a drive for storage, and to set the storage size. Note: If you set more than 90% of your hard drive to be allocated to the QLR460 storage, your computer may read the drive as being full, as this hard drive space is being saved for the program. It is recommended that you remove the installation CD and then restart your computer before running the VistaPro 6 Server Software. Logging In to VistaPro 6 Server 8 9 The installation screen will open. Click on the Install button and then click the Express installation button. 64 bit Vista/7 users: A Windows Security window appears during setup. Select the checkbox beside “Always trust software from “Cap Co”. Click the Install button to continue. 4 The installation window will pop up. Follow the instructions by clicking the “Next” buttons after making your selections. You will be asked to set the installation location, language and program folder. 5 Once installed, you will be asked to select whether you want the program to start automatically or manually. Connect additional cameras 5 Follow the auto-run instructions on screen. Click on the “Run SetupDisc.exe” option if prompted. CONTINUED Click the DVR shortcut on your desktop , or locate the application in the start menu. If a Windows Firewall warning pops up, select the “Unblock” option. Click the Lock Button . The Logon window appears. Default ID: admin Default Password: 1111 Note: A pop-up window may appear asking you to verify the software. Click the button to allow the installation. Connect power adaptor Repeat these steps for up to three additional cameras. 10 Under ID, enter admin; under Password, enter 1111. Click the checkmark button to log in. NOTE: Click the Virtual Keyboard button to type in the User ID and Password if you do not have access to a keyboard. NOTE: It is recommended to change the default password. For details on changing the admin password, see “Changing User Account Password” on page 34. NOTE: Click the Exit button on the bottom right hand corner of the window to exit the program. Plug in the power adaptor Plug the power adaptor into the wall outlet. This will provide power for up to 4 cameras. Congratulations! You have completed Step 1 successfully. Your computer can now support up to 4 cameras. 3 Note: 16 Channel QLR1670 includes a 16-in-1 BNC multi-channel cable. For more information on the QLR1670 please refer to the User Manual. 6 For detailed setup information, please refer to your included User’s Manual. For additional information, please visit our website www.lorextechnology.com Hardware over 60 minutes Skills - Easy easy If your system does not support auto-run, you can browse the CD, and search for the Vista Pro 6 Server in the X:\Package\Remote Client directory, where “X” is your CD/DVD drive. the extension cable to the back of the QLR card. The connection should be snug and secure. Push the card firmly into an available PCI slot until it clicks in place. The gold-colored connector pins should not be visible after the card is secure. Secure the PCI card Hardware PC under 60 minutes 7 Plug the camera’s power connector into the power connector end of the extension cable. Connect BNC to the computer 3 Screw in the BNC connector from Insert the PCI card 3 Hand Tools under 30 minutes Connect to BNC extension cable Connect power cable Remove the PCI cover plate Time: 10 Minutes Installing the PCI Card Driver Intermediate under 15 minutes LOCAL INSTALLATION GUIDE Router Hi Speed Skill Level Before you install a camera, carefully plan where and how you will position the camera, and where you will route the cables. NOTE: The 4 Port PCI card has 4 Video inputs, allowing you to connect up to 4 cameras (the instructions below apply to the cameras included with QLR464). You may connect your own cameras, however please make sure to use a proper power adaptor NOT EXCEEDING 12V DC for each camera. EXPRESS INSTALLATION under 60 minutes Skills - Easy Router Camera Installation NOTE: Please turn off the computer’s power and unplug the power cord prior to installing the QLR Capture Card. If you are unfamiliar with installing PC hardware, it is recommended to have a PC technician perform the installation. under 30 minutes Hand Tools advanced Skill Level easy STEP 2 Hi Speed Intermediate under 15 minutes Time CAMERA INSTALLATION GUIDE Router over 60 minutes under 60 minutes under 30 minutes Hand Tools easy DIGITAL VIDEO RECORDER under 30 minutes PCI CARD INSTALLATION GUIDE • QLR464 - 4 CHANNEL CARD • QLR1670 - 16 CHANNEL CARD PCI CARD under 15 minutes Time Time For QLR464, you are required to use the included power adaptor. Use of a non-regulated, nonconforming power adaptor can WARNING damage the cameras and will void the warranty. Note: It is recommended that you select “automatically”. This ensures that your DVR is always ready to record, even after restarting your computer. Congratulations! You have successfully installed the VistaPro 6 Server software. You can now view, record and playback video on your local computer. Time Time Time LOREX EASY CONNECT INTERNET REMOTE MONITORING ADVANCED (AUTO PORT FORWARD under 15 minutes WIZARD) under 30 minutes Hand Tools under 15 minutes Hardware Hi Speed LOREX DDNS SETUP under 15 minutes under 30 minutes Hand Tools over 60 minutes under 60 minutes Hardware Hi Speed (DYNAMIC DOMAIN NAME SERVICE) Time Time Router LOREX DDNS SETUP INSTALL REMOTE VIEWING (DYNAMIC DOMAIN NAME SERVICE) (ON A REMOTE COMPUTER) LO R E X DDNS SETUP GUIDE Router STEP 4 Hardware Skills - Intermediate Time: 15 Minutes Time Skill Level PC/Router under 15 minutes under 30 minutes Hand Tools under 15 minutes over 60 minutes under 60 minutes Hardware under 60 minutes Router Intermediate over 60 minutes Time: 30 Minutes Hardware Skill Level PC/Router STEP 5 Hi Speed easy under 30 minutes under 15 minutes Time under 30 minutes Hand Tools Skills - Advanced under 60 minutes Hardware Hi Speed under 30 minutes over 60 minutes Router Intermediate under 60 minutes easy Time: 10 Time Minutes Hardware: PC CONTINUED advanced under 15 minutes STEP 6 STEP 5 over 60 minutes advanced Skill Level 1 Auto Port Forward Wizard Hardware Intermediate easy Hi Speed advanced The Lorex Auto Port Forwarding Wizard is a software that automates router port forwarding. Router Skill Level You must have the following before you configure the software: 1. Your router’s model and version numbers 2. Your router’s user name and password 3. Your Lorex device’s IP address 4. Your Lorex device’s port numbers that require port forwarding Intermediate easy advanced 2 Installation 1. Insert the system’s software CD, select the Lorex Easy Connect Internet Setup Wizard and follow the instructions to register, download and launch the Wizard. Manual Port Forwarding. OPTIONAL under 15 minutes Complete new account information 1. FOR PRODUCT LICENSE select 4 the QLR460 Series option from the drop down menu. 2. FOR PRODUCT CODE enter your computer’s physical address. 3. FOR URL REQUEST enter a unique URL name (e.g. tomsmith) Skill Level Port forwarding allows your computer to communicate with the remote computers connecting to it. Please consult your router’s owner’s manual on port-forwarding instructions. You must port forward the following ports on your router: • 6880 (Web Port) • 6808 (Playback Port) • 6807 (Live Port) easy Intermediate advanced EXAMPLE under 30 minutes 6800 6900 12 IP ADDRESS : MAC ADDRESS : . : . : . : 2 An automated REGISTRATION CONFIRMATION EMAIL will be sent to your email. Print and Save this confirmation. You will need this information to access your System remotely. Follow the steps outlined in the e-mail before proceeding to step 5.6. NOTE: Please wait 10-15 minutes before logging in for the first time. DDNS Server: ddns.lorexddns.net (already added) Domain Name: tomsmith User ID: tomsmith1 Password: (your password) 6 From within the VistaPro 6 Server software, click the Setup button and then click the Network tab. The Network tab will open. 7 In the DDNS section, click the “Use” checkbox. Click the Set button. The DVR Management window opens. Enter the information you received from your registration email in step 5-5. Enter your DDNS user ID Under Domain name, enter the SUBDOMAIN of your Lorex DDNS address (ie. if your domain name is tomsmith.lorexddns.net, only enter tomsmith into the ID field) ADMIN 1111 IF SUCCESSFUL, PROCEED TO STEP 5-1. OTHERWISE, CONTINUE TO THE NEXT STEP. From Lorex DDNS website, click the CREATE ACCOUNT option. Under User Password, enter the password of the Lorex DDNS 10 account. Create Account 11 STEP 6 Intermediate advanced 8 Click on the “SITE” button at the top left of the software screen. 9 Click on the “Register New Site” button. Skill Level Intermediate advanced Congratulations! You have successfully installed the VistaPro 6 Client software. You can now view your cameras from a remote location. Click Register. A message should confirm a proper registration. Click OK to continue. The installation window will pop up. Follow the instructions by clicking the “Next” buttons after making your selections. You will be asked to set the installation location, language and program folder. Click “Finish”. NOTE: You may now close the VistaPro 6 Installation window. 6 VistaPro 6 Client software is now installed. Double-click the icon on your desktop to run the program. 7 In the Login window, enter your username and password and select Log In. Fill out each field and click “Register”. Note: If you are connecting from a remote computer within the local area network of the installed server (i.e. not over the internet) you can simply enter the IP address of the server recorded in step 5-1. the site name from the left menu 11 Drag and drop it into the viewing window. Note: Pop-up windows may appear asking you to verify the software. Allow the software to continue installation when the warning window appears. 5 CONTINUED Hi Speed Name: set a name for the site (e.g. office) IP/DDNS: enter the DDNS address created in Step 5-5 (ie. tomsmith.lorexddns.net) Video Port Numbers: must be set to 6807 ID: (default ID is admin) Password: (default password is 1111) Click on the “VistaPro 6 Client” button under the Software tab. Under User ID, enter in your user ID of the Lorex DDNS account. Create account 3 (ON A REMOTE COMPUTER) If your system does not support auto-run, you can browse the CD, and search for the Vista Pro 6 Server in the X:\Package\Remote Client directory, where “X” is your CD/DVD drive. 4 http://www.lorexddns.net 8 Hi Speed 10 The installation screen will open. Click on the Install button and then click the Advanced installation button. : 9 PASSWORD easy over 60 minutes Enter your DDNS address http://www.lorexddns.net in the address bar. ID Hardware Router INSTALL REMOTE VIEWING Follow the auto-run instructions on screen. Click on the “Run SetupDisc.exe” option if prompted. 3 Enter your DDNS password : under 60 minutes To configure DDNS settings: Record the IP and MAC Addresses in the section below: DDNS set-up your web browser (Internet 2 Open Explorer by default) and enter 1. Click the Update Router button. The program begins updating the router settings. This may take 20 - 30 seconds. 2. Close the update window when the update finishes. NOTE: You may have to manually save your router settings after the software makes the required changes to your router. over 60 minutes Skill Level 2 EXAMPLE: (located and the left side of your monitor screen) and type “cmd” in the search field (on older versions of Windows, click “Start”, then click “Run” and then type “cmd”). Type “ipconfig /all” and make a note of your computer’s Physical Address (e.g. 001D09C4D5C8). On a remote computer, insert the installation disc into the CD/DVD reader. easy 1 3 Registration E-mail 5 Hardware Router 1 (Required for DDNS registration) Step 3: Update the Router Settings under 60 minutes Skills - Easy Installing VistaPro 6 Client (Remote Viewing) Note: URL name should not be more than 15 characters. Retrieve system information order to register for Lorex DDNS, you need to make a note 1 In of your computer’s Physical ID (MAC address). Click on “Start” 1. Under the Router drop-down list, select the model of your router OR click the Search button to enter the name of your router 6880 model. If your IP address does not appear 6807 automatically, click the button and write down your IP, then enter into the box 6808 highlighted to the right. NOTE: Ensure you select the proper model and firmware number of the router. NOTE: Click the Auto Detect button if you have a Linksys or Netgear router (works with most models). 2. Under Router IP, click the Detect Router IP button. The router’s IP populates in the blank field. 3. Under Username and Password, enter the router’s username and password. 4. Under IP, enter the IP address of your Lorex device. 5. Under Port, enter the port number(s) that require forwarding (6880, 6807 and 6808). 6. Click Next to continue. NOTE: Ensure that Internet Explorer is your system’s default internet browser. advanced Router Step 2: Enter your Router Settings 1. Click the Test Your Connection button. Your system’s default browser opens and connects to your Lorex device. Hi Speed Intermediate easy QLR460 1. Click the Next button after the software detects your router configuration. Step 4: Test your Connection Hardware If you were unable to use the Auto Port Forward Wizard, then you will need to do so manually. Please skip this step if the Wizard was successful. A router configuration guide featuring the most commonly used routers in the market is available on www.lorextechnology.com/support in the Consumer’s Guide Section. 3 Step 1: Populate the Router Database The Auto Port Forwarding Wizard automatically populates a list of current routers, and detects the number of connected routers. Skill Level Hand Tools Hand Tools REMOTE VIEWING INSTALLATION GUIDE Hand Tools Hand Tools under 30 minutes over 60 minutes under 60 minutes ADDITIONAL CONNECTION OPTIONS: INTERNET EXPLORER Connecting to your system using Internet Explorer Open Internet explorer and enter your DDNS address you created earlier, followed by a semi-colon, and then the web port number. For example, you would enter: http://mylorexdvr.lorexddns.net:6880 NOTE: There is a semi-colon (: ) right after the DDNS address. Note: The default login information is: ID: admin Password: 1111 admin 1111 Click Temporarily Allow Pop-ups to continue NOTE: If asked to run ActiveX, click “yes” or “allow”. NOTE: For full details on connecting to your system using Internet Explorer, please refer to the User’s Manual.