1
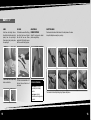
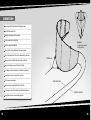
WIPIKAMANUAL
WWW.WIPIKAKITEBOARDING.COM
CONGRATULATIONS
GENERALWARNING
Release of Liability and Assumption of Risk
By assembling and/or using this Wipika kiteboarding
product, you agree that you have read and understood
the entire Wipika User’s Manual, including all instructions and warnings contained in this manual, prior to
using the Wipika kiteboarding product in any way. You
additionally agree that you will ensure any additional or
subsequent user of your Wipika kiteboarding product
will read and understand the entire Wipika User’s Manual, including all instructions and warnings contained in
this manual, prior to allowing that person to use your
Wipika kiteboarding product.
Assumption of Risk:
Use of the Wipika kiteboarding product and any of its
components involve certain inherent risks, dangers, and
hazards which can result in serious personal injury and
death to both the user and non-user third parties. In using the Wipika kiteboarding product, you freely agree to
assume and accept any and all known risks of injury to
you and to third parties while using this equipment. The
risks inherent in this sport can be greatly reduced by
abiding by the warning guidelines listed in this manual
and by using common sense.
Release and Waiver of Claims:
In consideration of the Wipika kiteboarding product to
you, you hereby agree to the fullest extent permitted by
law, as follows:
3
To Waive Any and All Claims
That you have or may in the future have against Wipika
International Ltd and all related parties resulting from
use of the Wipika kiteboarding product and any of
its components.
To Release
Wipika International Ltd. and all related parties from any
and all liability for any loss, damage, injury or expense
that you or any users of the Wipika kiteboarding product
may suffer or that your next of kin may suffer, as a result
of the use of the Wipika kiteboarding product, due to any
cause whatsoever, including negligence or breach of
contract on the part of Wipika International Ltd. and all
related parties in the design or manufacture of the Wipika kiteboarding product and any of its components.
In the event of your death or incapacity, all provisions
contained herein shall be effective and binding upon
your heirs, next of kin, executors, administrators, assigns, and representatives. Wipika International Ltd.
related parties have not made and expressly deny any
oral or written representations other than what is set
forth herein and the Wipika User’s Manual.
Congratulations on purchasing your Wipika kite! Since the
beginning our product design
has been focused on safety,
user-friendliness, and technical
innovations. For 2005, we have
focused on making our products
lighter and stronger by focusing
on small details such as Reflex
Struts, Single Struts, and superior manufacturing techniques.
We’re also excited to continue
offering the Central Line System in our continual push to
increase safety standards.
Please read through the following manual for information on
how to get started using your
Wipika kite quickly and safely.
TABLEOFCONTENTS
Safety and Warnings
05
Wind Ranges
07
Kite Features
09
Bar Features
11
The Central Line System (CLS) Overview:
12
SET UP
Kite Inflation
13
Bar Set-Up and Safety System Attachment
15
Safty Leash
17
Kite Connection
19
Tuning
21
USING CLS
Power Stop/ Power Start, Self-Landing
23
Power Meter
24
CLS Tips
24
Packing Up Bar
25
Packing Up Kite
26
SUPPORT
The information contained in this
manual is for your reference and may
be subject to change at anytime. Please
visit our website at www.wipikakiteboa
rding.com for the most current updates
to this manual.
Care and Maintenance
27
Advice and Troubleshooting
28
Glossary
29
Warranty Policy
30
4
GENERALSAFETYANDWARNINGS
Kiteboarding is dangerous. Wipika kites are designed
exclusively to fly over water only, not on land. For safety
reasons Wipika kites are to be used for kiteboarding
only. Always check the local wind conditions before
flying a kite. Stay clear of all obstacles such as people,
trees, buildings, rocks, airports, and power lines. Always
keep a safe distance from all objects downwind. Be familiar with safety systems and rescue techniques before
ever attempting kiteboarding.
This manual is not comprehensive; seek certified
instruction before attempting to fly a Wipika kite.
Constantly Monitor the Weather:
Check local weather patterns and forecasts. Never kite
in wind conditions that are likely to change dramatically.
Never kite in gusty conditions or winds too strong for
you to maintain precise control of the kite at all times.
Never kite in onshore winds; you can be dragged over
land. Never kite in offshore winds; you can be dragged
out to deep water. Never kiteboard when overpowered.
Avoid kiteboarding in storms; you may be electrocuted
or hit with large gusts.
Safety of Others: You are responsible for ensuring
that your actions and equipment do not endanger other
people. Stay clear of crowds, swimmers, and all other
5
obstructions within a 100-meter perimeter downwind.
Ensure that all bystanders are upwind of you and the
kite. Ensure that others are aware of your flying lines
at all times. Watch where other kiters and water users
(surfers, swimmers, kayakers, etc.) are on the water.
Always look for other kiters before jumping or changing
directions. Detach flying lines when not in use. The kite
can accidentally launch and tension the lines causing
harm to yourself or others. Ensure that you are able
to maintain precise control the kite under all circumstances.
Your Own Safety: Know your ability and limitationsover confidence and fatigue are two major causes of
kiteboarding accidents. Practice and be familiar with
your safety mechanisms. Perform pre-flight checks
of lines, connections, leader lines, safety systems,
harness, etc; replace if worn or damaged. Never use
lines with knots, they are significantly weaker and will
break more easily. Never kiteboard out further than you
can swim back. Always use a kite leash with a reliable
quick release. Never use a kite to jump over land. Avoid
standing on land with kite above your head, you can be
lifted and dropped on the beach or obstacles. Before
kiting, tell someone when you are leaving and when you
expect to return.
General Safety: Use your judgment- do not go
kiteboarding unless you feel comfortable. Practice kiteboarding only while in unobstructed water. Do not kite
within 5 km of any airport. Avoid kiting near power lines.
Secure kites not in use with sand, leading edge down.
Detach lines of unattended kites. Be mindful of flying
lines. Use extreme caution whenever connected to kite.
Be aware of the usual risks associated with water sports
including, but not limited to drowning, sunburn, reef
cuts, marine life, and hypothermia. Wear a coast guard
approved personal floatation device. Wear a helmet, especially if using a board that is leashed to your body.
Precautions:
When using kiteboarding equipment you run the risk of:
Being dragged over land or into objects or people. Being
lifted and dropped on land or obstacles. Being dragged
out into deep water. Lines wrapping around your arms,
legs, or neck and tensioning with the kite power.
Courtesy and Right of Way
Talk with locals before kiting in any new spots and let
them know your plans. When passing downwind of
other kiters, keep your kite low to the water, passing
your kite under the upwind kite.
When passing upwind of other kiters, keep your kite
high above the water, passing your kite over the
downwind kite. Look for other kiters before jumping or
changing directions. Right of way is determined by size
of vessel, but closest to the wave peak has priority, followed by kites in neutral position.
Be considerate and do your best to stay out of everyone’s way while you kiteboard. Help other kiteboarders
to launch and land. Watch out for others and they might
watch out for you.
6
WIND RANGES
Below are general wind range references. This is a general guide and is not
meant to be a substitute for proper on-the-beach assessment of kite selection.
7
BFT
KM/H
KNOTS
NOTES
1
1-5
1-3
Still air/ almost no wind
2
6-11
4-6
Gentle breeze
> 21 m²
3
12-19
7-10
Light winds
> 14 to 19.5+ m²
4
20-28
11-16
Whitecaps
14 to 19.5 m²
5
29-38
17-21
Sand blowing on beach
7 to 16 m², maximum 7.0 for learners
6
39-49
22-27
Flags flapping, no beginners
5 to 14 m², extra caution required
7
50-61
28-33
Strong winds
< 10 m², experts only
8
62-74
34-40
Dangerous conditions
Kiteboarding not recommended
9
75-88
41-47
Highly dangerous conditions
Do not kiteboard
10+
>89
>48
Extreme conditions
Do not kiteboard
Recommended size for 75-80kg/165-176lb
rider on 130 cm board
8
�����
KITEFEATURES
Central Line System (optional) - Safety that works.
Single Strut- Shaped strut with one-piece construction for light weight and durability.
�������� ����
������
Reflex Strut- Curved struts for stability in larger sized kites.
Turn Power Adjusters- For extensive turning style options and tunability.
Inflatable wingtips- Floats better, helps relaunch, packs lighter and smaller.
Single-Point Attachment Struts - Struts can twist, allowing the kite to depower in gusts. Creates a smoother
feel and easier relaunch.
Kitesaver Strip- Strengthens and protects the leading edge from tears.
Pump Leash- Holds the kite, freeing both hands to pump the leading edge.
�����
Easy-Connect pigtails- Color-coded and reversed knots to simplify kite line connection.
Direct-Connect- Wipika kites are ready to fly directly out of the bag. No bar rigging.
������� ����
COMPLETE KITE PACKAGE INCLUDES:
Kite
Control Bar
Pre-Rigged Line Set
9
Expandable Kite Bag
Aluminum Shaft Pump
Allen Key
Bladder Repair Kit
Warranty Card
CD-ROM User’s Manual
���� ���
10
CENTRALLINESYSTEM
BARFEATURES
CLS-ADVANTAGES
Pre-rigged bar and lines for fast
and easy set-up.
1
On-the-fly power adjustment for
immediate power control.
Safety-Complete depower.
7
8
9
Easy-to-use safety release.
2
Bar Indicator: if the word “Wipika”
faces you, the bar is right- side-up.
Ergonomic bar construction for
reducing strain on your wrists and
arms.
3
4
Depower-Use CLS to depower
kite, without crashing kite.
Kite can be flown without pulling
on the rider.
Extends wind range.
3
Power Stoppers for customizable
depower distance.
CLS equipped- Safety that works.
5
6
11
Power Stop/Start- Completely
depower the kite on demand.
Instantly re-power kite.
1
LINE ADJUSTMENT KNOTS
2
PU SLEEVED LEADER LINE
3
ADJUSTABLE STOPPER BALLS
4
CLS LEASH RING
5
SAFETY QUICK RELEASE
6
CHICKEN LOOP
7
ONE-LOOP DEPOWER STRAP
8
CLS LINE
9
RE-RIDE SAFETY
Relaunch Helpful during water
starts.
Self -Land-Safely self-land using
CLS.
12
KITESETUP
KITE INFLATION
Locate wind direction.
Roll out kite in area with no sharp
objects, thorns, etc....
13
Lay out kite folded in half- wingtips
downwind. Weight upwind side of
kite with board or sand.
Begin at wingtips, pump struts until
firm. Pump all struts while working
towards Leading Edge (LE) valve.
Connect Pump Leash.
Close large valve.
Pump leading edge.
Flip kite over. Weight with sand or
board
14
BARSETUP
15
LINES
Unroll lines until straight. Have a
friend hold bar. Double check front
(center) lines for equal length.
Double check back (outside) lines
for equal length.
CLS LINE
CLS should be even with front flying
lines. Note: front lines will stretch
after the first few uses. Please
readjust the CLS after first uses so
that it is even with front flying lines.
If uneven back lines, adjust using
knots on outside line.
CLS line comes assembled on 05
kite bars. Remove Central Line if
not desired.
ADJUSTABLE
POWER STOPPERS
Adjust CL line stoppers to desired
position using Allen key.
SAFETY RELEASE
Practice and be familiar with the function of the safety release. To release
bar: pull red safety sleeve away from your body.
WIPIKA RECOMMENDS:
Base stopper: 5 cm from
top of safety for full safety
function.
Top stopper: adjust to
comfortable arm’s length when
hooked in.
To reconnect bar: thread straps through ring. Replace safety sleeve.
16
SAFETY LEASH
RE-RIDE STOPPER BALL
USING A LEASH IS MANDATORY FOR SAFE KITING.
To attach safety release to the harness.
Slide red sleeve down. Place pin through ring and
back into red sleeve. Slide red sleeve back over pin
and secure tightly. Hook safety leash to CLS ring near
Chicken Loop.
Optional feature to prevent bar
from sliding up when re-ride safety
system is released.
To remove ball: un-thread line from
the ball. Move line on adjustment
knot on outside leader line to make
lines even.
17
Pull line through loop and tighten.
Change adjustment knot on outside
line leader to make lines even.
FIX TUBE
For shackled riding, place fix tube
through spreader bar.
LEASH ATTACHMENT TO BAR
Safety system options:
CLS leash atttachment
To use the CLS as a safety system, attach the safety
leash to the CLS ring. When the safety leash is attached
to the CLS ring the kite will depower from the leading
edge using the CLS. Attach the leash to the CLS ring
whenever the CLS is rigged on the kite.
To replace ball: slide sheath up
outside flying line 15 meters.
Place line through ball, loop line
through ball again.
Re-ride leash attachment.
When not using the Central Line System, attach the
safety leash to the outside line re-ride ring. When the
safety leash is attached to the outside line re-ride ring
the kite will depower from the outside line.
18
CONNECTION
Place pumped kite 30 meters downwind, leading edge down.
Place CLS bridle upwind of kite.
Start below right wingtip, unroll lines upwind.
Pull lines upwind until in a straight line.
Back lines:
Connect to last or second
to last pigtail knot.
Spin bar to untangle twists near bar.
Walk out the two turning (outside lines). Place apart on ground.
Walk out front (center) lines. Place CLS line between the two front lines.
Keep separate; pick up left side back line, front line, and CLS line.
CENTRAL LINE
Walk around leading and connect CLS line to CLS bridle.
At left wingtip, connect front (inside) line, and then back (outside) line.
Connect back lines to last or second to last pigtail knot
*This technique reduces tangles.
INSIDE FLYING LINE
Keep separate; pick up right side back line and front line.
At right wingtip, connect front (inside) line, and then back (outside) line.
OUTSIDE FLYING LINE
Connect back lines to last or second to last pigtail knot
19
20
KITE TRIM SYSTEM
Always tune your kite to the conditions
ONE-LOOP SYSTEM
To de-power kite:
pull back part of de-power loop
towards your body.
To power kite:
pull front part of de-power loop
towards your body.
21
FLIGHT TUNING
Proper Tuning with kite flying.
Kite connection:
Place back lines on last or
second to last pigtail knot
With kite flying in neutral, CL
hooked in, bar at top stopper,
look at flying lines for:
Bar Connection:
Left back line on second knot
from top. Right back line on
re-ride ring. Center lines on
top knot.
1. Tight front (center) lines.
Full load on front lines.
Please note: front lines will
stretch after first use. Please
move them to second or
third knot from the top after
stretching.
Routinely check that CLS line
and front lines are equal length
with chicken loop pulled 10cm
and depower strap fully
extended. Adjust if uneven.
Routinely check that CLS line
and Chicken Loop line for
wearing. Replace if wearing!
2. Back (outside) lines become
tight when bar is pulled to
half de-power range. Use the
de-power strap and pigtail
knots
to
adjust
lines
properly.
3. CLS line is straight, but not
tensioned. Front lines and
CLS line should be equal
length.
22
USING CLS ON THE WATER
POWER METER:
CLS can be used as depower.
Simply pull CLS line to depower
the kite. If kite stalls or flies
backwards, pull CLS to fly kite
forwards.
CLS TIPS:
23
POWER STOP
In the case of an emergency:
Release the bar using safety release
or unhook from bar and let go.
Kite will immediately lose power and
fall downwind.
POWER START
No need to swim to kite. Pull CLS
until kite rolls onto back.
NOTE: twists in flying lines may
cause CLS to function improperly.
NOTE: Always release the CLS
safety if kite begins to roll. Not releasing the Central Line when the
kite rolls can tear the kite.
NOTE: pulling on the outside leader
line can help taxi the kite to edge of
wind window.
NOTE: If kite falls with trailing edge
on water pull CLS and kite will restart immediately.
Proceed with conventional water
start.
SELF-LANDING (experts only):
Return to beach with clear area 4050 meters downwind. Turn kite into
wind window and release bar. Kite
will fall downwind. Once landed, secure CLS leash to weighted board,
anchor, etc…. Flip kite over, leading
edge down, secure with sand.
CLS works best with full power
in kite (center of wind window).
Don’t release CLS when kite at
edge of wind window.
Tip: For extra spinability of CLS
remove Central Line from the
V-connection ring.
24
PACKING UP KITE
PACKING UP BAR
Pull bar back to end of CLS leash.
(1) Flip kite over, wingtips up.
1. Holding bar in one hand. Grab
leader lines and depower strap,
wind tightly around bar in figure
8 motion. For CLS, all lines will fit
neatly onto the bar.
Release leading edge valves.
Pull center strut and allow kite to
fold, leaving wingtips downwind. (2)
Weight upwind side of kite. (3)
Release strut valves. With wingtips
together, fold kite towards center
strut. (4) Neatly fold kite in 3 along
the strut. (5)
1
1
2. Once to flying lines, tightly wind
lines around bar end in figure 8
motion.
3. With 1 meter flying line remaining,
2
tightly hitch-knot lines around
both bar ends for neat storage.
2
4
3
5
*This method keeps sand out of
stored kite. Easy for windy conditions.
*Tight winding and tight hitch knots
will prevent tangles.
3
25
26
SUPPORT
The kite does not launch or fly well.
PERFORM ROUTINE INSPECTION FOR WEAR AND TEAR ON:
Flying Lines
Pigtails
Kite Line Connections
Depower System
Safety System
Kite Canopy-look for punctures
Replace if worn.
BAR AND LINES
Wind lines on bar and rinse in fresh water after every use. Check for knots in
lines, these can cause breakage.
PUMP
Avoid contamination with sand or dirt.
If necessary pull apart, clean and reassemble with lubricant.
PANEL REPAIR
If kite panel is damaged, place sail ape
on both sides of the tear. For large kite
panel rips, sew around edges of rip with
a new section of panel material. Always
sew with professional grade zigzag
stitching. Consult professional repair
advice if unfamiliar with process.
27
ADVICE AND TROUBLESHOOTING
CARE AND MAINTANENCE
BLADDER REPAIR
If a bladder is leaking or punctured, deflate bladder.
Attach a kite line to valve.
Remove bladder from trailing edge tip.
Slowly re-inflate bladder.
Be careful not to over inflate bladder.
Submerge bladder in water to locate leak(s).
Mark the location(s) with a pen.
Deflate bladder, clean and dry.
Lightly sand over puncture with supplied sand paper.
Applying supplied patch over puncture.
Fold bladder tip inward.
Fold into star shape.
Place bladder into strut tip.
Pull with kite line. Check for twists while pulling.
Fold over strut closure.
Slowly inflate HALF WAY.
Lightly squeeze strut to force bladder into strut tip.
Fully inflate.
1. You may have a leaking / under inflated kite.
2. Bladders are twisted, or contaminated with water or
sand. Remove, clean and replace with no twists.
The kite pulls or turns to one side.
1. Lines are uneven, check for equal length. Adjust as
in “bar set-up” section.
2. Leading edge bladder is twisted. Remove leading
edge bladder. Reinsert the bladder with no twists in material. Reinflate slowly, checking that bladder is straight.
If kite still pulling, check strut bladders for twists.
3. Your kite has been damaged or deformed and should
be repaired by a professional.
You are getting line tangles
You are getting very small punctures or repetitive blowouts.
1. Sand in the strut housings can cause punctures.
Close all valves and hose out thoroughly.
2. Bladder must completely fill strut housing; partially
inflate bladder and lightly squeeze strut to force bladder
into tips. Sprinkle talcum powder on bladder for easier
placement.
3. Do not pinch or squash kite when stored or transported, protect it from sharp objects.
Valves are sucking into strut housings
1.Bladders are unclean or twisted.
2. Clean and dry kite. Remove bladder as in “bladder
repair instructions.” (live link to bladder repair) Reinsert
bladder carefully. Hint: For easier installation, put talcum
powder on bladder.
1. Remove all twists in lines, detach one end and walk
the length while pinching the lines.
2. Always make sure that lines are taught when winding
and unwinding. This is the best way to prevent tangles.
28
WARRANTY POLICY
GLOSSARY
KITEBOARDING: board sport using the power of the wind with large
kites, normally inflatable.
LEADER LINES: thicker lines that
attach flying lines to control bar, essential to reduce risk of line cuts
INFLATABLE KITE: kite with
inflatable struts, normally a half
circle leading edge at the front and
multiple struts perpendicular to the
leading edge
DEPOWER OR SHEETING OUT:
trimming the kite angle into the wind
using c-loop or adjustments so that
the leading edge is closer to you.
This reduces the pull of the kite.
BLADDER: inflatable plastic tube
that fits inside strut housing. Bladders give the kite structure and
floatation.
POWER UP OR SHEET IN: trimming the kite angle into the wind
using c-loop or adjustments so the
leading edge is further from you.
This increases the pull of the kite.
C-LOOP OR CHICKEN LOOP:
plastic loop used to regulate the
power of a kite when hooked in
to a harness.
TRAINER KITE: kite suitable for
practice on land to simulate kiteboarding, normally smaller than 3
meters squared.
FLYING LINES OR KITE LINES:
2 or 4 lines attaching the kite to the
leader lines.
29
HARNESS: attaches around your
waist and/or buttocks, equipped
with a spreader bar and hook. The
c-loop attaches to the spreader bar
on the harness attaching the rider
to the kite.
OVERPOWERED: Using a kite size
too big for riders weight and skill.
This is extremely dangerous.
UNDERPOWERED: Opposite of
overpowered, can be avoided by
using a bigger board or a bigger
kite.
UPWIND: the region where the
wind is coming from, or where a
sailor tacks up to.
DOWNWIND: the region where the
wind is going to, or where a sailor
bears off.
REACH: when a sail-craft travels
perpendicular to or across the
wind direction.
GUST: a period of stronger wind
than normal.
LULL: a period of less wind than
normal.
KNOTS: a measure of wind speed.
Wipika International Ltd warrants this
product to be free of major defects in
material or workmanship to the original purchaser, for a minimum guarantee period of 90 days. This warranty is
subject to the following limitations:
The warranty is only valid when the
warranty card is properly filled out
and returned to Wipika International
Ltd within seven (7) days from the
date of purchase, or the product is
registered online at www.wipikakite
boarding.com within seven (7) days
from the date of purchase.
The warranty is valid only when the
product is used for normal recreational activities, and does not cover
products used in rental or teaching
operations. For safety reasons,
Wipika products should be used on
and over water only.
Wipika International Ltd will make the
final warranty determination, which
may require inspection and/or photos
of the equipment, which clearly show
the defect(s). If necessary, this infor-
mation must be sent to the Wipika
distributor in the country of purchase,
postage prepaid. All defects must
be shown using only sticky tape; no
marks are to be made on the product.
If a product is deemed defective by
Wipika International Ltd, the warranty
covers the repair or replacement of
the defective product only. Wipika
International Ltd will not be responsible for any costs, losses, or damages
incurred as a result of loss of use of
this product.
This warranty does not cover damage
caused by misuse, abuse, neglect, or
normal wear and tear including, but
not limited to, color fading, punctures,
rigging with other than Wipika components, damage due to excessive
sun exposure, or damage due to over
inflation of bladders, damage caused
by improper handling and storage,
damage caused by use in waves or
shore break, and damage caused by
anything other than defects in material and workmanship. This warranty
is voided if any unauthorized repair,
change or modification has been
made to any part of the equipment.
The warranty for any repaired or
replaced equipment is good from
the date of original purchase only.
The original purchase receipt must
accompany all warranty claims. The
name of the retailer and date of purchase must be clear and legible.
There are no warranties, which extend beyond the warranty specified
herein.
Warranty Claims
Warranty claims must be processed
and be issued a return authorization number prior to shipping to
Wipika. Please call or write for claims
processing to your local dealer or
national distributor.
If the product is beyond the warranty
period, Wipika International Ltd will
inform the dealer/shop about the
cost of repairing and will charge an
inspection fee at a minimum of US
$30.00 (or equivalent value in local
currency).
30