1
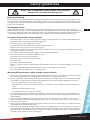
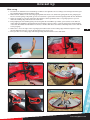
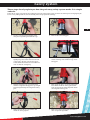
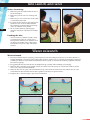
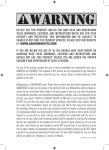
WE ADVICE YOU
TO REGISTER YOUR KITE ON:
www.crazyflykites.com/register
1
1
0
2
p
l
u
c
S
USER MANUAL
CAUTION!
Using a kite is dangerous and can cause severe injuries.
Before use, carefully read this manual.
m
o
c
.
s
e
t
i
k
y
l
f
y
craz
Safety guidelines
Using a kite is dangerous and can cause severe injuries.
Before use, carefully read this manual.
Release of liability
By assembling or using this CrazyFly kiteboarding product (further named only as product), you agree that you have
read and understood the CrazyFly kiteboarding manual (further named only as manual) before using this product. You
also agree that you will ensure any other user of this product to read and understand this manual before allowing this
person to use this product.
Assumption of risk
Using this product involves certain inherent risks, dangers and hazards, and can cause severe injuries, damage, or
death to both the user and to nonuser third party. The user of this product assumes and accepts any and all risks related
to the usage of this product. The risk of using this product can be greatly reduced by acquiring training lessons in an
accredited kiteboarding school, following the guideline principals of this manual and by using common sense.
For your safety and the safety of others:
•• We strongly advice every user of this equipment to take professional lessons in an accredited kitesurfing school.
•• Always be extremely careful when using this equipment.
•• The safest way to use this equipment is on water.
•• You are responsible for yourself and others when using this product.
•• Always use the safety system in case of an emergency.
•• Always use the right kite size for your ability and wind conditions. Do not over estimate your abilities. Be aware that
strong gusts can be life threatening.
•• Never kite in stormy weather and strong gusts. The kite may attract lightning.
•• Never kite when there are obstacles downwind of you.
•• Never kite in off or on shore wind conditions.
•• Never kite under the effect of drugs and alcohol.
•• Never kite alone.
•• Never kite without a safety system.
•• Never tie yourself to the kite permanently. You should always be able to let go of the kite rapidly in a case of emergency.
•• Do not try to grab a kite by its lines. Under tension, they can be as lethal as a razor blade.
•• Do not use this kite as a flying device or a floating device.
Meaningful tips for your safety and the safety of others:
1. Helmet, life vest and harness. It is highly recommended to wear a helmet, life vest and a harness when learning to
kite and using this product. The harness should be comfortable and of strong manufacture.
2. Choose your practice spot carefully. The best spot for learning to use this product is an accredited kiteboarding
school. When choosing a spot after taking kiteboarding lesson in an accredited kiteboarding school, look for:
•• The least crowded place (but do not kite alone).
•• Spot which is free of obstacles, such as houses, trees, electric lines, cars etc. Always consider enough room for
error.
•• Shallow water with sideshore winds.
•• It is always good to have a safety boat near by.
3. Check for weather and wind conditions. Check with the local weather forecast. Look for the wind direction and
speed, which might change during the day. You should not ride in stormy weather or strong gusts. The kite may
attract lighting.
4. Respect other kiters. Always look around you and pay attention to other kiters. Do not hesitate to help others
launch or land their kites. Never unwind your kite line on top of others’. Never land your kite on top of someone’s
lines, it may cause danger.
5. Respect people standing by. Always inform spectators about the power of the kite and the potential risk for them
when staying downwind from a kite surfer.
6. Learn to use your safety system. Always check carefully before flying this kite, if the safety system is not worn out
and works properly. Learn how to use the push away safety system. Never fly this kite without the safety system,
which allows you to kill rapidly the power of the kite. Use a safety leash which connects you to the kite. This leash
should also be releasable for cases of emergency.
www.crazyflykites.com
3
Basics
Glossary
Here are the basic terms and names for different parts of your equipment used further in this manual.
Kite
8
1. Leading edge
2. Trailing edge
3. Struts
3
4. Wingtips
5. Front lines
4
1
6. Back lines
7. The bridle
2
8. Inflate and deflate vents
7
4
5
6
Bar
3
4
1. Releasable chicken loop
2. Push away safety system
3. Front lines
4. Back lines
5. Back lines adjustment
9
6. Depower line
7. Leash line
8. Smart stopper
9. Bar floats
8
5
2
7
6
1
Kite set up
Kite set up
1. Determine the wind direction and wind speed. Choose the right kite size according to the wind speed. Unroll your
kite standing with your back against the wind.
2. Make sure the deflation vent is closed properly. Make sure there is no sand in the pump tube before pumping the
kite. To clear the pump of any sand, operate it a few times to prevent the sand from getting inside the kite bladders.
3. Attach your pump to your kite and leash it through the leash loop. This kite has a one pump system, so you can
inflate the leading edge and struts at the same time.
4. Start pumping the kite standing with your back against the wind. When you inflate your new kite for the first few
times, inflate the bladders only half way full and “massage” them in order to correctly position the inside bladder
of the strut. Then finish the full inflation of the kite to make it firm. Close the inflate vent firmly and secure it with the
velcro properly.
5. Make sure to close the clips on the on pump system tubes between the leading edge and struts. Open the clips
when deflating the kite. You can do this through the protection cover.
6. Turn your kite on it leading edge with struts pointing downwind and secure it with sand.
1
2
3
4
5
6
WIND
WIND
www.crazyflykites.com
5
Bar set up and tunning
Bar set up
Tunning
1. Unroll your lines facing the wind until the end of
the lines. Turn around with your back against the
wind and lay your bar down with the red end on the
left side and the blue end on the right side.
2. Untangle the lines by walking toward the kite. Make
sure there are no knots on the lines. Hold the red
back line in your left hand and the blue back line in
your right hand.
3. Make sure the bridles are free of tangles and free
of defects.
4. Connect the front lines to the grey front connectors
of the kite. Do a small loop knot to connect the lines
with the kite.
5. Connect your back lines the same way as the front
lines. Remember to connect the red on red and
blue on blue. Warning, the front and back lines
must not cross each other.
To decrease the power of your kite you can pull down
the depower line and secure it in the clam cleat. Now, try
the power of the kite at zenith again to find the optimal
setting. (photo 1.)
To increase the power of your kite release the depower
line from the clam cleat and the kite will pull the depower line up. When you think the depower line reach
the optimum setting, secure it in the clam cleat again.
Now, try the power of the kite at zenith again to find the
optimal setting. (photo 2.)
1
Blue (Right)
2
Red (Left)
6
Before every riding session, you should try the power of
your kite. Do this on the beach with your kite at zenith
position. Pull down on the bar as much as you can. The
bar should reach the chicken loop. This gives you an
estimate power potential of the kite in the current wind
conditions.
Safety system
These steps clearly explain you how the push away safety system works. It is simple
and safe.
Follow these steps every time before riding, because the safety system can get worn out and may not work properly. So
before every riding sessions, check carefully if the safety system is working.
7
1. In case of an emergency, simply push
away the red plastic part with “C” logo.
2. This releases the safety pin.
3. Now the chicken loop is opened. This kills
rapidly the power of the kite. You are now
connected to the kite only via the safety
leash, which should also be releasable in a
case of extreme emergency.
4. To re-assemble the safety system, put the
metal oval ring of the chicken loop on the
safety pin.
5. Hold the chicken loop in your left hand
and the red plastic safety part in your right
hand and push away the red plastic safety
part.
6. This opens the space to put the safety pin
back inside. Push the safety pin back inside the metal part and slowly slide down
the red plastic safety part.
7. Make sure that there is no sand or dirt
inside the safety system.
8. Rinse the safety system with clean water
after every ride if possible.
www.crazyflykites.com
Kite launch and land
Before launching:
Launch
Land
1. Make sure your lines and bridles are free of
knots and tangles.
2. Make sure your lines are not crossing each
other.
3. Make sure you are connected to the kite with
a releasable safety leash.
4. To launch the kite safely, it is strongly recommended to have someone skilled around
who will help you with holding your kite up
in the air as shown on the picture.
8
5. We recommend using a sign language
understood by most of the kiters around the
world.
Landing the kite:
• You need someone skilled enough to help
you land the kite. Choose a clean area to
land your kite and have your assistant catch
the kite by the middle of the leading edge.
Land the kite only in the edge of the wind
window.
Water relaunch
Water relaunch
1. The water relaunch is quite easy, but you should practice it before riding in a safe place a few times. The kite is
straight downwind of you lying on its leading edge. Hook the chicken loop to your harness and pull the bar down
towards you. Grab one of the bar floats and tension the line going out of the bar float which you grabbed until the
kite starts to right up.
2. Keep pulling the bar float until the kite is straightened up vertically and is standing on its wingtip.
3. When the kite is standing on its wingtip, reduce the tension in the line going out of the bar float and let the kite
move to the edge of the wind window.
4. When the kite is at the edge of the wind window, let go of the bar float and steer the kite with the bar out of the
water. When the kite launches from the water, push the bar away to depower the kite.
5. Bring the kite to zenith along the edge of the wind window.
1
2
3
4
Kite care/repair
Kite care
Before packing your kite, always try to rinse it with fresh water and let the kite dry out. We recommend doing this procedure while the kite is inflated. If you cannot rinse it while inflated, make sure the inflation and deflation vents are closed.
Regularly rinse your bar and lines with fresh water to get rid of salt and sand, which wears out the materials. Or you can
also let them soak in a tub to clean them.
When packing up your kite, make sure the inflation and deflation vents are closed properly, so no sand or dirt can get
inside the inner tubes.
We do not recommend storing the kite inflated for longer periods of time. Differences in temperature and pressure can
damage the inner tubes. Also, do not store your kite on the sun for longer periods of time this can damage the inner
tubes or the fabric as well.
When you are taking a break and not using the kite, do not let it sit on the beach. It will flap as a flag and this causes
more wear and tear for the fabric. When taking a break, cover each panel with enough sand to prevent the kite from
flapping in the wind.
Regularly check for wear and tear or any cuts and other types of damage on the connectors, lines, kite, bar parts, and
pulleys. If you notice any damage on these parts, replace them immediately.
Kite repair
We strongly recommend leaving the kite repairing job to the professionals, especially when the damage is on the bladders or the tears on the kite fabric are longer than 5 cm.
Repairing the kite fabric tears:
•• Only repair the kite fabric with the kite repair patches which you can find in the kite repair kit packed together
with the kite.
•• Make sure your kite is clean and dry before repairing the tear.
•• Lay down your kite on a flat and clean surface.
•• Cut out two equally sized strips from the self adhesive patches big enough to cover the whole tear.
•• Stick one piece over the tear and push down any air bubbles by rubbing it.
•• Do the same with the other strip on the other side of the tear.
www.crazyflykites.com
9
Warranty
The most important thing of all in the warranty section is that you have to register your kite online on
www.crazyflykites.com/register
By registering your kite, you increase the speed of handling the warranty issue and ensure your warranty rights.
CrazyFly warrants this product to be free of major material or production defects to the original purchase for a 1 year
period from the date of purchase.
CrazyFly limited warranty:
10
This warranty is valid only if the product is used for recreation and excludes products used in teaching or rental operations.
CrazyFly will make the final warranty decisions, after careful inspection of photos of the damaged equipment which
have to display the serial number of the kite as well. This product can be returned if the authorization by CrazyFly is
given to you. If CrazyFly gives the authorization to return the product, the customer is responsible to prepay all the
shipping costs and insure the package. Shipping charges are not refundable. CrazyFly is responsible for return shipping and insurance costs to the customer. All coverage under this warranty is void if any modification or change has
been made to this product. Repaired or replaced products are covered only for the remainder of the original warranty.
All warranty claims must be accompanied by the original purchase receipt, which has to clearly state the name of the
retailer, item name and the date of purchase.
Covered by CrazyFly limited warranty:
•• Any manufacturer’s defect as determined by CrazyFly.
Not covered by CrazyFly limited warranty:
•• Any problems resulting from misuse, abuse, impact on any surface including water.
•• Any problems resulting from excessive sun exposure or winds on the beach, such as discolored graphics.
•• Damage due to improper storage and handling of the kite.
•• Damage due to excess inflation.
•• Damage caused by any modifications, or defacing the serial number.
•• Damage from rigging with any other components other than CrazyFly.
•• Damage caused by pilot error.
•• Normal wear and tear.
•• Tears in the canopy.
•• Kite lines.
•• Bladders.
•• Damage caused by anything other than defects in the material or workmanship.
Meaningful tips for shipping the kite if required:
•• Send the kite only. Do not send the bar and lines.
•• Do not send the kite in its original protection bag. Use a firm box instead for shipping.
•• Use masking tape to point out the kite’s problem.
For all warranty claims, contact your nearest CrazyFly retailer.
Retailer stamp:
Date of purchase:
Serial number:
!
u
o
Y
k
n
Tha
Sculp.
MooWii.
Slash.
CrazyFly s.r.o has the right for changes and modifications of the shown products.
Pictures and drawings in this file are only for illustrational purposes as colors can appear differently in reality.
© CrazyFly Kiteboarding 2010.
All rights reserved.
CrazyFly is a registered trademark.
Crazy Fly s.r.o.
Štefánikova 19
911 01 Trenčín
Slovakia
tel: 00421 32 743 42 72
fax: 00421 32 743 42 73
[email protected]
www.crazyflykites.com
m
o
c
.
s
e
t
i
k
y
l
f
y
craz