1
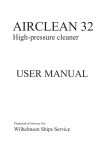
CLJ-H603 user manual
[email protected]
1
INDEX
INDEX......................................................................................................................1
Introduction..............................................................................................................3
Accessories ..............................................................................................................3
Unpacking and Initial Inspection .............................................................................3
Quick Start ...............................................................................................................5
Function and Editor Key Definitions .......................................................................5
Base..........................................................................................................................6
LCD Screens ............................................................................................................6
Power-On Screen (Welcome Screen)...............................................................6
Setup screen .....................................................................................................7
Measure(Real-time data) screen.......................................................................8
Data Review screen..........................................................................................9
Using the counter ...................................................................................................10
Setting parameters..........................................................................................10
Setting date and time..............................................................................10
Setting period˄means sampling time for each cyclesˈ1minˉ10min
selectable˅............................................................................................10
Setting hold time˄means holding time between sampling cycles˅ .10
Setting locations˄means how many locations you need to sample in one
room˅ ...................................................................................................10
Setting cycles˄means how many cycles you need to sample each
location˅...............................................................................................11
Setting the unit (default unit is 0.1 ft3) ................................................11
Setting the alarm level˄only functional under manual mode˅...........11
Setting the channels need to be printed out............................................11
MEASURE ....................................................................................................12
“Manual mode” ......................................................................................12
“Auto mode” ..........................................................................................12
CLJ-H603 user manual
[email protected]
2
Data review ....................................................................................................12
UCL calculation .............................................................................................13
Print................................................................................................................13
Print data saved ......................................................................................13
Print results of UCL calculation.............................................................14
Clear memory.................................................................................................15
Maintenance...........................................................................................................15
Cleaning the case ...................................................................................................15
Charging the battery and using the AC adapter .....................................................16
Purging the particle counter sensor ........................................................................16
Connecting the particle counter to a PC.................................................................16
About software.......................................................................................................17
CLJ-H603 user manual
[email protected]
3
Introduction
This operating guide describes how to use the Model CLJ-H603 Particle Counter
and provides complete operating, application information for the particle counter.
The model CLJ- H603 counter has 0.3 micron sensitivity and six particle size
channels (0.3, 0.5, 1, 2, 3, 5 microns), the data will be showed on the screen and
can be saved according to the different room numbers, and it also can be printed
out by an optional printer or downloaded to PC.
Accessories
Isokinetic Probe (provided with counter)—used to connect to the inlet.
Purge Filter (provided with counter)—used for self clean; keeps external particles
from contaminating sensor while purging sensor of internal particles.
Carrying Case—protects the counter during shipment and storage.
Software CD —used to download the data to PC
RS232 cable— used to connect the particle to computer
Unpacking and Initial Inspection
The particle counter is thoroughly inspected and tested at the factory and is ready
for use upon receipt. When received, inspect the shipping carton for damage. If the
carton is damaged, notify the carrier and save the carton for carrier inspection.
Inspect the counter for broken parts, scratches, dents, or other damage. If the
carton is not damaged, keep for reshipment. For example, you may want to reuse
the carton when you return the counter for the annual factory calibration.
Safety information:
A Warning identifies a condition or action that poses hazard(s) to the user; a
CLJ-H603 user manual
[email protected]
4
Caution identifies a condition or action that may damage the Particle Counter or
the equipment under test. Read the entire Users Manual before using the Particle
Counter.
Warning
To avoid electric shock, body harm or damage to the particle counter, please
follow these safety guidelines:
Use the Particle Counter only as described in the Users manual, otherwise the
protection by the instrument may be impaired;
Do not use the Particle Counter in explosive atmospheres
The Particle Counter contains no user serviceable parts. Do not open the
instrument. For service and battery replacement, the instrument must be sent to
Honri Airclean Tech Company.
Have the Particle Counter serviced only by qualified service personnel.
Inspect the particle counter before use, don’t use it if appears damaged.
Always use the AC adapter/charger and connector (supplied with the Particle
Counter) appropriate for the voltage and outlet of the country or location in which
you are working.
Caution
To avoid possible damage to the Particle Counter:
• Avoid using the Particle Counter in an excessively dirty or dusty atmosphere.
Excessive particle intake can damage the Particle Counter.
• Remove the Probe Cover (the black cap) before use. Not doing so can damage
the Particle Counter.
• Do not use a wrench to connect or disconnect the Probe or intake nozzle. The
connection should be finger tight.
• If using the tilt stand, hold the instrument while using the keypad.
CLJ-H603 user manual
[email protected]
5
Quick Start
The Particle Counter may be used directly out of the box. To immediately use the
Particle Counter:
1.
Read “Safety Information”.
2.
Remove the inlet Cover (the stainless steel cap)
3.
Set the power switch to “on” position
4.
Press the ENTER twice to show the “MEASURE” screen.
5.
Press MODE to convert into manual mode, the measurement mode is
displayed at the left below corner of the screen.
6.
Press Run/Stop. Particle counting will then begin and the number of particles
counted will be listed in a column opposite the size column.
7.
Press Run/Stop again to stop counting. The total number of particles counted
during the time will be displayed.
Be sure to read the entire Users Manual for more detailed information
Warning
Do not attempt to sample reactive gases (such as hydrogen or oxygen) with the
particle counter. Reactive gases create an explosion hazard in the counter. Contact
the factory for more information.
Exposure to infrared radiation may cause eye injury. Do not look into counter inlet
tube while counter is on.
Function and Editor Key Definitions
The following keys either control functions of the counter (run/stop, print, etc.) or
are used to edit the various programming functions available (locations, hold time,
etc.).
ɻ ɺ
Used to select the different functions and the different parameters
ɼ ɽ
Used to change the parameters
CLJ-H603 user manual
Enter
[email protected]
Saves to memory the new setup data; confirm the functions,
which you have selected.
Run/Stop
Starts the count cycle and stops the count cycle.
ON/OFF
Turn on/off the screen for saving power
Mode
Switches the count mode between Auto mode and Manual mode
Base
On the base of the Particle Counter are the connection ports for the RS-232
Modular Cable (I/O Port) . The Tripod Mount is also located on the base
LCD Screens
The LCD Display shows several different screens and menus. Navigate
through each using the keypad. The following sections explain the
different screens used by the Particle Counter.
Power-On Screen (Welcome Screen)
MODEL CLJ-H603
Airborne Particle Counter
Honri Airclean Tech Co., Ltd
6
[email protected]
CLJ-H603 user manual
Setup screen
SETUP
Date˖YYYYˉMM-DD
Time: HH;MM:SS
Period˖xx min
Hold: xx sec
LOCs˖xx
CYCs: xx
Conv: xx
Alarm: x
5 0.3um
5 0.5um
7 1.0um REVIEW
5 2.0um
5 3.0um
5 5.0um MEASURE
This screen shown above provides the followed information:
a)
Date
the current date
b)
Time
the current time
c)
Period
length of time the test lasted each cycle
d)
Hold
length of time holding between cycles
e)
LOCs
Total number of locations need to be measured in
one clean room
f)
CYCs
how many cycles will be taken every location
g)
Conv
unit converted between M3 and Ft3 or no
conversion
h)
Alarm
setup the alarm level from 100 to 100,000
7
[email protected]
CLJ-H603 user manual
i)
8
Selection of channels user want to print out
Measure(Real-time data) screen
Measure
0.3
0.5
1.0
2.0
3.0
5.0
Auto
2007ˉ1ˉ26 15: 30: 34
Room˖01 Loc˖01 Cyc˖01
um
um
um
um
um
um
Period˖01
0
0
0
0
0
0
LOCs˖03
REVIEW
SETUP
This screen provides following indications
a) Date and time of the day
b) real-time particle count information for each size range
c) Current room number
d) Current location number
e) Current cycle number
f)
Period of sampling
g) Total number of locations
h)
Count mode (Auto or Manual): the data will be saved according to
different numbers, times and locations in Auto mode, and in manual
mode, the data is used to observe only and will not be saved.
[email protected]
CLJ-H603 user manual
9
Data Review screen
Review 2007ˉ1ˉ26 15: 30: 34
Data: 000 Room˖01 Loc˖00 Cyc˖00
0.3
0.5
1.0
2.0
3.0
5.0
um
um
um
um
um
um
UCL
0
0
0
0
0
0
Print
Erase
MEASURE
SETUP
This screen provides following indications:
z
Review˖xxx
room number that have been tested and saved
z
Room˖ xxx
to choose the inquired room number.
z
Loc˖
xxx
to choose the inquired location
z
Cyc˖
xxx
the tested date and time of current data
z
UCL
to calculate the mean value and 95% upper confidence limit
z
Print
to print out the data selected when the counter is connected to a
printer
z
Erase
to clean up the data that saved in the counter
z
MEASURE
to enter the test screen
z
SETUP
to enter the parameter setup screen.
[email protected]
CLJ-H603 user manual
10
Using the counter
Setting parameters
There are two ways to enter the “setup screen”˖press any key after power on ˈ
or select SETUP function at “review screen” and “measure screen”ˈthen press
ENTER key to confirmDŽ
Setting date and time
1.
Enter “setup screen”
2.
Press ɻ or ɺ
3.
Press ɼ or ɽ to change the parameters
4.
Press
to select “date: xxx” or the “time :xxx”
Enter to confirm
Setting period˄means sampling time for each cyclesˈ1minˉ10min selectable˅
1.
Enter “setup screen”
2.
Press ɻ or ɺ
3.
Press ɼ or ɽ to change the parameters
4.
Press
to select “period: xxx”
Enter to confirm
Setting hold time˄means holding time between sampling cycles˅
1.
Enter “setup screen”
2.
3.
Press ɻ or ɺ to select “hold: xxx”
Press ɼ or ɽ to change the parameters
4.
Press
Enter to confirm
Setting locations˄means how many locations you need to sample in one room˅
1.
Enter “setup screen”
2.
Press ɻ or ɺ
to select “LOCs: xxx”
[email protected]
CLJ-H603 user manual
3.
Press ɼ or ɽ to change the parameters
4.
Press
Enter to confirm
Setting cycles˄means how many cycles you need to sample each location˅
1.
Enter “setup screen”
2.
Press ɻ or ɺ
3.
Press ɼ or ɽ to change the parameters
4.
Press
to select “CYCs: xxx”
Enter to confirm
Setting the unit (default unit is 0.1 ft3)
1.
Enter “setup screen”
2.
3.
Press ɻ or ɺ to select “CONV: xxx”
Press ɼ or ɽ to change the parameters (NO, ft3, m3)
4.
Press
Enter to confirm
Setting the alarm level˄only functional under manual mode˅
1.
Enter “setup screen”
2.
3.
Press ɻ or ɺ to select “Alarm: xxx”
Press ɼ or ɽ to change the alarm level
4.
Press
Enter to confirm
Setting the channels need to be printed out
1.
Enter “setup screen”
2.
3.
Press ɻ or ɺ to select the particle channel
Press ɼ or ɽ to change the setting
4.
Press
Enter to confirm
11
CLJ-H603 user manual
[email protected]
12
MEASURE
There are two counting modes “AUTO’’ mode and “MANUAL” mode , it can be
set on the “MEASURE” screen by press Mode key and the setting will be
displayed at the left below corner of the screen.
“Manual mode”
used to observe the cleanness of the clean room, the data measured will not be
saved for UCL calculation.
1.
2.
3.
4.
Enter the “MEASURE” screen by select “measure” on other screen
Setting the counting mode to “MANUAL” mode
Press Run/Stop to start the counting , and the counting down time will be
displayed on the screen
Press Run/Stop to stop counting
“Auto mode”
used to counting according to the number of locations and number of cycles you
have set , and the data measured will be saved in memory and used for UCL
calculation
1.
2.
3.
Enter the “MEASURE” screen by select “measure” on other screen
Setting the counting mode to “AUTO” mode
Press Run/Stop key to start counting , the counter will stop counting
automatically while the cycles measured reach the cycles you have set for
each location, and the data are saved in the memory for the future calculation
After you finish the measurements of all the locations in one clean room , if you
start counting again ,the room number will increase by one automatically .
Data review
1.
Enter the “REVIEW” screen by select “REVIEW” on other screen
2.
Press ɻ or ɺ to select “room:xxx” or “loc:xxx” or
CLJ-H603 user manual
3.
[email protected]
13
“cycle:xxx”
Press ɼ or ɽ to change the value ˈand the data saved will be
displayed according to the room number , location number and cycle number.
UCL calculation
1.
2.
Enter the “REVIEW” screen
Select the room you want to do the UCL calculation
3.
Press ɻ or ɺ
4.
Press Enter to confirm ˈfirst the Mean value will be displayed , press
Enter again , the UCL value will be displayed
to select ĀUCL”
Print
Print data saved
1.
2.
3.
Connect the counter with printer by the print cableˈconnect the power cord
Enter the “review” screen
Display the data you want
4.
Press ɻ or ɺ
5.
Press
to select ĀPrint”
Enter to confirm ˈdata of the location displayed will be printed out
Data format ˖
INDEX: 1-1-2
DATE:07-3-24
TIME:9:45
PERIOD:1
VOLUME:2.83
2-1
0.5um
0
room ˉlocationˉcycle
sample volume 2.83L
[email protected]
CLJ-H603 user manual
5.0um
0
2-2
0.5um
5.0um
0
0
14
Print results of UCL calculation
1.
2.
3.
Connect the counter with printer by the print cableˈconnect the power cord
Enter the “review” screen
Display results of UCL calculation
4.
Press ɻ or ɺ
5.
Press
to select ĀPrint”
Enter to confirm ˈdata will be printed out
Data format˖
STATISTICS
INDEX:1-2-1
DATE: 07-3-24
TIME: 9:45
PERIOD:1
VOLUME:2.83
0.5um
1
5.0um
1
INDEX:1-2-2
DATE: 07-3-24
TIME: 9:45
PERIOD:1
VOLUME:2.83
average value of 1st location
average value of 2nd location
[email protected]
CLJ-H603 user manual
0.5um
5.0um
15
4
0
MEAN
0.5um
5.0um
mean value of the room
2
0
95%UCL
0.5um
5.0um
8
0
Clear memory
1.
Enter the “review” screen
2.
Press ɻ or ɺ
3.
4.
5.
Press Enter to confirm
Select “Yes”
Press Enter again to confirm
to select ĀEraseā
Maintenance
The particle counter contains no user-serviceable parts. To avoid electronic shock,
injury or damage to the particle counter, do not open the instrument. For service or
replacement of battery, the instrument must be sent back to Honri Airclean
Technology Co., Ltd.
Cleaning the case
Periodically wipe the case and holster with a damp cloth and mild detergent. To
avoid damaging the Particle Counter, do not use abrasives or solvents to clean the
case.
CLJ-H603 user manual
[email protected]
16
Charging the battery and using the AC adapter
Recharge the battery as soon as
appears on the display. The ac adapter is
used to recharge the battery as well as power the Particle Counter. This feature
allows the counter to be used while the battery is charging.
To connect the ac adapter/charger:
1. Plug the charger into the jack on the side of case
2. Plug the ac adapter into an ac outlet. While the LED indicator on the charger
is red , it means the battery is in progress of charging , when the LED turns
green , charging is finished. The Particle Counter will take4-6 hours to fully
charge.
Purging the particle counter sensor
To avoid possible damage to the Particle Counter, avoid using the Particle Counter
in an excessively dirty or dusty atmosphere. Excessive particle intake can damage
the Particle Counter.
To purge the Particle Counter sensor:
1. Screw the purge filter to the inlet
2. Operate the instrument under manual mode for approximately 15 minutes.
3. On the average, not more than one particle greater than 0.3 m in five
minutes or not more than one particle per 0.5 cubic foot should be apparent.
This purges the Particle Counter.
Once the unit is purged, resume normal use. Remove the purge filter
Connecting the particle counter to a PC
To connect the Particle Counter to a PC:
1. Connect the particle serial port to the serial communications port of the PC
with the RS232 cable supplied with the instrument
2. Turn the Particle Counter on.
3. Enter the “review “screen
CLJ-H603 user manual
[email protected]
17
Access the utility software on the PC and run the program by clicking
counter.exe.
If the software does not work properly, follow the instructions on the CD.
4.
About software
The software allows user to download the data saved in the memory of particle
counter. The software screen is as follow:
Port: used to select the serial port number
Get index: used to download the index the data saved in counter
Get buffer: used to download the data user selected and the data will be saved as
hr*.txt