1
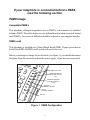
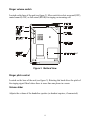
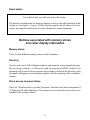
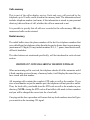
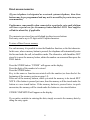
Enterprise Discovery CALLER DISPLAY TELEPHONE USER MANUAL This Interquartz telephone has been manufactured to very high standards and is very easy to use. Please read this manual carefully to find out how to use the features. Contents The Features of your Telephone .................................................................................. 2 1. Important notes ................................................................................................................ 3 Intended Use ......................................................................................................................... 3 Telephone Facilities ............................................................................................................. 3 REN Number ........................................................................................................................ 4 Handsfree Speaking .............................................................................................................. 4 Emergency Calls ................................................................................................................... 4 Audible Tones ....................................................................................................................... 4 2. Installation ............................................................................................................................ 5 Power Supply and Batteries .................................................................................................. 5 PABX Usage ......................................................................................................................... 6 - Compatible PABXs ...................................................................................................... 6 - PABX Recall .................................................................................................................. 6 - PABX Access ................................................................................................................ 7 - Voice Messaging ............................................................................................................ 7 - Centrex Service ............................................................................................................. 8 Connection ............................................................................................................................ 9 3. Telephone Features ...................................................................................................... 10 Telephony Buttons .............................................................................................................. 11 Memory Stores .................................................................................................................... 14 4. Operating Instructions ............................................................................................... 16 Setting the Clock ................................................................................................................. 16 Handsfree/Headset mode .................................................................................................... 16 Answering a Call ................................................................................................................. 17 Manual Dialling .................................................................................................................. 17 Speakerphone Dialling ........................................................................................................ 17 Preview Dialling ................................................................................................................. 18 Memory Dialling ................................................................................................................. 18 Directory Memories ............................................................................................................ 19 Direct Access memories ...................................................................................................... 21 Calls memories .................................................................................................................... 22 Redial memories ................................................................................................................. 24 5. Maintenance and Problem Solving ............................................................. 25 6. Warranty and Service ........................................................................................ 26 PABX Configuration (Figure 1) ............................................................................. 6 General Appearance ( Figure 2 ) ................................................................................ 10 Bottom View ( Figure 3 ) ............................................................................................... 13 1 The features of your telephone This telephone is a sophisticated instrument but, with just a little practice and some patience, you will soon be able to use it to its full capabilities. Most importantly, the telephone is able to show caller display information, provided that it is available on your telephone line and that your network operator has provided the service to you. You may have to pay a small charge for the service. If caller display is connected then, when a call is received at the telephone, it will display the number of the person calling you (there are some exceptions to this but please refer to the appropriate section in this manual). This information is stored together with information about the time/date of the call and whether you answered the call or not. Information on the last 30 calls is retained in the telephone memory and it is possible to scan through these calls and dial someone back by simply pressing one button. There is an independent directory for you to store the telephone numbers and names of the 140 people whom you call most often or who call you. By accessing an entry in the directory and pressing one key, that number will be called. If one of your directory names calls you, then the display will show not only the number calling you but the name, as stored in your directory. As well as a directory of numbers it is possible to store up to 20 names and numbers in ten one- and two-touch buttons. NOTE: one variant of this telephone is designed to use Network Services and it utilises these buttons. In this case, it is not possible to store user programmable memories in these locations. It is also possible to use this telephone in combination with a headset. There is a universal interface in the telephone which will allow connection of most headsets, providing that they have an RJ11 plug for connection to the headset socket situated at the back of the telephone. 2 1. Important Notes Intended Use This apparatus is intended for use on 2 wire analogue PSTN and PABX circuits within Europe. Declaration of Conformity Interquartz (UK) Limited declares under its sole responsibility that this product Model : ENTERPRISE DISCOVERY Is in conformity with the following relevant harmonized standards Health & Safety 73/23/EEC Electromagnetic Compatibility EN55022 : 1998 & EN55024 : 1998 Telecom EN301437 : 1999 & TBR38 : 1998 Following the provisions of Council Directive on radio equipment and telecommunications terminal equipment. JANUARY 2001 Telephone facilities This telephone has been designed for the use of the following facilities: - caller display facilities - liquid crystal display - handsfree speakerphone operation - optional message wait - operation on PABXs which return secondary indication - memories accessed by a button - last number redial - PBX recall (earth or timed break selectable) - MF signalling only - optional use of headset - access pause insertion (maximum of 3) - mute function - speaker volume control - ringer volume control - ringer pitch control - ringing indicator 3 REN number The REN number of this telephone is 1. If you wish to connect any other equipment to the line, simply add the REN numbers of each piece together and ensure that the total does not exceed 4. If too many phones are connected to the line, the circuit may be overloaded and your telephone may not ring. Not all telephones have the same REN. If a British Telecom phone is supplied unmarked, you can assume that it has a REN of 1. Handsfree speaking This telephone is designed to work on most telephone lines by drawing power from the line. However, when using the loudspeaking facility, there are some instances where the power available may not be sufficient to provide an adequate performance. This telephone requires the use of a power supply, or batteries, for handsfree operation and for the caller display to function. If the telephone is used in handsfree mode without any additional power, difficulties may be experienced but your telephone will still work simply by lifting the handset and proceeding to dial. Emergency calls Calls can be made on this telephone to contact the emergency services. The European code for emergency services is 112, however, you can still use 999 in the UK. An access code may also be required, if the phone is connected to a PABX. Audible tones This telephone is provided with audible tones. When you carry out a store operation that is NOT successful, a low pitch beep will be heard. If the operation IS successful, a high pitched beep will be heard. 4 2. Installation This telephone is designed to plug straight into a modular style socket. If you do not have one of these sockets, they can be obtained from your Network Operator. Power Supply or Batteries This telephone requires an additional power supply in order to operate correctly. A suitable power supply is included with the telephone and it should be connected to the socket at the rear of the telephone. Alternatively, the telephone will operate utilising battery power. 4 AA battery cells are required (not provided). To insert the batteries, first ensure that the telephone is dis-connected from the telephone line. Locate the battery compartment on the base of the telephone, next to an engraving WARNING: Unplug the connection to the network before opening this cover. You will need to insert a small pointed tool in the hole next to the compartment. Press down and slide the battery compartment out. Insert the four AA batteries making sure that they are the correct way round, replace the compartment and connect the telephone to the network. The battery life will depend on usage, amongst other factors, but you should expect to replace the batteries approximately every two to three months. 5 If your telephone is connected behind a PABX, read the following section. PABX Usage Compatible PABX’s This telephone, although designed for use on PABXs, is not meant to be installed behind a PABX. The caller display service will not function when connected behind most PABXs. Any cases of difficulty should be referred to your supplier/installer. PABX recall This telephone is supplied set to Timed Break Recall(TBR). If your system has an Earth Recall(ER), the PBX recall switch will need to be reset. Before you attempt to change the recall switch (see figure 1), you should disconnect the phone from the network and from the power supply, if you have so connected it. RESET BUTTON MESSAGE WAITING SELECTOR SWITCH N/S MESSAGE WAITING POLARITY SWITCH S1/S2 EEPROM MODE 1 / MODE 2 SYS X DISABLE / ENABLE TBR / ER Figure 1 PABX Configuration 6 You will need a small screwdriver, or similar pointed tool, to remove the clear plastic cover plate and the single touch memory location card. With the tool you can then adjust the switch to the setting required. If you are unsure as to which recall setting is applicable, please consult your PABX manager or supplier. Note: there are some other switches beneath this cover. Do NOT adjust them. Replace the cover, plug the phone back into the socket and it is ready for use. PABX access Where a PABX access digit is required to obtain a direct outside line, it may be necessary to insert a pause after dialling the access digit. Voice Messaging When used behind a PABX, this telephone will respond to voice messaging systems on specific PABX types. Your telephone manager should be able to advise you. As supplied, the telephone will respond to message signalling. If your system provides reverse polarity message signalling, then the following action will have to be taken before your telephone will operate correctly. Refer to figure 1 on page (6). Remove the telephone from the line and then remove the lower memory overlay card. Message waiting polarity switch marked N/S should be moved from "N" to position "S". When the telephone is connected to line and voice message signals are received, the message light should flash or stay on( system dependent ). If for some reason the message light, a bright red, comes on with NO message signals received, remove the telephone from the line and adjust the Message waiting polarity switch marked S1/S2 from the S1 position to the S2 position. When reconnected, the telephone should now function correctly. It must be pointed out that various PABX types have individual system requirements in order for visual message waiting signals to be detected. If there is a signal present, the telephone will detect it. If there is no signal, then it will not be detected! If in any doubt, please refer to your telephone manager or to your supplier. 7 If your telephone is connected to a Centrex Service, read the following section. Centrex services are offered by many Network Operators. They give similar functions to a PABX. Your Network Operator or telephone manager will advise you, if you are connected to such a service.To fully appreciate the functions of this telephone you will have to read further sections in the User Guide. However, there is one important matter that has to be considered at this stage. If you are a member of a Centrex group, then you will almost certainly have to dial 9 to get outside the group. If you receive incoming calls on the Caller Display, the number recorded will be the full standard STD code and number. It will not include your external access number so you will not be able to make a call to the caller from the display. To make such calls possible, the telephone will accept a CENTREX external dialling digit. Automatic centrex external code insertion If you exit your Centrex group with, say, 9 it is possible to store this digit in the telephone. eg. if the exit code is 9, the telephone can be programmed in the following way - press store - press “9” - press store - press “ * “ 8 If the above procedure is invoked, then any call that you make from the calls directory, the directory memories or the direct access memories will automatically have the Centrex access code inserted before the number is dialled. To cancel this feature - press store - press store - press “ * “ Connection Insert the line cord into the socket. Set the ringer volume and ringer pitch control, as desired. Make sure that you have installed the power supply OR the batteries (see page 5). WHEN YOU FIRST INSTALL THE TELEPHONE IT IS ESSENTIAL THAT YOU LIFT THE HANDSET FOR A FEW SECONDS, BEFORE REPLACING IT ON THE CRADLE. Failure to do this may result in an apparently incorrect, non-functioning of the handsfree system. 9 3. Telephone Features Figure 2 General Appearance To help you find your way round the telephone, the various features and buttons are briefly described. You should refer to the relevant section of this user guide to learn how to use the features available. Liquid crystal display (LCD) The telephone is supplied with a protective cover over the display. Carefully peel this off before using the telephone. The large LCD panel normally shows the time of day and the number of new calls that you have not yet viewed. With incoming calls or when viewing the directory or viewing the calls list it will show the date, the number and the name of the caller (if programmed into the directory). There are several prompts that also tell you what state the telephone is in at a particular moment in time. 10 THE MAIN TELEPHONY BUTTONS Handsfree button/Headset button The function of this button is determined by the position of the Handsfree / Headset select switch (HS/HF) underneath the telephone (see section 4). With the switch set to HF (handsfree) then pressing this button switches the speakerphone mode on or off. The red LED above the button glows when the speakerphone is on. With the switch set to HS (headset), then pressing this button transfers an incoming call directly to the headset. The red LED glows for the duration of the call which is terminated by pressing this button once more. This feature is storable in memory. Mute button Press to activate the mute circuit, cutting off the speech transmission to the handset, the headset or handsfree microphone. Press again to resume normal conversation. The red LED, above the mute button, glows when the call is muted and a MUTE prompt is also displayed on the LCD. Note: The MUTE function will only operate in the on-line state and replacing the handset will automatically release the mute function. Pause button Introduces a pause of 3.6 seconds during dialling. A maximum of 3 pauses may be inserted, otherwise the telephone may cease to function properly. This feature is storable in memory. Recall To provide a timed break or an earth recall for use on a PABX (see page 6) Note: only Timed Break recall is storable in memory. Earth recall is not storable. 11 Timer In normal mode, the LCD displays the time of day. When making a call or receiving a call the telephone will automatically record the call duration in minutes and seconds and display this information on the screen. Pressing the timer button once will cause the display to revert to time of day. Pressing it again will revert to the timer in its upcounting operation. If the telephone is not in use, then pressing the timer button changes the mode of operation continuously in the following sequence - previous elapsed time - count from zero - stop counting - time of day The timer button is also used to set the clock on the LCD display. However, if you receive caller display signals at your telephone, a part of this signal is a real-time clock and your display will automatically be adjusted to this clock time. The default time, set at the factory, is to show AM and PM times. If you wish to show the 24 hour clock then it will be necessary to set the time (see section 4) in 24 hour mode. When a caller display signal is received, it will automatically adjust the time, on the display but to the 24 hour format. Ringer indicator Flashes when the telephone rings with an incoming call. 12 Ringer volume switch Located on the base of the unit (see figure 3). Move switch to select no sound (OFF), muted sound (LOW) or full sound (HIGH) for ringing on incoming call. Figure 3 Bottom View Ringer pitch control Located on the base of the unit (see figure 3). Rotating this knob alters the pitch of the ringing signal. Ideal where there is more than one phone in a room. Volume slider Adjusts the volume of the handsfree speaker (or headset earpiece, if connected). 13 Reset button It is unlikely that you will need to use this button. The button is located under the memory number overlay at the right-hand side of the telephone (see figure 1, page 6). If the telephone appears not to function, for any reason, pressing this button will re-set the telephone to normal operation. Buttons associated with memory stores and caller display information Memory stores There are four different memory stores on this telephone. Directory You can store up to 140 telephone numbers and names in your personal directory. By accessing a memory, a call can be made by pressing the DIAL button. If an incoming call is received from someone whose name is stored in the directory, then that name will appear on your display together with the incoming callers telephone number. Direct access memory buttons There are 10 buttons able to provide 20 memory locations, each with a maximum of 32 digits and 20 alpha characters. The memories are accessed by one touch or two touches of the memory button. 14 Calls memory This is part of the caller display service. Each and every call received by the telephone, up to 30 calls, can be stored in this memory bank. The information stored includes telephone number (and name, if this information is stored in your personal directory) date and time of call, whether the call was answered or not. It is possible to specify that all calls are recorded in the calls memory OR only unanswered calls can be retained. Redial memory The redial buffer stores the phone numbers of the last five telephone numbers that were called from the telephone, either from the keypad or from a direct access memory (maximum of 32 digits). It may include numbers 0-9, #, *, pause, timed break recall, off-hook, handsfree. The other buttons not mentioned specifically, will be introduced in each relevant section. IMPORTANT NOTE REGARDING MEMORY STORAGE When an incoming call is received, the telephone checks all of the memories and if it finds a number as stored in any of memory banks, it will display the name that you have stored with that number. All incoming calls contain the complete STD code as well as the number. If you store a local number as just the number part, the telephone will not provide a match. Thus, for local calls, you should store the STD code as well as the number in your directory (NOTE: storing the STD code will not affect calls made to these numbers and you will be charged the correct rate for a local call). Carrying out the above procedure will ensure that any local numbers stored will give you a match on the incoming CLI signal. 15 4. Operating Instructions Setting the clock When first connected, the LCD display shows the time of day, in its normal mode, as 12.00AM. If you have subscribed to, or your network operator provides, caller display information then you only need to study this section if you require your clock to show the time in the 24 hour format (when you receive your first call, the clock will automatically be set to the correct time by the caller display signal). The time can be set in either a 12 hour or a 24 hour clock. The format is HH - MM (H hours, M minutes) To set the time of day: Press the STORE button Press the TIMER button Insert the time by following the screen prompts Press the relevant hour time on the keypad (HH) - as two digits Press the minute time on the keypad (MM) - as two digits Decide on the format and press 0 for 12-hour mode 1 for 12-hour mode 2 for 24-hour mode AM setting PM setting Press the STORE button Setting the handsfree/headset mode The default setting is handsfree. If you do not intend to use a headset with this telephone then ignore this section. 16 If you are using a headset, then you will need to change the operating mode of this telephone. Turn the unit over, locate the HS/HF switch (see figure 3 ) and move it to HS. Install your headset (the telephone has an RJ11 socket) and the telephone is ready for headset working. Pressing the headset button connects to line; a second press disconnects the line. The remainder of this manual assumes handsfree working but references to handsfree can be translated to headset. Answering a call You may answer a call by simply lifting the handset. If your telephone is set to handsfree mode (factory default) and you press the handsfree / headset button, the call will automatically be answered in full handsfree working. If you are using a headset (and your telephone is set to headset mode - see above) then pressing the handsfree / headset button will automatically allow the call to be answered at the headset. Manual dialling Lift the handset, listen for the dial tone and then dial the required number using the keypad. The number called will appear on the LCD. Handsfree dialling The speakerphone can be used for manual dialling. - Press the Handsfree button firmly and the dial tone will be heard in the speaker. - Dial the required number on the keypad - When the called party answers the phone, continue to speak using the microphone in the telephone or pick up the handset, if you so wish. With the handset in use it is possible to revert to speakerphone use by pressing the Handsfree button BEFORE replacing the handset. 17 Note: if using the handset and the Handsfree button is pressed to revert to speakerphone operation, both the handset and the speakerphone microphones are muted until the handset is replaced. - The call is terminated by replacing the handset on the cradle or by pressing the Speakerphone button. The telephone will continue to ring an unanswered number until the call is terminated by pressing the Handsfree button. Preview dialling It is possible to carry out preview dialling on this telephone. Simply key in the number that you wish to call and then press the dial button, or the handsfree button, and the telephone will then proceed to dial in handsfree mode (see above). With preview dialling, if a mistake is made when entering a digit you can use the cursor keys to backspace using the key or forward space using the key and the digit flashing is the one that will be corrected when the keypad is pressed to correct the digit. Memory dialling Many of the memory dialling functions are very similar but to ease understanding, they are dealt with separately in this section. Throughout this section - all memory locations will accept 32 digits and 20 alpha characters. - to key in alpha characters - press the appropriate key a number of times eg. pressing the 6 key once will give M pressing it twice will give N, three times O and four times 6 - pressing a different key will automatically move the cursor to the next space - if it is necessary to press the same key again, then move the cursor forward using the key before re-pressing the key " Continued On Page 19 " 18 e.g. to store DENNIS press 3 key once (D) press key to move the cursor press 3 key twice (E) press 6 key twice (N) press key press 6 key twice (N) press 4 key three times (I) press 7 key four times (S) To complete the process, press the STORE key Directory memories The directory is your personal memory store for up to 140 names/numbers. Each entry can be up to 32 digits long with 20 alpha characters. See note on page 15 about storage of local numbers. To store a Directory memory Press STORE Press DIRECTORY Follow the screen prompts - at ENTER NUMBER key in the number to be stored. To make for easier reading you can, if you wish, enter hyphens and/or spaces. These will be ignored by the telephone in any dialling process. To enter a hyphen press the scroll up key for 1 second until the hyphen appears on the screen. To enter a space, simply press the move key . Press STORE - at ENTER NAME key in the name to be stored (use the notes at the beginning of this section on storing alpha characters). The names will be stored in alphabetical order. Press STORE 19 To access the Directory Press DIRECTORY You can then scroll through the complete directory by using the scan key . Each memory will appear in alphabetical order. Alternatively, you can search for a particular letter by pressing DIRECTORY, followed by the alpha key for which you want to search - press 6 once for M or twice for N, for example. All entries that begin with that letter will then be scanned as you use the scan key . To edit a Directory memory Access a directory entry, as above, and use the scroll key to move up or down the directory to locate the correct record to be edited. With the record displayed, press the STORE key. The first digit of the number will then flash. Use the and cursor keys to select the digits(s) that need correcting; type in the new digit. Press STORE. The first letter of the associated name will now flash. Again, use the and cursor keys to select the letter(s) that need correcting and type in the new letter; press STORE and the corrected entry will be stored. To delete a Directory memory Access the directory memory to be deleted, as described above. Press the CLEAR button TWICE in quick succession. ERASE will appear on the display and the memory will be deleted. To call a Directory memory Access the directory memory to be called, as described above. Press the DIAL key. The telephone will then proceed to dial the number on the display in handsfree/ headset mode. You may pick up the handset if you so wish. 20 Direct access memories (If your telephone is designated as a network systems telephone, then these buttons may be pre-programmed and may not be accessible for you to store your own memories). Furthermore, some models when connected to a particular voice mail platform will have a special use for the memory button labelled 10/20. Your supplier will advise about this, if applicable. The memories are stored two each behind ten direct access buttons. Each entry can be up to 32 digits with 20 alpha characters. To store a Direct Access memory For each memory it is possible to store the Handsfree function, as the first character. In this case, when a memory button is pressed, the telephone will automatically seize the line and make the call, in handsfree mode. The alternative, with handsfree NOT stored is to press the memory button, obtain the number on screen and then press the DIAL button. Press the STORE button. STORE will appear on the display. Press the digits of the number to be stored Press the STORE button Key in the name or function associated with the number (as described at the beginning of the memory section on page 14) Press one of the memory buttons, where you wish the memory to be stored. BUT NOTE: if the button is pressed just once, then the memory will be stored under the button as a one touch button. If the memory button is pressed twice in quick succession, the memory will be stored under the button as a two-touch button. STORE COMPLETED will appear on the display. If you make a mistake in entering the data, simply overwrite the memory data by doing the entry again. 21 To dial a Direct Access Number If HANDSFREE is stored as the first character Press the appropriate memory button either once for access to the one touch memory or twice in quick succession for access to the two-touch memory. If HANDSFREE is NOT stored Press the appropriate memory button either once for access to the one touch memory or twice in quick succession for access to the two-touch memory. Press DIAL button or HANDSFREE button Either answer the call in handsfree mode or pick up the handset. Note: when the telephone is dialling a call, the word dialling appears on the LCD screen. Upon completion of dialling, the screen reverts to showing the name associated with the number being called. Calls memory This memory information is generated by the telephone and it contains details of the last 30 telephone calls that were received by the telephone. When the memory is full (30 memories) the next call to be received replaces the first call in the memory queue, which is then dropped. It is possible to clear the complete calls memory - see the end of this section. Setting Calls Memory mode It is possible to retain either ALL calls or just UNANSWERED calls in this memory bank. The factory option is ALL calls. To change the setting Press the CALLS key for more than six seconds. The display will show 22 SET LIST TYPE UNANSWERED ALL The current setting will flash. (If this is the setting required, no more action need be taken). Using the cursor keys and , the other alternative can be made to flash. When the alternative required is flashing, press the STORE key. Calls memory - how it works Each call received by the telephone creates a record in the calls memory - the contents are described in the next section. When a call is received it is treated as a NEW CALL and the LED above the CALLS button flashes. This is to let you know that calls have been received which have not been reviewed. Pressing the CALLS button will bring the calls information on the display and, at the same time, cause the LED to stop flashing and reset the NEW CALLS counter to 0. Calls Information Each entry on the display will show The time that the call was received The date that the call was received The call number (01 to 30) Whether it is a NEW CALL ie one that has not been reviewed before, or a CALL If the directory setting is to show ALL CALLS the flag, next to the number of calls, will indicate whether the call was answered or unanswered answered unanswered The telephone number of the caller will be displayed. Note there are circumstances where this information may not be available. Your caller may have withheld the information in which case WITHHELD will show in the display. If the call came from overseas or from a payphone, for example, the caller display details are not available so the display shows NOT AVAILABLE / INTERNATIONAL / PAYPHONE. 23 If the details of your caller are stored in your own directory, then the name (as stored) of that caller will also be shown on the display. Viewing the Calls Directory Press the CALLS button. Note that if the LED is flashing then there are new calls in the directory that you have not viewed before. The last call to be received is displayed on the screen. Using the SCROLL key you can move up and down through the memories to see who has called. If you wish to make a call to a particular caller, make sure that the entry is on the screen and then press the DIAL key. The telephone will automatically call the number in question, in handsfree mode. Deleting the Calls memory There may be situations where you wish to delete the entire calls memory. To do this First, make sure that you are NOT in the calls directory. If unsure, lift the handset and replace. press CLEAR button twice in quick succession and then HOLD the clear button down for at least three seconds.The screen will display HOLD TO CLEAR CALLS and then "ERASED". Redial memory This memory information is generated by the telephone and it contains details of the last 5 telephone calls that were made on the telephone. When the memory bank is full the next call to be made replaces the first call in the memory queue, which is then dropped. Viewing the Redial Information Press the REDIAL key. The last number called at the telephone will be displayed with the telephone number and the message REDIAL 1. Using the SCROLL key all five redial numbers can be viewed. To call any of the numbers, make sure that the entry required is on the screen and press the DIAL button. The telephone will automatically call the number in question, in handsfree mode. 24 5. Maintenance and Problem Solving Please bear in mind that this telephone is designed to receive Caller Display information. It will only do so if your Network Operator provides the service and, where applicable, you have subscribed to it. Your telephone is a precision electronic instrument. Avoid rough handling and extreme temperatures. Use a mild detergent and a damp cloth when cleaning. Never use a stronger cleaner. If your telephone does not appear to be working correctly, please check the following: No dial tone - is phone cord properly connected to the wall socket? No display - is power supply/batteries connected? Will not ring - ringer switch is set to off - REN number may exceed 4, for all telephones connected to the line. Disconnect a phone until the number is below 4 Poor handsfree performance - Ensure that an approved external power supply is connected If there are still problems, and you have more than one telephone: Remove the problem telephone. Insert another telephone and check that it works. If yes then the problem telephone is possibly faulty. If not, then you may have a faulty line. Try using the other socket and see which telephones work. If you do have a faulty line then you should contact British Telecom or the network operator. You should however be aware that if you request them to repair a fault that is found not to be theirs, then they are entitled to charge you for a visit. In the event that you still have problems then you should consult your supplier. 25 6. Warranty and Service This product is guaranteed, by Interquartz (UK) Limited, for six years from the date of manufacture. Every Interquartz telephone has a unique serial number and part of that number refers to the date of manufacture. A label, similar to that shown below is affixed to each telephone 0111 030852 (model no) The figure 0111 means that the telephone was made during week 11 (12 March) 2001. The six year warranty, cover will apply until 12 March 2007. A warranty is designed to cover either manufacturing faults or component defects. It is not designed to cover fair wear and tear. The Interquartz warranty is no exception. We look to you, our customer, to be reasonable and sensible over the warranty. We will endeavour to repair any telephone sent in to us within the warranty period but we reserve the right to charge for items that we consider replaceable under wear and tear. For example, if a handset cord splits within a few months, it will be replaced. If a phone is returned after, say, four years of heavy use with a similar problem, we might take a different view and wish to charge. If you have a genuine warranty problem and provided that the warranty seal has not been broken, we will either repair your telephone, or, at our sole discretion, replace it with a similar telephone. In the event that a model may have been discontinued, any replacement would have similar or enhanced features. If you need to return a faulty unit to us, send it to: Interquartz (UK) Limited Pennine House Salford Street Bury BL9 6YA 26 Make sure that you tell us what is wrong with the phone. DO NOT FORGET TO INCLUDE YOUR OWN NAME AND ADDRESS. We ask that you bear the cost of returning the telephone to us. We will return it to you, at our expense. This warranty is in addition to any statutory rights. For further advice visit our Website www.interquartz.co.uk This telephone is approved to EEC directive 1999/5/EC Distributed in the United Kingdom by Interquartz (UK) Limited Manufactured by International Quartz Limited A Subsidiary of Chiaphua Industries Ltd. ©Copyright INTERNATIONAL QUARTZ LTD. 2002 3C9859012T12B