1
Business Music System:
Internet Radio Player
by Grace Digital Audio
User Guide
Model No. GDI-IRBM20
_______________________________________________________________________
INTRODUCTION
The Business Music System (GDI-IRBM20) plays music directly from the internet to a telephone
or audio system. The unit is ideal for business and professional applications providing musicon-hold and/or background music.
The system is designed for ease of use. Simply plug the unit into your existing PBX or Key
phone system with a single audio cord from the RCA Mono out connection. For use with an
audio system connect the Stereo out L R connections to your existing audio system.
The Business Music System’s internet radio function can be established by connecting to a
wireless router using a wireless WiFi connection or wired Ethernet LAN connection.
Once connected, the internet radio provides access to more than 17,000 stations from within
and outside the United States. Stations can be searched by location or genre. Preferred
stations can be saved to a preset button on the front panel for ease of access.
ADVISORY WARNING: Please carefully read the User Guide for safety & operational
instructions. Keep the User’s Guide in a secure place for future reference.
SAFETY & GENERAL USE INFORMATION
FCC INFORMATION Pursuant to Part 15 of the FCC Rules, this equipment has been tested and
found to comply with the limits for a Class B digital device. These limits are designed to
produce reasonable protection against harmful interference in a residential installation. This
equipment generates, uses and can radiate radio frequency energy and, if not installed and
used in accordance with the instruction, may cause harmful interference to radio
communications. However, there is no guarantee that interference will not occur in a particular
installation. The unit may malfunction when there is radio interference on the power line/signal
line. The unit will revert to normal operation when the interference stops. If this equipment
does cause harmful interference to radio or television reception, which can be determined by
turning the equipment on and off, the user is encouraged to try to correct the interference by
one or more of the following measures:
Reorient or relocate the receiving antenna
Increase the separation between the equipment and receiver
Connect the equipment in to an outlet on a circuit different from that to which the
receiver is connected
Consult the dealer or an experienced radio/TV/electronics technician for assistance.
CAUTION: To comply with the limits, Federal Communication Commission (FCC) warns any
changes or modification not expressly approved by the party responsible for compliance may
void the user’s authority to use and/or operate this equipment. Any modification or improper
use of the unit may void the limited manufacturer’s warranty.
ADVISORY
This Product is intended for North American markets. The GRACE Wireless Internet Radio GDI-IRBM20 is in compliance with the essential
requirements and other relevant provisions of Directive 1999/5/EC
ADVISORY
FCC Compliance and Advisory Statement: This device complies with Part 15 of the FCC Rules. Operation is subject to the following two
conditions: 1) this device may not cause harmful interference, and 2) this device must accept any interference received, including
interference that may cause undesired operation
NOTE: This equipment has been tested and found to comply with the limits for a Class B digital device, pursuant to Part 15 of the FCC Rules.
These limits are designed to provide reasonable protection against harmful interference in a residential installation. This equipment
generates, uses and can radiate radio frequency energy and, if not installed and used in accordance with the instructions, may cause harmful
interference to radio communications. However, there is no guarantee that interference will not occur in a particular installation. If this
equipment does cause harmful interference to radio or television reception, which can be determined by turning the equipment off and on,
the user is encouraged to try to correct the interference by one or more of the following measures:
To comply with FCC RF exposure compliance requirements, a separation distance of at least 20 cm must be maintained between the antenna
of this device and all persons. This device must not be co-located or operating in conjunction with any other antenna or transmitter.”
INSTALLATION
o Never install the unit where the unit may be subject to heat, water, dust, mechanical
vibration, mechanical shock, electromagnetic radiation sources including and not limited
to:
Direct sunlight
Air ducts or radiators
Environments with dirt or dust
Environments with moisture or rain
Environments with mechanical vibration or shock
Environments with electromagnetic radiation
OPERATIONAL USE
o Power the unit with the power adapter included.
o Do NOT cover the unit in any material such as cloth or plastic. IF the unit is covered in
this manner the temperature inside the unit and outside the unit may rise substantially.
Substantial temperature increase may result in a malfunction, product damage or
personal injury
o For best performance, the unit should be used in an ambient temperatures between
41F (5C) and 95F (35C). Avoid use in temperatures below 41F (5C) or above 95F (35C).
o To avoid fire or shock hazard, do not expose the unit to any water source including
moisture or rain. To prevent electrical shock, do NOT open the cabinet. Refer inspections
and servicing to qualified personnel only
CARE & MAINTENANCE
o CLEANING
Do NOT use volatile cleaners, chemicals or solvents on this unit.
Clean with a soft cloth & wipe lightly
o RESET & Electrostatic Discharge
In the instance the unit is subject to electrostatic discharge, the unit may
malfunction. Should a malfunction occur, reset may be required to address the
issue. To reset the unit: turn the power OFF, unplug the unit, allow the unit to sit
unplugged for at least 60 seconds, plug-in the unit, turn the power ON again.
FEATURES
o INTERNET RADIO & AUDIO CONTENT
Select from over 17,000 radio stations from within the USA and abroad
Create your own radio station to stream to your unit
Select from over 50 genres including Jazz, Talk, Rock, Country, SiriusXM …
o WIRELESS or WIRED CONNECTION to the INTERNET
Connect to the internet with a wireless 802.11n WiFi connection to a 802.11n, b or g
wireless router or connect to the internet with a wired Ethernet (RJ45) LAN
connection
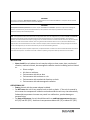
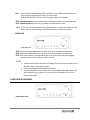
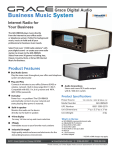
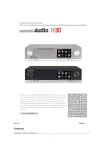
BACK PANEL VIEW:
o AUDIO QUALITY
Pure digital sound
Mono connection for use with telephone systems
Stereo L (left) R (right) connections for use with audio systems
8 / 600 ohm switch
o DISPLAY, MONITOR SPEAKER & SPEAKER BUTTON, PRESETS
4-Line LCD for easy set up and music selections
Built-in Monitor Speaker allows the user to monitor audio
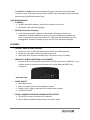
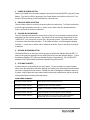
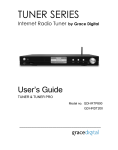
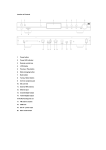
FRONT PANEL VIEW:
Monitor Speaker Button allows the user to turn the Speaker ON/OFF as desired
Volume knob allows the user to increase and decrease the Monitor Speaker volume
5 front panel presets for immediate access to your music selections
o POWER LOSS & AUTO PLAY FUNCTION
Following a power loss, the volume settings are saved and the unit returns to play
mode automatically
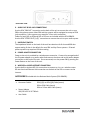
o INDUSTRIAL DESIGN, RACK & WALL MOUNTS
Metal enclosure & quality electronics to meet business environment demands
Unit can be installed on a table, rack or wall
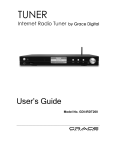
TOP PANEL VIEW:
Use the side rack and wall mounts to secure the unit in place on a rack or hang on a
wall, respectively
SET UP & OPERATION
o SET UP CONNECTION to a PHONE (PBX / KEY PHONE SYSTEM) or AUDIO SYSTEM
BACK PANEL VIEW:
STEP 1 Plug the Power Adapter into a wall power outlet
STEP 2 Plug the Power Adapter into the jack marked “DC 5V”
STEP 3 (Phone System) Insert the RCA connector cable to the “PBX OUT“ jack
STEP 3 (Audio System) Insert the RCA connector cable to the “STEREO OUT” (L) (R)
NOTE: Most phone systems have an RCA connection on the PBX or Key System unit.
Some systems may have a 3.5mm mini connection.
RCA-to-RCA & RCA-to-3.5mm mini connector cables are included.
STEP 4 (Phone System) connect other end to the Phone system’s on-hold input jack
STEP 4 (Audio System ) connect (L) (R) cables to Audio system’s jacks
NOTE: IF the jack cannot be located on the phone system, contact the Vendor for the
phone system you are using to identify the correct connection location.
o OPERATION
FRONT PANEL VIEW:
STEP 1 Press the Power Button on the front of the unit to power on the device
STEP 2 Press the Power Button on the front of the unit to power on the device
STEP 3 Turn the Volume Control Knob on the front of the unit to set the outgoing
volume level to be heard by the caller on hold
NOTES:
Volume Knob controls the built-in Speaker and controls the volume level to
the PBX system / KEY phone system
Continuous playback will begin automatically
Press the Speaker Button to turn the monitor Speaker ON and monitor the
audio output to your system, or turn the monitor Speaker OFF and not
monitor the audio
FUNCTIONS & CONTROLS
FRONT PANEL VIEW:
1. POWER & POWER BUTTON
Power is provided from the power adapter connection & turned ON/OFF using the Power
Button. Turn the unit ON by pressing in the Power Button on the front of the unit. Turn
the unit OFF by pressing in the Power Button a second time.
2. DISPLAY & MENU SELECTION
Use the Volume Knob to scroll the internet radio menu selections. To initiate a selection,
scroll through the display until the < > marks are on either side of a desired selection.
Press in the Knob to activate a selection.
3. VOLUME & VOLUME KNOB
Turn the Volume Knob clockwise on the front of the unit to increase the output volume
and volume to the monitor speaker. The Volume Knob controls the output level to the
“AUDIO OUT” jack connection to your PBX / Key phone system. The same knob is used
to scroll the internet radio selections. To initiate a selection, scroll through the display
until the < > marks are on either side of a desired selection. Press in the Knob to activate
a selection.
4. SPEAKER & SPEAKER BUTTON
The Speaker Button on the front of the unit turns the Monitor Speaker ON and OFF. To
listen to the program playing from the USB Flash Drive press the Speaker Button. To turn
the Monitor Speaker OFF, press the Speaker Button a second time. The “AUDIO OUT”
playback is NOT affected by the Monitor Speaker being ON nor OFF.
5. STATIONS & PRESETS
5 preset buttons are provided on the front panel. To save a station to a preset button,
select your desired station and while playing the station press and hold the preset button
you wish to designate to the station. Should you wish to designate a different station to
a preset, simply repeat the same steps and the previously saved station will be removed
and replaced with the newly selected station.
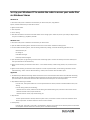
FRONT PANEL SUMMARY
P1: Preset 1 station selection
BACK: press to return to previous screen
P2: Preset 2 station selection
SPEAKER: push to turn audio ON/OFF
P3: Preset 3 station selection
POWER : press button to power unit ON/OFF
P4: Preset 4 station selection
VOL/ Scroll Knob: turn to the right to increase VOLUME
P5: Preset 5 station selection
VOL/ Scroll Knob: turn to move up / down within the MENU
SELECTIONS. Push in the knob to select desired station
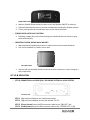
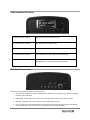
BACK PANEL VIEW:
6. AUDIO OUT & RCA JACK CONNECTIONS
Use the RCA “PBX OUT” connection on the back of the unit to connect the unit to your
PBX or Key phone system. Most PBX and Key systems will be equipped to accept an RCA
jack connection. Some systems may require a 3.5mm mini connection.
Cables for both RCA-to-RCA and RCA-to-3.5mm are included with the GDI-IRBM20.
Use the RCA “STEREO OUT (L) (R)” connections to connect the unit to your audio system.
7. IMPEDENCE SWITCH
The impedance Switch on the back of the unit has selections for 8 ohm and 600 ohm
output setting. 8 ohm is the default for most PBX and Key Phone systems. IP based
phone systems may require a 600 ohm setting.
8. POWER ADAPTER CONNECTION
Power to the unit is provided by a wired power connection. Connect the pronged end of
the 5V power adapter to a power outlet and connect the other end to the power adapter
connection on the back of the unit. Once connected, turn the power ON by pressing the
Power Button on the front of the unit.
9. WIRELESS or WIRED INTERNET CONNECTION
Use the built-in wireless 802.11n connection to connect to a b, g or n wireless router
OR use the wired Ethernet LAN connection on the back of the unit to connect to the
internet.
ACCESSORIES included with the Business Music System (GDI-IRBM20):
Connector Cables:
Power Adapter
100/220 VAC-5V DC 700mA
User Guide
RCA (L)(R)-to-RCA(L)(R) Cable (stereo)
RCA to RCA Cable (mono)
RCA-to-3.5mm Mini Cable (mono)
INTERNET & INTERNET RADIO CONNECTION
The Business Music System utilizes the Grace internet radio platform to provide audio content. Thus an
internet connection is required.
Once your Business Music System has established an internet connection, your system will have access
to thousands of local & international stations for use on your phone or audio system.
Radio Functions & Controls
P1: Preset 1 station selection
BACK: press to return to previous screen
P2: Preset 2 station selection
SPEAKER: push to turn audio on/off
P3: Preset 3 station selection
POWER : press button to power unit on/off
P4: Preset 4 station selection
VOL/ Scroll Knob: turn to the right to increase VOLUME
P5: Preset 5 station selection
VOL/ Scroll Knob: turn to move up / down within the MENU
SELECTIONS. Push in the knob to select desired station
Back Panel Connections
There are several optional connections on the back panel.
1)
AC Power Jack Connection - Plug the supplied power adapter into the radio’s power adapter jack & plug
the other end into the wall.
2)
STEREO OUT - RCA (L) & (R) Jacks connect to desired audio system for a stereo audio connection.
3)
PBX OUT - Single RCA Jack connect to Phone system (PBX /Key) input jack.
4)
LAN – connect to the internet with the wired Ethernet LAN connection. OR connect to the internet with
the wireless 802.11n (connects to 802.11 n, b, g wireless routers) WiFi connection
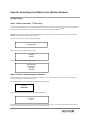
Steps for Connecting Your Radio to Your Wireless Network
Getting Started
Step 1 - Power up the radio - 1st time set up
Connect one end of the AC Power cord to the back of your GDI-IRBM20 and the other end to the available wall plug. The radio can be switched
on or off with the STANDBY/ON button. The STANDBY/On button is marked on your radio with this symbol . If only the clock is displayed on
the top of the display, the unit is in standby mode. Please turn the radio on before going to the next step.
CAUTION: Use only the power adapter supplied with GDI-IRBM20. Connecting a power supply with a different rating will cause permanent
damage and may be hazardous and will void the warranty.
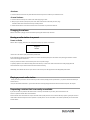
After you turn the radio on it will briefly display the following:
Grace Digital Radio
After a few seconds, the screen will change to show:
Initializing
Network
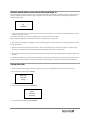
After a few seconds, the screen will change to show:
Scan for networks
Enter network
View Config
Edit Config
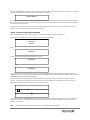
Step 2 - Scan for a wireless network connection
When the display shows brackets next to the words <Scan for networks>, press the ‘Select’ dial. (NOTE: IF you make an error at any point,
press the ‘Back’ button to return the previous screen)
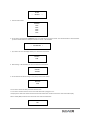
The GDI-IRBM20 will now scan for all available wireless networks and will display:
Scanning
IIIIIIIIIIIIIIIIIII
IF the radio does not find a wireless network router, the display will show:
No networks
Found
If this happens after subsequent attempts you should check the status of your Wi-Fi router - see the instructions supplied with your wireless
router / modem or contact the person who set up your home computer network.
When the GDI-IRBM20 finds your wireless network, the display will show the SSID (the name of your home wireless network) - this is the name
ascribed to your Wi-Fi router by the person who set up your network - for example:
< My Home Network >
It is possible, and in some locations likely, that your radio will find more than one wireless network, in which case you can choose the wireless
(Wi-Fi) network you want to connect to. Turn the dial on your radio until the name of the wireless network has brackets {} next to the name of
the network you want to connect to.
For optimal performance you may want to check your home network settings to make sure your radio is on a deferent channel than your
neighbors. To do this please consult your Wi-Fi router owner’s manual.
Step 3 - Connect to the wireless network
When the SSID for the Wi-Fi router you want to connect to is displayed on the screen, press the large dial inward.
IF your network is not configured to require an encryption code, the screen should display:
Connecting to
Network
then:
Network OK
IF the screen displays either WEP or WPA, a password is required:
Enter WEP key
OR
Enter WPA key
Then the network is using one of the encryption systems: Wired Equivalent Privacy (WEP) or WiFi Protected Access (WPA or WPA2). You
therefore need to enter the correct WEP or WPA password on your GDI-IRBM20 radio to communicate with your network. Please note that the
GDI-IRBM20 does not currently support WPA2 Business.
Only the person who set up the network in the first place knows this password; if that person is not you then you need to find out the
password. You can do this by checking with the Customer Service of your internet provider or the manufacturer of your wireless router.
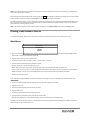
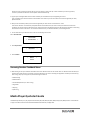
After approximately 3 seconds, the display goes into the password entry mode:
< END ◄ ►
A
BCDEF>
█
To enter the password, use the SCROLL to select each letter/number/symbol of the password in turn. When the 1st letter or number of your
password is in the center of the display, press the large dial inward to select that letter or number. Repeat this process for each letter or
number in your password.
NOTE:
WEP and WPA passwords are upper and lower case sensitive and MUST be entered exactly
HINT: Use the ’Back’ button to erase incorrect characters that you may have entered. IF the display shows: “Invalid key” or “Network Error”,
an incorrect password has been entered.
After entering the final letter/number/symbol, scroll to find & select END . The word ‘END’ is centered in the display press in the volume knob.
Once the password is entered correctly, your GDI-IRBM20 should now be able to connect to the network.
Your radio should now be able to connect to the selected network without having to re-enter a password. Your password will be saved in your
Grace radio even if a power outage occurs. You will have to alter your password however, should you attempt to connect to an alternative
wireless network or you change your Wi-Fi router.
NOTE: IF you would like to give your radio a static IP address then please see the ‘Network config’ section under the ‘Setting’ section.
Choosing a radio station to listen to
1. Press the ‘Select’ button. NOTE: IF you make an error at any point, press the ‘Back’ button to return to the previous screen)
Main Menu
Internet Radio
Personal Radio
Podcasts
My Stuff
2. If the screen does not show < Internet radio > as shown above, turn the knob until it does. Please note that the ‘My Stuff’ folder will only
show up after you register your radio onto our web site.
3. Press the ‘Select’ button, to choose <Internet radio>.
4. Turn the knob to choose from, <Location>, <Genre>, <Search>,<Sirius>, <Live 365>.
5. Press the ‘Select’ knob inward to choose the option you want.
<Location> allows you to choose radio stations by country.
<Genre> allows you to choose radio stations according to their content. For example: Classic Rock, Sport, News, etc.
<Search> Allows you to enter in the 3 or 4 letter call sign of the radio station that you want to listen to. For example: 95.3, 96.9, KROC etc.
<SIRIUS> allows you to choose a Sirius Internet Radio station if you are have a Sirius Premium Internet Radio subscription.
<Live365> is a subscription service.
If you would like to change your SIRIUS username and password choose ‘change username’ in the SIRIUS menu. Follow the above steps.
<Location>
1. Turn the knob until the display shows the region you want (or select ‘All’ to display all countries),
2. Press the ‘Select’ knob.
3. Turn the knob until the display shows the country you want.
4. Press the ‘Select’ knob.
5. Turn the knob until the display shows the station you want.
6. Press the ‘Select’ knob and wait until the radio connects to that station.
Note that some radio stations do not broadcast 24 hours per day, and some stations are not always on-line.
If this station has on-demand content (that is, it gives the option of listening to programs which have already been broadcast), see “Stations
which enable you to choose what you listen to”.
<Genre>
1. Turn the knob until the display shows the type of content you want to listen to (sports, news, 90’s, talk radio etc) , then press the ‘Select’
knob inwards.
2. Turn the knob until the display shows the station you want.
3. Press the ‘Select’ knob and wait until the radio connects to that station.
NOTE some radio stations do not broadcast 24 hours per day, and some stations are not always on-line.
If this station has on-demand content (that is, it gives the option of listening to programs which have already been broadcast), see “Stations
which enable you to choose what you listen to”.
<Search>
1. After you choose ‘search’ the radio will display ‘Station Name’ and the alphabet and numbers below. Enter in the station that you would like
to search for in the same manner that you entered in your Wi-Fi password i.e. choose the 1st letter or number of the station then press the
large dial inward. Continue until the number of call sign is entered then choose the word END .
2. The list of stations that include the numbers or letters that you searched will be displayed.
3. Press the ‘Select’ knob and wait until the radio connects to that station
<SIRIUS>
If you have a valid SIRIUS ‘Premium’ Internet radio package you can access SIRIUS stations on your GDI-IRBM20. To sign up for SIRIUS premium
internet radio service . Please note: SIRIUS ‘standard’ internet radio service will not work on
the GDI-IRBM20 a user must have SIRIUS ‘premium’ internet radio service.
When you are in the SIRIUS menu on the GDI-IRBM20, press the select dial inward to choose <sign in> or <change username>. When prompted
enter in your SIRIUS user name (user names are UPPER and lower case sensitive). After you enter in your username choose END . The display
will show ‘Loading…’. You will then be prompted to enter in your SIRIUS password (passwords are UPPER and lower case sensitive). After you
enter in your password choose END . The display will show ‘Loading…’ After your password has been accepted please press the ‘back’ button
on the radio until you see ‘SIRIUS’ on the menu. Choose SIRIUS. Now after you choose SIRIUS your radio will show ‘Loading….’ Then the list of
SIRIUS stations by genre will be shown on the radio.
If you would like to see the full list of all stations available please go to the bottom of the SIRIUS genre list and choose ‘all stations’. You will
now be able to view the Sirius internet radio stations with their appropriate SIRIUS number. Scroll to the station you would like to listen to and
press the select dial inward to listen to that station.
Choosing a Pandora radio station
(Personal Radio)
Below the ‘Internet Radio’ choice on your radio is the “Personal Radio’ choice. This section allows for new Grace Digital Personal radio
services. The current service is Pandora. Prior to this feature working you must first register your radio on the Grace web site. Please see
the section in this manual for ‘Registering your radio / creating an account ’.
<Stations>
1. Press the select knob to choose any of the Pandora stations that you have created on your Pandora account.
<Create Stations>
1. Press the select knob and you can create a new station by typing in a word.
2. After you type in the word, select (end) in the menu. After a few seconds it will show you artist, songs
and albums with names similar to the word you initially entered.
3. Choose desired selection. This function will also create a new station on your Pandora web site.
Changing the volume
When a radio station is playing increase the volume by turning the Volume Knob, clock wise.
Storing a radio station in a preset
Preset on Radio
When a station is playing, hold down one of the preset buttons (1-5) until the screen shows:
Assigned to
Preset #
* Where “#” is the number of the preset button you held down.
If you would like to program more than 5 preset i.e. 6-10. Press the shift key then press and hold the corresponding preset button until the
screen shows Assigned to Preset 6 etc.
All of your presets are saved in internal memory in the event of a power outage.
As a factory default ‘P1’ has a demo recording stored in the memory. To save a new station over the demo recording simply follow the
instructions above and your station will be saved over the demo recording.
Additionally, the P1 button will also turn your radio on. It will not turn your radio off. Please use the designated power button.
Playing a preset radio station
When your radio is powered on and connected to your Wi-Fi network, briefly press the preset button (1-5) on the radio for the station you
want to listen to.
* Note, do not hold the button down - if you do then the station currently playing will overwrite the one stored in the preset; *be careful*.
Requesting a station that is currently unavailable
If you want to listen to a particular radio station which is currently not available on your radio, please contact Reciva and
enter in a request to add the station to the database.
Please note that some radio stations do not pass the audio stream quality test so we are not able to add every request. Typically we can add a
station within 10 business days if the station provides us a quality stream. You can check back on our web site periodically to see if the station
has been added.
Stations which allow you to choose what you listen to
Some radio stations can provide a number of options associated with their station; for example, some stations enable you to listen to programs
that have already been broadcast. When you select a radio station that has this ability, the station does not start playing immediately, but
instead the display shows:
<
Live
>
On Demand
1. Turn the knob to choose <Live> or <On Demand>, then press the select knob inwards. IF you choose <Live> then the radio plays the current
output from this station as normal.
If you choose <On Demand> more screens are displayed and you can choose what you want to listen.
What is displayed will depend on the station you have chosen - the following steps are only a guide.
2. When you choose <On Demand>, the display shows the names of the programs. Turn the knob to choose the program you want, then press
the large knob inwards.
3. When you have chosen the program you want to listen to, either it will just start playing, or the display may show a list of days for you to
choose from - use the large knob to set the day the program was broadcast, and then press the ‘Select’ button.
4. After you have chosen the day, you may be able to choose the Start Time. Set the Start Time turning the knob and pressing it inwards to play
the station.
5. Program which enables you to choose the time also enable you to fast-forward and rewind to the part you want to listen to while the radio is
playing. The elapsed time is displayed. Using the Skip forward (P3) or Skip backward (P1). Skip forward or backward in 30 second intervals.
Setting the clock
1. Press the ‘Select’ knob inward. (Note: if you make a mistake at any point, press the BACK button to go back to the previous screen.)
2. Turn the knob until the display shows <Settings>
Media Player
Alarm Clock
<
Settings
>
3. Press the ‘Select’ knob.
4. Turn the knob until the display shows <Clock Setup>
<
Register
Clock Setup
Sleep Timer
>
5. Turn the knob until the display says <Set Time/Date>
<
Set Time/Date
Set Alarm
DST
>
6. Press the ‘Select’ knob.
Pacific
Central
Eastern
7. Turn the knob until the correct time zone is seen on the display. Push the ‘Select’ knob to set your time zone. Then turn the Menu knob
until the hour setting is correct, then press the ‘Select’ knob.
Set Time
1:30 PM
8. Turn the knob until the minute setting is correct, then press the ‘Select’ button.
Set Time
1:34 PM
The display shows <Set Time> with the new time shown beneath for 3 seconds, then returns to the menu, press the ‘Back’ button 2 times to go
to the main menu. The radio will now keeps time based on information it receives from the internet.
Setting the alarm
1. Press the ‘Select’ button.
NOTE: IF you make a mistake at any point, press the BACK button to go back to the previous screen
2. Turn the knob until the display shows <Alarm Clock>
<
Stations
Alarm Clock
Media Player
3. Press the ‘Select’ button.
4. Turn the knob until the display shows <Set Alarm>
>
<
Set Time
Set Alarm
>
5. Press the ‘Select’ button.
Disable all
1 OFF
2 OFF
3 OFF
4 OFF
5 OFF
6. Turn the knob to choose between <Disable all> which turns off all alarms or any of the 5 alarms. Press the select button to set the alarm that
you want to activate. Below is an example to set Alarm 1. Choose < 1 Off 12:00 AM>
<
1 Off 12:00 AM
>
7. If you choose “Yes” then the display enables you to set the time for the alarm.
Set Alarm
15:06
8. After selecting < 1 Off 12:00 AM> you can choose the time to set the Alarm.
Set Alarm
12:00 AM
9. Turn the knob until the minute setting is correct, then press the ‘Select’ button.
Alarm Set:
07:45
10. Turn knob to choose how often you want the Alarm to alarm
11. Turn knob to use either the buzzer or the current radio station that is playing to turn on.
The display shows <Alarm Set> with the time of the alarm shown beneath for 3 seconds and then returns to the radio station display.
When in Standby Mode, the Alarm time is shown next to the clock time with brackets.
1:58
Ensure the volume is set to the desired level before you turn the radio off.
NOTE: when your Alarm turns on, the radio’s back light display will turn on and show a menu asking if you want to turn on the radio or not. If
within 60 seconds after the display turns on your radio does not connect to your Wi-Fi network and the radio station starts playing, the buzzer
will announce instead. For optimal performance choose a radio station that typically buffers very quickly.
Setting the sleep timer
1. Choose Alarm Clock
2. Choose Sleep Timer
3. Then scroll the Select knob form between 30 seconds and 99 hours. When the desired time is reached, Press the select knob. The radio will
stay on until the timer is reaches zero.
Registering your radio / creating an account
Registering your radio / creating an account
1. Your radio must be connected to your Wi-Fi internet connection prior to registering your radio and creating an account. Go to the main
menu of your radio. ‘Internet radio’ will be on the top of the radio’s main menu. Go to the bottom of this menu and choose ‘settings’. On
the next menu scroll the large knob to the right until you see ‘register’ between brackets ,- then push the large select knob inwards. Your
radio will create a registration code (key) . Write this number down. If you radio does not provide a registration code (key) then your radio
is not currently connected to your Wi-Fi network. Please see the section in this manual on connecting your radio to your Wi-Fi network.
Please note: If you do not create your online account within 24 hours of requesting a registration code (key) on your
radio you will have to go through the above registration code (key) step on your radio again. You only have to register your radio one time on
the above account.
2. Open the website from your computer’s internet browser.
3. Enter in the code (key) that you obtained from your radio onto the web site and choose ‘submit’ on the web site. Please note that the web
site will show the ‘serial number’ of your radio after you choose submit, not your registration code (key). You do not need to note this
number. Please proceed to creating your account on the web site.
4. After your account is successfully created your radio will be associated with this web site. After you power your radio on/off and choose the
‘internet radio’ menu on the radio (this pushes a new menu to the radio) you will now be able to see additional menu choices on the radio (A
‘my stuff’ folder will be created on the 2nd page of the main menu) as well as the web site.
You will see 3 sections on the web site.
* ‘see extra features’: This is the area to link your Pandora, live365 and future services to your radio
* ‘manage my stuff’:
This is the area to add your personal streams and to save addition stations.
* ‘manage my radios’: This is the area to delete your radio from your account or to add additional radios.
Configuring ‘My Profile’
1. Once logged into you Grace Digital Audio account, you can edit your account’s details from your ‘My Profile’ section.
2. Click on the ‘My Profile’ link to view your account’s current information. This information will include various details such as your address,
user name, password etc. Edit your details and then click on the ‘Update’ button to save them.
Configuring ‘My Stations’
1. It is possible to search for radio stations that are available in Grace Digital Audio’s stations’ database from Grace Digital Audio’s website.
Whenever stations are searched for on the website, they will be displayed in a list of search results together with a link to ‘Add to My
Stations’.
2. Clicking on the ‘Add to My Stations’ link, will add the station to your account’s ‘My Stations’ list. Clicking on ‘My Stations’ and then selecting
the station will allow you to edit this list.
3. Once you have Internet stations available in your ‘My Stations’ list, you may play these stations directly from your Internet Radio. These
stations will be available on your radio from the menu item: ‘Stations > My Stuff > My Stations’. Please note, the stations will only be available
to your radio once your radio has downloaded a new stations list. To cause the radio to download a new stations’ list, please remove and
reconnect the power to your radio.
4. Anytime you are listening to a station on your radio you can choose the ‘retrieve’ or ‘reply’ button on your radio or your remote control. This
will bring up a menu on your radio that will allow you to ‘add to My Stations’. Choosing this selection will automatically add the station to you
‘my stations’ folder on your radio. You can save up to 99 stations in your ‘my stations’ folder for easy access at anytime. All of these stations are
saved in the event of a power outage.
Configuring ‘My Streams’
1. Once logged into your Grace Digital Audio website account, you can add your own Internet radio streams to your ‘My Streams’.
2. Clicking on ‘My Streams’ will prompt you to enter the station’s name and its media stream URL. The media stream URL should be a link to a
website’s actual audio stream. If you have any doubt about locating the media stream URL from a webpage, then please refer to the FAQs
section on Grace Digital Audio’s website . You can also contact the website of the station that you want to listen to,
to obtain the exact URL.
3. Once you have Internet radio streams available in your ‘My Streams’ list, you may play these stations from your Internet Radio. These
stations will be available on your radio from the menu item: ‘Stations > My Stuff > My Streams’. Please note, the streams will only be available
to your radio once your radio has downloaded a new stations’ list. To cause the radio to download a new stations’ list, please remove and
reconnect the power to your radio.
Configuring ‘My Podcast’
1. It is possible to add audio podcasts (RSS feeds) to your Grace Digital Audio account that can be accessed on your Internet radio. To add a
podcast, simply login to your account and then click on the ‘My Podcasts’ link.
2. From your ‘My Podcasts’ section, you can add your chosen podcast by entering in the podcast’s name and its URL as prompted by the
website. Please note, the podcast URL will have to be a direct RSS feed which will end with the ‘.xml’ extension e.g.
3. Once you have podcasts available in your ‘My Podcasts’ list, you may access these feeds from your Internet Radio. These podcasts will be
available on your radio from the menu item: ‘Stations > My Stuff > My Podcasts’. Please note, the podcasts will only be available to your radio
once your radio has downloaded a new stations’ list. To cause the radio to download a new stations’ list, please remove and reconnect the
power to your radio.
Configuring “My Pandora’
1. In order to use the Pandora feature on the Grace Digital Internet radio you must 1st have an active Pandora account. You can create a
Pandora account at www.pandora.com or on Grace’s web site.
2. Grace Digital is not affiliated in any way with Pandora nor do we guarantee any of Pandora’s services or streams. Please see Pandora’s web
site for information on how to update and activate your Pandora services. After you have successfully signed up with Pandora’s service that
allows you to use a stand alone internet radio you are now ready to go to the next step. Please note that if you have any questions,
concerns or problems with Pandora’s services please contact Pandora directly.
3. Log onto your Grace Digital Audio account. Please note that you must follow the steps in ‘Registering an Account
prior to upgrading your radio to be able to receive Pandora music stream. If you have not created an account and registered your radio,
please do so now.
4. After you have successfully created your account and registered your radio choose ‘see extra features’. In this
menu choose ‘Pandora’. You will then be prompted to add the ‘email address’ that you used to create your Pandora account and the
‘password’ you used to create your Pandora account. After you have done this please unplug your radio from power and wait 1 minute. Plug
the radio back in and turn the radio on. You will now be able to listen to your Pandora stations on your Grace digital radio.
5. You can then listen to your Pandora music section via the following menu choices.
Select ‘Personal Radio’
<
Internet Radio
Personal Radio
<
My Pandora
>
6. Select ‘My Pandora’
>
6. Select ‘Stations’
<
Stations
Search
>
Accessing Pandora Feedback Menu
1. While listening to one of your Pandora radio stations choose the ‘Retrieve’ button on the internet radio. The ‘Retrieve’ button will allow you
to perform the similar choices as you do with your regular Pandora on line account. Choosing the reply button will allow you to thumbs up /
down a song, sleep up to 6 songs an hour, book mark songs and artist etc.
• Bookmark Song
• Bookmark Artist
• Give Feedback (thumbs up or down a song)
• Song Details
• Skip Song
• Explain Song
Media Player Quickstart Guide
The Media Player allows you to play unprotected audio files (AAC, AIFF, MP3, RM, WAV, WMA) and play lists (M3U) stored on a networked PC
or Apple. It has been verified to work with Windows 2000 and Windows XP, and Apple OSX.
Set Up your Windows PC to enable the radio to access your audio files
via Windows Shares
Windows XP
1. Please ensure that your PC is available on the network for your Internet radio, then, using Windows
Explorer, locate the folder where your audio files are stored.
2. Right click on the folder.
3. Select ‘Properties’.
4. Click on ‘Sharing’.
5. Select ‘Share this folder on the network’ and ‘Allow network users to change my files’. Please note, do not try to make your ‘My Documents’
or any of its sub-folders (e.g. ‘My Music’) shareable.
Windows Vista
1. Please ensure that your PC is available on the network for your Internet radio.
2. Open the ‘Network and Sharing Center’ windows from ‘Start menu > Control Panel > Network and Sharing Center’.
3. From the ‘Network and Sharing Center’, under the ‘Sharing and Discovery’ heading, ensure that the following parameters are set:
Network discovery On
File sharing On
Public folder sharing On
Password protected sharing Off
4. Open ‘Windows Explorer’ by right clicking on the Start menu and selecting ‘Explore’. Create a new directory in the ‘Public’ directory and
move your media files into this new directory.
5. Right click on the directory just created and select ‘Share…’. Ensure that the directory is listed as being shared, if not, click on the ‘Share’
button.
6. Right click on the directory just created and select ‘Properties’. From the ‘Properties’ window, click the ‘Sharing’ tab and then click the
‘Advanced Sharing…’ button. From the ‘Advanced Sharing…’ window, click to check the ‘Share this folder’ option.
Apple OSX
1. The MAC will require Windows File Sharing. MAC OS 9 and earlier versions of the OS will need extra software to use Windows File Sharing.
MAC OS X 10.2 and later versions have Windows File Sharing built into the OS. Please ensure that your PC is available on the network for
your Internet radio. Your radio will also need to be able to access directories that require a user name and password.
2. Setup Windows File Sharing on the MAC:
From the ‘Dock’, click ‘System Preferences’. From the ‘System Preferences’ window, under the ‘Internet & Network’ section, click
‘Sharing’.
From the ‘Sharing’ window, do the following:
• Under the ‘Services’ section, enable ‘Personal File Sharing’ and ‘Windows Sharing’ Also, click ‘Start’ for each of these services.
• Under the ‘Firewall’ section, keep the firewall off.
• Under the ‘Internet’ section, keep ‘Internet Sharing’ off.
3. Setup Account:
From the ‘System Preferences’ window, under the ‘System’ section, click ‘Accounts’. Select an account and remember its ‘Short
Name’ and password. This will be used for the radio to connect to the MAC.
4. Directory Setup:
From the ‘Dock’, click ‘Finder’. From ‘Finder’, click ‘Applications > Utilities’. Click on ‘More Info’ for ‘Directory Access’ and ensure that
it is ‘Read/Write’ enabled. Double-click on ‘Directory Access’ and enable the following:
• AppleTalk
• LDAPv3
• SLP
• SMB/CIFS
Also, for ‘SMB/CIFS’, click ‘Configure’ and select an appropriate workgroup.
Copy and paste the mp3 media files to ‘Documents’ in the ‘Finder’ window.
Turn on ‘AirPort’ (or wireless sharing).
Wait for a few minutes for the changes to take place.
5. The radio should now be able to access the MAC from its ‘Media Player > Windows Shares’ menu after entering in the MAC account’s short
name and password on the radio.
Locate the shared audio files using the radio
1. Power up the radio.
2. Wait for ‘Stations’ to be displayed on the radio, or press the BACK button repeatedly until ‘Stations’ is displayed.
3. Turn the knob until the radio display shows ‘Media Player’.
4. Press the SELECT button and turn the knob until ‘Windows Shares’ is displayed.
5. Press the SELECT button, turn the knob until ‘Scan for PCs’ is displayed and press SELECT again.
6. The radio will now display ‘Finding PCs’. Once the radio has finished, turn the knob to highlight the correct PC.
7. Press the SELECT button. The radio will search for shared folders.
8. Turn the knob to highlight the correct shared folder and press SELECT.
9. The radio will display ‘File Scan…’ as it scans through the media files in the shared folder. Text on the bottom row of the display will change
to indicate that the file scan is in progress. If you have a large number of audio files this could take several minutes to complete.
10. Once the radio has finished scanning, it will display ‘By Album’. You can now browse through the scanned media files, which will now be
organized ‘By Album’, ‘By Artist’ and ‘Play lists’ – if available.
NOTE: The first time the file scan is done a file called ‘.reciva_media_cache’ is written to the folder where the audio files are stored. This is in
order to speed up subsequent file scans.
Listening to a single shared track
1. Turn the knob until ‘By Artist’ is displayed.
2. Press the SELECT button.
3. Turn the knob until the required artist is displayed.
4. Press the SELECT button.
5. Turn the knob until the required album name is displayed.
6. Press the SELECT button. ‘*Add to Queue+’ will be displayed.
7. Turn the knob until the required track is displayed.
8. Press the SELECT button. The track will begin playing.
Listening to a complete shared album
1. Turn the knob until ‘By Artist’ is displayed.
2. Press the SELECT button.
3. Turn the knob until the required artist is displayed.
4. Press the SELECT button.
5. Turn the knob until the required album name is displayed.
6. Press the SELECT button. ‘*Add to Queue+’ will be displayed.
7. Press the SELECT button. The album will begin playing.
Arranging (Queuing Up) tracks for playback later
1. Highlight the required track.
2. Press the SELECT button. ‘Track Added To Queue’ will be displayed.
Arranging (Queuing Up) albums for playback later
1. Highlight the required album.
2. Press the SELECT button.
3. Turn the knob until ‘*Add To Queue+’ is displayed.
4. Press the SELECT button. ‘Tracks Added to Queue’ will be displayed.
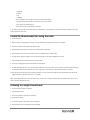
Controlling playback
1. Use the STOP button to stop playback.
2. Use the PLAY/PAUSE button to either pause a currently playing track or to restart a currently paused track or to restart a stopped track.
3. Use the SKIP TO PREVIOUS TRACK button to start playback of the previous track in the queue.
4. Use the SKIP TO NEXT TRACK button to start playback of the next track in the queue.
Browsing the list of tracks currently arranged (queue up) for playback
1. Press the BROWSE button. The currently playing track name will be displayed.
2. Turn the knob to see which tracks are queued up for playback.
3. If you want to jump to a particular place in the queue then press the SELECT button when the required track is displayed.
Removing tracks from the list (queue)
1. Press the BROWSE button. The currently playing track name will be displayed.
2. Turn the knob to select the track you want to remove from the queue.
3. Press and hold the STOP button for 2 seconds and the radio will display: ‘Delete Track?’
4. Turn the knob to highlight ‘Yes’ or ‘No’.
5. Press SELECT to confirm whether you actually want to delete the track from the queue.
6. If ‘Yes’ was selected then ‘Removed From Queue’ will be displayed.
7. To remove all tracks from the queue, keep pressing BACK until the ‘Media Player’ menu item is selected, press SELECT and then turn the knob
to select ‘Clear Queue’ and press SELECT again.
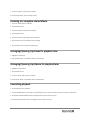
Playing tracks in random order
1. Select the individual tracks as described previously.
2. Navigate to top-level menu item ‘Media Player’ using the SELECT and BACK buttons.
3. Press the SELECT button.
4. Turn the knob until ‘Playback Mode’ is displayed.
5. Press the SELECT button.
6. Turn the knob until ‘Shuffle’ is displayed.
7. Press the SELECT button.
8. Turn the knob to select YES/NO to confirm that shuffle mode should be enabled.
Playing tracks in the list (queue) repeatedly
1. Select the individual tracks as described previously.
2. Navigate to top-level menu item ‘Media Player’ using the SELECT and BACK buttons.
3. Press the SELECT button.
4. Turn the knob until ‘Playback Mode’ is displayed.
5. Press the SELECT button.
6. Turn the knob until ‘Repeat’ is displayed.
7. Press the SELECT button.
8. Turn the knob to select YES/NO to confirm that repeat mode should be enabled.
NOTE:
1. IF the shared folders contain more songs than the Internet Radio memory limit, it will
display “Too many files”
2. Repeatedly pressing button P4 will toggle Repeat and Shuffle modes
Set up a Windows PC to allow the radio to access your audio files via a
UPnP server
1. If your PC is running Microsoft Windows XP or Windows Vista, then you can use Windows Media Player 11 (WMP11) to act as your UPnP
(Universal Plug and Play) media server 1.0. Windows Media Player 11 may be downloaded from Microsoft’s website and installed by
following the instructions detailed in its installation wizard.
2. Once installed, Windows Media Player 11 will create a library from all the media files available to it on your PC. To add new media files to the
library, select ‘File > Add to Library… > Advanced Options’, click ‘Add’ and choose the files you wish to add and click ‘OK’.
3. You will now need to connect your Internet radio to Windows Media Player 11 and configure it to allow the radio to access your media
library. In order to this, you will need to do the following:
a. Keep pressing BACK to get to the radio’s top-level menu and then turn the rotary knob to select ‘Media Player’.
b. Press SELECT and then turn the knob to highlight ‘UPnP Servers’.
c. Press SELECT and the radio will scan for all available UPnP servers. Note, this may take a few seconds for the radio to complete its scan
and before the scan has completed, the radio will display ‘*Empty+’. The radio will continue to display ‘*Empty+’ if no UPnP servers are
found.
d. After a successful scan, select your UPnP server, by rotating the knob if there is more than one UPnP server, and then press SELECT
(note, your radio will display ‘Access Denied’ at this stage).
4. Your PC will now prompt you that a device has attempted to connect to your UPnP server. In order to allow the radio to have access to the
media files, you will need to click the ‘Library’ tab from Windows Media Player 11 and select the ‘Media Sharing…’ item to open the ‘Media
Sharing’ window.
Selecting ‘Media Sharing…’ for Windows Media Player 11:
5. From the ‘Media Sharing’ window, the radio will be listed as an unknown device. Click on the unknown device listed, then click the ‘Allow’
button and then click ‘OK’.
Allowing your GDI-IRBM20 to connect:
Locating and playing media files using the radio and UPnP
1. Once the UPnP server is configured to share media files with the Internet radio, you can play the files by doing the following on the radio.
2. Keep pressing BACK to get to the radio’s top-level menu and then turn the knob to select ‘Media Player’.
3. Press SELECT and then turn the knob to highlight ‘UPnP Servers’.
4. Press SELECT and the radio will scan for all available UPnP servers. Note, this may take a few seconds for the radio to complete its scan and
before the scan has completed, the radio will display ‘*Empty+’. The radio will continue to display ‘*Empty+’ if no UPnP servers are found.
5. After a successful scan, select your UPnP server, by rotating the knob if there is more than one UPnP server, and then press SELECT.
6. The radio will now list the media categories available from the UPnP server, e.g. ‘Music’, ‘Playlists’ etc. Turn the knob to select which
category you wish to browse, press SELECT and turn the knob to highlight a sub category and press SELECT again. For example, you could
select ‘Music’ and then ‘Album’.
7. Turn the knob to highlight the media files that you wish to play and press SELECT.
8. The radio will display ‘*Add to Queue+’, press SELECT and the radio will add the tracks to its queue and begin playing them automatically.
Browsing the list of tracks currently arranged (queued up) for
playback
1. Press the BROWSE button. The currently playing track name will be displayed.
2. Turn the knob to see which tracks are queued up for playback.
3. If you want to jump to a particular place in the queue then press the SELECT button when the required track is displayed.
4. It is important to note here that media files scanned from the radio’s ‘Windows Shares’ function can also be added to the radio’s queue.
Arranging (queuing up) UPnP tracks for playback later
1. Highlight the required track.
2. Press the SELECT button. ‘Track Added To Queue’ will be displayed.
Arranging (Queuing Up) albums for playback later
1. Highlight the required album.
2. Press the SELECT button.
3. Turn the knob until ‘*Add To Queue+’ is displayed.
4. Press the SELECT button. ‘Tracks Added to Queue’ will be displayed.
Controlling playback
1. Use the STOP button to stop playback.
2. Use the PLAY/PAUSE button to either pause a currently playing track or to restart a currently paused track or to restart a stopped track.
3. Use the SKIP TO PREVIOUS TRACK button to start playback of the previous track in the queue.
4. Use the SKIP TO NEXT TRACK button to start playback of the next track in the queue.
Removing track from the list (queue)
1. Press the BROWSE button. The currently playing track name will be displayed.
2. Turn the knob to select the track you want to remove from the queue.
3. Press and hold the STOP button for 2 seconds.
4. Turn the knob to highlight ‘Yes’ or ‘No’.
5. Press SELECT to confirm whether you actually want to delete the track from the queue.
6. If ‘Yes’ was selected then ‘Removed From Queue’ will be displayed.
7. To remove all tracks from the queue, keep pressing BACK until the ‘Media Player’ menu item is selected, press SELECT and then turn the knob
to select ‘Clear Queue’ and press SELECT again.
Playing tracks in random order
1. Select the individual tracks as described previously.
2. Navigate to top-level menu item ‘Media Player’ using the ‘Select’ and ‘Back’ buttons.
3. Press the ‘Select’ button.
4. Turn the knob until ‘Playback Mode’ is displayed.
5. Press the ‘Select’ button.
6. Turn the knob until ‘Shuffle’ is displayed.
7. Press the ‘Select’ button.
8. Turn the knob to select YES/NO to confirm that shuffle mode should be enabled.
Playing tracks in the list (queue) repeatedly
1. Select the individual tracks as described previously.
2. Navigate to top-level menu item ‘Media Player’ using the ‘Select’ and ‘Back’ buttons.
3. Press the ‘Select’ button.
4. Turn the knob until ‘Playback Mode’ is displayed.
5. Press the ‘Select’ button.
6. Turn the knob until ‘Repeat’ is displayed.
7. Press the ‘Select’ button.
8. Turn the knob to select YES/NO to confirm that repeat mode should be enabled.
The Media Player allows you to play unprotected audio files (AAC, AIFF, MP3, RM, WAV, WMA) and play lists (M3U) stored on a networked PC.
Verified to work on Windows 2000 and Windows XP.
Settings Menu
Choosing desired option from the Configure menu
1. Press the ‘Select’ button.
(Note: if you make a mistake at any point, press the ‘Back’ button to go back to the previous screen.)
2. Turn the knob until ‘Settings’ is displayed
3. Press the ‘Select’ button.
4. Turn the knob until the display shows the option you want.
5. Press the ‘Select’ button to choose the option shown on the display. The options are explained below.
<Network Config>
Enables you to scan again for connection to another wireless network, or to manually configure the network parameters. Use this if you take
the Internet radio to another building where you want to use it, or if you change your wireless router.
<Upgrade Firmware>
Use this option to download new firmware for the radio from the Grace Digital Audio portal on the Internet. If there is new firmware available,
then the radio will prompt you if you want to download it or not. Note, at this stage, you can press the radio’s ‘Back’ button to cancel the radio
beginning a firmware upgrade. A Firmware upgrade may take several minutes, so do not switch off the power to the radio until the operation is
complete otherwise the radio may become permanently damaged.
<Language>
Allows you to change the display language.
<Factory Reset>
Puts all the settings back to their defaults as they were when the unit left the factory. If you perform a factory reset on your radio you will lose
all your presets and your wireless network connection.
Please note that your radio’s serial number will still be registered with your Grace Digital internet radio account (assuming you already
registered the radio). Any premium station passwords, my stuff stations and podcast that were saved on our web site will be saved all reassociate with your radio after you power back on, log onto your network and download a new stations list.
<Register>
This will display a key that can be used to register the radio on the Grace Digital Audio Customer portal
<Clock Setup>
Use this option to set the time, to set an alarm and to view the current alarm setting, see “Setting the alarm”.
<Backlight>
Selecting this option will alter the Internet radio’s backlight brightness.
1. After selecting the ‘Backlight’ menu item, the radio will display its list of three menu modes: ‘Inactive’, ‘Active’ and ‘Standby’. These three
states are explained below:
• The radio gets into its ‘inactive’ state when there is no button pressed for 30 seconds.
• The ‘active’ state is when there is user activity.
• ‘Standby’ is the state when the radio has been turned off.
2. Rotate the knob to highlight the desired menu mode and press SELECT.
1.
The radio will now display the current backlight value for this menu mode. You can alter this value by rotating the knob to increase or
decrease it.
<UPnP>
This menu allows you to change the name of your device. You can name your device any name you want so other UPnP devices will be able to
view the name. Such as Greg’s Kitchen Radio etc.
<Wi-Fi Strength>
This menu will show the signal strength of your Wi-Fi access point as it is seen by the internet radio. This feature can assist you in locating of
your internet radio for optimal performance.
<Other Cool Stuff>
Please note this manual is for the current shipping version of software (FIRMWARE). We periodically release new software (FIRMWARE) with
new features and move some menu items around that may reorganize your current menu layout. Please have fun and look around at all the
features, enjoy listening to premium music content, talk radio, kids programs, music, NPR, BBC and sports from around the world, and check
with us periodically for feature and content updates.
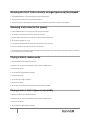
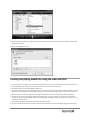
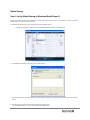
Media Sharing
Step 1: Set Up Media Sharing In Windows Media Player 11
After you download and install Windows Media Player 11 for Windows XP and connect your radio to your network, you need to set up media
sharing so that you can share music with your radio.
The following steps describe how to set up media sharing in Windows Media Player 11.
1.
In Windows Media Player 11, click the small arrow below the Library tab, and then click Media Sharing.
2. In the Media Sharing dialog box, select the Share my media check box.
3. In the list below the Share my media to: check box, click your Radio*, click Allow, the selected device will now show a green tick and then
click OK.
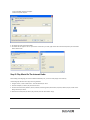
• If your device does not appear in the list of devices perform the following steps;
1. From the “Media Player” menu of your internet radio select “UPnP Servers”
2. A list of available computers will appear.
3. Select the required computer.
4. The display may show “Access Denied (801)”
5. Your device will now appear in the list. If you want to confirm this is your radio, right click the device and select Properties your radio’s MAC
address will be shown.
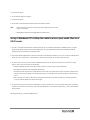
Step 2: Play Music On The Internet Radio
After installing and configuring your radio and Windows Media Player 11, you are now ready to play music wirelessly.
The following steps describe how to play music using the Radio.
1. Using the control, to select “UPnP Servers” from the “Media Player” menu.
2. Select the computer you wish to play the music files from.
3. Use the control to browse by All Music, Genre, All Artists, Contributing Artists, Album Artists, Composers, Albums, Play lists, Folders or Star
Ratings and then press Select.
4. Select the music track/tracks you want to play, and then press the ‘Select’ button. Enjoy!
Troubleshooting
Please read the User’s Guide carefully to ensure proper use of your system and to enjoy your GDI-IRBM20’s basic and advanced
features.
Please keep this User’s Guide for future reference. If you experience any trouble with your wireless internet radio GDI-IRBM20, then you may
find it useful to visit the help section on our webpage
If you have trouble connecting GDI-IRBM20 to your wireless network, these steps may help to resolve the problem:
1. Confirm a WiFi connected PC can access and browse the internet (web) using the same network.
2. Check that a DHCP server is available, or that you have configured a static IP address on GDI-IRBM20. You can configure a static IP address on
GDI-IRBM20 using the menu item ‘Setting - Network Config - Edit Config’, and then select ‘No’ for ‘Auto (DHCP)’.
3. Check that your network’s firewall is not blocking any outgoing ports. As a minimum, GDI-IRBM20 needs access to UDP and TCP ports 80,
554, 1755, 5000, 6000 and 7070.
4. Check your access point does not restrict connections to particular MAC addresses. You can view GDI-IRBM20’s MAC address using the menu
item ‘Setting - Network Config - View Config - MAC address’.
5. If you have an encrypted network, check that you have entered the correct key or pass phrase into GDI-IRBM20. Remember that text-format
keys are case sensitive. If, when attempting to connect to an encrypted network, your radio displays: ‘Wireless error’ followed by a 5-digit
number, then please ensure that you enter the correct pass phrase for the network. If the problem persists, then you may need to consult
your network configuration.
If your radio can connect to the network successfully, but is unable to play particular stations, it may be due to one of the following causes:
1. The station is not broadcasting at this time of the day (remember location may be different time zone)
2. The station has reached the maximum allowed number of simultaneous listeners.
3. The station is not broadcasting anymore.
4. The wireless link on GDI-IRBM20 is out of date.
5. The internet connection between the server (often located in a different country) and you is slow.
Try using a PC to play back the stream via the broadcaster’s web site. If you can play back the station with a PC
to notify us so that we can change the station data that may be accessed by your GDI-IRBM20 at a future date
.
Specifications
802.11n WiFi (compatible with 802.11n, b,g wireless routers)
Impendence: 8 / 600 ohm
Frequency response: 120Hz – 15KHz ± 3dB
4-Line dots display
100/220 VAC-5V DC 700mA
100 - 240V, 12V 1.2A switching power adapter
* Specifications subject to change without notice
This warranty is applicable in the United States only and does not in any way limit the
customer’s legal rights. Claims and enquiries under the warranty for Grace products purchased
outside the USA should be addressed to the local importers or distributors. If you have reason
to claim under the warranty please contact your dealer in the first instance. Please retain all
original packaging materials for possible future use. We suggest that you complete details of
purchase now and keep this information in a safe place for future reference. Grace Digital
provides their Canadian, Central & South American dealers, distributors, and retailers with a 1
year warranty.
Grace system
Your Business Music System (GDI-IRBM20) is supported by a limited manufacturer’s
warranty for product defects in material or workmanship that may be evident under normal
use for 1 year from date of purchase from an authorized franchisee or dealer.
The warranty stated herein is the only warranty applicable to this product. All other
warranties, expressed or implied are hereby disclaimed and are limited by the written
limited warranties contained herein. Except as provided herein, the manufacturer shall have
no liability or responsibility to a customer or any other person or entity with respect to any
liability, loss or damage caused directly or indirectly by use or performance of the product
or arising out of any breach of this warranty, including, but not limited to, any damages
resulting in inconvenience, loss of time, data, property, or profit or any indirect, special,
incidental, or consequential damages, even if the manufacturer has been advised of the
possibility of such damages.
In the event of a product defect during the warranty period, return of the product and your
sales receipt as proof of purchase date for your GDI-IRBM20 unit is required and shall, at
the discretions of the manufacturer, result in: (a) correction of the defect by repair without
charge for parts and labor; (b) replacement with the same or similar design; or (c) refund for
the purchase price if purchased directly and returned within 30 days of purchase. All
replaced parts and products, and products, on which a refund may be made, become the
property of the manufacturer. New and reconditioned parts and products should be
warranted for the remainder of the original warranty period.
The warranty does not cover:
(a) damage or failure caused by or attributed to acts of God, abuse, accident, misuse,
improper installation or improper maintenance, alteration, lightning or excessive voltage or
current;
(b) any repairs other than those provided by a GDI-IRBM20 authorized service facility;
(c) consumables such as fuses or batteries;
(d) cosmetic damage;
(e) transportation, shipping or insurance costs;
(f) costs of product removal, installation, set-up, service adjustment or re-installation.
Customers are responsible for any shipping costs related to product return, repair and/or
refund.
Warranty terms may be revised without notification at the discretion of the manufacturer.
Home radio