1
www.freecom.com
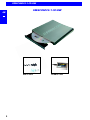
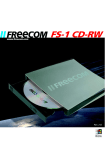
FS-1 CD-RW
Rev. 212
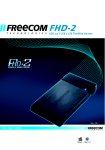
FREECOM FS-1 CD-RW
FREECOM FS-1 CD-RW
GB
USB-2 cable
2
CardBus cable
Table of Contents
U SERS
MANUAL
GB
General Information ........................................................................ page 5
Precaution and operating hints ...................................................... page 6
CHAPTER 1:
FS-1 CD-RW USB-2 version ............................................................... page 7
CHAPTER 2:
FS-1 CD-RW CardBus version ......................................................... page 10
CHAPTER 3:
Installing the CD Recording Software .......................................... page 17
CHAPTER 4:
Troubleshooting ............................................................................ page 20
FREECOM Internet Service & Support Hotline ............................. page 21
CHAPTER 5:
Glossary - List of key words ........................................................... page 22
© 2002 FREECOM Technologies
3
FREECOM FS-1 CD-RW
Dear user!
GB
Welcome to the FREECOM FS-1 CD-RW installation. Before you install the
device, please read the contents of this manual carefully.
Recommendation: For optimal results, use FREECOM blank CDs.
FREECOM Technologies Germany
www.freecom.com
Warning !
All rights reserved. The products named in this manual are only used for identification
purposes and may be trademarks or registered trademarks of the respective
companies. This device was designed for home or office use.
Warning! This device is equipment complying with EN55022 class A. This equipment
can cause radio disturbances in a residential area. If this is the case, the user has to
take appropriate measures and assume all responsibility and costs for. It may not
be used near or with any life-sustaing systems.
FREECOM Technologies is not liable for any damages that may occur from the use
of a FREECOM system. All rights reserved. We reserve the right to upgrade our
products in keeping with technological advances.
4
General Information
General Information
GB
The following hardware and software requirements must be fulfilled to ensure
trouble-free operation.
Hardware Requirements
In order to use the FREECOM FS-1 CD-RW, following components are needed:
USB-2 cable or CardBus cable (depending on the connection type chosen)
USB port or CardBus port (depending on the connection type chosen)
Pentium I 166 Mhz and higher
at least 32 MB RAM
at least 100 MB free hard disk space
a floppy drive or internet connection for driver installation
recommended: Pentium II processor or higher, 64 MB RAM or higher, 740 MB
hard disk space
Software Requirements
CardBus cable
USB-2 cable
Windows 98 SE
Windows 98 SE
Windows ME
Windows ME
Windows 2000
Windows 2000
Windows XP
Windows XP
Media Formats
Data CDs (ISO 9660 and Joliet)
Audio CDs
Mixed mode CDs
CD-ROM XA
UDF (Universal Disc Format)
Photo CDs
CD-Is
The drive can write,rewrite and read CD-R (W) disks. The capacity of the CD-RW
is 650 MB/700 MB. CD-RW disks are only read-compatible with multi-read
capable CD-ROMs, DVD-ROMs as well as CD-RW drives.
5
FREECOM FS-1 CD-RW
Precaution and operating hints
GB
The FS-1 CD-RW can be opened in the following modes with the Eject button
or with the emergency-eject:
-
in the running mode
-
The tray can be openend at any time by cautious insertion of a pointed
object like a bent paperclip and pressing the emergency-eject.
The FS-1 CD-RW should be operated in horizontal state. It should not be
moved during operation.
Operating the device should only take place within temperature ranges of
5 50 °C.
Please ensure the FREECOM FS-1 CD-RW and media attain room temperature
for operation. The reason for this is to avoid condensation which may have
occured at transportation.
The FS-1 CD-RW should not be used in dusty and humid surroundings.
Use only the original FREECOM AC adapter (FREECOM Art No 16723). The use
of other AC adapters may damage your FS-1 CD-RW. FREECOM refers the
right to refuse any warranty claim in case other AC Adapters have been used.
Avoid places close to a heat source.
Never move the drive while operating and allow at least 30 seconds spin
down time after you switched off the device.
Avoid contact with any liquids.
To clean the FS-1 CD-RW use a non-corrosive, clean and dust free soft
cleaning cloth.
The FS-1 CD-RW should not be operated near strong electromagnetic
radiation source (loud speakers, mobile phones etc.)
Note: For maximum performance of the FREECOM FS-1 CD-RW, both
computer system and software must support USB 2.0. Connecting the
FREECOM FS-1 CD-RW to a USB-1 interface will limit the recording speed
to 4x.
On the right side of the FS-1 you will find the Kensington security slot. This slot is
to help protect the FS-1 from theft. Please see www.kensington.com for details on
how this slot works.
6
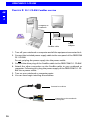
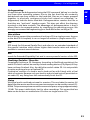
FS-1 CD-RW USB-2 version
C HAPTER 1: FS-1 CD-RW USB-2 version
GB
1
computer or
notebook
FS-1 CD-RW
USB-2 Cable
Power
adapter
1. Connect the drive connector of the USB-2 cable to the FREECOM FS-1 CD-RW.
2. Connect the power connector to the FREECOM FS-1 CD-RW.
3. Insert the power adapter of the FREECOM FS-1 CD-RW into a power socket.
4. Connect the USB-2 connector of the cable to your notebook or computer.
5. You can now start with the software installation.
Note: You can plug the USB-2 cable into your computer and unplug it
while the computer is running ("hot plug & play"). Remove the USB-2
cable from the computer when doing so, never remove the USB-2 cable
from the drive when the power of the notebook or computer is on.
7
FREECOM FS-1 CD-RW
1.1 USB driver installation
GB
Your FREECOM FS-1 CD-RW is fully backwards compatible with USB 1.1. The
installation for USB 1.1 is the same as described below for USB-2.
1
1.1.1 Driver Installation under Windows ME / 2000 / XP
Under Windows ME/2000/XP a separate FREECOM driver is not required. The
drivers for Windows ME, Windows 2000 and Windows XP will be installed
automatically by the operating system after plugging in the FREECOM FS-1 CDRW into the USB port of the computer.
1.1.2 Driver installation under Windows 98 SE
1. Insert the FREECOM driver Disk for Windows 98 SE into the Floppy Disk Drive.
2. Connect your FREECOM FS-1 CD-RW to the USB connector of your notebook
or computer.
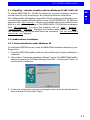
3. The "Add New Hardware Wizard" opens and a "USB 2.0 Device" (USB-2 Host
Controller) or a "USB2-IDE Controller" (USB 1.1 connector) is found.
Click on "Next".
4. In the next window select "Search for the best driver for your device.
(Recommended)".
Click on "Next".
8
FS-1 CD-RW USB-2 version
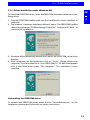
5. Make sure that the checkbox "Floppy disk drives" is activated in the next
window.
GB
1
Continue by clicking on "Next".
6. The Hardware Wizard finds a "FREECOM USB-2 Drive".
By clicking on "Next" the necessary files will be installed. Afterwards click on
"Finish" to complete the installation.
Congratulations! Youve just finished to install the FREECOM FS-1 CD-RW and
the drive is almost ready to use. Right now the drive is recognized as a CD-ROM
drive in "My Computer". To burn CDs you need to install the included CDRecording software (see chapter 3).
9
FREECOM FS-1 CD-RW
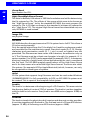
C HAPTER 2: FS-1 CD-RW CardBus version
GB
2
computer or
notebook
FS-1 CD-RW
CardBus cable
Power
adapter
1. Turn off your notebook or computer and all the equipment connected to it.
2. Connect the included power supply cable to the rear panel of the FREECOM
FS-1 CD-RW.
Do not yet plug the power supply into the power outlet.
3. Connect the drive plug of the CardBus cable to the FREECOM FS-1 CD-RW.
4. Attach the other connection on the CardBus cable to your notebook or
computer. Following this, plug the power supply of the FREECOM FS-1 CDRW into a power outlet.
5. Turn on your notebook or computer again.
6. You can now begin installing the software.
Connection to drive
Connection to the notebook
or computer
10
FS-1 CD-RW CardBus version
2.1 "Plug&Play" with the CardBus cable for Windows 98 / ME / 2000 / XP
GB
To use the FREECOM FS-1 CD-RW for Windows, primary installation must be
carried out only once, according to the following software installation.
The Cardbus cable is Plug&Play compatible. When working with Windows, you
can attach the CardBus while the drive is in use. Your FREECOM FS-1 CD-RW then
appears under "My Computer". Likewise, the CardBus can be removed while the
drive is in use, by first cancelling it. The FREECOM FS-1 CD-RW then disappears
from "My Computer". To cancel the CardBus, click on "Start", "Settings",
"Control Panel", "CardBus". Highlight the CardBus cable and click on "Stop".
The CardBus cable can be removed when the command "You may now safely
remove the card" appears.
2
2.2 CardBus driver installation
2.2.1 Driver installation under Windows 98
To install the FREECOM driver, insert the FREECOM installation diskette in your
floppy drive.
1. Plug the FREECOM CardBus cable into the CardBus slot of your notebook or
computer.
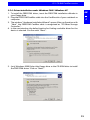
2. The window "Hardware Installation Wizard" opens. The FREECOM CardBus
cable is recognized as "PCI Mass Storage Controller". Confirm with "Next" to
continue the installation.
3. In the next window the option for finding the best driver for the device has
been selected. Confirm with "Next".
11
FREECOM FS-1 CD-RW
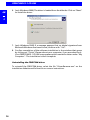
4. In the next window select the floppy drive to install the FREECOM driver. Click
on "Next".
GB
2
5. The driver is loaded from the diskette. Click on "Next" to continue the
installation.
6. In the next window click on "Next" to confirm the installation.
7. Please reboot your computer, if you are asked for it. Your FREECOM FS-1 CDRW drive appears with a new drive letter under "My Computer". The
installation is then complete.
Uninstalling the FREECOM driver
To uninstall the FREECOM driver, select the file "DriverRemove.exe" on the
installation diskette and follow the on-screen instructions.
12
FS-1 CD-RW CardBus version
2.2.2 Driver Installation under Windows ME
GB
To install the FREECOM driver, insert the FREECOM installation diskette in your
floppy drive.
2
1. Plug the FREECOM CardBus cable into the CardBus slot of your notebook or
computer.
2. The window "Hardware Installation Wizard" opens. The FREECOM CardBus
cable is recognized as "PCI Mass Storage Controller". Confirm with "Next" to
continue the installation.
3. Windows ME automatically detects and installs the FREECOM driver from
diskette.
4. After completion of the installation, click on "Finish". Please reboot your
computer, if you are asked for it. Your FREECOM FS-1 CD-RW drive appears
with a new drive letter under "My Computer". The installation is then
complete.
Uninstalling the FREECOM driver
To uninstall the FREECOM driver, select the file "DriverRemove.exe" on the
installation diskette and follow the on-screen instructions.
13
FREECOM FS-1 CD-RW
2.2.3 Assigning the drive letter under Windows 98 / ME
GB
After successfully completing the installation of the FREECOM FS-1 CD-RW, a
new drive letter is assigned automatically (the first available letter after the
internal hard drives). This can shift the drive letter of an internal CD-ROM drive
(for example, 'D' to 'E'). If this leads to problems, it is possible to change the drive
letter assignment as follows:
2
1. Click on "Start" - "Settings" - "Control Panel".
2. Click on "System".
3. Select "Device Manager" and click on "CD-ROM" or "Drive".
4. Click on the FREECOM FS-1 CD-RW, then on "Properties" - "Settings". (The
currently assigned drive letter as well as the reserved drive letters will then
be displayed.)
5. Under "Reserved Drive Letter" enter a drive letter, for example "F" for the
FREECOM FS-1 CD-RW as the "First drive letter" and "F" again as the "Last
drive letter".
6. Confirm your selection with "OK". When you restart your computer, the
FREECOM FS-1 CD-RW will be assigned the letter F in "My Computer".
14
FS-1 CD-RW CardBus version
2.2.4 Driver installation under Windows 2000 / Windows XP
GB
1. To install the FREECOM driver, insert the FREECOM installation diskette in
your floppy drive.
2. Plug the FREECOM CardBus cable into the CardBus slot of your notebook or
computer.
3. The window "Hardware Installation Wizard" opens. After confirmation with
"Next" the FREECOM CardBus cable is recognized as "PCI Mass Storage
Controller".
4. In the next window, the default option for finding a suitable driver for the
device is selected. Confirm with "Next".
2
5. (only Windows 2000) Select the floppy drive or the CD-ROM drive to install
the FREECOM driver. Click on "Next".
15
FREECOM FS-1 CD-RW
6. (only Windows 2000) The driver is loaded from the diskette. Click on "Next"
to install the driver.
GB
2
7. (only Windows 2000) If a message appears that no digital signature from
Microsoft Windows has been found, confirm with "Yes".
8. Confirm completion of the software installation in the window that opens
by clicking on "Finish".Please reboot your computer, if you are asked for it.
Your FREECOM FS-1 CD-RW now appears with a new drive letter under "My
Computer". The installation is then complete.
Uninstalling the FREECOM driver
To uninstall the FREECOM driver, select the file "DriverRemove.exe" on the
installation diskette and follow the on-screen instructions.
16
Installing the CD Recording Software
C HAPTER 3: Installing the CD Recording Software
GB
After installing the cable driver software, your FREECOM FS-1 CD-RW drive is
now able to read CD-ROMs.
3
To record a blank CD, you must first install the CD Recording software (refer to
the mastering or the packet writing procedure). We recommend using the
software which has been provided with your drive.
The installation guide for the software is supplied with the CD. After installation,
the drive is fully operational.
Note: If you wish to use other software, please find out from the supplier
whether his products support the FREECOM FS-1 CD-RW .
3.1 Special Instructions before writing a CD
You should realize that writing CDs is principally a sensitive data transmission
procedure which can be disrupted by even the smallest mechanical disturbance.
Never clean the CD-R/CD-RW with a commercially available CD-ROM cleaning
set. This can damage the drive.
Recordable and Rewritable CDs (blanks) are more sensitive than commercially
available CDs. Use only a solvent-free, non-abrasive marker when writing on
a CD.
Do not stick any conventional labels on the CD-Rs/CD-RWs, since the adhesive
can attack the medium. Special labels for CD-R/CD-RW media are available in
retail computer stores. Never remove a label from a CD-R/CD-RW media
otherwise you will damage the protective layer and make the CD-R/CD-RW
unusable.
The drive recognizes the medium as soon as it is placed into the drive. CD-R/
CD-RW media are compatible with the vast majority of CD-ROM drives and
CD audio players and work in most DVD-ROM drives.
Recommendation: For optimal results, use FREECOM blank CDs.
17
FREECOM FS-1 CD-RW
3.2 Preparing to write a CD
GB
Before creating a CD:
1. By clicking "Start" - "Programs" - "Accessories" - "System Tools" -"Scandisk"
check your hard disk with the Scandisk program.
3
2. By clicking "Start" - "Programs" - "Accessories" - "System Tools" - "Disk
Defragmenter" defragment your hard disk.
other preparations:
No sleep mode / no multitasking
Close all open windows and other running programs (Anti Virus)
Deactivate automatic recognition of CDs
(in the Device Manager under Windows 98/ME/2000)
Deactivate the screen saver
Log out of the network before starting the writing procedure (if applicable)
Deactivate your modem
3.3 Procedure for writing CDs
There are two procedures for creating and writing your CDs.
Mastering
Packet Writing
3.3.1 The Mastering procedure
is a process for creating data CDs and Audio CDs. Data is compiled onto a "Master
CD" in one (single session) or several (multisession) writing procedures. During
these procedures, the data is made compatible according to various industry
norms, allowing for example audio CDs to be read by any CD player. The
standards for new technology (for CD, video etc.) are prepared for data storage
in special readable formats. Special programs such as "Easy Creator", "WinOnCD",
"CEQuadrat ToGo!", "Nero Burning ROM" are necessary to convert data into
these specified formats. These types of programs are necessary for writing data
CDs in ISO 9660 and Joliet formats as well as for writing audio CDs, Mixed Mode
CDs and Photo CDs.
Note: Data CDs in Joliet format are only readable under Windows 95, 98,
ME, NT 4.0, 2000 and XP.
18
The Packet Writing procedure
3.3.2 The Packet Writing procedure
GB
can be used to create CDs without starting a special mastering program. The
Packet Writing procedure allows to use blank CDs in combination with the
Universal Disc Format (UDF) as an additional hard disk or floppy disk. Standard
software for packet writing e.g. "Direct CD" (Roxio), "InCD" (Nero Burning
ROM). Afterwards the writing procedure can be started.
3
Files can be written directly from any Windows application (e.g. Microsoft Word)
to the CD using the same procedure as writing to the hard disk. Files can also be
copied to CD using the Windows Explorer.
Note: We recommend using the software which has been provided with
your drive. If you wish to use other software, please find out from the
supplier whether his products support the FREECOM FS-1 CD-RW .
Afterwards the writing procedure can be started by simply dragging the file to
be written in the Explorer/File Manager (Drag&Drop Principle), assuming there
is a UDF-formatted blank disk in your CD-RW drive.
A medium can only be written once with the CD-R drive and previously written
files can be deleted but not overwritten. The great advantage of the CD-RW
drive in conjunction with a CD-RW medium is that it allows to rewrite the
medium.
Note: Please note that the mastering procedure and the packet writing
procedure can only be used seperately, therefore a mixing of these
procedures on one CD-RW is not possible.
3.4 Peculiarities when writing audio CDs
Please note that some older CD player models principally cannot read selfwritten CDs.
Note: Audio files must have the proper format (stereo, 16 bit and 44.1
Hz sampling frequency) and must be supported by the CD recording
software, for example, *.wav. Some programs offer conversion functions.
Soundcards and the software that come with them can also be used.
Please note that *.wav files cannot or have supported formats such as:
mono, 8 bit.
19
FREECOM FS-1 CD-RW
C HAPTER 4: Troubleshooting
GB
General problems
4
If you still have problems getting your FREECOM FS-1 CD-RW to function
properly despite having installed it correctly, then please check whether
the cable is properly connected to your FREECOM FS-1 CD-RW
the FREECOM FS-1 CD-RW is being supplied with power
the tray can be opened and closed
your system meets the hardware requirements (see pages 5/6)
Note: If the FREECOM FS-1 CD-RW is supplied with power via the Card
Slot of the computer, first use the enclosed power cord if problems
arise.
Should your notebook or computer cause problems when attempting to install
software,
do not use any memory manager such as QEMM
disable the systems Power Management
check if all the requirements contained in the instructions on the disk have
been fulfilled
check if the FREECOM FS-1 CD-RW is properly connected to the cable
check if the FREECOM FS-1 CD-RW is being supplied with power when you
boot your system
If audio playback does not work, please check if
the loudspeaker is properly connected
the FS-1 cable is firmly connected
the loudspeaker control on the amplifier or on the active loudspeakers is
correctly set
the audio software is correctly installed
Note: Please note that CD-RW drives (FREECOM FS-1 CD-RW ) must never
be cleaned with a lens cleaning set!
20
FREECOM Internet Service & Support Hotline
FREECOM Internet Service
GB
FREECOM Technologies makes the following service available in the Internet
under www.freecom.com
4
Online information about technical problems
current product information
Drivers, driver updates and software information
Forum
Support Hotline
The following hotlines are available if you still are unable to get your FREECOM
FS-1 CD-RW to work properly after reading the manual and the suggestions for
troubleshooting:
Hotline
Deutschland & Österreich
Email
+49 (0) 20 37 68 09 50 [email protected]
België (NL)*
0 78 25 00 00
[email protected]
Belgique (F)*
0 78 25 00 01
[email protected]
Belgien (D)*
0 78 25 00 02
[email protected]
France
+33 (0) 1 34 04 72 05
[email protected]
Nederland
+31 (0) 1 58 88 01 10
[email protected]
Schweiz (D)
+41 (0) 8 48 88 99 10
[email protected]
Suisse (F)
+41 (0) 8 48 88 77 10
[email protected]
United Kingdom & Ireland +44 (0) 14 23 70 47 15 [email protected]
other countries
+31 (0) 1 58 88 01 10
[email protected]
* (alléén in België/seulement pour la Belgique/nur in Belgien)
If possible, try to call from a phone near your computer.
Please have the following information on hand for your call:
the serial number on the rear side of your FREECOM FS-1 CD-RW and the
serial number of the FS-1 cable
the revision number of the cable driver disk
information on the power supply
the version number of your operating system and the software you are
having problems with
the precise error description or error message displayed
the name and the model of your notebook or computer and, in case it is
needed, the installed hardware
Is the problem reproduced every time?
Has this problem occurred before? If not, have you recently changed your
system configuration?
21
FREECOM FS-1 CD-RW
C HAPTER 5: Glossary - List of keywords
GB
Audio CD
See CD-DA
5
Bridge Disk
CDs which can be read by CD-ROM/XA drives and CD-I players, for example a
Kodak Photo CD.
Blue Book
Specification for CD-Extra (formerly CD-Plus)
Buffer underrun
When the write memory of the drive is empty, the writing procedure will be
terminated. The flow of data from the system to the drive was insufficient.
Either the transfer is too low for the writing speed or the data flow was
interrupted.
CD-DA
CD-DA stands for "CD Digital Audio" and is the known audio CD standard
described in the Red Book. It contains audio data that is to say music and can
be played back in CD-ROM drives which support audio CDs as well as in normal
CD players in stereo systems.
The audio data is stored as so-called "frames" with a length of 1/75 of a second.
44,100 audio signal samples are stored per second. Each sample uses two bytes
(16 bit), and two channels are stored (left and right). This results in a sector size
of 44,1000 x 2x 2 /75 = 2352 bytes per frame which corresponds to the size of a
physical block on a CD.
CD-I
CD-Interactive, special CD format defined in the Green Book The CD-I track is
not entered into the TOC (CD directory). Thus, the audio tracks can be listened
to on a normal CD player. To access a CD-I track, an appropriate drive is required.
Some older CD players incorrectly recognize the CD-I track as an audio track
and attempt to play it back accordingly.
CD-R
CompactDisc-Recordable, designation for recordable CDs.
CD-ROM (Single and Multisesssion)
CD-ROM describes a CD which contains computer data much like a hard disk.
CD-XA
XA stands for "Extended Architecture" and is a standard for Multimedia CDs
containing audio and computer data.
22
Glossary - List of keywords
Defragmenting
A hard disk can be defragmented using the DOS command 'defrag' or a similar
tool from other operating systems. Due to the fact that files are constantly
deleted and new ones written to the hard disk, files are no longer grouped
together in physically contiguous blocks but instead are scattered, i.e.
fragmented, over the entire hard disk. Defragmentation rewrites the files so
that they are "put back" together again. This does not affect the directory
structure or the data contents. The advantage of defragmentation is that it
allows files to be accessed quicker by simplifying the searching process. We
strongly recommend defragmenting your hard disk before writing a CD.
GB
5
Disc-at-Once
Not all drives support the procedure of writing a CD in a single process. As soon
as the disc/CD is complete, it can no longer be written to (single session CD).
EPP
EPP stands for Enhanced Parallel Port and refers to an extended standard of
the parallel interface which allows higher data transfer rates and makes it
possible to connect several devices.
ECP
stands for Extended Capability Port and is a more powerful version of the EPP.
Finalising/ End disc / Close disc
Completely finishing a CD. Necessary (according to Red Book regulations) for
audio CDs which cannot be read by normal reading devices (CD players) if they
have not been finalised. Also, the definitive end of a data CD. It is not possible
to write anything else on a finalised CD.
Finalization consists of a lead-in and a lead-out (as with fixing) with a final
table of contents. Because only one lead-in and one lead-out are permitted on
an audio CD, any fixing here will automatically finish the CD.
Fixing
Writing a lead-in and lead-out area for a session. This concludes the session. All
data from the session and from any previous sessions can be read by normal CDROMs. This process requires an enormous amount of space, using up approximately
15 MB. This space is definitively lost for other recordings. This means that less
data can be written on multisession CDs than on single session CDs.
23
FREECOM FS-1 CD-RW
Green Book
Specification for CD-I.
GB
High Sierra/High Sierra Format
The Hotel in Nevada, USA where in 1985 the foundation was laid for determining
the file systems for CDs. The efforts of the group which came to be known as
the "High Sierra Group" led to the standard ISO 9660, the most common file
system for CDs. A CD that conforms to this standard is at times still referred to
as a "High Sierra" CD. The original High Sierra format has almost died out; as a
rule, ISO 9660 is used instead.
5
Image File
see physical image
ISO 9660
ISO 9660 describes the requirements a CD file system has to fulfill. This allows a
CD to be used universally.
Only the capital letters from A to Z, the digits 0 to 9 and the underscore symbol
are permitted for file and directory names. Diacritical marks (Ä, Ö, Ü), foreign
characters and punctuation marks (ß, ?, ! etc.) as well as hyphens are not
permitted. The filename can have a max. of 8 characters, the extension only up
to 3. The filename must be at least one character in length, for example 'A'. A
version number (1 to 32767) can be appended (for example 'A.B;1'). A maximum
directory hierarchy of eight levels is permitted whereby the root is considered
the first level. The ISO 9660 employs specifications of the High Sierra Group
and is for that reason also called the High Sierra format. There are also other
file systems ( for example HFS for Apple Macintosh) which, however, can only
be recognized on these types of systems.
Joliet
CD file system that supports long filenames and can be used under Windows
95/98/ME/2000/XP. For full compatibility to DOS, an ISO 9660 file system must
be created. This is a part of the complete Joliet system.
Lead-In
The lead-in is a data area at the beginning of a CD-R session. This area contains
the directory (table of contents TOC) of a session. The lead-in is written together
with the lead-out of a session. Every lead-in uses 4500 sectors (approx. 9 MB) on
the CD.
Lead-Out
The lead-out marks the physical end of a session and does not contain any data.
It is written together with the lead-in. The first lead-out of a CD uses 6750 sectors
(approx. 13 MB), all following ones 2250 sectors (approx. 4 MB).
24
Glossary - List of key words
Mixed Mode CDs
A CD which contains both computer data and audio data is known as a Mixed
Mode CD. The computer data is stored on the first track. All the other tracks
contain audio data. Modern CD players do not reproduce the first track. Older
models, however, will try to "play back" the computer data which, in some
cases, can cause damage to the stereo system.
GB
5
Multisession
A data CD can be written in several sessions. This must be set accordingly while
writing. Typical instances where multisession CDs are used are regular backups
and Photo CDs which are gradually filled up.
Multitasking
Windows allows you to run several programs simultaneously. This is known as
multitasking. When writing CDs, only the CD recording software window should
be open (running), for full and exclusive use of the computer's resources. Screen
savers, modems and network functions should be deactivated as they all use up
computer resources which, in extreme cases, may disrupt the writing process.
On-the-Fly
Writing directly onto a CD-R without creating a physical image. If it is not possible
to gain fast access to the source files, the writing process cannot be carried out
successfully ("Buffer Underrun"). Only small amounts of data with simple data
structure should be written On-the-Fly. The source files should be copied onto
the hard disk.
Orange Book
The Orange Book contains the specifications for CD-R (recordable CDs). These
CDs contain no information other than some special data (ATIP Codes), and
they can be written according to any of the other color book standards.
Manufacturers of blank CDs have to abide by the regulations in the Orange
Book.
Packet Writing
The packet writing method enable to write data on CDs in smaller blocks
(packets) than with the usual Track-at-Once or Disc-at-Once procedures. This
procedure allows data blocks to be written onto the CD-R without having to
finish the particular track. A further advantage of Packet Writing is the simple
updating of existing files. Data can be simply added without having to rewrite
the file directory each time.
25
FREECOM FS-1 CD-RW
Physical Image
Before writing a CD, an identical 1:1 copy of the new CD is created on the hard
disk. The file will be the size of the record (i.e. up to 650 MB). Creating a physical
image requires a certain amount of processing which is not necessary for writing.
For the writing procedure, only the file to be written is transferred. The CPU
load ( C entral P rocessing U nit) remains small and cannot cause disruption.
When creating several identical CDs, the physical image is less time-consuming
because the processing mentioned above only has to be carried out once.
GB
5
"Raw" Files
A "raw" file contains data which is already in CD format. It can be directly
written without further modification. One "raw" file corresponds to one track.
For example, a "raw" audio file can be used as the contents of one CD-DA
track. Image files are "raw" files.
Red Book
Specification for audio CDs.
Session
CDs are separated into tracks and sessions. One session (or "sitting") consist of
files, which are recorded in a process. It contains one or more tracks. A session
can only consist of one data track, but several audio tracks.
Single session
The CD is recorded in one session (or "sitting"). Audio CDs are always single
session CDs.
Thermal Calibration
Procedure for adapting hard disks to the effects of thermal expansion. The hard
disk cannot be accessed while it is calibrating. This can be a sufficient amount of
time to empty the driver's buffer space. This leads to a 'buffer underrun' which
will interrupt the writing procedure and will render the blank disc unusable. It
is not possible to control the moment at which calibration takes place. If no
calibration occurred beforehand but happens during writing, even a test-run of
the drive can occur. This type of hard disk is unsuitable as a source drive (or for
physical and virtual images).
26
Glossary - List of key words
TOC
Table of Contents, Directory of the CD. The table of contents documents not
only the number of tracks but also their starting position and the total length
of the data area of the disc.
GB
5
Track
a track is a section of the CD. Every audio title has its own track. In contrast, all
the data of a data CD is contained within a single track. A Mixed-Mode CD has
a data track (track 1) and audio tracks. The data track cannot be played back
with an audio player. Older devices can produce a whistling sound which can
damage your stereo system. The data track for CDs conforming to the Blue
Book standard (CD-Extra, CD-Plus) is located at the end of the CD.
Track-at-Once
"Track-at-Once" is a method of writing by which all tracks are written individually.
For data CDs there is no significant difference to "Disc-at-Once"; however, a gap
of two seconds is appended to every track of an audio CD.
Some CD recorders can only write according to this method.
Virtual Image
The data structure of a CD is different to those of other media. The writing
program must first convert the data in to an appropriate form before it sends it
to the recorder. The virtual image is constantly updated during the writing
procedure. This requires a computer system with enough power to handle the
complexity of the data. The virtual image requires approx. 30MB of free hard
disk space. It is automatically deleted after the writing procedure. Writing with
virtual images is also known as "On-the-Fly." If problems occur (insufficient
data transfer rates), you should use physical images to separate the image
creation and data transfer/writing processes.
Yellow Book
Specification for CD-ROM (data CDs) and CD-ROM XA.
27