1
Autoplay™
USER MANUAL
&
INSTALLATION INSTRUCTIONS
ALARMCO ®
Guilford, CT U.S.A.
203 - 458 - 2646
intelligent message repeaters
1
ALARMCO, Autoplay, intelligent message repeaters, and the ALARMCO logo are trademarks of
ALARMCO.
Copyright © 1999, ALARMCO ®. All rights reserved.
WARNING: This equipment generates, uses and can radiate radio
frequency energy. If not installed and used in accordance with the
instruction manual, it may cause interference to radio communications.
The rules with which it must comply afford reasonable protection against
such interference when it is used in a commercial environment.
Operation of this equipment in a residential area is likely to cause
interference, in which case the user will be required to correct the
interference at his own expense.
2
/ / / ////ALARMCO
TABLE OF CONTENTS
Introduction ................................................................................................ 5
Autoplay Command Summary................................................................ 7
Autoplay Optional Commands ................................................................ 8
*
Chapter 1: Recording Messages ............................................................ 9
Getting started ........................................................................................ 9
Your first command ................................................................................ 9
The RESET command............................................................................ 9
Setting the RECORD SOURCE.............................................................. 10
RECORD MESSAGE ............................................................................. 10
HEAR MESSAGE................................................................................... 11
Saving time............................................................................................. 12
ERASE MESSAGE................................................................................. 12
Changing messages............................................................................... 12
*
Chapter 2: Single Playlist......................................................................... 13
Repeating announcements..................................................................... 13
SET SPACING ....................................................................................... 13
SET PLAYLISTS .................................................................................... 13
HEAR PLAYLIST.................................................................................... 14
Chapter 3: Multiple Playlists (Day-Parting)............................................. 15
SET PLAYLISTS .................................................................................... 15
HEAR PLAYLISTS ................................................................................. 15
SET PLAYLIST NUMBER ...................................................................... 16
CANCEL PLAYLIST ............................................................................... 16
Chapter 4: Special Playlist Entries .......................................................... 17
[ 0 ] "Stop Announcing"........................................................................ 17
[ 1 - 250 ] ................................................................................................ 17
[ 901 - 910 ] "Splash Tones" ................................................................ 17
[ 1001 - 1020 ] "Say Playlist Once"...................................................... 17
[ 10000 - 19999 ] "Manual Spacing" .................................................... 18
[ 30000, 30001 ] "Press to Continue"................................................... 18
Chapter 5: Scheduling with the 7 Day Clock .......................................... 19
Scheduled Announcements.................................................................... 19
SET CLOCK ........................................................................................... 19
SCHEDULE MESSAGE ......................................................................... 19
HEAR SCHEDULE ................................................................................. 20
CANCEL SCHEDULE............................................................................. 20
Special Schedule entries ........................................................................ 20
*
Chapter 6: Record Speed, Message Music, PA Source....................... 21
SET RECORD SPEED ........................................................................... 21
SET MESSAGE MUSIC ......................................................................... 22
SET PA SOURCE (Live Announcements).............................................. 22
intelligent message repeaters
3
Chapter 7: Keypad Mode .......................................................................... 23
Keypad Mode "PA Request"................................................................... 23
Chapter 8: Output Relay Option .............................................................. 25
SET RELAY Touch Tone Command ...................................................... 25
Special Schedule and Playlist Entries .................................................... 26
Chapter 9: Telephone Control Option ..................................................... 27
Accessing the Announcer from a Remote Phone ................................... 27
Changing the Security Code Number ..................................................... 28
Remote Recording of Messages ............................................................ 28
TIMED RECORD.................................................................................... 28
Remote Hearing of Messages ................................................................ 29
STOP REMOTE (Terminate Remote Control Session) .......................... 29
Remote Keypad Mode............................................................................ 29
Telephone Control Option Consumer Information .................................. 30
Chapter 10: Second Channel Options..................................................... 31
Second Channel (-2C) ............................................................................ 31
Second Channel with Music (-2M).......................................................... 31
Chapter 11: Serial Link Option ................................................................ 33
Chapter 12: Addressable Announcer Option ......................................... 35
Addressable Autoplay Commands ......................................................... 35
Addressing over the Satellite or SCA Channel ....................................... 36
Unique Hardware Address...................................................................... 36
SET GROUP NUMBERS (Define Group Addresses) ............................. 36
SET RECORD SPEED ........................................................................... 37
Terminating a Control Channel Session ................................................. 37
Control Channel Connections................................................................. 38
Chapter 13: Tips on Recording Good Messages ................................... 39
Chapter 14: Programming Examples ...................................................... 41
Example 1: Different Daytime and Nighttime Messages
Automatic Day-Parting........................................................ 41
Example 2: Customer Triggered Commercials ...................................... 42
Example 3: Non-stop Repeating Message ............................................ 43
Example 4: Keypad mode, Playlists, and Schedules............................. 43
*
4
Autoplay Installation Instructions ............................................................ 45
/ / / ////ALARMCO
INTRODUCTION
USING THE ALARMCO AUTOPLAY™ RECORDER/ANNOUNCER
Autoplay is frequently used to provide a series of messages to someone who has called
on the telephone and been put on hold. Another common use is to broadcast recorded
announcements in stores (Storecasting with automatic day-parting). Music is usually
played between announcements and often at reduced volume during the
announcements.
The default settings cause all messages to be continuously repeated in numerical order
with 30 second spacing between them.
A single Autoplay can provide continuous messages along with scheduled messages
and user-selected messages. All functionality can be provided within the same machine
at the same time.
For example, you can provide storecasting messages throughout the day and still
schedule store closing announcements to be said automatically at the appropriate time.
With keypad mode, you can randomly select and queue prerecorded announcements
simply by entering their numbers on a telephone keypad — while Autoplay continues
announcing its repeated messages.
Should you want Autoplay only to play messages that are triggered by a telephone
keypad or with the internal 7-day clock, the automatic message repeating function can
simply be suspended.
To control Autoplay, you use a standard touch tone telephone. You "talk" to Autoplay in
touch tone. It "talks" to you in English. Once you specify the command you want to
perform, e.g., RECORD, Autoplay gives you instructions telling you what to do.
Autoplay is easy to use. This manual will lead you step by step as you record a
message, change it, and so forth.
intelligent message repeaters
5
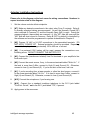
This chart contains a brief summary of Autoplay's commands. More complete
descriptions can be found in the appropriate chapters. For simple applications, you only
need to read Chapters 1, 2, and 6.
COMMAND LIST
Press:
6
*
*
*
1
2
3
#
#
#
to
to
to
RECORD
HEAR MESSAGE
ERASE
CHAPTER
1
1
1
*
*
*
4
5
6
#
#
#
to
to
to
SET SPACING
SET PLAYLIST
HEAR PLAYLIST
2
2
2
*
*
*
*
7
8
9
10
#
#
#
#
to
to
to
to
SET RECORD SOURCE
SET RECORD SPEED
SET MESSAGE MUSIC
SET PA SOURCE
1
6
6
6
*
*
*
*
21
22
23
24
#
#
#
#
to
to
to
to
SET CLOCK
SCHEDULE MESSAGE
HEAR SCHEDULE
CANCEL SCHEDULE
5
5
5
5
*
*
*
*
41
42
43
44
#
#
#
#
to
to
to
to
SET PLAYLISTS
HEAR PLAYLISTS
SET PLAYLIST NUMBER
CANCEL PLAYLISTS
3
3
3
3
*
*
*
*
*
51
52
61
62
71
#
#
#
#
#
to
to
to
to
to
STOP REMOTE (Optional)
SET GROUP NUM. (Opt)
TIMED RECORD (Optional)
SET RELAY (Optional)
SET CODE (Optional)
9
12
9
8
9
*
127
#
to
RESET
1
/ / / ////ALARMCO
Autoplay Command Summary
1
RECORD A MESSAGE
Press:
Press:
Speak
Press:
2
(To erase all messages ... or
... to erase selected message)
* 4#
(spacing in seconds) #
(Set new spacing)
*5#
999 #
(message number) #
or
(Define which messages to play)
(To broadcast all messages ... or
... to define specific messages to play)
*6#
(Hear msg. numbers on control phone)
*7#
(1, 2, or 3) #
(1 = Mic, 2 = Aux, 3 = Phone)
*8#
(1000 .. 1011) #
(1000 = longest record time, 1011 = highest fidelity.
Each step shortens record time and increases fidelity)
SET MESSAGE MUSIC
Press:
Press:
10
or
SET RECORD SPEED
Press:
Press:
9
*3#
999 #
(message number) #
SET RECORD SOURCE
Press:
Press:
8
(Preview message with control phone)
(To hear all messages ... or
... to hear selected message)
HEAR PLAYLIST
Press:
7
or
SET PLAYLIST
Press:
Press:
6
*2#
999 #
(message number) #
SET SPACING BETWEEN MESSAGES
Press:
Press:
5
(Starts recording selected message)
(Autoplay records from phone, ... or
... microphone, ... or
... aux. input)
[See #7 below]
(Stop recording)
ERASE A MESSAGE
Press:
Press:
4
or
or
HEAR A MESSAGE
Press:
Press:
3
*1#
(message number) #
into control phone
into microphone
play taped message
#
*9#
(0, 1, or 2) #
(Music on during message?)
(0 = Off, 1 = On, 2 = On for odd only)
SET PA SOURCE
Press:
Press:
* 10 #
(1, 2, 3, or 4) #
intelligent message repeaters
(1=Mic, 2=Aux, 3=Phone, 4=Msg 250)
7
21
SET CLOCK
Press:
Press:
22
Press:
(Select day, then for each entry:)
(To keep entry in schedule ... or
... to delete entry from schedule)
* 24 #
(day number) #
999 #
1#
or
(Cancel one day's schedule ... or
... cancel entire schedule)
(To confirm that you really want to)
* 41 #
(playlist number) #
(message number) #
(Used to enter multiple playlists)
(Select playlist to define)
(For each message to add to the list)
* 42 #
(playlist number) #
(Select playlist to review)
SET PLAYLIST NUMBER
Press:
Press:
44
or
HEAR PLAYLISTS
Press:
Press:
43
* 23 #
(day) #
#
9#
SET PLAYLISTS
Press:
Press:
Press:
42
(enter day, time, and message
number for each message being
scheduled)
CANCEL SCHEDULE
Press:
Press:
41
* 22 #
(day) #
(time) #
(message number) #
HEAR SCHEDULE
Press:
Press:
24
(day = 1..7, time = 24 hour time)
SCHEDULE MESSAGE
Press:
Press:
23
* 21 #
(day) # (time) #
* 43 #
(playlist number) #
(Select which playlist to run)
CANCEL PLAYLIST
Press:
Press:
* 44 #
(playlist num) #
999 #
or
(Cancel one playlist ... or
... cancel all playlists)
127 RESET
Press:
Press:
* 127 #
1#
(Resets Autoplay to Factory Defaults)
(To confirm that you really want to)
Autoplay Optional Commands
For optional commands, please refer to Chapters 8 through 12.
8
/ / / ////ALARMCO
CHAPTER 1: RECORDING MESSAGES
This chapter tells how to record messages. Autoplay lets you record up to 250
messages and change them at any time. The only limitation is that the combined length
of your messages cannot exceed the total recording time available for your unit.
Getting started
Any standard touch-tone telephone can be used to program the Autoplay. Simply
connect a standard touch-tone telephone into the RJ-11 jack labeled "Control Phone" on
the back of the Autoplay. If you have supplied power to the unit, it should now be
operable. (For detailed installation instructions, please refer to page 45 of this manual.)
Pick up the handset on the control phone and listen to it. Hang up and then pick it up
again. Hang up in the middle of the speech and pick it up again.
You can always hang up at any time. Autoplay will stop whatever it is doing. So if you
ever get confused, just hang up and start over.
Notice where the [*] key and the [#] key are. You'll be using them a lot, as all
commands begin with [*] and end with [#].
Your first command
Let's do as the voice suggests and press the keys: * 0 #. Autoplay will start reciting the
command list to us.
After listening to the first few commands, press: * 0 # again.
This time after listening to a command or two, press: *.
Any time you press *, Autoplay stops what it's doing and gets ready for a new
command. That means you can restart a command or switch to a new one at any time.
Since you have a typed list of the commands in this manual, it's faster to look at it than
to have Autoplay read the list to you.
The RESET command
The RESET command erases and cancels everything that's been done to the Autoplay.
All messages are erased and any programming is canceled.
Press: * 127 # and listen.
intelligent message repeaters
9
A RESET is serious business. Autoplay makes you confirm you really want to do it by
pressing: 1 #.
A RESET returns all Autoplay choices to their default values, that is, their factory
settings. For example, even if someone changed it before, the record source is now set
for Microphone, and any messages you record will be played back with 30 seconds of
spacing between them when the control phone is hung up.
Setting the RECORD SOURCE
Default = MIC
Autoplay can record from a microphone, from its Aux. input (usually a tape recorder), or
from the mouthpiece of the control phone. You have to specify which you want to use.
Press: * 7 # and listen. (Don't forget you can press * 7 # again if you want to hear the
instructions again.)
If you have a microphone, we'll be using it so you don't need to press anything. If you
don't have a microphone, select the phone as the record source by pressing 3 # (and
whenever we say "microphone", you think "phone"). If you changed the record source,
press * 7 # and listen to confirm that it's now set the way you want.
Should you want to record from the Aux. input, the entire sequence of commands would
be:
*7#
2#
When recording from the Aux input, you can monitor by listening on the control phone
while the recording is being made.
RECORD MESSAGE
Autoplay messages are numbered from 1 to 250. You can record messages in any
order.
Press: * 1 # and listen.
Autoplay first responds by telling how many seconds of record time are available (at the
current RECORD SPEED setting, as described in Chapter 6). It then tells you the
current RECORD SOURCE. In addition, you can use the control phone to monitor the
recording as it is being digitized. If you tap on the microphone you should hear it
through the phone.
10
/ / / ////ALARMCO
We're going to record message 4. Get ready to talk into the microphone, but don't do
anything until we describe the steps:
When you press 4 #, recording will start.
Say into the microphone something like, "This is message 4."
or "Message 4 sounds like this."
Press: # to stop the recording.
Do the same for messages 1, 2, and 3. Make messages 2 and 3 at least ten seconds
long. (You don't need to press * 1 # again, once is enough.) Don't start each recording
until you're ready to talk. Stop each recording as soon as you finish.
If you messed up one of the messages, record it over again saying something like, "This
is a new version of message 3." If you want to find out how much recording time is still
available, press: * 1 #.
HEAR MESSAGE
You can review your recordings by using the HEAR MESSAGE command.
Press: * 2 # and listen
Press: 999 # and listen.
How did they sound? Want to hear message 2 again?
Press: 2 #.
If you want to hear just the first several seconds of a message, press: (message
number + 1000) #.
Press: 1002 #
Press: 1004 #
Press: 1999 #
to hear the beginning of message 2.
for message 4.
to hear the first part of all messages.
If they didn't sound great, don't worry. There are some tips in Chapter 10 that will make
your recordings sound much better. The objective was to record several messages,
and you succeeded.
intelligent message repeaters
11
Saving time
Autoplay's prerecorded instructions are there for your benefit. Once you've done a
command a few times though, you don't need most of them.
If you know what keys you're going to press next, don't wait. Go ahead and press them.
For example,
Press: * 2 #, then without waiting,
Press: 999 #.
ERASE MESSAGE
Press * 3 # and listen. Press 2 #. Message 2 is now gone (and its record time is
available again). You can verify this with the HEAR MESSAGE command, * 2 #.
Changing messages
If you want to change a message, you don't have to erase it before recording it again.
When you record a message, Autoplay automatically erases any previous version. The
new recording can be either longer or shorter than the original.
12
/ / / ////ALARMCO
CHAPTER 2: SINGLE PLAYLIST
Repeating announcements
If you hang up the control phone, Autoplay will start broadcasting your recorded
messages. Depending on the installation, your messages will probably go over the PA
system or into the telephone system.
All of the recorded messages will be sent in numerical order with spacing between
messages. After the last message, the list automatically starts over. The next 3
commands let you control and change this operation.
SET SPACING
Press: * 4 # and listen. The spacing between messages is measured in seconds. You
can select any spacing you want between 0 seconds and 2:45 hours. (For several
hours of spacing, please refer to Chapter 4, "Manual Spacing.") If, for example, you
want a spacing of 10 minutes, you should press 600 #.
The default value is 30 seconds. For this tutorial, let's set the spacing at 5 seconds by
pressing: 5 #.
SET PLAYLISTS
A playlist is a list of messages and/or commands that control how the Autoplay
functions.
Press: * 5 # and listen.
This command lets you play all recorded messages in numerical order (the default
value) or to enter the specific playlist you want. For example, 1 # will cause only
message 1 to be played (over and over).
Let's say you have recorded several messages, but currently want to use only 1, 2, and
7. Then you should enter:
1#
2#
7#
intelligent message repeaters
13
You can also get fancy. Let's actually enter the following:
5#
1#
5#
28 #
5#
3#
This will repeat message 5 every other time. If you specify a message that isn't
recorded, Autoplay will not play that entry. A playlist can be up to 100 entries long.
There are other entries for the playlist that put "splash" tones before messages and
handle special applications. You can have several different playlists and have them
automatically turn on and off during the week. For example, you might have one playlist
running during business hours and a second running nights and weekends. These
features are covered in later chapters.
HEAR PLAYLIST
Press: * 6 # and listen to hear the message numbers that comprise the playlist recited
back to you.
14
/ / / ////ALARMCO
CHAPTER 3: MULTIPLE PLAYLISTS (DAY-PARTING)
You may want to use the internal clock to automatically play one list of messages during
business hours, another at night, and a third on weekends. Autoplay lets you enter up
to 20 different playlists (numbered 1 to 20) and switch back and forth among them. The
following four commands are used when working with multiple playlists.
NOTE: If you have multiple playlists, DO NOT use the * 5 # and * 6 # commands. They
are for single playlist applications only.
SET PLAYLISTS
This command lets you create up to 20 different playlists.
Press: * 41 # and listen.
Autoplay first responds by asking you to enter the number of the playlist you want to
create. Let's create playlist 1. Press: 1 # and listen.
Enter the message numbers for the chosen playlist. For example:
7#
10 #
8#
7 #
24 #
There is a 100 entry maximum for your playlist entries. All entries can all go in one
playlist, or they can be distributed any way you want among multiple playlists.
HEAR PLAYLISTS
This command lets you review the message numbers that are on different playlists.
Press: * 42 # and listen. Now select any playlist number and listen. Autoplay will read
back the message numbers you have entered. For example, to hear playlist 1, press:
* 42 #
1#
intelligent message repeaters
15
SET PLAYLIST NUMBER
This command lets you select which playlist to run when you hang up the control phone.
Press: * 43 # and listen.
Autoplay tells you the current playlist number and then lets you (optionally) enter a new
choice. Your choices are:
0
Don't run any playlist
1 .. 20
Run the selected playlist
999
Play all recorded messages in sequential order. (Default )
For example, to define playlist 7 as the current playlist, press:
* 43 #
7#
CANCEL PLAYLIST
This command lets you cancel a single selected playlist. You can also cancel all of the
playlists.
Press: * 44 # and listen. Your choices are:
1 .. 20
Cancel the selected playlist.
999
Cancel all playlists.
For example, to cancel playlist 3, press:
* 44 #
3#
16
/ / / ////ALARMCO
CHAPTER 4: SPECIAL PLAYLIST ENTRIES
There are several numbers you can enter in a playlist to handle special requirements.
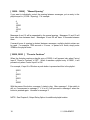
[0]
"Stop Announcing"
A zero in the playlist stops any further playlist announcing. For example:
3
5
0
Message 3 will be said, then message 5, then announcing will stop and this playlist will
not be repeated. The playlist can be started over again with a momentary contact
closure on the Stop/Start input (Control Input #4), by hanging up the control phone, or
with a schedule entry.
If the first entry in the playlist is 0, no announcements will be made. This is used when
the Autoplay's messages are not to be repeatedly announced, but rather, only triggered
by the schedule or through Keypad Mode.
[ 1 - 250 ]
The selected message will be played.
[ 901 - 910 ]
"Splash Tones"
The selected announcement tone will be played followed by a short pause. The various
tones can be auditioned by using the * 2 # (HEAR MESSAGE) command and then
entering 901 #, 902 #, and so forth.
Entries 901 - 905 are "splash" tones with a slight pause after each. Entries 906 - 909
are individual tones with almost no pause after them. They are used to create your own
"melody." Entry 910 is 1/2 second of silence for use after (or during) your own
sequence.
[ 1001 - 1020 ]
"Say Playlist Once"
An entry of (1000 + playlist number) will cause the requested playlist to be played once
and then the current playlist will continue. This can be used to conserve entries if a long
sequence shows up in several playlists. Define it once as a separate playlist and then
request it from each of the original lists.
intelligent message repeaters
17
[ 10000 - 19999 ]
"Manual Spacing"
If you want to individually control the spacing between messages, put an entry in the
playlist equal to (10,000 + Spacing). For example:
4
12
10000
19
10010
50
Messages 4 and 12 will be separated by the normal spacing. Messages 12 and 19 will
have zero time between them. Messages 19 and 50 will have 10 seconds between
them.
If several hours of spacing is desired between messages, multiple playlist entries can
be used. For example, 7200 seconds = 2 hours; to pause for 4 hours, simply enter
17200 on the playlist twice.
[ 30000, 30001 ]
"Press to Continue"
When the Autoplay reaches a playlist entry of 30000, it will proceed only when Control
Input 2 "Press to Continue" is OFF. When it reaches a playlist entry of 30001, it will
proceed only when Control Input 2 is ON.
For example, if input 2 is ON when a push-button is pressed and this is the playlist:
30001
1
30001
2
30001
3
30000
With the press of the button, message 1 starts to play. After message 1, if the switch is
still on, it sequences to message 2. If it is off, it will proceed to message 2 when the
button is pressed again. Likewise for message 3.
NOTE: See Chapter 8, Output Relay Option for additional playlist entries.
18
/ / / ////ALARMCO
CHAPTER 5: SCHEDULING WITH THE 7 DAY CLOCK
Scheduled Announcements
Autoplay can make store closing or other time-scheduled announcements automatically.
You have to set Autoplay's 7 day clock and enter the desired schedule of
announcements. The next 4 commands let you do this.
SET CLOCK
Autoplay has an internal 7 day clock. Days are numbered 1 to 7 for Sunday through
Saturday. Military (24 hour) time is used. For example 10:15 AM is 1015 and 4:52 PM
is 1652. If the clock is stopped, no scheduled announcements will be made.
Press: * 21 # and listen.
The clock is stopped after a reset and so it will say "Day 0, time 000." Set the clock to
the present day and time. For example, if it's Monday at 9:45 AM, press: 2 # 945 #.
Press: * 21 # to verify that it's set.
SCHEDULE MESSAGE
Messages are scheduled by day and time. For example, day 3, time 1400, message 6.
If day 0 is specified, the message will be announced every day of the week.
Press: * 22 # and listen.
Enter several messages in the schedule, particularly for day 4. Remember that days
are numbered 1..7 for Sunday..Saturday, and day 0 means every day of the week.
Time is 24 hour military time, e.g., 1700 for 5:00 PM. For example, to enter Tuesday,
4:15 PM, message 9, press: 3 # 1615 # 9 #.
If you realize you've made a mistake, e.g., entered time 200 instead of 1400 for 2:00
PM, you can abort the entry by reentering: * 22 #.
You can place up to 100 entries in the schedule. There are special entries that enable
you to perform more sophisticated functions, such as turning the playlists on and off at
scheduled times. Please refer to "Special Schedule Entries" later in this chapter.
intelligent message repeaters
19
HEAR SCHEDULE
This command lets you review the schedule one day at a time and cancel individual
messages.
Press: * 23 # and listen.
After you enter the day you're interested in, i.e., 0..7, Autoplay recites the first schedule
entry for that day. To delete that entry, press 9 #. To leave it alone, press #. Autoplay
then recites the next entry.
CANCEL SCHEDULE
This command lets you cancel all schedule entries for an entire day or for the entire
week.
(The Hear Schedule command can be used to cancel individual
announcements.)
Press: * 24 # and listen.
To cancel one day's schedule, press: (day number) #, where (day number) is 0, 1, 2, 3,
4, 5, 6, or 7. To cancel the entire schedule, press: 999 #.
Special Schedule entries
There are several "message numbers" you can enter in a schedule to handle special
requirements. These entries enable you to automatically turn playlists on and off and
change spacings at scheduled times.
[ 1 - 250 ]
Play the requested message.
[ 901 - 910 ]
Play the requested announcement tone.
[ 1000 - 1020, 1999 ] Set the playlist number. An entry of (1000 + Playlist Number) will
cause Autoplay to switch to the specified Playlist. The possible
Playlist Numbers are:
0
Don't play any playlist.
1 .. 20 Play the specified playlist number.
999
Play all messages in sequential order.
[ 10000 - 19999]
An entry of (10000 + spacing) will cause the spacing to be set to
the specified number of seconds.
Please refer to Chapter 8, "Output Relay Option" for additional playlist entries.
20
/ / / ////ALARMCO
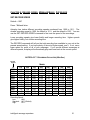
CHAPTER 6: RECORD SPEED, MESSAGE MUSIC, PA SOURCE
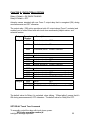
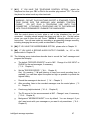
SET RECORD SPEED
Default = 1007
Press: * 8 # and listen.
Autoplay has twelve different recording speeds numbered from 1000 to 1011. The
slowest recording speed is 1000, the fastest is 1011, and the default is 1007. You can
use the SET RECORD SPEED command to fine tune the speed of the recordings.
Lower recording speeds give lower fidelity and longer recording time. Higher speeds
give higher fidelity, but shorter recording time.
The RECORD command will tell you the total recording time available in your unit at the
present speed setting. If you have plenty of time at a higher speed, use it. If not, use a
lower speed for some or all of your messages. If you record different messages at
different speeds, Autoplay will automatically play each one back at the correct speed.
AUTOPLAY™ RECORDING CAPACITIES (Min:Sec)
Record
Speed
V
1000
1001
1002
1003
1004
1005
1006
1007
1008
1009
1010
1011
110
1:47
1:40
1:34
1:27
1:20
1:14
1:07
1:00
:53
:47
:40
:33
220
3:35
3:21
3:08
2:54
1:41
2:28
2:14
2:01
1:47
1:34
1:21
1:07
330
5:22
5:01
4:42
4:21
4:01
3:42
3:21
3:01
2:40
2:21
2:01
1:40
MODEL
430
7:10
6:42
6:16
5:48
5:22
4:56
4:28
4:02
3:34
3:08
2:42
2:14
540
8:57
8:22
7:50
7:15
6:42
6:10
5:35
5:02
4:27
3:55
3:22
2:47
650
10:45
10:03
9:24
8:42
8:03
7:24
6:42
6:03
5:21
4:42
4:03
3:21
760
12:32
11:43
10:58
10:09
8:56
8:38
7:49
7:03
6:14
5:29
4:43
3:54
860
14:20
13:24
12:32
11:36
10:44
9:52
8:56
8:04
7:08
6:16
5:24
4:28
Recording Speed:
Low:
1000
Standard: 1007 (Default)
High:
1011
intelligent message repeaters
21
SET MESSAGE MUSIC
Default = ON
Press: * 9 # and listen. Having message music means that the background music is on
quietly during your message. The actual volume is set with a volume control on the
back of the unit. This command lets you turn it off completely if your background music
includes talking or if your recorded messages include their own music.
As a third choice, you can have message music on for all odd numbered messages and
off for even numbered messages. For example, use odd numbers when recording your
"home made" or voice-only messages and even numbers for studio productions that
include their own music.
Press:
0 # to turn off message music
1 # to turn it on
2 # to turn it on for odd numbers, off for even
Note: If you have two audio output channels, please refer to Chapter 10.
SET PA SOURCE (Live Announcements)
Default = MIC
Press: * 10 # and listen. Autoplay can feed "live" audio straight through, overriding its
normal announcing if its PA control input is on. Your installer may have provided a
switch to turn the PA on. If so, this command is used to select the audio source. The
possible sources are Microphone, Aux, or Phone. A fourth choice is to have message
250 repeat every few seconds whenever the PA input is on.
Press:
22
1#
2#
3#
4#
for Mic
for Aux.
for Phone
for Message 250
/ / / ////ALARMCO
CHAPTER 7: KEYPAD MODE
Your installer may have provided a switch to put Autoplay in Keypad Mode. When the
switch is on, the touch tone phone will not talk to you. If you press: 17 #, message 17
will be broadcast (assuming there is a message 17). If you press # again, message 17
will be repeated. One repeat is the limit. Pressing # again has no effect.
If you rapidly press several numbers, the requests will be queued. For example:
14 # #
148 #
12 # #
9#
would play message 14 twice, message 148, message 12 twice, and finally message 9.
Pressing * cancels any keypad entries since the last #. For example,
202 #
93 *
94 #
will cause messages 202 and 94 to be broadcast. If you haven't used the keypad for a
while, it's a good idea to hit * before entering your request, just in case someone has
bumped the keypad.
Note: If you're using Autoplay in keypad mode, you'll probably want to stop the playlist
(* 5 # 0 #) or to enter a playlist of only those messages which should be broadcast
automatically. If the playlist is set for ALL, Autoplay will cycle through all of the
messages whenever the phone is on hook.
Scheduled messages continue to be broadcast at the appropriate time whether the
announcer is in keypad mode or not. Keypad requests, playlist requests and scheduled
announcement requests are queued and made on a first come, first served basis.
Keypad Mode "PA Request"
While in keypad mode, Autoplay allows live announcements to be made over the PA
system by pressing: * 0 #. This "live" feedthrough will be active until you hang up the
phone.
If a message is being broadcast at this time, it will be aborted.
Any requests in the queue will be said after the live PA announcement.
Note: For information on using Keypad Mode from a remote telephone, please refer to
Chapter 9.
intelligent message repeaters
23
24
/ / / ////ALARMCO
CHAPTER 8: OUTPUT RELAY OPTION
Relay A Default = ON WHEN TALKING
Relay B Default = OFF
Autoplay comes standard with one Form C output relay that is energized (ON) during
announcements and OFF otherwise.
The output relay (-OR) option provides a total of 2 output relays (Form C contacts) and
enables you to control them both with touch tone commands, playlist entries, and
schedule entries.
Relay
Relay A
Relay B
Operation
Number
2000
Description
If unlocked, set to OFF
2001
If unlocked, set to ON
2002
If unlocked, set to WHEN TALKING
2003
Unlock
2004
2005
2006
Unlock and set to OFF
Unlock and set to ON
Unlock and set to WHEN TALKING
2007
Lock
2008
2009
2010
Unlock and set to OFF
Unlock and set to ON
Unlock and set to WHEN TALKING
2020
Set to
OFF
2021
Set to
ON
7001 - 7999 Set ON & hold for 0.1 - 99.9 sec.
then Lock
then Lock
then Lock
then OFF
The default value for Relay A is unlocked, when talking. "When talking" means that it's
ON during announcements, OFF otherwise. The default value for Relay B is OFF.
SET RELAY Touch Tone Command
To manually control the relay with touch tones, press:
* 62message
# (relay repeaters
operation number) #
intelligent
25
Special Schedule and Playlist Entries
By placing a relay operation number in a schedule or playlist, Autoplay will coordinate
the relay commands with messages to produce the specified results. With a 7xxx entry,
the playlist or schedule turns on the B relay and then proceeds immediately to the next
entry while the relay is doing its timed pulse. A 7xxx entry in a playlist between two
messages will turn on the relay at the end of the first message. The spacing between
messages comes after the relay operation starts.
The LOCK feature lets one set of commands override another. For example, even
though a playlist is running 24 hours a day ( and trying to operate Relay A each time it
makes an announcement), the schedule may lock the relay OFF from 9:00 PM until
8:00 AM.
26
/ / / ////ALARMCO
CHAPTER 9: TELEPHONE CONTROL OPTION
The Telephone Control (-TC) option lets you dial into the Autoplay over a switched
telephone system from a standard touch tone phone. Once the announcer answers, the
calling phone can remotely control the Autoplay to record new messages, change
playlists, and so forth.
After the announcer detects ringing and answers, the caller must usually enter a code
number (security code) before the announcer will accept commands. Once the proper
code has been entered, the operation of the remote phone for controlling the unit is very
similar to that of the local control phone plugged directly into the announcer.
WARNING - DO NOT PLUG ANYTHING EXCEPT A STANDARD TOUCH
TONE PHONE INTO THE MODULAR JACK MARKED "CONTROL
PHONE."
DO NOT PLUG A TELEPHONE LINE ONTO THIS
CONNECTOR. ATTACHING A TELEPHONE LINE TO THIS MODULAR
JACK COULD PERMANENTLY DAMAGE THE ANNOUNCER.
Accessing the Announcer from a Remote Phone
When you dial the announcer's extension number on your phone system, the Autoplay
detects ringing on its line and answers the phone. What happens next depends on the
announcer's current code number.
If the security code number is set to "0," the announcer stops its normal announcing
activities, talks to you over the phone, and is ready to accept touch tone commands
without entering a password.
If the code number is in the range of 1 .. 99,999, the announcer stops its normal
announcing activities and tells you to "Press Star, Number, Pound." If you enter the
correct code, the unit will talk to you and be ready to accept commands. An incorrect
code causes the unit to hang up.
If the code is 100,000 or larger, the announcer does not talk to you, but instead
continues its normal announcing. If you enter * (correct code number) #, it stops
announcing, talks to you and is ready to accept commands. An incorrect code results in
the unit's hanging up on you.
The caller has 30 seconds to enter the code before the announcer hangs up.
If you enter the wrong code number, just start over with the " * " key.
intelligent message repeaters
27
SET CODE (Changing the Security Code Number)
The default value of the code number is 98,304. To hear the current value and
(possibly) change it:
Press: * 71 # and listen. Then
Press: (new code number) #
Press: *71 # and listen to verify the new code number.
Security code numbers can range from 0 to 1,000,000,000.
Remote Recording of Messages
When the * 1 # record command is used from a remote phone, the recording source is
always the remote phone. This does not affect the recording source specified by the * 7
# command which is used when the local control phone is off hook.
TIMED RECORD
When recording messages for a specific amount of time, the TIMED RECORD
command may be used. The sequence of operations is:
Press: * 61 # (message number) # (recording time) #
The Autoplay records from the Control Phone (either local or remote) for the specified
number of seconds. The touch tone detector is turned off during the message
recording. This command is thus useful if the message to be recorded contains touch
tones or music or speech that imitates touch tones.
The command will be rejected if a recording time greater than 860 seconds is specified.
If memory capacity is exhausted, recording will stop. The touch tone detector will not be
turned back on, however, until the specified recording time is completed.
Because recording memory does not come in one second increments, the total
recording memory used will not exactly equal the sum of the recording times.
Remote Hearing of Messages
The * 2 # command turns off the DTMF detector while it is playing messages back over
the remote phone. If you want to hear just the first several seconds of one or more
messages, enter (1000 + message number) instead of the message number. For
example, to hear a short sample of message 5, press 1005 #. To scan through the first
several seconds of each of the recorded messages, press 1999 #, rather than the usual
999 #.
28
/ / / ////ALARMCO
STOP REMOTE (Terminate Remote Control Session)
An announcer will stop responding to remote commands and hang up when any of the
following happens:
1. The Stop Remote Programming command sequence ( * 51 # 1) is entered by the
caller.
2. While Autoplay is waiting for a command, more than 30 seconds passes without
receipt of the "#" touch tone. (During a timed message recording, the 30 second
timeout starts at the end of the recording time.)
3. A RESET command (* 127 # 1 #) is executed.
4. The local control phone is taken off hook.
Remote Keypad Mode
If an Autoplay is jumpered for keypad mode (Control Input 3 is ON)
announcer is called, the operation is different from that described above.
when the
If the security code number is 0, the announcer immediately enters keypad mode and is
ready to accept message numbers from the remote phone.
If the code number is not 0, the announcer waits for * (code number) # to be entered.
If the code is correct, the announcer enters keypad mode, otherwise it hangs up.
The user has 30 seconds to enter the first (message number) #, and 15 seconds for
each subsequent entry. Once the time is exceeded, the announcer hangs up.
Message number 0 (request for PA when done on the local control phone) is ignored
from the remote phone.
In Keypad Mode, the only way to terminate a session is to let 15 seconds pass without
sending "#." In other words, just hang up after you enter the desired number(s).
When the keypad mode screw terminal is jumpered on, the announcer never talks over
the remote phone.
intelligent message repeaters
29
Telephone Control Option Consumer Information
This equipment complies with Part 68 of the FCC rules. On the rear of this equipment is
a label that contains, among other information the FCC registration number and ringer
equivalence number (REN) for this equipment. If requested, this information must be
provided to the telephone company.
An RJ11C jack is used for the telephone interface.
The REN is used to determine the quantity of devices which may be connected to the
telephone line. Excessive RENs on the telephone line may result in the devices not
ringing in response to an incoming call. In most, but not all areas, the sum of RENs
should not exceed five (5.0). To be certain of the number of devices that may be
connected to the line, as determined by the total RENs, contact the telephone company
to determine the maximum REN for the calling area.
If the announcer causes harm to the telephone network, the telephone company will
notify you in advance that temporary discontinuance of service may be required. But if
advance notice isn't practical, the telephone company will notify the customer as soon
as possible. Also, you will be advised of your right to file a complaint with the FCC if
you believe it is necessary.
The telephone company may make changes in its facilities, equipment, operations, or
procedures that could affect the operation of the equipment. If this happens, the
telephone company will provide advance notice in order for you to make the necessary
modifications in order to maintain uninterrupted service.
If trouble is experienced with this announcer, please contact ALARMCO at 203-4582646 for repair and/or warranty information. If the trouble is causing harm to the
telephone network, the telephone company may request you remove the equipment
from the network until the problem is resolved.
No repairs to the announcer should be performed by the user.
This equipment cannot be used on public coin service provided by the telephone
company. Connection to Party Line Service is subject to state tariffs. (Contact the state
public utility commission, public service commission, or corporation commission for
information.)
30
/ / / ////ALARMCO
CHAPTER 10: SECOND CHANNEL OPTIONS
Second Channel (-2C)
The Second Channel (-2C) option allows Autoplay to broadcast messages over either or
both audio output channels. Autoplays with this option are equipped with a second
audio output channel that is available on the screw terminals marked "LG" or "DTMF,"
which are to the right of the standard "Line Out" terminals.
This is a transformer isolated, 600 Ohm, line level output. No volume control is
available. Background music fed through the "Music In" port does not appear on this
channel.
To access the second channel, add [8000] to the desired message number on a playlist
or on the schedule. For example, 8001 will cause message number 1 to be broadcast
on the second channel.
Second Channel with Music (-2M)
The Second Music Channel (-2M) option provides the ability to simultaneously play
music and broadcast messages over either or both audio output channels. Autoplays
with this option are equipped with a second audio output channel that is available on the
screw terminals marked "LG" or "DTMF," which are to the right of the standard "Line
Out" terminals.
Three volume controls set the music level, message level, and "ducked" music volume
for both channels. The music level is ducked down on the active channel only during
messages. The other channel is unaffected.
Music will be ducked beneath the messages appearing on the second channel.
cannot be "cut" completely.
It
To access the second channel, add [8000] to the desired message number on a playlist
or on the schedule. For example, 8004 will cause message number 4 to be broadcast
on the second channel.
intelligent message repeaters
31
32
/ / / ////ALARMCO
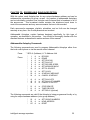
CHAPTER 11: SERIAL LINK OPTION
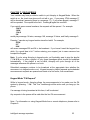
With the serial link option, Autoplay's announcements can be triggered over an RS-485
serial link.
The UART in the announcer is set up for serial communication with the following
specifications:
Baud rate:
Data bits:
Parity:
Stop bits:
9600
8
None
2
The electrical signal levels meet the RS-485 specification. All characters are ASCII.
The format for a command is:
$Unit;Command(line terminator)
For example, to request unit 1 to say message 5, enter:
$1;5(RETURN)
•
The line must start with "$."
•
The unit number is one or more decimal digits. Single digits are preferred.
•
The unit number must be immediately followed by ";."
•
The command is one or more decimal digits. The command can be a
message number between 1 and 250, or a playlist number between 1001 and
1020. A command for a single message will cause that message to be
played one time. However, if a playlist is requested, that playlist will run
continuously until a new command is received, or a previously scheduled
command overrides it.
•
The line must be terminated immediately after the command by a LINE FEED
character or a RETURN character.
•
No spaces or tabs may be included within the line.
•
The DELETE character will delete the last character entered.
•
The CONTROL-X character will delete the entire current line.
To set Autoplay's unit number, use the Control Phone to enter the command:
*71#unit number#
intelligent message repeaters
33
34
/ / / ////ALARMCO
CHAPTER 12: ADDRESSABLE ANNOUNCER OPTION
With this option, each Autoplay has its own unique hardware address and can be
addressed as a member of a group, as well. Any number of addressable Autoplays
can be individually controlled over a single control channel that is broadcast to all of
the announcers. This broadcast stream contains the telephone touch tones to
control the announcers and any announcements that are to be recorded.
Each announcer's messages, playlists, schedules, and so forth can be changed
remotely at any time. No on-site personnel are involved.
Addressable Autoplays contain features designed specifically for this type of
operation, as described in this section. You should be thoroughly familiar with the
standard features as described in earlier sections of this manual.
Addressable Autoplay Commands
The following commands are used to program Addressable Autoplays either from
the local control phone or via the remote control channel:
Press:
Press:
* 9276 # (Address) # To Address Unit
*
*
*
*
*
*
*
1
3
4
5
8
9
10
#
#
#
#
#
#
#
to
to
to
to
to
to
to
RECORD
ERASE
SET SPACING
SET PLAYLIST
SET RECORD SPEED
SET MESSAGE MUSIC
SET PA SOURCE
*
*
*
21
22
24
#
#
#
to SET CLOCK
to SCHEDULE MESSAGE
to CANCEL SCHEDULE
*
*
*
41
43
44
#
#
#
to SET PLAYLISTS
to SET PLAYLIST NUMBER
to CANCEL PLAYLISTS
*
*
*
51
61
62
#
#
#
to STOP REMOTE
to TIMED RECORD
to SET RELAY (Optional)
The following commands are valid if the Autoplay is being programmed locally or by
using its unique hardware address (not a group address).
*
*
*
52
53
127
intelligent message repeaters
#
#
#
to SET GROUP NUMBERS
to HEAR ADDRESS
to RESET
35
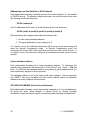
Addressing over the Satellite or SCA Channel
Each addressable Autoplay constantly monitors the control channel, i.e., the satellite
or FM-SCA source. To address a single announcer, the control channel must send
the following touch tone sequence:
* 9276 # (address) #
Up to 5 addresses can be sent, as in the following touch tone sequence:
* 9276 # (addr1) # (addr2) # (addr3) # (addr4) # (addr5) #
Each announcer will compare each address broadcast with:
1. Its own unique hardware address.
2. The group addresses (if any) assigned to it.
If a "match" occurs, the addressed announcer will stop its normal announcing and
enter the Remote Programming mode. In Remote Programming mode, the
announcer will accept touch tone commands received over the control channel. If
no "match" occurs, the announcer will ignore all commands received over the control
channel.
Unique Hardware Address
Each addressable Autoplay has a unique hardware address. To determine this
address, plug a phone into the announcer's "Control Phone" port. Press: * 53 # and
listen. You will hear the hardware address, along with any group addresses that you
have dynamically assigned to this announcer.
The hardware address is set at the factory and never changes. Some commands,
e.g., RESET, will not be accepted over the control channel unless the hardware
address was used to address the announcer.
SET GROUP NUMBERS (Define Group Addresses)
Each addressable Autoplay can be dynamically assigned up to 3 group addresses.
By giving the same group address to several dozen (or several hundred)
announcers, those announcers can all be addressed and controlled simultaneously.
36
/ / / ////ALARMCO
For example, a single announcer may be part of a group of announcers in the
Eastern Time Zone, and part of a particular convenience store chain, and part of a
particular C-store chain that has gas pumps outside.
Group addresses are either assigned locally or over the control channel. When
assigning group addresses over the control channel, the Autoplay must be
addressed with its unique hardware address.
To set an announcer's group address(es), enter the following:
* 9276 # (hardware addr) #
* 52 #
(group address) #
0#
to address a specific announcer
... then for each group address
or
for no group addresses.
Valid group addresses are between 1 and 65535.
SET RECORD SPEED
Entering Remote Programming mode sets the recording speed to its default value.
The speed can then be changed to a different value, if desired.
Terminating a control channel session
An addressed announcer will stop responding to control channel commands and go
back to its normal announcing operation when any of the following occurs:
1. The STOP REMOTE PROGRAMMING command sequence
(* 51 # 1 #) is received.
2. The addressing sequence (* 9276 #) is received.
3. More than 2 minutes (120 seconds) passes without receipt of the "#" touch
tone. (During a timed message recording, the 2 minutes start at the end
of the recording time.)
4. A RESET command (* 127 #) is executed.
5. The local control phone is taken off hook.
intelligent message repeaters
37
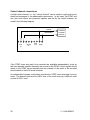
Control channel connections
A single audio channel, i.e., the "control channel" can be used to supply both touch
tones and messages to the addressable announcers. In this case, the DTMF and
Aux (low level) inputs are jumpered together and fed by the control channel, as
noted in the following diagram.
If the DTMF tones and audio to be recorded are available independently, (such as
with two separate satellite channels) the source for the DTMF control signals should
attach to the DTMF screw terminals and the channel of the audio to be recorded
should attach to the AUX screw terminals.
An addressable Autoplay continuously monitors the DTMF screw terminals for touch
tones. The desired input level for EACH tone of the touch tone pair is 800 mV peak
to peak (0.283 V rms).
38
/ / / ////ALARMCO
CHAPTER 13: TIPS ON RECORDING GOOD MESSAGES
1. If possible, use a microphone. You'll get a much fuller, richer sound than you will
using the phone.
2. Do NOT hold the microphone in your hand. Use a stand or prop it up on something
solid. Turn slightly sideways to the mic. so that the "p" in a word like "punch"
doesn't blast into the mic.
3. Record in a quiet place. You don't need a studio, but watch out for noises that
you're so used to that you don't hear them anymore. That includes things like
ringing phones, PA announcements, refrigerators, water fountain coolers, fans, air
conditioning, and printers. Maybe you can turn them off for a few minutes.
4. Forget the microphone and pretend you're talking to someone you know. Picture
him holding the phone or listening to the PA. Enter * 1 # (message number), but
not the final "#." Say a sentence or two to that person before you start the recording,
"Jim, I want to tell you about the sale we're going to have ... (take a breath and press
the # key to start the recording) ..."
5. Have a friend coach you the first time. He's used to your voice and knows how it
sounds when you're talking naturally.
6. If possible, use the microphone as a PA so that you can hear yourself over a
speaker. It's amazing how quickly you can develop a good "recording voice" when
you can hear yourself talk.
7. When you breathe between sentences, either do it loud enough to be recorded (it
sounds natural) or so quietly the microphone doesn't pick it up. In between sounds
like noise.
8. If you want to record message 4 again to see if you can do it better, record the new
one as message 5. Then you can pick your favorite and erase the other.
9. Turn on Message Music. You'll sound considerably better with music in the
background. It masks all the little recording problems and makes you sound good.
intelligent message repeaters
39
40
/ / / ////ALARMCO
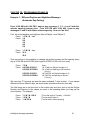
CHAPTER 14: PROGRAMMING EXAMPLES
Example 1: Different Daytime and Nighttime Messages
(Automatic Day-Parting)
From 10:00 AM until 9:00 PM, I want to play messages 1, 2, 3, 4, and 5 with five
minutes spacing between each. From 9:00 PM until 10:00 AM, I want to play
messages 21 and 22 with fifteen minutes spacing. How can I do this?
First, set up the daytime and nighttime lists as Playlist 1 and Playlist 2:
Press: * 41 # 1 # then,
Press: 1 #
2#
3#
4#
5#
Press: * 41 # 2 # then,
Press: 21 #
22 #
Then put entries in the schedule to change the playlist number and the spacing every
day at 10:00 AM and 9:00 PM (don't forget 9:00 PM is 2100 in 24 hour time):
Press: * 22 #
Press: 0 # 1000 # 1001 #
0 # 1000 # 10300 #
0 # 2100 # 1002 #
0 # 2100 # 10900 #
then,
{At 10 AM, set Playlist Number to 1}
{At 10 AM, set Spacing to 300 seconds
(5 min.)}
{At 9:00 PM, set Playlist Number to 2}
{At 9:00 PM, set Spacing to 900 sec.
(15 min.)}
We used day "0" because we want the same schedule 7 days a week. If you wanted
different times on different days, we would make schedule entries for each day.
The final steps are to set the clock to the correct day and time, and to set the Playlist
Number and Spacing to the values you want to be operating when you hang up the
control phone. For example,
Press: * 21 # 3 # 1100 #
Press: * 43 # 1 #
Press * 4 # 300 #
intelligent message repeaters
{To set the clock to Tuesday, 11:00 AM}
{To start with Playlist 1}
{To start with 5 minute spacing}
41
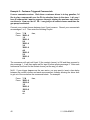
Example 2: Customer Triggered Commercials
I have a convenience store. Each time a customer drives in to buy gasoline, I'd
like to play a commercial over the PA to advertise items in the store. Let's say I
have 6 commercials I want to sequence through, tripping the next one each time a
car drives in. How can I do it? PS: I can give you a contact closure each time the
gas pump is activated.
Connect your contact closure between Input 2 and common. Record your commercials
as messages 1 to 6. Then enter the following Playlist:
Press: * 5 #
Press: 30001 #
1#
30001 #
2#
30001 #
3#
30001 #
4#
30001 #
5#
30001 #
6#
then,
The announcer will wait until Input 2 (the contact closure) is ON and then proceed to
play message 1. It will then again wait for Input 2 before playing message 2. After each
commercial it will wait for the contact closure just the way you want.
NOTE: If your trigger happens as the cars arrive, you may want to insert a time delay
between the contact closure and each announcement, thereby allowing the driver time
to get out of the car before the commercial starts. For example:
Press: * 5 #
Press: 30001 #
10010 #
1#
30001 #
10010 #
2#
etc.
42
then,
/ / / ////ALARMCO
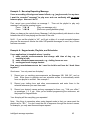
Example 3: Non-stop Repeating Message
I have a recording of background sound effects, e.g., jungle sounds, for my store.
I want the recorded "message" to play over and over endlessly with no pause
between plays. How can I do it?
First, record your sound effects as message 1. Then set the playlist to play only
message 1 and set the spacing to zero:
Press: * 5 # 1 #
(Play one message only)
Press: * 4 # 0 #
(Define no spacing between plays)
When you hang up the control phone, Message 1 will play endlessly with almost no time
between the end of one playing and the start of the next.
NOTE: If you set the playlist to "all," you'll get a delay of a couple seconds between
plays as the announcer checks the other 249 possible messages to see if any of them
has been recorded.
Example 4: Keypad mode, Playlists, and Schedules
I have applications in hospitals where I need to :
1) make periodic announcements that change with time of day, e.g., no
smoking in halls
2) make scheduled announcements, e.g., visiting hours are over
3) use keypad mode to page doctors.
How many recorder/announcers do I need to do this and how do I hook them
together?
Good news. You only need one Autoplay!
1)
Record your no smoking announcements as Messages 249, 248, 247, and so
forth. Enter these in playlists and use schedule entries to automatically switch
from one playlist to another. See example 1.
2)
Record your visiting hour and other announcements and enter them in the
schedule whenever you want them said.
3)
Record your doctors' names and any messages for them, e.g., "Call your office,"
as messages 1, 2, 3, etc. After you've finished programming the announcer, set
the jumper for Keypad Mode.
Your Autoplay will do everything you requested.
Note: One thing to remember when using keypad mode is that you never want the
playlist set for "ALL." You don't want the unit to sequence through the doctors' names,
for example, you only want them said upon request.
intelligent message repeaters
43
44
/ / / ////ALARMCO
Autoplay Installation Instructions
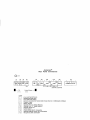
Please refer to the diagram on the back cover for wiring connections. Numbers in
square brackets relate to this diagram.
1.
Set the volume controls at their midpoints.
2.
[#7] Make any desired connections to the output relay Form C contacts. Relay A
is normally energized during announcements. At rest, the Normally Closed (NC)
side is shorted to Common (C) and the Normally Open (NO) is open. During the
mesage playback, these states are reversed, i.e., the "NC" side will open and the
"NO" side will short closed to Common. Relay B (OFF by default) is controlled by
the software and must be programmed to operate as described in Chapter 8.
3.
[#5] Prepare 16 VAC or 24 VDC connections to the associated terminals. DO
NOT APPLY POWER YET. External protection should be provided. Depending
on model, Autoplays draw approximately 100 to 400 ma. of current.
4.
[#6] If an external (12V) battery will be used, prepare the connections now,
including a fuse. DO NOT CONNECT THE BATTERY YET.
5.
[#3] Connect the (transformer isolated) Line Out terminals to your amplifier's line
level audio input.
6.
[#2] Connect the music source, if any, to the screw terminals labled "MUSIC IN.". If
the level is more than 0 dBm, connect to High (H) and Ground (G). Otherwise,
connect to Low (L) and Ground (G). If you're not sure of the level, use Low.
7.
[#1] If you're recording from a tape recorder or other line level source, connect it
to the screw terminals labled "AUX IN." If its level is more than 0 dBm, connect to
High (H) and Ground (G). Otherwise, connect to Low (L) and Ground (G).
8.
[#12] Connect the microphone, if you're using one.
9.
[#10] Connect the a standard touchtone telephone to the RJ11 jack labled
"CONTROL PHONE," not to the RJ11 jack labled "T/R," if present.
10. Apply power to the announcer.
intelligent message repeaters
45
11. Audio from the music source should be present on the LINE OUT terminals. Adjust
the music volume control to the level desired. If music volume is too loud, change
to High, as described in step 7 above.
12. If you are using a 9V battery, install an alkaline (not carbon) battery in the holder
provided, making sure the polarity is correct. The battery preserves the memory
during short power failures. Remove the battery if the announcer is ever taken out
of service.
A fully charged 9V alkaline battery should maintain the memory of your announcer
for several hours. If more protection is needed, a 12V external battery backup with
a 2 stage charger is available from ALARMCO. Twenty-four volts is also
acceptable, if available.
If, instead of the 9V battery, you're using an external 12V battery, disconnect the
leads to the 9V battery holder. Connect the battery, battery charger, and fuse.
DANGER - Do not connect both 9V and 12V batteries to the Autoplay.
13. Pick up the control phone. You should hear a voice prompt over the control phone
each time it's taken off hook. As long as the control phone is off hook, no
messages will be broadcast over the PA system, however music will continue to
play through.
14. Record a test message and play it back:
a.
Turn the microphone on and get ready to talk into it.
b.
Take the control phone off hook.
c.
Press: * 1 # and listen.
Press: 1 # to start recording message 1.
d.
Talk into the microphone.
e.
Press # to stop recording.
f.
Press: * 4 # and listen.
Press: 5 # to set the spacing between messages to 5 seconds.
g.
Hang up the phone.
h.
You should hear your recording on the Line Out terminals with 5 seconds of
music between repeats.
15. Set the message volume (MSG) to the desired level.
16. Set the background volume (MUSIC UNDER MSG) to the level of music desired
during the message.
46
/ / / ////ALARMCO
17. [#11] IF YOU HAVE THE TELEPHONE CONTROL OPTION, attach the
telephone line from your PBX or DAA to the modular plug marked "T/R." Do not let
the phone line wires touch any other terminals.
WARNING - DO NOT PLUG ANYTHING EXCEPT A STANDARD TOUCH
TONE PHONE INTO THE MODULAR JACK MARKED "CONTROL
PHONE."
DO NOT PLUG A TELEPHONE LINE ONTO THIS
CONNECTOR. ATTACHING A TELEPHONE LINE TO THIS MODULAR
JACK COULD PERMANENTLY DAMAGE THE ANNOUNCER.
With the control phone on hook, place a call to the telephone line you just
connected. Autoplay should answer the phone and talk to you. On the remote
phone you used to place the call, Press: * 98304 #. Autoplay should talk to you
some more. You can now make any recording or programming changes remotely,
including changing the security code, as described in Chapter 9.
18. [#4] IF YOU HAVE THE ADDRESSABLE OPTION, please refer to Chapter 12.
19. [#4] IF YOU HAVE A SECOND AUDIO OUTPUT CHANNEL, i.e., -2C or -2M,
please refer to Chapter 10.
20. The following seven instructions describe how to record the "real" messages and
program the Autoplay.
a.
The default "RECORD SOURCE" is set to MIC. Change it to AUX INPUT or
PHONE for the real messages, if necessary.
(* 7 # - Chapter 1)
b.
Set the "RECORD SPEED." (* 8 # - Chapter 6)
Hint: By pressing * 1 # and listening to hear how much recording time is
available, you can then adjust the speed as high as possible to provide the
highest fidelity.
c.
Record the messages to be stored. (* 1 # - Chapter 1)
d.
After recording, listen to the recorded messages over the control phone. (* 2
# - Chapter 1)
e.
Create any playlists desired. (* 41 # - Chapter 2)
f.
The PA source for live announcements is MIC. Change it now, if necessary.
(* 10 # - Chapter 6)
g.
Background "MESSAGE MUSIC" is on by default. You can change it if you
don't want music with your messages or you want it only sometimes. (* 9 # Chapter 6)
intelligent message repeaters
47
21. After the real messages have been recorded in the unit, hang up the control
phone.
Your first recorded message should play over the LINE OUT terminals.
Listen to the mesages and readjust the 3 volume controls. Adjust the "MUSIC
UNDER MESSAGE" level so that the music level steps down gently before or
during a message.
22. A final assessment of the playback might include the spacing between messages
on playlists, if you have them. If necessary, this spacing can be changed with the *
4 # command, as described in Chapter 2.
Unique spacings can be tailored at particular points within a playlist by using the
Special Playlist Entries as described in Chapter 2.
23. [#9] Make any desired connections to the control inputs.
between Common and an input is ON, an open circuit is OFF.
48
A contact closure
a.
Input 1 turns on the PA for "live" announcements. The selected PA source
(Mic, Aux, Phone) is fed through to Line Out.
b.
Input 2 is the "press to continue" input. This can be set to wait for either an
ON or OFF condition. (See User Manual, Chapter 4)
c.
Input 3 turns on "Keypad Mode." (See User Manual, Chapter 7)
d.
Input 4 stops any recorded announcements and cancels any announcement
requests which have been queued. When released, it starts the current
Playlist at the beginning.
/ / / ////ALARMCO
intelligent message repeaters
49
50
/ / / ////ALARMCO
Autoplay™
USER MANUAL
&
INSTALLATION INSTRUCTIONS
ALARMCO ®
Guilford, CT U.S.A.
203 - 458 - 2646
intelligent message repeaters
1
ALARMCO, Autoplay, intelligent message repeaters, and the ALARMCO logo are trademarks of
ALARMCO.
Copyright © 1999, ALARMCO ®. All rights reserved.
WARNING: This equipment generates, uses and can radiate radio
frequency energy. If not installed and used in accordance with the
instruction manual, it may cause interference to radio communications.
The rules with which it must comply afford reasonable protection against
such interference when it is used in a commercial environment.
Operation of this equipment in a residential area is likely to cause
interference, in which case the user will be required to correct the
interference at his own expense.
2
/ / / ////ALARMCO
TABLE OF CONTENTS
Introduction ................................................................................................ 5
Autoplay Command Summary................................................................ 7
Autoplay Optional Commands ................................................................ 8
*
Chapter 1: Recording Messages ............................................................ 9
Getting started ........................................................................................ 9
Your first command ................................................................................ 9
The RESET command............................................................................ 9
Setting the RECORD SOURCE.............................................................. 10
RECORD MESSAGE ............................................................................. 10
HEAR MESSAGE................................................................................... 11
Saving time............................................................................................. 12
ERASE MESSAGE................................................................................. 12
Changing messages............................................................................... 12
*
Chapter 2: Single Playlist......................................................................... 13
Repeating announcements..................................................................... 13
SET SPACING ....................................................................................... 13
SET PLAYLISTS .................................................................................... 13
HEAR PLAYLIST.................................................................................... 14
Chapter 3: Multiple Playlists (Day-Parting)............................................. 15
SET PLAYLISTS .................................................................................... 15
HEAR PLAYLISTS ................................................................................. 15
SET PLAYLIST NUMBER ...................................................................... 16
CANCEL PLAYLIST ............................................................................... 16
Chapter 4: Special Playlist Entries .......................................................... 17
[ 0 ] "Stop Announcing"........................................................................ 17
[ 1 - 250 ] ................................................................................................ 17
[ 901 - 910 ] "Splash Tones" ................................................................ 17
[ 1001 - 1020 ] "Say Playlist Once"...................................................... 17
[ 10000 - 19999 ] "Manual Spacing" .................................................... 18
[ 30000, 30001 ] "Press to Continue"................................................... 18
Chapter 5: Scheduling with the 7 Day Clock .......................................... 19
Scheduled Announcements.................................................................... 19
SET CLOCK ........................................................................................... 19
SCHEDULE MESSAGE ......................................................................... 19
HEAR SCHEDULE ................................................................................. 20
CANCEL SCHEDULE............................................................................. 20
Special Schedule entries ........................................................................ 20
*
Chapter 6: Record Speed, Message Music, PA Source....................... 21
SET RECORD SPEED ........................................................................... 21
SET MESSAGE MUSIC ......................................................................... 22
SET PA SOURCE (Live Announcements).............................................. 22
intelligent message repeaters
3
Chapter 7: Keypad Mode .......................................................................... 23
Keypad Mode "PA Request"................................................................... 23
Chapter 8: Output Relay Option .............................................................. 25
SET RELAY Touch Tone Command ...................................................... 25
Special Schedule and Playlist Entries .................................................... 26
Chapter 9: Telephone Control Option ..................................................... 27
Accessing the Announcer from a Remote Phone ................................... 27
Changing the Security Code Number ..................................................... 28
Remote Recording of Messages ............................................................ 28
TIMED RECORD.................................................................................... 28
Remote Hearing of Messages ................................................................ 29
STOP REMOTE (Terminate Remote Control Session) .......................... 29
Remote Keypad Mode............................................................................ 29
Telephone Control Option Consumer Information .................................. 30
Chapter 10: Second Channel Options..................................................... 31
Second Channel (-2C) ............................................................................ 31
Second Channel with Music (-2M).......................................................... 31
Chapter 11: Serial Link Option ................................................................ 33
Chapter 12: Addressable Announcer Option ......................................... 35
Addressable Autoplay Commands ......................................................... 35
Addressing over the Satellite or SCA Channel ....................................... 36
Unique Hardware Address...................................................................... 36
SET GROUP NUMBERS (Define Group Addresses) ............................. 36
SET RECORD SPEED ........................................................................... 37
Terminating a Control Channel Session ................................................. 37
Control Channel Connections................................................................. 38
Chapter 13: Tips on Recording Good Messages ................................... 39
Chapter 14: Programming Examples ...................................................... 41
Example 1: Different Daytime and Nighttime Messages
Automatic Day-Parting........................................................ 41
Example 2: Customer Triggered Commercials ...................................... 42
Example 3: Non-stop Repeating Message ............................................ 43
Example 4: Keypad mode, Playlists, and Schedules............................. 43
*
4
Autoplay Installation Instructions ............................................................ 45
/ / / ////ALARMCO
INTRODUCTION
USING THE ALARMCO AUTOPLAY™ RECORDER/ANNOUNCER
Autoplay is frequently used to provide a series of messages to someone who has called
on the telephone and been put on hold. Another common use is to broadcast recorded
announcements in stores (Storecasting with automatic day-parting). Music is usually
played between announcements and often at reduced volume during the
announcements.
The default settings cause all messages to be continuously repeated in numerical order
with 30 second spacing between them.
A single Autoplay can provide continuous messages along with scheduled messages
and user-selected messages. All functionality can be provided within the same machine
at the same time.
For example, you can provide storecasting messages throughout the day and still
schedule store closing announcements to be said automatically at the appropriate time.
With keypad mode, you can randomly select and queue prerecorded announcements
simply by entering their numbers on a telephone keypad — while Autoplay continues
announcing its repeated messages.
Should you want Autoplay only to play messages that are triggered by a telephone
keypad or with the internal 7-day clock, the automatic message repeating function can
simply be suspended.
To control Autoplay, you use a standard touch tone telephone. You "talk" to Autoplay in
touch tone. It "talks" to you in English. Once you specify the command you want to
perform, e.g., RECORD, Autoplay gives you instructions telling you what to do.
Autoplay is easy to use. This manual will lead you step by step as you record a
message, change it, and so forth.
intelligent message repeaters
5
This chart contains a brief summary of Autoplay's commands. More complete
descriptions can be found in the appropriate chapters. For simple applications, you only
need to read Chapters 1, 2, and 6.
COMMAND LIST
Press:
6
*
*
*
1
2
3
#
#
#
to
to
to
RECORD
HEAR MESSAGE
ERASE
CHAPTER
1
1
1
*
*
*
4
5
6
#
#
#
to
to
to
SET SPACING
SET PLAYLIST
HEAR PLAYLIST
2
2
2
*
*
*
*
7
8
9
10
#
#
#
#
to
to
to
to
SET RECORD SOURCE
SET RECORD SPEED
SET MESSAGE MUSIC
SET PA SOURCE
1
6
6
6
*
*
*
*
21
22
23
24
#
#
#
#
to
to
to
to
SET CLOCK
SCHEDULE MESSAGE
HEAR SCHEDULE
CANCEL SCHEDULE
5
5
5
5
*
*
*
*
41
42
43
44
#
#
#
#
to
to
to
to
SET PLAYLISTS
HEAR PLAYLISTS
SET PLAYLIST NUMBER
CANCEL PLAYLISTS
3
3
3
3
*
*
*
*
*
51
52
61
62
71
#
#
#
#
#
to
to
to
to
to
STOP REMOTE (Optional)
SET GROUP NUM. (Opt)
TIMED RECORD (Optional)
SET RELAY (Optional)
SET CODE (Optional)
9
12
9
8
9
*
127
#
to
RESET
1
/ / / ////ALARMCO
Autoplay Command Summary
1
RECORD A MESSAGE
Press:
Press:
Speak
Press:
2
(To erase all messages ... or
... to erase selected message)
* 4#
(spacing in seconds) #
(Set new spacing)
*5#
999 #
(message number) #
or
(Define which messages to play)
(To broadcast all messages ... or
... to define specific messages to play)
*6#
(Hear msg. numbers on control phone)
*7#
(1, 2, or 3) #
(1 = Mic, 2 = Aux, 3 = Phone)
*8#
(1000 .. 1011) #
(1000 = longest record time, 1011 = highest fidelity.
Each step shortens record time and increases fidelity)
SET MESSAGE MUSIC
Press:
Press:
10
or
SET RECORD SPEED
Press:
Press:
9
*3#
999 #
(message number) #
SET RECORD SOURCE
Press:
Press:
8
(Preview message with control phone)
(To hear all messages ... or
... to hear selected message)
HEAR PLAYLIST
Press:
7
or
SET PLAYLIST
Press:
Press:
6
*2#
999 #
(message number) #
SET SPACING BETWEEN MESSAGES
Press:
Press:
5
(Starts recording selected message)
(Autoplay records from phone, ... or
... microphone, ... or
... aux. input)
[See #7 below]
(Stop recording)
ERASE A MESSAGE
Press:
Press:
4
or
or
HEAR A MESSAGE
Press:
Press:
3
*1#
(message number) #
into control phone
into microphone
play taped message
#
*9#
(0, 1, or 2) #
(Music on during message?)
(0 = Off, 1 = On, 2 = On for odd only)
SET PA SOURCE
Press:
Press:
* 10 #
(1, 2, 3, or 4) #
intelligent message repeaters
(1=Mic, 2=Aux, 3=Phone, 4=Msg 250)
7
21
SET CLOCK
Press:
Press:
22
Press:
(Select day, then for each entry:)
(To keep entry in schedule ... or
... to delete entry from schedule)
* 24 #
(day number) #
999 #
1#
or
(Cancel one day's schedule ... or
... cancel entire schedule)
(To confirm that you really want to)
* 41 #
(playlist number) #
(message number) #
(Used to enter multiple playlists)
(Select playlist to define)
(For each message to add to the list)
* 42 #
(playlist number) #
(Select playlist to review)
SET PLAYLIST NUMBER
Press:
Press:
44
or
HEAR PLAYLISTS
Press:
Press:
43
* 23 #
(day) #
#
9#
SET PLAYLISTS
Press:
Press:
Press:
42
(enter day, time, and message
number for each message being
scheduled)
CANCEL SCHEDULE
Press:
Press:
41
* 22 #
(day) #
(time) #
(message number) #
HEAR SCHEDULE
Press:
Press:
24
(day = 1..7, time = 24 hour time)
SCHEDULE MESSAGE
Press:
Press:
23
* 21 #
(day) # (time) #
* 43 #
(playlist number) #
(Select which playlist to run)
CANCEL PLAYLIST
Press:
Press:
* 44 #
(playlist num) #
999 #
or
(Cancel one playlist ... or
... cancel all playlists)
127 RESET
Press:
Press:
* 127 #
1#
(Resets Autoplay to Factory Defaults)
(To confirm that you really want to)
Autoplay Optional Commands
For optional commands, please refer to Chapters 8 through 12.
8
/ / / ////ALARMCO
CHAPTER 1: RECORDING MESSAGES
This chapter tells how to record messages. Autoplay lets you record up to 250
messages and change them at any time. The only limitation is that the combined length
of your messages cannot exceed the total recording time available for your unit.
Getting started
Any standard touch-tone telephone can be used to program the Autoplay. Simply
connect a standard touch-tone telephone into the RJ-11 jack labeled "Control Phone" on
the back of the Autoplay. If you have supplied power to the unit, it should now be
operable. (For detailed installation instructions, please refer to page 45 of this manual.)
Pick up the handset on the control phone and listen to it. Hang up and then pick it up
again. Hang up in the middle of the speech and pick it up again.
You can always hang up at any time. Autoplay will stop whatever it is doing. So if you
ever get confused, just hang up and start over.
Notice where the [*] key and the [#] key are. You'll be using them a lot, as all
commands begin with [*] and end with [#].
Your first command
Let's do as the voice suggests and press the keys: * 0 #. Autoplay will start reciting the
command list to us.
After listening to the first few commands, press: * 0 # again.
This time after listening to a command or two, press: *.
Any time you press *, Autoplay stops what it's doing and gets ready for a new
command. That means you can restart a command or switch to a new one at any time.
Since you have a typed list of the commands in this manual, it's faster to look at it than
to have Autoplay read the list to you.
The RESET command
The RESET command erases and cancels everything that's been done to the Autoplay.
All messages are erased and any programming is canceled.
Press: * 127 # and listen.
intelligent message repeaters
9
A RESET is serious business. Autoplay makes you confirm you really want to do it by
pressing: 1 #.
A RESET returns all Autoplay choices to their default values, that is, their factory
settings. For example, even if someone changed it before, the record source is now set
for Microphone, and any messages you record will be played back with 30 seconds of
spacing between them when the control phone is hung up.
Setting the RECORD SOURCE
Default = MIC
Autoplay can record from a microphone, from its Aux. input (usually a tape recorder), or
from the mouthpiece of the control phone. You have to specify which you want to use.
Press: * 7 # and listen. (Don't forget you can press * 7 # again if you want to hear the
instructions again.)
If you have a microphone, we'll be using it so you don't need to press anything. If you
don't have a microphone, select the phone as the record source by pressing 3 # (and
whenever we say "microphone", you think "phone"). If you changed the record source,
press * 7 # and listen to confirm that it's now set the way you want.
Should you want to record from the Aux. input, the entire sequence of commands would
be:
*7#
2#
When recording from the Aux input, you can monitor by listening on the control phone
while the recording is being made.
RECORD MESSAGE
Autoplay messages are numbered from 1 to 250. You can record messages in any
order.
Press: * 1 # and listen.
Autoplay first responds by telling how many seconds of record time are available (at the
current RECORD SPEED setting, as described in Chapter 6). It then tells you the
current RECORD SOURCE. In addition, you can use the control phone to monitor the
recording as it is being digitized. If you tap on the microphone you should hear it
through the phone.
10
/ / / ////ALARMCO
We're going to record message 4. Get ready to talk into the microphone, but don't do
anything until we describe the steps:
When you press 4 #, recording will start.
Say into the microphone something like, "This is message 4."
or "Message 4 sounds like this."
Press: # to stop the recording.
Do the same for messages 1, 2, and 3. Make messages 2 and 3 at least ten seconds
long. (You don't need to press * 1 # again, once is enough.) Don't start each recording
until you're ready to talk. Stop each recording as soon as you finish.
If you messed up one of the messages, record it over again saying something like, "This
is a new version of message 3." If you want to find out how much recording time is still
available, press: * 1 #.
HEAR MESSAGE
You can review your recordings by using the HEAR MESSAGE command.
Press: * 2 # and listen
Press: 999 # and listen.
How did they sound? Want to hear message 2 again?
Press: 2 #.
If you want to hear just the first several seconds of a message, press: (message
number + 1000) #.
Press: 1002 #
Press: 1004 #
Press: 1999 #
to hear the beginning of message 2.
for message 4.
to hear the first part of all messages.
If they didn't sound great, don't worry. There are some tips in Chapter 10 that will make
your recordings sound much better. The objective was to record several messages,
and you succeeded.
intelligent message repeaters
11
Saving time
Autoplay's prerecorded instructions are there for your benefit. Once you've done a
command a few times though, you don't need most of them.
If you know what keys you're going to press next, don't wait. Go ahead and press them.
For example,
Press: * 2 #, then without waiting,
Press: 999 #.
ERASE MESSAGE
Press * 3 # and listen. Press 2 #. Message 2 is now gone (and its record time is
available again). You can verify this with the HEAR MESSAGE command, * 2 #.
Changing messages
If you want to change a message, you don't have to erase it before recording it again.
When you record a message, Autoplay automatically erases any previous version. The
new recording can be either longer or shorter than the original.
12
/ / / ////ALARMCO
CHAPTER 2: SINGLE PLAYLIST
Repeating announcements
If you hang up the control phone, Autoplay will start broadcasting your recorded
messages. Depending on the installation, your messages will probably go over the PA
system or into the telephone system.
All of the recorded messages will be sent in numerical order with spacing between
messages. After the last message, the list automatically starts over. The next 3
commands let you control and change this operation.
SET SPACING
Press: * 4 # and listen. The spacing between messages is measured in seconds. You
can select any spacing you want between 0 seconds and 2:45 hours. (For several
hours of spacing, please refer to Chapter 4, "Manual Spacing.") If, for example, you
want a spacing of 10 minutes, you should press 600 #.
The default value is 30 seconds. For this tutorial, let's set the spacing at 5 seconds by
pressing: 5 #.
SET PLAYLISTS
A playlist is a list of messages and/or commands that control how the Autoplay
functions.
Press: * 5 # and listen.
This command lets you play all recorded messages in numerical order (the default
value) or to enter the specific playlist you want. For example, 1 # will cause only
message 1 to be played (over and over).
Let's say you have recorded several messages, but currently want to use only 1, 2, and
7. Then you should enter:
1#
2#
7#
intelligent message repeaters
13
You can also get fancy. Let's actually enter the following:
5#
1#
5#
28 #
5#
3#
This will repeat message 5 every other time. If you specify a message that isn't
recorded, Autoplay will not play that entry. A playlist can be up to 100 entries long.
There are other entries for the playlist that put "splash" tones before messages and
handle special applications. You can have several different playlists and have them
automatically turn on and off during the week. For example, you might have one playlist
running during business hours and a second running nights and weekends. These
features are covered in later chapters.
HEAR PLAYLIST
Press: * 6 # and listen to hear the message numbers that comprise the playlist recited
back to you.
14
/ / / ////ALARMCO
CHAPTER 3: MULTIPLE PLAYLISTS (DAY-PARTING)
You may want to use the internal clock to automatically play one list of messages during
business hours, another at night, and a third on weekends. Autoplay lets you enter up
to 20 different playlists (numbered 1 to 20) and switch back and forth among them. The
following four commands are used when working with multiple playlists.
NOTE: If you have multiple playlists, DO NOT use the * 5 # and * 6 # commands. They
are for single playlist applications only.
SET PLAYLISTS
This command lets you create up to 20 different playlists.
Press: * 41 # and listen.
Autoplay first responds by asking you to enter the number of the playlist you want to
create. Let's create playlist 1. Press: 1 # and listen.
Enter the message numbers for the chosen playlist. For example:
7#
10 #
8#
7 #
24 #
There is a 100 entry maximum for your playlist entries. All entries can all go in one
playlist, or they can be distributed any way you want among multiple playlists.
HEAR PLAYLISTS
This command lets you review the message numbers that are on different playlists.
Press: * 42 # and listen. Now select any playlist number and listen. Autoplay will read
back the message numbers you have entered. For example, to hear playlist 1, press:
* 42 #
1#
intelligent message repeaters
15
SET PLAYLIST NUMBER
This command lets you select which playlist to run when you hang up the control phone.
Press: * 43 # and listen.
Autoplay tells you the current playlist number and then lets you (optionally) enter a new
choice. Your choices are:
0
Don't run any playlist
1 .. 20
Run the selected playlist
999
Play all recorded messages in sequential order. (Default )
For example, to define playlist 7 as the current playlist, press:
* 43 #
7#
CANCEL PLAYLIST
This command lets you cancel a single selected playlist. You can also cancel all of the
playlists.
Press: * 44 # and listen. Your choices are:
1 .. 20
Cancel the selected playlist.
999
Cancel all playlists.
For example, to cancel playlist 3, press:
* 44 #
3#
16
/ / / ////ALARMCO
CHAPTER 4: SPECIAL PLAYLIST ENTRIES
There are several numbers you can enter in a playlist to handle special requirements.
[0]
"Stop Announcing"
A zero in the playlist stops any further playlist announcing. For example:
3
5
0
Message 3 will be said, then message 5, then announcing will stop and this playlist will
not be repeated. The playlist can be started over again with a momentary contact
closure on the Stop/Start input (Control Input #4), by hanging up the control phone, or
with a schedule entry.
If the first entry in the playlist is 0, no announcements will be made. This is used when
the Autoplay's messages are not to be repeatedly announced, but rather, only triggered
by the schedule or through Keypad Mode.
[ 1 - 250 ]
The selected message will be played.
[ 901 - 910 ]
"Splash Tones"
The selected announcement tone will be played followed by a short pause. The various
tones can be auditioned by using the * 2 # (HEAR MESSAGE) command and then
entering 901 #, 902 #, and so forth.
Entries 901 - 905 are "splash" tones with a slight pause after each. Entries 906 - 909
are individual tones with almost no pause after them. They are used to create your own
"melody." Entry 910 is 1/2 second of silence for use after (or during) your own
sequence.
[ 1001 - 1020 ]
"Say Playlist Once"
An entry of (1000 + playlist number) will cause the requested playlist to be played once
and then the current playlist will continue. This can be used to conserve entries if a long
sequence shows up in several playlists. Define it once as a separate playlist and then
request it from each of the original lists.
intelligent message repeaters
17
[ 10000 - 19999 ]
"Manual Spacing"
If you want to individually control the spacing between messages, put an entry in the
playlist equal to (10,000 + Spacing). For example:
4
12
10000
19
10010
50
Messages 4 and 12 will be separated by the normal spacing. Messages 12 and 19 will
have zero time between them. Messages 19 and 50 will have 10 seconds between
them.
If several hours of spacing is desired between messages, multiple playlist entries can
be used. For example, 7200 seconds = 2 hours; to pause for 4 hours, simply enter
17200 on the playlist twice.
[ 30000, 30001 ]
"Press to Continue"
When the Autoplay reaches a playlist entry of 30000, it will proceed only when Control
Input 2 "Press to Continue" is OFF. When it reaches a playlist entry of 30001, it will
proceed only when Control Input 2 is ON.
For example, if input 2 is ON when a push-button is pressed and this is the playlist:
30001
1
30001
2
30001
3
30000
With the press of the button, message 1 starts to play. After message 1, if the switch is
still on, it sequences to message 2. If it is off, it will proceed to message 2 when the
button is pressed again. Likewise for message 3.
NOTE: See Chapter 8, Output Relay Option for additional playlist entries.
18
/ / / ////ALARMCO
CHAPTER 5: SCHEDULING WITH THE 7 DAY CLOCK
Scheduled Announcements
Autoplay can make store closing or other time-scheduled announcements automatically.
You have to set Autoplay's 7 day clock and enter the desired schedule of
announcements. The next 4 commands let you do this.
SET CLOCK
Autoplay has an internal 7 day clock. Days are numbered 1 to 7 for Sunday through
Saturday. Military (24 hour) time is used. For example 10:15 AM is 1015 and 4:52 PM
is 1652. If the clock is stopped, no scheduled announcements will be made.
Press: * 21 # and listen.
The clock is stopped after a reset and so it will say "Day 0, time 000." Set the clock to
the present day and time. For example, if it's Monday at 9:45 AM, press: 2 # 945 #.
Press: * 21 # to verify that it's set.
SCHEDULE MESSAGE
Messages are scheduled by day and time. For example, day 3, time 1400, message 6.
If day 0 is specified, the message will be announced every day of the week.
Press: * 22 # and listen.
Enter several messages in the schedule, particularly for day 4. Remember that days
are numbered 1..7 for Sunday..Saturday, and day 0 means every day of the week.
Time is 24 hour military time, e.g., 1700 for 5:00 PM. For example, to enter Tuesday,
4:15 PM, message 9, press: 3 # 1615 # 9 #.
If you realize you've made a mistake, e.g., entered time 200 instead of 1400 for 2:00
PM, you can abort the entry by reentering: * 22 #.
You can place up to 100 entries in the schedule. There are special entries that enable
you to perform more sophisticated functions, such as turning the playlists on and off at
scheduled times. Please refer to "Special Schedule Entries" later in this chapter.
intelligent message repeaters
19
HEAR SCHEDULE
This command lets you review the schedule one day at a time and cancel individual
messages.
Press: * 23 # and listen.
After you enter the day you're interested in, i.e., 0..7, Autoplay recites the first schedule
entry for that day. To delete that entry, press 9 #. To leave it alone, press #. Autoplay
then recites the next entry.
CANCEL SCHEDULE
This command lets you cancel all schedule entries for an entire day or for the entire
week.
(The Hear Schedule command can be used to cancel individual
announcements.)
Press: * 24 # and listen.
To cancel one day's schedule, press: (day number) #, where (day number) is 0, 1, 2, 3,
4, 5, 6, or 7. To cancel the entire schedule, press: 999 #.
Special Schedule entries
There are several "message numbers" you can enter in a schedule to handle special
requirements. These entries enable you to automatically turn playlists on and off and
change spacings at scheduled times.
[ 1 - 250 ]
Play the requested message.
[ 901 - 910 ]
Play the requested announcement tone.
[ 1000 - 1020, 1999 ] Set the playlist number. An entry of (1000 + Playlist Number) will
cause Autoplay to switch to the specified Playlist. The possible
Playlist Numbers are:
0
Don't play any playlist.
1 .. 20 Play the specified playlist number.
999
Play all messages in sequential order.
[ 10000 - 19999]
An entry of (10000 + spacing) will cause the spacing to be set to
the specified number of seconds.
Please refer to Chapter 8, "Output Relay Option" for additional playlist entries.
20
/ / / ////ALARMCO
CHAPTER 6: RECORD SPEED, MESSAGE MUSIC, PA SOURCE
SET RECORD SPEED
Default = 1007
Press: * 8 # and listen.
Autoplay has twelve different recording speeds numbered from 1000 to 1011. The
slowest recording speed is 1000, the fastest is 1011, and the default is 1007. You can
use the SET RECORD SPEED command to fine tune the speed of the recordings.
Lower recording speeds give lower fidelity and longer recording time. Higher speeds
give higher fidelity, but shorter recording time.
The RECORD command will tell you the total recording time available in your unit at the
present speed setting. If you have plenty of time at a higher speed, use it. If not, use a
lower speed for some or all of your messages. If you record different messages at
different speeds, Autoplay will automatically play each one back at the correct speed.
AUTOPLAY™ RECORDING CAPACITIES (Min:Sec)
Record
Speed
V
1000
1001
1002
1003
1004
1005
1006
1007
1008
1009
1010
1011
110
1:47
1:40
1:34
1:27
1:20
1:14
1:07
1:00
:53
:47
:40
:33
220
3:35
3:21
3:08
2:54
1:41
2:28
2:14
2:01
1:47
1:34
1:21
1:07
330
5:22
5:01
4:42
4:21
4:01
3:42
3:21
3:01
2:40
2:21
2:01
1:40
MODEL
430
7:10
6:42
6:16
5:48
5:22
4:56
4:28
4:02
3:34
3:08
2:42
2:14
540
8:57
8:22
7:50
7:15
6:42
6:10
5:35
5:02
4:27
3:55
3:22
2:47
650
10:45
10:03
9:24
8:42
8:03
7:24
6:42
6:03
5:21
4:42
4:03
3:21
760
12:32
11:43
10:58
10:09
8:56
8:38
7:49
7:03
6:14
5:29
4:43
3:54
860
14:20
13:24
12:32
11:36
10:44
9:52
8:56
8:04
7:08
6:16
5:24
4:28
Recording Speed:
Low:
1000
Standard: 1007 (Default)
High:
1011
intelligent message repeaters
21
SET MESSAGE MUSIC
Default = ON
Press: * 9 # and listen. Having message music means that the background music is on
quietly during your message. The actual volume is set with a volume control on the
back of the unit. This command lets you turn it off completely if your background music
includes talking or if your recorded messages include their own music.
As a third choice, you can have message music on for all odd numbered messages and
off for even numbered messages. For example, use odd numbers when recording your
"home made" or voice-only messages and even numbers for studio productions that
include their own music.
Press:
0 # to turn off message music
1 # to turn it on
2 # to turn it on for odd numbers, off for even
Note: If you have two audio output channels, please refer to Chapter 10.
SET PA SOURCE (Live Announcements)
Default = MIC
Press: * 10 # and listen. Autoplay can feed "live" audio straight through, overriding its
normal announcing if its PA control input is on. Your installer may have provided a
switch to turn the PA on. If so, this command is used to select the audio source. The
possible sources are Microphone, Aux, or Phone. A fourth choice is to have message
250 repeat every few seconds whenever the PA input is on.
Press:
22
1#
2#
3#
4#
for Mic
for Aux.
for Phone
for Message 250
/ / / ////ALARMCO
CHAPTER 7: KEYPAD MODE
Your installer may have provided a switch to put Autoplay in Keypad Mode. When the
switch is on, the touch tone phone will not talk to you. If you press: 17 #, message 17
will be broadcast (assuming there is a message 17). If you press # again, message 17
will be repeated. One repeat is the limit. Pressing # again has no effect.
If you rapidly press several numbers, the requests will be queued. For example:
14 # #
148 #
12 # #
9#
would play message 14 twice, message 148, message 12 twice, and finally message 9.
Pressing * cancels any keypad entries since the last #. For example,
202 #
93 *
94 #
will cause messages 202 and 94 to be broadcast. If you haven't used the keypad for a
while, it's a good idea to hit * before entering your request, just in case someone has
bumped the keypad.
Note: If you're using Autoplay in keypad mode, you'll probably want to stop the playlist
(* 5 # 0 #) or to enter a playlist of only those messages which should be broadcast
automatically. If the playlist is set for ALL, Autoplay will cycle through all of the
messages whenever the phone is on hook.
Scheduled messages continue to be broadcast at the appropriate time whether the
announcer is in keypad mode or not. Keypad requests, playlist requests and scheduled
announcement requests are queued and made on a first come, first served basis.
Keypad Mode "PA Request"
While in keypad mode, Autoplay allows live announcements to be made over the PA
system by pressing: * 0 #. This "live" feedthrough will be active until you hang up the
phone.
If a message is being broadcast at this time, it will be aborted.
Any requests in the queue will be said after the live PA announcement.
Note: For information on using Keypad Mode from a remote telephone, please refer to
Chapter 9.
intelligent message repeaters
23
24
/ / / ////ALARMCO
CHAPTER 8: OUTPUT RELAY OPTION
Relay A Default = ON WHEN TALKING
Relay B Default = OFF
Autoplay comes standard with one Form C output relay that is energized (ON) during
announcements and OFF otherwise.
The output relay (-OR) option provides a total of 2 output relays (Form C contacts) and
enables you to control them both with touch tone commands, playlist entries, and
schedule entries.
Relay
Relay A
Relay B
Operation
Number
2000
Description
If unlocked, set to OFF
2001
If unlocked, set to ON
2002
If unlocked, set to WHEN TALKING
2003
Unlock
2004
2005
2006
Unlock and set to OFF
Unlock and set to ON
Unlock and set to WHEN TALKING
2007
Lock
2008
2009
2010
Unlock and set to OFF
Unlock and set to ON
Unlock and set to WHEN TALKING
2020
Set to
OFF
2021
Set to
ON
7001 - 7999 Set ON & hold for 0.1 - 99.9 sec.
then Lock
then Lock
then Lock
then OFF
The default value for Relay A is unlocked, when talking. "When talking" means that it's
ON during announcements, OFF otherwise. The default value for Relay B is OFF.
SET RELAY Touch Tone Command
To manually control the relay with touch tones, press:
* 62message
# (relay repeaters
operation number) #
intelligent
25
Special Schedule and Playlist Entries
By placing a relay operation number in a schedule or playlist, Autoplay will coordinate
the relay commands with messages to produce the specified results. With a 7xxx entry,
the playlist or schedule turns on the B relay and then proceeds immediately to the next
entry while the relay is doing its timed pulse. A 7xxx entry in a playlist between two
messages will turn on the relay at the end of the first message. The spacing between
messages comes after the relay operation starts.
The LOCK feature lets one set of commands override another. For example, even
though a playlist is running 24 hours a day ( and trying to operate Relay A each time it
makes an announcement), the schedule may lock the relay OFF from 9:00 PM until
8:00 AM.
26
/ / / ////ALARMCO
CHAPTER 9: TELEPHONE CONTROL OPTION
The Telephone Control (-TC) option lets you dial into the Autoplay over a switched
telephone system from a standard touch tone phone. Once the announcer answers, the
calling phone can remotely control the Autoplay to record new messages, change
playlists, and so forth.
After the announcer detects ringing and answers, the caller must usually enter a code
number (security code) before the announcer will accept commands. Once the proper
code has been entered, the operation of the remote phone for controlling the unit is very
similar to that of the local control phone plugged directly into the announcer.
WARNING - DO NOT PLUG ANYTHING EXCEPT A STANDARD TOUCH
TONE PHONE INTO THE MODULAR JACK MARKED "CONTROL
PHONE."
DO NOT PLUG A TELEPHONE LINE ONTO THIS
CONNECTOR. ATTACHING A TELEPHONE LINE TO THIS MODULAR
JACK COULD PERMANENTLY DAMAGE THE ANNOUNCER.
Accessing the Announcer from a Remote Phone
When you dial the announcer's extension number on your phone system, the Autoplay
detects ringing on its line and answers the phone. What happens next depends on the
announcer's current code number.
If the security code number is set to "0," the announcer stops its normal announcing
activities, talks to you over the phone, and is ready to accept touch tone commands
without entering a password.
If the code number is in the range of 1 .. 99,999, the announcer stops its normal
announcing activities and tells you to "Press Star, Number, Pound." If you enter the
correct code, the unit will talk to you and be ready to accept commands. An incorrect
code causes the unit to hang up.
If the code is 100,000 or larger, the announcer does not talk to you, but instead
continues its normal announcing. If you enter * (correct code number) #, it stops
announcing, talks to you and is ready to accept commands. An incorrect code results in
the unit's hanging up on you.
The caller has 30 seconds to enter the code before the announcer hangs up.
If you enter the wrong code number, just start over with the " * " key.
intelligent message repeaters
27
SET CODE (Changing the Security Code Number)
The default value of the code number is 98,304. To hear the current value and
(possibly) change it:
Press: * 71 # and listen. Then
Press: (new code number) #
Press: *71 # and listen to verify the new code number.
Security code numbers can range from 0 to 1,000,000,000.
Remote Recording of Messages
When the * 1 # record command is used from a remote phone, the recording source is
always the remote phone. This does not affect the recording source specified by the * 7
# command which is used when the local control phone is off hook.
TIMED RECORD
When recording messages for a specific amount of time, the TIMED RECORD
command may be used. The sequence of operations is:
Press: * 61 # (message number) # (recording time) #
The Autoplay records from the Control Phone (either local or remote) for the specified
number of seconds. The touch tone detector is turned off during the message
recording. This command is thus useful if the message to be recorded contains touch
tones or music or speech that imitates touch tones.
The command will be rejected if a recording time greater than 860 seconds is specified.
If memory capacity is exhausted, recording will stop. The touch tone detector will not be
turned back on, however, until the specified recording time is completed.
Because recording memory does not come in one second increments, the total
recording memory used will not exactly equal the sum of the recording times.
Remote Hearing of Messages
The * 2 # command turns off the DTMF detector while it is playing messages back over
the remote phone. If you want to hear just the first several seconds of one or more
messages, enter (1000 + message number) instead of the message number. For
example, to hear a short sample of message 5, press 1005 #. To scan through the first
several seconds of each of the recorded messages, press 1999 #, rather than the usual
999 #.
28
/ / / ////ALARMCO
STOP REMOTE (Terminate Remote Control Session)
An announcer will stop responding to remote commands and hang up when any of the
following happens:
1. The Stop Remote Programming command sequence ( * 51 # 1) is entered by the
caller.
2. While Autoplay is waiting for a command, more than 30 seconds passes without
receipt of the "#" touch tone. (During a timed message recording, the 30 second
timeout starts at the end of the recording time.)
3. A RESET command (* 127 # 1 #) is executed.
4. The local control phone is taken off hook.
Remote Keypad Mode
If an Autoplay is jumpered for keypad mode (Control Input 3 is ON)
announcer is called, the operation is different from that described above.
when the
If the security code number is 0, the announcer immediately enters keypad mode and is
ready to accept message numbers from the remote phone.
If the code number is not 0, the announcer waits for * (code number) # to be entered.
If the code is correct, the announcer enters keypad mode, otherwise it hangs up.
The user has 30 seconds to enter the first (message number) #, and 15 seconds for
each subsequent entry. Once the time is exceeded, the announcer hangs up.
Message number 0 (request for PA when done on the local control phone) is ignored
from the remote phone.
In Keypad Mode, the only way to terminate a session is to let 15 seconds pass without
sending "#." In other words, just hang up after you enter the desired number(s).
When the keypad mode screw terminal is jumpered on, the announcer never talks over
the remote phone.
intelligent message repeaters
29
Telephone Control Option Consumer Information
This equipment complies with Part 68 of the FCC rules. On the rear of this equipment is
a label that contains, among other information the FCC registration number and ringer
equivalence number (REN) for this equipment. If requested, this information must be
provided to the telephone company.
An RJ11C jack is used for the telephone interface.
The REN is used to determine the quantity of devices which may be connected to the
telephone line. Excessive RENs on the telephone line may result in the devices not
ringing in response to an incoming call. In most, but not all areas, the sum of RENs
should not exceed five (5.0). To be certain of the number of devices that may be
connected to the line, as determined by the total RENs, contact the telephone company
to determine the maximum REN for the calling area.
If the announcer causes harm to the telephone network, the telephone company will
notify you in advance that temporary discontinuance of service may be required. But if
advance notice isn't practical, the telephone company will notify the customer as soon
as possible. Also, you will be advised of your right to file a complaint with the FCC if
you believe it is necessary.
The telephone company may make changes in its facilities, equipment, operations, or
procedures that could affect the operation of the equipment. If this happens, the
telephone company will provide advance notice in order for you to make the necessary
modifications in order to maintain uninterrupted service.
If trouble is experienced with this announcer, please contact ALARMCO at 203-4582646 for repair and/or warranty information. If the trouble is causing harm to the
telephone network, the telephone company may request you remove the equipment
from the network until the problem is resolved.
No repairs to the announcer should be performed by the user.
This equipment cannot be used on public coin service provided by the telephone
company. Connection to Party Line Service is subject to state tariffs. (Contact the state
public utility commission, public service commission, or corporation commission for
information.)
30
/ / / ////ALARMCO
CHAPTER 10: SECOND CHANNEL OPTIONS
Second Channel (-2C)
The Second Channel (-2C) option allows Autoplay to broadcast messages over either or
both audio output channels. Autoplays with this option are equipped with a second
audio output channel that is available on the screw terminals marked "LG" or "DTMF,"
which are to the right of the standard "Line Out" terminals.
This is a transformer isolated, 600 Ohm, line level output. No volume control is
available. Background music fed through the "Music In" port does not appear on this
channel.
To access the second channel, add [8000] to the desired message number on a playlist
or on the schedule. For example, 8001 will cause message number 1 to be broadcast
on the second channel.
Second Channel with Music (-2M)
The Second Music Channel (-2M) option provides the ability to simultaneously play
music and broadcast messages over either or both audio output channels. Autoplays
with this option are equipped with a second audio output channel that is available on the
screw terminals marked "LG" or "DTMF," which are to the right of the standard "Line
Out" terminals.
Three volume controls set the music level, message level, and "ducked" music volume
for both channels. The music level is ducked down on the active channel only during
messages. The other channel is unaffected.
Music will be ducked beneath the messages appearing on the second channel.
cannot be "cut" completely.
It
To access the second channel, add [8000] to the desired message number on a playlist
or on the schedule. For example, 8004 will cause message number 4 to be broadcast
on the second channel.
intelligent message repeaters
31
32
/ / / ////ALARMCO
CHAPTER 11: SERIAL LINK OPTION
With the serial link option, Autoplay's announcements can be triggered over an RS-485
serial link.
The UART in the announcer is set up for serial communication with the following
specifications:
Baud rate:
Data bits:
Parity:
Stop bits:
9600
8
None
2
The electrical signal levels meet the RS-485 specification. All characters are ASCII.
The format for a command is:
$Unit;Command(line terminator)
For example, to request unit 1 to say message 5, enter:
$1;5(RETURN)
•
The line must start with "$."
•
The unit number is one or more decimal digits. Single digits are preferred.
•
The unit number must be immediately followed by ";."
•
The command is one or more decimal digits. The command can be a
message number between 1 and 250, or a playlist number between 1001 and
1020. A command for a single message will cause that message to be
played one time. However, if a playlist is requested, that playlist will run
continuously until a new command is received, or a previously scheduled
command overrides it.
•
The line must be terminated immediately after the command by a LINE FEED
character or a RETURN character.
•
No spaces or tabs may be included within the line.
•
The DELETE character will delete the last character entered.
•
The CONTROL-X character will delete the entire current line.
To set Autoplay's unit number, use the Control Phone to enter the command:
*71#unit number#
intelligent message repeaters
33
34
/ / / ////ALARMCO
CHAPTER 12: ADDRESSABLE ANNOUNCER OPTION
With this option, each Autoplay has its own unique hardware address and can be
addressed as a member of a group, as well. Any number of addressable Autoplays
can be individually controlled over a single control channel that is broadcast to all of
the announcers. This broadcast stream contains the telephone touch tones to
control the announcers and any announcements that are to be recorded.
Each announcer's messages, playlists, schedules, and so forth can be changed
remotely at any time. No on-site personnel are involved.
Addressable Autoplays contain features designed specifically for this type of
operation, as described in this section. You should be thoroughly familiar with the
standard features as described in earlier sections of this manual.
Addressable Autoplay Commands
The following commands are used to program Addressable Autoplays either from
the local control phone or via the remote control channel:
Press:
Press:
* 9276 # (Address) # To Address Unit
*
*
*
*
*
*
*
1
3
4
5
8
9
10
#
#
#
#
#
#
#
to
to
to
to
to
to
to
RECORD
ERASE
SET SPACING
SET PLAYLIST
SET RECORD SPEED
SET MESSAGE MUSIC
SET PA SOURCE
*
*
*
21
22
24
#
#
#
to SET CLOCK
to SCHEDULE MESSAGE
to CANCEL SCHEDULE
*
*
*
41
43
44
#
#
#
to SET PLAYLISTS
to SET PLAYLIST NUMBER
to CANCEL PLAYLISTS
*
*
*
51
61
62
#
#
#
to STOP REMOTE
to TIMED RECORD
to SET RELAY (Optional)
The following commands are valid if the Autoplay is being programmed locally or by
using its unique hardware address (not a group address).
*
*
*
52
53
127
intelligent message repeaters
#
#
#
to SET GROUP NUMBERS
to HEAR ADDRESS
to RESET
35
Addressing over the Satellite or SCA Channel
Each addressable Autoplay constantly monitors the control channel, i.e., the satellite
or FM-SCA source. To address a single announcer, the control channel must send
the following touch tone sequence:
* 9276 # (address) #
Up to 5 addresses can be sent, as in the following touch tone sequence:
* 9276 # (addr1) # (addr2) # (addr3) # (addr4) # (addr5) #
Each announcer will compare each address broadcast with:
1. Its own unique hardware address.
2. The group addresses (if any) assigned to it.
If a "match" occurs, the addressed announcer will stop its normal announcing and
enter the Remote Programming mode. In Remote Programming mode, the
announcer will accept touch tone commands received over the control channel. If
no "match" occurs, the announcer will ignore all commands received over the control
channel.
Unique Hardware Address
Each addressable Autoplay has a unique hardware address. To determine this
address, plug a phone into the announcer's "Control Phone" port. Press: * 53 # and
listen. You will hear the hardware address, along with any group addresses that you
have dynamically assigned to this announcer.
The hardware address is set at the factory and never changes. Some commands,
e.g., RESET, will not be accepted over the control channel unless the hardware
address was used to address the announcer.
SET GROUP NUMBERS (Define Group Addresses)
Each addressable Autoplay can be dynamically assigned up to 3 group addresses.
By giving the same group address to several dozen (or several hundred)
announcers, those announcers can all be addressed and controlled simultaneously.
36
/ / / ////ALARMCO
For example, a single announcer may be part of a group of announcers in the
Eastern Time Zone, and part of a particular convenience store chain, and part of a
particular C-store chain that has gas pumps outside.
Group addresses are either assigned locally or over the control channel. When
assigning group addresses over the control channel, the Autoplay must be
addressed with its unique hardware address.
To set an announcer's group address(es), enter the following:
* 9276 # (hardware addr) #
* 52 #
(group address) #
0#
to address a specific announcer
... then for each group address
or
for no group addresses.
Valid group addresses are between 1 and 65535.
SET RECORD SPEED
Entering Remote Programming mode sets the recording speed to its default value.
The speed can then be changed to a different value, if desired.
Terminating a control channel session
An addressed announcer will stop responding to control channel commands and go
back to its normal announcing operation when any of the following occurs:
1. The STOP REMOTE PROGRAMMING command sequence
(* 51 # 1 #) is received.
2. The addressing sequence (* 9276 #) is received.
3. More than 2 minutes (120 seconds) passes without receipt of the "#" touch
tone. (During a timed message recording, the 2 minutes start at the end
of the recording time.)
4. A RESET command (* 127 #) is executed.
5. The local control phone is taken off hook.
intelligent message repeaters
37
Control channel connections
A single audio channel, i.e., the "control channel" can be used to supply both touch
tones and messages to the addressable announcers. In this case, the DTMF and
Aux (low level) inputs are jumpered together and fed by the control channel, as
noted in the following diagram.
SIGNAL
GND/SHIELD
H
L G
AUX
IN
H
L G
MUSIC
IN
LINE
OUT
CONTROL
CHANNEL
SOURCE
L G
DTMF
If the DTMF tones and audio to be recorded are available independently, (such as
with two separate satellite channels) the source for the DTMF control signals should
attach to the DTMF screw terminals and the channel of the audio to be recorded
should attach to the AUX screw terminals.
An addressable Autoplay continuously monitors the DTMF screw terminals for touch
tones. The desired input level for EACH tone of the touch tone pair is 800 mV peak
to peak (0.283 V rms).
38
/ / / ////ALARMCO
CHAPTER 13: TIPS ON RECORDING GOOD MESSAGES
1. If possible, use a microphone. You'll get a much fuller, richer sound than you will
using the phone.
2. Do NOT hold the microphone in your hand. Use a stand or prop it up on something
solid. Turn slightly sideways to the mic. so that the "p" in a word like "punch"
doesn't blast into the mic.
3. Record in a quiet place. You don't need a studio, but watch out for noises that
you're so used to that you don't hear them anymore. That includes things like
ringing phones, PA announcements, refrigerators, water fountain coolers, fans, air
conditioning, and printers. Maybe you can turn them off for a few minutes.
4. Forget the microphone and pretend you're talking to someone you know. Picture
him holding the phone or listening to the PA. Enter * 1 # (message number), but
not the final "#." Say a sentence or two to that person before you start the recording,
"Jim, I want to tell you about the sale we're going to have ... (take a breath and press
the # key to start the recording) ..."
5. Have a friend coach you the first time. He's used to your voice and knows how it
sounds when you're talking naturally.
6. If possible, use the microphone as a PA so that you can hear yourself over a
speaker. It's amazing how quickly you can develop a good "recording voice" when
you can hear yourself talk.
7. When you breathe between sentences, either do it loud enough to be recorded (it
sounds natural) or so quietly the microphone doesn't pick it up. In between sounds
like noise.
8. If you want to record message 4 again to see if you can do it better, record the new
one as message 5. Then you can pick your favorite and erase the other.
9. Turn on Message Music. You'll sound considerably better with music in the
background. It masks all the little recording problems and makes you sound good.
intelligent message repeaters
39
40
/ / / ////ALARMCO
CHAPTER 14: PROGRAMMING EXAMPLES
Example 1: Different Daytime and Nighttime Messages
(Automatic Day-Parting)
From 10:00 AM until 9:00 PM, I want to play messages 1, 2, 3, 4, and 5 with five
minutes spacing between each. From 9:00 PM until 10:00 AM, I want to play
messages 21 and 22 with fifteen minutes spacing. How can I do this?
First, set up the daytime and nighttime lists as Playlist 1 and Playlist 2:
Press: * 41 # 1 # then,
Press: 1 #
2#
3#
4#
5#
Press: * 41 # 2 # then,
Press: 21 #
22 #
Then put entries in the schedule to change the playlist number and the spacing every
day at 10:00 AM and 9:00 PM (don't forget 9:00 PM is 2100 in 24 hour time):
Press: * 22 #
Press: 0 # 1000 # 1001 #
0 # 1000 # 10300 #
0 # 2100 # 1002 #
0 # 2100 # 10900 #
then,
{At 10 AM, set Playlist Number to 1}
{At 10 AM, set Spacing to 300 seconds
(5 min.)}
{At 9:00 PM, set Playlist Number to 2}
{At 9:00 PM, set Spacing to 900 sec.
(15 min.)}
We used day "0" because we want the same schedule 7 days a week. If you wanted
different times on different days, we would make schedule entries for each day.
The final steps are to set the clock to the correct day and time, and to set the Playlist
Number and Spacing to the values you want to be operating when you hang up the
control phone. For example,
Press: * 21 # 3 # 1100 #
Press: * 43 # 1 #
Press * 4 # 300 #
intelligent message repeaters
{To set the clock to Tuesday, 11:00 AM}
{To start with Playlist 1}
{To start with 5 minute spacing}
41
Example 2: Customer Triggered Commercials
I have a convenience store. Each time a customer drives in to buy gasoline, I'd
like to play a commercial over the PA to advertise items in the store. Let's say I
have 6 commercials I want to sequence through, tripping the next one each time a
car drives in. How can I do it? PS: I can give you a contact closure each time the
gas pump is activated.
Connect your contact closure between Input 2 and common. Record your commercials
as messages 1 to 6. Then enter the following Playlist:
Press: * 5 #
Press: 30001 #
1#
30001 #
2#
30001 #
3#
30001 #
4#
30001 #
5#
30001 #
6#
then,
The announcer will wait until Input 2 (the contact closure) is ON and then proceed to
play message 1. It will then again wait for Input 2 before playing message 2. After each
commercial it will wait for the contact closure just the way you want.
NOTE: If your trigger happens as the cars arrive, you may want to insert a time delay
between the contact closure and each announcement, thereby allowing the driver time
to get out of the car before the commercial starts. For example:
Press: * 5 #
Press: 30001 #
10010 #
1#
30001 #
10010 #
2#
etc.
42
then,
/ / / ////ALARMCO
Example 3: Non-stop Repeating Message
I have a recording of background sound effects, e.g., jungle sounds, for my store.
I want the recorded "message" to play over and over endlessly with no pause
between plays. How can I do it?
First, record your sound effects as message 1. Then set the playlist to play only
message 1 and set the spacing to zero:
Press: * 5 # 1 #
(Play one message only)
Press: * 4 # 0 #
(Define no spacing between plays)
When you hang up the control phone, Message 1 will play endlessly with almost no time
between the end of one playing and the start of the next.
NOTE: If you set the playlist to "all," you'll get a delay of a couple seconds between
plays as the announcer checks the other 249 possible messages to see if any of them
has been recorded.
Example 4: Keypad mode, Playlists, and Schedules
I have applications in hospitals where I need to :
1) make periodic announcements that change with time of day, e.g., no
smoking in halls
2) make scheduled announcements, e.g., visiting hours are over
3) use keypad mode to page doctors.
How many recorder/announcers do I need to do this and how do I hook them
together?
Good news. You only need one Autoplay!
1)
Record your no smoking announcements as Messages 249, 248, 247, and so
forth. Enter these in playlists and use schedule entries to automatically switch
from one playlist to another. See example 1.
2)
Record your visiting hour and other announcements and enter them in the
schedule whenever you want them said.
3)
Record your doctors' names and any messages for them, e.g., "Call your office,"
as messages 1, 2, 3, etc. After you've finished programming the announcer, set
the jumper for Keypad Mode.
Your Autoplay will do everything you requested.
Note: One thing to remember when using keypad mode is that you never want the
playlist set for "ALL." You don't want the unit to sequence through the doctors' names,
for example, you only want them said upon request.
intelligent message repeaters
43
44
/ / / ////ALARMCO
Autoplay Installation Instructions
Please refer to the diagram on the back cover for wiring connections. Numbers in
square brackets relate to this diagram.
1.
Set the volume controls at their midpoints.
2.
[#7] Make any desired connections to the output relay Form C contacts. Relay A
is normally energized during announcements. At rest, the Normally Closed (NC)
side is shorted to Common (C) and the Normally Open (NO) is open. During the
mesage playback, these states are reversed, i.e., the "NC" side will open and the
"NO" side will short closed to Common. Relay B (OFF by default) is controlled by
the software and must be programmed to operate as described in Chapter 8.
3.
[#5] Prepare 16 VAC or 24 VDC connections to the associated terminals. DO
NOT APPLY POWER YET. External protection should be provided. Depending
on model, Autoplays draw approximately 100 to 400 ma. of current.
4.
[#6] If an external (12V) battery will be used, prepare the connections now,
including a fuse. DO NOT CONNECT THE BATTERY YET.
5.
[#3] Connect the (transformer isolated) Line Out terminals to your amplifier's line
level audio input.
6.
[#2] Connect the music source, if any, to the screw terminals labled "MUSIC IN.". If
the level is more than 0 dBm, connect to High (H) and Ground (G). Otherwise,
connect to Low (L) and Ground (G). If you're not sure of the level, use Low.
7.
[#1] If you're recording from a tape recorder or other line level source, connect it
to the screw terminals labled "AUX IN." If its level is more than 0 dBm, connect to
High (H) and Ground (G). Otherwise, connect to Low (L) and Ground (G).
8.
[#12] Connect the microphone, if you're using one.
9.
[#10] Connect the a standard touchtone telephone to the RJ11 jack labled
"CONTROL PHONE," not to the RJ11 jack labled "T/R," if present.
10. Apply power to the announcer.
intelligent message repeaters
45
11. Audio from the music source should be present on the LINE OUT terminals. Adjust
the music volume control to the level desired. If music volume is too loud, change
to High, as described in step 7 above.
12. If you are using a 9V battery, install an alkaline (not carbon) battery in the holder
provided, making sure the polarity is correct. The battery preserves the memory
during short power failures. Remove the battery if the announcer is ever taken out
of service.
A fully charged 9V alkaline battery should maintain the memory of your announcer
for several hours. If more protection is needed, a 12V external battery backup with
a 2 stage charger is available from ALARMCO. Twenty-four volts is also
acceptable, if available.
If, instead of the 9V battery, you're using an external 12V battery, disconnect the
leads to the 9V battery holder. Connect the battery, battery charger, and fuse.
DANGER - Do not connect both 9V and 12V batteries to the Autoplay.
13. Pick up the control phone. You should hear a voice prompt over the control phone
each time it's taken off hook. As long as the control phone is off hook, no
messages will be broadcast over the PA system, however music will continue to
play through.
14. Record a test message and play it back:
a.
Turn the microphone on and get ready to talk into it.
b.
Take the control phone off hook.
c.
Press: * 1 # and listen.
Press: 1 # to start recording message 1.
d.
Talk into the microphone.
e.
Press # to stop recording.
f.
Press: * 4 # and listen.
Press: 5 # to set the spacing between messages to 5 seconds.
g.
Hang up the phone.
h.
You should hear your recording on the Line Out terminals with 5 seconds of
music between repeats.
15. Set the message volume (MSG) to the desired level.
16. Set the background volume (MUSIC UNDER MSG) to the level of music desired
during the message.
46
/ / / ////ALARMCO
17. [#11] IF YOU HAVE THE TELEPHONE CONTROL OPTION, attach the
telephone line from your PBX or DAA to the modular plug marked "T/R." Do not let
the phone line wires touch any other terminals.
WARNING - DO NOT PLUG ANYTHING EXCEPT A STANDARD TOUCH
TONE PHONE INTO THE MODULAR JACK MARKED "CONTROL
PHONE."
DO NOT PLUG A TELEPHONE LINE ONTO THIS
CONNECTOR. ATTACHING A TELEPHONE LINE TO THIS MODULAR
JACK COULD PERMANENTLY DAMAGE THE ANNOUNCER.
With the control phone on hook, place a call to the telephone line you just
connected. Autoplay should answer the phone and talk to you. On the remote
phone you used to place the call, Press: * 98304 #. Autoplay should talk to you
some more. You can now make any recording or programming changes remotely,
including changing the security code, as described in Chapter 9.
18. [#4] IF YOU HAVE THE ADDRESSABLE OPTION, please refer to Chapter 12.
19. [#4] IF YOU HAVE A SECOND AUDIO OUTPUT CHANNEL, i.e., -2C or -2M,
please refer to Chapter 10.
20. The following seven instructions describe how to record the "real" messages and
program the Autoplay.
a.
The default "RECORD SOURCE" is set to MIC. Change it to AUX INPUT or
PHONE for the real messages, if necessary.
(* 7 # - Chapter 1)
b.
Set the "RECORD SPEED." (* 8 # - Chapter 6)
Hint: By pressing * 1 # and listening to hear how much recording time is
available, you can then adjust the speed as high as possible to provide the
highest fidelity.
c.
Record the messages to be stored. (* 1 # - Chapter 1)
d.
After recording, listen to the recorded messages over the control phone. (* 2
# - Chapter 1)
e.
Create any playlists desired. (* 41 # - Chapter 2)
f.
The PA source for live announcements is MIC. Change it now, if necessary.
(* 10 # - Chapter 6)
g.
Background "MESSAGE MUSIC" is on by default. You can change it if you
don't want music with your messages or you want it only sometimes. (* 9 # Chapter 6)
intelligent message repeaters
47
21. After the real messages have been recorded in the unit, hang up the control
phone.
Your first recorded message should play over the LINE OUT terminals.
Listen to the mesages and readjust the 3 volume controls. Adjust the "MUSIC
UNDER MESSAGE" level so that the music level steps down gently before or
during a message.
22. A final assessment of the playback might include the spacing between messages
on playlists, if you have them. If necessary, this spacing can be changed with the *
4 # command, as described in Chapter 2.
Unique spacings can be tailored at particular points within a playlist by using the
Special Playlist Entries as described in Chapter 2.
23. [#9] Make any desired connections to the control inputs.
between Common and an input is ON, an open circuit is OFF.
48
A contact closure
a.
Input 1 turns on the PA for "live" announcements. The selected PA source
(Mic, Aux, Phone) is fed through to Line Out.
b.
Input 2 is the "press to continue" input. This can be set to wait for either an
ON or OFF condition. (See User Manual, Chapter 4)
c.
Input 3 turns on "Keypad Mode." (See User Manual, Chapter 7)
d.
Input 4 stops any recorded announcements and cancels any announcement
requests which have been queued. When released, it starts the current
Playlist at the beginning.
/ / / ////ALARMCO
intelligent message repeaters
49
50
/ / / ////ALARMCO