Transcript
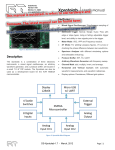
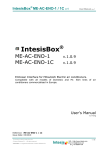
XScopes User’s Manual 9.2 Firmware upgrade using the bootloader 9.2.1 Tools required Standard USB type A to micro USB cable. Atmel’s FLIP software: http://www.atmel.com/tools/FLIP.aspx. Flip Manual with driver installation procedure: http://www.atmel.com/Images/doc8429.pdf. HEX and EEP files for the device, found on the product's page (Look for the HEX icon). 9.2.2 Activating the bootloader The device needs to be powered off first. The K1 button needs to be pressed while powering on the device: For the portable devices, you need to press K1 and also press the MENU button. For the non-portable, you need to press K1 while connecting the device to the computer with the USB cable. Once the XScope enters the bootloader, the red LED will be lit, and will blink with USB activity. The XScope will appear as a new device on the host computer, the drivers required are found in the FLIP application folder. 9.2.1 FLIP application instructions 1) 2) 3) 4) 5) 6) 7) 8) 9) 10) 11) 12) Start Flip. Select ATXMEGA32A4U in the device selection list. Select USB as communication medium Open the USB port to connect to the target Make sure the FLASH buffer is selected and check: ERASE, BLANK CHECK, PROGRAM, VERIFY. Load the HEX file .hex Press RUN Press SELECT EEPROM Load the HEX file .eep Uncheck ERASE and BLANK CHECK, only leave checked PROGRAM and VERIFY Press RUN Press START APPLICATION 13) After updating the firmware, the device will enter the calibration function on the first power up (See section 1.6). Figure 74: Flip application DS-XScopes-3.0 – December, 2013 Page | 38