1
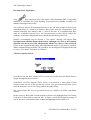
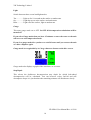
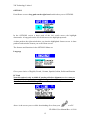
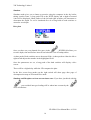
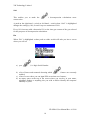
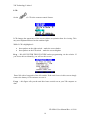
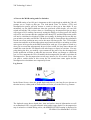
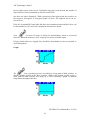
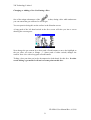
VR Technology Limited
VR
DIVE COMPUTER
USER MANUAL
VR NHeO User Manual Rev A 12/09
1
VR Technology Limited
Table of Contents
Model Name...................................................................................................................4
Manufactured by ............................................................................................................4
CE Declaration...............................................................................................................4
WARNING ................................................................................................................4
Getting Started ...............................................................................................................6
Battery........................................................................................................................6
Switches .....................................................................................................................6
Switch Help....................................................................................................................7
Home Screen (3.5v lithium battery fitted) .....................................................................7
The Home Screen features .........................................................................................7
Understanding Our PIN Upgrade System......................................................................8
How to enter a PIN ....................................................................................................9
Security and Trace-ability..........................................................................................9
Notes about the Battery and Cap .................................................................................10
The Home Screen – Navigation via Mini Screen Feature ...........................................11
Pre Dive Check ........................................................................................................11
Powering up .............................................................................................................12
Decompression Algorithms .........................................................................................13
The Dive Options Screen .............................................................................................13
Light.........................................................................................................................14
Gauge .......................................................................................................................14
Stop Depth ...............................................................................................................14
OPTIONS.....................................................................................................................15
Language..................................................................................................................15
PC Link ....................................................................................................................15
Simulate ...................................................................................................................16
Dive plan..................................................................................................................16
Mini Screens ................................................................................................................17
GAMES....................................................................................................................17
SETUP .........................................................................................................................17
Units.........................................................................................................................17
Safe ..........................................................................................................................18
Pin ............................................................................................................................18
LCD..........................................................................................................................19
Prog ..........................................................................................................................19
Usage........................................................................................................................19
NO STOP .................................................................................................................20
FLY TIME ...............................................................................................................20
SELECT and ADJUST gases.......................................................................................21
A Note on the MOD setting and Gas Switches........................................................22
Log Screen ...............................................................................................................22
Graph........................................................................................................................23
Warnings ......................................................................................................................24
Gas Switching ..........................................................................................................26
Air Breaks ................................................................................................................26
Decompression Stop Violation ................................................................................27
VR NHeO User Manual Rev A 12/09
2
VR Technology Limited
How to read the Dive Screen. ......................................................................................28
Open Circuit Diver – No Decompression Screen ....................................................28
Open Circuit Diver – Decompression Screen..........................................................29
How to Switch Gases during a Dive. ...........................................................................30
Changing or Adding a New Gas During a Dive ..........................................................31
Going from the Main Dive Screen to Other Dive Screens ..........................................32
Warranty and Support ..................................................................................................33
Warranty ..................................................................................................................33
Service......................................................................................................................33
User Feedback..........................................................................................................33
Suggestions ..............................................................................................................33
Planned Upgrades ....................................................................................................33
Maintenance Tips.........................................................................................................34
Battery Cap Maintenance.........................................................................................34
Power Supply ...........................................................................................................34
Switch Maintenance.................................................................................................34
Troubleshooting ...........................................................................................................35
NeHO will not turn on. ............................................................................................35
Specifications...............................................................................................................36
VR NHeO User Manual Rev A 12/09
3
VR Technology Limited
Model Name
VR
Manufactured by
VR Technology Limited
Unit 12 Blackhill Road West
Holton Heath Industrial Estate
Poole
Dorset
BH16 6LE
England
CE Declaration
VR Technology Limited declare that the VR NHeO Dive Computer complies with the
essential requirements of the EC General Product Safety Directive(s)
2001/95/EC
This product also complies with EN 13319:2000 sections 4, 5 and 6.
WARNING
Diving is an adventurous sport and should not be
undertaken without receiving the necessary training
from a recognised training agency.
VR NHeO User Manual Rev A 12/09
4
VR Technology Limited
Congratulations on your purchase of a VR dive computer!
You are going to have a lot of fun learning how to use your new VR
Your
comes from the same stable as the World famous VR3 and VRx
mixed gas diving computers (www.technologyindepth.com).
Your
can be configured as a Air, Nitrox or Trimix open-circuit
decompression computer or as a simple depth/time gauge.
Your
is delivered to you in multicolour mode. If you have ordered the
multicolour upgrade from new then of course multicolour mode will be permanent. If
you have ordered a single colour
you will be able to enjoy multicolour
mode for your first three dives so that you can see what it looks like before your
computer reverts back to single colour mode. If you then decide you preferred
multicolour mode, just call your dealer and buy the multicolour upgrade PIN and
install it.
VR NHeO User Manual Rev A 12/09
5
VR Technology Limited
Getting Started
Looking at the computer (image below) in your hand
Battery
The battery compartment is at the top of the case, accessible via the battery cap (top
left hand corner) which is opened using the dedicated black two-pronged key that
came in the box with your computer.
The
lithium.
is powered by a single AA battery. It can be a 1.5v alkaline or a 3.6 v
Switches
On the left and right at the bottom are two black plastic slide switches which you use
to navigate your way through the functions of the computer either on the surface or
underwater.
The switches work in four ways, as follows:1. A short push and release of either switch
2. A push and long hold of one switch (hold the switch in until the screen changes.)
3. A short push of both switches.
4. A long push and hold of both switches (again, hold the switches in until the screen
changes.)
In some cases 3 and 4 are shown as < > with the option between the arrows.
VR NHeO User Manual Rev A 12/09
6
VR Technology Limited
Your
is activated by pushing and holding either switch. The first screen to
be displayed will be the Home screen.
Switch Help
At start-up your
will prompt you to read some help screens on how to use
the switches. Press NEXT to cycle through the help. You can EXIT the help and start
using the computer. Pressing STARTUP will also exit and the help will be showed at
start-up again. If you want to see the help again it is in the main menu under HELP
and available as a mini screen (below), simply press<GO> when the mini screen is
shown.
Home Screen (3.5v lithium battery fitted)
The Home Screen features
•
•
The current active gas, (top left hand corner)
The current remaining battery voltage, (bottom left)
•
A BAT LOW advisory when the battery voltage drops to 1.1V and an alkaline
battery is being used or 2.8V when a 3.6V battery is being used.
•
The Pre Dive Check mini screen feature, (on Start Up the log screen shows
first, giving you a profile of your most recent dive.)
•
•
•
A
bottle graphic in the bottom left corner
A
graphic in the bottom right corner
A GO graphic in the centre at the bottom
VR NHeO User Manual Rev A 12/09
7
VR Technology Limited
When the
is sleeping and the Home Screen is still active, only the selected
Mini Screen, active gas and a flashing BAT LOW warning will show.
Understanding Our PIN Upgrade System
The
Dive Computers comes with the following options available;
1. Trimix upgrade PIN (phone/email for PIN)
2. Colour upgrade PIN (phone/email for new PIN)
3. PC Link (available with a hard and software factory upgrade)
The computers are sent out of the factory as Open Circuit Air / Nitrox units but all are
fully loaded with every currently available level and feature including the permanent
Multicolour screen upgrade and the Trimix option. These levels and features are
locked but can be activated by purchasing and installing a number of unique dedicated
16 digit PINs.
If you bought your
as a single colour, nitrox unit but have purchased PINs,
the PINs required to activate other levels, can be found on a white strips attached to
the plastic CD envelope that came with the computer. Please keep a note of these
PINs, and any other PINs you subsequently purchase, in a safe place.
To activate the purchased level and features, enter the 16 digit PIN(s) following the
procedure outlined below. To purchase further level upgrades or activate additional
features, contact your VR Computers dealer or the factory. So that they can give you
the correct PIN(s), when you make the purchase you will need to provide the unique
16 digit serial number of your VR. This Serial Number is on line 4 of the Pin screen
which can be found in the SETUP menu.
The SETUP menu is accessible via the mini screen feature in the Home screen.
VR NHeO User Manual Rev A 12/09
8
VR Technology Limited
How to enter a PIN
PINs are keyed in using the switches and are logged in on the bottom line of the Pin
Num screen. A short push on a switch will move the number highlighted by 1; a long
hold will move it by 8. When keying in each digit or letter move forwards using the
right hand + switch. Do not move backwards using the left hand - switch except to
correct, as this may cause previously entered numbers to change. After you have
keyed in the last digit of your PIN there will be a pause before the cursor moves to the
top of the screen you can use the left and right switches to key in your name and
phone number, or any other data you wish, in order to identify the VR computer as
yours, (see below).
After a PIN has been successfully installed the bottom line of the screen will revert to
16 zeros.
Security and Trace-ability
A key benefit of the PIN system is the security and trace-ability it offers. In order to
change or remove the identifying particulars you have installed, someone would need
one of your PINs so keep them in a safe place away from your
. Then, if
your computer is ever lost or stolen, notify us and, as your identifying particulars will
still be there on the screen, we can look out for it in the event that it ever comes in to
us for repair or upgrade. Also don’t forget to write to us and register ownership via
our website, www.technologyindepth.com. If you lose your PIN(s), we can only
reissue them to you if we have you listed as the owner. If you should ever sell on your
computer, you will need to give the new owner the PINs so that the security
information can be changed.
VR NHeO User Manual Rev A 12/09
9
VR Technology Limited
Notes about the Battery and Cap
The battery cap is protected by a pair of O-rings which should be replaced after 10
battery changes or if they become damaged or worn. Replacement O rings are
available from your dealer, (item C36 in our Accessory List or as part of our Field
Triage Kit.)
The battery must be inserted positive + end first or the VR will not work. Check
the battery spring is in the cap before inserting the battery. The battery must move
freely on the spring. If the battery coating is too thick and fits too tightly in the
cap, this may lead to power supply problems during the dive and the computer
may malfunction. Make sure the cap and body threads are clean as these provide the
system earth. When replacing the battery compartment cap, screw it in until it will
screw in no further.
When changing the battery it is good practice to turn the unit on first and then
let it turn itself off again so the internal battery is fully charged. Install a new
battery within 30 seconds of removing the old one to avoid the risk of losing some
stored data.
Battery life is highly dependent on the operating mode of the active backlight. To
conserve power set Tm instead of ON or Don as the light setting in the Dive Modes
screen. Keep an eye on the battery voltage reading in the Home Screen.
Remember that lithium batteries have a faster discharge curve than standard cells and
although they last longer, they discharge quickly towards the end of their life. When a
lithium battery’s voltage begins to drop quickly, change it.
If you are not planning to go diving for an extended period, (say three months or
more), to avoid any risk of the battery leaking while in storage and damaging the
computer, remove it. If you are keeping a PC log of your dives, download them first.
Install a new battery just before you are about to start diving again. Note that you will
need to restore your gas list and set up data if the battery has gone flat.
VR NHeO User Manual Rev A 12/09
10
VR Technology Limited
The Home Screen – Navigation via Mini Screen Feature
Pre Dive Check
The Mini Screen feature in the Home Screen is designed primarily to make it easy for
you to check the settings in your
settings if necessary before you dive.
and allow you to change any of the
A short push on either the right or left switch will allow you to move through the mini
screens one by one. A short push of both switches <GO> will expand whichever mini
screen is currently showing and allow you to change settings within the screen.
The mini screens appear in the following order with successive short pushes of the
right hand switch
•
•
•
•
•
•
•
•
•
Log
Adjust
Dive Options
Fly Time
Setup
Help
Time & Date
No Stop Plan
Options
A long push of the left hand switch at any time in the Home Screen will take you into
the Gas List so you can set up, select or adjust the gas mixes you are planning to dive
with..
A long push of the right hand switch will take you into the Options Menu which will
give you access to further features, as follows
Time & Date Screen
VR NHeO User Manual Rev A 12/09
11
VR Technology Limited
Mini Screen
Full Screen
The VR meets the European PREN standard for digital dive timing devices but it is
not a precision chronograph. You may need to adjust it occasionally in order to
display the correct time.
Changing the time will not affect desaturation calculations.
A short push of the right switch + will increment the highlighted field by one, a long
push by ten.
A short push of the left hand switch will decrement the highlighted field by one, a
long push by ten.
A short push of both switches together will move the highlight to the next field.
A long push of both switches will exit the screen, save the changes and return you to
the home screen.
Powering up the
It is not necessary to power up the VR before you dive. The screen will automatically
power up within a minute of exposure to an absolute pressure of 1.3 Bar or greater.
Note that this means in practice that if you do a very fast descent the VR computer
may not switch on until you are at depth.
If you want the screen to be on from the moment you enter the water, power up the
VR before you dive and push either switch once. The screen will stay active for 5
minutes. (On the surface, if no switch is pushed the VR will turn itself off after about
a minute to save power.)
VR NHeO User Manual Rev A 12/09
12
VR Technology Limited
Decompression Algorithms
Your
dive computers uses a derivative of the Buhlmann ZHL 16 algorithm
modified to assimilate the latest thinking in practical micro-bubble avoidance for
enhanced decompression safety.
You will note that on all decompression dives, the VR will prompt for deep-water
controlling stops of 2 minutes in duration. Deep-water stops are recognised by their
duration (normally two minutes) and a + next to the time. It is important that these
stops are conducted correctly for a safe decompression as they help to reduce the
problems associated with potential micro-bubble growth during an ascent.
Should a microbubble stop be missed, a “Use tables” message will appear. The
decompression schedule displayed thereafter, although very close to the required
duration, may be in error, but will probably still be very close to what you need.
If this occurs consult backup tables and add additional stops or stop time as required.
While continued diving with the VR is possible, the decompression displayed may not
be exact. “Use tables” will show for 24 hours.
The Dive Options Screen
In surface mode the Dive Options (DVo) screen is accessible from the Home Screen,
(toggle through the mini-screens).
Underwater, the Dive Options (DVo) screen is accessed by a short push of both
switches when you are in the second dive screen. You get to the second dive screen
from the main dive screen via a long push on the right switch.
The screen allows the diver to get quick access to a number of useful controllable
features.
In this screen, a short push of both switches will move the highlight from one feature
to the next, a short push of either the left - or right + switch will change the setting. If
you do not have a particular feature enabled, the highlight will not land on it.
VR NHeO User Manual Rev A 12/09
13
VR Technology Limited
Light
Switch between three screen backlight modes
Tm............... Light on for 10 seconds at the surface or underwater
On................ Light always on at the surface and underwater
DOn............. Light off at the surface, light on underwater
Gauge
This turns gauge mode on or OFF. In OFF all decompression calculations will be
turned off.
If you select Gauge mode then you have 15 minutes to enter the water or the unit
will revert to a decompression mode.
If you do a gauge mode dive you have to wait 24 hours until you can use the unit
as a dive computer again.
Gauge mode is recognisable by its’ large character format on the dive screen.
Gauge mode also displays a graph of the actual dive as it occurs.
Stop Depth
This selects the shallowest decompression stop depth for which look-ahead
decompression will be calculated. You can however select 3m/10ft and still
decompress deeper it is just that then the remaining minutes will finish more slowly.
VR NHeO User Manual Rev A 12/09
14
VR Technology Limited
OPTIONS
From Home screen a long push on the right hand switch takes you to OPTIONS.
In the OPTIONS screen a short push of the left switch moves the highlight
downwards. A long push on the left switch moves the highlight upwards.
A short push on the right switch takes you into the highlighted feature screen. A short
push on both switches returns you to the Home screen.
The features and functions in the OPTIONS Menu are
Language
Gives you a choice of English, French, German, Spanish, Italian, Polish and Russian
PC Link
Note this option is only available if purchased before shipment or via return to
factory for a hard and software upgrade. If purchased the options screen will
also now include a PC LINK option.
Above is the screen you see while downloading dives from your
to a PC.
VR NHeO User Manual Rev A 12/09
15
VR Technology Limited
Simulate
Simulate mode gives you a chance to practice using the computer in the dry before
taking it under water. A long push The to the DIVE display and a depth of around
10m will be displayed. Short pushes of the left and right switches will increment or
decrement the depth. To exit a simulated dive do a long hold of both switches or
ascend to zero depth.
Dive plan
Once you have set your planned dive gases in the
, DIVEPLAN allows you
to enter depth, time and surface interval and calculate a set of backup tables.
A short push of both switches moves between fields. A short push on either the left or
right switch adjusts the number in the highlighted field.
Once the parameters are set, a long push of the both switches will display a dive
screen.
There will be a slight delay while the VR computes the plan.
In the dive screen long pushes on the right switch will show page after page of
decompression stops as in normal Dive mode.
Simulate and Diveplan work on current tissue state. If you have just dived with the
your residual inert gas loading will be taken into account by the
in its calculations.
VR NHeO User Manual Rev A 12/09
16
VR Technology Limited
Mini Screens
GAMES
THE OCTOPUS GAME
The Octopus Game works like this: The aim is to try to hit the white octopus with a
squirt of ink from the black octopus. The white octopus will explode when he is hit
and you will then get a summary of your score. In the game screen short pushes of
both switches will move you between Ang (angle), Vel (velocity) and Fire modes.
When you are in Fire mode a jet of ink will squirt from the black octopus and, if your
angle and velocity are correct, you will hit the white octopus. If not, you need to
adjust the angle and velocity settings and this you can do in Ang or Vel mode, by a
short push of either the right hand + or left hand - switch. (A long push will increment
or decrement the setting by 10). While you are firing you will see Tide appear. This is
a random setting; the strength and direction of the tide will change from game to game
just so that it does not all become too easy!
SETUP
Selecting SETUP from the Mini-Screens in the Home Screen will give you access to a
range of sub-menus, which allow you to configure the
personal preference.
according to your
A short push of both switches moves the highlight to the next setting. A long push of
both switches takes you back to the Home Screen.
Units
When “Units” is highlighted, a short push of either the right-hand + or left-hand -
switch will change the depth and temperature settings in your
(m) to imperial (ft) or vice versa.
from metric
VR NHeO User Manual Rev A 12/09
17
VR Technology Limited
Safe
This enables you to make the
conservative.
’s decompression calculations more
A push on the right-hand + switch or left hand – switch when “Safe” is highlighted
changes the setting by 10%, from 0% up to a maximum of 50%.
Every 10% increase adds a theoretical 2% to the inert gas content of the gas selected
for the purposes of decompression calculation.
Pin
When “Pin” is highlighted a short push on either switch will take you into a screen
where you will see
a) your
’s 16 digit Serial Number
features are currently
b) a list of letters and numerals denoting which
enabled
c) a line of zeros where you can input PINs to activate new features
d) an empty space at the top of the screen where you can key in your name,
telephone number or anything else you wish to add to identify the computer
indelibly as yours.
VR NHeO User Manual Rev A 12/09
18
VR Technology Limited
LCD
On the
s, LCD is the contrast control feature.
LCD changes the appearance of the screen colours to optimise them for viewing. This
may need adjustment based on the ambient light.
While LCD is highlighted:-.
•
•
short pushes on the right switch + make the screen darker
short pushes on the left switch - make the screen brighter.
Prog - DO NOT ENTER THIS FEATURE unless programming via the website. If
you access this accidentally, you will see this screen.
Enter NO with a long push of the left switch. If the unit freezes in this screen simply
remove the battery for ten minutes to reset it.
Usage - this figure tells you the total dive hours carried out on your VR computer to
date.
VR NHeO User Manual Rev A 12/09
19
VR Technology Limited
NO STOP
In this screen you can see No Stop Times (NST) for a single gas dive to the MOD of
that gas, taking into account your previous dives and surface interval. The surface
interval and target depth are user changeable. Note that the surface interval figure that
you set is in addition to time already spent out of the water. You may be surprised that
the No Stop times appear to be short. They do in fact correspond to standard
Buhlmann dive tables which incorporate safety stops.
For instance:
18m dive No Stop Time = 39 mins
18m with 3 min
stop at 4.5m = 54 mins This means that if you were to do a dive to 18m on air with 54
minutes bottom time, you would see a required 3 minute stop at 4.5m on your look
ahead schedule as you began your ascent. (Times are on air and assume no residual
nitrogen to take into account).
For a more detailed mixed gas decompression planning aid, go to DIVEPLAN
under the OPTIONS menu.
FLY TIME
The FLYTIME screen shows the time that must elapse before you may fly in a
pressurised aircraft and the length of time before your tissues will be totally
desaturated.
VR NHeO User Manual Rev A 12/09
20
VR Technology Limited
SELECT and ADJUST gases
From the Home screen, the SIMULATE screen and the Dive screen, you can access
the gas features with a long push of the left-hand switch.
With a short push of both switches, a new field will be highlighted and can be
adjusted using by a short push of either switch + or -.
The fields available are:
A) Active gases. Tick all gases you want to use on this dive. All gases will be
used in the decompression look-ahead.
B) Current gas (the diver symbol). This is the gas you are breathing now.
C) The oxygen and helium levels in the mix:•
•
•
Air is displayed as AIR. AIR and cannot be changed.
Nitrox is displayed as NX followed by the oxygen fraction, (e.g. NX36)
Trimix is displayed as TX then the oxygen fraction followed by the helium
fraction e.g. TX 18/35. The helium content setting can be reached by a short
push of both switches after the oxygen content has been set, (as long as the
Trimix activation PIN has been purchased and installed.).
To change the gas content simply highlight the gas and use the +/- buttons.
D) The MOD: As you change the MOD the PP (PO2) will adjust accordingly.
E) Closed circuit mode (as long as the closed circuit activation PIN has been
purchased and installed.) Current fixed PO2 setpoint can be adjusted by
increasing or decreasing PO2 by 0.05 bar with use of the +/- buttons.
VR NHeO User Manual Rev A 12/09
21
VR Technology Limited
A Note on the MOD setting and Gas Switches
The MOD setting of an ON gas is important as this is the depth at which the VR will
prompt you to switch to that gas. The look-ahead Time To Surface (TTS) and
decompression profile will also assume a switch to deco gas at that depth. If you
mistakenly set the MOD shallower than the preferred switch depth, you can still
switch and tell the VR you have done so. Switching to a decompression gas too deep
will trigger a PO2 warning. Incorrectly setting the MOD, or leaving gases ON which
will not be used, means that the optimum look-ahead TTS and decompression profile
will not be calculated or displayed. What you actually do during the ascent and any
gas switches you make and tell the VR about will still be factored into the calculation
but the on-screen prediction may not be the most efficient profile. The TTS includes
ascent time and time at all decompression stops based on the diver switching to all the
active gases in his gas list at the MOD selected for each gas. If you plan to switch to a
deco gas on ascent but subsequently do not in fact switch, the stop times shown will
remain the same but the VR minutes will take longer to elapse in real time. If at any
point during the dive you modify a gas content on the active list, the decompression
profile prediction will alter to take this into account. When you change to a different
gas, in a few moments the VR will modify the decompression list and re-calculate all
decompression. The decompression screen stays inactive for 20 seconds. Every time
you push a switch whilst in this screen the 20 second timer starts again and the
decompression calculations are temporarily frozen.
Log Screen
In the Home Screen, when the graph depth and time of your last dive are shown on
the mini screen, a short push of both switches will take you to the Dive Log Feature.
The logbook screen shows depth, date, time and surface interval information as well
as accumulated OTUs (oxygen tolerance units) and average depth. If a decompression
stop is missed or violated during a dive, the MISSED STOPS warning is displayed in
VR NHeO User Manual Rev A 12/09
22
VR Technology Limited
the top right corner of the screen. If multiple stops have been missed, the number of
stops missed is shown immediately after the word STOP.
One dive at a time is displayed. With a short push of the right switch, the next dive in
the sequence will appear. A long push jumps 10 dives. The logbook stores 100 onscreen dives.
If the PC download PIN and cable link have been purchased and installed, dives can
be downloaded to a PC and can be displayed in much more detail.
Your
can store 22 hours of diving for downloading, stored at 10-second
intervals. When the memory is full, it simply overwrites and starts again.
If long, detailed dives are logged, they should be downloaded as soon as possible to
avoid losing them.
Graph
The
has a second log screen, accessible by a long push of both switches, in
which a graphic profile of the dive is shown. While in the graphic profile screen, a
short push of both switches will bring up a screen showing a graph of ambient
temperature throughout the dive.
VR NHeO User Manual Rev A 12/09
23
VR Technology Limited
Warnings
The
displays warnings in the form of on-screen messages in the top right
section of the dive screen and the backlight flashing. On multicolour
right hand side of the screen goes red.
s the
A Downward Arrow means “Descend, you have violated a decompression ceiling”
An Upward Arrow means “Ascend, your PO2 is at a dangerously high level and you
have no alternative active gas to switch to.”
The Hand Icon means “Slow down, your ascent rate is greater than 10m/min.”
VR NHeO User Manual Rev A 12/09
24
VR Technology Limited
“USE Table” means “Decompression has been violated on current dive, or previous
dive within the previous 24 hours.” The decompression displayed will still be very
accurate if only a small violation has occurred. This should be compared to
tables as a backup.
If ‘Use Tables’ was shown on a dive, “Missed stops” is shown on reaching the surface
after a dive where a decompression stop has not been completed.
“Violated stops” is shown on reaching the surface after a dive where a decompression
ceiling has been breached for longer than 1 minute (example below shows 29 seconds
left to correct the deco violation), but all required estimated stops have subsequently
been carried out as advised by the VR in USE TABLES mode.
VR NHeO User Manual Rev A 12/09
25
VR Technology Limited
Gas Switching
The two bottles with arrow icon means “Gas Switch warning. Switch to another gas in
the gas list you have set. This will occur at the MOD of the gas you have set as the
next decompression gas. You can elect to ignore this and continue the ascent on
the existing gas, however the decompression look-ahead will be in error although
the actual stops the computer makes you do will still be correct.
Air Breaks
If a single bottle icon with AIR to the left is displayed in the top right hand corner,
this is the Air Break warning. It repeats for 5 minutes every 30 minutes while CNS %
is above 80%.
VR NHeO User Manual Rev A 12/09
26
VR Technology Limited
Decompression Stop Violation
If you ascend past a decompression stop to a level where the tissues may become
over-pressurised, then the down arrow message appears and a 60 second timer display
starts to count down (see previous screen). If the warning is ignored, after 60 seconds
a message will appear which says USE TABLE. Once this message appears the VR
will continue to display ‘best guess’ decompression data. This means that the
decompression displayed may be in error because of the missed stop and that you
should consult back up tables and add additional safety stops as required. But your
VR will continue to track ‘best guess’ decompression. If you temporarily break a
decompression ceiling and get back to the correct depth within 60 seconds the timer
will start to count up again. When it reaches 60 the decompression calculations will
restart. Depending on the extent of your excursion you should build in extra safety for
the remainder of the dive. MISSED STOPS warnings will be stored on the logbook
and the warning will be displayed for 24 hours on the home screen. The VR will not
lock you out. If you re-enter the water, best-guess decompression will still be shown
but should not be relied upon.
VR NHeO User Manual Rev A 12/09
27
VR Technology Limited
How to read the Dive Screen.
Open Circuit Diver – No Decompression Screen
This dive screen shows
The diver has no decompression burden – hence the green colour on the right of the
screen.
The diver is at 30m and is 19 mins into his dive.
The maximum depth he has reached on the dive is 30m
He can spend a further two minutes at this depth before he goes into deco. In other
words his no stop time (NST) is two minutes.
He is using air and diving on open circuit.
It will take him three minutes to reach the surface at a rate of 10m per minute. In other
words his Time To Surface (TTS) is 3 minutes.
.
VR NHeO User Manual Rev A 12/09
28
VR Technology Limited
Open Circuit Diver – Decompression Screen
This dive screen shows
The diver has a decompression burden – hence the yellow colour on the right of the
screen.
The diver is at 50m and is 10 mins into his dive.
The maximum depth he has reached on the dive is 50m
His first decompression stop is 2 minutes at 28m.
He is using Air and is diving on open circuit.
It will take him fourteen minutes (14 TTS) to reach the surface at an ascent rate of
10m/30ft per minute and including required decompression stops. In other words his
Time To Surface (TTS) is 14 minutes.
The dark colour on the graph shows the track of the dive so far. The light colour
shows a profile of the ascent the diver should make if he ascends now.
Note too that when in deco the top line of the right side of the screen will alternate
between “MaxD” and “deco!”
VR NHeO User Manual Rev A 12/09
29
VR Technology Limited
How to Switch Gases during a Dive.
The Gas Switch advisory will appear in the top right hand corner of the dive screen on
ascent as you reach the MOD you have set for your decompression gas. It will also
appear on descent to ask if you wish to use your deco gas as a travel gas and, if you
are using a travel gas, it will appear again when you exceed the MOD of that gas to
remind you to switch to bottom mix. If you are going to switch gases, first actually do
the switch and then as soon as you have begun breathing from the new gas, tell the
VR that you have done so first by a long push on the left switch.
This will take you into a screen (above) where you will see all the gases. The correct
gas will be highlighted for the depth you are at and the MOD you have set. A short
push of the left or right button will select the radio button highlighted (under the
diver). You have now switched to that gas. Now do a long push of both buttons to
save the selection.
Remember, your decompression look-ahead (TTS) is based on you switching to all
active decompression gases immediately upon reaching the MOD set. If you do not
switch gas, or delay switching, your decompression time will be extended. This will
not be reflected in the number of minutes on the look ahead. These will stay the same.
The minutes will just take longer to elapse.
VR NHeO User Manual Rev A 12/09
30
VR Technology Limited
Changing or Adding a New Gas During a Dive
One of the unique advantages of the
is that, during a dive while underwater
you can amend the gas content of a current gas.
You can practice doing this on the surface in the Simulate screen.
A long push of the left hand switch in the dive screen will take you into a screen
showing the current gases
Now change the gas content by a short push of both buttons to move the highlight to
the gas value you want to change. +/- (short push of either switch) changes the
content. Now save with a long push of both buttons.
Ticking a box puts that gas in the decompression look-ahead for this dive. In other
words ticking a gas means I will use it at some point on this dive.
VR NHeO User Manual Rev A 12/09
31
VR Technology Limited
Going from the Main Dive Screen to Other Dive Screens
A long push of the right switch in the main dive screen will take you into further dive
screens showing your dive summary information
A short push of both switches in this screen takes you into the Dive Options screen.
Then a short push of the right switch takes you to a list of required decompression
stops if you are in decompression.
In these screens a further short pushes of the right switch move you to the next page
of stops until the final stop is shown.
A long push on the left switch at any time will return you to the first dive screen.
VR NHeO User Manual Rev A 12/09
32
VR Technology Limited
Warranty and Support
Warranty
This product carries a one year guarantee from date of purchase for bonafide
manufacturing faults. This does not cover damage to the case or screen and switches
during operation.
Keep your proof of purchase to submit in the event of warranty repair.
Faulty
’s will be repaired or replaced as appropriate.
Service
All digital depth monitoring devices need a calibration check from time to time. Due
to the potential depth of operation of VR computers it is recommended that you return
yours to the factory for this check periodically, (a service after every 100 hours of
diving is recommended.)
User Feedback
We welcome any feed back from our customers. Please feel free to email or fax us
with any requests or suggestions. Registered users will be kept informed of upgrades.
Suggestions
For technical support visit our website on www.technologyindepth.com or email us at:
[email protected]
Planned Upgrades
If you have any comments on functions you would like to see included on the
computer, please do not hesitate to let us know. Please see our website
www.technologyindepth.com for announcements regarding new features and options.
VR NHeO User Manual Rev A 12/09
33
VR Technology Limited
Maintenance Tips
The bulkhead I/O connector port (optional, PC Link mode)
The bulkhead I/O connector port is watertight and any water that gets in to the port
cannot harm your VR. However, should sea water get inside the port or the ends of
your cable link, flush them with fresh water as soon as possible afterwards then leave
them to dry completely BEFORE refitting the cap. If the reading from a 4th cell cable
becomes erratic, a solution may be to put a SMALL amount of grease on the metal
end of the cable end that slides into the bulkhead I/O connector to lubricate the inner
O ring of the bulkhead connector. This will serve to improve the seal and make the
connection more reliable. If corrosion appears on the contacts rinse in a solution of
white vinegar and use a fine toothbrush to remove the build-up. Rinse and dry before
replacing the cap. Remember, the cleanliness of the contacts is essential to the
integrity of the link. Look after your cable and it will look after you.
Battery Cap Maintenance
Clean and re-grease the O-rings and O-ring grooves every 10 dives.
Power Supply
If you get a power supply problem, check the battery compartment, spring and cap for
any build up of corrosion. If corrosion is present, pull the spring out of the cap, soak
the spring and cap in a solution of white vinegar, remove any residual build up with a
fine toothbrush, rinse in fresh water and dry.
Switch Maintenance
If the switchs stick, rotate them first in their carrier to loosen it up. If that does not
work, the switch carrier can be taken apart. Be careful as the springs will fly out once
the carrier is separated. The springs and switchs will then come out easily. Wash the
carrier with fresh water to remove any sand and grit.. Soak switch and spring in white
vinegar, rinse with fresh water and dry off. After flushing the switch carrier with fresh
water, spray A LITTLE light engineering oil (WD 40 or similar) inside the carrier.
Put the springs and switchs back in, assemble the carrier and screw it to the body. Do
not apply excessive force to the screws as body/carrier damage may ensue. The
switches should now move freely.
VR NHeO User Manual Rev A 12/09
34
VR Technology Limited
Troubleshooting
NeHO will not turn on.
If the
appears to “lock” in a screen when changing the battery, simply leave
it for three minutes (with the battery in) and it will reset. If the battery coating is too
thick and fits too tightly in the cap, this may lead to power supply problems during the
dive and the computer may malfunction. Replace the battery with one that moves
freely within the cap even when the spring is compressed.
If the computer does not start up when a new battery is installed, unscrew the cap then
screw it in again slowly until the screen flashes on. Stop screwing in the cap at this
point and allow the unit to turn on and go into the start up screen. After a short time it
will turn off (meaning the backup battery is now charged). Continue screwing in the
cap fully.
If the
does not turn on, check to see if the pinhole on the rear may be
blocked or covered. The Pressure transducer lies below this pinhole. In order for the
computer to function, this pinhole must not be covered or blocked in any way. If it
does get blocked, remove debris carefully but NEVER insert a sharp object or direct
a jet of water into the pinhole as it will damage the pressure transducer irrevocably.
If you cannot get past the initial Start Up screen when turning the
on,
remove and check both the switches to see if one or both may be broken and needs
replacement. Call your dealer for a replacement set. If the external switches are fine,
the problem may be a broken internal reed switch, in which case the computer will
need to come back to us.
VR NHeO User Manual Rev A 12/09
35
VR Technology Limited
Specifications
Depth limit 150m (calibrated)
Time limit 9999 mins and 59 seconds
Max deco stop 99 levels
Number of gases 4
Battery life Up to 100 hours
Sleep Approx. 1 year
Dive memory Approx. 80 hours
Record resolution 10 seconds
Logbook dives 99
Dive time stops when a pressure equating to 1.5m is reached
Operating temperature: 0°C to 40°C
Depth accuracy: ±0.1m Max
Register your ownership and sign up to receive updates and newsletters on our
website www.technologyindepth.com
VR NHeO User Manual Rev A 12/09
36