1
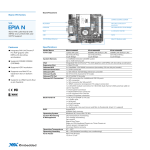
EE-260
VIA ETX Motherboard
User’s Manual
Edition 1.0
2008/05/14
EE-260 User’s Manual
Copyright
Copyright 2006. All rights reserved. This document is copyrighted and all rights are
reserved. The information in this document is subject to change without prior notice to make
improvements to the products.
This document contains proprietary information and protected by copyright. No part of this
document may be reproduced, copied, or translated in any form or any means without prior
written permission of the manufacturer.
All trademarks and/or registered trademarks contains in this document are property of their
respective owners.
Disclaimer
The company shall not be liable for any incidental or consequential damages resulting from
the performance or use of this product.
The company does not issue a warranty of any kind, express or implied, including without
limitation implied warranties of merchantability or fitness for a particular purpose.
The company has the right to revise the manual or include changes in the specifications of
the product described within it at any time without notice and without obligation to notify any
person of such revision or changes.
Trademark
All trademarks are the property of their respective holders.
Any questions please visit our website at http://www.commell.com.tw
TU
2
UT
EE-260 User’s Manual
Packing List
Please check the package before you starting setup the system
Hardware:
EE-260 ETX CPU Module x 1
Cable Kit:
26-pin slim type floppy cable x 1
Serial ATA ribbon cable x 2
Head Sink and four screws
Other Accessories:
Divers CD (including User’s Manual) x 1
3
EE-260 User’s Manual
Index
Chapter 1 <Introduction> ..................................................................................... 7
1.1 <Product Overview>................................................................................. 7
1.2 <Product Specification> ........................................................................... 8
1.3 <Mechanical Drawing>........................................................................... 10
1.4 <Block Diagram>.................................................................................... 11
Chapter 2 <Hardware Setup>............................................................................. 12
2.1 <Connector Location>............................................................................ 12
2.2 <Connector Reference>......................................................................... 13
2.2.1 <Internal Connector>.................................................................. 13
2.3 <CPU and Memory Setup> .................................................................... 14
2.3.1< CPU>........................................................................................ 14
2.3.2 <Memory> .................................................................................. 14
2.4 <Enhanced IDE & CF Interface>............................................................ 15
2.5 <Serial ATA Interface>........................................................................... 15
2.6 <Floppy Port>......................................................................................... 16
2.7 <LAN Interface> ..................................................................................... 17
2.8 <Onboard Display Interface> ................................................................. 17
2.8.1 <Analog VGA Interface> ............................................................ 17
2.9 <USB2.0 & IEEE1394 Interface> ........................................................... 18
2.10 <Serial Port> ........................................................................................ 18
Chapter 3 <System Configuration>................................................................... 19
3.1 <SATA RAID Configuration>.................................................................. 19
3.2 <Audio Configuration> ........................................................................... 21
3.3 <Display Configuration>......................................................................... 22
Chapter 4 <BIOS Setup> .................................................................................... 25
Appendix A <ETX connector Assignment>……………………………………….27
Appendix B <I/O Port Pin Assignment> ........................................................... 31
4
EE-260 User’s Manual
B.1 <Floppy Port> ........................................................................................ 31
B.2 <Serial ATA Port>................................................................................... 31
Appendix C <Flash BIOS>.................................................................................. 33
C.1
BIOS Auto Flash Tool ...................................................................... 33
C.2
Flash Method................................................................................... 33
Contact Information ............................................................................................ 35
5
EE-260 User’s Manual
(The Page is Left For Blank)
6
EE-260 User’s Manual
Introduction
Chapter 1 <Introduction>
1.1 <Product Overview>
EE-260 is the ETX module based on VIA Luke CoreFusion
TM
Processor. It integrates the
VIA embedded Luke Processor with VT8237R+, DDR SoDimm SDRAM, and serial ATA with
RAID to provide the economical embedded platform.
VIA Luke CoreFusion
TM
Processor & VT8237R+
The board comes with the VIA embedded processor Luke DDR266/333/400 SoDimm
integrated the S3 Graphics UniChrome Pro IGP graphics core ,hardware MPEG-2 and
MPEG-4 acceleration .
The VT8237R+ provides the board to support Ultra V-Link (1GB/s) , two serial ATA ports
with RAID array function, Support 4 x USB2.0 ports and Realtek ALC202A 2 channel audio.
Multimedia solution
Based on VIA CoreFusion
TM
Processor, the module provides optional 18/24-bit LVDS
interface, which supports dual independent display with CRT.
High Speed Hot-plug Interface
Based on VIA VT8237R+, the board support 4 USB2.0 interfaces with up to 480Mbps of
transferring rate.
Product Overview
7
EE-260 User’s Manual
Introduction
1.2 <Product Specification>
General Specification
Form Factor
CPU
Memory
Chipset
BIOS
Green Function
Watchdog Timer
Real Time Clock
Enhanced IDE
Serial ATA
ETX CPU Module
TM
Embedded VIA Luke CoreFusion
processor
Ratio: 533MHz/800MHz/1GHz
Front side bus: 133MHz
Fanless with Luke 533MHz processor
1 x 200-pin DDR SoDIMM SDRAM up to 1GB
Unbufferred, none-ECC memory supported only
TM
VIA CoreFusion
and VT8237R+
Phoenix-Award v6.00PG 4Mb PnP flash BIOS
Power saving mode includes doze, standby and suspend modes.
ACPI version 1.0 and APM version 1.2 compliant
System reset programmable watchdog timer with 1 ~ 255
sec./min. of timeout value
VIA VT8237R+ built-in RTC with lithium battery
Support two channels & up to four IDE device
Support Ultra DMA 33 IDE device
VIA VT8237R+ integrates 2 Serial ATA interface
RAID 0, 1 array Technology supported
Multi-I/O Port
Chip
Serial Port
USB Port
Floppy Port
IrDA Port
K/B & Mouse
GPIO
Hardware
Monitor
Winbond W83697HG controller
Support two RS232 Serial Port
Support four USB 2.0 Ports
Onboard slim type Floppy connector
Support IrDA compliant Infrared interface supports SIR
Support external PS/2 keyboard and mouse ports
8-bit programmable I/O interface
CPU temperature and voltage monitoring
VGA Display Interface
Chipset
Core Frequency
Memory
Display Type
8
TM
VIA Luke Processor CoreFusion
built-in S3 Graphics
UniChrome Pro IGP graphics core
200MHz
BIOS selectable 16/32/64MB shard with system memory
Support CRT, LCD monitor with analog display
Product Specification
EE-260 User’s Manual
Introduction
Optional LVDS Interface
Chip
Resolution
VT1631L
Support 18/24bit dual channel 1600 x 1200 resolution
Ethernet Interface
Chip
Type
VIA VT6103 PHY
10Base-T / 100Base-TX
auto-switching Fast Ethernet
Full duplex, IEEE802.3U compliant
Audio Interface
Chip
Interface
Realtek ALC202A
Support Line-in, Line-out and MIC-in
Expansive Interface
PCI
4 PCI bus master interface
Power and Environment
Power
Requirement
Dimension
Temperature
5V/3.2A, 5Vstandby/
95mm x 114mm
Operating within 0 ~ 60oC (32 ~ 140oF)
Storage within -20 ~ 85oC (-4 ~ 185oF)
P
P
P
P
P
P
P
P
Software support
Operation
System
Windows 98SE/ME, Windows 2000, Windows XP
Windows CE 4.0 or later, Windows XP Embedded
Linux (Fedora Core 1, Mandrake 9.2 and Red Hat 9.0)
Ordering Code
EE-260L5
EE-260L8
EE-260L10
TM
SOM-ETX with VIA Luke CoreFusion
processor
533MHz/VGA/LVDS/LAN/Audio/SATA
TM
SOM-ETX with VIA Luke CoreFusion
processor
800MHz/VGA/LVDS/LAN/Audio/SATA
TM
SOM-ETX with VIA Luke CoreFusion
processor
1GHz/VGA/LVDS/LAN/Audio/SATA
1. The specifications may be different as the actual production.
For further product information please visit the website at http://www.commell.com.tw
TU
Product Specification
UT
9
EE-260 User’s Manual
Introduction
1.3 <Mechanical Drawing>
10
Product Specification
EE-260 User’s Manual
Introduction
1.4 <Block Diagram>
CRT/LCD Monitor
1 x 200-pin SoDIMM
Optional LVDS
DDR266/333/400
Ultra V-Link
1GB/s
4 x USB2.0 Ports
Up to 1GB
2 x SATA
VT6103 PHY
VT8237R+
PCI
ALC202 Codec
2 x Serial ports
1 x Floppy ports
8-bit GPIO
BIOS
IrDA
LPT
Product Specification
11
EE-260 User’s Manual
Introduction
Chapter 2 <Hardware Setup>
2.1 <Connector Location>
DIMM
SATA
12
FDD
Product Specification
EE-260 User’s Manual
Hardware Setup
2.2 <Connector Reference>
2.2.1 <Internal Connector>
Connector
DIMM
FDD
CN_SATA1/2
Connector Location
Function
200-pin DDR SDRAM SoDIMM
26-pin slim type floppy connector
7-pin Serial ATA connector
Remark
Standard
Standard
Standard
13
EE-260 User’s Manual
Introduction
2.3 <CPU and Memory Setup>
2.3.1< CPU>
The board supports Embedded VIA Luke CoreFusion
TM
processor, default ratio is
533Mhz/800Mhz/1GHz with CPU cooler fan, Luke 533 (533MHz) with heatsink only.
2.3.2 <Memory>
The board supports one 200-pin DDR SoDIMM SDRAM and up to 1GB of capacity, only
non-ECC, unbuffered memory is supported.
DIMM
(1. Insert the DDR SO-DIMM module into the socket at 45 degree)
(2. Press down the module with a click sound)
14
CPU and Memory Setup
EE-260 User’s Manual
Hardware Setup
2.4 <Enhanced IDE & CF Interface Optional >
The module supports two enhanced IDE interface, dual channel for 4 ATAPI devices with
ATA33.
2.5 <Serial ATA Interface>
Based on VIA VT8237R+ Southbridge, the board supports two Serial ATA interfaces with
RAID 0 and 1 array function. The following is the list of the specification of the Serial ATA.
1.
Complies with Serial ATA Specification Revision 1.0
2.
Dual Channel master mode PCI
3.
On-chip two-channel Serial ATA (S-ATA) PHY for support of up to two S-ATA devices
directly.
4.
S-ATA drive transfer rate is capable of up to 150 MB/s per channel (serial speed of 1.5
Gbit/s).
For more information please visit VIA website (www.via.com.tw)
SATA2
Serial ATA Interface
SATA1
15
EE-260 User’s Manual
Introduction
2.6 <Floppy Port>
The board provides a slim type floppy port; please use the 26-pin ribbon cable in the
package to connect the floppy device.
FDD
Floppy rear side
4.
16
1.
Lift up this plastic bar
2.
Slot the cable in (Blue paste for outside)
3.
Press back the plastic bar
Lift up the brown plastic bar
5.
Slot the cable in (Blue paste for
6.
brown bar side)
Press back the plastic bar
Floppy Port
EE-260 User’s Manual
Hardware Setup
2.7 <LAN Interface>
The board provides 10/100Mbps LAN interfaces with VIA VT6103 PHY PCI controller, and
compliant with standard IEEE 802.3 Ethernet interface for 100BASE-TX.
2.8 <Onboard Display Interface>
Based on VIA Luke CoreFusion
TM
processor, the module supports integrated S3
Graphics UniChrome Pro IGP graphics, with BIOS selectable 16/32/64MB shared with
system memory for frame buffer.
2.8.1 <Analog VGA Interface>
The module provides a DB15 VGA connector up to 1920 x 1400 dpi on the rear I/O panel.
Onboard Audio Interface
17
EE-260 User’s Manual
2.9<USB2.0 & IEEE1394 Interface>
Based on VIA VT8237R+, the board provides 4 USB2.0 ports.The USB2.0 interface
provides up to 480Mbps of transferring rate.
Interface
USB2.0
Controller
VIA VT8237R+
Transfer Rate
Up to 480Mb/s
PS: The USB2.0 will be only active when you connecting with the USB2.0 devices, if you
insert an USB1.1 device, the port will be changed to USB1.1 protocol automatically. The
transferring rate of USB2.0 as 480Mbps is depending on device capacity, exact transferring
rate may not be up to 480Mbps.
2.10 <Serial Port>
The board provides two RS232 serial ports.
(This Page is Left For Blank)
18
EE-260 User’s Manual
System Configuration
Chapter 3 <System Configuration>
3.1 <SATA RAID Configuration>
The board supports two Serial ATA ports onboard, and supports RAID 0, 1 and JBOD disk
array, the RAID 0, 1 and JBOD are specified below:
RAID 0 (Stripping): Two hard drives operating as one drive for optimized data R/W
performance. It needs two unused drives to build this operation.
RAID 1 (Mirroring): Copies the data from first drive to second drive for data security, and if
one drive fails, the system would access the applications to the workable drive. It needs two
unused drives or one used and one unused drive to build this operation. The second drive
must be the same or lager size than first one.
JBOD (Span): As different as RAID 0, the JBOD combines two disks as one without any
fault tolerance and I/O performance enhancement.
To build Serial ATA disk array, please press <TAB> while booting up the system before
entering OS, and follow the instructions to edit the RAID function.
(Selectable Functions)
(Option Instruction)
(Disk Statement)
SATA RAID Configuration
19
EE-260 User’s Manual
System Configuration
You also can edit disk array under OS, please install the VIA RAID Utility in the driver CD.
(To getting start, please click here to learn more information)
(Click here to build RAID 0)
(Click here to build RAID JBOD)
(Click here to build RAID 0)
20
SATA RAID Configuration
EE-260 User’s Manual
System Configuration
3.2 <Audio Configuration>
The board provides 2 channel audio interface with driver installed, please install the VIA
audio driver in the CD before getting start to enjoy the 2 channel sound system.
Audio Configuration
21
EE-260 User’s Manual
System Configuration
3.3 <Display Configuration>
The board provides onboard analog VGA interface, and optional digital display interface
with LVDS , please install the VIA video driver before enjoy the vivid display.
Based on the VIA Luke with S3 UniChrome Pro graphic, the board provides dual display
function for clone or extended desktop modes with secondary display device attached.
After installing video driver, please launch the desktop display properties.
Please select each device to
configure the resolution and
color bit.
For secondary display device, you have two options selectable.
For more display properties setting, please click “Advanced” button.
22
Display Configuration
EE-260 User’s Manual
System Configuration
Please select S3Display for advanced device setting.
Connected Devices
Click check box to
enable/disable device
Specified display setup
When you set dual display clone mode, you’ll see the same screen display on two devices.
When you set the dual display for extended desktop mode, you can have the independent
desktop on the second device.
Display Configuration
23
EE-260 User’s Manual
(This Page is Left for Blank)
24
EE-260 User’s Manual
BIOS Setup
Chapter 4 <BIOS Setup>
The motherboard uses the Award BIOS for the system configuration. The Award
BIOS in the single board computer is a customized version of the industrial standard
BIOS for IBM PC AT-compatible computers. It supports Intel x86 and compatible CPU
architecture based processors and computers. The BIOS provides critical low-level
support for the system central processing, memory and I/O sub-systems.
The BIOS setup program of the single board computer let the customers modify the
basic configuration setting. The settings are stored in a dedicated battery-backed
memory, NVRAM, retains the information when the power is turned off. If the battery
runs out of the power, then the settings of BIOS will come back to the default setting.
The BIOS section of the manual is subject to change without notice and is provided here
for reference purpose only. The settings and configurations of the BIOS are current at
the time of print, and therefore they may not be exactly the same as that displayed on
your screen.
To activate CMOS Setup program, press <DEL> key immediately after you turn on
the system. The following message “Press DEL to enter SETUP” should appear in the
lower left hand corner of your screen. When you enter the CMOS Setup Utility, the Main
Menu will be displayed as Figure 4-1. You can use arrow keys to select your function,
press <Enter> key to accept the selection and enter the sub-menu.
Figure 4-1 CMOS Setup Utility Main Screen
BIOS Setup
25
EE-260 User’s Manual
(This Page is Left for Blank)
26
EE-260 User’s Manual
Appendix A <ETX connector Assignment>
Connector A
A1
GND
A2
GND
A51
VCC
A52
VCC
A3
PCICLK5
A4
PCICLK6
A53
PAR
A54
-SERR
A5
GND
A6
GND
A55
-GPERR
A56
N/C
A7
PCICLK1
A8
PCICLK2
A57
-PME
A58
-USB2
A9
-REQ3
A10
-GNT3
A59
-LOCK
A60
-DEVSEL
A11
-GNT2
A12
+3.3V
A61
-TRDY
A62
-USB3
A13
-REQ2
A14
-GNT1
A63
-IRDY
A64
-STOP
A15
-REQ1
A16
+3.3V
A65
-FRAME
A66
+USB2
A17
-GNT0
A18
N/C
A67
GND
A68
GND
A19
VCC
A20
VCC
A69
AD16
A70
-CBE2
A21
SERIRQ
A22
-REQ0
A71
AD17
A72
+USB3
A23
AD0
A24
+3.3V
A73
AD19
A74
AD18
A25
AD1
A26
AD2
A75
AD20
A76
USB-
A27
AD4
A28
AD3
A77
AD22
A78
AD21
A29
AD6
A30
AD5
A79
AD23
A80
-USB1
A31
-CBE0
A32
AD7
A81
AD24
A82
-CBE3
A33
AD8
A34
AD9
A83
VCC
A84
VCC
A35
GND
A36
GND
A85
AD25
A86
AD26
A37
AD10
A38
AUXAL
A87
AD28
A88
+USB0
A39
AD11
A40
MIC
A89
AD27
A90
AD29
A41
AD12
A42
AUXAR
A91
AD30
A92
+USB1
A43
AD13
A44
N/C
A93
-PCIRST
A94
AD31
A45
AD14
A46
SNDL
A95
-INTRC
A96
-INTRD
A47
AD15
A48
ASGND
A97
-INTRA
A98
-INTRB
A49
-CBE1
A50
SNDR
A99
GND
A100
GND
27
EE-260 User’s Manual
Connector B
B1
GND
B2
GND
B51
VCC
B52
VCC
B3
LGP0
B4
N/C
B53
N/C
B54
N/C
B5
LGP1
B6
N/C
B55
N/C
B56
N/C
B7
LGP2
B8
N/C
B57
N/C
B58
N/C
B9
LGP3
B10
N/C
B59
N/C
B60
N/C
B11
LGP4
B12
N/C
B61
N/C
B62
N/C
B13
LGP5
B14
N/C
B63
N/C
B64
N/C
B15
LGP6
B16
N/C
B65
N/C
B66
N/C
B17
N/C
B18
N/C
B67
GND
B68
GND
B19
N/C
B20
N/C
B69
N/C
B70
N/C
B21
LGP7
B22
N/C
B71
N/C
B72
N/C
B23
N/C
B24
N/C
B73
N/C
B74
N/C
B25
N/C
B26
N/C
B75
N/C
B76
N/C
B27
N/C
B28
N/C
B77
N/C
B78
N/C
B29
N/C
B30
N/C
B79
N/C
B80
N/C
B31
N/C
B32
N/C
B81
N/C
B82
N/C
B33
N/C
B34
N/C
B83
VCC
B84
VCC
B35
GND
B36
GND
B85
N/C
B86
N/C
B37
N/C
B38
N/C
B87
N/C
B88
N/C
B39
N/C
B40
N/C
B89
N/C
B90
N/C
B41
N/C
B42
N/C
B91
N/C
B92
N/C
B43
N/C
B44
N/C
B92
N/C
B94
N/C
B45
N/C
B46
N/C
B95
N/C
B96
N/C
B47
N/C
B48
N/C
B97
N/C
B98
N/C
B49
N/C
B50
N/C
B99
GND
B100
GND
28
IDE Port
EE-260 User’s Manual
Connector C
C1
GND
C2
GND
C51
LPT
C52
N/C
C3
AR
C4
AB
C53
VCC
C54
GND
C5
HSYNC
C6
AG
C55
-STB
C56
-AFD
C7
VSYNC
C8
SPCLK2
C57
N/C
C58
PD7
C9
-DETEC
C10
SPD2
C59
IRRX
C60
-ERR
C11
CLK2M
C12
A7M
C61
IRTX
C62
PD6
C13
CLK2P
C14
A7P
C63
RXD2
C64
-INIT
C15
GND
C16
GND
C65
GND
C66
GND
C17
A5P
C18
A6P
C67
-RTS2
C68
PD5
C19
A5M
C20
A6M
C69
-DTR2
C70
-SLIN
C21
GND
C22
GND
C71
-DCD2
C72
PD4
C23
A3M
C24
A4P
C73
-DSR2
C74
PD3
C25
A3P
C26
A4M
C75
-CTS2
C76
PD2
C27
GND
C28
GND
C77
TD2
C78
PD1
C29
A2M
C30
CLK1P
C79
-RI2
C80
PD0
C31
A2P
C32
CLK1M
C81
VCC
C82
VCC
C33
GND
C34
GND
C83
RD1
C84
-ACK
C35
A0P
C36
A1P
C85
-RTS1
C86
BUSY
C37
A0M
C38
A1M
C87
-DTR1
C88
PE
C39
VCC
C40
VCC
C89
-DCD1
C90
SLCT
C41
N/C
C42
N/C
C91
-DSR1
C92
MSCLK
C43
N/C
C44
INV ON
C93
-CTS1
C94
MSDAT
C45
N/C
C46
AVDDCTL
C95
TD1
C96
KBCLK
C47
N/C
C48
N/C
C97
-RL1
C98
KBDATA
C49
N/C
C50
N/C
C99
GND
C100
GND
29
EE-260 User’s Manual
Connector D
D1
GND
D2
GND
D51
-SDIOW
D52
-PDIOR
D3
5V_SB
D4
PWRGD
D53
SDDREQ
D54
-PDIOW
D5
PS_ON
D6
SYSPKR
D55
SDD15
D56
PDDREQ
D7
PW_BN
D8
BATT
D57
SDD0
D58
PDD15
D9
N/C
D10
N/C
D59
SDD14
D60
PDD0
D11
N/C
D12
-ACT
D61
SDD1
D62
PDD14
D13
N/C
D14
-SP100
D63
SDD13
D64
PDD1
D15
N/C
D16
N/C
D65
GND
D66
GND
D17
VCC
D18
VCC
D67
SDD2
D68
PDD13
D19
-OC0
D20
N/C
D69
SDD12
D70
PDD2
D21
-EXTSMI
D22
N/C
D71
SDD3
D72
PDD12
D23
SMBCLK
D24
SMBDATA
D73
SDD11
D74
PDD3
D25
-SCS3
D26
N/C
D75
SDD4
D76
PDD11
D27
-SCS1
D28
-HDLED2
D77
SDD10
D78
PDD4
D29
SDA2
D30
-PCS3
D79
SDD5
D80
PDD10
D31
SDA0
D32
-PCS1
D81
VCC
D82
VCC
D33
GND
D34
GND
D83
SDD9
D84
PDD5
D35
-LID
D36
PDA2
D85
SDD6
D86
PDD9
D37
SDA1
D38
PDA0
D87
SDD8
D88
PDD6
D39
IRQ15
D40
PDA1
D89
-RING
D90
GPI1
D41
-BATLOW
D42
N/C
D91
RD-
D92
PDD8
D43
-SDDACK
D44
IRQ14
D93
RD+
D94
SDD7
D45
SHDRDY
D46
PDDACK
D95
TD-
D96
PDD7
D47
-SDIOR
D48
PHDRDY
D97
TD+
D98
-IDERST
D49
VCC
D50
VCC
D99
GND
D100
GND
30
IDE Port
EE-260 User’s Manual
Appendix B<I/O Port Pin Assignment>
B.1 <Floppy Port>
Connector: FDD
Type: 26-pin connector
Pin
Description
1
VCC
3
VCC
5
VCC
7
DRV1
9
MTR1
11
RPM
13
N/C
15
Ground
17
Ground
19
N/C
21
N/C
23
Ground
25
Ground
Pin
2
4
6
8
10
12
14
16
18
20
22
24
26
Description
INDEX
DRV0
DSKCHG
N/C
MTR0
DIR
STEP
WRITE DATA
WRITE GATE
TRACK 0
WRPTR
RDATASEL
B.2 <Serial ATA Port>
Connector: CN_SATA1/2
Type: 7-pin wafer connector
1
2
3
4
5
6
7
GND RSATA_TXP1 RSATA_TXN1 GND RSATA_RXN1 RSATA_RXP1 GND
31
EE-260 User’s Manual
(This Page is Left for Blank)
32
EE-260 User’s Manual
Appendix C <Flash BIOS>
C.1 BIOS Auto Flash Tool
The board is based on Award BIOS and can be updated easily by the BIOS auto flash
tool. You can download the tool online at the address below:
http://www.award.com
http://www.commell.com.tw/support/support.htm
TU
UT
TU
UT
File name of the tool is “awdflash.exe”, it’s the utility that can write the data into the BIOS
flash ship and update the BIOS.
C.2 Flash Method
1. Please make a bootable floppy disk.
2. Get the last .bin files you want to update and copy it into the disk.
3. Copy awardflash.exe to the disk.
4. Power on the system and flash the BIOS. (Example: C:/ awardflash XXX.bin)
5. Re-star the system.
Any question about the BIOS re-flash please contact your distributors or visit the
web-site at below:
http://www.commell.com.tw/support/support.htm
33
EE-260 User’s Manual
(This Page is Left for Blank)
34
EE-260 User’s Manual
Contact Information
Any advice or comment about our products and service, or anything
we can help you please don’t hesitate to contact with us. We will do
our best to support you for your projects and business.
Taiwan Commate Computer Inc.
Address
8F, No. 94, Sec. 1, Shin Tai Wu Rd., Shi Chih
Taipei Hsien, Taiwan
TEL
+886-2-26963909
FAX
+886-2-26963911
Website
http://www.commell.com.tw
TU
UT
[email protected] (General Information)
E-Mail
TU
UT
[email protected] (Technical Support)
TU
UT
Commell is our trademark of industrial PC division
35