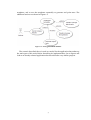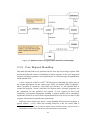
1
Charles University in Prague Faculty of Mathematics and Physics BACHELOR THESIS Jan Konopásek Systém pro správu úkolů a testů Department of Software Engineering Supervisor of the bachelor thesis: RNDr. Irena Mlýnková, Ph.D. Study programme: Computer Science Specialization: General Computer Science Prague 2011 I would like to thank my supervisor, RNDr. Irena Mlýnková, Ph.D., who bore with me throughout the whole time it took me to finish this project. I offer my sincere gratitude to my parents for both the wanted and the needed advice. Finally, I thank you, Misha, for keeping me going. I declare that I carried out this bachelor thesis independently, and only with the cited sources, literature and other professional sources. I understand that my work relates to the rights and obligations under the Act No. 121/2000 Coll., the Copyright Act, as amended, in particular the fact that the Charles University in Prague has the right to conclude a license agreement on the use of this work as a school work pursuant to Section 60 paragraph 1 of the Copyright Act. In ................... date .................. Jan Konopásek Název práce: Systém pro správu úkolů a testů Autor: Jan Konopásek Katedra: Katedra softwarového inženýrství Vedoucí bakalářské práce: RNDr. Irena Mlýnková, Ph.D., Katedra softwarového inženýrství Abstrakt: Cílem této práce je implementace softwarového systému usnadňujícího správu domácích úkolů a automatické generování testů. Správou domácích úkolů se z pohledu vyučujících rozumí vytváření úloh a jejich zadávání studentům a oprava a hodnocení přijatých řešení. Z pohledu studentů se pak jedná o odevzdávání řešení k aktuálně zadaným úlohám a o přehled hodnocení vypracovaných řešení. Těžištěm práce je popis implementace a způsobu použití webové aplikace Assignment Manager. Součástí aplikace je kromě výše uvedených vlastností také správa uživatelských skupin, správa studentských skupin a sdílení úloh mezi skupinami v rámci přednášky a možnost částečné automatizace kontroly řešení pomocí externích „pluginů“. Samostatnou částí je schopnost generování testů z uložených množin testových otázek. Aplikace byla testována ve zkušebním provozu po dobu jednoho semestru a upravována na základě připomínek studentů i pedagogů. Práce obsahuje i diskuzi kontrastu mezi původními předpoklady, na jejichž základě byla aplikace navržena, a reálnými požadavky při nasazení aplikace v praxi. Klíčová slova: správa domácích úkolů, automatické opravování domácích úkolů, automatické generování testů, generování náhodných testů Title: Homework and Test Management System Author: Jan Konopásek Department: Department of Software Engineering Supervisor of the bachelor thesis: RNDr. Irena Mlýnková, Ph.D., Department of Software Engineering Abstract: The goal of this thesis is to implement a software system facilitating management of homework assignments and automated generation of tests. From the teachers' point of view, homework management means creation of problems, their assignment to students, and correction and rating of solutions. For students, it means handing in solutions to assigned problems and solution rating overview. The focus of this thesis is the description of implementation and utilization of the Assignment Manager web application. Apart from the goals described above, the application also enables the management of user groups, sharing of problems among student groups within the scope of a single course, and using external “plug-ins” for automated correction of solutions. Furthermore, it is capable of automated generation of tests from saved sets of test questions. The application was field-tested during a single semester and it was extended based on the teachers' and students' suggestions. The thesis includes a discussion of the differences between the original assumptions serving as the basis for the application's implementation and the demands of live deployment. Keywords: homework management, automated correction of homework, automated generation of tests, generation of random tests Contents Introduction ......................................................................................... 1 1. Management of College Course Homework and Tests ...................... 3 1.1 Extended Homework Assignment Scenario ................................................... 4 1.1.1 Basic Terminology ................................................................................... 4 1.1.2 Actors ...................................................................................................... 5 1.2 Automated Generation of Tests ..................................................................... 6 2. Code Examiner ................................................................................ 9 2.1 Lecturer & Tutor vs. Group Owner ................................................................ 9 2.2 Fully Automated Correction ........................................................................ 10 2.3 Notable Similarities ..................................................................................... 10 3. Inside the Assignment Manager ..................................................... 11 3.1 Used Technologies ........................................................................................ 11 3.2 System Breakdown and Interaction ............................................................. 12 3.3 Core .............................................................................................................. 13 3.3.1 Tasks ..................................................................................................... 13 3.3.2 User Session ......................................................................................... 14 3.3.3 User Account ........................................................................................ 15 3.3.4 User Permissions .................................................................................. 15 3.3.5 Courses, Groups, Problems, and Assignments ..................................... 17 3.3.6 Solutions and Their Correction ............................................................ 18 3.3.7 Attachments, Questions, Templates, and Tests ................................... 19 3.3.8 Core Request Handling ........................................................................ 21 3.3.9 Errors ................................................................................................... 22 3.3.10 Error Logging ..................................................................................... 23 3.3.11 Plug-in Launching ............................................................................... 23 3.3.12 File Management ................................................................................ 24 3.3.13 Sending E-mails .................................................................................. 25 3.3.14 Configuration ..................................................................................... 26 3.3.15 Database ............................................................................................. 27 3.3.15.1 Database Request Layer .............................................................. 27 3.3.15.2 Abstract Query Layer .................................................................. 27 3.3.15.3 Database Adapter Layer ............................................................. 28 3.3.15.4 Data Structure ............................................................................. 29 3.3.16 Requirements ..................................................................................... 29 3.4 User Interface .............................................................................................. 30 3.4.1 Presentation Elements .......................................................................... 31 3.4.2 Table Element ...................................................................................... 32 3.4.3 Form Element ...................................................................................... 34 3.4.4 Layout and Content ............................................................................. 36 3.4.5 Visual Design ....................................................................................... 40 3.4.6 Model-view-controller Pattern ............................................................. 41 3.4.7 Widgets ................................................................................................. 42 3.4.8 User Session ......................................................................................... 44 3.4.9 Navigation and Browser History ......................................................... 44 3.4.10 Display Components .......................................................................... 46 3.4.11 Data Retrieval and Storage ................................................................. 47 3.4.12 Events ................................................................................................. 48 3.4.13 Error Reporting .................................................................................. 49 3.5 Plug-ins ........................................................................................................ 50 3.5.1 Tasks ...................................................................................................... 51 3.5.2 Plug-in Format ...................................................................................... 51 3.5.3 Communication Contract ..................................................................... 52 3.5.4 PHP Plugin Framework ....................................................................... 54 3.6 Installer ........................................................................................................ 55 3.6.1 Install .................................................................................................... 56 3.6.2 Upgrade ................................................................................................ 56 3.7 Documentation ............................................................................................. 57 4. How to Use he Assignment Manager .............................................. 59 4.1 User Roles .................................................................................................... 59 4.2 Installation and Configuration .................................................................... 60 4.2.1 Requirements ....................................................................................... 60 4.2.2 Installation ........................................................................................... 60 4.2.3 Configuration ....................................................................................... 61 4.3 User Interface Layout .................................................................................. 62 4.4 Control Elements ......................................................................................... 64 4.4.1 Table ..................................................................................................... 64 4.4.2 Form ..................................................................................................... 66 4.5 Error Reporting ............................................................................................ 67 4.6 How to ... ..................................................................................................... 68 4.6.1 Common Tasks ..................................................................................... 69 4.6.2 Student ................................................................................................. 70 4.6.3 Tutor ..................................................................................................... 71 4.6.4 Lecturer ................................................................................................ 72 4.6.5 System .................................................................................................. 74 4.7 Common Task Sequences ............................................................................. 75 4.7.1 Student .................................................................................................. 75 4.7.2 Tutor ..................................................................................................... 75 4.7.3 Lecturer ................................................................................................ 75 4.7.4 Administrator ....................................................................................... 76 5. Assignment Manager in the Wild ................................................... 77 5.1 Design for Reality ......................................................................................... 77 5.1.1 Users Real and Imaginary ..................................................................... 77 5.2 Cost of Modularity and Complexity ............................................................. 79 5.3 Testing and Reliability ................................................................................. 80 5.4 Dependencies and Maintenance ................................................................. 80 5.5 Proposed Enhancements .............................................................................. 81 Conclusion ......................................................................................... 85 Bibliography ...................................................................................... 87 List of Abbreviations .......................................................................... 91 List of Figures .................................................................................... 93 Attachments ....................................................................................... 95 A. List of Files .................................................................................................... 95 Introduction The need for homework assignments is a thing that almost all college lectures have in common. For teachers and their assistants, the management of homework submission and correction is a waste of precious time, which could be better used on research. Nowadays, basic management of homework assignment usually entails setting up a web page containing descriptions of assigned problems and their deadlines as well as tables with students' results. Teachers with little or no background in IT may find it daunting, therefore they might greatly benefit from a solution suited specifically to this task. Also, correction of students' homework takes more time with ever increasing number of students, which could be often remedied by partial or full automation of the correction process. But again, creating a correction tool complete with user interface etc., is a big time investment with uncertain results. Another necessity common to all lectures is the creation of tests. To keep up with the students posting test solutions on the Internet, teachers need to create a special set of questions for every exam. One way to aproach this problem is to generate a large pool of test questions from which the tests could be randomly generated. Again, teachers would benefit from a simple solution that would let them enter questions and generate tests on demand. This thesis is concerned with the implementation of a web-based software system allowing teachers to set up problems, to assign them to students as homework, and to set up systems of partially or fully automated correction of solutions, and allowing students to hand in their solutions and see the results, all in one place. The objective is to create a modular solution that works as a tool for the management of homework assignments on its own, but is easily extensible to allow automated correction as well. In addition, the system should let lecturers create pools of test questions and generate tests on demand. The deployment of the application with some specific homework correction plugins in a real-world use-case scenario is discussed as well. The initial chapter, Management of College Course Homework and Tests, analyses the problem and presents a broad outline of the proposed solution. The following chapter, Code Examiner, looks at the application with a similar focus and discusses its bearing on the problem. Chapter three, Inside the Assignment Manager, contains a detailed description of the implemented software. The user manual is included in the next chapter, How to Use he Assignment Manager. The last chapter, Assignment Manager in the Wild, describes the experience with the deployment of the application in the real world and suggests several changes and extensions of the application based on that experience. The implemented application 1 itself, as well as the extensive code documentation, is located on the attached CD (see Attachment A.). 2 1. Management of College Course Homework and Tests Before we start creating software for the management of homework assignments, we need to define its expected properties. Let us do this by defining a simple homework assignment scenario and then expanding it to cover the requirements outlined in the previous chapter. Our simple homework assignment scenario has two actors, a teacher and a student. The teacher creates homework problems and assigns them to the student with a specific deadline. Then the student creates a solution of assigned problem and hands it in. In the end, the teacher grades the solution. The role of the assignment manager software in such scenario would be just to provide teachers with a place to post the homework problems and their deadlines, to allow students to post their solutions, and to let the teachers retrieve them and post the grades. To meet the expectations outlined in the first chapter, we need to expand the scenario described above by a few important elements. The most important of them is making the software capable of (semi-)automated correction of students' solutions. This makes the software a discernible entity instead of a mere transparent interface between the teacher and the students. However, it should still be possible to use the software as a simple manager. Adding the automated correction means splitting the grading process into two parts further called “correction” and “rating”, where the former is performed by the software and the latter by the teacher. Other important expansion follows the usual structure of a college course. In large college courses, students are divided into smaller groups for exercise or experimental sessions, which can only accommodate limited amount of people at a time. These exercise groups have their assigned tutors, who supervise the exercise sessions, assign homework to students, and rate their solutions. In this case, homework assignment needs to be split into two separate parts, problem creation and problem assignment. Thus, all students attending the same course can be assigned the same problems, but the deadlines can be specific for each exercise group to fit its schedule and pace. Lastly, a typical college course contains multiple homework assignments of unequal importance. Therefore the homework assignment scenario should support separate weighted ratings of individual assignments, which could be combined into a single comprehensive rating of the whole coursework. While extending the scenario, the following considerations should be taken into account. Firstly, the project presented here is to be the work of a single developer 3 over a limited period of time, so the scope of the project needs to be reasonably limited. Additionally, it is the author's opinion that any software should not only help users accomplish their tasks but also promote good practices. In the context of homework correction and grading, these are namely transparency and fairness. 1.1 Extended Homework Assignment Scenario Before we continue with the description of the extended homework assignment scenario, we need to define some terms. All terms defined below are commonly used words with broad meaning (e.g. course, group, problem). For the purpose of this work, their meaning is constrained. They are sorted in logical, not alphabetical, order. 1.1.1 Basic Terminology Assignment manager software (AMS). AMS stands for the focus of this work, an application facilitating simple management of homework assignments and (semi-)automated correction of solutions. It is used to refer to such software in general, rather than to the particular implementation described in the rest of this work. Course (lecture). Course stands for a single college course, as well as a set of problems related to the course topic. Group. Group stands for a group of students belonging to certain course, created for the purpose of exercise sessions and homework assignments. Problem. Problem stands for the description of a homework problem. Assignment. Assignment stands for a problem bundled with its deadline as well as for the act of passing such a bundle to all students in a single homework group. Solution. Solution is a set of data created to solve certain problem. Submission. Submission stands for a solution successfully uploaded to the server plus all the data bound to it during its life cycle inside the application (e.g. the results of automated correction or rating). Correction. Correction stands for the automated correction performed by AMS, during which the solution is checked for adherence to some or all problem specifications. 4 Checker plug-in. Checker plug-in (or just plugin-in) is a separate executable or script added to the AMS to extend it with a capability of automated correction of solutions of certain problems. Rating. Rating (noun) stands for the points received by a student for a specific solution. Rating (verb) is the act of assigning a rating to that solution. The remaining special terms are defined in the following section. 1.1.2 Actors In the extended form, the college course homework assignment scenario involves the following actors: Lecturer. Lecturer is the person designing the course and responsible for it. He creates problems, which are the same for all students attending the course. He also manages the corrective plug-ins to be used for correcting the problems. Tutor. Tutor is responsible for a single group. He assigns homework problems created by the lecturer to his group and rates the solutions. Student. Student is a member of one or more groups. He receives homework assignments and submits his solutions for correction and rating. Administrator. Administrator is a person responsible for installation and maintenance of the AMS and also for the management of AMS users and their privileges. Of course, this list of actors does not match every possible real-world situation, but it should be comprehensive for most cases. The actors and the actions performed by them are shown in Figure 1.1. 5 Figure 1.1: Actors in a homework assignment scenario. 1.2 Automated Generation of Tests Automated generation of tests is mentioned in the Introduction separately, because it is not directly related to the management of homework assignments. It is, however, one of the goals of this project. Namely, the goal is to allow the lecturers to submit test questions related to the lecture's topic, to let them create test constraints, and to generate tests from the set of submitted questions based on these constraints. The generated tests should be formatted for printing. Additionally, the lecturers should be able to supplement the test questions with text or image file attachments. Let us define a few additional terms to be used in the rest of this work. Question. Question stands for a test question. Attachment. Attachment stands for a text or image file that can be attached to a question. Template. Template stands for a set of questions and a set of constraints usable as a basis for the test generation. The constraints include the number of questions that the generated tests should contain. Test. Test stands for a set of questions and their attachments in a printable format. Providing the test generation to the scenario described above requires only to add a few additional actions that could be performed by the lecturer. He should be able to upload attachments, to create questions and bind attachments to them, to create 6 templates, and to use the templates repeatedly to generate and print tests. The additional actions are shown in Figure 1.2. Figure 1.2: Test generation actions. The scenario described above is used as a model for the application that makes up the main part of this work. Before describing its implementation, let us digress and look at an already released application that was tailored to very similar purpose. 7 8 2. Code Examiner Before implementing an application, it would be appropriate to look at already existing applications with the same goals and analyse their merits and faults. However, even extensive Internet search revealed no reference to such an application. Fortunately, there is a similar project developed right at the Faculty of Mathematics and Physics of Charles University in Prague (MFF UK), that has been released just recently. Its name is Code Examiner (CodEx) and its properties are describe in full in [1]. CodEx also deals with management of homework assignments, but it is focused on programming courses, and problems in programming courses form a very specific class of problems from the correction point of view. Generally, homework is "simple"; there is one set of input data and the task is to find the corresponding output. What is specific about programming problems is the fact, that their "input" is a whole class of input data sets. The solution of a programming problem is a program able to find the corresponding output for any input from the defined class. While going over the solution of a "simple" problem should provide an accurate notion whether it is correct or not, programming problem solutions usually need to be "tested", i.e. run on multiple sets of input data prepared with potential solution flaws in mind. Automation of testing is the main focus of CodEx. There are many similarities between CodEx and the proposed AMS. CodEx is an application that allows teachers to post homework problems, set up correction mechanisms, and assign problems to students with specific deadlines. Also, it allows students to hand in their solutions and have them automatically corrected. But in spite of the similarities, the focus of AMS is quite different from the focus of CodEx. The differences between the model scenario used by CodEx and the scenario used by AMS (further referred to as the "proposed scenario") are described below. 2.1 Lecturer & Tutor vs. Group Owner The first notable difference is the fact that CodEx recognizes only a single unified “group owner” instead of the proposed two-tiered teacher hierarchy (lecturer-tutor). In CodEx, problems are created by group owners as either "public" or "private", where the public ones can be used by any group owner while the private ones can be used only by their creator. This scenario is simpler, which is obviously beneficial. On the other hand, its drawback is the lack of support for multiple parallel courses, each containing multiple groups of students. As a consequence, it is impossible to share problems between the groups inside a single course while not exposing them to other courses. This drawback can be bypassed by having a separate instance of 9 CodEx for each course, which requires more administration, or by re-creating the problems separately for each group, which means more work for group owners. Proposed scenario eliminates these shortcomings. Moreover, it adds additional options, such as the possibility for the lecturer to check on his students' results while delegating the rating process to his subordinate tutors. 2.2 Fully Automated Correction What is really different between the CodEx design from proposed scenario is the premise that the correction of all solutions can be fully automated. While this premise makes sense in the context of programming courses, it cannot work for the assignment management in general, because for many homework problems automated correction would be either very difficult or it would not make sense at all. The authors of CodEx obviously realized this shortcoming and added a mechanism for awarding "bonus points" manually. Still, the model used in AMS based on manual correction with an option of adding automated one is more intuitive and transparent than the model used by CodEx. The question of full automation with bonus points vs. manual correction with the possibility of automation is just a technical detail. What makes the key difference between our project and CodEx is the different approach to the problem definition. The authors of CodEx asked "How do we automate the correction of programming homework?" and they ended up with a solution allowing basic homework management as well. We approach the problem from the opposite direction. The question behind the proposed scenario is "How do we make homework management easier?" or even "How do we make course management easier?" and the ability to correct solutions automatically or to generate simple tests is just an additional requirement. 2.3 Notable Similarities Despite the differences, some of which were discussed above, several parts of CodEx design fit the proposed scenario well, namely the system of groups, private and public, to which the students subscribe to receive assignments. Other similarities include 1) the setting of a maximum rating to each assignment and awarding points for the respective solutions, 2) having predefined user roles but supporting different configurations, and 3) having a special role for system administrator. These elements can serve as a possible source of inspiration when implementing the AMS. The following chapter describes the implementation of the application designed to make handling proposed homework assignment scenario easier. 10 3. Inside the Assignment Manager Assignment Manager (AsM) is a software system designed to fulfill the expectations outlined in the first two chapters. Its concept was first proposed in the spring of 2008 and it was developed during the years 2009-2011. The development time was longer than expected both due to misjudging the complexity of the project and the time constraints of the author. It was deployed live in the spring of 2011 and tested on the XML1 Technologies course at MFF UK. This chapter broadly describes AsM implementation and discusses the choices made. For more implementation details, please see the developer documentation on the attached CD, or see [2]. 3.1 Used Technologies A web-based application is the obvious choice for this project with no real drawbacks and a lot of benefits, the foremost among them being portability. Particular technologies chosen for this project include PHP2 for the server side and “dynamic HTML” (XHTML3 and JavaScript4 with jQuery5 framework) for the client side, which is a common choice for web applications. This selection of technologies offers the least restrictions and makes use of author's previous experience. Selecting PHP for the application's server side imposes a restriction upon it and that is the "passive application" logic. PHP in its most common form is designed just to respond to client requests. PHP scripts are invoked upon receiving a client request and return a result upon completion. (There are different possibilities as well, but this one is prevalent.) This model suits the proposed scenario, because AMS is just supposed to help the actors perform their tasks easily. All actions performed by the application are to be triggered by users, with one notable exception. The checker 1 Extensible Markup Language (XML) is a set of rules for creating documents with added logical structure (see [19]). 2 PHP is a programming language with syntax loosely based on C, Java, and Perl. It is most often used for serving dynamic web pages and server-side scripting in web applications (see [3] for details). 3 XHTML is a document type used for web pages based on XML (see [22]). 4 JavaScript is a programming language most often used to add interactivity to web pages, specified in [4]. 5 jQuery is a JavaScript library that simplifies access to XHTML elements and events and communication with the web server. It radically changes the way of writing JavaScript code (see [5]). 11 plug-ins, although being a part of the application, should run on its own and trigger "save correction results" action. This is achieved by launching the plug-ins asynchronously in the background and binding handlers to their completion (as described below). Out of the selected programming languages, only PHP is a full-fledged language with file-system access, etc. Being also the programming language, the author was most familiar with at the time of AsM development, PHP serves as the project's base programming language. As such, it is used not only for server-side part of AsM, but also for various utility scripts. The next section explores the top-level breakdown of application parts and the interactions between them. 3.2 System Breakdown and Interaction In the AsM implementation, a lot of emphasis is placed on extensibility, i.e. creating a modular and robust code, which is a concept not directly related to its goals. Simplicity vs. extensibility is a choice to be made on every level of application structure. In this case, maximum extensibility had been chosen wherever possible, even on the top level of the application. This choice was based on the assumption that extensibility always saves time in the long run. Unfortunately, that assumption, caused by the lack of author's previous experience with projects of comparable scope, proved false. The excessive focus on extensibility increased application's complexity dramatically. For further discussion of this problem, see Section 5.2. The AsM application is divided into three separate parts. The following list provides just a brief overview of the parts and their interaction. The rest of this chapter provides more detail. Core. Core is an alias for the application's server side. It is written exclusively in PHP and it uses MySQL6 database for data storage. It is open for communication with the client side using HTTP7 requests with specifically formatted contents. This type of communication is initiated exclusively by the client side. Other venue of communication is the communication between the Core and the checker plug-ins, when the Core launches the plug-ins and receives specifically formatted results. User Interface. User Interface is the application's client side and provides the only access point to the application for users. It is written mainly in 6 MySQL is an open source database widely used by modern web applications. 7 Hypertext Transfer Protocol (HTTP) is a networking protocol used as the base means of communication between a web browser and a web server (see [20]). 12 JavaScript and it makes use of jQuery framework for extended cross-browser capabilities of DOM8 manipulation and AJAX9 communication. Plug-ins. Checker plug-ins are not an inherent part of the application, but they are closely tied to it. Each of them belongs to one of the three possible types: PHP script, Java JAR10 archive, or a native executable. All of them have to conform to the AsM plug-in specifications, which differ quite a bit between PHP script and the other types. A framework for PHP plug-in creation is part of the AsM itself. Apart from correction results, plug-ins can also produce other arbitrary output, so they can be used for solution preprocessing as well as correction. There are other parts belonging to the AsM project than just the AsM application. The most costly one is a complete set of checker plug-ins for a single college course XML Technologies. Another part closely tied to the AsM is the AsM Installer, which helps with the initial configuration and upgrades. Last significant part is a code documentation framework that allows to document both the PHP and JavaScript code using similar formatting and to generate single common external documentation. The following sections describe the individual parts in greater detail. 3.3 Core AsM Core performs various tasks upon receiving requests from the client (AsM User Interface, a.k.a. UI). Apart from that, the Core is passive - there are no Core processes running on the server other than those handling the client requests. The first part of this section, up to the Section 3.3.6, describes the tasks performed by the Core and the logical entities the tasks are performed on. The rest is dedicated to implementation details. 3.3.1 Tasks Follows the list of tasks performed by the Core. 8 Document Object Model (DOM) is a cross-platform representation of objects in XHTML documents used by JavaScript and other scripting languages to manipulate those objects (see [21]). 9 Asynchronous JavaScript and XML (AJAX) is a set of technologies used to create asynchronous web applications. Asynchronous web application is a web page that communicates with the server in the background, which enables it to behave like a single application entity rather than a set of interlinked pages. 10 Java Archive (JAR) is an archive file format used for distribution of applications or libraries written in Java programming language. 13 Authentication. Login and logout. Access restrictions based on users' permissions. User management. Creation, modification, and removal of user accounts and user types. Plugin management. Receiving uploads, testing, and removing the plugins. Course management. Creation, modification, and removal of courses and their associated problems, attachments, questions, and templates. Group management. Creation, modification, and removal of student groups. Assignment of problems to students in those groups, and rating of students' solutions. Solution hand-in. Receiving solution uploads and correction of solutions using plug-ins. Removal of solutions or their confirmation for rating. 3.3.2 User Session Before performing any other tasks, the Core requires the user to be authenticated. The only exception to this rule are the tasks that assist the user with getting authenticated. After the user successfully logs in using active user account credentials, a "user session" is started, which allows the user to perform required tasks while being restricted by the permissions associated with his account. The user session makes use of PHP session to store data. Particular behaviour of the PHP session depends on the web server configuration. The session remains active only for a certain period of time, but can be "refreshed", which resets the timer. The session is refreshed by any successful core request that requires authentication, but it can also be refreshed manually by a special request. The main reason for automatic expiration of the session is security. Leaving the session open "forever" would increase the risk of session hijacking if the user left an open session on a public computer. For increased security, users can also terminate session manually by logging out. The inherent part of user session data are user's permissions, which are loaded from a database on the session start. They are used to determine which of the requested tasks are permitted to the user. See Section 3.3.4 for more detail. The PHP session is bound to the web browser, so multiple user sessions can be opened from the same computer only by using multiple browsers. In that case, each session is completely separated from the others. There is no limit on the number of concurrently open user sessions apart from the limits of the PHP server itself. 14 3.3.3 User Account Before a user can log in, i.e. start a user session, he first needs to own an active user account. User account consists of login information (username and password), associated user type (see the next subsection), and other miscellaneous data. User account can be created in two ways, each suited to a different situation. One way is very simple - a user with appropriate permissions can directly create a new active user account of any kind. This is useful for creating user accounts for lecturers and tutors, as they need specific permissions. However, creating all students' accounts this way would mean a lot of work for the person in charge of creating the accounts. Another way to create an account is to "register" it. Registering a new user account does not require login, so it can be done by the students themselves. User account created this way has two important properties. First, right after its creation the user account is inactive and cannot be used to log in. To become active, it needs to be activated by a code sent to the e-mail address entered during the registration process. This security measure prevents automated user account creation by bot scripts. Second, users cannot choose their permissions when registering new user account. Instead, they are assigned the default user type STUDENT. User type of any user account can be changed by a user with appropriate permissions. Users cannot remove user accounts without appropriate permissions, not even their own account. 3.3.4 User Permissions The proposed scenario describes several actors and the actions they need to be able to perform. This is a simplification for the sake of an easy use-case analysis. In reality, different situations call for slightly different solutions, so having a fixed set of actors would not be a good idea. Instead, every task performed by the Core has an associated "permission", and these permissions are grouped into sets called "user types". AsM comes with several predefined user types corresponding to the actors of the proposed scenario. Two of the predefined user types are special. The first of them is the ADMIN type, which has all permissions and cannot be modified or removed. AsM contains a single non-removable user of this type to ensure that there is always a user capable of managing it. The second is the STUDENT type mentioned above, which cannot be removed either. It serves as the default user type. Follows the list of all user permissions. Create user. Create a new active user account. 15 Modify user. Modify any user account. Remove user. Remove any user account. Browse users. Retrieve user account data of all users (except passwords). Manage user types. Create, modify, remove, or view any user type. Create plug-in. Upload new plug-in and add it to the application. Modify plug-in. Modify data of any plug-in. Browse plug-ins. Retrieve data of all plug-ins. Remove plug-in. Remove plug-in from the application. Test plug-in. Test-run any plug-in with custom arguments and input. Submit solution. Upload solution to assigned problem. Subscribe (public). Subscribe to a public group. Subscribe (private). Subscribe to a private group without requesting consent from the group's owner. Request (private). Request owner's consent to subscribe to his private group. Create group. Create a new group. Manage group (own). Modify or remove owned group and create, modify, or remove assignments bound to it. Manage group (any). Modify or remove any group and create, modify, or remove assignments bound to it. Create course. Create a new course. Manage course (own). Modify or remove owned course and create, modify, or remove problems, attachments, questions, and templates bound to it. Manage course (any). Modify or remove any course and create, modify, or remove problems, attachments, questions, and templates bound to it. Rate solution. Rate a solution uploaded by a student in one of the owned groups. View author. See real names of solution authors while rating the solutions. Modify rating. Modify rating of an already rated solution. View log. Retrieve the system log contents. As it is apparent from above descriptions, there are actions that require more than just a specific permission. Few of them require ownership of the action's object as 16 well. In most cases there are stronger "override" permissions allowing to bypass the ownership requirement, but there are a few cases, where that is not possible, e.g. the rating of solutions. Object ownership is established at the time of its creation and cannot be changed later. An option to pass object ownership from the original creator to another user, as seen in CodEx, could be a nice extension, but it is not part of the original design. Originally, AsM was designed to enforce maximum fairness and transparency to the point of being very unforgiving to tutors' mistakes when rating. Modifications, such as adding the permission to change the rating of an already rated solution, have been made as the results of live testing. 3.3.5 Courses, Groups, Problems, and Assignments From the Core viewpoint, a course is a named group of problems owned by a single user. A problem consists of a problem description and (optionally) of plug-in configuration, which comprises of plug-in selection and the arguments required to make it usable for this specific problem (if the plug-in accepts arguments). Unlike CodEx, where problems can exist in public domain, every problem in AsM belongs to a single course. It is possible to view each course as a namespace encapsulating CodEx-like environment. A group is a named set of assignments bound to a single course and owned by a single user. The group can be owned by a different user than its “parent” course. An assignment consists of a problem from the parent course and a deadline. A group can be either public or private. Public groups are visible to all users with the subscribe (public) permission and these users can freely subscribe to any of them. To subscribe to a private group, a user needs to request consent from the group's owner. This mechanism allows tutors to make sure that only students belonging to their homework group in reality are subscribed to it in AsM, thus keeping the groups well-arranged. Students subscribed to a group can access the problems assigned to that group and submit their solutions. The entities described above cannot outlive the entity they belong to. Therefore, a great care needs to be taken when removing objects like courses, groups, problems, and assignments, or when cancelling subscriptions. Removing an assignment removes all respective solutions. Removing a group removes all assignments in that group, while removing a problem removes all assignments based on that problem. Removing a course removes all problems and groups belonging to that course, effectively removing any trace of it from the system. Removing a user causes his groups to become owner-less and thus practically unusable. This mechanism was chosen for its simplicity and heavily relies on the responsibility of more empowered 17 users. Associated risks may be lowered by not giving users permissions to remove higher-level objects or by adding safeguards to the user interface. Relations between the objects described above are shown in Figure 3.1. Figure 3.1: Course management entities and their relationships. 3.3.6 Solutions and Their Correction The format of a solution may vary a lot depending on the problem it is supposed to solve. These differences have no meaning from the Core viewpoint, so a unified format is imposed to hide them and make the solution handling more convenient. Before handing in, the data of every solution have to be packed into a single ZIP11 archive. This is convenient, because ZIP archives are supported on all major operating systems and compression makes uploading solutions to the server faster and helps save space. After a solution is successfully uploaded to the server, it is annotated with date and time and becomes a submission. During its life-cycle in Core, a submission is always in one of the following states: new, corrected, confirmed, and rated. The sequence of the states is linear and their changes are irreversible. Every submission starts as new. If there is a plug-in set up to correct it, it is launched and the uploaded solution is handed to it. When the correction is finished, the plug-in returns the results of all performed checks. The results are added to the 11 ZIP is a common file format allowing to compress multiple files into a single archive. 18 submission as well as the percentage of the overall success. If there is no plug-in associated with the problem, this step is skipped. In both cases, the submission becomes corrected. The corrected submission is still fully under its author's control. The author of the submission can view the correction results (if present) and decide whether to confirm the submission for rating (which makes it confirmed). The only alternative (apart from leaving the solution in corrected state) is the removal of the submission, which can be done at any point before the confirmation. Once a submission is confirmed, it becomes the author's official solution and can be viewed and rated by its associated tutor. It can no longer be removed and no other submission for the same assignment can be confirmed. Submission stays in this state until the tutor reviews and rates it. Then it becomes rated. There are two key points in the solution handling procedure described in this section. One of them is the possibility to cancel the submission based on the correction results before handing it over for rating. The main motivation for this is the assumption that the tutors' time is much more valuable than computing time. It is also assumed that the main point of any homework is an exercise, not testing. While the latter holds true for the AsM's original deployment environment, it is not true for every possible case. To remedy this, a limit could be put on the number of solutions that a single user can upload for a single assignment. Another key point in the solution handling procedure is the lack of an option to return the solution to its author for modifications, once the solution has been confirmed. This restriction was imposed not just because of the complications associated with the implementation of such an option, but also to promote fairness. If it was possible to return confirmed solutions, additional safeguards would have to be put in place to ensure that the users are kept informed about their returned solutions and that they have enough time to submit new solutions before the deadline. 3.3.7 Attachments, Questions, Templates, and Tests Attachments, questions, and templates are all connected to a particular course; therefore, they are all managed by that course's owner. The attachments are mentioned as separate entities, because they are managed separately, which allows reusing the same attachment for multiple questions. It could also allow binding the attachments to homework problems if necessary. Apart from the attachment file itself, the attachment entity created by the Core contains the attachment's name and type. The name is used to easily identify the file when binding it to a question. The 19 type can be one of the following three types: text, code, and image, and it is used to render the attachment correctly when including it in a test to be printed. A question can have one of multiple types as well. In this case, the types are text, choice, and multi, and they indicate the style of the answer. A question with the text type requires a complete text answer, while the choice and multi types of questions require selecting one and any number of options, respectively. Therefore, a question with the choice or multi type must be supplemented by a set of options (answers). Additionally, a question can use one or multiple attachments. A template is created by selecting a set of questions and the number of questions the generated tests should contain. The selected questions are further divided into two categories: mandatory and optional. The template can be used to generate a test that contains all the mandatory questions and as many of the optional questions as necessary to reach the required question total. For increased convenience, a test is generated right when the template is created, and the Core stores the last generated test for every template to allow downloading and printing the test multiple times. The generated tests are downloaded as HTML files, each containing first the selected questions and second the attachments, if there are any. Both the questions and the attachments are numbered. Questions with choice and multi types are followed by the description of their type and a list of available answers. Every attachment is included only once, even if it is used by multiple questions, and each question that uses attachments is followed by the list of the attachment numbers it uses. The relationships between the entities described in this section are shown in Figure 3.2. 20 Figure 3.2: Entities used for test generation and their relationships. 3.3.8 Core Request Handling The tasks described above are performed by the Core upon receiving a request. This section describes the nature and handling of these requests. A list of all supported requests and their arguments and requirements is in the developer documentation on the attached CD. A Core request is a POST or GET12 HTTP request containing key-value pairs in the format appropriate for the request type. These are further called "properties", where "property A" stands for a key-value pair with key "A". All requests have to contain the property "action" with the Core request name. All other properties are the arguments for the specified core request. A Core request can have both mandatory and optional arguments. Sending a request without all its mandatory arguments results in an error. Other requirements have to be met to run most of the requests, often based on specific user permissions. AsM Core has a single entry point, a script handling all the received requests. A special address ./core/, where the working directory is the one where AsM is 12 POST and GET are the most common HTTP request methods used by web browsers to submit data to web servers and retrieve content from them respectively. 21 deployed, is used to redirect requests to the handler script instead of addressing it directly. The handler script sets up the environment for request handling and launches the handling procedure. Every request has an associated handler class, which contains the logic specific to that request. All handler classes are descended from a common parent, which implements the base handling logic including error reporting and logging, input validation, handling of uploaded files, and other common tasks. Both this and the adjustments of the environment done by the entry point script ensure consistent request handling and error reporting behaviour. In response to requests, the Core returns either an output file (in some special cases), or a JSON13-encoded object with two properties. A property data contains request-specific result data, or it may be empty in case of errors. A property errors is set only if some error(s) occurred and contains an array of errors. 3.3.9 Errors Generally, most applications use a simple model for errors, in which an error consists of an error message and (optionally) its “severity”. AsM expands on this by splitting the error message into “cause”, “effect”, and “details” and adding code numbers to known error causes. The errors should simultaneously serve all of the following purposes. 1. To give the user a general idea, what might be the cause of the problem. The user should be able to differentiate between errors caused by his incorrect use of the application, and other errors. 2. To inform the user about the immediate effects of the error related to the action he was trying to perform. 3. To provide a detailed error description helpful for the person trying to fix the problem. Additionally, using code numbers for known causes serves two different purposes. First, not to confuse users with different error messages in different instances of the same error cause. Second, to allow the client (UI) to define specific reactions to certain error causes (e.g. insufficient permissions) without binding them to specific error message strings. As a side-effect, the described expansion of the error structure emphasises the need of being aware of the relation of created errors to the user while writing the code. This helps preventing a frequent mistake of software developers - creating errors that are incomprehensible for users, because they describe the error in a completely alien context. 13 JavaScript Object Notation (JSON) is an open standard for text representation of simple data structures (see [23]). 22 3.3.10 Error Logging To fix errors encountered by users, the administrator needs to have access to all details of these errors. Since the users often fail to remember or write down the encountered error messages, it is necessary to backup all error data on the server for later perusal. Using a database for this purpose would be unwise, because errors can easily occur during the communication with the database. In contrast to writing into a database, writing directly to a file is very simple and therefore much easier to keep error-free. For this reason, AsM logs all errors directly into log files. Additionally, should AsM ever break down completely, having errors logged in simple text files makes it easy for the system administrator to look them over without AsM's assistance. Logging in AsM is managed by a stand-alone logging class independent on the rest of the application. Its functionality is based on the fact that all errors occur in certain context and that multiple errors may have the same context. In AsM's case, every error's context consists of a Core request, IP address issuing the request, etc. Therefore, AsM logger enables logging of "entries", each one consisting of a header (context) and variable number of "lines" (events). Entry header always contains a time-stamp and it can optionally contain any other data as well. Each entry line may contain any number of data "items". When using the logger, this abstract structure has to be concretized by supplying strings for separating individual log entities. The separators are stripped from all consequently logged items to avoid corrupting the log. Care should be taken to select separators that make the log files human-readable and that are not needed inside the logged entries. The log files themselves do not contain information about their structure, so it is possible to read a log file using two differently configured loggers. To avoid swamping the file system with overly large logs, log files have configurable maximum size and they are automatically "rotated". This means that a single log consists of a whole sequence of files. When an entry would make a log file exceed its size limit, it is logged to the next file in the sequence instead. Maximum number of files in the sequence is customizable. Then , when the number of log files in the sequence reaches a given limit, the oldest file is always deleted before a new one is created. Log rotation is a mechanism commonly implemented on Unix operating systems. However, using this implementation would mean a substantial restriction for AsM deployment, so the log rotation is implemented as part of the AsM logger instead. 3.3.11 Plug-in Launching Launching of plug-ins is AsM's only deviation from the conventional model of passive PHP application. The automated correction can be time-consuming; 23 therefore, the handler of a Core request that leads to plug-in launch cannot wait for the plug-in to finish before returning request results. Consequently, plug-ins need to be able to run outside the passive model of Core request handling. Additionally, when a plug-in stops running, AsM database needs to be updated with the correction results. This is accomplished by detaching plug-ins from the request handling process into a separate background process. This requires the following two steps. 1. Detaching the environment. If plug-ins were allowed to call the Core with the correction results directly, it would result in great increase of complexity. In that case, the channels of communication between the Core and the plugins would have to be defined. To ensure security, a plug-in session would have to be established based on the user session that caused the plug-in to be launched. AsM uses a much simpler alternative. When a plug-in needs to be detached, the Core dynamically creates a script, which is able to initialize a partial copy of the current PHP environment and then launch the plug-in and retrieve its results. The created script is then launched in a separate process. 2. Detaching the process. Launching the script in a separate process is unfortunately an OS-dependent task not covered by the native PHP functions. AsM contains methods for detaching a background process on both Unixbased operating systems and Microsoft Windows. These methods belong to one of the standalone utility modules implemented as a part of AsM and they are very convenient for any application in need of performing asynchronous tasks on the server. Plug-ins themselves are launched and handled in a manner depending on their type. Executables and JAR archives are simply launched and requested to return results as specifically constrained XML. PHP plug-ins are more closely integrated with the Core. They are executed inside the parent environment and are given access to the PHP Plugin Framework classes released with AsM. They are requested to return results directly in order to avoid XML creation and parsing. See the Section 3.5 for detailed description of how the plug-ins work and how they are integrated into the Core. 3.3.12 File Management AsM Core needs to deal with files on a regular basis. These files include attachments, plug-ins, assignment solutions, input data for plug-in testing, and plug-in output files. They are uploaded to the server as property values of certain Core requests. The POST method needs to be used for these requests, because the GET method does not support file transfer. Sending files attached to regular requests has a significant drawback. Request handlers accepting files need to wait for the whole files to be uploaded before doing 24 anything else. Waiting for a response to such a request may therefore take quite a long time. A possible way to improve this situation is to add a special file upload request that temporarily saves the file and returns its storage ID. Request making use of that file would then include just the file ID, not the file itself. The user interface could use it when a user needs to enter additional data that are to be sent with the file. The file in question could be sent as soon as it is selected by the user and it could already be uploaded by the time the user sends the rest of the data along, resulting in shorter waiting times. The mechanism for pre-uploading files had been implemented as a part of the AsM Core, but it was abandoned after testing, because the benefits were not substantial enough to warrant the increased complexity of the system. Furthermore, there are just a few requests making use of file upload, and the single one that is used frequently (solution upload) does not accompany the file with any additional data. The handling of uploaded files depends on their purpose. Uploaded attachment files are stored with unique names based on the id of the lecture they belong to and their assigned name. Solutions, input data for plug-in testing, and plug-in output data are stored as ZIP archives with unique names based on the date and time of the upload/creation and other context variables. Solutions are passed to plug-ins still as ZIP archives, and the plug-ins themselves are responsible for their temporary unpacking. Plugin files are unpacked right after their upload and they are stored unpacked to be ready for repeated execution. Downloading a file stored by the AsM Core is not only a simple matter of knowing the file's location and requesting it from the server. In such model, enforcing restrictions based on the ownership and user permissions would be very difficult, not to mention, that the file storage folder structure and filenames are private implementation details. Instead, files are requested in the same way as all other data, using a Core request. If the request is granted, the requested file is returned directly as the result. This is the only case where the result of a Core request is not a JSON-encoded object. If an error occurs during the handling of such request, the usual error result is returned instead. Therefore, the sender of the request needs to adjust the handling of the result based on its type. 3.3.13 Sending E-mails Sending e-mail alerts and digests is a feature not included in AsM due to time constraints. However, the e-mail sending mechanism itself is implemented and it is used during the user account registration process. The implementation of the mailing mechanism is modular. The mailer class is decoupled from the rest of the application to be easily exchangeable for a different 25 implementation of the mailer interface defined by AsM. The currently used mailer is just an adapter for the PEAR14 class Mail used with SMTP15 back-end. SMTP server set-up is a part of the AsM Core configuration. 3.3.14 Configuration To be deployed successfully, AsM Core needs some specific information about the environment it is supposed to interact with. This information is supplied using the AsM configuration file, which is an INI file with sections, as described in [17]. The INI format has been chosen both because it is a standard format for configuration files and because PHP includes support for INI file parsing. From the Core viewpoint, the configuration file is read-only. AsM configuration consists of two parts, public and private. In the public part, properties describe the external environment. AsM administrator is encouraged to change them manually if necessary. They include MySQL account data and a database name, SMTP server account data and a "From" header value for outbound e-mails, paths to PHP CLI16 and Java interpreter, an absolute path to Apache document root and a relative path to AsM deployment directory, etc. The private part is clearly separated from the public part and contains properties describing the inner structure of the application. These properties serve only for development purposes and should not be changed manually by AsM administrators under any circumstances. During the early development and even in the alpha version of AsM Core, the manual modification of the configuration file was the only way to configure the application. Later on, an additional script, AsM Installer, was introduced to make AsM deployment simpler. The Installer requests the initial configuration data from the administrator and it attempts to guess and verify some of the values (e.g. paths to PHP and Java interpreters). Section 3.6 contains more information on this subject. 14 PHP Extension and Application Repository (PEAR) is a system for distribution of reusable PHP components (see [24]). It is used to add the component modules directly to the web server. 15 Simple Mail Transfer Protocol (SMTP) is a standard defining e-mail communication over IP networks, e.g. the Internet (see [25]). 16 PHP Command-Line Interface (CLI) is an interface of PHP usable from command-line (as opposed to the PHP CGI used for web server scripting). 26 3.3.15 Database The Core uses a database to store all data apart from the configuration and from error logs. The access to the database is managed by a special database framework, which is implemented as a part of AsM. The framework provides the following abstraction layers over the used database implementation: the database request layer, the abstract query layer, and the database adapter layer. 3.3.15.1 Database Request Layer The database request layer is the only layer accessible to the rest of the Core. It provides a set of "database requests", i.e. addProblem, cofirmSubscriptionById, or getGroupsVisibleByUserId. Each of them has a name and a specific set of required arguments. The layer's purpose is to restrict the access to the database to a set of predefined actions and thus ensure the consistency of contained data with the application data model. Ensuring database consistency is much easier when the Core uses abstract requests based on application logic instead of accessing the database directly. In the former case, the mistakes are much more easily spotted. On the other hand, transforming raw database requests into the abstract logical requests without adding unnecessary restrictions to the Core requires a lot of additional code. Another function of the database request layer is to provide high-level validation of database query data, so that any error messages refer to data in application terms instead of revealing details about the internal database structure. At this level, the data that are potentially harmful to the database are rejected or erased, so the lower layers may expect all input passed to them to be clean and sensible. To fully function as a buffer between the database and the rest of the Core, the database request layer needs to perform one additional role - to translate the internal database representation of stored data into the application data model. This is accomplished by translating property names of application entities (i.e. user, problem, group) into field names of database entries. This approach allows to use the same name for a certain property of a certain entity regardless of the possible differences in its naming on lower levels. Again, this feature makes the rest of the Core code cleaner and easier to maintain, but it requires additional code. 3.3.15.2 Abstract Query Layer The abstract query layer basically makes it possible to avoid using a particular database query language altogether by providing an object-oriented query framework. It uses an extensive hierarchy of abstract expressions to cover basic database query functionality and bring its strong typing over into the PHP code (using “type hinting” feature of PHP described in [6]). 27 The abstract query framework contains wrappers for all expressions required in the basic database queries. The complex expression constructors have strongly typed arguments, which ensures semantic correctness of all expressions. The expression wrappers include expressions that yield a value (e.g. Literal), predicates that yield a boolean value (e.g. Conjunction, Negation), "statements" (e.g. Query), and special re-typing wrappers (e.g. QuerySource). Creating database queries in this manner is much more verbose than using a native database query language. To overcome this disadvantage, AsM contains various factory methods that make creating simple database queries as easy as supplying sets of values. Another drawback is that abstracting database management logic requires keeping track of the whole database layout inside the application code. Such data duplication lowers extensibility by increasing modification costs. Main purpose behind the creation of the abstract query framework was an effort to write code that clearly shows the application logic and that is independent on the particular database type chosen. The framework is a feature that proved to be insufficiently analysed and much more costly than previously expected. Its implementation required creation of a class hierarchy that sufficiently reflects the semantics of simple database queries. That is a task markedly diverging from the scope of AsM Core. As a result, the part of AsM Core dealing with the database management became so large that it does not correspond to its importance with respect to the project. Due to time limitations, some of the more complex features of the framework (notably complex queries joining multiple tables) could not be included and workarounds have to be used instead. 3.3.15.3 Database Adapter Layer Database adapter layer is the bottom layer and it manages the transformation of abstract queries into a native query language of the used database. MySQL was selected as a database of choice for AsM; therefore, the only adapter implemented is the MySQL adapter. Database adapter layer logic is implemented as part of abstract query functionality; therefore, an abstract query just needs a set of databasedependent tokens to be transformed into a native query string. Figure 3.3 shows the interaction between the layers during a single database request. 28 Figure 3.3: Interaction between database layers during a database request. 3.3.15.4 Data Structure The database contains both the various entities and the connections between them. Base data are stored in simple tables. Each table has a special ID column with numeric IDs of table rows. The connection of the tables is arranged using "views", which are predefined SELECT queries stored in the database, which can be used as sources for other queries just like normal tables. The views created as a part of AsM join the tables by connecting ID references with the respective IDs. As an example, the database contains tables users and usertypes. The first table contains columns for properties such as user's full name, his e-mail address, username, and password. It also has a type column, which contains references to row IDs in the second table. Apart from the obligatory ID column, the second table contains columns for the usertype name and the set of user permissions. A view usersWithPermissions, also included in the database, joins these two tables by extending the user table rows with the usertype name and the privileges corresponding to the user type referenced by the type column. 3.3.16 Requirements AsM Core code is written in PHP 5.3 and takes full advantage of its features, such as namespaces or class constants; therefore, it is incompatible with the earlier versions of PHP. A great deal of effort was put into making its object-oriented code as clean 29 as possible. Type hinting (PHP 5 feature) is used to substitute strong typing missing in older versions of PHP. Furthermore, the Core requires Apache17 to run and takes advantage of some very convenient features including (but not limited to) the usage of its rewrite module (documented in [7]) to prevent access to AsM source, configuration files, and stored data. This is not a large restriction, because Apache runs on all major operating systems. This concludes the section dealing with the AsM Core. For more insight into the implementation, please see the developer documentation on the attached CD. The next section describes another large part of the project, the AsM User Interface. 3.4 User Interface User Interface (UI) of the AsM is a JavaScript application that runs in a web browser and provides access to the tasks performed by the AsM Core. It communicates with the Core using POST and GET HTTP requests (see previous section for more details). To provide access to the Core tasks and present retrieved data the UI uses just a few basic elements (e.g. “form” or “table”) with extended functionality. The AsM UI is written in JavaScript. It utilizes a tiny framework Base.js, which enhances regular JavaScript with some “syntactic sugar” that enables the use of the classical inheritance pattern instead of the default prototypal inheritance (see [8]). Another much larger framework, jQuery, is used as the sole means of DOM manipulation and AJAX communication. jQuery was chosen because it is simple to use and provides an extensive array of DOM access and manipulation functions. Its functionality bridges the gap between the implementation of standards in web browsers and the usability requirements of a modern web application. Another reason for choosing jQuery as the base framework was its extension, jQuery UI. It extends the severely outdated HTML model by using various "widgets" like “date-picker”, “dialog” window, and “progress bar” together with the animation effects for element transitions. jQuery UI also provides a "widget factory" that can be used to create additional widgets. The widgets created by this factory represent an exception to the class-based model used throughout the rest of the AsM UI code. Instead of being part of the class hierarchy, they follow the jQuery model of immediate extension of DOM element selection. This section consists of two distinct parts. The first part (up to Visual Design) deals with the used presentation elements and the UI contents. The rest of the section describes the key aspects of internal UI functionality. 17 Apache HTTP server (Apache) is an open source web server. 30 3.4.1 Presentation Elements To fulfill its purpose, the AsM UI has to be usable by users with very little or no technical background. This requires maximum possible clarity, which is achieved by simplicity and consistency of the UI. Only a handful of presentation and interaction elements is used throughout the application. Thus, the users are not surprised with new concepts on every page. The elements are carefully extended to provide tools required by the users while remaining intuitive and easy to use. The list of used elements follows (the details of the most important two of them are provided in the following sections Table Element and Form Element). See section Widgets for implementation details. Form. Form fields provide hints about value restrictions as well as visual focus cues and an instant validation feedback. Forms are designed to be fully validating, so that instead of sending the data and hoping for the best, the users are sure that they are sending the correct data. Table. Enhanced tables serve as the principal means of data presentation and interactivity. They include both static enhancements concerned just with data display, such as pagination, sorting, and filtering, and interactivity enhancements provided by "action buttons". Editor. Editor is not a single visual element like a form or a table, but rather a design pattern, which combines a table with a form for the creation and/or modification of table rows. Editor pattern, as defined in AsM, unifies the look and descriptions of the action buttons used for the creation, modification, and removal of rows and how the two used elements interact. In its initial state, an editor is just a table with rows that can be created, modified, or removed. When a user decides to either create or modify a row, the table is hidden and a form is shown instead. When the form is successfully submitted, it is hidden again, and the table is brought back. The resulting effect is different from having a table with editable cells, because when using the editor pattern, the rows are the base entities instead of the cells. Panel. AsM UI does not have open space for random content. Most content has a tabular character and it is therefore displayed using the table element (or form element when showing a single item). Panel provides a consistent way to enclose content with different structure. Apart from visually setting off the content, it provides a unified way to add an icon to it or to highlight it to increase clarity. Accordion. Accordion is a common design pattern (described in [9]), which is used in AsM UI only for a single element, the navigation menu. It provides a natural way to merge the two navigation levels into a single visual element that displays the lower level of navigation only for the currently selected item in the 31 upper level, thus showing all information needed while avoiding unnecessary clutter. Loading overlay. Sometimes, the user should not be able to access a particular content area, because its content is being loaded or submitted and touching it would only lead to inconsistencies. The loading overlay provides a unified method to prevent access to content in such cases while clearly presenting the user with the reason of access denial and indicating that the restriction is only temporary. It does so by putting up a semi-transparent screen over the restricted area with a small panel in the middle containing an animated icon indicating activity and a short explanatory message. Text cutter. In certain cases only a beginning of a long block of text should be displayed by default to avoid cluttering the screen (e.g. when displaying long text inside a table cell). Text cutter provides a smart way to cut text exceeding a certain length and to hide the rest, even in HTML content. It is optimized to either display just the first line of text, or at least to cut at spaces. A click-able tool for showing/hiding the remaining text is appended after the text. 3.4.2 Table Element Figure 3.4 shows a mock-up of a simple table element and points out all areas of interest. An enhanced table is built on a standard table with a caption, a row of column headers and multiple rows of data. Below, there are the descriptions of the additional features that make the table truly useful as the main presentation element. Most of these extensions are similarly used by many modern web applications. Figure 3.4: Table element mock-up. Pagination. If the table is to be used as a main display element, it needs to be capable of being limited to certain height. Then it is possible to put multiple 32 tables on a single content page while keeping the layout well-arranged. This needs to be done without limiting the volume of table contents. It is achieved by breaking the table into "pages" of similar size (the number of rows) and showing only one page at a time. A control panel is added to the bottom of the table to allow changing pages and/or changing the page size. Page changing controls allow going one/five pages forward/backward or jumping to the first/last page directly. To avoid unnecessary clutter, these controls are hidden while all rows fit on a single page. Sortable columns. Table columns can be flagged as sortable by the developer. The headers of flagged columns are highlighted on mouse-over and they are click-able. When a user clicks on a column header, the values in table rows are sorted in ascending order. Clicking on the same header again sorts the table in descending order. The sorting is stable and it is possible to flag a column for the numeric sorting instead of the default lexical sorting. Filters. Tables containing large ammounts of data can be hard to navigate, especially when a user is interested only in a specific subset of that data. Filters provide a way to restrict the displayed data by placing restrictions on values in certain columns. A filter may restrict values to those equal to, less/greater than, starting/ending with, or containing a specific value (all of these can be inverted as well). Filters of the "start/end with" or “contain” type cannot be used on columns flagged for numeric sorting. Multiple filters can be applied at once for more complex filtering. Filter controls are at the bottom of the table as well, next to and below the pagination controls. By default, only the Filter overview button is displayed, showing the numbers of currently enabled filters and all created filters, as well as a button for removing all filters at once. Clicking the Filter overview button toggles visibility of the whole filter control pane underneath, containing array of filters and a simple tool for the creation of additional filters. Individual filters consist of a button showing the filtering rule and an adjoined button for removing the filter. It is possible to disable a filter temporarily by clicking its button and then enable it again by another click. The filtering not only is convenient for users in certain cases (e.g. for an administrator trying to find only users of a certain type), but it is also used by the application itself as (e.g. linking to problems belonging to a certain course right from the table of courses). Action buttons. Adding action buttons transforms a table from a static display element to a highly useful interactive element. Action buttons fall into two categories - row action buttons and global action buttons. Row action buttons are displayed at the left side of each row and they are used to add actions which are connected specifically to the entities represented by the table 33 rows (e.g. for editing a user account, cancelling a subscription, downloading a solution, or viewing problems belonging to a specific course). Global action buttons are located on the column header row above the row action buttons and they are used for actions not directly connected to any specific entity displayed in the table, but rather to the whole group of entities represented by that table (e.g. for adding a new user/course/problem/group). Action buttons represent the main method of interacting with AsM UI. Collapsibility. A table has an option to be collapsed as a whole by clicking the table header, while another click expands the table again. This feature is useful when there are more tables on a single content page. Additionally, a table can be flagged as auto-collapsing, so that it is automatically collapsed when empty. Collapsing an empty table means hiding its column headers and bottom controls, which saves space and also significantly decreases page clutter. An empty auto-collapsed table has “(empty)” label appended to the header and it cannot be manually expanded. 3.4.3 Form Element A form consists of one or more field-sets and a submit button, and optionally some additional custom buttons. Each field-set contains one or more fields. Figure 3.5 shows a mock-up of a sample form with multiple field-sets, various field types, and with extended interaction cues. Regardless of the field type, all fields have the same visual structure and use the same interaction patterns described below. 34 Figure 3.5: Form element mock-up. Every form field consists of three parts: a field label, one or more input elements, and an interaction cue space. Field parts are displayed from the left to the right in a row and aligned with the respective parts of other fields, as seen in Figure 3.5. Interaction cue space contains one of the following interaction cues. Initial hint. Initial hint contains information about the value expected to be filled in. It can be empty if the value restrictions are self-enforced (in case of a check-box, a radio button, or a select box) or self-explanatory. Check mark. Check mark is an icon indicating that the field value is valid. Validation hint. Validation hint specifies the value restriction not satisfied by the current field value. A field is always in one of the following states. Disabled. A disabled field has no value and cannot be edited. A field may be disabled for example when its value would not make sense in the context of another field's value (e.g. field "plug-in configuration" makes no sense if there is no plug-in selected in the "plug-in" field). The state of the disabled field is indicated by the input elements being "greyed out" and unselectable and the interaction cues being hidden. 35 Read-only. The only difference between a disabled and a read-only field is that a read-only field contains a value. This makes sense for fields that must not be edited for some reason (e.g. the username and user type of admin user, which cannot be modified). There is not difference in visual properties. Untouched. A field is untouched when it is enabled (i.e. not disabled or readonly) and its value has not been edited yet. An initial hint is shown while the field is in this state. Focused. A field is focused when one of its input elements is focused. The focused input element is always highlighted, while the rest of field's visual properties depend on its previous state. If a field becomes focused after being invalid, it retains the visual cues of the invalid state. Otherwise the initial hint is displayed. Valid. Valid field is an enabled field that is not focused containing a value that has been edited and that is valid. A check mark is shown to inform the user about the field's validity. Invalid. Invalid field is an enabled unfocused field with a value that has been edited and that is now invalid. In this case, the whole field (not just the input elements) has a background and border indicating an error and a validation hint is displayed. These visual properties are retained even after an invalid field becomes focused. While a form contains one or more invalid fields, its submit button is disabled to prevent submission of invalid data. The field state transitions described above ensure instant feedback and empower the user to fill the form correctly before submitting it. This ensures that the user feels completely in control of the consequences of his actions, in contrast to the server-side validation model and thus leads to higher user satisfaction. Custom form buttons are not directly related to the form functionality. They just provide a way to add additional exit points to the form apart from the submit button. For example, a simple "Go back" exit point may be convenient for users not familiar with using the browser history. 3.4.4 Layout and Content AsM UI uses one of two simple layouts depending on the displayed content. The three special pages that do not require login (Registration, Activation, and Login) have the content displayed in the middle of the screen, because each of them consists just of a single form. Figure 3.6 shows the layout used by the rest of the application. It consists of three distinct areas - the header, the left menu, and the content area. The header contains the AsM logo (which is in fact just a place-holder 36 icon), the application name and version on the left, and the user's username and the Logout button on the right. The left menu contains the UI navigation divided into two levels by separating pages by the role of their typical user. The content area is designated for the content of each content page, where a content page is a set of content belonging to a particular navigation item. Figure 3.6: Main UI layout. Figure 3.7 shows the grouping of content pages and the connections between them. The descriptions of the individual content pages and the tasks managed by them follow. See the Core section for task details, as the UI only provides an access to the tasks performed by the Core. 37 Figure 3.7: Content page grouping. Registration page allows the registration of a new inactive user account. Activation page allows the activation of a previously registered user account. Login page lets the user log in using an active user account data. Home page is the first page displayed after login and it provides a welcome screen with a “dashboard” and a link to the AsM project documentation (which contains the AsM User Manual). The dashboard shows an overview of tasks related to the used user account. Its content depends on permissions associated with that user account. It may include information about point totals for subscribed groups, pending assignments, unconfirmed solutions, solutions pending for rating, system errors, and others things. Assignments page contains two tables, one with the pending assignments from subscribed groups and one with the past assignments. Assignments can be selected to view their details in a well-arranged format and to allow the upload of solutions. Submissions page contains three tables with new, corrected, and confirmed submissions, respectively. Submissions can be confirmed or removed depending on their state. 38 Subscriptions page displays two tables; 1) groups available for subscription and 2) groups already subscribed to. User may subscribe or request subscription to the former and unsubscribe from the latter. Assignments page (in the Tutor section) is an editor allowing the management (creation, modification, and removal) of assignments. Groups page is an editor for the management of groups. Submissions page (in the Tutor section) contains a table with solutions ready to be rated. User ratings page contains a table for every owned group. Each table shows ratings awarded to solutions created by students in that group as well as every student's total rating. Subscription requests page is a table with pending subscription requests, which can be used to allow or deny other users' requests to subscribe to a private group owned by the user. Lectures page is an editor allowing the management of courses (a.k.a. lectures). Problems page is an editor for the management of problems. Plugins page is another editor for the creation and removal of plug-ins. Plugin tests page allows testing plug-ins by running them with custom arguments on the supplied input. The page contains two tables with running and completed tests, respectively, and a form for starting a new test. The tables provide means for test removal and, in case of completed tests, the download of plug-in output. Questions page contains an editor for the management of questions and a form for the creation of templates. The latter is hidden while a question is being created or edited. The form is closely connected to the table, because it uses the table for the selection of questions. Table filters can be used to constrain the set of questions included in the template. Additionally, table row selection can be used to choose the mandatory questions. Attachments page is an editor for the management of attachments. Tests page is a table of templates. It enables generating new tests from the templates, printing the generated tests, and removing the templates. System log page allows viewing of the Core error log in a table. While this is not the best way to view long log entries, it is very convenient for sorting and filtering of entries, which is often used while trying to fix a particular error. 39 UI error log page is a table with errors that occurred during the currently open user session. Unlike system log, this page is accessible for all users and it exists solely for the purpose of remote troubleshooting. Not only does it contain error messages received from the AsM Core, but it also contains UI errors and notices which do not appear in the system log at all. Data contained in the user log are available only while the user session is open, because the user log is cleared upon logout. UI error log page is one of the two pages that exist independently on Core tasks. Users page is an editor for the management of user accounts. User types page is an editor for the management of user types. User account settings page lets users change properties of their own user account (i.e. their full name, e-mail address, and password) using a simple form. UI settings page is the second page with no connection to the Core. It allows changing of UI properties. Unfortunately, the personalisation of the UI is very low on AsM project priority list; therefore, the page currently allows only the visual theme selection. 3.4.5 Visual Design The goal of the AsM UI visual design is to create an interface that is clean and clutter-less while feeling fresh and up-to-date. A big emphasis is put on clarity of the UI. To accomplish these goals in a limited time frame and without having any visual design experience, the author relied heavily on the jQuery UI theme framework. jQuery UI theme framework is a CSS18 framework with capabilities extending far beyond styling of widgets that come with the jQuery UI library itself. It defines a handful of logical types of elements and allows the definition of visual styles appropriate for each of the element types. A set of visual style definitions for all defined element types (plus a few common style properties) is called a "theme". DOM elements can then be flagged as belonging to a particular type (using classes) to have the appropriate style applied to them when a theme is used. This allows using well-defined visual cues consistently throughout the application to ensure the clarity. Additional feature of jQuery UI theme framework is that every theme contains an extensive set of simplistic single-color icons, which is rendered in multiple colors, one for each element type. Using these icons is as simple as adding an appropriate 18 Cascading Style Sheets (CSS) is a style sheet language used to describe the look and formatting of a document written in a markup language such as HTML or XHTML (see [26]). 40 icon class to a DOM element, which then becomes an icon. Icons are always displayed in color combinations appropriate to their context (the element type of their container), allowing them to be used to complement or replace text wherever needed. That is a very powerful tool for UI simplification and it increases the clarity even more. Each jQuery theme is comprised of the used font (only a single font face is used), the corner radius of rounded corners, overlay and shadow definitions, and color schemes for various types of elements. Every color scheme consists of a background color and texture, and the border, text, and icon colors. A texture is a pattern displayed over the background in white color with customizable transparency. The list of defined element types and their use in AsM UI follows. Header/toolbar. Used for application header bar and headers of some jQuery UI widgets (e.g. dialog windows, date-picker). Content. Partially used as a base style for the whole application and fully used for bodies of jQuery widgets as well as AsM UI widgets (e.g. table, form, panel, dialog window). Click-able: default state. Used for interactive UI elements (those that can be clicked). Also used for headers in a few cases where using header styles would be confusing (field-set headers, table column headers). Click-able: hover state. Used for interactive UI elements when a mouse cursor is hovering over them to indicate their ability to be clicked. Click-able: active state. Used for interactive UI elements just after they have been clicked (in case of button-like elements) or as long as they are active (in case of tabs, accordion headers, and other switch-like elements). Highlight. Used to highlight focused input elements in forms and warning messages. Error. Used to highlight form fields with invalid values and error messages. AsM UI uses the jQuery UI theme framework as the base for visual theme definition (apart from base layout constraints). This keeps the UI looking fresh while behaving consistently and therefore predictably. As a bonus, jQuery UI web page contains both a large selection of already completed themes and a tool for easy creation of new ones. All of the completed themes are included in AsM UI and the user can switch between them on the UI Settings page. 3.4.6 Model-view-controller Pattern AsM UI implementation is loosely based on the model-view-controller (MVC) design pattern described in [10]. It is not a matter of conscious choice, because at the time 41 of AsM implementation, the author was not familiar with MVC pattern yet; nonetheless, it emerged in the code due to an ever-present effort to reduce the complexity and to keep the code modular and extensible. A part of AsM UI acting as the "model" (or back-end) is in fact just a layer providing direct access to data retrieved from server and masking the retrieval process (see Section 3.4.11 for more details). It does not have exclusive access to the server, because it is not necessary for requests concerned with actions rather than data retrieval. Those actions are preformed directly by the “controller”. "Controller" and "view" parts of AsM UI are reasonably well decoupled, even though the decoupling was not done with the MVC pattern in mind. Their separation is clear even in the source code, because each of them is written using a very different approach. View code is completely separated from the rest of AsM UI codebase, because it consists of external library (jQuery UI) and an extension of it through its widget factory (see the Widgets section for details). Controller, on the other hand, uses classical hierarchy enabled by Base.js library, the same as the model. For details on controller implementation, see Section 3.4.10. Wiring of the three parts together is facilitated by events, which are further discussed in the Events section. 3.4.7 Widgets AsM UI implementation uses a combination of two different approaches. Most of it is implemented using purely a classical hierarchy model and uses jQuery, which does not follow such model at all, just as a DOM access layer and a communication layer. In a similar fashion, jQuery UI is used as an extension to DOM element functionality. However, part of AsM UI code falls into another category, which directly extends jQuery UI using its “widget factory”. "Widgets" created this way are not regular stand-alone classes, but rather direct functional and visual extensions for regular DOM elements. There are three kinds of extensions provided by widgets, extensions of properties, extensions of methods, and visual enhancements. Visual enhancements are usually a part of any widget. Property extensions are far more common than method extensions. Widgets implemented as a part of AsM UI depend only on jQuery, jQuery UI, and sometimes on other simpler widgets. Therefore, they are fully reusable in other projects. The reason for implementing them separately is to thoroughly separate the display logic layer from the main application logic. In other words, widgets created as a part of the AsM UI help the display layer to function as required, so that the rest of the code can really focus on what should be displayed. 42 The list of selected widgets and the extensions they offer follows. Note that some of them follow concepts described in the Presentation Elements section. Corner. Corner widget extends an element with a corner style property reflecting (when used on a box element) which element corners are rounded. The corner rounding in this context means the uniform corner rounding used throughout the application with a common radius. Field. The Field widget greatly extends a basic form field by making its type mutable, adding several new field types (e.g. check-box set or date), and adding a lot of other properties based on behaviour requirements of the form presentation element (see Section 3.4.3). It binds a field with its label, visually enhances it, and adds mechanisms for value hinting and validation. Other extensions include an option to make the field read-only and an option to use an alternate "fancy" display mode for some field types (e.g. a check-box can be displayed as a button switch). Fields are grouped together using the Fieldset and Form widgets. Icon. Icon widget turns an element into an icon and extends it with an icon type property specifying which icon it is. Stateful. The Stateful widget extends an element to support mouse clicking. The element can be enhanced visually based on its state and handlers can be assigned to its activation and deactivation events. It can also be assigned a group of other stateful elements together with a group behaviour style (e.g. single, which means that only one element of the group can be active at a time). Table. The Table widget greatly extends a basic table both visually and by adding sorting, filtering, and pagination capabilities, as well as an option to add action buttons to its rows and to the table as a whole. A part of the action button specifications is a handler function, which is launched when the button is clicked, and which is supplied with the respective row data. Table widget is an extension of a static table. Sorting, filtering, and pagination make use of showing only certain rows and hiding the rest, so they are as fast as possible. However, it means that all rows have to be initialized when the table is created, which is a severe drawback for large tables. Moreover, all rows also have to be initialized every time the table is updated with new data (in case of dynamic tables). The Table widget could possibly be upgraded to enhance only the currently displayed rows. For very large tables, partial data retrieval could also come into play, but that would mean adding filtering and sorting capabilities to the Core. 43 Text cutter. Text cutter enhances an element containing (formatted) text with the capability to show only its beginning and to show/hide the rest by clicking a special mark added after the text. 3.4.8 User Session The Core uses user sessions as the way to provide secure access to its features. To assure this, the UI has not only to provide login/logout option but also to handle other user session aspects, namely its automatic expiration and the access restrictions based on permissions associated with the user account. Automatic expiration of a user session decreases security risks, but it is not very practical for users, because the session may expire while users are performing some of the more time-demanding tasks, e.g. writing a full description of a more complex problem. Additional mechanisms would have to be implemented for letting a user re-log without losing unfinished work and even then it would not be very convenient. Other extreme would be refreshing the session automatically before it expires, which would be in conflict with the purpose of automatic expiration. AsM UI uses a third approach; it keeps automatically refreshing the session as long as it is actively used. This basically means extending the "refresh session on every successful action" principle, present in the Core, to the UI as well. A UI action is either a mouse movement or a keyboard key press while the application is focused. Access restrictions in the UI have to reflect the possibility of having user types with various combinations of user permissions based on the deployment context. Retaining such modularity makes it impossible to hand-craft the UI layout and content specifically for every possible user role, which is otherwise a feasible option for systems with just a few distinct user roles. Also, it is necessary to disable interaction with UI parts connected with unavailable tasks, namely to disable navigation items leading to inaccessible pages, or to hide these parts entirely. Both approaches have their benefits. Disabling keeps users informed about the full application functionality even if they cannot access some of it at the time, while hiding reduces the clutter. Because the AsM user-base will always consist mostly of students, i.e. users with very few permissions, hiding is the obvious choice in this case. Hiding permeates both levels of navigation; the navigation group header is hidden if all of the items in that group are hidden. 3.4.9 Navigation and Browser History Navigation in AsM UI is not just restricted to using navigation menu or a few of the action buttons in select tables. AsM UI is a web application running in a web browser, which means that its users may well expect it to act like a static web page 44 and respond to browser controls Back and Forward. In other words, it should be possible to navigate it using the browser “history” (or through the address bar). The address bar navigation is trivial for regular web pages that are served by the web server depending on the URL19 entered into the address bar. In contrast, a JavaScript web application, such as AsM UI, is served just once by the server. After that its interaction with the server (even content retrieval) takes place in the background, hidden from the user. While the application is running, sending a new URL to the server using the address bar would stop the application and load new content into the browser window/tab. However, there is an optional part of URL called fragment identifier (or "hash"), which is not sent to the server with the rest and which can therefore be changed without triggering a server request (see [11]). Fragment identifiers are used by regular web pages to point the user to a specific part of the currently loaded page (e.g. chapter, section, picture). AsM UI uses them in a similar fashion, only in this case the page content is dynamic, making it impossible to just let the browser point the user to the appropriate part of the content. Instead, the UI keeps an active lookout for hash changes and reacts to them by rendering the content corresponding to the current hash value. This makes it possible to use the browser buttons Back and Forward or to navigate the application directly using the browser address bar. Using the hash for navigation has one caveat. Unlike a static web page, where the hash is simply an address of a point on the page, the addressing in dynamic web application means, in a sense and to some extent, describing the state of the application. Navigation complexity depends on the complexity of the address space. Therefore, AsM UI chooses to impose the following limits for its navigation and content. 1. At any time there is exactly one "content area" in the whole display area (a.k.a. viewport) and only the content in that area is addressed. The left menu in user session layout is a slight exception to this, as its selection reflects the current address even though it is not a part of the content area itself. 2. An address consists of one or more parts separated by hash signs, ordered from the left to the right by decreasing importance. Each part but the leftmost is a further specification of the address formed by the parts to its left. Address change handling is closely connected to the component hierarchy of the UI and it is described in the following section, Display Components. Invalid addresses are stripped of the invalid parts from the right until the remaining fragment is a valid address and then they are replaced with that fragment, so they do not even remain in the browser history. The addresses of content pages unavailable to the user because of insufficient user permissions are considered invalid. 19 Uniform Resource Locator (URL) is an address of an Internet resource, e.g. web page, image, or script (see [27]). 45 AsM UI uses the hash navigation only in its simplest form. Possible enhancements include assigning titles to the components so that the use of the application would leave a history, that could be used for jumping directly to a certain content page. This would also make creating bookmarks of a specific content page more convenient; however, that would require an accompanying mechanism for remembering the requested address through the login process. Another possible enhancement would be the ability to lock the hash navigation while the access to other navigation controls (i.e. menu, action buttons) is disabled (e.g. while showing a modal dialog window). 3.4.10 Display Components The main application logic of the AsM UI consists of the communication with the Core and generation and display of the UI content. In the context of the whole AsM project, AsM UI is the front-end and AsM Core is the back-end. The same distinction can be made in the AsM UI context, with content generation and display being the front-end, and data retrieval and storage being the back-end. The front-end is clearly separated from the back-end and it uses its global "data stores" to get the needed data regardless of how they got there (see Section 3.4.11 for more details). This section broadly describes the implementation of AsM UI front-end. The AsM UI front-end consists predominantly of "components". Components are classes with common ancestor Panel, that take over a certain DOM element and using it as a container for the content managed by them. There are two distinct types of components, “containers” and “content components”, which can be visualized as the inner nodes and the leaves of the component hierarchy tree, respectively. The containers cannot manage any content directly, but instead they contain children components and manage sharing of their assigned display space between those children. The content components, as their name suggest, contain the real UI content. All components share a handful of common properties and behavior patterns defined by their common ancestor. They are eventful (a.k.a. observable, see Section 3.4.12 for details) and use their hierarchy as the event hierarchy. They have two layers of configuration, the base configuration supplied to the constructor and additional "display parameters" passed to content display/adjustment methods. Most importantly, they share a common two-part display model, which separates content "showing" and "adjusting". Content showing is the creation of the base content independent on display parameters while content adjusting is the modification of the base content to reflect the display parameters. This helps to separate building of the static and dynamic parts of the content and thus to avoid repetitive building of the same static content (e.g. forms do not need to be rebuilt every time they are to be filled with new values). 46 The Container class extends the functionality described above not only with its signature ability to have children but also with common handling of display parameters, which makes it possible to control the component hierarchy with the hash navigation (see Navigation and Browser History). The base container is designed to be completely transparent. It passes commands and display parameters directly to its children. The navigation is really connected to the component hierarchy in its descendant, ContentSwitcher, which uses the first of its display parameters to select one of its children to be displayed and passes the rest of the parameters to that child. The ContentPanel class (base for the content components) extends the base component functionality by going one step further and separating content building from its display and adding an option to cache the content, so that it does not need to be rebuilt when being repeatedly hidden and shown. It also provides a way to disable access to the content (see the Loading overlay in Section 3.4.1), which can be used while the content is being built. Its descendant DynamicContentPanel, the ancestor of almost all of the content components used throughout the application, goes even further by introducing an additional step, called “initializaton”, into the content showing process. In this context, initialization means the retrieval of needed data from the UI back-end and generation of the content based on that data. Disabling access to the content is stretched to cover the initialization period as well. 3.4.11 Data Retrieval and Storage AsM UI back-end manages the retrieval of data from the Core using jQuery as a cross-browser connection layer. Retrieved data are stored in "stores", which are global instances of classes with a common ancestor, Store. UI front-end interacts solely with the stores, leaving the underlying data management to the back-end. Apart from data retrieval, the front-end also manages flagging stores as expired based on user's actions. A store provides a way to store the results of a specific Core request and to decouple data retrieval from data usage. It contains various features designed to prevent redundant requests or UI rebuilds. It uses a timed caching mechanism implemented separately to refresh itself (reload data) only if the age of contained data exceeds certain threshold, so parallel data retrieval by multiple UI components does not lead to redundant Core requests. Caching can be influenced in two slightly different ways - manual refresh and expiration flagging. Refreshing a store manually bypasses the caching completely and causes an immediate data reload. The store refresh method can be used in the same manner as the common data retrieval method in cases where no caching is required. Flagging the store as expired does not have any immediate consequences, but it causes the store to be refreshed the next time anyone tries to retrieve data from it. 47 Stores are designed to be used as read-only to avoid code duplication and possible inconsistencies. When a certain action (e.g. entity removal) impacts the validity of the data contained in a certain store, a proper course of action is to flag that store as expired. Stores are eventful (see Section 3.4.12), so their updates and/or expiration can be observed and acted upon. For example, when a store used by a currently displayed UI component expires, that component may refresh the store (and subsequently itself) right away to keep the display up-to-date. Last feature of stores is their ability to refresh automatically upon expiration (cache time-out as well as manual expiration). The automatic refresh is very useful when a store is being used by a currently active UI component. However, frequent component rebuilds based on store reloads would not be very convenient for users, especially when the store refresh does not necessarily mean data change. For that reason, stores contain an additional mechanism called "revisions". A store contains a numeric property revision, that is increased only when the newly loaded data actually differs from previously stored data. A store triggers a change event only when its revision number increases, which makes it possible to refresh the store often (possibly automatically) and, at the same time, to rebuild the UI only when it is really necessary. 3.4.12 Events Event-driven interaction between classes is an important part of AsM UI implementation. The idea of events is based on DOM events, which constitute the means of binding JavaScript handlers to user interaction with a web page. jQuery further enhances these events by adding more convenient ways of their handling as well as an option to create completely new custom events. However, jQuery custom events are still bound to DOM elements and bubble up the DOM tree. Events in AsM UI (further called just “events”) take this concept and apply it to any JavaScript class (see the beginning of this chapter for details on how classical hierarchy is added to JavaScript). Before describing how the event model works, an excursion needs to be made about a concept called “mix-ins”, which is used in the AsM UI implementation, but which does not fit into a classical hierarchy model. Mix-ins allow a partial multiple class inheritance. While full multiple inheritance is not feasible (a class can have only a single constructor, etc.), it can be used with some restrictions for impressive results. A mix-in class must not have a constructor and its properties should follow especially established naming conventions so that the risk of overwriting other classes' properties would be minimal. Its purpose is not to be instantiated directly, but to be "mixed into" other classes instead, thus extending them with a specific behaviour. Mix-in concept is very useful for implementing behaviour patterns common to multiple classes without needing them to descend from a class with that 48 behaviour pattern implementation. This enables to include multiple behaviour patterns in a single class independently, which is impossible in the classical inheritance model. A mix-in most widely used throughout the AsM UI is the Eventful class, which extends classes with an ability to trigger events similar to those used by DOM elements. Events can be observed and acted upon in a similar fashion (event handlers are bound to the class instance and event name to be automatically run when an event with that name is triggered by the instance). Events can be triggered with arguments which specify the nature of the event and which are passed to all event handlers. Instances of eventful classes may be assigned a parent (in event hierarchy) to make all events bubble up to that parent. Events bubble up to the parent only after being handled by the immediate instance handlers, which have the option to stop event propagation much as it is possible with DOM events. Multiple handlers can be bound to the same event and the bound handlers can be unbound again. Eventful mix-in is a practical implementation of the Observer design pattern described in [12] and allows to wire together model, view, and controller parts of the AsM UI while avoiding pitfalls of the tight coupling. 3.4.13 Error Reporting Error reporting constitutes a small separate part of AsM UI. It is divided into four parts: error wrapping, management, display, and logging. To enforce common error structure, a wrapper class is provided and it or its descendants are used to wrap all errors. Error wrapper structure does not reflect AsM Core error structure, because the UI has very different needs where errors are concerned. Every error in UI consists of error message, severity, time-stamp, a "reported" flag, and optionally a list of additional details (providing implicit extensibility). Specialized error wrapper descendants are provided for most commonly encountered errors, namely connection errors and Core errors. The Core errors are transformed by having their cause, effect, and details squeezed into a single string with unified formatting and their severity mapped onto a less granular UI error severity scale. Regardless of their real source, errors in AsM UI take the form of error events originating in a UI component. Error event triggering mechanism is common to all components (it is implemented in their common ancestor) and it includes wrapping of those errors, that are not wrapped already. Because UI components create a tree structure used for event hierarchy as well, it is possible to catch errors originating in a specific part of the UI by observing its root component. Catching and logging of errors (and possibly their display) is a task for "error manager" classes. Design of the error managers (and error wrappers to certain extent) is based on the following requirements. 49 1. Errors should be displayed close to their source. Therefore it should be possible to handle the display of errors originating in different parts of UI separately. 2. A single error should not be displayed repeatedly. 3. There should be a way to view all errors that occurred in the UI on demand, regardless of their point of origin. Based on the above requirements, error managers contain different logic for logging and displaying of errors added to (caught by) them. Additionally, error wrappers contain a "reported" flag, which helps to ensure that each error is displayed just once. Stopping the event's propagation could be used for the same purpose, but using a separate flag allows simple creation of a log containing all errors by catching errors at the root of the component tree (AsM UI makes use of this technique and allows viewing of the error log on a separate page). The default behaviour of an error manager is to observe its assigned component, to log all observed errors, to display those of them which are not yet flagged as reported, and to flag them as reported. The base error manager class does not implement error display at all, just a notion of having a set of "currently displayed" errors, to which all new errors to be displayed are added. Descendant classes implement their own methods of error display and hiding. AsM UI contains two such descendants, PanelErrorManager and DialogErrorManager, which use a set of panels and a sequence of dialogs, respectively, to report errors. While using dialogs for error reporting is quite straightforward, it is also very disruptive to user's work. Therefore, the use of panels is preferred throughout the application. The panels have additional features such as auto-hiding after certain time supplemented by the ability to be "pinned” to the screen (preventing auto-hiding) or to be closed manually. Both panels and dialog windows can be highlighted to indicate error severity. 3.5 Plug-ins Plug-ins for the correction of solutions make up the third part of the AsM application. The AsM project contains six full-fledged plug-ins, but they are not interesting with regard to this paper, because they are narrowly focused on the correction of some very specific problems (see [18]). Rather than describing the individual plug-ins, this section is concerned with the AsM plug-in specifications, communication between the Core and plug-ins, and the PHP Plugin Framework included in AsM. The author's work also includes a project concerned with facilitating Java plug-in creation, called ASM Plugin Framework. It is distributed separately from the AsM and therefore it is not further discussed in this paper (it is fully documented in [13]). 50 It is, however, built on the same basic principles as the PHP Plugin Framework discussed at the end of this section. 3.5.1 Tasks Each AsM plug-in needs to do the following tasks during its every run. Unpack a ZIP archive with the solution files to be able to access those files. Set up the “criteria” to be used for judging the solution. For every criterion, check the files of interest in the supplied solution and determine, how much they fulfill the criterion. Optionally, process some of the input files to produce other files (a.k.a. plug-in output). Pack the output files into a single ZIP archive. Clean up all temporary files (unpacked solution files, output files). Return a response with information about the fulfilment of the plug-in criteria (including descriptions of all found mistakes). If an error occurred during the plug-in run, return the error info instead. As described above, every plug-in must have a set of criteria, which reflect the requirements imposed on the solutions. Adherence to each of the criteria must be judged and reported separately. Judging of each criterion results in the following information: an indication of whether the criterion is “passed”, a “fulfilment” percentage, and the “details”. The first two properties are not automatically bound together, i.e. a criterion may be flagged as passed even when it is not fulfilled completely. If the criterion is not fulfilled completely, all found mistakes must be accurately described in the details. 3.5.2 Plug-in Format An AsM plug-in needs to have a very specific format to be accepted by the AsM Core. All of the plug-in files need to be packed in a single ZIP archive together with a special "manifest" file (see below). A plug-in is unpacked (with the folder structure being preserved) as soon as it is added to the Core and the information contained in the manifest is used to determine how to use it. A plug-in cannot be added to the application, if its manifest file is not well-formed or if it does not contain the required data. A plug-in manifest is a XML file manifest.xml, which is located in the plug-in root folder (i.e. the root folder of the ZIP archive). It uses the following format: <?xml version="1.0" standalone="yes"?> 51 <plug-in-manifest> <mainFile>MAIN_FILE_PATH</mainFile> <type>TYPE</type> <description>DESCRIPTION</description> <arguments> <argument>ARGUMENT_DESCRIPTION</argument> ... <!-- more arguments --> </arguments> </plug-in-manifest> where TYPE is a plug-in type (see below), MAIN_FILE_PATH is a path to the main plugin file (relative to the plug-in root folder), DESCRIPTION is a plug-in description (the names and specifications of the required input files, etc.), the <arguments> tag is optional, and ARGUMENT_DESCRIPTION is a short argument description. Arguments must be listed in the order in which they are accepted by the plug-in. A plugin type is based on the type of the main plug-in file (the one that is able to be run by the AsM Core). The Core accepts three plug-in types: php, java, and exe, which stand for PHP, Java, and native executable plug-ins respectively. At the first glance, the last type is the least restrictive, because there are many ways to create a native executable. However, it is not a cross-OS solution, which may impact reusability of the plug-in. Both PHP and Java plug-ins use their specific programming language, but they are interpreted independently on the OS; therefore, they are more portable. While the Java plug-ins and the native executables are launched from the command-line and act like stand-alone programs, PHP plug-ins use a different approach. The main file of a PHP plug-in must contain a class descended from the Plugin class included in the PHP Plugin Framework (see Section 3.5.4). The Plugin class implements all the technical tasks required from every plug-in, so the individual plug-ins only need to contain the main correction logic. 3.5.3 Communication Contract Every plug-in's contract (i.e. the accepted input and the returned output) needs to adhere to the specifications described in this section, so that it could be properly launched by AsM Core. The first restriction is that every plug-in needs to accept a path to a solution archive as its first argument. There are no restrictions placed on the other arguments accepted by plug-ins but every accepted argument must have a corresponding entry in the plug-in manifest. Argument descriptions in the plug-in manifest are necessary because the AsM Core needs to be able to inform its users about them. The argument values supplied by users are guaranteed to be passed on to the plug-in only for the arguments described 52 in the manifest. Plugin arguments allow for greater flexibility through abstraction instead of creating a separate plug-in for every problem. The flexibility could be further enhanced by allowing the use of multiple plug-ins for correction of a single solution, but it would notably increase the complexity. A similar result can be achieved by sufficient abstraction in the plug-in code and by subsequent code reuse. Unlike plug-in arguments, the plug-in results (i.e. the values returned by plugins) need to follow very strict formatting rules. These rules are based on the criterion model (see Section 3.5.1), but they differ largely based on the plug-in type. PHP plug-ins need to return an instance of the PluginResponse class, which is used as a plug-in response parser and wrapper by the Core. Fortunately, the response management is implemented as a part of the base Plugin class, so the PHP plug-in developers do not need to concern themselves with the output formatting at all. Plug-ins of other types need to return a XML string with one of the following structures, depending on the nature of the response. If a plug-in finishes successfully, it needs to use the following response structure: <?xml version="1.0" standalone="yes"?> <plug-in-reply> <output> <file>OUTPUT_FILE_PATH</file> </output> <criterion name="CRITERION_NAME"> <passed>PASSED</passed> <fulfillment>FULFILLMENT</fulfillment> <details>DETAILS</details> </criterion> ... <!-- more criteria --> </plug-in-reply> where the <output> tag is optional, CRITERION_NAME is unique (in context of the response), PASSED is either "true" or "false", FULFILLMENT is a number from 0 to 100, and DETAILS is a string of arbitrary length. If a plug-in finishes with an error, it needs to use a simpler response structure: <?xml version="1.0" standalone="yes"?> <plug-in-reply> <error>ERROR</error> </plug-in-reply> where ERROR is a string containing the detailed error message. 53 3.5.4 PHP Plugin Framework PHP Plugin Framework is a set of PHP classes distributed together with the AsM Core, which provides a solid base for the development of AsM plug-ins in PHP. The benefits provided by it can be divided into three parts: the implementation of the common plug-in logic, a "test" model aimedtheat decoupling the input processing from the correction, and the set of utility functions. The part of the PHP Plugin Framework implementing the common plug-in logic is not only a asset, but it is also a restriction, because its use is compulsory for all PHP plug-ins This allows for close integration of PHP plug-ins into the AsM Core without a need for an additional interface layer. Since the common logic is quite straightforward and it would have to be implemented by every plug-in anyway, this restriction is not of any importance. The benefits of the framework, on the other hand, are unquestionable, because the framework allows the individual plug-ins to focus on implementing their main correction logic without being distracted by the unrelated tasks of technical nature. A PHP plug-in just needs to implement its correction logic as an override of a particular abstract method and to use the criterion handling, output saving, and error reporting methods of its ancestor to save the results. Everything else including the unpacking of the solution archive, error handling, output packing, clean-up, and returning well-formatted results, is taken care of. See the developer documentation on the attached CD for more implementation details. There is a second part of the PHP Plugin Framework, which is not compulsory for plug-in developers. It establishes a specific model of solution processing and correction, which allows to keep these two tasks separated and thus increase code re-usability. The impulse for the development of such model is a simple realization, that even with an inventive use of arguments, the code of a plug-in can never be really reusable, because it needs to be specialized for a very specific problem (or a set of problems at best). While the correction is connected to a specific problem, most of the solution processing could be reusable if it was separated correctly. This idea led to the creation of the "test" model. The first concept of plug-in tests had been to have a lot of small separate tests for all processing tasks that need to be done. However, it soon became apparent that the processing tasks tend to form groups based on common prerequisites (e.g. parsing of the same input file). This led to the emergence of a more complex test concept. A test, as implemented in the Test class of the PHP Plugin Framework, is a set of "goals", which can be reached or failed. It is run with a set of parameters, containing at least the paths of files to be processed. Using tests to group the tasks related implementation-wise, while using plug-ins to group the tasks related problem-wise, is a good way to separate the problem-specific code and keep the rest as reusable as possible. The Test class included in PHP Plugin Framework is useful by providing 54 goal management, precision error reporting tools, and a few other convenience enhancements. The last advantage of choosing PHP as a platform for plug-in development, is the access to utility classes and functions implemented as a part of the AsM Core. These include various convenient methods not included in PHP itself, such as simplified custom array sorting, filtering, and mapping, or ZIP (de)compression of whole directories. For the full list of available utility enhancements, see the developer documentation on the attached CD. 3.6 Installer The AsM Installer was not a part of the first version of the AsM project. It was added as an afterthought, and it is completely separated from the other parts. It is a webbased “wizard”20, which guides the administrator through the initial configuration of AsM or through an upgrade to a newer version. There are two reasons for adding the Installer to the application. First of them is an upgrade capability and the second one is usability. Upgrading AsM without such a tool would be a very trying task as it may require for example a direct adjustment of the database. If done incorrectly, such adjustment could have catastrophic results. The initial configuration of AsM Core could be done without the Installer by editing the configuration file manually, but using the Installer for this task allows to add features like guessing and validation of certain configuration option values, e.g. locations of PHP and Java command-line interpreters. The Installer is written in XHTML and PHP, but its code-base is not in any way connected with AsM Core. It uses the redirection module of the Apache server to present itself in place of the AsM UI as long as the initial configuration is not successfully finished and every time when the administrator attempts to upgrade AsM. The same redirection module is used to hide the Installer after it has finished and to provide access to the UI and Core instead. It is not possible to switch between the AsM UI and the Installer on demand. This section briefly describes the implementation of the install and upgrade procedures in AsM. The implementation of the Installer itself is trivial, it is only a set of web pages using PHP as the server-side scripting language; therefore, it is not explored further. 20 A “wizard” in this context means a sequence of steps (pages, forms) shown one at a time to help the user complete a certain complicated task. 55 3.6.1 Install The AsM install procedure is not as sophisticated as the procedures employed by many other contemporary software products because its enhancements are not costeffective, i.e. they do not impact main application functionality. The installation of AsM on a web server consists of copying the folder with the source files into an accessible location, slightly altering the web server configuration if necessary, and installing a set of PHP library modules (see Section 4.2 for details). The implemented Installer is not a real installer concerned with the procedure described above. It is just a tool designed to help with the initial configuration of the AsM, which requires the configuration to function properly (see Section 3.3.14 for details). Its purpose is to gather the initial configuration values from the user and to use them to create the configuration file and to initialize the database. Apart from being used to store the configuration, the configuration file serves as an indicator of that the application is/is not properly initialized. After the initialization is completed, the Installer moves on to the upgrade procedure described below. 3.6.2 Upgrade Upgrading AsM is similar to its installation, but it is far less complicated. An upgrade is started simply by copying a new set of the source files over the old ones. This rewrites the file with redirection rules and thus puts the application into the install mode again, i.e. it starts showing the Installer instead of the UI. If the application is already initialized, the Installer skips the initialization procedure described above and continues directly to the upgrade. The upgrade process consists in the application of patches. A patch is a set of changes that need to be performed on the application parts except for the source files in order to reflect the source file changes. Most commonly, this means a change (or extension) of the database structure. A patch can either be a set of MySQL queries that perform the changes of the database, or it can be a full-fledged patch script. Patches are versioned so that the Installer could automatically apply the necessary changes in the correct order. The upgrade is irreversible, because making it reversible would require substantial amount of programming unrelated to the main AsM functionality. 56 3.7 Documentation Any source code that should be easily modifiable (extensible) needs to be documented. For a project as large as AsM, the code documentation is not sufficient; more accessible documentation has to be available as well. A common way to provide such documentation is to automatically generate the developer documentation from a specifically formatted code documentation. However, every programming language is different; therefore, many of them have their own formatting rules and documentation tools. This section describes the tools used by the AsM project to generate common developer documentation for the whole project. AsM project is composed of parts written in different programming languages, mostly in PHP and JavaScript. PHP has a formal code documentation standard, PHPDoc, which is described in [14]. It not only allows to generate a separate documentation using external tools such as phpDocumentor, but it also lets IDEs21 provide various convenient features, e.g. code completion. JavaScript, being a very different programming language altogether, has no such standard. While it would be possible to generate separate documentation for each part of the AsM project (the Core and the UI being the most important), it would be quite restrictive, e.g. crossreferencing between parts would become a problem. Additionally, using different tools for each part would require spending additional time studying how to use those tools. Instead, a decision was made to use a single tool for generating documentation for the whole project, providing that there is one which meets the following requirements. PHP documentation format should resemble PHPDoc format, so that the IDEs could understand it as such. There should be little or no difference between the JavaScript and PHP code documentation formatting. Modification of the tool for this purpose should be less costly, i.e. timeconsuming, than creation and maintenance of documentation in two different formats. The tool selected on the basis of these requirements, Doxygen, is the most widely used source code documentation tool nowadays. It supports a wide range of programming languages and it is highly customizable. Doxygen formatting can be customized to resemble PHPDoc formatting enough to pass for one (see [15]). Unfortunately, JavaScript is not supported by Doxygen, because in general, the JavaScript code has very loose structure. To remedy this, the AsM project includes a 21 Integrated Development Environment (IDE) is an application providing a comprehensive set of tools for software developers, including a source code editor, a compiler, and a debugger. Commonly used IDEs include NetBeans, Microsoft Visual Studio, or Eclipse. 57 script for turning both the classical JavaScript code and widget factory code (see Section 3.4 for details) to a pseudo-C# code understood by Doxygen. Formatting accepted by this pre-processing script is identical to the PHP code documentation formatting, except for a few details, e.g. @tparam is used for adding types to the method arguments, instead of @param. Having a common documentation for the whole project could quickly make it incomprehensible with the increasing project size. To prevent this, a combination of two mechanisms is used. On the top level, the documentation is separated into "modules" (Doxygen constructs). Each module has its own documentation page explaining its purpose and basic functionality. Entities such as namespaces or classes can be linked to modules. The second mechanism is a coordinated use of namespaces across the whole project. A common namespace asm is used for the whole project (except for widgets) and the second namespace level is used to distinguish parts of the project and link them to modules. By virtue of Doxygen's extensive set of features, the main page with project description is a part of the documentation as well as the whole User manual. This makes it possible to publish all project documentation together and to maintain it very easily. 58 4. How to Use he Assignment Manager Assignment Manager UI is focused on establishing high standard of usability while staying flexible and extensible. This chapter starts with the User Roles section, which describes how these conflicting goals are achieved. The next section, Installation and Configuration, deals with the deployment of the AsM. Finally, the rest of the chapter describes how to use the AsM UI to perform the tasks provided by the AsM. AsM UI uses powerful tools to achieve high usability: simplicity and uniformity. It uses just a few control and presentation elements to provide all of its functionality. The level of the uniformity is so high that learning to use AsM UI requires first of all that the user should cope with these few control elements. Therefore, it is more reasonable to describe how to use the control elements, and then to add a few details that are particular to individual tasks, rather than to describe all tasks in full detail. For this reason, the sections concerned with using AsM UI were divided into two groups. The first group describes the UI in general. It consists of the following sections: User Interface Layout, Control Elements, and Error Reporting. The former two are particularly important and using the UI after reading those two sections should be very intuitive. The second group consists of just one section, How to ..., containing all details useful for the users who are still unsure about a certain task. 4.1 User Roles Accessing any AsM feature requires a user account. Every user account has a set of permissions bound to it, which defines the features available while using that account. The sets of permissions are called "user types" and they are defined separately to make it easier to manage permissions of whole groups of users. To retain maximum possible flexibility, AsM allows combining permissions into custom sets. However, such flexibility alone would make it very difficult to start using the application right away, so the AsM also provides a set of predefined user types, which reflect the actors described in Section 1.1.2. They are administrator, lecturer, tutor, and STUDENT. These four user types altogether provide access to all application functionality but each of them provides an access only to the tasks necessary for the respective role (see Figure 1.1 and Figure 1.2 for an overview of task distribution between user roles). User roles reflected by predefined user types do not only provide a way to let users start using the application quickly and easily. They also provide a very intuitive 59 distribution of tasks into distinct groups. The same grouping of the tasks is used in the last section of this chapter to help the reader to find any particular task very quickly. 4.2 Installation and Configuration AsM is a web-based application, which means that it needs to be installed on a web server. Once installed properly, it is accessed over the local network or over the Internet using a web browser. Using the application is quite simple even for users with very little or no information technology (IT) background. However, the installation requires certain experience with IT. It should not be performed without some basic knowledge of the Apache web server, and the PHP server (extended by PEAR). 4.2.1 Requirements The requirements necessary for installing and running AsM are described below. Apache web server accessible to all potential users (either through the school's local network or over the internet) running PHP version 5.3 or greater with PEAR. The server needs to be correctly configured, as described below. MySQL server using MySQL version 5.0.1 or greater. AsM needs a valid user account on the MySQL server with permissions to create a database and to fully manage it. A standard-compliant web browser such as Mozilla Firefox, Opera, or Google Chrome on a computer with the access to the web server mentioned above. 4.2.2 Installation The installation (or upgrade) is partly manual and partly managed by the AsM Installer. Use the following steps to install the application. 1. Extract the application files and folders to a folder located inside the "document root" of your Apache web server (see [16]). 2. Ensure that the web server is correctly configured (.htaccess files are allowed in the application folders and URL rewriting is enabled) by adding the following configuration to the configuration file of the Apache server. AccessFileName .htaccess LoadModule rewrite_module /path/to/mod_rewrite.so <Directory /application/folder/path/relative/to/document/root> 60 AllowOverride FileInfo </Directory> 3. Ensure that the correct default time-zone is set for both PHP CGI and CLI (see Runtime Configuration section of [6]): date.timezone = Europe/Prague (use your time-zone, set the same values for CGI and CLI). 4. Install the PEAR modules Mail and Net_SMTP (if they are not already installed). 5. Ensure that the Apache server can create files and sub-folders in ./files, create files in ./core, and write to .htaccess, where all the paths are relative to the root folder of the extracted files. 6. Access the AsM Installer from your web browser by entering the following address: http://WEB_SERVER_ADDRESS/APPLICATION_LOCATION/, where WEB_SERVER_ADDRESS is the address (IP or domain name) of your web server, and APPLICATION_LOCATION is the path to the folder where you extracted the application (relative to the document root). 7. Follow the Installer wizard and fill in the appropriate data. The entered data are saved to the configuration file and it is possible to modify them later. The configuration file is described below. 8. Wait for the AsM UI to launch after the Installer has successfully finished. 9. Log in as administrator (username admin, password admin) and change your administrator password. 4.2.3 Configuration AsM is configured using a special configuration file ./core/config.ini, which can be opened and edited in any text editor. It is an INI file with sections, as described in [17]. Only the property values should be edited, while property names and section names should never be changed. Neither the properties nor the sections should be moved or added. Values should be enclosed in quotes and any quotes inside the values should be escaped with backslash. The description of the individual sections and properties follows. database - MySQL server properties host - server address user - username pass - password 61 db - database name mail - SMTP server configuration host - SMTP server address user - username (leave blank for no authentication) pass - password (optional) from - value of the From e-mail header. Some SMTP servers require this to be at least syntactically valid e-mail address to accept outgoing e-mails. bin - paths to used external programs phpCli - path to PHP interpreter for running PHP scripts from command- line java - path to the Java interpreter for running Java plug-ins defaults submissionFileName - default name suggested when downloading a submitted solution file pluginTestFileName - default name suggested when downloading a test input file for a plug-in pluginOutputFileName - default name suggested when downloading a plug-in output file roots web - absolute path of the web server document root (with trailing slash) app - path to the application root folder relative to the document root (without leading slash, with trailing slash) Only forward slashes should be used in paths, independently on the used operating system. Editing the properties below the comment "DO NOT CHANGE PROPERTIES BELOW" is discouraged, because it can have unexpected results including severe data loss. 4.3 User Interface Layout AsM UI uses two layouts, the "pre-login" and the "post-login" layout. The pre-login layout is used just by the three content pages, which do not require login, and each of which consists of a single form. Figure 4.1 shows these three pages as well as navigation between them. A successful login leads to the post-login (main) layout. 62 Figure 4.1: Pre-login layout. The main layout is shown in Figure 4.2. It consists of a top bar, a left menu, and a content area. The top bar and the left menu take up just a little space on the edges of the screen and the rest is reserved for the dynamic content. The right side of the top bar allows the user to log out, leading him back to the login screen (in the pre-login layout). Figure 4.2: Main application layout. The left menu consists of navigation links divided into groups. A menu group is expanded by clicking its header. Only one group can be expanded at a time. Other groups are collapsed, showing only their headers. Menu groups reflect the user roles (see Section 4.1), so that each one contains the pages useful for a particular user role. 63 There are two exceptions to this rule. The first exception is the UI error log page in the System group, which is accessible by all users regardless of their role. The second exception is the last group, Settings, which also contains pages useful for all users. See Figure 4.3 for an overview. Figure 4.3: Navigation menu. The content area is filled with content depending on the selected item in the left menu. There is one additional page not accessible from the menu, namely the one that is shown right after the login. It is a minimalistic dashboard, showing important information related to current user's account (e.g. number of pending assignments or point totals for subscribed groups) as well as a link to the AsM project documentation. The dashboard can be accessed at any time by clicking the application name on the top bar. 4.4 Control Elements AsM UI is controlled by using just two control elements (apart from the left menu described in the previous section), table and form. These two elements are extended to provide all necessary functionality, as described below. 4.4.1 Table The table element is used for data presentation. In addition to data perusal, it is possible to interact with the table in the following ways (see Figure 4.4 for the positions of all interaction elements mentioned below). 64 Figure 4.4: Table. Perform table-specific actions. A table can contain "global" and/or "row" action buttons, which provide the main method of interaction. They are labelled only with icons to avoid taking too much space, but hovering with a mouse cursor over an action button displays the action's description. Clicking the button performs the described action. Row action buttons are used to perform actions on the respective rows (e.g. delete a user in the table of users). Global action buttons perform actions related to the table but not actions related to a specific row (e.g. create a new user). Collapse/expand table. The whole table can be collapsed (or expanded) by clicking on its header. An empty table is automatically collapsed and cannot be expanded. Expand/collapse cell content. If a cell contains an overlong text, only the beginning of the text is shown. The rest can be shown (or hidden) by clicking a small plus (or minus) sign in square brackets appended aside the value. All cells in a single row can be expanded (or collapsed) at once by double-clicking the row. Show table as multiple pages with X rows. To prevent tables from using too much space, there is a row limit (page size) set for each table. If a table exceeds that limit, its rows are divided into "pages". User can navigate pages using "pagination controls" on the bottom of the table, which allow moving one or five pages forward or backward or moving directly to the first or to the last page. Page size can be changed at the bottom of the table as well. Sort rows by column. Clicking a column header will sort the table by the values in that column in ascending order. Clicking the same header again reverses the order. The latest sorting is indicated by a little triangle icon shown inside the column header, pointed upwards (or downwards) to indicate ascending (or descending) sorting. Filter rows. A table can be filtered to show only the rows satisfying certain conditions. A filtering condition restricts values in a certain column by 65 comparing them to a specified value. Possible restrictions are "equal to" ( ==), "greater than" (>), "less than" (<), "starting with" (^=), "ending with" ($=), and “containing” (*=), where the last three cannot be used with numeric columns. All of the restrictions can be inverted. Filtering is accomplished by creating a filter for each condition. A filter is created as "active" and it is immediately applied, but it can be deactivated again without being destroyed. Filtering controls are located at the bottom of the table. Only two buttons are visible by default, Filter overview and Remove all filters. The first button shows the current number of active filters and the current number of all filters, respectively. Clicking on it shows (or hides) the rest of the controls, i.e. a list of filters and a filter creation tool. A filter is created with the filter creation tool by selecting a column, optionally the “inversion flag” (!), and a comparison type, filling in the value for comparison, and confirming the selection. The created filter immediately shows up in the filter list. Any filter in the list can be deactivated (or activated) by clicking it or removed by clicking the Remove filter button next to it. “Pin” rows to screen. Any table row can be selected by a single click. Selected row is highlighted and "pinned" to the screen, so that it is displayed even after moving to a different table page or after applying a filter that would otherwise hide it. The selected row can be deselected by another single click. Multiple rows can be selected at a time. 4.4.2 Form The form element is mostly used for modification of application entities (e.g. users, assignments) or creation of new ones, but there are a few cases, where it has a different purpose (e.g. as login or user account activation). The forms used in the AsM UI have the following enhancements (see Figure 4.5 for details). 66 Figure 4.5: Form. Value hints. When entering a form, most of the fields have hints displayed next to them. Hints provide the information needed to fill in the correct values. Instant validation. After a form field is edited and abandoned (the user moves to the next field), its value is checked immediately and a feedback is provided in one of the two possible forms. If the field is correctly filled in, a check mark is displayed next to it. If the value is incorrect, the whole field is highlighted as an error and a validation hint is displayed in place of the value hint, describing how to correct the current value. Smart submit button. Form submit button is disabled as long as the value of any field is invalid. Therefore, the user cannot submit incorrect data by mistake. The described enhancements empower users to fill in the appropriate data quickly and correctly before submitting a form. 4.5 Error Reporting Any errors that occur during the application run are displayed either in error panels or in error dialog windows, depending on their importance and the current layout. While in the pre-login layout (see Section 4.3), all errors are displayed in dialog windows regardless of their importance. In the main layout, only the fatal errors are displayed in dialog windows (see Figure 4.6); non-fatal errors are displayed in panels (see Figure 4.7). Both styles of error reporting also include highlighting of errors and adding icons to errors reflecting their importance. 67 Figure 4.6: Error dialog. Figure 4.7: Error panels. Dialog windows are displayed in the center of the screen. They are "modal", preventing the access to the rest of the UI until they are closed. Error panels are shown in the content area of the main layout above all other content. They are set to fade away fifteen seconds after they appear, which can be either prevented by "pinning" the error to the screen or hastened by closing the error manually. Pinning the error to the screen does not suspend the timer, so if the error is unpinned again, it is usually hidden immediately. A log of all the errors that appeared during a single user session can be accessed at any time to help with troubleshooting (see below). 4.6 How to ... This section describes how to perform all basic tasks available in AsM UI. All tasks require the user to be logged in first if not specifically told otherwise. After logging in, the user usually needs to find the appropriate content page using the menu or the top header. To keep the descriptions short, this step is described as "go to group > page", where group is the group name shown at a menu group header and page is the name of the menu item to be selected. Other common steps include using the table action buttons or using the "editor" pattern. Action buttons are labelled with icons and using them is described as "use the action (icon) action", where action is the action description visible on mouse68 over, and icon is the icon name. See Figure 4.8 for a comprehensive list of icon names used below. Editor pattern consists of using the "Edit entity" (or "Create entity") action, filling in the displayed form, and submitting it to modify (or create) a particular entity (e.g. user). The act of filling in and submitting the form is described simply as "edit entity" (or "create entity"). Figure 4.8: Icon names. The tasks described in this section are divided into five groups. The first group includes all tasks not specific to any user role. The rest is grouped based on the menu groups (i.e. based on the user roles). 4.6.1 Common Tasks Register a new user account. 1. Instead of logging in, click on the Register button on the login screen. 2. Fill in the registration form and submit it. Entering a working e-mail address is essential. 3. Check your mailbox corresponding to the e-mail address you entered. When you receive the activation e-mail, continue by activating the user account. Activate a user account. 1. Instead of logging in, click on Activate button on the login screen. 2. Enter the activation code received in the activation e-mail (see above) and submit the form. 3. Registered user account is now active and it can be used to log in. Log out. Click the Logout button in the top right corner of the screen. If there is no Logout button there, you are not logged in. Change the properties of your user account (full name, e-mail address, or password). Go to Settings > Account settings, make the required changes, and submit the form. The password is changed only if a new password is entered. 69 Change the appearance of the application. Go to Settings > User interface and select one of the available application themes. The theme is changed instantly without a need to submit the form. However, this preference is bound to the currently used web browser on the currently used computer, not to the user account, so it will persist if accessing AsM from a different browser or computer. View errors that occured during the current session. Go to System > UI error log and peruse the Error log table. Find the AsM project documentation. If not logged in, click the link in the upper right corner of the screen. Otherwise, click the application name on the top bar and find a link to the documentation in the last but one panel at the bottom. If neither of these options work, try entering the following URL into the address bar of your web browser: http://hon2a.wz.cz/asm/docs/. Access the dashboard. Click the application name on the top bar to show the Home page. It shows some of the following information (based on user role): solution rating totals for subscribed groups (student), number of pending assignments (student), number of uploaded solutions that are corrected but not yet confirmed (student), number of solutions waiting to be rated (tutor), number of incoming subscription requests (tutor), and number of new errors in the system log since previous login (administrator). Find out what needs to be done next. See "Access the dashboard" above. Go to a previously visited page. Use the browser buttons Back and Forward browser buttons. 4.6.2 Student Subscribe to a homework group. Go to Student > Subscriptions and use the add/request subscription (add) action in the Available subscriptions table. Open an assignment. Go to Student > Assignments and use the open assignment (paper) action to view the assignment details. 70 Submit a solution. Open an assignment (see above). It is possible to upload the solution file using the form at the bottom of the page providing that no other solution has been confirmed already and it is not past the deadline. Submitting the form switches to the page with uploaded solutions. Confirm a solution. Go to Student > Submissions and use the confirm submission (check) action. Only a corrected solution can be confirmed. Confirming a solution marks it as ready for rating and prevents confirmation of another solution to the same assignment. View solution rating. Go to Student > Submissions and check the Confirmed submissions table. If the solution does not have a rating, it has not been rated by the tutor yet. Unsubscribe from a homework group. Go to Student > Subscriptions and use the cancel subscription (cross) action in Active and requested subscriptions table. Download plug-in output based on an uploaded solution. Go to Student > Submissions and use the download output (down arrow) action. Delete uploaded solution. Go to Student > Submissions and use the remove submission (trash can) action. Confirmed solutions cannot be deleted. 4.6.3 Tutor Create a homework group. Go to Tutor > Groups, use the add group (thick plus) action, and create the group. Before a group can be created, its parent course has to exist. Marking a group as "public" means that any student will be able to subscribe to it directly. Otherwise, students will have to request permission to subscribe to the group. Allow (or deny) a request to subscribe to your private group. Go to Tutor > Subscription requests to view all pending requests. Use the allow subscription (check) or deny subscription (cross) to allow or deny the request, respectively. Assign a problem to a homework group. Go to Tutor > Assignments, use the add assignment (thick plus) action, and create the assignment. The problem to be assigned is selected from the problems belonging to the homework group's parent course. Rate a solution. Go to Tutor > Submissions, use the rate solution (tag) action, select a rating, and submit the form. 71 View student's ratings. Go to Tutor > User ratings. Ratings are shown in a separate table for every homework group with students as rows and problems as columns. Each table contains an additional column with the total rating. View assignments for a certain homework group. Go to Tutor > Groups and use the show assignments for this group (calendar) action to view the table of assignments filtered to show only the assignments belonging to that group. View ratings of students in a certain homework group. Go to Tutor > Groups and use the show ratings of users in this group (person) action to view the page with user ratings where all tables are collapsed except for the table belonging to that group. Edit or delete a group. Go to Tutor > Groups. Use the edit group (pencil) action and edit the group or use the remove group (trash can) action. Deleting a group deletes all its assignments. Edit or delete an assignment. Go to Tutor > Assignments. Use the edit assignment (pencil) action and edit the assignment or use the remove assignment (trash can) action. Deleting an assignment deletes all solutions submitted for this assignment. 4.6.4 Lecturer Create a lecture (course). Go to Lecturer > Lectures, use the add group (thick plus) action, and create the lecture. Install a plug-in for automated correction. Go to Lecturer > Plugins, use the add plugin (thick plus) action, and use the displayed form to upload the plug-in. It is essential to test the plug-in before using it, because plug-ins cannot be upgraded. Test a plug-in. Go to Lecturer > Plugin tests. Use the form on the bottom of the page to upload the test input and start the test. Use the tables above the form to keep track of the test and view results after the test is completed. Use the download test input (up arrow) and download test output (down arrow) actions to download the test input and plug-in output files, respectively. Create a problem. Go to Lecturer > Problems, use the add problem (thick plus) action, and create the problem. Before a problem can be created, its parent lecture has to exist. If a problem is supposed to use a plug-in for automated correction, then the plug-in has to be installed as well. 72 Upload an attachment. Go to Lecturer > Problems, use the add attachment (thick plus) action, and create the attachment. Before an attachment can be created, its parent lecture has to exist. Create a question. Go to Lecturer > Questions, use the add question (thick plus) action, and create the question. Before a question can be created, its parent lecture has to exist. If a question is supposed to use attachments, the attachments have to be already uploaded as well. Create a test template. Go to Lecturer > Questions. Use the table filtering and row selection to select the optional and mandatory questions, respectively. Then fill in the test description and number of questions in the form below the table and submit the form. Submitting the form switches to the page with test templates. Note that the test description is used as a heading when printing the generated tests. Generate a test. Go to Lecturer > Tests. Use the re-generate test (refresh) action to generate a new test from a particular template. Note that the first test is generated automatically when a template is created. Print a test. Go to Lecturer > Tests and use the print test (print) action to print the test. View problems/questions/attachments/templates belonging to a certain lecture. Go to Lecturer > Lectures and use the show problems/ questions/attachments/tests for this lecture (paper/dialog/contact/paper 2) actions to view the tables of problems/questions/attachments/templates filtered to show only the appropriate entities, respectively. Edit lecture description. Go to Lecturer > Lectures, use the edit lecture (pencil) action and edit the lecture description. Edit a problem description or the configuration of the used plug-in. Go to Lecturer > Problems, use the edit problem (pencil) action, and edit the problem. Upload a new file for an existing attachment. Go to Lecturer > Attachments, use the edit attachment (pencil) action, and edit the attachment. The name of the attachment cannot be changed. Edit a question. Go to Lecturer > Questions, use the edit question (pencil) action, and edit the question. Delete a lecture. Go to Lecturer > Lectures and use the remove lecture (trash can) action. Deleting a lecture removes all data belonging to that lecture, including problems, groups, assignments, and solutions. 73 Delete a problem. Go to Lecturer > Problems and use the remove problem (trash can). Deleting a problem deletes all assignments using that problem. Delete an attachment. Go to Lecturer > Attachments and use the remove attachment (trash can) action. Deleting an attachment removes all questions using that attachment. Delete a question. Go to Lecturer > Questions and use the remove question (trash can) action. Deleting a question removes all templates using that question. Delete a test template. Go to Lecturer > Tests and use the remove test (trash can) action. Cancel running test or remove completed test results. Go to Lecturer > Plugin tests and use the remove test (trash can) action. 4.6.5 System Create a user type. Go to System > User types, use the add user type (thick plus) action, and create the user type by specifying the set of permissions. Create a user. Go to System > Users, use the add user (thick plus) action and create the user. View system log. Go to System > System log and peruse the log table. Note that the System log table may take long time to render. Edit or delete a user type. Go to System > User types. Use the edit user type (pencil) action and edit the user type or use the remove user type (trash can) action. Deleting a user type causes all users of that type to be assigned the default user type STUDENT. Base user types STUDENT and ADMIN cannot be deleted and the ADMIN type cannot be edited. Edit or delete a user. Go to System > Users. Use the edit user (pencil) action and edit the user or use the remove user (trash can) action. Deleting a user does not delete the entities owned by that user (e.g. lectures, groups). However, it is currently impossible to set a new owner for them. The user account with the username admin cannot be deleted and cannot have its user type changed. Give a particular user certain permissions. Users cannot be given permissions on individual basis, their permissions are determined by their assigned user type. To change the user type of a particular user, edit that user (see above). 74 4.7 Common Task Sequences This section describes common work-flow patterns for all user roles. 4.7.1 Student The first thing a student needs to do, is to subscribe to a homework group. After that the usual student's work-flow is as follows. 1. Check the dashboard after every login to see if there are any pending assignments. 2. If there is a pending assignment, find it in the table of assignments, view its details, and create a solution. 3. Submit the solution and wait for its correction. 4. If the correction results fail to fulfill the expectations, delete the solution, create another one, and go to the previous step. Otherwise confirm the solution. 5. After some time, check the rating of the submitted solution (the tutor has to rate it first). 4.7.2 Tutor A tutor needs to create a homework group that can be subscribed to by students. Then it is possible to assign problems to students in that group either all at once or separately during the semester. Apart from that, the tutor needs to check the dashboard regularly to see whether there are any pending subscription requests or solutions to be handled. Subscription requests should be handled as a priority so that the students would not miss any assignment deadlines. The rating of the solutions does not have to be done immediately; however, all solutions should be rated by the end of the semester. 4.7.3 Lecturer At first, a lecturer has to create a lecture to be able to create problems or to generate tests for that lecture. Problems as well as plug-ins needed by them can be added at any time before they are to be assigned to the students. For test generation, a lecturer has to create the test questions and optionally upload attachments to be used by some of them. Only then can he create a test template and generate and print tests based on that template. There are no repeated tasks that would require handling by lecturers. 75 4.7.4 Administrator An administrator has to create user accounts for lecturers and tutors (or just edit their user accounts, if they registered themselves). He may periodically check the dashboard for a notification about new system errors and view their details in the system log if necessary. 76 5. Assignment Manager in the Wild Based on very broad specifications, the implementation of Assignment Manager took more than 1.5 years. Then it was released and tested for one semester on a single course, XML Technologies, at MFF UK. During the development, quite a few assumptions were made, which seemed perfectly obvious at the time from the theoretical point of view. This chapter focuses on the differences between those assumptions and the reality and on other information gathered during the live testing. 5.1 Design for Reality AsM development was heavily impacted by the fact that the main purpose of the AsM project was to act as a school project and a basis for this work. The purpose of a school project is to provide students with experience in developing a full-fledged software product, which they may not have had previously (as it was in the author's case). There are certain requirements imposed on the school projects to help the students learn how to approach the development of such software product. The most prominent requirement is the complete separation of the specification and implementation phases, which should teach the student to perform an analysis and to create specifications before starting the implementation. However, enforcing such complete separation has certain drawbacks as well. There is an important distinction between separating the specification phase in the context of a single development cycle and separating it for the whole project. The latter works under the assumption that the whole application can be correctly designed beforehand and then implemented based on the completed design. This assumption is not a problem as such but it becomes a problem when the project development is supposed to be done by a single inexperienced developer. In this particular case, the created specifications turned out to be both not specific enough, allowing wide range of implementations, and too extensive, specifying much more features than necessary. Especially the latter had a large impact on the project. 5.1.1 Users Real and Imaginary AsM implementation was based on a generalized scenario describing the management of homework assignments. This scenario used idealized actors performing tasks at their level of responsibility and the implementation reflected this by restricting users' access to the application accordingly. Additional restrictions were added to promote fairness and transparency, e.g. the authors of solutions to be 77 rated were hidden and solution rating could not be changed. While this seemed sensible during the specification and implementation phases, it proved objectionable after the deployment. The most important lesson resulting from the deployment of AsM is the discovery that the users' priorities in the real world are different from their priorities in the idealized scenario. Namely, the main drive behind the users' behavior seems to be convenience. While the separation of the lecturer and the tutor reflects how creation and assignment of homework problems work in reality, it proved to be meaningless during the testing. In the observed case, it turned out to be most convenient for the lecturer not to interact with the application at all, but delegate this task to the tutors and interact with them instead. In addition, the tutors were given user accounts with full privileges, again for the sake of convenience, so there was no need of the special administrator role. Over the testing period, even more restrictions had to be removed for the sake of convenience. Rating solutions as anonymous turned out to be the most controversial feature, because the tutors did not see any reason for it and wanted to be able to communicate with individual authors of solutions before rating the solutions. Being unable to change the rating of the solution after it was rated, was not appreaciated either and had to be removed by a hot-fix because the tutors sometimes made a mistake when rating a solution and needed a way to amend it. The problems described above and others not mentioned arose from two misconceptions. First, it was assumed that it was possible to design the application by observing how the homework management works without such application and attempting to simulate the same scenario within the application. With hindsight, the problem with this approach is that adding the application to the scenario changes the scenario completely. Rather than simulating the previous scenario, the application needs to create a new one that is more convenient for all actors. Second, it was assumed that it was possible to create the right design for the whole application in advance and on one's own. Unfortunately, creating the design in advance is unfortunately one of the constraints of a school project. Without this constraint, it would be much better to apply an agile approach and to implement the application iteratively based on user feedback. On the other hand, getting a meaningful and representative user feedback repeatedly would pose the challenges of its own. Creating the design on one's own was not mandatory and it appeared to be another step in the wrong direction. Instead, the first step of the design process should have been to poll the potential users for opinions on what they would require and/or expect from such application as AsM. It is essential for the developer to recognize that he sees the application with different eyes than the potential user and to have it in mind when he is asked to both design and develop the application. 78 5.2 Cost of Modularity and Complexity Even during late phase of AsM development it became clear that the internal design of AsM should have been focused on completely different features. Deploying AsM for testing only further exposed this problem. The implementation of AsM had been focused on modularity, on separating various application parts as much as possible to allow extending or completely changing the individual parts. While this had seemed like a good approach and the author had made a point of it both as an exercise and out of misplaced perfectionism, quite the opposite proved true. Since the AsM is ultimately only a school project, which is not very likely to ever reach a wide audience and even less likely to be extended by other developers, the benefits of modularity are doubtful. On the other hand, the cost of modularity turned out to be very high. While the modularity enables to perform certain substantial changes, e.g. switching to a different database type, without much hassle, it makes all smaller changes much more difficult. Adding a new feature almost always requires changes on multiple levels separated from each other and extensions of interfaces between them. For example, enabling to add a note to a solution when rating it would require extending the database layout, applying this change in the abstract database layout in the Core, changing or adding a database request, changing or adding a core request, and extending the UI to reflect this change. So it became apparent that the modularity should have been applied deliberately and only where really necessary. By default, the implementation should have been as simple as possible. Instead of aiming to create absolutely robust code, the focus should have been put on other aspects, like the application's reliability. And again, keeping it simple would be much easier using an iterative development pattern rather than specifying everything in advance. The arguments against modularity discussed above can be similarly applied to the complexity of the scenario used as a model for AsM's functionality. Expanding the scope of the model scenario to cover the homework management of a whole college added a lot of complexity that was not really necessary. In this case, it is the application design that should have been kept as simple as possible at the beginning and extended iteratively. Unfortunately, due to the author's lack of experience or lack of formal schooling in application design at the time of AsM creation, this was an understandable mistake as well as a very expensive way to learn to keep the design simple. 79 5.3 Testing and Reliability The previous section explained why focusing on modularity was a bad idea altogether. Its main results is that focusing on modularity made the author overlook other aspects of the implementation, which later turned out to be significant. With hindsight, the most notable of those were testing and reliability. Developing software on one's own and without regular contact with users does not force the developer to devote time to the creation of tests. As all the application code is written by the same person, changes are made with full insight and a very accurate notion of consequences. That makes it seem possible (with just a few rules and a little discipline) to maintain application integrity by manually testing it after each set of changes is made. However, as the project grows larger, the manual testing gets progressively more difficult, which clearly shows a need for automated testing. Automated testing would not only need time that was spent elsewhere (as discussed above), but it would also need more detailed analysis and specifications so that the units to be tested would have well-defined stable interfaces. Live deployment showed that the need for more extensive testing is paramount, because it is impossible to detect all bugs by manual testing, and because fixing the bugs after the application has already been deployed is much more difficult. Additionally, testing manually while creating hot-fixes for an already deployed application puts even more strain on the developer, because it is essential to avoid creating new bugs in the hot-fixes themselves. On the other hand, even the best unit and integration tests cannot be 100% sure to reveal all problems either. Therefore, it would be the best to also test the application on real users. This would need both an iterative development pattern, allowing to release and to gather feedback after each development cycle, as well as the set of willing application testers. Automated testing is only one of the bases of application reliability. One of the other important but often overlooked elements is the data safety. Any application that is a sole owner and manager of valuable data should have backup capability to prevent complete data loss in case of unforeseen circumstances, e.g. server failure. Adding the backup capability to AsM would require more than only saving the current state of the database. Certain files (at least plug-ins and confirmed but not yet rated solutions) would have to be saved as well. 5.4 Dependencies and Maintenance During its development, the AsM had been tested on a private local web server. Having a web server fully dedicated to the application made it possible to make use of its various features and add a few libraries, which made certain tasks unrelated to the main application functionality possible or easier (e.g. sending e-mails or parsing 80 XML). The author's lack of experience with public projects led him to pay little attention to the impact of adding such dependencies. An application designed for users with no IT background, has to avoid having too many dependencies or to hide them with automated installation process. AsM's installation process provides some help by partially guessing and/or testing the configuration, but it does not cover the necessary web server configuration and the installation of the required PEAR libraries. Another area that could be improved to better support the expected user-base is the maintenance of the application. At the time of its deployment, AsM needed active maintenance as the result of the lack of automated testing discussed in the previous section. Since the application cannot be actively maintained by its author in multiple instances, additional steps should be taken to completely remove the need for regular maintenance. Attempting to remove or hide dependencies and the need for maintenance is not the only possible approach. AsM is designed to be usable in large scenarios (e.g. for the whole school at once), which could give sufficient reason to have an IT specialist maintaining it. Currently, the user manual contains sufficient information for such a person to install the application. Additional documentation would have to be created for all periodic maintenance tasks required from the AsM administrator. 5.5 Proposed Enhancements The previous sections discuss some of the possible general enhancements for the AsM. This section completes the chapter with an outline of a few potential specific enhancements (features) that could also benefit AsM in its present state while being smaller in scope. Some of the following enhancements were proposed by the AsM users during the live deployment. Add "submission date" to the list of corrected solutions. Currently the corrected solutions can be distinguished only by their success ratio and correction results. This requires that users actively keep the number of corrected solutions manageable by deleting the unsatisfactory ones. Adding the date of submission would allow easy identification of solutions even when there is a lot of them. Allow user-based column hiding in tables. This is an extension of the previous enhancement. Instead of always providing users just with the data that the author considered the most useful, AsM Core could provide all data relevant to the query and the UI could let the users choose themselves which data to display and which to hide. The current selection would remain as the default. 81 Allow adding notes when rating a solution. The fact that rating of a solution is restricted to the number of awarded points, is an oversight in AsM design. While it may seem that gaining points to pass the course requirements is the point of submitting homework, the main point is actually learning from mistakes in the submitted solutions. AsM needs to facilitate this goal by allowing tutors to describe found mistakes in detail. Allow forgotten password recovery. Automated password recovery is one of the features necessary for reducing AsM maintenance. It would be sufficient to generate a new random password on demand and send it to the user's email address. Limit the number of uploads for a single assignment. Correcting large amounts of solutions could become resource-demanding. Discouraging the students from uploading too many incorrect solutions could be achieved by limiting the number possible uploads of solutions for a single assignment. Improve the model of table display to support scaling. Another oversight in the design is the lack of focus on data volume scaling. This is most apparent in the implementation of the table element, which renders all its contents and performs pagination, sorting, and filtering only by hiding certain parts. Consequently, large amounts of data cause a long rendering of the table. This could be remedied by performing selection functions on raw data and rendering only the current selection. Allow server-side filtering. An extension to the previous enhancement would be to move data selection functions to the server and to make the selection commands part of the Core requests. However, such a modification would be very costly, while there are only a few requests that could really benefit from it (e.g. system log retrieval). Allow adding attachments to a problem. Problem descriptions could be enhanced by allowing to add attachments to them, similarly to adding attachments to test questions. The attachments could be either downloadable or they could be displayed together with the problem description. Allow online solving of tests. Allowing the students to solve the tests online would be quite a large enhancement but a highly useful one as well. Creating an application for sophisticated test generation and for online testing could be a goal for a thesis of its own. Enhance correction results returned by the plug-ins. AsM project includes six correction plug-ins, which are not discussed in this work as a result of being specific to the problems they correct. These plug-ins use various external libraries to cope with parsing of XML, DTD, XSLT, and other XMLrelated formats, and they finally pass the error messages that were received 82 from the library validation functions on to the users. Unfortunately, live testing showed that such error messages are not always very user-friendly. Additional analysis would be necessary to determine whether it is possible to improve error intelligibility in those cases. It is important to note that even though using external libraries is a necessity, they may not always be error-free themselves. Adding work-arounds for known library bugs or at least reporting them as plug-in runtime errors instead of correction results, is essential if the plug-ins are to be really useful. 83 84 Conclusion The objective of this work was to create an application that would serve as an online platform for the management of homework assignments. Specifically, it was required to provide means for the creation and assignment of homework problems, for handing in solutions, for automated correction of solutions, and for their manual rating. Additionally, it was required to facilitate the automated generation of tests from prepared sets of test questions. These objectives are met by the Assignment Manager application implemented as a part of this work. The Assignment Manager is a web-based application that can be deployed on any Apache web server after appropriate server configuration. It is split into two parts, the Core and User Interface, which were developed using different technologies, namely PHP and JavaScript. It is controlled solely through the user interface, which can be accessed using any standard-compliant web browser. All required features are included in the core functionality with the exception of automated correction which can be added using external plug-ins. The automated correction is completely optional, as proposed in the Introduction. Meeting of the described objectives was verified by live deployment of the Assignment Manager at the MFF UK during a single semester. The application's performance was satisfactory and the deployment provided valuable feedback and commentary on decisions made during the implementation. The comparison of the live deployment feedback with the original assumptions is discussed in this work as well and forms an important part of it. Assignment Manager is designed with high degree of modularity, which makes several parts independent on the main application. Therefore, these parts can be used or published separately as for example the presentation elements used in AsM User Interface. Moreover, this work also deals with the problem of documenting a project that uses multiple programming languages. The solution presented here can be applied elsewhere as well. 85 86 Bibliography [1] CodEx – The Code Examiner [online]. 2008 [cit. 2011-11-20]. CodEx – Design Manual. Available from WWW: <http://codex2.ms.mff.cuni.cz/project/doc/ manual.pdf>. [2] Assignment Manager – Home [online]. 2009, last updated 2010 [cit. 2011-11-20]. Assignment Manager Documentation. Available from WWW: <http://hon2a.wz.cz/asm/docs/>. [3] PHP: Hypertext Processor [online]. 2001, last updated Sun Nov 20 15:02:56 2011 UTC [cit. 2011-11-20]. PHP: Documentation. Available from WWW: <http://www.php.net/docs.php>. [4] Ecma International [online]. 2011 [cit. 2011-11-20]. ECMAScript Language Specification. Available from WWW: <http://www.ecma-international.org/ publications/files/ECMA-ST/Ecma-262.pdf>. [5] jQuery: The Write Less, Do More, JavaScript Library [online]. 2010 [cit. 2011-11-20]. jQuery: The Write Less, Do More, JavaScript Library. Available from WWW: <http://jquery.com/>. [6] PHP: Hypertext Processor [online]. 2001, last updated Nov 2011 [cit. 2011-11-20]. Type Hinting. Available from WWW: <http://cz.php.net/manual/ en/language.oop5.typehinting.php>. [7] Apache HTTP Server version 2.2 [online]. 2011 [cit. 2011-11-20]. Apache Module mod_rewrite. Available from WWW: <http://httpd.apache.org/docs/ 2.2/mod/mod_rewrite.html>. [8] EDWARDS, Dean. A Base Class for JavaScript Inheritance [online]. 2006 [cit. 2011-11-20]. A Base Class for JavaScript Inheritance. Available from WWW: <http://dean.edwards.name/weblog/2006/03/base/>. [9] WELIE, Martin van. Welie.com – Patterns in Interaction Design [online]. 2008 [cit. 2011-11-20]. Accordion. Available from WWW: <http:// www.welie.com/patterns/showPattern.php?patternID=accordion>. [10] Wikipedia, the free encyclopedia [online]. 2003, last updated Nov 2011 [cit. 2011-11-20]. Model–view–controller. Available from WWW: <http:// en.wikipedia.org/wiki/Model–view–controller>. [11] Architecture of the World Wide Web, Volume One [online]. 2004 [cit. 2011-11-20]. Fragment identifiers. Available from WWW: <http:// www.w3.org/TR/webarch/#fragid>. 87 [12] Object Oriented Design [online]. [cit. 2011-11-20]. Observer pattern. Available from WWW: <http://www.oodesign.com/observer-pattern.html>. [13] ASM Plugin Framework Project [online]. 2010 [cit. 2011-11-20]. ASM Plugin Framework Project. Available from WWW: <http://hon2a.wz.cz/asm/docsjava/>. [14] phpDocumentor Manual [online]. 2000 [cit. 2011-11-20]. phpDocumentor Tutorial. Available from WWW: <http://manual.phpdoc.org/ HTMLframesConverter/default/>. [15] Doxygen [online]. 1997, last updated Aug 2011 [cit. 2011-11-20]. Documenting the code. Available from WWW: <http://www.stack.nl/~dimitri/doxygen/>. [16] Apache HTTP Server version 2.2 [online]. 2011 [cit. 2011-11-20]. Apache Core Features. Available from WWW: <http://httpd.apache.org/docs/current/ mod/core.html>. [17] Cloanto Implementation of INI File Format [online]. 2009, last updated Jun 2010 [cit. 2011-11-20]. Cloanto Implementation of INI File Format. Available from WWW: <http://www.cloanto.com/specs/ini/>. [18] MLÝNKOVÁ, Irena. Technologie XML (PRG036) - cvičení, LS 2011 [online]. 2011 [cit. 2011-11-20]. Technologie XML (PRG036) - cvičení, LS 2011. Available from WWW: <http://www.ksi.mff.cuni.cz/~mlynkova/prg036/ indexCV.html>. [19] Extensible Markup Language (XML) 1.0 (Fifth Edition) [online]. 2008 [cit. 2011-11-29]. Extensible Markup Language (XML) 1.0 (Fifth Edition). Available from WWW: <http://www.w3.org/TR/2008/REC-xml-20081126/>. [20]Hypertext Transfer Protocol – HTTP/1.1 [online]. 1999 [cit. 2011-11-29]. Hypertext Transfer Protocol – HTTP/1.1. Available from WWW: <http://www.w3.org/Protocols/rfc2616/rfc2616.html>. [21] Document Object Model (DOM) [online]. 1995, last updated 2005 [cit. 2011-11-29]. Document Object Model (DOM). Available from WWW: <http://www.w3.org/DOM/>. [22]XHTML™ 1.0 The Extensible HyperText Markup Language (Second Edition) [online]. 2000, last updated Aug 2002 [cit. 2011-11-29]. XHTML™ 1.0 The Extensible HyperText Markup Language (Second Edition). Available from WWW: <http://www.w3.org/TR/xhtml1/>. [23]Introducing JSON [online]. 2006 [cit. 2011-11-29]. Introducing JSON. Available from WWW: <http://www.json.org/>. [24]PEAR – PHP Extension and Application Repository [online]. 2011 [cit. 2011-11-29]. PEAR Manual. Available from WWW: <http://pear.php.net/ manual/en/>. 88 [25]KLENSIN, J. Simple Mail Transfer Protocol [online]. 2008 [cit. 2011-11-29]. Simple Mail Transfer Protocol. Available from WWW: <http://tools.ietf.org/ html/rfc5321>. [26]Cascading Style Sheets Level 2 Revision 1 (CSS 2.1) Specification [online]. 2011 [cit. 2011-11-29]. Cascading Style Sheets Level 2 Revision 1 (CSS 2.1) Specification. Available from WWW: <http://www.w3.org/TR/CSS21/>. [27] Berners-Lee T. Uniform Resource Locators (URL) [online]. 1994 [cit. 2011-11-29]. Uniform Resource Locators (URL). Available from WWW: <http://www.ietf.org/rfc/rfc1738.txt>. 89 90 List of Abbreviations AJAX Asynchronous JavaScript and XML, a set of technologies used to create asynchronous web applications AMS assignment manager software fitting the role described in Section 1.1.1 AsM Assignment Manager application implemented as a part of this work CodEx Code Examiner application (see [1]) CSS Cascading Style Sheets, a style sheet language used to describe the look and formatting of a document written in a markup language such as HTML or XHTML (see [26]) DOM Document Object Model, a representation of objects in XHTML documents used by scripting languages to access and manipulate those objects (see [21]) GET the GET method supported by the HTTP protocol, used for retrieving data from the web server HTML HyperText Markup Language used for creating web pages HTTP Hypertext Transfer Protocol, a networking protocol used for communication between a web server and a web browser (see [20]) ID identification number IDE integrated development environment, an application providing a comprehensive set of tools for software developers INI INI file format, a standard for simple configuration files (see [17]) IT information technology JAR Java Archive, a file format extended from ZIP used for distribution of applications/libraries written in Java JSON JavaScript Object Notation, an open standard for text representation of simple data structures (see [23]) MFF UK Faculty of Mathematics and Physics of Charles University in Prague MVC model-view-controller, a software architecture pattern used to separate the application logic from the display logic (see 91 [10]) PEAR PHP Extension and Application Repository, a system for distribution of reusable PHP components (see [24]) PHP PHP: Hypertext Preprocessor programming language (see [3]) PHP CGI the PHP preprocessor of content returned by a web server in response to a HTTP request PHP CLI a PHP preprocessor that can be used directly from the command-line independently on a web browser PHPDoc PHP documentation standard (see [14]) POST the POST method supported by the HTTP protocol, used for sending data to the web server as part of the request SMTP Simple Mail Transfer Protocol, a standard concerned with e-mail communication (see[25]) UI user interface in general or AsM User Interface specifically URL Uniform Resource Locator, a format for addressing an internet resource (see [27]) XHTML Extensible HyperText Markup Language, an application of XML offering functionality similar to that of HTML (see [22]) XML Extensible Markup Language, a set of rules for creating documents with added logical structure (see [19]) ZIP ZIP file format used for data compression and archiving 92 List of Figures 1.1 Actors in a homework assignment scenario. ...................................................... 6 1.2 Test generation actions. ...................................................................................... 7 3.1 Course management entities and their relationships. ...................................... 18 3.2 Entities used for test generation and their relationships. ................................ 21 3.3 Interaction between database layers during a database request. .................... 29 3.4 Table element mock-up. ................................................................................... 32 3.5 Form element mock-up. ................................................................................... 35 3.6 Main UI layout. ................................................................................................. 37 3.7 Content page grouping. .................................................................................... 38 4.1 Pre-login layout. ............................................................................................... 63 4.2 Main application layout. ................................................................................... 63 4.3 Navigation menu. ............................................................................................. 64 4.4 Table. ................................................................................................................ 65 4.5 Form. ................................................................................................................. 67 4.6 Error dialog. ..................................................................................................... 68 4.7 Error panels. ..................................................................................................... 68 4.8 Icon names. ...................................................................................................... 69 93 94 Attachments A. List of Files The attached CD contains the Assignment Manager application built and ready for installation as well as the source files. It also contains six plug-ins for automated correction of homework problems belonging to the XML Technologies course at MFF UK. Additionally, it contains the AsM project documentation generated by Doxygen, including the User Manual. The included documentation has been generated from the current version of source files (AsM 0.6.2), but the User Manual section covers only the features included in the version deployed on MFF UK (AsM 0.5.5). See the following sections of this thesis for descriptions of the automated test generation feature added in AsM o.6: Section 3.3.7, Section 3.4.4, and Section 4.6.4. Finally, the CD contains the digital version of this thesis. The descriptions of the most important files and folders follow. asm-0.6.2.zip the full AsM application, ready for installation asm-0.6.2-lite.zip the AsM application without the documentation, ready for installation docs/index.html the index file of the AsM project documentation (open in a web browser to access the full documentation) plugins/ correction plugins for the homework assigned at the XML Technologies course (each ZIP archive is a valid plug-in accepted by the AsM application) src/ AsM source files src/core/ AsM Core source files src/docs/ the source files of the documentation framework and the special documentation pages (the User Manual, etc.) src/install/ AsM Installer source files src/web/ AsM UI source files thesis.pdf this thesis 95