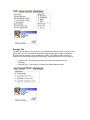
1
Gradience Records™
User Manual
Welcome!......................................................................................................................................... 4
Gradience 2007 - New Features ..................................................................................................... 4
System Requirements ..................................................................................................................... 5
Network Requirements .................................................................................................................... 6
License Options ............................................................................................................................... 6
CD Menu Instructions ..................................................................................................................... 6
Setup Types..................................................................................................................................... 7
Standalone Computer Installation Instructions................................................................................ 8
Quick Note about Peer-to-Peer Installations ................................................................................... 9
Upgrading from Version 8 to Gradience 2007................................................................................. 9
Logging In for the First Time............................................................................................................ 9
Checklist for Setting Up ................................................................................................................. 10
Creating Locations & Departments................................................................................................ 10
Creating Locations and Departments............................................................................................ 10
Global Preferences........................................................................................................................ 11
Setting up General Codes ............................................................................................................. 13
Security Options ............................................................................................................................ 14
Common Features......................................................................................................................... 14
Detail Tab (Common Features) ..................................................................................................... 14
Setting up access to specific program features............................................................................. 15
Program Features (Records)......................................................................................................... 15
Setting Up Access To Locations, Departments and Individual Employees .................................. 16
Forgotten Password Feature ......................................................................................................... 16
How to Manage Your Employee Records Information .................................................................. 17
The Menu Bar ................................................................................................................................ 17
Using Gradience Records ............................................................................................................. 18
The Program Bar ........................................................................................................................... 18
The Feature Column...................................................................................................................... 18
Recent Features Pane................................................................................................................... 18
Employee Detail Feature ............................................................................................................... 18
EEO/Other Feature........................................................................................................................ 19
Personal Contacts Feature............................................................................................................ 20
Address Tab .................................................................................................................................. 23
Benefits Feature ............................................................................................................................ 23
Training Feature ............................................................................................................................ 24
Emergency Feature ....................................................................................................................... 25
Performance Feature..................................................................................................................... 26
Wages Feature .............................................................................................................................. 27
Separation Feature........................................................................................................................ 27
COBRA Feature............................................................................................................................. 28
Reminders ..................................................................................................................................... 29
Accidents Feature.......................................................................................................................... 31
Warnings Feature .......................................................................................................................... 32
Education Feature ......................................................................................................................... 33
Emergency Contacts ..................................................................................................................... 33
Reports in Gradience Records ...................................................................................................... 34
Basic Report Options..................................................................................................................... 34
Types of Available Reports............................................................................................................ 35
Charts ............................................................................................................................................ 37
Accident Detail Report................................................................................................................... 38
Anniversary Report........................................................................................................................ 38
Benefits Report .............................................................................................................................. 38
Birth Date Report ........................................................................................................................... 38
COBRA Report .............................................................................................................................. 39
Employee Detail Report................................................................................................................. 40
Employee Education Report.......................................................................................................... 40
Employee Emergency Report........................................................................................................ 40
Employee Separations Report....................................................................................................... 41
Employee Training and Training Extended Report ....................................................................... 41
Employee Warnings Report........................................................................................................... 41
Entering the Product Key / DEMO Mode....................................................................................... 42
I-9 Renewals Report...................................................................................................................... 42
ID Badges ...................................................................................................................................... 42
Labels Report ................................................................................................................................ 44
New Hires Report .......................................................................................................................... 44
Salary Ranking/Analysis Report .................................................................................................... 45
Salary Tax Settings Report............................................................................................................ 45
Seniority Report ............................................................................................................................. 45
Table Listings................................................................................................................................. 45
Telephone List Report ................................................................................................................... 46
Backup and Restore Operations ................................................................................................... 46
Creating a manual backup............................................................................................................. 47
Restoring from a Backup ............................................................................................................... 47
Getting Help with Records............................................................................................................. 48
The Help Menu .............................................................................................................................. 48
The F1 Key .................................................................................................................................... 48
Searching for Help ......................................................................................................................... 48
Using Custom Reports .................................................................................................................. 49
Importing and Exporting Data........................................................................................................ 52
Overview........................................................................................................................................ 52
Import Features ............................................................................................................................. 52
Required Fields.............................................................................................................................. 52
Importing........................................................................................................................................ 53
Exporting........................................................................................................................................ 54
Troubleshooting ............................................................................................................................. 55
Frequently Asked Questions ......................................................................................................... 55
Unable to connect to Firebird Server............................................................................................. 55
SQL Parse Error: EOF in String Detected..................................................................................... 57
Unable to Convert.......................................................................................................................... 57
Unable to install on a Windows NT, 2000, or XP system .............................................................. 57
Exceeded the authorized user count............................................................................................. 57
Importing / Export File Format ....................................................................................................... 59
Using the Notes / Comments Editor .............................................................................................. 61
Adding Attachments to Comments or Notes ................................................................................. 62
Inserting an Attachment................................................................................................................. 62
Insert Object Options..................................................................................................................... 62
About the Fingerprint Reader ........................................................................................................ 63
Benefits Descriptions..................................................................................................................... 64
Welcome to Gradience!
Welcome!
Thank you for choosing Gradience Records to track your company's employee information. Our
software application includes many features based on the suggestions of our customers, and we
certainly welcome any further comments or improvements you may have.
When combined with other Gradience software such as Gradience Records and Gradience
TimeClock, this powerful tool helps you keep critical employee information without entering data
twice.
Software Features
Open-ended licensing – Unlike many human resource software applications designed for
large companies, Gradience Records does not require annual licensing. However, we do
encourage you to purchase upgrades so that you have the latest enhancements and
newest features to make your job easier.
Easy, standalone PC installation – We designed Gradience to be simple to install and get
running, even for a large client-server system.
Password security – Anyone who uses the program must have a login ID and password,
and you can set different access levels for each user.
Data import – If you already have information from a spreadsheet or other program, you can
save time setting up Gradience Records by importing it.
Reminders– Set pop-up reminders for important dates, such as employee anniversaries,
birthdays, I-9 renewals and reviews.
Reports– You can choose from 26 standard reports and change options to get the
information you need. Export information to other file formats such as Excel or text, too,
as well as build your own reports with the powerful Custom Reports module included.
Automatic backup – Gradience Records can make sure you have a backup of your
important employee information each time you close the program. With the included DB
Monitor and Maintenance utilities, you can also schedule server backups and perform
routine database maintenance.
Unlimited employees – This application lets you manage records for up to unlimited
employees.
Gradience 2007 - New Features
•
•
•
•
Expanded Performance, Accidents, Warnings and Separations Features – These
areas now allow you to document more thoroughly than ever with additional information
fields.
Add file attachments to notes/comments – Store all documentation in one place!
Attach Word, Excel, PDF and image files to any notes or comments field. For instance,
you can attach a Gradience Forms™ FMLA Request Form to the comments field of the
Benefit Detail screen for that employee. There’s also a full text editor available now.
Quick print reports – In each program feature, you’ll find a print icon that lets you
quickly create related reports. Combined with the new, faster Employee Select Column,
this makes printing reports a breeze.
New user interface design – There's a whole new look and feel to Gradience, which is
even easier to use than ever! For customers using Gradience Records in concert with
Gradience Attendance or TimeClock, a single login/password will grant access to all
three programs.
Unlocking the Demo
You can unlock your demo copy after a new installation, or after you have already installed the
program.
New Installation
You can unlock your installation immediately, or run any Gradience application in Demo mode.
Here’s how:
• During the installation of any Gradience application, you will be prompted to enter your
license key in the Product Key window.
• Enter the key in the Key field if you have it, or click Next to continue installing the
application to run Gradience in Demo mode.
• After running the applications in Demo mode, you will periodically be reminded of the
Demo trial period remaining and given the option to purchase Gradience Attendance,
Records, or TimeClock.
Previous Installation
If you have already installed the demo of Records, you can unlock it by following the steps listed
here.
• Open Gradience Records.
• Select Alter Current Product License from the Help menu.
• Select EDIT for the program you want to unlock and enter the Product Key you received
with your purchase. This will be located inside the Gradience CD sleeve and/or sent to
your e-mail address.
• Click OK. If the confirmation message does not appear, verify that you entered the correct
key. The Product Key is not case sensitive.
Note: There is a different product key for each Gradience software product.
System Requirements
Minimum
Windows XP Home (SP2), Windows XP Professional (SP2), Windows 2000 Professional
Pentium III or Higher Processor
128 MB available RAM (Random Access Memory)
30 MB available hard disk space
Access to a CD-ROM drive
SVGA monitor with 800 x 600, 16-bit color depth or higher
Recommended
Windows XP Professional (SP2), Windows 2000 Professional, Windows 2003 Server or
Windows Vista
Pentium IV or Higher Processor
512 MB available RAM (Random Access Memory)
60 MB available hard disk space
CD-ROM drive
SVGA monitor with 1024 x 768, High Color or higher
Windows-compatible graphics quality printer
Network Requirements
•
•
•
•
Windows-based Server or PC – The included Firebird database is not compatible with a
non-Windows-based operating system, such as Novell. However, you may run the
database on a Windows-based server or PC connected to a non-Windows based network
Server with a static (persistent) IP address – PC or Server where the database
resides
Proper user license – The database will only allow the purchased number of users to be
connected at any one time to the database. Wide-Area Networks (WAN) require a WAN
license based on the number of geographic locations. The Product Key is affixed to the
inside cover of the CD sleeve.
CD-ROM drive or access to our software product download area
on www.gradiencesupport.com.
Installation
License Options
The license options currently available:
•
•
•
•
Basic – Only one user can run the program at a time.
Professional – Up to five users can run the program at the same time when connected
to a single, common database.
Enterprise – Site License – Any number of users can run the program at the same
time when connected to a single, common database from a single site (location).
Wide Area Network (WAN) licenses for multiple locations are also available. Please call
for more information.
CD Menu
Instructions
To begin installing Gradience Records, please follow these steps:
1. Close ALL running programs.
2. Insert the Gradience 2007 CD-ROM into the appropriate drive of your computer.
3. The menu will appear. Select which product you want to install. (If the installation menu
does not appear, click Start > Run. The Run dialog will appear. In the dialog box type
D:\setup.exe where D: is the letter of your CD-ROM drive. Click OK or press Enter.)
4. Once the installation procedure begins, follow the on-screen instructions to install the
software. It is recommended you accept the default settings for each step of the install
process. If you are installing the software in a network environment (the Client - Server
installation process), you should consult your Network Administrator prior to installation.
You must have proper network rights in Windows 2000, XP, or Vista in order to install
Gradience software.
5. Once the application has been installed, a Gradience program group will appear in your
Start > Programs menu, and a Gradience Records icon will appear on your desktop.
Setup Types
•
•
•
•
•
•
STANDALONE: Use this option if you are installing to a standalone computer. This will
install both the program files and database files to your local drive.
SERVER: This is the first of two steps in the Client-Server Installation, either for true
client-server configurations or peer-to-peer network that may be using a workstation PC
for the database. Choose this option to install the database and application files on the
Server and before installing the Client application to PC workstations.
CLIENT: This is the second step in the Client-Server installation.
After clicking on a Setup Type, you will have the following options:
EXPRESS: We recommended that you select this option if you are installing or upgrading
Gradience Records for the first time. This will take you through the installation process
with minimum user intervention.
CUSTOM: This option is for Advanced Users who have specific installation needs.
Note – A Client-Server Installation is recommended. The database is more secure than if you
install it on a Standalone computer, especially when installing Gradience TimeClock. When
running Gradience TimeClock on a Standalone computer, you run the risk of someone changing
the clock settings and creating false time card entries. On a Client-Server Installation, the
database and time are pulled from the server, not from the client workstation.
Installation Overview
Gradience Records can be installed on a single standalone workstation or a network for database
sharing among several users, depending on your needs.
Regardless of which license you purchased, you may install the database to a network directory
for the purpose of backup. Please consult your network administrator before installing to a
network directory.
Installing to a Network
To install to a network requires these items:
• Windows-based Server or PC – The included Interbase database is not compatible
with a non-Windows-based operating system, such as Novell. However, you may run the
database on a Windows-based server or PC connected to a Non-Windows based
network.
• A static (persistent) IP address so that the database will be always connected to the
client application
• Proper user license – The database will only allow the purchased number of users to be
connected at any one time to the database. Wide-Area Networks (WAN) require a WAN
license based on the number of geographic locations. The Product Key is affixed to the
inside cover of the CD sleeve.
• CD-ROM drive or access to our software product downloads area on
www.gradiencesupport.com/.
Note: Technical Support cannot provide technical assistance with setting up or maintaining your
computer network. Please consult your computer manufacturer or network administrator before
contacting Tech Support.
Client-Server Installation
Installing a Client-Server setup is a two-step process. You will need to install to the Server first
and then to the Workstation(s).
Server Installation Instructions
Install to the Server first by following these instructions:
1. Insert the Gradience CD on the Server. (Follow the CD Menu Instructions above.)
2. At the Setup Type, select Server. Click Next.
3. Select Express. Click Next.
4. IMPORTANT STEP: Write down the Server Name and Database Path EXACTLY as they
appear on the screen.
5. Click “I have written this information down.” Click Close.
6. Click Next at the Current Settings screen. This will install the program files to the Server.
7. Click Finish. This will start the installation of the database files.
8. Click Next, then the I Agree button if you agree to the license.
9. After the installation, click Finish.
10. Follow the installation instructions for the Client Workstation.
Note: You only have to run the Server installation once. Then you may install multiple Clients for
the Gradience Version of Records, Attendance Controller or TimeClock, if purchased, or to run as
a demo.
Client Workstation Installation Instructions
Install to the Client Workstation by following these instructions.
1. Insert the Gradience CD on the Client Workstation.
2. Select Client as the Setup type.
3. Select Express, and then click Next.
4. Enter the Server Name and Database Path exactly as you wrote down from Step 4 of the
Server Installation. Then Click Next.
5. Click Next at the Current Settings screen. This will install the program files to the Server.
6. Click Finish. This will start the installation of the needed files to run the database.
7. Click Next, then the I Agree button if you agree to the license.
8. After the installation, click Finish.
9. Install the Client for any other Gradience versions. (You do not have to install to the
Server again) You may also install to other Workstations, if needed.
10. Double-click on the desktop application shortcut. To login, use the default Login (ADMIN)
and default Password (also ADMIN).
Standalone Computer Installation Instructions
Installing to a Standalone Computer is quick and easy. Follow these steps:
1. Insert the Gradience CD on Standalone Computer.
2. Select Standalone as the Setup Type.
3. Click on Express, and then click Next.
4. Click Next at the Current Settings screen. This will install the program files.
5. Click Finish. This will start the installation of the database files.
6. Click Next, then the I Agree button if you agree to the license.
7. After the installation, click Finish.
8. Double-click on the desktop application shortcut; the default Login and Password are
ADMIN.
IMPORTANT NOTE FOR VERSION 6 AND EARLIER USERS Gradience software does not
share the same database with version 6 or earlier. You will need the Gradience version to share
the database. Call Technical Support at 888.925.7740 for more details.
Quick Note about Peer-to-Peer Installations
A peer-to-peer connection allows you to share information between two computers without the
need of a formal client-server connection. The peer-to-peer connection must be in place
before following these instructions. See your Network Administrator for more details on setting
up this type of connection.
On the host computer (the one on which you wish the database to reside), follow the instructions
above for a Server installation. Write down the Server Name and Database Path when prompted.
Note: The Server installation will install both the software client application and database files to
the host computer. Then install the application Client on the other computer that will be sharing
the information, entering the Server Name and Database Path when prompted.
Upgrading from Version 8 to Gradience 2007
If you’re upgrading from version 8 to Gradience 2007, we recommend backing up your current
data first, then simply run the installation program for Gradience 2007. Your database will be
automatically converted the first time you start the program.
Upgrading from Version 7 to Gradience 2007
If you’re upgrading from version 7 to Gradience, simply install Gradience 2007 on top of version
7. Opening Gradience for the first time will update the database to Gradience. The Gradience
program must have exclusive use of the database to perform the update. Because all Gradience
programs share the same database, you must upgrade all programs from Version 7 to Gradience
at once. Using a version 7 application with a Gradience database could result in data loss.
Company Setup
Before you begin using Gradience Records, follow this checklist to get started quickly.
PLEASE HAVE READ AND FOLLOWED THE PRECEDING CHAPTER ON INSTALLATION
BEFORE INSTALLING ANY Gradience PROGRAM, INCLUDING Gradience TimeClock.
Also, have available:
• Location and Department names
• User Information (Managers and other users that will have access to the data)
• Employee Data Employee name, Hire Date, Work Status (full or part time), Active Status
(Active, Inactive, or Terminated), Location and Department, Work Hours and Week Hours]
Logging In for the First Time
After installation, run the application by double-clicking the desktop application. The default Login
and Password are ADMIN.
Checklist for Setting Up
Gradience Records first needs some information set up to correctly track your employee
absences; to get started, please follow the checklist below:
If you are upgrading from a previous version, install the Gradience version then run the
conversion utility.
Change the Admin password by going to Settings, User Security. If needed, set up access for
others who will need to continue setting up the program. If you need to give access to specific
locations and departments, or individual employees, set these up first and then come back to
User Security and complete security access. (Security Options.)
Create Locations and Departments (Locations & Departments .)
Set up Global Preferences. (Company Information.)
Enter employee information. (Adding New Employees.)
Complete Setting up User Security, if needed. (Security Options.)
Creating Locations & Departments
Locations and Departments are required and must be assigned to each of your Employees
(See Adding a New Employee to assign Location/Department to employees).
Note: When setting up Locations and Departments for the first time, a Location must be set up
first, and then you may assign a Department to that Location.
Creating Locations and Departments
Locations and Departments are required and must be assigned to each of your Employees (See
Adding New Employees to assign Location and Department information to employees). When
setting up Locations and Departments for the first time, a Location must be set up first, and then
you may assign a Department to that Location.
Setting up Locations and Departments is a critical task and must be performed before you can
proceed with other data entry steps. During the process, you will create Locations first, and then
Departments afterward. Departments can then be assigned to Locations. Follow these steps:
1.
Click on Settings and then Locations and Departments.
2.
Click New and then select the New Location? menu item.
3.
Enter the location name.
4.
Click OK. If a helpful tip message box appears, read the tip and click OK to proceed.
5.
Click New again to create other locations.
6.
Now, click New and select the New Department? Item.
7.
Enter the Department name.
8.
Click OK.
9.
Repeat the above steps as necessary for new locations and departments.
10. After all Locations and Departments are created, click the + sign next to the Location in
the right pane.
11. Assign Departments by selecting (placing a check in) the box next to the Department
name.
Note: As you add more locations and departments, you will see that each location has ALL of
the departments you have created. However, only those departments that you assign to a
location will show up when assigning them on other screens. You may not remove a Department
from a Location if an Employee is still assigned to that Location/Department combination. After
adding and editing locations and departments, you may need to restart Gradience Records
before the changes become available for selection.
Global Preferences
To access Global Preferences, go to Settings, Global Preferences.
This Global Preferences screen allows you to control your default program settings, such as
Company Info, Report Options, and specific program options.
If you are setting up for the first time, please follow the Checklist order.
NOTE: Before editing any of the Global Settings, you must first click the EDIT button.
Company Information
The Company Information screen allows you to enter your company name, address and logo.
The company name is required as this will print out on Reports. Having a company logo is
recommended, but not required. If you have one, this will also print out on Reports.
• Company Name (required for report headings)
• Address, City, State, Zip and Country Code (optional)
• Bitmap filename for your Company Logo (optional) If you have your company logo
available in a bitmap (. bmp) file format, you can have this logo appear on reports.
Records supports .bmp file formats not to exceed 200 x 200 in size. Enter the directory
where the bitmap file is stored or use the Browse to locate it.
Editing Company
1. Click Edit.
2. Enter Information as needed.
3. To add a company logo, click Assign New Logo. Navigate to where the directory path is
and click on the bitmap logo, then click Open.
4. Click Save.
General Settings
The General Settings Tab allows you to set the program defaults such as the Epoch setting,
default hours in a day, and SSN format, among others.
•
•
•
•
Epoch Setting – We strongly recommend keeping the default settings. This setting will
allow the program to appropriately interpret any two-digit year entered that is between
1920 and 2019. For example, with the default Epoch setting of 1920:
o If you enter a date (such as in the Hire Date field) of 03/05/78, the program will
interpret this as 03/05/1978.
o If you enter a date of 03/05/01 within the program, it will be interpreted as
03/05/2001.
Note: If you need to enter a year prior to 1920 or after 2019 in a date field within the
program, you may enter the year as a four-digit number.
Default Hours in a Day – These are the default hours that will be assigned when
creating a new employee. The Day Hours on the Employee Detail screen will be filled in
automatically with these default hours when a new employee is created.
National ID Number Format /Label – Selecting one of these options will allow you to set
the mask for the National ID Number Format. The default mask is set to the USA SSN
•
•
•
•
•
•
format. With this selected, whenever you enter a new employee, the dashes will
automatically come up in the XXX-XX-XXXX format. The label is the title that will appear
on the Employee Detail screen (SSN by default).
Allow use of Forgotten Password Utility – This option allows access to a utility that
can be used, only with assistance from Technical Support, to gain access into the
Gradience program. In order to use this feature, we require that a statement on a
company letterhead and signed by a supervisor, be sent by fax or mail stating that the
user is allowed full access into the program. We keep statements on file. Call Technical
Support if you have forgotten or lost your Gradience password.
Forced Writes for Interbase – If running the Gradience database on a Standalone
computer, this option will help to keep the database more stable. A Workstation is more
prone to lock up or crash than a Server. If the Gradience database is installed on a
Workstation and the program is open at the time the computer locks up or crashes, the
database is prone to becoming corrupt and possibly unrepairable. A computer lockup or
crash can be attributed to several things, including having too many programs open at
the same time than what your computer memory can handle.
Note: If the database is installed on a Workstation or Standalone computer, we
recommend keeping this option checked. The performance may lag a little, but unless
you have more than 800 employees, you may not even notice it. We also recommend
having a current backup, created within Gradience or DB Monitor, available. If the
database is installed on a Server, normally a backup of the whole Server is created on a
daily or regular basis. We still recommend setting up Scheduled backups within DB
Monitor, but having this option checked is not as important on a Server.
Prompt for backup on Exit – This option allows you to turn on or off the message
prompting for backup when you close out of the program. Backups are very important.
We recommend that you turn this feature off only if you have scheduled backups within
the DB Monitor.
Remember last login name – This option remembers the last user logged in, and
reenters the login name on application startup.
Enable Taylor Processing – This option enables Taylor processing.
Report Options Tab
These settings affect how reports will appear by default.
• Print Preview – Toggles (turns on and off) showing preview first before printing
• Header Bold – Toggles bolding for Header Title
• Header Line – Toggles putting a line under the Header Title
• Header Shade – Toggles shading for Location or Department title row
• Data Line – Toggles lines to separate data information
• Print SSN – Toggles ability to show Social Security Numbers
• Print Picture – Toggles ability to print Picture on printout
• Print Totals – Toggles whether or not Totals show up on reports
Other Gradience Tabs
Additional Gradience programs must be installed for these options to display. See the appropriate
manual for setting up these options.
Setting up General Codes
To access General Codes, go to Settings, General Codes.
General Codes allow you to set up codes in addition to the ones already included in the program.
For example, if you have Performance Rating selected from the Select Code column, you may
add Fair if you so choose.
1. To add a new code, select the appropriate category from the Select Code column and
click New.
2. Click in the blank Code Value block and enter the new code (For Example, Life Insurance
- Self).
3. Double-click the Enabled block (adds a checkmark) and click Save. This will allow all
codes selected to be viewed on the specific screen. For Example, if you click on the
Benefits tab on the main menu, and click Benefits List, you will see the code Life
Insurance-Self.
4. Click Save.
5. Follow the above steps to add new codes to any of the category listings.
A code cannot be deleted if it is in use. To delete a code, click on the appropriate code and click
the Delete key. A message will pop up to confirm deletion and let you know if the code is in use.
Using the Enabled feature
If you deselect a code by unchecking the Enabled block next to a Code, it will not show up as a
selection in the drop-down box for the appropriate feature. For example, if you unselect the
Enabled block for Not Applicable, it will not show up as a selection when entering a body part
under Performance Rating.
Select Code Definitions
• Addresses Type – This allows you to set codes for the list that will appear under
Personal Contacts, Address, and Address Type.
• Benefits – This allows you to set codes for the list that will appear under Benefits,
Benefits List.
• Education Degree – This allows you to set codes for the list that will appear under
Education, Degrees.
• Education School – This allows you to set codes for the list that will appear under
Education, School.
• Employee Relations – This allows you to set codes for the list that will appear under
Personal Contacts, Detail, and Relations.
• Performance Rating - This allows you to set codes for the list that will appear under
Performance, Ratings.
• Performance Reasons - This allows you to set codes for the list that will appear under
Performance, Reason.
• Salutation– This allows you to set codes for the list that will appear under Personal
Contacts, Detail, and Salutation.
• Separation Reasons – This allows you to set codes for the list that will appear under
Separations, Reason for Separation.
• Separation Type – This allows you to set codes for the list that will appear under
Separations, Separation Type.
• Training Certificate Names – This allows you to set codes for the list that will appear
under Training, Certification.
• Training School – This allows you to set codes for the list that will appear under
Training, School.
• Training Seminar – This allows you to set codes for the list that will appear under
Training, Seminar.
•
•
Wages Reasons – This allows you to set codes for the list that will appear under Wages,
Reason for Change.
Warnings – This allows you to set codes for the list that will appear under Warnings,
Warning Type.
Security Options
Security Options
Due to the confidential nature of information stored in Gradience Records, security is always
turned on. This will help prevent unauthorized persons from accessing critical employee data.
The use of security is required, and setting up access to Gradience Records and any other
Gradience programs you have should be the second thing you do. The first thing you should do is
set up Locations and Departments.
New!
In Gradience TimeClock 2007, a new feature called Encrypt Data is present on the Settings
menu > Global Preferences > Global Settings tab. This feature is designed to prevent
employee Social Security numbers from being viewed inside the database in the event the
database itself is lost or stolen. This feature has no effect inside the program itself, meaning, as
the Administrator you will still be able to view Social Security numbers in their regular format.
However, if you were to try and examine these numbers inside the database by using a database
utility designed for that purpose, you will NOT be able to do so.
How to Turn On Encryption
Look for the Encrypt Data button. Once you click Encrypt Data, you will see a dialog box asking
you for an encryption key. Enter any alphanumeric combination and click OK.
Important!
Please write down or store your encryption key in a safe place! If you lose it, you will need to
contact Technical Support to get it back.
Common Features
Features under the User Security Features Tab are shared among Gradience Records,
Attendance and TimeClock. For instance, Locations and
Departments, Accidents, Performance, and Personal Contacts are common to all three programs,
as are Global Settings. Even if you only have one of the listed programs, you will need to follow
these instructions to set up user access rights.
Note: You will not see the Attendance and TimeClock tabs if those programs are not installed.
Detail Tab (Common Features)
Search For – This allows you to search by User Name.
Save As – This allows you to create additional users based on the access rights of another user.
Process Taylor CSV –
Employee Record Access – This allows access to view, add or delete employee records.
Employee Detail – This grants access to the Employee Detail screen.
View SSN – This allows access to view Social Security Numbers.
Run Reports – This allows access to run reports.
Reminders – This allows access to add and delete reminders.
Reminders, Assign Global – This allows access to assign reminders as Global.
Reminders, Assign Users – This allows access to assign reminders to other users.
User Security – This allows access to add, edit, and delete users and user access.
Location/Department Maint – This allows access to assign
location /department access for users.
Global Preferences – This allows access to edit global preferences.
Database Monitor – This allows access to the DB Monitor.
Database Backup – This allows access to Backup from the DB Monitor.
Database Restore – This allows access to Restore from the DB Monitor.
Alter Product License – This allows access to change one or more Product License.
Conversion – This allows access to run the Conversion Utility.
Custom Reports – This allows access to create/modify Custom Reports.
Import Data – This allows access to import employee data into the database.
Export Data – This allows access to export employee data.
Guest Users – This allows access to connect to the database via a third-party ODBC driver. (We
recommend EasySoft’s ODBC-Interbase 6 Driver, available at www.easysoft.com.)
Setting up access to common features (Detail Tab)
1.
2.
3.
4.
5.
6.
7.
8.
9.
10.
11.
12.
13.
Click New from the User Security > Detail screen.
Enter a Log In and Password (letters and numbers only) and the user's Full Name.
Select options for Displaying Reminder Alarms and Hints for this login.
Select Yes to allow the user to begin logging in after giving access. Setting this option to
NO is a good security measure when users are out of the office for a number of days.
Select what type of Feature Access users will have by clicking in the Feature Access
Rights field.
Clicking on the arrow will allow you to select from the following:
NO ACCESS – no access to selected feature
READ ONLY – allows user to view only, cannot make any changes
READ WRITE – allows user to view, add, and edit; no deleting allowed
READ WRITE DELETE – allows user full editing rights to feature
YES – allows access to feature
NO – no access to feature
Click Save.
Setting up access to specific program features
Once the above steps are completed, follow these steps to set up access to specific program
features:
1. From Settings, then User Security, click on the Records Tab.
2. Select what type of Feature Access users will have by clicking in the Feature Access
Rights block until a drop-down arrow shows up. Clicking on the arrow will allow you to
select from the following:
3. NO ACCESS – No access to selected feature
4. READ ONLY – This allows user to view only, cannot make any changes
5. READ WRITE – This allows user to view, add, and edit; no deleting allowed
6. READ WRITE DELETE – This allows user full editing rights to feature
7. Click Save.
Program Features (Records)
Address – This allows access to the Address screen under the Personal Contacts screen.
Emergency – This allows access to Emergency screen.
Benefits – This allows access to the Benefits screen.
COBRA – This allows access to the COBRA screen.
Personal Contacts – This allows access to the Personal Contacts screen that allows you to
enter emergency and dependent information.
Taxes – This allows access to the Taxes screen.
Wages – This allows access to the Wages screen.
Performance – This allows access to the Performance screen.
Warnings – This allows access to the Warnings screen.
Education – This allows access to the Education screen.
Training – This allows access to the Training screen.
Accidents – This allows access to the Accidents screen.
Separations – This allows access to the Separations screen.
Reminders – This allows access to the Reminders screen (Settings, Reminders).
EEO/Other – This allows access to the EEO/Other tab.
Photo – This allows access to Edit Picture under Personal Contacts.
General Codes – This allows access to the General Codes under Settings.
Setting Up Access To Locations, Departments and Individual Employees
You should have already set up your Location and Department names (see Locations and
Departments). Now you will want to set up users’ access to the Locations and Departments by
following these steps:
1. Click on Location/Department Tab from Settings > User Security > Detail.
2. Click on the “+” (plus sign) next to Locations/Departments and next to the location and
department name to expand the list.
3. Click in the box next to the location and department name to select access to these areas
or individual employees within these departments. This will put a checkmark in the box.
Click in the box again to unselect.
4. If you have already entered your employees in the program and assigned location and
departments to them, when you expand a department, you will see all the employees
assigned to that location/department combination. You may then select access to
individual employees at this point by clicking in the box next to the employee. Note: If you
haven’t entered your employees (through the Employee Detail feature or Import Data
under the File Menu) into the program, you will still be able to assign access to a
location/department combination, just not down to the employee level. You may later
assign access down to the employee level after you enter your employees and assign a
location/department to them.
5. Click Save.
For instructions on setting up user access to any other Gradience program (e.g., Attendance or
TimeClock), please see Security Options in the appropriate user manual.
Forgotten Password Feature
Records has a Forgotten Password feature that can be used in case of forgotten or lost
passwords. Because of security concerns, this utility can only be used in conjunction with
Gradience Technical Support. To get password help, please follow these instructions:
1. Fax a statement on your company letterhead to our Technical Support team, signed by
a manager or supervisor, authorizing you to have full access to the security feature within
the program. Example Statement: (authorized name and title) is authorized to have full
access to the (name of program). Signed by (supervisor name, title and contact
information).
2. Once the fax is sent, contact Technical Support. The representative will walk you through
the correct procedure allowing you to get back into the program.
Managing Employee Records
How to Manage Your Employee Records Information
This chapter will help you become acquainted with the program layout and how to enter
employee information. Throughout this chapter there are examples of different program screens.
You may wish to view the sample database to get a better picture of how employee records look
once entered.
Make sure you have gathered the following information for each employee before attempting to
enter employee records:
•
•
•
•
•
•
•
•
•
•
Social Security Number
Name (First, Middle, Last)*
Employee Identification Number
Date of Hire*
Job Title
How many hours in a day the employee works*
Location*
Department*
Full or Part-time*
Active, Inactive or Terminated Status*
* - Required data
The Menu Bar
File Menu
•
•
•
•
•
•
•
Maintenance -> Backup Database – This lets you perform a database backup while
running the program.
Import Data – Imports basic employee data into the Gradience database.
Export Data – Exports basic employee data from the Gradience database.
(See Exporting)
Delete Employee – Deletes an employee from the Browse or Employee Detail screens.
Note: This cannot be undone and deletes all data for the selected employee!
Process Taylor CSV
Exit
MRU list – Allows you to quickly select an employee by clicking on his or her name
View Menu
•
•
•
•
Filter Page – Gives other options for sorting and filtering, such as hiding terminated or
inactive employees.
Open Reminders – Brings up all open reminders (those not checked as resolved)
Checklist– Displays Checklist screen that helps you set up the program
Welcome– Displays initial Welcome screen that pops up when you first run Gradience
Records
Settings Menu
•
•
•
•
•
User Security – Allows you to set user access to features, locations / departments and
employees
Global Preferences – Allows you to set program preferences such as Company Info,
Report Options and other program options
Guest Users – Allows you to set up user access for connection through an ODBC driver
General Codes – Allows you to add/edit fields for most drop-down fields
Locations/Departments– Allows you to add/edit locations and departments and assign
departments to a location
Reports Menu
Previews and prints up to 36 reports; you can also access this list and select a report by clicking
Reports on the left Feature Column.
Help Menu
•
•
•
•
•
•
•
•
Contents – Brings up the Help File
Check For Updates – Checks for any new updates
System Information – Displays database information and current users
About– Displays program version number and current license
Alter Current Product License – Allows you to enter/edit product key code
System Information – Displays database information and current users
About– Displays program version number and current license
Alter Current Product License – Allows you to enter/edit product key code
Using Gradience Records
Gradience Records is now easier to navigate than ever before. Even better, if you have other
Gradience software installed, such as Gradience Attendance and TimeClock, you have access to
all programs and features from one convenient interface.
The main parts of the Gradience user interface are the Menu Bar, Program Bar, Feature Column,
Employee Select Column, Selected Feature Pane and the Recent Features Pane.
The Program Bar
The Program Bar allows you to select the Gradience program you wish to use and displays its
features in the Feature Column. The programs are color coded as follows: Gradience Attendance
– Green; Gradience Records – Red; Gradience TimeClock – Purple.
The Feature Column
The Feature Column allows you to select which feature will be displayed in the Feature Pane on
the right side. To make it easier, we also color-coded the features of each program. For example,
if you select Gradience Records, and select Employee Detail from the feature column, you will
see a red title bar.
Recent Features Pane
This is a list of the most recently used features. Clicking on a feature from this list will bring it up
in the Feature Screen. It’s a quick way to get back to a previous screen.
Employee Detail Feature
The Employee Detail Feature is the main data entry and viewing screen for employee
information. It is shared between the Gradience versions of Records, Attendance and TimeClock.
If only one program has been installed, the features for the others will not be seen. The screen is
divided into two sections, the search and browse view on the left, and the main data entry screen
on the right. Note: Pictures are assigned to an employee through the Edit Picture button under
the Personal Contacts or Employee Detail Feature.
•
•
•
•
•
•
•
•
•
•
•
•
•
•
•
•
•
•
•
•
•
•
Salutation: Select Mr., Mrs., Ms., as appropriate; this field is not required.
First: Enter employee's First Name.
Middle: Enter the first letter for the employee's Middle Name (Middle Initial).
Last: Enter the employee's Last Name.
SSN: Employee's Social Security Number (or other National ID as selected under Global
Preferences, General Settings)
ID: Enter a unique ID for the Employee.
Hire Date: Enter the date the employee was hired. If the employee has been hired more
than once, you should enter the last (most recent) hire date.
Work Status: Select Full Time or Part-time as appropriate.
Employment Status: Select Active, Inactive, or Terminated to show the employee's
status.
Type: Select Regular or Seasonal
Job Title: Enter the employee's current Job Title.
Location: Select the location at which the employee is primarily employed.
Department: Select the Department that the employee is currently assigned to.
Day Hours: Enter the number of hours the employee will work in a typical workday.
Week Hours: Enter the number of hours the employee will work in a typical workweek.
Hide Picture: Click in this box to hide the assigned picture. To assign a picture, see the
Edit Picture button under the Personal Contacts Feature.
Supervisor: Enter the employee's Supervisor.
Position code: Enter the employee's position code.
Recruiter: Enter the employee's recruiter.
Source of Hire: Enter the employee's source of hire.
Comments: Enter any comments about the employee.
Edit Picture: Remove or Assign a picture for the employee.
Adding a New Employee
1. Click the New button.
2. Enter the Required Fields. (You can use the TAB key to move from field to field or hold
down the SHIFT key and press TAB to move back a field.)
Required Fields:
• First and Last Name
• Hire Date
• Work Status
• Employment Status
• Location
• Department
• Hours (Day and Week) - This is the amount of hours an employee works for a typical
workday and workweek. These numbers are used as defaults when generating report
totals.
EEO/Other Feature
This option is for tracking EEO information as required by the Equal Employment Opportunity
Commission. This information should be kept confidential and used strictly for EEO reporting
purposes. Each EEO field is described below:
EEO
•
•
•
•
•
EEO Category: Select the appropriate category for the employee.
Date of Birth: Enter the employee's birth date.
Sex: Select Male or Female.
Race: The select item most appropriate for the employee’s race.
Apprentice: Check the checkbox to indicate the employee is an apprentice.
Note: The provided categories and race selections are taken from the official EEO categories as
defined by the EEO commission. You may create other categories by going to Settings, General
Codes and selecting EEO/Other.
Other
The following items are miscellaneous information that you may choose to store about each
employee:
• Clearance Level: This field would generally be used for a security clearance. For
example, some government contracts may require your employees to have a security
clearance, such as Top Secret, Secret, Classified, etc. If your organization doesn't have a
need for this information, you could use this field for other purposes like whether or not
this employee has authorization to enter the building after hours, etc.
• Clearance Date: This field would generally be used for storing the date that a security
clearance was granted. This field is optional and can also be used for other dates as you
see fit.
• License: This field is optional and can be used to store a license number if appropriate
for your type of business.
• Veteran Status: If your business has a need to track an employee's veteran status,
select the appropriate veteran status for the employee.
• Martial Status: Select the marital status of the employee.
Note: The provided categories and race selections are taken from the official EEO categories as
defined by the EEO commission. You may create other categories by going to Settings, General
Codes and selecting EEO/Other.
I-9
•
•
Verified: Is the employee verified for I-9 Renewals?
Renewal Date: Select the date for Renewal.
Personal Contacts Feature
The Personal Contacts Feature allows you to add and edit dependent and emergency contact
information. There are four tabs within the Personal Contacts Feature (Browse, Detail and
Address) that are discussed below.
Note: Before setting up your emergency information under the Emergency Tab, you will need to
enter the contact information into the Personal Contacts Feature.
•
•
•
Browse– This allows you to view dependent and emergency contact information in a
column format.
Contact Detail – This allows you to enter dependent and contact information.
Address– This allows you to add/edit address information for each employee’s contacts.
Personal Contacts – Browse Contacts Tab
The Browse Contacts Tab allows you to quickly locate contact information for an employee.
The first Relation listed will always be the selected employee. This helps identify which employee
you are assigning contact information for.
You have the following options:
Filter by:
• Show Only Dependents – This allows you to show only names marked as dependents.
• Hide Employee – This allows you to hide the employee name.
Sort By:
• First Name – This sorts in alphabetical order by first name.
• Last Name – This sorts in alphabetical order by last name.
• SSN– This sorts in numerical order by Social Security Number.
• Relation– This sorts in alphabetical order by relation type.
Selecting the above options will carry over when going to the Personal Contacts Detail,
and Address screen.
Personal Contacts – Contact Detail Tab
This Contact Detail Tab allows you to enter dependent and contact information. All contacts,
whether dependent or emergency, need to be entered through this screen before assigning them
in the Emergency Tab.
The first Relation on the Contact Detail Feature is the Employee you want to add dependents or
contact information to. The title Employee under the Relation drop-down box for this person
cannot be changed.
To add a dependent or other contact, follow these steps:
1. Select an employee from the employee list.
2. Click New.
3. Enter First Name, Last Name and Relation information (required fields). Enter other fields
as needed (Salutation, Maiden Name, Birth Date, SSN, Student, Disabled and
Dependent info). Note: When entering Relation information, you may add to the list for
the type of Relation (child, aunt, doctor, physician, etc.) by going to Settings, General
Codes and selecting “Employee Relations” from the Select Code column.
4. Click whether to hide photo on this screen, if assigned.
5. Click Save.
6. Click the Edit Picture to assign a photo to this contact person.
7. Click Address to add an address to this contact person.
Adding an Employee Picture
A photo gives you a visual image of an employee, their dependent(s) or emergency contact
person(s). Photos are not required. We recommend you use a digital camera to take your photos
and save the images in the industry standard JPEG (.JPG) picture format or Bitmap (.BMP)
format. An image size of 200x200 pixels works best. If your picture is larger than this, the
program will squeeze your larger picture into the displayed picture frame. If your digital camera
has TWAIN support, you can import the picture right into Gradience using the Twain Import
feature.
To add an employee picture follow these steps:
1. From either the Personal Contacts or Employee Detail Feature select the employee you
want to add a picture to.
2. Click Edit Picture.
3. Click Assign New Photo.
4. Navigate to where the employee picture is. Select it and click Open. If your photo is larger
than the recommended size (200x200 pixels), you may get a message that asks if you
still want to assign the file. If you click Yes, the program will try to squeeze your larger
picture into the frame, however, the larger size of the file will be maintained and may
make the database larger.
5. Click Ok.
Using Twain Import
The Twain Import button allows you to import pictures directly from your Twain-compliant digital
camera. You’ll need to install the software that came with your digital camera. To import a photo
from your digital camera, follow these steps:
1. First, you’ll need to make sure that your digital camera is Twain-compliant and that the
software that came with your camera is installed on the same computer where you will
run Gradience.
2. Connect your digital camera to your computer.
3. Open Gradience and navigate to the employee you want to add a picture to.
4. Click on the Personal Contacts Tab.
5. Select the Edit Picture button and click on the Twain Import button.
6. Click the Select Source button and then on your camera name. You may have one or two
options available.
6.1. [Camera Name] – This option allows you to take the picture and import it to
Gradience. Go to Taking a Picture and Importing to Gradience below to continue
instructions.
6.2. Photos in [Camera Name] - This option will allow you to download and view the
pictures on your camera’s disk if you’ve already taken pictures. Go to Downloading
Pictures from Camera Disk below to continue instructions.
Taking a Picture and Importing it into Gradience
Continue following these steps from Step 6.1 above:
1. After selecting your camera as the source, click OK
2. Click the Acquire Picture button and click Take Picture. The picture should show up on
the Twain Import screen.
3. Click OK to select the picture.
Note: The instructions for selecting or downloading a picture may be different depending on your
camera.
Downloading Pictures from Camera Disk
1. Continue following these steps from Step 6.2 above:
2. After selecting this option, click OK
3. Click the Download button to download the pictures to your computer.
4. Select the picture you want to import then click Transfer.
5. Click Ok to select this picture.
Note:The instructions for selecting or downloading a picture may be different depending on your
camera.
Saving a Photo to Disk
All the pictures in Gradience are stored in the Gradience database (hrware.gdb). This option will
allow you to save the picture to a different directory, if needed.
To save an assigned photo to your computer, follow these steps:
Note: The picture must be assigned to an employee before you can save it to a different directory.
1.
2.
3.
4.
5.
Click Personal Contacts, then the Edit Picture button.
Click Save Photo to Disk.
Navigate to where you want to save the photo.
Name the photo.
Click OK. The picture can only be saved as a .bmp file.
Address Tab
The Address Tab allows you to enter an employee’s contact information.
When entering an address, verify which name you are adding the address to by looking at the
relation and name just below the Address Tab (or above Address Type and Last Updated). As in
the above screen shot, we would be adding contact information to the Employee, Neil Adams.
Use the top set of arrows to scroll to another contact name for the selected employee. For
example, if we clicked on the Next arrow, we would scroll through the contact list for Neil Adams.
Use the bottom set of arrows to scroll though the Address Type (Home, Office, etc.).
To enter address information for the selection Relation, follow these steps:
.
1. Click on the New icon
2. Enter the contact information, filling out as much information as needed. These fields are
not required.
3. Click the Save icon
to accept changes.
4. Click the Cancel icon
to discard any changes.
5. Click the Delete icon
to delete an address record.
Benefits Feature
Benefits are important to all employees. On this screen, you can enter all of the information for
the benefit plans your company provides. This screen will allow you to track benefits such as
401(k), COBRA, FMLA, dental, medical, life insurance, disability and others.
Benefit Detail Tab
The Benefit Detail Tab shows you the currently selected benefit.
• Benefit- Benefit Name
• Eligibility Date – The date the employee is eligible to receive benefits
• Date Enrolled – The date the employee enrolled in the benefit plan
• Date Withdrew – The date the employee withdrew from the benefit plan
• Coverage or Deduction – You may use this field to enter the amount of coverage for a
specific benefit or a deduction amount
• Employer Cost – This allows you to break down in dollar amounts how much money the
company will contribute.
Beneficiaries
You may assign a recipient of a benefit by assigning their name in the Benefits block. In order to
assign a beneficiary name to a benefit, the name must first be entered into the Personal Contacts
screen. (See Personal Contacts for setting up other names.)
• Primary– Main beneficiary
•
•
•
•
•
•
Secondary– Alternate beneficiary
Relationship– This will fill in automatically from the information entered into the Personal
Contacts screen
Allocation % - (0 – 100) – This allows you to allocate how much each beneficiary
receives
Waived this benefit – This will denote if employee waived this benefit
Approval on File – This will denote if approval is on file
Comments
Use the arrow keys to scroll through the benefits, or click on the Current Benefits Tab, select a
benefit from the list and click back on Benefit Detail. Using the arrow keys will scroll through
assigned benefits. Click on the Benefits List to see assigned benefits. (Assigned benefits will
have a checkmark next to them.)
To add a benefit from the Benefits List, follow these steps:
1. Click on the Benefits List Tab.
2. Select a benefit by clicking in the box next to it. This will place a checkmark in the box.
3. Click Yes to add the benefit.
4. Enter the benefit information.
Click Save.
You may add other benefits that are not on the Benefit List by going to Settings, General Codes
and selecting Benefits.
The Current Benefits Tab shows you all the current benefits for this employee. It also allows you
to filter the following:
• Show All – This allows you to view all assigned benefits for the selected employee.
• Show Eligible but Not Enrolled through date – This allows you to view benefits that
have an eligible date but not an enrolled date.
• Show Only Withdrawn – This allows you to view only benefits that have a Withdrawn
date on the Benefit Detail screen.
Training Feature
The Training Feature allows you to track seminars, certifications and courses.
•
•
•
•
•
•
•
•
•
•
•
•
Seminar– Name of the seminar
School– Name of the school
Certification– Name of the certification
Certification # – Certification number
Employer Cost – How much the company paid for the training
Employee Cost – How much the employee paid for the training
Begin Date – Starting date of training
End Date – Concluding date of training
Expiration– Expiration date of training, if applicable
Mandatory– Select if mandatory
Completed– Select if employee completed the training
Comments– Enter notes regarding training, plus file attachments
To add a new training record, click on New and fill in all appropriate blocks. You may also enter
the Seminar, School or Certificate name on the screen. Only names that have been entered
through the General Codes screen will appear on the drop-down box.
To add to the list under Seminar, School, or Certification, go to Settings, General Codes and click
on Training Seminar, Training School, or Training Certificate. Click Save to keep changes. To
delete a record, click Delete.
Taxes Feature
The tax screen can be used to record an employee's exemption and filing status. This information
is usually found on the employee's W-4 form.
•
•
•
•
•
•
•
•
•
Number of Dependents – Dependents may be children, spouse, parents or other.
Number of Federal Exemptions – This is the number of exemptions that an employee is
claiming.
Additional Amount Withheld – Any additional amount withheld from an employee’s
paycheck.
Federal Tax Withheld – Amount of Federal tax to be withheld from an employee’s
paycheck.
Effective Date – Date of changes made to the employee’s family status or the initial hire
date.
Other Taxes – This allows you to indicate if other types of taxes are paid.
Filing Status – This allows you to enter the employee's filing status.
Full Time Student – If the employee meets the requirements to be classified as a fulltime student, you may check this option.
Comments– This allows you to enter additional tax-related notes.
Emergency Feature
The Emergency Feature allows you to designate whom the company should contact in case of
emergency, as well as the call order. It’s a fast way to get this information because you simply
select the employee, then the Emergency Feature. Contact information is taken from the
Personal Contacts screen
To assign a contact name, follow these steps:
Note: Contact Names must be entered through the Personal Contacts screen before you will be
allowed to assign emergency contacts.
1. Click Personal Contacts and enter any new contacts. (See Personal Contacts.)
2. From the Emergency screen, click New. This will create a blank row.
3. Click on the blank row. This will show a drop-down arrow.
4. Click on the drop-down arrow. This will show you a list of contact names to choose from.
5. Enter Notes, if necessary.
6. Click Save.
To unassign a record, click Delete. This does not delete the contact name from the Personal
Contacts screen, it only unassigns the name from the Emergency window.
Performance Feature
The Performance Feature allows you to schedule and track performance reviews, as well as
document employee skills and achievements. Several new areas of information have been added
to this feature for Gradience Version 9, plus you can now attach supporting documentation files to
comments fields.
•
•
•
•
•
•
•
•
Interviewer– Name of the person conducting the review
Reason– General reason for review (annual, 3 month, etc.)
Review Date – Date of performance review
Next Review Date – Date of next performance review
Overall Rating – If applicable, the total score of the review
Increase % – Amount of salary increase due as a result of the interview
Comments– Allows you to enter comments or attach supporting documents (e.g., in
Microsoft® Word) regarding the logistics of the review
General Ratings – Lets you rate employee (Outstanding, Very Good, Good,
Improvement Needed, Unsatisfactory or Not Applicable) for various attributes:
o Quality
o Productivity
o Job Knowledge
o Reliability
o Attendance
o Independence
o Creativity
o Initiative
o Adherence to Policy
o Work Relationships
o Judgement
Note: There are separate comment fields for each attribute so that you can include a brief note
or attach supporting documentation; for example, under Productivity, you might attach an Excel
file that summarizes the amount of work an employee performs.
•
•
•
•
•
Major Strengths – Here’s where you can summarize the employee’s strengths and
contributions to the company. This field allows file attachments.
Area Needing Improvements – Point out specific skills or contributions that employee
should work on here. This field also allows file attachments.
Previous Goals / Achieved – List up to five major goals the employee worked on during
the last review period, plus assign a percentage to the amount of the goal that was
achieved. The comments field for each goal allows file attachments.
New Goals / Achieved –List up to five major goals the employee should work toward
until the next review; you can periodically update the percentage achieved as you get
closer to the next review. The comments field for each goal allows file attachments.
Additional Comments – Here you can write any remaining notes concerning the review
plus add file attachments.
To add a Performance Review, click on New and fill in all applicable fields, then click Save.
Clicking on Print, then Review Detail, prints the Performance Review for the selected employee
and review date.
Wages Feature
Use the Wages Feature screen to track employee salaries and wage histories.
•
•
•
•
•
•
•
•
•
•
•
•
•
Reason for Change – The Reason for change in wage amount.
Effective From – Date of pay change
Effective To – Date of next review
Department– Enter new department, if applicable
Job Title – Enter new title, if applicable
Reason for Change – Type of change (merit increase, length of service, etc.)
Pay Frequency – Frequency that employee is paid
Rate – Employee's pay rate
Maximum – Pay range (high end)
Minimum– Pay range (low end)
Exempt – Indicates exempt status. An employee is considered exempt if pay is
determined on a salary basis. An non-exempt employee is paid by the hour.
Hours – Choose Full or Part Time, and if work for the employee is Educational, Seasonal
and/or Temporary.
Comments – Enter additional wage related information, as well as attach any supporting
file.
Click New to create a new wage record and fill in all applicable blocks. Click Save to keep
changes. To delete a record, click Delete.
Separation Feature
The Separation Feature allows you to document employee separations properly, which can be
very important if the separation is a termination. This documentation could serve as evidence at
an unemployment compensation hearing or if an employee levels allegations of discrimination.
The Separation Feature has been significantly expanded in Gradience Version 9.
•
•
•
•
•
•
•
Separation Meeting Date / Time / AM or PM – This field allows you note when the
separation meeting with the employee occurred.
Location– Likewise, you can document where the meeting took place; the more specific,
the better.
Last Day Worked – Enter the last day that the employee worked here.
Effective Date – In this field, you can specify the effective date of the separation.
Supervisor– Note the employee's supervisor in case he or she was not present at the
meeting.
Type of Separation – Select the type for the separation from the following, which can be
edited or added to through the Settings, General Codes, Separation Types screen.
o Discharge
o Layoff
o Resignation
Date of Hire – Gradience will automatically populate this field with the current Hire Date
information contained in the Employee Detail Feature; however, there are instances
when you might have an employee who was re-hired, so you can change this date.
Note: If you change the Hire Date in Separations, it will not change the Hire Date in the
Employee Detail Feature.
•
•
•
•
•
•
•
Shift– Record the shift that employee worked here.
Position–Enter the employee’s position at the time of separation; note that past positions
during separations could be different than the current position title under the Employee
Detail Feature.
Present During Meeting – List up to four attendees at the separation meeting; it can be
important to have witnesses to corroborate events should there be dispute regarding the
separation process.
Comments– Use this field to document the events of the separation meeting: what was
said, behavior of the employee, etc. You can also include file attachments in this field.
Reason for Separation – Select a reason from the drop down list; there are many
default choices, but you can also customize this list through Settings, General Codes,
Separation Reasons
Ok to Rehire – This checkbox lets you designate whether the company would rehire the
employee.
Separation Issues Discussed with Employee – Select from the following separation
topics:
o COBRA Rights
o Company Materials / Equipment Returned
o Final Pay
o Mail/Pick Up Last Paycheck
o Outstanding Expense Reports / Advances
o Retirement / Savings Distribution Options
o Trade Secret / Confidentiality Obligations
o Vacation Due: Days / Hours
To add more reasons and separation types to the drop-down list, go to Settings, General Codes.
Click New to record a new record. Click Save to keep changes. Click Delete to delete a record.
COBRA Feature
Gradience Records tracks basic COBRA-related information for employees leaving your
company. Qualifying events typically associated with COBRA: Employee Termination, Reduction
of Hours, Employee Death, Divorce or Separation, Medicare Entitlement, Loss of Dependent
Status.
COBRA Detail Tab
•
•
•
•
•
•
Employee or Dependent – Shows selected person
Event– Allows you to choose the triggering event
Dates– Allows you to enter the dates for Employer Ending, COBRA Ending, and
Employee Notified.
Acceptance– Allows you to indicate what type of response was given from the employee
Apply to all Dep. – Clicking on this button will assign the currently displayed COBRA
information to the employee and all their dependents. In order for the COBRA Feature to
be able to perform this action, dependents need to be entered in Personal Contacts for
the selected employee.
Comments– Enter supporting information here, as well as file attachments that
document the employee’s notification of COBRA events.
Click New to add a record. Click Delete to delete a record.
COBRA Browse Tab
The Browse allows you to view all employee dependents at a glance. To bring up the detail
screen for a specific dependent, double-click on the name you want. Note: You may also scroll
through the dependents by using the arrow keys.
Reminders
The Reminders Feature will show you all open (unresolved) reminders and allow you to create,
delete and resolve reminders. If you have created a reminder it will show up when you first open
the program, starting on the reminder date. Reminders will continue to display until you click
Resolve.
Reminders Tool Bar and Pane Layout
Tool Bar
• First-Prior-Next-Last arrows – navigates through selected reminders
• New – Creates a new reminder
• Edit – Allows you to make changes to a reminder
• Save – Saves reminder
• Cancel – Cancels current changes
• Delete– Deletes selected reminder
• Print – Lets you print the Reminders report for selected employees
• Help– Brings up help for this screen
Pane Layout
• Reminder Date – Date reminder should first display
• Title– Heading of reminder
• Resolved – Checkbox displays checked for resolved or unchecked for open (unresolved)
• Employee Name – Displays name of employee that reminder is associated with
• User – Displays name of user that reminder will display for
• Description – The purpose of the reminder shows here
Filters
• User – Allows you to view reminders associated with specific users (must have access to
Reminders, Assign Users under User Security)
• Show Resolved – Displays Resolved reminders only
• Show Unresolved – Displays Unresolved (open) reminders only
Creating a New Reminder
There are two types of reminders in Gradience:
One Time Reminders– These are reminders that are only meant to remind you of a one-time
event, such as filing an EEO Report.
Recurring Reminders – These remind you of repeating events:
• Anniversaries
• Birthdays
• Performance Reviews
• I-9 Renewals
Setting a Reminder
One Time Reminder
1. Click on Reminders from the Features Column.
2. Click New.
3. Select (check) One Time Reminder.
4. Enter a Title and Reminder Date
5. If you want the reminder to be associated with specific employees, select the checkbox
“Assign to all selected (checked) employees.” This is optional and will create a separate
reminder that is associated with each employee.
6. If you selected the checkbox in Step 5, you will need to select (check) any employees
that this reminder is about in the Employee Select Column. Otherwise, skip to the next
step.
7. By default, the User’s name will default to the login that was used to enter the program.
Change this if you want the reminder to come up for another user, or you may select
Global which allows the reminder to come up for all users logging in. Note: You must
have access to Reminders, Assign Users and Reminders, Assign Global under User
Security to be able to change this option.
8. Enter a description of the reminder, if needed.
9. Click Save.
Recurring Reminder
1. To create a recurring reminder, follow these steps:
2. Select Reminders from the feature list.
3. Click New.
4. Select (check) Recurring Reminder.
5. Select the type of reminder: Anniversary, Birthday, Performance Review, or I-9 Renewal.
6. Select a Through Date (when do you want to stop the reminder from occurring).
7. Select how many days you want to be reminded before the event.
8. By default, the User’s name will default to the login that was used to enter the program.
Change this if you want the reminder to come up for another user, or you may select
Global, which allows the reminder to come up for all users logging in. Note: You must
have access to Reminders, Assign Users and Reminders, Assign Global under User
Security to be able to change this option.
9. Enter a description of the reminder, if needed.
10. Click Save.
Deleting Reminders
Reminders are deleted from the Main Reminders screen by clicking on the Delete icon.
Editing Reminders
There are two ways to edit reminders:
Main Reminders screen
From the main Reminders screen you can edit the following columns just by clicking in the field:
Reminder Date, Title, Resolved and Description.
Edit Reminders screen
Clicking on Edit from the main Reminders screen will bring up the Edit Reminder screen. You
may also double-click on the title of a reminder. The Edit Reminders screen allows you to change
the Title, Reminder Date, User and Description.
Note: If you need to change the Employee Name that this reminder is about, you’ll need to delete
the reminder and then re-add it.
Open Reminders
Open reminders will appear for the user they are assigned unless the Global option is checked. If
a reminder is marked with Global, then it will show for all users. You may view open reminders by
opening the program or selecting Reminders from the feature list.
Note: If you have security access to “Reminders, Assign Users” (See Security Options), you may
view reminders set up by other users. You may also resolve reminders from the Open Reminders
screen.
Accidents Feature
The Accidents Feature allows you to document on-site accident information as required by
OSHA. This Feature in Gradience complies with OSHA's Form 301 and must be completed
within 7 calendar days after you receive information that a recordable work-related injury or
illness has occurred. The information must be kept on file for five years following the year to
which it pertains, in accordance with Public Law 91-596 and 29 CFR 1904 (OSHA's
Recordkeeping Rule).
There are many data fields that should be completed with each new incident. To add a new
accident record, click New and fill in all applicable blocks. Click Save to keep changes. To delete
a record, click Delete.
Warnings Feature
The Warnings Feature allows you to record disciplinary action, which protects employers in the
event there’s a dispute, especially if repeated warnings formed the basis of serious employee
sanctions (e.g., suspension, demotion or termination). Several areas of information are new with
this version of Gradience Records.
•
•
•
•
•
•
•
•
Date – Date of the employee’s unacceptable behavior or incident
Time / AM or PM – Time of the incident
Date of Warning –The date that the employee received the warning
Interviewer– Identify the individual giving the warning
Warning Type – Select the reason for the warning, as defined under Reason Codes
under the Settings menu
Comments– Enter additional information regarding this warning, including file
attachments that could provide supporting evidence. You can also note any other
persons who witnessed the incident or presentation of the warning.
Notification– Select the type of notification, either verbal or written. Gradience
recommends employers always give warnings in written form, with both the Interviewer
and Employee providing signature and date.
Action Taken – Select the type of action that was taken:
o Warning only
o Probation
o Suspension
•
•
o Dismissal
o Other (Specify in Comments field)
Signed Copy By Employee / Supervisor – As noted above, a signed hardcopy of the
warning by both employee and supervisor is best. Check here to verify this important step
was taken.
Consequences should the incident occur again – Note here what the employee
should expect should the incident be repeated. The most broad statement would be
“Disciplinary action up to and including termination.”
To add additional Warning Types, go to Settings, General Codes and click on Warnings. Click
New to record a new record. Click Save to keep changes. Click Delete to delete a record.
Education Feature
The Education Feature allows you to record information about an employee’s educational
background.
•
•
•
•
•
School – Name of the school
Degree – Select a degree or certification from the drop-down list (see the Schools button
for information on adding to the list)
Graduated – Employee's graduation status
Date Graduated – Enter a date or click on the drop-down arrow to select a date
Comments – Enter comments regarding education
Click New to create a new record and fill in all applicable blocks. Click Save to keep changes. To
delete a record, click Delete.
To add to the School or Degree list, go to Settings, General Codes, and click on Education
School or Education Degree. You may also enter the Seminar, School or Certificate name on the
screen. Only names that have been entered through the General Codes screen will appear on the
drop-down box.
Emergency Contacts
The Emergency Feature allows you to designate whom the company should contact in case of
emergency, as well as the call order. It’s a fast way to get this information because you simply
select the employee, then the Emergency Feature. Contact information is taken from the
Personal Contacts screen.
To assign a contact name, follow these steps:
1.
2.
3.
4.
5.
6.
Click Personal Contacts and enter any new contacts. (See Personal Contacts.)
From the Emergency screen, click New. This will create a blank row.
Click on the blank row. This will show a drop-down arrow.
Click on the drop-down arrow. This will show you a list of contact names to choose from.
Enter Notes, if necessary.
Click Save.
Reports
Reports in Gradience Records
Gradience Records creates many reports and charts that relate to employee record keeping. For
additional reporting capability, please try Gradience Attendance, which offers you the power to
track absenteeism and time-off benefit balances.
Creating and Printing Reports
There are two ways to preview and print a report.
1. You may preview and print from the individual feature by clicking on the Printer icon
associated with that feature or
2. You may go to the Reports drop down menu or feature list for more sorting/filtering
options.
Printing from the Reports Feature or Menu Bar
1.
2.
3.
4.
From the Employee Select column, select which employees you want to report on; you
may use either the Browse mode or TreeView mode to select employees.
From the feature list, click Reports and then choose a report.
Select sorting / filtering options in the Feature Pane, if needed, and click Preview.
Click the printer icon to print.
Each report has basic and additional options for that specific report.
Print Preview
The Print Preview screen gives you the following options:
• Zoom Buttons – These allow you to zoom each page: Zoom to fit – fits the page to the
screen; 100% - zooms the page to 100%; Zoom to Width – zooms the width of the page
to fit the screen.
• Print Setup/Print – These allow you to enter print setup or print the report.
• Save to File/Open File – From here you can save the report as a Quick Reports file. You
can also open an existing Quick Reports file. Normally, you would not need to save as a
Quick Reports file.
• Close- This button closes the preview.
Basic Report Options
Each report has the same Menu, Grouping and Export options:
Report Menu Options
•
•
•
•
Preview– Displays the report with options to print and setup printer.
Print – Sends the report to the selected printer.
Custom – Allows you to customize a report.
Help– Displays help pertaining to this screen.
Grouping Options
•
•
•
Location– Groups data by Location.
Department– Groups data by Department. With Location also selected, the report will
group by location, then department.
Show Group Totals – Shows total number of employees after Location and/or
Departments with a grand total at the end of the report. Location and/or Department must
be selected for this option to be enabled. With both Location and Department unselected,
the report will group by Last Name in alphabetically order.
Display Options
•
Show Social Security Number on Report – This allows you the option of displaying the
SSN on reports that include this data field.
ALERT FOR VERSION 7 Optima USERS: Options for selecting only Active, Inactive or
Terminated employees no longer appear within the Report Options Pane. However, if you do
need sort by employment status, you can do so through the Sorting/Filter Page under the View
menu.
Types of Available Reports
Employee Reports
•
•
•
•
•
•
•
•
•
•
•
•
Accidents Report – Track and report on employee Accidents.
Performance Report – Track and report Employee Performance details.
Detail – The Employee Detail Report produces a detailed report of each employee's
primary information.
Summary – The Employee Summary Report produces a summary report of each
employee's primary information.
Training – Training Report #1. The Employee Training Report produces a record of
training sessions attended by all employees.
Training Extended – Training Report #2. The Training Extended Report produces a
training report on legal size paper to fit more information.
Education – The Employee Education Report produces a record of educational
institutions attended by an employee. Degrees and certifications are included in this
record.
Reminders – The Employee Reminder Report produces a listing of all open reminders
sorted by reminder date.
Separations – The Employee Separations Report documents reasons for separations.
Warnings – The Employee Warnings Report produces a printed record of all employee
warnings occurring within a specified date range.
Dependents – The Employee Dependents Report produces a report of employee
dependents.
Emergency – The Employee Emergency Report produces a report of emergency contact
information for employees.
Date Reporting
•
•
•
Anniversary – The Anniversary Report produces a list of employees whose hire dates fall
within a specified date range.
New Hires – The New Hire Report produces a list of employees hired within a specified
date range.
Birth Date – The Birth Dates Report produces a list of employees whose birthdays fall
within a specified date range.
•
Seniority – The Seniority Report produces a list of employees by hire date, from the
earliest to latest hire date.
Salary Reports
•
•
•
Ranking/Analysis– The Salary Ranking/Analysis Report produces a list of employees
ranked by salary.
History – The Salary History Report produces a list of all employee salary changes.
Tax Settings – The Tax Settings Report produces a report of employee’s tax information.
Benefits Report
The Benefits Report produces a listing of each employee’s benefit status.
Performance Reports
•
•
Review History – This report is useful for department managers to schedule and prepare
for upcoming reviews. It shows selected employee’s next and last review dates,
increases and ratings. It can be sorted by location, department and by date of last review.
Review Schedule – This report produces a listing of performance review records. It
shows each employee’s next review date, job title, hire date, and last review date. It can
be sorted by location, department, and by date of next review.
Government Reports
•
•
•
•
•
•
EEO Detail –The Equal Employment Opportunity (EEO) Detail Report shows the data
used to compile the EEO Summary Report. This report shows the employee name, title,
full-time/part-time, status, hire date, sex, EEO, category and ethnic code.
EEO Summary –The Equal Employment Opportunity (EEO) Summary Report shows
each of the five U.S. Government defined race classifications broken down by EEO
classifications (from the EEO categories table). EEO Categories are job classifications
such as Sales Workers, Craftsman, Professional, etc.
COBRA– The COBRA Report produces a listing of important COBRA dates for all
employees and their dependents if applicable. This report shows the date the employee
was notified about COBRA benefits, if the employee accepted, when benefits end and
the ending COBRA coverage date.
I-9 Renewals – The I-9 Renewals Report produces a listing of upcoming renewal dates
for employees to resubmit their government I-9 form. It shows each employee’s name,
title, hire date and I-9 renewal date.
Accident Report – The Accident Report produces a listing of all reported accidents that
occurred within a specified date range.
Accident with OSHA – The Accident with OSHA report produces a listing of all reported
accidents that occurred within a specified date range.
Telephone List
The Telephone List Report produces a record of all employee phone numbers. You can print
office phone number with extension number, office extension only or home phone number.
ID Badges
This feature enables you to print employee ID badges with photos.
Labels
This report enables you to print mailing labels for employee mailings. Records supports three
different Avery label formats:
Avery 5160 3x10 (2.63’’ x 1”), Avery 5261 2x10 (4’’ x 1’’) and Avery 5262 2x7 (4’’ x 1.33’’).
Gradience Records now enables you to adjust the position of your labels. On the Label Report
screen there are two options: Left Offset and Top Offset. Adjust the position of your labels using
these two options.
Charts
•
•
Salary Breakdown – The Salary Breakdown Chart allows you to view salaries broken
down in a pie chart, bar graph, line or point chart format.
Ethnic Codes – The Ethnic Codes Chart allows you to view race categories broken down
in a pie chart, bar graph, line or point chart format.
Charts – Salary Breakdown, Ethnic Codes and EEO Category Breakdown
Report Interface
Charts allow you to view Salary Breakdown, Ethnic Codes, and EEO Category Breakdown
information.
Charts can help you view information at a glance. Using the charts, you can view these charts:
• Salary Breakdown – Enables you to view and compare salary breakdown.
• Ethnic Codes Breakdown – Enables you to view your companies race breakdown.
• EEO Category Breakdown - Enables you to view your companies EEO category
breakdown.
Follow the steps here to print a chart:
1. Click Reports from the main menu, select Charts; then select the Chart you wish to
use.
2. Select the Options you want.
3. Click Run Graph. The chart control window will appear.
4. The selections here will affect the chart as it is shown on screen. Select the options you
want and click the Preview & Print icon to see how the chart will appear.
From the Preview screen, click the Printer icon to print the chart.
When you click on Run Graph you will have the following options:
•
•
•
•
•
•
•
•
•
•
•
Preview & Print – This shows a preview of the chart.
Close– Exits the Chart screen.
Help– Brings up Help pertaining to this screen.
Chart Type – Gives you the choice of viewing as a Pie, Bar Graph, Line, or Point Chart.
Color assignments – This allows you to set the colors of a specific month.
Display– Toggles the Legend (data box next to the chart), Parameters (data at the bottom
of the chart), and Ignore Zeros (any data on the chart with zeros).
Label Display – Toggles the Label only (months), Value only (see Value Display), or
Label and Value.
Value Display – Toggles the value as a number (count), percentage, or Percentage Of
(shows as: [percentage] of [total count]).
3D Control – This allows you to view the depth of 3D by moving the arrows.
Rotation– Rotates the Pie Chart in the desired direction.
Explode Biggest – Moves the largest piece away from the pie.
Accident Detail Report
The Accident Detail report prints all accident information that occurred within a specified date
range for each employee selected.
Additional options for this report:
• Injury Date: From/Through – This allows you to view all injury dates.
• Date Reported: From/Through – This allows you to filter by date reported.
Accident Report
The Accident Report produces a listing of all reported accidents that occurred within a specified
date range.
Additional options for this report:
•
•
•
•
•
•
•
Employee – Employee name.
Case Number – Assigned case number.
Injury Date: From/Through – This allows you to view all injury dates.
Date Reported: From/Through - Date reported from and through.
Incident Occurrence – How incident occurred.
Days Off – How many days the employee was off work.
Return Date – Return to work date.
Anniversary Report
The Anniversary Report produces a list of employees whose hire dates fall within a specified date
range.
Additional options for this report:
• From Date/To Date – runs the anniversary report according to this date range
Benefits Report
The Benefits Report produces a listing of each employee’s benefit status.
Additional options for this report:
• Eligible Date – Shows Benefits with an Eligible Date within selected date range
• Joined Date – Shows Benefits with a Joined Date within selected date range
• Withdrew Date – Shows Benefits with a Withdrew Date within selected date range
• Waived Benefits Only – Shows Benefits with a Waived Benefits date within a selected
date range
• Report Only Selected Benefit(s) – With this box checked, it allows you to select one or
multiple benefits to report on
Birth Date Report
The Birth Dates Report produces a list of employees whose birthdays fall within a specified date
range.
Additional options for this report:
• Filter Settings – runs a birthday report within a certain date range.
COBRA Report
The COBRA Report produces a listing of important COBRA dates for all employees and their
dependents if applicable. This report shows the date the employee was notified about COBRA
benefits, if the employee accepted, when benefits end and the ending COBRA coverage date.
Additional options for this report:
• Employer Ending Date– Shows employers ending COBRA date
• COBRA Ending Date – Shows COBRA ending date
• Notification Date – Shows employee notification date
EEO Detail Report
The Equal Employment Opportunity (EEO) Detail Report shows the data used to compile the
EEO Summary Report. This report shows the employee name, title, full-time/part-time, status,
hire date, sex, EEO, category and ethnic code. The EEO Detail report is a great report for
auditing purposes. It gives specific EEO information including Employee Name, Title, Full or Parttime, Active status, Date of Hire, Sex, Race and Category.
Additional options for this report:
• Employed During: From/Through – Reports on employees employed during a selected
date range
• Separation Date: From/Through – Employed During must be selected before this option
will be available. Reports on employees separated during a selected date range.
• Sort By Hire Date – This allows you to sort data on report by Hire Date
• Sort By Separation Date – This allows you to sort data on report by separation date
• Sex – This allows you to sort by Male or Female
• Select Specific Race – This allows you to sort by multiple selected races. Click in the box
next to Select Specific Race to be able to select specific races.
• Select Specific Category – This allows you to sort by multiple selected categories. Click
in the box next to Select Specific Category to be able to select specific categories
EEO Summary Report
The Equal Employment Opportunity (EEO) Summary Report shows each of the five U.S.
Government defined race classifications broken down by EEO classifications (from the EEO
categories table). EEO Categories are job classifications such as Sales Workers, Craftsman,
Professional, etc. The EEO Summary is another great report for auditing purposes. It gives
specific Race totals by Category.
Additional options for this report:
• Employed During: From/Through – Reports on employees employed during a selected
date range
• Separation Date: From/Through – Employed During must be selected before this option
will be available. Reports on employees separated during a selected date range.
• Select Specific Race – This allows you to sort by multiple selected races. Click in the box
next to Select Specific Race to be able to select specific races.
• Select Specific Category – This allows you to sort by multiple selected categories. Click
in the box next to Select Specific Category to be able to select specific categories.
Employee Dependents Report
The Employee Dependents Report produces a report of employee dependents.
Additional options for this report:
• Show Social Security Number on Report – toggles on or off the SSN
Employee Detail Report
The Employee Detail Report shows pertinent employee information including accrual plan
assignments, balances, initial balances and notes from the Employee Detail Feature.
Additional options for this report:
•
•
Show Social Security Number on Report – allows you to toggle on or off the SSN on this
report.
Print Picture – allows you to toggle on or off the assigned employee picture on this report.
Employee Education Report
The Employee Education Report produces a record of educational institutions attended by an
employee. Degrees and certifications are included in this record.
Additional options for this report:
• Degree Date – filters when an employee received his or her degree
Employee Emergency Report
The Employee Emergency Report produces a report of emergency contact information for
employees.
Additional options for this report:
• Show Social Security Number on Report – toggles on or off the SSN
Employee Reminders Report
The Employee Reminder Report produces a listing of all open reminders sorted by reminder
date.
Additional options for this report:
• Sort Options – Sorts by Date, Name, Topic or User Name
• Reminder Date – Selects the date range of reminders to display
Additional Filters
• User – Shows reminders assigned to selected user
• Display All Users – Shows reminders for all users
• Show Resolved – Shows resolved reminders
• Show Unsresolved – Shows unresolved reminders
• Show Global Only – Shows reminders assigned as Global
Employee Separations Report
The Employee Separations Report documents reasons for separations.
Additional options for this report:
• Separation Date – Filters on separations within this date range
Employee Summary Report
The Employee Summary Report shows an employee’s date of hire, title, status and work status.
Use this report when you want an employee listing.
Employee Training and Training Extended Report
Training Report: The Employee Training Report produces a record of training sessions attended
by all employees. In contrast, the Training Extended Reportproduces a training report on legal
size paper to fit more information.
Main options:
• Training Date Filters
• Begin Date –select a beginning date for training
• End Date – select training ended through this date
• Expiration Date – select an expiration date for training
Additional Filters
• Mandatory – filters on training marked as mandatory
• Completed – filters on training marked as completed
• Select Seminar – filters on a specific seminar
• Select School – filters on a specific school
• Select Certification – filters on a specific certification
Additional Options:
• Grouping Options – By checking these boxes, you can group your report by Location,
Department, or by (Show) Group Totals.
• Show Social Security Number on Report - Displays the employee SSN on reports.
• Include Images for Custom Reports – Check this box if you want to include images
when creating or printing your custom reports.
Employee Warnings Report
The Employee Warnings Report produces a printed record of all employee warnings occurring
within a specified date range.
Additional options for this report:
• Warning Date – filters on warnings given within this date range
• Show Comments - displays comments on Warnings report.
• Show Consequences – displays consequences on Warnings report.
• Grouping Options – By checking these boxes, you can group your report by Location,
Department, or by (Show) Group Totals.
•
Include Images for Custom Reports – Check this box if you want to include images
when creating or printing your custom reports.
Entering the Product Key / DEMO Mode
The Product Registration window allows you to either enter the Product Key or Demo Mode. The
Product Key is located on the inside of the CD Sleeve that comes with your purchase. Each
Gradience program comes with it’s own Product Key.
To enter the Product Key click on the Edit Key button and select Continue.
To enter in Demo Mode for a 30-day trial, click on the Demo button and select
Note: The
Continue button will not activate until you click
Edit Key or
Continue.
Demo
New! You may now enter your Product Key during the installation of any Gradience program.
I-9 Renewals Report
The I-9 Renewals Report produces a listing of upcoming renewal dates for employees to resubmit
their government I-9 form. It shows each employee’s name, title, hire date and I-9 renewal date.
Additional options for this report:
• I-9 Renewal Date: From/Through – This allows you to view all I-9 Renewal dates
ID Badges
This feature enables you to print employee ID badges with photos and barcode. There are four
types of ID Badges: Employee, Temporary, Guest or without a title.
Additional options for this report:
Layout Tab
The Layout Tab allows you to select what features will be on the ID Badge. For example, if you
want the badge title to read Guest instead of Employee you can select Guest under the Badge
Title.
•
•
•
Printing Options: Print Title, Print Department, Print Employee ID Style 1, Print Employee
Style 2, Print Location, Print Picture, Print Company Logo and Print Company Name
Badge Title – This allows you to print selected Title across Badge.
Name Format – This allows you to choose how the name will display on the badge.
Barcode Tab
The Barcode Tab allows you to select the type of Barcode that will be printed. If you’re not sure
which type to use, we recommend keeping the default barcode type of Code 39. Gradience
Records uses the Employee ID as the Barcode number. If an employee does not have an
Employee ID number (See Employee Detail screen), a barcode will not print out on the label.
•
•
Print Barcode – This allows you to print a barcode across the bottom of the
ID Badge.
Barcode Type – This allows you to select from popular barcode types.
Print Stock Tab
The Print Stock Tab allows you to select the label type. The Gradience ID Badge Kit (S0050) can
be requested through our sales team and is specifically designed to work with Gradience Records
and TimeClock. Each kit makes 25 badges.
Label Adjustments Tab
Printers are not created equally; some may print the labels too far to the right or left. The Label
Adjustments tab allows you to move the labels to the left or right and up or down to accommodate
quirky printers. Normally, you should not need to adjust the labels to the right and left, or up and
down, but it’s there in case you need it.
Feature
Left Offset
Top Offset
Picture Offset
Save Label
Adjustment
Description
When using the Left Offset, positive numbers will offset the label to the right
and negative numbers will offset the label to the left.
When using the Top Offset, positive numbers will move the labels down, and
negative numbers will move the labels up.
The Picture Offsetallows you to stretch the picture by using positive numbers
and negative numbers will squish the picture, if needed.
The Save Label Adjustmentsbutton allows you to save your current settings.
Labels Report
This report enables you to print mailing labels for employee mailings. Gradience Records
supports three different Avery label formats and a number of other printing options:
General Options
Print Phone Number on Label
Print Names Only
Name Format (Last, First or First Last)
Label size - (you can only choose one size)
Avery 5160 (3 x 10 (1" x 2.625")
Avery 5261 (2 x 10 (1" x 42")
Avery 5162 (2 x 7 (1.333" x 4")
Sorting Options
Location
Department
Show Social Security Number
Include Images for Custom Reports
New Hires Report
The New Hire Report produces a list of employees hired within a specified date range.
Performance Review History Report
This report is useful for department managers to schedule and prepare for upcoming reviews. It
shows selected employees’ next and last review dates, increases and ratings. It can be sorted by
location, department and by date of last review.
Additional options for this report:
•
•
•
Last Review Date – This allows you to report on dates of Last Review within selected
date range
Grouping Options – By checking these boxes, you can group your report by Location,
Department, or by (Show) Group Totals.
Include Images for Custom Reports – Check this box if you want to include images
when creating or printing your custom reports.
Performance Review Schedule Report
This report produces a listing of performance review records. It shows each employee’s next
review date, job title, hire date, and last review date. It can be sorted by location, department, and
by date of next review.
Additional options for this report:
•
•
•
Next Review Date – This allows you to report on dates of Next Review within selected
date range
Grouping Options – By checking these boxes, you can group your report by Location,
Department, or by (Show) Group Totals.
Include Images for Custom Reports – Check this box if you want to include images
when creating or printing your custom reports.
Salary History Report
The Salary History Report produces a list of all employee salary changes.
Salary Ranking/Analysis Report
The Salary Ranking/Analysis Report produces a list of employees ranked by salary.
Salary Tax Settings Report
The Tax Settings Report produces a report of employee’s tax information
Seniority Report
The Seniority Report produces a list of employees by hire date, from the earliest to latest hire
date.
Table Listings
Table Listings enable you to view and print out the following settings:
• User Security(Summary) – ?
•
•
•
•
•
User Security(Detail ) – ?
Locations – This prints all locations.
Departments – This prints all departments.
Assigned Departments – This prints Locations with assigned departments.
General Codes – This prints the code listing from Settings, General Codes.
Steps to print a Table Listings report:
1. From the Reports menu, select Table Listings.
2. Choose the Table Listings report you would like to run.
3. Click Preview to view the report or Print to print out the report.
4.
In Preview mode click the
print icon to send the report to your printer.
Telephone List Report
The Telephone List Report produces a record of all employee phone numbers. You can print
office phone number with extension number, office extension only or home phone number.
Additional options for this report:
• Phone Number – Allows you to select which phone number to report on
• Office Phones with Extension
• Office Extension Only
• Home Phones
• Name Format – Allows you to select how to sort the employee names
• Display Job Title – Allows you to toggle showing employee Job Title
Backup and Restore
Backup and Restore Operations
A Backup is essentially a “copy” of your employee records. Backing up ensures that you can
recover from a computer failure or emergency. You may also install Records on another
computer (even as a demo) and restore from your backup. For example, this is how you would
transfer information from an old computer to a new computer.
Backup after you make changes to your employee records.
It is recommended that you backup your database after making any significant changes to the
records. For example, any time you enter several employees, or input many changes to absence
information would be a good indication of when to backup. You may also set up the DB Monitor to
backup at assigned times.
Rotate backups and store backup copies offsite.
A good backup routine is to have at least three sets of backups covering different days of the
week. This practice is called rotation and reduces your risk of data loss. It is also a good practice
to always keep one copy offsite in case of a fire or flood. Consult your system administrator for
your company policy regarding data storage.
A Restore is when you recover from a backup. There are three different uses for the restore
feature.
1. To overwrite the current data with archived data
2. To recover from a hardware crash
3. To move information onto a new computer
Please keep in mind that when you restore data, your information will only be as current as the
backup you are restoring from.
A Backup and Restore may only be done through the DB Monitor.
IMPORTANT NOTE
The backup file may only be saved to the Server or Standalone Computer where the database
resides. The backup creates a zipped up file with an extension of .GBK.
Scheduling Automatic Backups
To create a scheduled backup, follow these steps:
1. Open the DB Monitor program by going to Start, Programs, Gradience, Maintenance,
and clicking on DB Monitor.
2. Enter your login and password. If you do not have access to the DB Monitor Backup
feature, you will need to see your Administrator.
3. Click the Backup tab.
4. Click New Backup.
5. Enter the Backup Type by selecting Daily, Weekly or Monthly.
6. Enter the military time in which you would like the backup to take place.
7. It is recommended to keep the other default settings of Performing Sweep and the path of
the backup. A different backup will be created for each scheduled backup. Note: The
name of the backup will be: [Type]_Backup_[mm-dd-yyyy]_[time] to distinguish it from
other backups. For example, Weekly_Backup_08-02-2001_2300, or
Monthly_Backup_09_01_2001_1700.
8. Click Save. The backup will be performed within a minute of the scheduled time.
Note:
The Server or Standalone Computer where the database is located must be turned on for
the backup to complete. If the computer is not on at the scheduled time, the DB monitor
will try to create the backup the next time it is opened.
Creating a manual backup
To create a manual backup, follow these steps:
1. Open the DB Monitor program by going to Start > Programs >
Gradience > Maintenance, and click on DB Monitor.
2. Enter your login and password. If you do not have access to the DB Monitor Backup
feature, you will need to see your Administrator.
3. Click the Backup tab.
4. Click the Backup Now button.
5. Click Yes to the message,
“Do you want to perform a sweep after the backup
completes?”
Note: A Sweep is a maintenance feature that keeps the database
working at peak performance.
6. Click OK at the Select Directory screen. It is highly recommended that you keep the
default location.
Note: You may only backup to the Server or Standalone Computer
where the database resides.
7. Click Close when the backup is complete.
Restoring from a Backup
Remember, restoring a backup will overwrite all data in the current database. Restore may only
be run from the DB Monitor on the Server or Standalone computer. To restore, follow these steps:
1. Go to the Server where the database files are located. (Restore cannot be done from a
Workstation)
Open the DB Monitor program by going to Start, Programs, Gradience, Maintenance,
and clicking on DB Monitor.
3. Enter your login and password. If you do not have access to the DB Monitor Restore
feature, you will need to see your Administrator.
4. Click the Restore tab.
5. Click the database to restore.
6. Click Browse and double-click the backup you wish to restore.
7. Click Start Restore.
8. After Restore is complete, click Hide to minimize the DB Monitor.
You may open the program to see your restored data.
2.
Getting Help
Getting Help with Records
There are many ways to get help if you have any questions with Gradience Records. First, let’s
talk about the Sample Company and database, and then we will discuss ways to get additional
assistance.
Sample Company - Tutorial Data
A sample company (called tutorial database) is provided so that you may view the different
screens with sample data already filled in. It is recommended that you use the program with the
sample database in order to get a feel for the program without having to worry about altering live
data. When you are in the Tutorial Data, no changes are made to your live database. To open the
tutorial database select Start, Programs, Gradience, Training, Sample Database.
The Help Menu
Select Help and Contents from the main menu. A listing of help topics is displayed. Select the
Book that interests you (using a double-click) and then double-click the topic you wish to display.
The F1 Key
Pressing the F1 key is another way to obtain online help. From most areas of the program,
pressing F1 will display the topic associated for that screen.
Searching for Help
You can search for Help in two different ways using the Help File.
Method 1 - Select Help and Search for Help on from the main menu. The Help Topics Index will
appear. Select the Topic that interests you.
Method 2 - Select Help and Contents from the main menu. Click the Find tab. If you have not
used this feature before, the Find Setup Wizard will walk you through setting up the search index.
Once the search index has been created, type in the Keywords you would like to search for and
the results will be displayed.
Typical Issues
A list of typical errors or messages that were known at the time of publication are listed in
Appendix C - Troubleshooting.
For more complete information, please refer to one of the following:
•
•
•
Readme.txt file located in the \gneil\cerf8 program directory.
Help File located in \gneil\cerf6 or accessible from the Start Menu.
Internet site: www.gradiencesupport.com
Contacting Technical Support
Technical Support for Records is available as follows:
Internet: www.gradiencesupport.com
To view our technical support website, please click the Help menu/About This will link you directly
to our Tech Support website.
Note: Before clicking this link please be sure that your computer is connected to the Internet.
E-Mail Requests: [email protected]
Phone Requests: (888) 925-7740 (8:30 a.m. to 6:00 p.m. , EST, Monday-Friday)
Please be sure to consult the user manual and troubleshooting options before submitting a help
request.
Using Custom Reports
From any report feature (and after selecting filters and options such as Date ranges, Location and
Department groupings, etc.) you can begin the process of creating a custom report. Custom
Reports are a function of the FastReport™ engine built into Gradience. The purpose of this
tutorial is to take you through the process for creating a custom report, editing some basic
information inside FastReport, then showing you the outcome. For a full tutorial on working with
FastReport, please see the FastReport documentation.
Custom Reports give the user the option to present data from the original (template) report in new
and exciting ways. How it works is the “default” Gradience report (called a “template” inside the
application) is used as a base for the new custom report. The user can always start a new report
from scratch, but it is usually easier to create a new report by modifying a copy of the original
template.
To create a custom report based on an existing report, you would click the Save As button and
select a new name for the report. You would then proceed to edit the new “copy” of the report.
To edit an existing report, select the report and click the Edit button. If you attempt to edit the
“Default” report, a new name will be automatically assigned.
To create a custom report, follow these steps:
1. For this example, we will use the original Attendance Detail report as a template to create
a new (custom) version of the report. Start by navigating to Reports > Attendance
Detail.
2. Locate and click the Custom Report icon near the top right of the pane.
3. A new window titled Custom Reports – Attendance Detail will appear (shown below).
As you can see, the current report name (in grayed out text) is Attendance Detail
Template.
4. A Custom Sort can be selected by using the drop down selection in the Custom Sort
Fields section. Custom Sort Fields work by allowing you to select a field which will be
used to sort the records on your custom report. Some built-in examples include
LastName and EmployeeID, and ReportDefault appears as the default selection when
you create your first custom report (you will probably want to change the default
selection). Click Edit first, then click the (+) button to the right of the dropdown to edit a
Custom Sort field or create a new one.
5. A Custom Filter can be selected by using the drop down selection in the custom filter
section. Since you have already activated editing for items in this window, you can go
ahead and click the (+) button to the right of the dropdown to edit Custom Filters or
create new ones.
6. By clicking the View Data button, you can see the results of any changes made to the
sorts or filters. This can be very helpful when creating your own custom reports because
you will be able to “preview” your report before you actually begin editing it in
FastReport.
7. After previewing your data, click Close in the viewer window to return to the Custom
Reports window.
8. If the report you wish to customize is not highlighted in the ReportName section, select
the desired report now.
9. Clicking New or Edit will bring you into the FastReport custom report designer. While in
the designer you will have the option to save the report as another name or save it to an
external FastReport 3 (.fr3) file. You will also have the option to open a previously
created FastReport file and save it in your database. See Help / Help Contents while in
the designer for more information.
10. Once you are finished editing your custom report in the designer, click File > Save, Save
As, or Exit to close the report to return to Gradience.
Import and Export
Importing and Exporting Data
The import feature allows you to add new data from a text file into the Gradience program.
Conversely
Overview
The import feature allows you to add new data from a text file into the Gradience program.
Conversely the export feature allows you to export data from the Gradience program.
The software that you export your data from must be able to export the required information to a
tab delimited or fixed length text file. See required import fields. Please note that we cannot
provide support for other software program(s). Please contact the software vendor or
manufacturer for more information on how to export data from your other software.
Import Features
Load File – Loads the selected file into the data window.
Test – This Tab will not highlight until a file is loaded. This checks for blank records and ensures
that the department and location names that are being imported are already in the database.
Import – This Tab imports the file into the database.
Help – This brings up the Help file pertaining to Importing.
Close – This closes the Import screen and takes you back to the main screen.
Import File Type – This allows you to select the file type.
Tab Delimited – We recommend exporting or importing as this type of file.
Fixed Length – Gradience may export or import fields with a fixed length.
Skip First Line (Headers)- This will take out the first line, in case you have headers.
Import File – This allows you to enter the path or navigate to the file you will be importing.
Check Duplicates – This allows you to check for duplicates against the import file and the files
already in the database.
Required Fields
The following are required fields for importing:
• Last Name
• First Name
• Location – name must be in the Gradience database prior to importing
• Department – name must be in the database prior to importing
• Date of Hire
• Full/Part Time
• Active Status (Active, Inactive, or Terminated)
Importing
To import your information, follow these steps:
From within the program click File, Import.
1.
2.
3.
4.
to navigate to it.
Enter the path of the file or click on the
Select Tab Delimited or Fixed Length. This should correspond with the way the import
file was saved.
Select Skip First Line if you have title headings. Do not select Yes if you don’t have title
headings or you may lose the first line of data.
Click Load File to preview the file. At this point you should check that all column headings
match the fields that will be imported.
Note the column titles above: SSN, Lastname, Firstname, and Middlename; check each column
to make sure the appropriate data is in the correct column. For example, the SSN number should
have an 11-digit number plus two hyphens.
5. Select which fields to check for duplicates in the Check Duplicates box. Duplicates will be
checked during the Test File phase.
6. Click Test. This checks for blank required fields, and in the case of Location and
Department, it checks to make sure that the name of the Location and Department has
already been set up within the program.
CAUTION: If duplicates were detected and you click on Import, these fields will be imported into
the program.
7. Once it passes the Test portion, you will be able to click on Import File.
Exporting
The export feature is used to transfer basic employee information into a text file that you can
open in any word processor or spreadsheet application. Only the basic information (see Field
Layout).
To export your information, follow these steps:
1. Click File, Export.
2. Select Tab Limited or Fixed Length for the Export File Type.
3. Enter a path and file name or keep the default name.
4. Click Export.
Your export file will be created as the file designated in the file block. You may rename the file,
but we recommend keeping the file extension of .txt. After exporting you may open the file from
within any other spreadsheet or word processor program.
Note: Only the information in the Field Layout will be available for export.
Appendix A - Troubleshooting
Troubleshooting
Here are the most common issues that you may experience when using Records.
•
•
•
•
•
Unable to connect to Interbase Server
Getting SQL Parse Error: EOF in String Detected message when logging in
Conversion program not installed, unable to convert
Cannot install on a Windows 2000 system
Exceeded the authorized user count
Frequently Asked Questions
What is a user?
Simply put, this is the person using the program. They may be entering or viewing data. The
Administrator may set specific access to only those features a user will need access to.
How many different users can be set up?
The security file can contain a list of as many users as you desire. For example, each user would
have their own login name and password with access rights to specific features.
Can I set up each user to view only his or her own employee information?
Yes. (See Setting Up Access To Locations, Departments and Individual Employees.)
Can Managers view ALL departments or just their own?
You may set up access for managers to view only their departments and/or view specific
employees from other departments. You may also set up employees to have read-only access to
their records.
Why should I change the default ADMIN password?
The program is set up with default logins with full rights (Admin). We highly recommend changing
the password for the Admin Login and set up other logins as necessary.
What is Security Access?
Setting up security access is necessary to allow others access to the program. It is recommended
that you do not give out the Login and Password to the Admin login. The Detail screen is the first
screen that comes up when going into User Security. You will need to set up access to the
common features, the locations and departments’ screen, and the specific program features.
Unable to connect to Firebird Server
Users affected
1. Gradience Attendance
2. Gradience Records
3. Gradience TimeClock
Issue
When launching one of the programs above the following message may be encountered:
"This program was unable to connect to your Firebird Server. This is likely due to the fact that the
default Interbase User Account has been change. Please provide a UserName and Password
with Administrative Privileges to Firebird."
Description
Users may encounter this issue for one of the following reasons:
If running from a Server:
1. If you're using a Windows 2000 server and trying to install the database files to a drive
other than C:\, permissions to the database folder may be incorrect.
2.
3. If running from a Standalone Computer:
4. Interbase Guardian may be shut down
If running from a Client Workstation:
1. Incorrect Server Name and/or Database Path
2. Client needs to have TCP/IP installed
3. Server may be down
Possible Resolution
1. If running Gradience from a Server and encountering the above issue, try each of these
solutions:
Check your permissions for the Database folder. Full Control access must be given to
System for the database folder. You may add to the Permissions by going through
Windows Explorer and going to Properties by right-clicking the database folder.
2. Check to make sure Firebird Guardian (or Interbase Manager) is running.
On a Win 95/98 system there will be an icon in the system tray (next to the clock). The
icon graphic appears as a gray tower with a green flag. When you put your mouse over
the icon it will read, "Firebird Guardian". This icon will not appear on a Windows 2000
system. You may check to see if it is running on a Windows 2000 system by clicking on
Start, Settings, Control Panel and clicking on the Interbase Manager. If it is not running
click on Start (from within the Interbase Manager), then try to open the Gradience
application again.
3. If encountering the message when running from a Client Workstation, try this:
Check the Server Name and Database Path by going to the Server, opening the
Gradience application and clicking on Help, System Information and printing out this
information from the TechSupport tab. (If you don't have the TechSupport tab then you
have an earlier version of Gradience and will need to do a screenshot of the System
Information screen and Current Users screen and print them out.)
Once you have the Server information, go to the Client Workstation that you cannot
connect to the Server with. From the Workstation, click on Start, Run, and enter:
HRWARE.INI. Verify that the Server Name and Database path are the same.
NOTE: The printout of the Server Name and Database path you were asked to print or
write down when installing the Server side must be exactly the same when entering this
information on the Client Workstation(s)!
4. The Client needs to have TCP/IP installed.
This is done through the Network Neighborhood Properties. Please see your Network
Administrator if you need more assistance in setting this up.
If everything is the same on the Client as it is on the Server and you're still unable to
connect then try this:
If your Server has a static IP Address, try entering this for the Server name when
installing to the Client Workstation.
5. If running from a Client Workstation and you went through the steps above and it didn't fix
the issue check with your MIS or Network Administrator regarding the status of the
Server.
SQL Parse Error: EOF in String Detected
Issue: Getting the above error message when logging in
Description: This is caused when pressing the comma key ( ‘) and Enter key at the same
Possible Resolution(s):
Avoid pressing the comma and Enter key at the same time.
Unable to Convert
Issue: Conversion program not installed, unable to convert
Description: This is usually caused when installing the Gradience program on a computer that
doesn’t have version 6 already installed and you need to convert your version 6 data.
Possible Resolution(s):
Install version 6 (either Attendance or Confidential Employee Record, doesn’t matter which one),
then re-install the Gradience program. You may get version 6 either from the Gradience CD or
from our Website at: www.gradiencesupport.com.
Installing from the Gradience CD
Through Windows Explorer, click on the CD-ROM drive with the Gradience CD. Click on the
folder BIN, Legacy, and Atcon 6.0 or Cerf 6.0, then double-click on the Setup.exe file. Accept all
the defaults by clicking Next. Once installation is finished, open the Version 6 program to the
main screen, then close out. Then install the Gradience version. In the Gradience installation
process, it will ask if you want to install the Conversion Utility, click Yes and follow the prompts.
When you open the Gradience program, it will ask if you want to convert your data, click Yes.
Unable to install on a Windows NT, 2000, or XP system
Issue: Does not finish installation
Description: This usually happens if you do not have full Administrator rights on the Windows NT,
2000, XP computer.
Possible Resolution(s):
Make sure you have full Administrator rights before installing.
Exceeded the authorized user count
Issue:
You have exceeded the authorized user count. Your product license allows up to [number of
licensed users] simultaneous users. There are # connections at this time.
The # of connections is a number greater than one that changes each time you close and reenter
the program.
Description:
Users may experience this issue when closing the program by clicking Exit under the File menu.
Users who exit the program by clicking the close window icon in the top right corner will not
experience the problem, but we still recommend downloading and installing the latest update.
Possible Resolution:
Download and install the latest Gradience Confidential Employee Record update from our
Updates area on our Website at: www.gradiencesupport.com.
Please follow the installation instructions. After downloading and installing the update follow the
steps below to clear the connections.
1. Close Records or any other Gradience Programs that are open.
2. Open DB Monitor and log in, if it is not already running. The DB Monitor resides on the
computer where the Gradience database is installed.
3. Click the Connections button.
4. Click the Refresh button to verify all connections are "N" (not active).
5. If all connections are "N", then Click the Clear Inactive connections button, this will reset
the connections.
6. If you wish to close the DB Monitor (not recommended if you have automatic database
backups scheduled), right-mouse click on the icon Gradience Database Monitor located
in the system tray area, select Shutdown Database Monitor, and click OK to close DB
Monitor.
7. Otherwise, click the Hide button.
Appendix B - Import / Export File Format
Importing / Export File Format
You may import and export only the fields on the Field Layout page. There are two different
formats that you may use: Tab Delimited and Fixed Length.
For a Tab Delimited format you may use any program that allows you to save as Tab Delimited.
Excel and Access are two that will allow this. This is the easiest format.
When entering your information into a spreadsheet such as Excel, you will need to follow the
order of the field names according to the Field Layout page.
For example, the columns should have SSN first, then Last Name, First Name, etc. Also, you will
need to leave a blank column for any fields that you will leave blank. For example, following the
format on the Field Layout page, we create a Tab Delimited file with the fields: SSN, Last Name,
First Name, [blank column for Middle Initial field], Location, Department, Date of Hire, Full/Part
Time, [blank column for Title field], [blank column for Employee Code field] and Active Status. All
of the fields in bold are required. You still need to have a blank column for MI, Title and Employee
Code in the order of the fields.
For a Fixed Length format, you may use the DOS Editor or any other editor that shows you the
field length. The lengths of each field must correspond to the Length column under the Field
Layout page. We recommend using the Tab Delimited format.
The following is the field layout for importing text files into Gradience Records. Fields shown in
bold type are required and all import text files must include them.
Field Name
Length
Format
Social Security Number
Last Name
First Name
Middle Initial
Location
Department
Date Of Hire
Full/Part-Time
Title
Employee Code
Active Status
(if fixed
length format)
123-45-6789
11
20
20
20
50
50
10
10
30
14
10
Date of Birth
up to 21 characters
up to 21 characters
up to 20 characters
up to 25 characters or numbers
up to 25 characters or numbers
MM/DD/YYYY (slashes required)
Full-Time or Part-Time (only)
up to 30 characters or numbers
up to 14 characters or numbers
Active or Inactive or Terminated (only)
MM/DD/YYYY (slashes required)
Address 1
Address 2
Home Phone
City
State
Zip Code
Salutation
Employee Security Level
Security Clearance Date
Race
10
30
30
30
30
2
15
5
16
10
EEO Category
25
Sex M/F
Driver’s License Number
I9 Renewal Date
25
1
15
up to 30 characters or numbers
up to 30 characters or numbers
800-123-4567 (dashes required)
up to 20 characters or numbers
Standard U.S. two-letter code (e.g., FL)
33325-1234 (-1234 can be omitted)
Mr. – Ms. – Mrs. – Dr. (only)
up to 16 characters or numbers
MM/DD/YYYY (slashes required)
Must match a valid race on the Employee
Detail Feature
Must match a valid category on the Employee
Detail Feature.
M or F only
up to 15 characters or numbers
MM/DD/YYYY (slashes required)
Veteran Status
Office Phone & Ext.
Fax
Email address
Address Effective Date
10
25
30
30
30
10
Disabled – Vietnam Era – Other Veteran – Not
Applicable (only)
800-123-4567 Ext. 123
800-123-4567
up to 30 characters or numbers
MM/DD/YYYY (slashes required)
Appendix C - Using the Notes/Comments Editor and Attachments
Using the Notes / Comments Editor
Gradience Records Version 9 includes new, powerful word processing features for all comments
and notes fields, as well the ability to attach objects and documents within these fields. When
documenting employee absences, you may find it useful to attach, Copies of e-mails, Word or
Excel attachments that you’ve used for tardies, warnings and specific sections of reviews
Gradience Forms personnel forms for vacation requests, FMLA requests and company
responses, warnings and counseling reports
Right-Click Menu Commands
Right-click on any notes or comments field – the menu shown at right will pop up with the
following options:
•
•
•
•
•
•
•
•
•
•
•
•
Edit– Opens the full text editor
Cut– Copies to the clipboard and deletes the currently selected text
Copy– Copies the currently selected text to the clipboard
Paste – Pastes the currently selected text into the comments or text field
Font – Brings up a standard font edit window, with settings for font, style, size, effects
and color
Bullet Style – Toggles bullets for selected paragraphs on and off
Paragraph– Brings up a standard paragraph settings window for alignment style,
indentation, and line spacing
Tabs– Lets you set tab stops for selected paragraphs
Find– Searches for the text you enter
Replace– Searches and replaces text according to your settings
Insert Object … – Opens the Insert Object window and lets you select either a type of
new object to insert into the notes / comments field or attach an existing file
Check Spelling – Launches the Microsoft Word spellchecker
Using the Rich Text Editor
When you right-click and select Edit, the text editor opens in a separate window, giving you
access to all Right-Click Menu commands in a word-processor-like environment. Here’s a brief
overview:
Toolbar
New
Creates a new document.
Print
Prints document.
Find
Finds specified text.
SpellCheck Checks spelling. Requires MS Word installed.
Cut
Cuts selection and puts it on the clipboard.
Copy
Copies selection to clipboard.
Paste
Pastes selection from clipboard.
Undo
Reverses the last action.
Redo
Reverses the last Undo action.
Format Bar
Font Type
Changes the font selection.
Font Size
Changes the font size.
Bold, Italic, Underline
Changes the font to Bold, Italic or Underline.
Font Color
Changes the font color.
Left, Center, Right
Alignment
Bullet
Changes the text to Left, Center, or Right
Alignment.
Inserts Bullet.
Highlight
Highlights selected text.
Adding Attachments to Comments or Notes
Each Comment or Note field allows you to insert an attachment to that field. Attachments can be
a Microsoft Word Document, Microsoft® Excel spreadsheet, PDF, Rich Text Format, or even a
picture file. Attachments may be linked to a file, displayed as an icon or inserted into the field.
Inserting an Attachment
To insert an attachment, follow these steps:
1.
2.
3.
4.
5.
6.
Locate the Comment or Note field you want to insert an attachment into.
Right click on this field and select Insert Object.
Select Create from File.
Click Browse to navigate to the file you want to attach and click Open.
Select Display as Icon.
Click Change Icon and change the Label, if necessary, to make the name more
descriptive.
7. Click OK, then OK one more time.
Insert Object Options
Create New
Selecting Create New allows you to insert a new object that you want to create from scratch. For
example, selecting Create New and clicking on Microsoft Word Document for the Object Type and
then clicking OK will bring up a blank Word Document for you to enter text. When you close out of
the Word Document it will appear in the Comments field. Double-clicking on the Word Document
object will bring up Microsoft Word so that you may again edit the document.
If the Display As Icon option is checked, then the Word Document (or object type) will appear as
an icon in the Comments field.
Create from File
Selecting Create from File will allow you to insert an existing object type, such as a Microsoft
Word document, PDF file or Excel spreadsheet. Normally, this will be the option you will use for
every day use.
If you do not select the Link or Display as Icon option, then the object type will be inserted into the
Comments field. In other words, you will see the text as you would see the text on a Word
Document within the Comments field. Double-clicking on this text in the Comments block will
bring up Microsoft Word so that you may edit the document.
We recommend selecting the Display as Icon option when inserting an object. This inserts the
object type within the Comments field; however, it shows as an icon. When you double-click on
the icon, it brings up the object within the program that created it.
The Link and Display as Icon options will perform the following, depending on your selections:
Selected
Link
Display Results
As Icon
Inserts the contents of the file as an object into your document so that you may
activate it using the program which created it.
X
X
Inserts a picture of the file contents into your document. The picture will be linked
to the file so that changes to the file will be reflected in your document.
X
Inserts the contents of the file as an object into your document so that you may
activate it using the program that created it. It will be displayed as an icon.
X
Inserts a shortcut that represents the file. The shortcut will be linked to the file so
that changes to the file will be reflected in your document.
Appendix D - USB Fingerprint (BIO) Reader Setup Guide
About the Fingerprint Reader
Pre-setup Requirements
The following should be completed prior to setting up the USB Fingerprint Reader:
• MyBiz 2.3.x.x or Gradience 8.3.x.x and above
• Device Driver for the USB Fingerprint Reader installed
• USB Fingerprint Reader connected
Setting up User Access for use with the Fingerprint Reader
1. From main menu, go to Settings, then
User Security.
2. Either select a user from the list or create a new user.
3. Under the Fingerprint heading, click on the Add button and follow the onscreen
instructions.
4. Click the Save button when completed.
Logging into the program using the Fingerprint Reader
1. Close out and launch the program to get to the login screen.
2. At the login screen, you may log in by fingerprint any time the “Fingerprint Scanner
Ready…” message is displaying. The Fingerprint Scanner will become inactive after 90
seconds.
Maintenance
Using a non-scratch cloth clean the lens of the Fingerprint Reader as needed.
Appendix E – Reference Information
Benefits Descriptions
Benefit Name
401(k) Plan
AD & D
Dependent
AD & D Self
COBRA
Credit Union
Dental-Dependent
Dental-Self
Life Insurance
Major Medical –
Dependent
Major Medical-Self
MedicalDependent
Medical-Self
Pension
Description
Employee savings and retirement plan, usually deducted pre-tax from salary,
designed to reward employees for their service and to provide a source of
income upon retirement, disability, death and/or termination of employment.
Accidental death and dismemberment Dependent coverage. Usually has a
maximum benefit. This may be company-sponsored.
Accidental death and dismemberment coverage. Usually has a maximum
benefit. This may be company-sponsored.
Federal law requires companies of 20 or more employees to continue
availability of health coverage for specific periods of time. (Your state law may
also have provisions.)
Financial institution that may offer special financial services such as low-interest
credit cards, direct deposit and a variety of loans to members.
Dental insurance coverage for employee’s dependents.
Dental insurance coverage for employee.
Employee life insurance, usually has maximum benefits.
Hospitalization for employee’s dependents.
Hospitalization for employee.
Medical insurance for employee’s dependents.
Medical insurance for employee.
Retirement plan.
A
Accident Detail Report Options ................................38
Accident Feature .......................................................31
Accident Report Options...........................................38
Adding a New Employee ..........................................19
Adding an employee picture .....................................21
Adding Attachments to Comments or Notes.............62
Address tab .............................................................23
Alter Current Product License ................................5
Anniversary Report Options .....................................38
Emergency Feature................................................... 25
Employee Dependents Report Options..................... 40
Employee Detail Feature .......................................... 18
Employee Detail Report Options.............................. 40
Employee Education Report Options ....................... 40
Employee Emergency Room Report Options........... 40
Employee Reminders Report Options ...................... 40
Employee Separations Report Options..................... 41
Employee Summary Report Options........................ 41
Employee Training and Training Extended Report
Options................................................................ 41
Employee Warning Report Options ......................... 41
Exceeded the Authorized User Count ...................... 58
Export Options ......................................................... 34
Exporting.................................................................. 54
B
Backup and Restore ..................................................47
Basic Report Options ................................................34
Beneficiaries .............................................................23
Benefit Descriptions .................................................64
Benefits detail tab .....................................................23
Benefits Feature ........................................................23
Benefits Report Options............................................38
Birthdate Report Options ..........................................38
F
Feature Column........................................................ 18
File Menu ................................................................. 17
Fingerprint (BIO) Reader Setup Guide .................... 63
Forgotten Password Feature ..................................... 16
Frequently Asked Questions .................................... 55
G
C
CD Menu Instructions.................................................6
Charts........................................................................37
Checklist for Setting Up............................................10
Client-Server Installation (Network)...........................8
COBRA Feature........................................................28
COBRA Report Options ...........................................39
Common Features .....................................................14
Company Information...............................................11
Company Setup .........................................................9
Contacting Technical Support...................................49
Creating a manual backup.........................................47
Creating a new reminder ...........................................29
Creating Locations & Departments...........................10
D
Deleting a reminder ..................................................29
Detail Tab (Common Features).................................14
Display Options ........................................................35
Downloading pictures from camera disk ..................22
E
Editing Company ......................................................11
Editing reminders......................................................30
Education Feature .....................................................33
EEO Detail Report Options.......................................39
EEO Summary Report Options.................................39
EEO/Other Feature ...................................................19
General Codes .......................................................... 13
General Settings ....................................................... 11
Global Preferences ................................................... 11
Grouping Options..................................................... 35
H
Help.......................................................................... 48
Help Menu................................................................ 48
I
I-9 Renewals Report Options ................................... 42
ID Badges Report Options ....................................... 42
Import / Export File Format ..................................... 59
Import and Export .................................................... 52
Import Features ........................................................ 52
Importing.................................................................. 53
Insert Object Options ............................................... 62
Inserting an Attachment ........................................... 62
Installation.................................................................. 7
L
Labels Report Options.............................................. 44
License Options.......................................................... 6
Locations and Departments
Setting up Locations and Departments................ 10
Logging In for the First Time..................................... 9
M
Managing Employee Records ...................................17
Menu Bar ..................................................................17
Minimum Requirements .............................................5
N
Network Installation ...................................................7
Network Requirements ...............................................6
New Hires Report Options........................................44
O
Open Reminders .......................................................31
Other Gradience Tabs ...............................................12
P
Peer to Peer Installations.............................................9
Performance Feature .................................................26
Performance Review History Report Options...........45
Performance Review Schedule Report Options....45
Personal Contacts - Browse Contacts Tab ................20
Personal Contacts - Contacts Detail Tab...................20
Personal Contacts Feature.........................................20
Print Preview ............................................................34
Printing from the Reports Feature of Menu Bar .34
R
Recent Features Pane ................................................18
Recommended Requirements .....................................5
Reminders .................................................................29
Report Menu Options................................................34
Report Options..........................................................37
Report Options Tab...................................................12
Reports.....................................................................34
Reports Menu............................................................18
Required Fields.........................................................52
Restoring from a Backup ..........................................47
S
Salary History Report Options ..............................45
Salary Ranking/Analysis Report Options .................45
Salary Tax Settings Report Options ..........................45
Saving a photo to disk...............................................22
Scheduling Automatic Backups .............................47
Searching for Help ................................................... 48
Security Options....................................................... 14
Seniority Report Options.......................................... 45
Separation Feature.................................................... 27
Server Installation Instructions................................... 8
Setting a reminder .................................................... 30
Setting up access to common features...................... 15
Setting up access to Locations Departments and
Individual Employees ......................................... 16
Setting up access to specific program features ......... 15
Setting up General Codes ......................................... 13
Setting up locations and departments ....................... 10
Settings Menu .......................................................... 18
Setup Types................................................................ 7
Software Features....................................................... 4
SQL Parse Error: EOF in String Detected................ 57
System Requirements................................................. 5
T
Table Listings Options ............................................. 45
Taking a picture and importing it into Gradience..... 22
Taxes Feature ........................................................... 25
Telephone List Report Options ................................ 46
Training Feature ....................................................... 24
Troubleshooting ....................................................... 55
Types of Available Reports...................................... 35
Typical Issues........................................................... 48
U
Unable to Connect to Firebird Server....................... 55
Unable to Convert .................................................... 57
Unable to Install on a Windows NT, 2000, XP system
............................................................................ 57
Unlocking the Demo .................................................. 5
Upgrading from Previous Versions ............................ 9
Using Gradience Records......................................... 18
Using the Notes/Comments Editor and Attachments 61
Using Twain Import ................................................. 22
V
View Menu............................................................... 17
W
Wages Feature.......................................................... 27
Warnings Feature ..................................................... 32
Welcome! ................................................................... 4