1
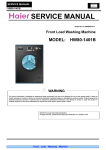
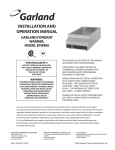
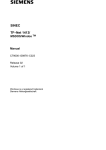
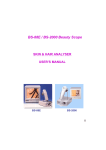
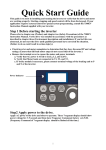
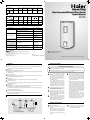
Technical parameters
Rated voltage /
Power
Frequency
220V~/ 230V~/
2500W 2700W
50Hz
Rated
Pressure of the
Rated Dimensions/ Waterproof
temperature
tap water
pressure weight/volume grade
0.7MPa
not less than
0.05MPa
60℃
See Fig.1
IPX4
Check
valve
(Pc)
Instruction
manual
(Copy)
Pipe fitting
(S 12 F-M 34 )
Packing list
Quantity
Components
Model
Electric
Relief valve /
water heater drain hose
(Set)
(Set)
(Pc)
Sea-ox King
Haier Household Electric Water Heater
User's Manual
3/4”
airproof
met (Copy)
FCD-JTLD200
1
1
1
1
1
2
FCD-JTLD245
1
1
1
1
1
2
FCD-JTLD200
FCD-JTLD245
FAQ
Phenomenon
Please check
Solutions
If the water supply system stops supplying
Check
water or the water pressure is too low
If the water outlet is blocked.
Check and clear
If the hot water valve is turned on.
If the water temperature is adjusted
Adjust again
properly
Call the service
If the thermostat fails
department
Heating time is too short
Continue to heat
No water outlet
Cold water outlet only
The amount and temperature
of the water delivered are
not stable
Do not heat after the power
is turned on (the heating
lamp does not illuminate)
The heating indicator lamp
stays on
Water is coming from the
relief valve
If the pressure of tap water is stable
Check
If the temperature limiter is activated due
Call the service
to dry heating
department
Call the service
department
Call the service
department
Failed thermostat
Overly high pressure (>0.7MPa)
or temperature (>99℃)
*URXS
zPlease read this manual before usage.
zRetain it for future reference.
4LQJGDR (FRQRPLF DQG 7HFKQRORJLFDO 'HYHORSPHQW 'LVWULFW
+DLHU :DWHU +HDWHU &R /WG
+DLHU*DUGHQ4LDQZDQJDQJ5RDG(FRQRPLF'HYHORSPHQW=RQH
4LQJGDR35&KLQD
Rev: 01
Specific Number: 0040501317
:HEVLWHKWWSZZZKDLHUFRP
Features
See to the physical product for the appearance, color or pattern.
Safety precautions
1 Safety
It is safe and reliable thanks to quality stainless steel electrical heating elements with
overheating protection and over pressure protection of inner tank.
2 Durability
Specially treated shell. Elegant and durable.
High quality and reliability due to 3-layer inner tank enamel technology employed in inner
tank production.
Description of the symbols
This symbol indicates actions you shall never do! Neglecting these instructions may
cause personal injury or even death.
This symbol indicates instructions you must observe! Neglecting these instructions
may cause personal injury or damage to your house or property.
uses
6 Multiple
Enclosed structure with several outlets can supply hot water to several places like the
• C h e c k i f t h e a m m e te r a n d w i re
diameter are in accordance with the
rated current of the water heater.
Please have them checked by an
experienced electrician if necessary.
• The product is only available for
alternating current.
Be sure to use a separate socket (never
use a multifunctional socket) which is
reliably grounded and complies with
national standards. Dirt on the metal
pins of the power plug shall be wiped off
regularly to avoid fire or other accidents.
washroom, kitchen etc (the hot water from it is not drinkable).
It is suitable for residential houses, enterprises, and service trades like beauty parlors or
hairdressers for supplying hot water.
To prevent being burned, please do not
face the shower nozzle towards your
body while turning the water valve.
3
Fast temperature rise
Unique separated structure of two heating bars can obtain twice the speed in temperature
rise compared to ordinary water heaters.
saving
4 Energy
It is highly efficient and energy saving due to super thick heat preservation layer.
operation
5 Convenient
60℃ fixed temperature heating means it will stop heating automatically when the water
temperature reaches 60℃.
7 Floorstanding design facilitates installation.
I f t h e p o we r c o rd o f t h e w a t e r
heater is damaged, be sure to have
it replaced by an after-sales service
technician with a special cord (offered
by the manufacturer).
Electric circuit diagram
Set the power socket of the water
heater in a dry position away from
water. Never insert or pull the power
plug with wet hands to avoid electric
shock, injury or other accidents.
The water heater you bought is the improved model of the series product. Please use it
according to the User's Manual.
MT1
BT2
BT1
L
N
EH2
EH1
E
HL
Setting environment
• Do not install it outdoor.
HL
Connected to
inner tank
• Before initial use after installation,
please first fully fill water and then
switch on the power. If it is powered
when the tank is not full of water, this
may cause overheating of the heating
element. Children must use under the
supervision of an adult.
• During winter in cold areas, if the heater
is not used for a long period, please
unscrew the blow down nut to drain the
water to avoid damage caused by icing.
Please remember to fill it with water
before turning on the power when it is
used again. The hot water tube may be
relatively long due to the installation
location of the water heater. Please drain
the cold water before use each time to
avoid getting cold water.
• Do not use electrical products with
damaged power cords or loose power
sockets and plugs. Otherwise electric
shock , shor t circuit, f i re or other
accidents may occur. Please make sure
the plug fits tightly with the socket.
If drain hose is connected, please
connect it to the inlet of the sewer to
avoid polluting by splashing.
• Do not install it in a place without
drainage.
L: live wire (brown)
N: neutral wire (blue)
MT1: manual reset thermostat
BT1: normal temperature thermostat
BT2: normal temperature thermostat
1
HL: heating indicator lamp
EH1: heating element
EH2: heating element
E: earth (yellow/green)
• Do not place it in a cold environment
where it tends to freeze. The tank
and the tubes may break if water in it
freezes. This may cause leakage and
scalding.
2
Dimension diagram
(Fig 1)
Appearance and components
Check valve
Unit: mm
185
Relief valve
12 0
Indicator lamp
c1
145
b1
Electrical
cabinet 1
Heating
element 1
a1
29 0
24 6
Magnesium
anode rod 2
175
Indicator lamp
Model
FCD-JTLD200
FCD-JTLD245
Volume Net weight
200L
245L
58 kg
65 kg
a1
b2
c1
1220mm
1399mm
629mm
629mm
601mm
601mm
Electrical
cabinet 2
Blowdown
port
Note: the allowed error range of above parameters is +10%.
Precautions during installation
Make sure the inlet pressure of the tap water is not less
than 0.05MPa.
The electrical water heater shall be installed indoors where
the ambient temperature is over 0℃. The pipelines shall
be arranged centralizedly. The location of hot water usage
should not be too far way from the water heater. If the
distance is more than 8 meters, the pipe shall be wrapped
with a heat preservation layer to reduce heat loss.
In selecting the installation location of the water heater,
convenient usage and repairing should be considered.
Besides, it must be installed in a place with a sewer so that
it will not cause damage to facilities nearby or downstairs
when the water tank and/or pipes leak.
Do not confuse the water inlet pipe and outlet pipe. The
relief valve shall be installed in the specified location. No
change is allowed. Its pressure relief hole must be kept
unblocked.
To ensure safety, please use a separate socket (never
use a multifunctional socket) which is reliably grounded
and complies with national standard. Check with an
electroprobe to ensure that the live wire and the neutral
wire are not connected backwards. Do not turn on the
power before ensuring that it is fully filled with water, that
there is no leakage from any joints, and that the power
supply meets the requirements.
Magnesium
anode rod 1
Shell
Heat preservation
layer
Enamel inner
tank
Blowdown pipe
Heating
element 2
Installation methods
Be sure to have it installed by the installation staff from the after-sales service center of
the manufacturer or a center authorized by them. It adopts floorstanding installation.
Check Water inlet
Water outlet
valve pipe
Locate the water heater and install all the pipes with a tap water tube (PP-R pipe is pipe
Relief
recommended) according to the dimension diagram and the user's requirements.
valve
Mount the relief valve and other accessories according to figure 2. Remember to use
Drain hose
Teflon seal tape to avoid leakage.
Indicator lamp
To facilitate installation and dismantling of the water heater, it is recommended to fit a
Indicator lamp
G1/2” flexible nut at the suitable location on the water inlet pipe and outlet pipe separately.
Confirm the positions needing water supply and connect the water inlet pipe, outlet pipes
and tap water pipes to the locations separately.
Blowdown
When installing the water heater, please reserve certain space to facilitate future
port
maintenance and repair. Fig. 2 is only a reference installation schematic of pipelines. In
(Fig 2) For reference only
specific installations, the actual situation of the user should be considered.
Connection and use of the check valve:
Connect the check valve with G1/2” connection screw according to the arrow on it.
Mount the relief valve on the water heater with position as shown in Fig. 2. Fit the double nipple in the
relief hole of the relief valve and then screw one end of the drain hose onto the double nipple (as shown
on Fig. 3). When the water heater is powered on, a small amount of water may drip out of the drain hose.
This is a normal phenomenon caused by expansion of water inside the water heater. The relief hole must
be kept unblocked.
The drain hose can be cut short or extended as necessary. Connect the other end of the drain hose to
Relief valve
the sewage drain to avoid polluting by splashing. The drain hose connecting the relief valve should be
installed in a continuous downward direction and in a frost-free environment.
(Fig 3)
Be sure to check and confirm that the tank is fully filled with water, that there is no leakage from any
joints, and that the power supply complies with the requirements before switching on the power.
3
Precautions during use
4
Cleaning and maintenance
1 To avoid damage, never turn on the power before the inner tank is fully filled with water.
scalding, adjust the water temperature to an appropriate degree before use. Water
2 Tooveravoid
50℃ can result in scalding.
relief valve should be checked once every two weeks during use. The method: turn the
3 The
small handle of the relief valve. It is normal if there is water flowing from it. If not, please
contact local after-sales service center.
4
heater is not to be used for an extended period or if it is to be repaired, please
5 Ifturntheoffwater
the inlet valve and turn on the relief valve to relieve pressure. Then, open the water
The product is a water heater of enclosed type. It can supply hot water to several locations
such as bathroom (bathtub, hand wash basin, shower nozzle) and kitchen.
outlet and blowdown port to drain the water in the inner tank. Before reusing, to avoid injury
or accidents, it is recommended to turn on the hot water valve before turning on the power of
the water heater. In this way you can discharge air in the pipeline. At this time, please do not
smoke or light other open flames near the open valve. Meanwhile, carefully check that all the
components of the water heater are in good condition. It can be put into use after all of these
are confirmed. Note: the other end of the drain hose may not be higher than the pressure relief
hole of the relief valve. The drain hose should be inserted into the floor drain or other places to
facilitate draining.
ask a service person to conduct safety examinations regularly. Remove the scale on the
6 Please
heating element in time. Check the consumption of the magnesium anode rod and replace it
in a timely manner if it is too seriously worn.
Note:
Please deal with simple issues by referring to the attached "FAQ" before calling a service
person.
Statement: Maintenance or repair work can only be performed by qualified service persons.
Improper methods may cause serious accidents or property damage. Make sure to
unplug the water heater before you intend to open the water heater or repair it.
To clean the outside: Disconnect the power supply before cleaning the water heater. Wipe it
lightly with a piece of wet cloth dipped in a little neutral detergent other than gasoline or other
solutions. Then, wipe it with a piece of dry cloth and keep the shell dry. Do not clean it with
detergent containing abrasives (e.g. toothpaste), acid, chemical solvents (e.g. alcohol) or polish.
To clean the inside: To keep the water heater working efficiently, the heating elements and the
inner tank should be cleaned once every three years. Take care not to damage the protection
coating outside the heating element and inside the inner tank. The magnesium anode rod
should be replaced periodically according to local water quality and the using habits.
To clean the inner tank: Blowdown procedure: disconnect the power supply, turn off the
inlet valve and turn on the relief valve to relieve pressure. When no water comes from it,
turn off all the water outlet valves. Remove the drain hose of the relief valve together with
the double nipple. Then, unscrew the blowdown nut. Connect the drain hose with double
nipple on the blowdown port (put the other end of the drain hose in the sewer inlet). Turn
on any one of the water outlets to conduct blowdown. Clean water coming out of the
drain hose indicates the dirt in the inner tank has been totally discharged. Install all the
components in their original places. Note: the water inlet valve should be turned on several
times to rinse the dirt at the bottom of the inner tank during blowdown.
Using method
In initial use after installation, it must be fully filled with water before turning on the power.
In first use, as the inner tank is empty, you must turn on the tap and one of the water outlets.
Wait until water comes out continuously from water outlets (it indicates the tank is full) and
then turn off the water outlet.
Check all the joints for leakage. After that, plug in the power cord
After the power is turned on, the upper indicator lamp illuminates and the upper heating
element starts heating. When the temperature of the hot water in the water heater reaches
60℃, the upper indicator lamp goes out, the lower indicator lamp illuminates and the
lower heating element starts heating. The water heater continues to work. When the lower
indication lamp goes out, the water heater stops working and the whole water heater
reaches the rated temperature 60℃.
The rated temperature of the water heater is 60℃. The indicator lamps will illuminate in
heating state. When it reaches the rated temperature, the power will be turned off and the
indicator lamps will go out.
Large amount of water will come out from the drain hose of the relief valve if the pressure of
the tap water is higher than 0.7MPa. This is caused by overly high water pressure. Please call
the after-sales service center. Water or vapor will come from the drain hose of the relief valve
if the temperature of water inside the inner tank exceeds 99+0
-5 ℃. It is reducing temperature
by relieving pressure as the temperature is too high. Please call the after-sales service center
in this case. Please keep away from the drain hose during use to avoid scalding.
5
Special hints
Be sure to disconnect the power supply before performing any maintenance or repair work
on it. Only professionals should be allowed to adjust or repair the water.
Make sure the water heater is fully filled with water before turning on the power. Otherwise
malfunction of the heating element may occur. Please make sure the power socket complies
with applicable national standards and is reliably grounded. Never use the water heater
without reliable earthing.
The water heater is fitted with a relief valve. To ensure safety, please do not change its
installation location and never block its outlet.
When the ambient temperature is under 0℃, the piping may be damaged due to freezing
of water in it and cause the water heater to malfunction. So you shall drain the water in the
tank to avoid freezing. If the water heater is not to be used for a period of over 1 month,
please unplug the power cord and drain the water tank.
If the electrical water heater is seriously soaked with water, it must be examined and repaired
by a technician authorized by the manufacturer before it is put into use again.
Scale can be formed in the water tank after long periods of use. Besides, water quality may
change due to ageing of the water pipe. After you wash rice or vegetables with water from
the water heater, please rinse them with clean tap water.
Do not place flammables such as gasoline near the water heater to avoid fire or other
accidents.
6