1
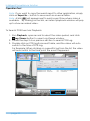
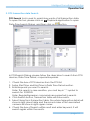
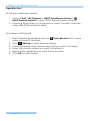
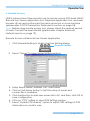
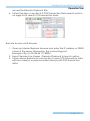
The Point of Sale Solution
Hardware & Software Installation
User Manual
Ver. 99.340.A112.001
Intelligent Surveillance Solution
Table of Contents
TABLE OF CONTENTS
TABLE OF CONTENTS .............................................................................................. 1
SYSTEM INTRODUCTION ......................................................................................... 2
Definition of Terms .......................................................................................... 2
Product Specification .................................................................................... 3
HARDWARE INSTALLATION .................................................................................... 4
SCB-C31A POS data capture convertor ..................................................... 4
SOFTWARE INSTALLATION ...................................................................................... 6
SCB-C31A POS data capture convertor ..................................................... 6
NUUO NVR/DVR/Hybrid system installation ................................................ 7
SOFTWARE SETUP .................................................................................................... 8
1. POS Device Management ........................................................................ 8
1.1. Insert/Delete/Configure POS devices .............................................. 8
1.2. New/Edit/Delete/Import/Export Tag Filter .....................................10
1.3. Setup POS Display Font .....................................................................14
2. Smart Guard Detection ...........................................................................15
2.1. POS Event ............................................................................................15
2.2. Instant Action on POS Event ............................................................18
3. Playback ....................................................................................................18
4. Remote Network Service .........................................................................19
OPERATION TOOLS ...............................................................................................21
1. Live Display ................................................................................................21
2. Log Viewer Search ...................................................................................22
3. POS transaction data Search .................................................................24
4. Playback video with POS data ..............................................................25
5. Backup video with POS data .................................................................26
6. Remote Access .........................................................................................28
page-1
Intelligent Surveillance Solution
System Introduction
SYSTEM INTRODUCTION
NUUO POS, a Point of Sale Systems based on NUUO NVR/DVR/NVDR,
provides financial transaction’s surveillance solution in one central system.
The architecture is as below; POS transaction data flows to NVR by
Ethernet. Each Cash Register with an external receipt printer is
connected by DB9 cable. The transaction information delivered in R232
format can be converted to Ethernet through SCB-C31A POS data
capture convertor. Alternatively, Cash Registers that support TCP/IP or
COM port output can connect directly to the system without the
SCB-C31A box.
Definition of Terms
Terms
POS Original Data
POS Transaction
POS Event Log
Definition
Original data from POS. Usually with a lot of symbols and no
line feed.
Filtered result by user-defined tag-filter.
Smart Guard Event Log from POS transaction. It includes
Transaction start, Transaction end, Cash register open, User
defined condition. Abbreviation
of POS Log.
page-2
Intelligent Surveillance Solution
System Introduction
Product Specification
Input
Output
DC In
Power consumption
Operating Temperature
Operating Humidity
NUUO Capture Box
SCB-C31A POS
RS232
Ethernet
DC +10V to +15V
500 mA
-20 to 65℃
0-90 % Non-Condensing
Baud Rate
Data Bits
Stop Bits
Parity
Flow Control
110 bps to 230.4 kbps
5, 6, 7 or 8
1, 1.5 or 2
None, Even, Odd, Mark, Space
None, RTX/CTS, XON/XOFF, DTR/DSR
page-3
Intelligent Surveillance Solution
Hardware Installation
HARDWARE INSTALLATION
SCB-C31A POS data capture convertor
To connect Cash Register, Printer, and SCB-C31A POS data capture
convertor together, please follow below steps:
Step 1: Please refer the user manual to setup Cash Register and printer.
Step 2: Using a “Y-shape” DB-9 cable, one DB-9 female connect to
POS system and one DB-9 male connect to the receipt printer
Y-shape (provided by Printer vendor).
Step 3: Using another DB-9 female connect to SCB-C31A POS Data
Capture R232/Ethernet convertor with Null modem.
Note: There are two kinds of serial cable: Straight pass-through
and Null-Modem. The connection between SCB C31A POS
Data capture box and Y-cable must be null modem (in
package).
Step 4: Check the system switch of the SCB-C31A POS is switch to OFF,
OFF position.
Step 5: Connect power source with SCB-C31A POS.
Step 6: Connect SCB-C31A POS with internet port by RJ45 LAN cable.
Cash register
F
Y-cable
SCB-C31A POS
Null Modem
M
Printer
F
Ethernet
F
M
Provided by printer
page-4
Intelligent Surveillance Solution
System Introduction
RJ-45
RS-232
Reset
Switch
Power
The LED Indicators:
PWR LED: System is ready (Blinking).
LINK LED: Ethernet cable connection and data active.
RXA LED: Transiting/Receiving Indicator.
TXA LED: No option of SCB-C31A POS
page-5
RS-232
Intelligent Surveillance Solution
Software Installation
SOFTWARE INSTALLATION
SCB-C31 POS data capture convertor
Step 1: Use IE-browser to setup SCB-C31A POS, the default IP address is
192.168.1.1
Step 2: Setup IP address and password, and then setup IP address.
Note: Each time you switch the page of the web, please click
Save at first. If you leave this page without saving, all changes
will be ignored.
Step 3: Setup Password if needed. Password is only using to activate a
security feature on the serial server. Once a password is entered
it will be required to access the menu and make change of
configuration when access.
Note: Please write down the Serial number and MAC address,
these two parameters are necessary when user forget your
password.
Step 4: Setup according to your POS or Cash Register. Usually all
devices are default setting, you can reserve your time to pass
this step.
Step 5: Please restart/reset the box after changing configurations to
active setup.
To reset the unit manually apply power, insert a small plastic
page-6
Intelligent Surveillance Solution
System Introduction
tool, and press lightly depressing reset located between the
switch (refer page 5). Hold for 3 seconds and release. The Link
and Run light will go out and turn back on. The SCB-C31A POS
will revert to the last setting.
Note: Every time you change the configuration of SCB-C31A
POS, please check the above settings, especially maximum
connection and Remote IP address to avoid connection fail.
Connection via COM Port
Please install system according to following diagram:
Connection via TCP Client
Please install system according to following diagram:
NUUO NVR/DVR/Hybrid system installation
Please refer to the Main Console user manual to complete system
installation with the NVR/DVR/Hybrid systems installation CD.
page-7
Intelligent Surveillance Solution
System Setup
SOFTWARE SETUP
1. POS Device Management
Each NUUO Main Console system can manage up to 64 POS cash register
devices. This section will teach you how to setup config of your system.
POS Application from the
Run Main Console and click on
menu to open POS Application window.
Config
You are able to Insert/Delete/Configure POS devices in this window.
Choose devices from the POS Tree, and info will be shown in the POS Info
window. Associated cameras will be shown in the preview window below.
POS Tree
POS Info
Associated Camera
1.1. Insert/Delete/Configure POS devices
To Insert a POS device
1. Click the
Insert button to open the POS Setting window
2. Configure data source info, including Name, Source Type, IP
address and Port.
3. After setting, click Test Connection to test POS device connection. If
all the settings are correct, the system will popup “POS “name (IP)”
is available” message to confirm the setting is successful.
page-8
Intelligent Surveillance Solution
System Setup
4. Setup Miscellaneous options, including Record POS Transaction and
Display on Videos Preview.
a. Record POS Transaction:
Select this checkbox to record POS transaction data and to
transfer into MS database. The MS data will allow searching and
display on associated recording video, and the MS data files
can also provide third-party application to analysis.
b. Display on Video preview:
Select this checkbox to display POS transaction data overlay on
associated camera live videos.
Two types of transaction data display time: Always means keep
transaction data on video until receiving next transaction data.
Last for 10 seconds means each transaction data only last on
video for 10 seconds.
5. Select Tag Filter (refer to Tag Filter section on on page 10).
6. Enable checkbox to select cameras desired to be displayed with
POS transaction data overlay on live video.
7. In Display Region Definition option, setup display area for each
camera video.
a. Default: The default display area is below the camera OSD.
b. User Define: Right-click on video preview and drag rectangle to
define display area.
8. Click OK to save.
page-9
Intelligent Surveillance Solution
System Setup
To delete POS device
1. Choose POS device.
2. Click
Delete button to remove this POS device from the system.
To configure POS device
1. Choose POS device.
2. Click
Configure button to open POS Settings window.
3. Please refer To insert POS device section (page 8 ) to modify
configuration.
1.2. New/Edit/Delete/Import/Export Tag Filter
The original transaction data from POS system is hard to read. Users can
define filters to make it comprehensible. NUUO also provides a simple
default tag filter to help filter out same common EPSON commands.
Users can edit other customized filters based on this default tag filter.
To add new Tag Filter
1. Click on the New button to open the Tag Filter window.
This window includes the following sections:
a. General: Setup Tag Filter name and a test connect button.
b. Original Data: Show original transaction data from POS device.
c. Filtered Data: Show filtered data after defined filter.
d. Filtered Function buttons: Tool used to define filter type.
e. Filter List: A list of all filters.
f. Data tools: Includes import/export buttons to import/export
original binary data, and a clear button to clear original/filtered
data windows.
g. Filter tools: Includes upper/down tool to arrange priority of each
filter, or remove filters from list. You may also edit existing filters or
add new ones.
h. Encoding: Choose desired language.
i. Transaction Timeout: Define a maximum time length for
transactions to end when no more data is received.
page-10
Intelligent Surveillance Solution
System Setup
General
Data Tools
Original
Data
Filtered
Data
Filtered Function
Filter Tools
Filter List
Encoding
Timeout
2. Enter name of tag filter.
3. Click Connect button to capture POS transaction data from POS
device.
4. Please operate POS device to send transaction data to filter.
The original transaction data will show on the left window.
Note: If you don’t want the data to keep importing when editing
filters, please click the Disconnect button to stop connection.
5. Data Tools:
Export: Capture and export original Binary data
Import: Reload exported Binary data.
Clear: Remove data form Original Data and Filtered Data windows.
6. Start to edit tag filters:
Click and highlight text from Original Data window, then use the six
buttons below to define filters. The filtered transaction data will
show on the right window.
page-11
Intelligent Surveillance Solution
System Setup
a. Omit: Neglect the selected text which is meaningless or not
important. The text will disappear in right filtered data window.
b. Substitute: Use other words to replace the selected text. The
system will popup a substitution panel for replacing desired
words. The text on the filtered data window will show the result.
c. Add New Line: Define the selected text as the symbol for
changing to a new line. The result will show on the right filtered
data table.
d. Start: Define the selected text as the symbol for the beginning of
a transaction. It will be replaced as a line as shown below.
Note: This setup is also used as detection tag for Smart Guard to
detect Transaction Start event.
e. End: Define the selected text as the symbol for the end of a
transaction. It will be replaced as a line as shown below.
Note: No transaction end may result in error or lost info.
If you do not define this filter please be sure to define a
transaction timeout. For more info please refer to p.16.
This setup is also used as detection tag for Smart Guard to
detect Transaction End event.
page-12
Intelligent Surveillance Solution
System Setup
f. Cash Register Opened: Define the selected text as the symbol
for cash register opened. The filtered data will show the <Cash
Register Open> mark as below.
Note: This setup is also used as detection tag for Smart Guard to
detect Open Cash Register event.
7. Filter Tools:
The
buttons are used to change priority of sub filter criteria.
The filter will operate by order of list; the filters on top will take effect
first. The
button will remove the filter from this list.
Click on
Edit / Add to configure tag filters or add new ones.
8. Click on OK to save configuration.
Note: If codepage of POS printer is different with Windows OS, please
correspond with POS printer to setup Encoding option.
page-13
Intelligent Surveillance Solution
System Setup
To Edit Tag Filter
1.
2.
3.
4.
Select Tag Filter name from drop-down menu,
Click Edit button
Configure the Tag Filter window.
Click OK to save configuration.
To Delete Tag Filter
1. Select Tag Filter name from drop-down menu,
2. Click Delete button
To Import/Export Tag Filter
1. Click Import/Export button and select Import/Export URL.
2. Click Open/Save to Import/Export Tag Filter.
3. After Import Tag Filters, users can simply select tag filter form
drop-down menu without edit new tag filter.
1.3. Setup POS Display Font
This option allows to setup font of POS transaction data on video.
1. Run Main Console, click on
POS
Application from Config menu to
open POS Application window,
and then switch to Display tab.
2. For POS transaction data displayed
overlay video, select the font, font
size, font color and any font effects
user wants.
page-14
Intelligent Surveillance Solution
System Setup
2. Smart Guard Detection
2.1. POS Event
Each POS System has five POS Event types:
Transaction Start - Detect any transaction beginning
Transaction End - Detect any transaction ending
Open Cash Register - Detect any cash register opening
User Defined - Detect any condition which is defined by user
Connection Lost – Detect any connection abnormal event
between the POS and Main Console systems.
Note: First three events require a pre-defined detection tag, please
refer to Edit Tag Filter section (see page 11).
To add new POS Event
1.
2.
3.
4.
Select
POS device from device tree.
Click on button to open Select Event Window.
Select Event Type.
Setup basic option of Event.
page-15
Intelligent Surveillance Solution
System Setup
a. Enable Event: Check the box to activate.
b. Life Cycle:
Manually cancel event or event continues triggered:
The alarm/action will continue until being canceled from Main
Console (Start>Open Event Report>Cancel All Events). The
user currently not at the seat watching the screen will be
notified by the alarm.
Cancel event after timeout xx seconds:
Enable checkbox and setup the timeout seconds to cancel
the event after the time that you set whatever the events
disappear or not.
c. Activated Period:
Always Activated:
Enable this option, the system will react always.
Activated only in the following period:
Setup the system to react during a certain time period; for
example, office working hours (8:58 to 18:02).
5. Setup advanced option of User Defined Event.
page-16
Intelligent Surveillance Solution
System Setup
a. Event name: Enter the name of user defined event.
b. Alert Condition:
Text:
Enter the text user wants to detect in Keyword column.
Enable Match case to search for names where the case
matches the letters you entered. Or enable Match whole
word to search for the terms you entered as a whole word.
Check Using Regular Expression to include regular expression
commands in search.
Numeric value:
Enter a number as the condition of event and then choose
one of the symbols ( ≦ < = > ≧ ) to define the numeric
value.
For advanced settings, use Prefix text/Postfix text to detect
special text before/after the value’s condition.
For Example: To detect Coke > 100 US, please insert as below:
Note: The value is also case sensitive, you must key in “,”
symbol to search for 10,000US.
External rule:
This feature allows developers to customize event rules. Main
Console can send filtered transaction data to third-party
applications and receive reply on whether to trigger alarm or
not. Please contact [email protected] for details.
c. Frequency:
Count:
Alarm will be triggered when this event happens over specific
number of times.
Count Period:
To reset count after each new transaction, or under specified
period of time.
To Copy Event to other POS Devices
1. Right-Click on POS Event which you want to copy. For example,
click , and select copy.
page-17
Intelligent Surveillance Solution
System Setup
2. Switch to other
POS device which you want post event:
Right-click on POS device, and select post.
Note: IF you want to copy POS event to all POS devices, simply select
copy to all of right-click menu on step 1.
2.2. Instant Action on POS Event
Each POS Event can be setup to trigger 9 instant response actions:
On Screen Display - A red warning message will be flashing on the
screen of associated cameras.
Play Sound – Play sound warning.
Send E-mail - Send E-mail with event type, time, and snapshot of
first associated camera.
Phone Call – dial pone call.
PTZ Preset Go – Control PTZ camera move to a preset point or patrol
around preset points.
Signal Digital Output - Triggers traditional alarming output devices.
Send a SMS message - Send a SMS message with event type and
time.
FTP – Upload snapshot of first associated camera to FTP.
Popup E-Map on Event – Auto popup E-map window to show POS
device location.
Note: For detail configuration please refer to chapter 4.2 Action
section of Main Console user manual.
3. Playback
To enable POS overlay option
1. Click
to open Setting window, and then switch to POS tab.
page-18
Intelligent Surveillance Solution
System Setup
2. Check the box of Enable POS overlay, the transaction data will be
overlaid on associated camera’s recording video.
3. Set up overlay configuration; select the font, size, font color and
any font effects user wants.
4. Setup option of Display on Video Preview to display POS transaction
data overlay on associated camera live videos.
Always Display: To keep transaction data on video until receiving
next transaction data.
Last for 10 seconds: Each transaction data is displayed last on
video for 10 seconds.
4. Remote Network Service
NUUO systems allow users to access POS data on remote sites.
To Start Network Service of Main Console
1. Open
Config menu and click Network Service to open Network
service window
2. Switch to
Live Streaming tab.
3. Setup the options of connection and then click start to allow
remote view POS Transaction with live videos.
page-19
Intelligent Surveillance Solution
System Setup
Note: Port 5150 is used when connecting via NUUO Remote Live
Viewer application. Web server port 8080 is used when
connecting via IE-browser. Please refer to chapter 5.14 Network
Service section of Main Console user manual for details.
4. Switch to
Remote Playback tab.
5. Setup the options of connection and then click start to allow
remote access database of POS Transaction.
Note: Port 5160 is used when connecting via NUUO Playback
application. Web server port 8080 is used when connecting via
IE-browser. Please refer to chapter 5.14 Network Service section of
Main Console user manual for details.
page-20
Intelligent Surveillance Solution
Operation Tool
OPERATION TOOLS
1. Live Display
To Display POS Transaction Data Overlay
1. Enable Display on Video Preview option.
Please go to Main Console > Config > POS Application > select POS
device and Configuration window, and then check the box of this
option.
2. Select Associated Cameras.
In Associated Cameras setup region, select cameras to overlay POS
transaction data.
3. Enable the POS device application
After setting the associated camera, click OK button back to POS
Application window. Select POS device form the device list, the
system default enables all POS device when inserted.
page-21
Intelligent Surveillance Solution
Operation Tool
4. View the Live Video with POS transaction data
After above setup, the transaction data would show on video when
transactions happen.
2. Log Viewer Search
Log Viewer is a tool used to search Unusual Events (Smart Guard
Events), System Logs, Counting Application results, and POS Logs (POS
Event Logs). For detailed description, please refer to chapter 5.12 Log
Viewer section of Main Console user manual.
Note: If you want to search the transaction data, please use POS
Search tool on next section 3. POS Transaction Data Search on page
24.
To Search POS Event via Main Console
1. Run Main Console, click on
Log Viewer from Config menu to
open Log Viewer window, and then switch to POS Log tab.
2. Select Log Type and POS device from drop-down menu.
3. Setup time criteria to search for special Date or a period of
Date&Time.
4. Click on Search, and search result will list on table.
page-22
Intelligent Surveillance Solution
Operation Tool
Note: If you want to copy the search result to other application, simply
click on Export to… button to save result as an excel table.
Note: A link (
) will appear next to each event time where video is
available. By clicking on the link, an instant playback window will pop
up to show recorded video.
To Search POS Event via Playback
1. Run Playback, open record to select the video period, and click
Log Viewer button to open Log Viewer window.
2. Follow the step 2-4 on previous section to search POS Log.
3. Double-click on POS log from result table, and the video will auto
switch to the time of POS log.
For Example: When clicking on a specific log from the list, the video
will auto switch to the time point the event happened.
page-23
Intelligent Surveillance Solution
Operation Tool
3. POS transaction data Search
POS Search tool is used to search key words of all transaction data.
To open this tool, please click on
Playback application to open
Date Time Search Dialog, and then click on
button.
In POS Search Dialog, please follow the steps blow to search from POS
devices, Date Time Period, or special keywords.
1. Check the box of POS devices from the POS list.
2. Setup Start Time and End Time in Data Time Period section.
3. Enter keyword you want to search.
Note: This search is case sensitive, you must key in “,” symbol to
search for 10,000US.
Note: Regular Expression commands are supported in search.
4. Click Search button, Transaction table will show results.
5. Select items from Transaction table, the whole transaction detail will
show in right-down table and the record video of first associated
camera will show in right upper corner.
6. Check the box of Search within result and enter keyword, it will
search again within the results.
page-24
Intelligent Surveillance Solution
Operation Tool
4. Playback video with POS data
To view record video with POS transaction data, please check you have
enable POS overlay option (refer the page 25). If you have started this
option, the system will auto overlay transaction data when play recording
video. Below are two modes to select video period.
To select Period by POS search
1. Click
on Playback application to open Date Time Search Dialog,
and then click on
button
2. Follow above section 3 POS Transaction data search to search.
3. Select the transaction data for result list, and click OK.
4. The period you select from POS search result will be automatically
selected.
5. Click OK to go back to Playback application.
To select Period by Date&Time
1. Click
on Playback application to open Date Time Search Dialog.
2. Setup Start Time on Date Time Period setup panel, or directly
left-click and drag to select period from Time Table.
3. Click OK to go back to Playback application.
page-25
Intelligent Surveillance Solution
Operation Tool
5. Backup video with POS data
NUUO system has three ways to backup video with POS transaction data.
To backup via Main Console
1. Open Config menu and then click
Backup to open backup
system window (For detail, please refer capture 5.13 backup
section of Main Console user manual).
to select data time period you want to backup.
2. Click on
The period will be listed on table after click OK. Click
to open
Backup option window.
3. Select the location where you want backup to.
4. Select which data base you want to backup with.
a. Event Log: The database of smart guide detected POS and
Camera Events.
b. System Log: Include recycle, start/stop/modify schedule,
Network service…
c. Counter Log: Database of Counting Application.
d. POS Transaction: The database of POS transaction data.
5. Click OK to backup.
page-26
Intelligent Surveillance Solution
Operation Tool
To backup via Backup System
1. Click on Start > All Programs > NUUO Surveillance System >
NUUO Backup System to open NUUO Backup System window.
2. Following above step 2-5 on backup on Main Console to backup
video with POS transaction data.
To backup via Playback
1. Start Playback Application and use
video you want to backup.
2.
3.
4.
5.
6.
Open Record tool to open
Click
Backup to open backup dialog.
Check the period and cameras are what you want to backup.
Setup the location where you want to backup to.
Select which database you want to backup with.
Click OK to start backup.
page-27
Intelligent Surveillance Solution
Operation Tool
6. Remote Access
NUUO systems have three remote tools to remote access POS data: NUUO
Remote Live Viewer application tool, Playback application tool, and web
browser. All access functions are the same as launch on local machine
(please refer 3.2 POS Transaction Data search section on page 24).
Note: Before using remote access tool, please check the network service
of Main Console has been started (please refer chapter 4 Remote
Network service on page 19).
Remote Access via Remote Live Viewer Application
1. Click General Setting to obtain LiveView Setting dialog.
General Setting
2. Select “Server” to open Server Setting window.
3. Setup Server Name, Address, Port, User Name.
4. Click on Test Server button to test the setup of server and
connection is available.
5. Click Add button to add new server site to list, and then, click OK to
save configuration.
6. Click on “POS” setting to open POS Setting window.
7. Select “Enable POS overlay” option to adjust OSD settings of POS
information on monitor view.
page-28
Intelligent Surveillance Solution
Operation Tool
8. For POS transaction data displayed overlay video, select the font,
font size, font color and any font effects user wants.
Note: The status of POS overlay will be the same with the one in
MainConsole. Go to Main console> Config >POS Application to check if
“Display on Video Preview” is enabled first, then the POS Overlay function
could be enabled.
Remote Access via Playback Application
1. Go to
General Setting – Setting – Server to open Remote
Playback Site Management window.
2. Setup Server Name, Address, Port, User Name
3. Click on Test Server button to test the setup of server and
connection is available.
4. Click Add button to add new server site to list, and then, click OK to
save configuration.
5. Click
page-29
icon on the top of the
Open Record window to
Intelligent Surveillance Solution
Operation Tool
access the Remote Playback Site.
6. Follow the step on section 3.2 POS Transaction Data search section
on page 24 to search POS transaction data.
Remote Access via IE-browser
1. Open an Internet Explorer browser and enter the IP address or DDNS
name of the server followed by the connecting port.
Example: http://169.254.54.171:8080/
2. Select Remote Live Viewer / Remote Playback to launch option.
3. Follow above Remote Access section to view POS transaction data
with live video(s), or play recorded video(s) with POS transaction
data.
page-30