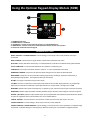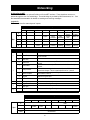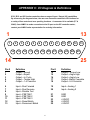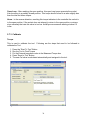
1
AcraDyne iEC DC Tool Controllers User Guide Introduction Thank you for your purchase of an AcraDyne iEC DC Tool Controller from AIMCO. The iEC represents the most advanced controller for AcraDyne series electric controlled assembly tools and is capable interfacing with all series of AcraDyne tools. This manual is designed to provide the user of the AcraDyne iEC Controller with a guide to understanding the features and functions of the controller. Programming this controller using AcraDyne’s ToolWare software package provides a broad range of operating choices to tackle the most difficult assembly projects with ease. Statistical analysis, communication and system diagnostic features are also built in. For more detailed programming, data analysis and system monitoring information please refer to the AcraDyne ToolWare Operations section at the back of this manual. For additional service and support, please contact your AIMCO distributor or contact AIMCO at 1-800-852-1368 between the hours of 7:00 AM—4:00 PM Pacific Time. Table of Contents Safety Information ··········································································· 3 Front Panel Diagram (Figure 1) ························································· 4 Bottom Panel Diagram (Figure 2) ······················································ 4 Top Panel Diagram (Figure 3) ··························································· 4 Main Display Panel Diagram (Figure 4) ·············································· 5 Dimensions ···················································································· 5 Initial Setup ··················································································· 6 Main Display Functions Changing Parameter Sets ······················································ 8 Programming the Display Options (Steps 1-3) ·························· 8 Display Optional Values for Individual Rundowns (Steps 1-2) ····· 10 Using the Optional Keypad Display Module (KDM) KDM Diagram ······································································· 11 Parameter Set Terms ····························································· 11 Turning the KDM On / Off ······················································· 12 Main Menu: 1) Parameter Setup Setting Up Parameter Sets ·········································· 12 Accessing Quick Start Parameter Sets·························· 13 Editing Quick Start Parameter Sets ······························ 13 Configuring New Quick Start Parameter Sets ················· 14 Configuring a Complete Parameter Set ························· Entering / Editing Values in the KDM ···························· 15 Main Menu: 2) Calibration ······················································ 16 Main Menu: 3) Administration Functions Parameter Set Defaults ··············································· 17 Security ···································································· 18 Tool Information ························································ 19 Reset Factory Defaults ··············································· 19 Error Codes ······························································ 20 Filter Frequency························································· 20 Adaptive Control ························································ 21 Networking ····················································································· 22 Error Proofing ················································································· 33 Appendix A Error Codes and Descriptions······································ 34 Appendix B Menu Structures of KDM ············································· 35 Appendix C I/O Diagram & Definitions ············································ 37 Appendix D Light Assignment for Light Tower and Key Bypass ········ 41 Appendix E Dual Trigger Lever Functionality for Gen 3-4 tools ·········· 41 Appendix F TUBE NUT Homing Sequence ······································ 42 Appendix G Frequently Asked Questions ······································· 43 Appendix H Toolware Users Guide - Separate Table of Contents ······· 45 2 Safety Information SAVE THESE INSTRUCTIONS 1) WORK AREA a) b) c) 2) Keep work area clean and well lit. Cluttered and dark areas invite accidents. Do not operate power tools in explosive atmospheres, such as the presence of flammable liquids, gases or dust. Power tools create sparks which may ignite the dust or fumes. Keep children and bystanders away while operating a power tool. Distractions can cause you to lose control. ELECTRICAL SAFETY a) Power to plugs must match the outlet. Never modify the plug in any way. Do not use any adapter plugs with earthed (grounded) power tools. Unmodified plugs and matching outlets will reduce risk of electric shock. b) Avoid body contact with earthed or grounded surfaces such a s pipes, radiators, ranges and refrigerators. There is an increased risk of electric shock if your body is earthed or grounded. c) Do not expose power tools to rain or wet conditions. Water entering a power tool will increase the risk of electric shock. d) Do not abuse the cord. Never use the cord for carrying, pulling or unplugging the power tool. Keep cord away from heat, oil, sharp edges or moving parts. Damaged or entangled cords increase the risk of electric shock. e) When operating a power tool outdoors, use an extension cord suitable for outdoor use. Use of a cord suitable for outdoor use reduces the risk of electric shock. 3) WIRING SAFETY DANGER: Ground the system. There may an electric shock or fire risk. DANGER: Turn off the system before wiring. There may be an electric shock or fire risk. NOTE: Verify that the rated voltage of the system matches with the connected AC power. There may be risk of electric shock, fire risk, or damage to the tool and controller. 3) PERSONAL SAFETY a) b) c) d) e) f) g) 4) 120 /240 VAC +/- 10% 50 / 60 Hz 16 Amps Stay alert, watch what you are doing and use common sense when operating a power tool. Do not use a power tool while you are tired or under the influence of drugs, alcohol or medication. A moment of inattention while operating power tools may result in serious personal injury. Use safety equipment. Always wear eye protection. Safety equipment such as dust mask, non-skid safety shoes, hard hat, or hearing protection used for appropriate conditions will reduce personal injuries. Avoid accidental starting. Ensure the switch is in the off-position before plugging in. Carrying power tools with your finger on the switch or plugging in power tools that have the switch on invites accidents. Remove any adjusting key or wrench before turning the power tool on. A wrench or a key left attached to a rotating part of the power tool may result in personal injury. Do not overreach. Keep proper footing and balance at all times. This enables better control of the power tool in unexpected situations. Dress properly. Do no wear loose clothing or jewelry. Keep your hair, clothing and gloves away from moving parts. Loose clothes, jewelry or long hair can be caught in moving parts. If devices are provided for the connection of dust extraction and collection facilities, ensure these are connected and properly used. Use of these devices can reduce dust-related hazards. POWER TOOL USE AND CARE a) b) C) Do not force the power tool. Use the correct power tool for your application. The correct power tool will do the job better and safer at the rate for which it was designed. Do not use the power tool if the switch does not turn it on and off. Any power tool that cannot be controlled with the switch is dangerous and must be repaired. This product is designed to be used in combination with AcraDyne DC Electric assembly tools for intermittent assembly processes. 3 Front Panel Figure 1 iE C 1—Main Display Panel—Annunciation and Display programming (see Page 5 for detail) 2— Power Disconnect Switch— Turns controller on and off 3—Keypad Display Module (KDM)—Onboard Interface for setup and programming (Optional) Bottom Panel Figure 2 1 7 2 6 3 5 4 1—CAN Connectors— For connection of AEC-CIM communication module and peripheral devices 2—System Connector (DB-15 Pin)— For upgrading / changing controller firmware 3—External transducer Connector (DB-25 Pin)— Non active, future feature 4— External I/O Connector (DB-25 Pin)— Input and output of signals for process control 5—Power Cord Connection— IPC-29 Connector 6—Ethernet Connection Access / Light Tower Board Connection/ Bottom Exit Tool Connection (Optional) 7—RS232 Connection (DB-9 Pin)— Serial-data output for communication with peripherals such as bar code readers Top Panel Figure 3 4 1 3 2 1—Tool Connector (26 Pin) —Standard connection point for tool cable 2—Serial data connection for peripherals 3—Ethernet connection port (2nd connection optional with advanced communication packages) 4—Serial data connection for peripherals 4 Main Display Panel 1 Figure 4 A B C D 7 2 6 3 5 A B C 4 1—Rundown Feedback Indicators A—ACCEPT— Green LED indicates OK rundown B—TORQUE—Steady red indicates HI, flashing red indicates LO C—ANGLE—Steady yellow indicates HI, flashing yellow indicates LO D—CYCLE—Blue LED indicates tool is in rundown cycle 2—Primary Display Field—Displays Parameter Set Target or Rundown torque 3—Secondary Display Field—Selectable Display Choices (Angle etc…) 4—Programmable Display Selection Buttons A—Optional Display Access—Accesses the Programmable Options menu B—NEXT—Scrolls through the different display options for the Secondary Display C—SET—Sets the selected display option in the Secondary Display 5—CHANGE PSET—Scrolls upwards through programmed Parameter Sets 6—PSET Indicator—displays PSET that is currently operating 7—IR PORT ENABLED—Future function, not currently enabled Dimensions Inches / Millimeters 5 INITIAL SETUP Step 1 Connect the tool cable to the Tool Connection (Figure 3, pg. 4). The cable consists of a male pinset housed in a molded connection with a notch or a 26-Pin male connector with two opposing locating pins. Align the notch of the tool cable with the notch of the connector or the male and female locating-pins and insert the cable. Next, securely thread the connector cover to the controller body. Step 2 Repeat the above process to connect the cable to the AcraDyne tool that will be used with the controller. AcraDyne pistol-style tools manufactured prior to January 2011 are hard–wired on the tool side and require no additional connection. Step 3 Plug the female end of the power cable into the Power Cable connection (Figure 2, pg. 4). Step 4 Plug the male end of the power cable into the appropriate power source. Due to the variety of 220V power outlets worldwide, the standard power cable plug-end provided with the controller may need to be modified to connect to local 220V power outlets. The iEC Controller is designed to work with either a 110V or 220V input supply. When operating a 3000 series tool on 120V, the maximum speed of the tool is ½ of its catalog speed. Since speed parameters are set as a percentage of maximum, the actual speeds of these tools run on 110V will be ½ of the speed run on 220V. ! Step 5 Turn the controller on by rotating the Power Disconnect Switch (Figure 1, pg. 4), to the POWER ON position, represented by the I symbol. When an iEC with SCC code 2.0 and higher is powered on, three messages will be shown on the display: ! SYS INIT- indicates the system is initializing IEC “#.##” - indicates the firmware version that is operating in the controller SERVO FIRMWARE (A or B) — indicates the firmware of the controller’s servo module These messages are normal and will clear as the system finishes initializing. 6 INITIAL SETUP ! If the controller is powered on without a tool connected the following message will be shown on the display: AUT FLT 129 This message is normal and will clear once a tool is connected Step 6 To turn the controller off, rotate the Power Disconnect Switch to the POWER OFF position, represented by the 0 symbol ! To reboot the controller without turning off the Power Disconnect, press and hold the buttons simultaneously for 3 seconds. NEXT + Factory & Default Parameter Sets Before the user programs the iEC controller for the first time, or after resetting the controller to factory default settings, one of three different groups of parameters may be present in the controller: DEFAULT WITH NO TOOL CONNECTED—These parameters will start at 10 Nm and increase up to 80 Nm in increments of 10 Nm DEFAULT WITH TOOL CONNECTED—This will create a group of 3 individual parameter sets, one each at 30%, 60% and 80% of the connected tools maximum torque capacity TEST PARAMETER SETS—Because every AcraDyne iEC controller is tested before being shipped, some parameter sets that were used in this testing may be present in the controller. ! If a parameter set is selected that has a target torque above the maximum capability of the tool, the following message will be shown on the display EXT FLT 4096 This message will clear when an allowable parameter set is selected or when the out-of-range parameter set is reprogrammed to be within the capabilities of the tool. 7 SET Main Display Functions Changing Parameter Sets To change the parameter set that is active, press the CHANGE PSET button (Fig. 4) until the desired parameter set number is displayed. With each separate press of the button the parameter set numeral will advance upwards through the highest parameter set that is programmed and then cycle back to parameter set #1. A maximum of 8 parameter sets can be programmed into the iEC controller. The display for each type of strategy will vary. The main control parameter (Torque, Angle or both) will be displayed when the Parameter Set is selected. The different strategies will display as follows: Example: PSET #2, Torque Control Strategy, 25 ft-lb Target Example: PSET #3, Angle Control Strategy, 270 Degree Target ALTERNATING Example: PSET #4, Torque Control / Angle Control Strategy, 25 ft-lb Target, 270 Degree Target Note: SCC Firmware Version 3.00 extends the number of parameter sets that can be programmed to 32. The extended parameter sets can be programmed via Toolware 3.0 or greater. For parameter sets 10 -32, the numeric Pset LED will flash the first digit, then the second followed by a pause. If any of the parameter sets are “Linked”, the CHANGE PSET button will automatically skip to the first Pset of the Linked Pset group. (For information on Linked parameter sets, see the Setting Parameters section in the ToolWare portion of the user manual.) Programming the Display Options The Programmable Display Options feature in the iEC allows the user to select the information that will be displayed in the Secondary Display Field. Step 1 Press the DISPLAY OPTIONS button (Fig. 4) to access the Display Options Menu. Immediately a message will appear in the Primary Display Field (Fig. 4) that will indicate which display option is currently selected. ! If no rundowns have been conducted since the most recent Power-On of the controller, the Secondary Display Field will display the default information relating to the current display option. If rundowns have been conducted since the controller was last Powered-On, then the Secondary Display Field will display the value for that option pertaining to the most recent rundown in the current parameter set. 8 Main Display Functions Step 2 To scroll through the available display options, press and release the NEXT button. Repeated presses will cycle the display options as follows DFLT > ANGL > BCNT > TOT > OK > NOK > CP > CPK > JTRT The definition of each Display Option is as follows: DFLT (Default) Field is blank if a Torque Control Strategy is programmed. For all other strategies the field will display the angle of rotation from Threshold to Final Torque ANGL (Angle) If selected, field will display angle of rotation for the previous rundown, regardless of strategy for the parameter set BCNT (Batch Count) Field will display the batch count information for the selected parameter set. Displayed values are current count (cc) and batch total (bt), with the information displayed as cc.bt. TOT (Total Count) Value shows the total number of rundowns for all parameter sets from midnight to midnight OK (OK Count) Value shows the total number of acceptable rundowns for all parameter sets from midnight to midnight NOK (NOT OK Count) Value shows the total number of unacceptable rundowns for all parameter sets from midnight to midnight CP (Cp Value) Statistical value is Cp for selected parameter set based on collection of programmed-minimum number of rundowns. This value is reset upon controller initialization or new Parameter Set Download or Tool Change CPK (Cpk Value) Statistical value is Cpk for selected parameter set based on collection of programmed-minimum number of rundowns. This value is reset upon controller initialization or new Parameter Set Download or Tool Change JTRT (Joint Rate) Displays joint rate of selected Parameter Set based on previous rundown. The value is displayed in degrees of rotation from the Joint Rate Threshold (not Parameter Set Threshold) to final torque. By default, the Joint Rate Threshold is 10% of target torque 9 Main Display Functions Step 3 When the desired Display Option is selected, press the SET button (Fig. 4) to lock this option as the visible display. Once the SET button is pressed, the display screens will clear. Upon completing a rundown cycle, the value for the selected Display Option will be shown in the Secondary Display Field (Fig. 4). ! The selected Display Option will be displayed for all Parameter Sets. Display Optional Values for Individual Rundowns By scrolling through the Display Options after a rundown cycle, the value for each option can be quickly viewed. Step 1 Immediately after a rundown cycle, the selected Display Option will be shown in the Secondary Display Field. To view a different Display Option value, press the NEXT button before conducting another rundown. Step 2 Continue to press the NEXT button to scroll though the available options. As each option is selected, the corresponding value will be displayed in the Secondary Display Field. ! The Display Option that is last shown before another rundown is conducted will be set as the programmed display option. To stop viewing the Display Option for the most recent rundown, simply conduct another rundown or press CHANGE PSET to select a different parameter set. 10 Using the Optional Keypad Display Module (KDM) 1 2 3 5 4 1—KDM Display Screen 2—KDM Power On / Off Button 3—Shift Button—used to access alternate functions on highlighted buttons 4—SEND Button—Used to send new or edited parameter sets to the tool and controller 5—Numerical / Alternate Function keypad Parameter Set Terms ANGLE CONTROL / TORQUE MONITOR—Control strategy in which angle is the control parameter, but torque is monitored. ANGLE TARGET—Desired value for angle rotation; measured from threshold torque value. AUTO-SET—Feature that allows manual entry of control parameters, but all others are determined by system defaults. CYCLE COMPLETE—Torque level that determines the completion of a fastening cycle. THRESHOLD—The torque value above which the system is, “in cycle” and data points are stored. DOWNSHIFT TORQUE—Torque level at which the spindle changes from free speed to downshift speed. ERGO MODE—Ramps the cut-off of power after reaching target torque, providing an ergonomic shutoff during a hand-held tightening operation. (Can negatively effect cpk calculations) HI LIMIT—The upper control limit for torque and/or angle. LO LIMIT—The lower control limit for torque and/or angle. Must be set lower than target parameter. Any torque/angle lower than this value will be indicated by a yellow light and with a Lo Torque and/or Low Angle error on KDM. RPM FREE—Spindle output speed at the beginning of a tightening cycle, entered as a percentage of maximum tool speed. RPM DOWN—Spindle output speed after exceeding downshift torque; entered as a percentage of maximum tool speed. SSTART—(Soft Start) Speed of output spindle ramps up at a programmable rate to RPM free speed; allows the operator or system to engage the socket onto the fastener in a more controlled fashion. TARGET TORQUE—Torque level which, when achieved, causes the power to the drive motor to be cut off. TORQUE CONTROL—Control strategy in which torque is the only control parameter. TORQUE CONTROL / ANGLE MONITOR—Control strategy in which torque is the control parameter, but rotational angle is monitored. A valuable strategy for controlling torque while also checking for cross threaded or stripped fasteners. 11 Using the Optional Keypad Display Module (KDM) The Optional KDM allows for quick access to the IEC Control programming features. Not all features are accessible by use of the KDM. For access to higher level features (i.e..Batch Programming, Button Options, Linked PSet) please use a PC connected to the controller and the ToolWare software interface program. Turning the KDM On After turning on the iEC Controller (described in Initial Set-up, Pg. 6), press the POWER button on the KDM. The following text will be shown on the KDM Display Screen: Turning the KDM Off 1) Turning off the iEC Controller (detailed in Initial Set-up, Pg. 6) 2) Pressing the POWER button on the KDM for 2 seconds. Note: The KDM does not support Psets above 8, Linked Psets, or Batch Control. These features are available via Toolware 3.0 or greater. Main Menu: 1) Parameter Setup Starting from the Main Menu, a variety of functions can be accessed through the KDM. Programming, calibration, controller set-up, security set-up, and error analysis can all be achieved through properly using the KDM. The following sections will detail the Menu Structure of the KDM and the various functions within each area. Setting Up Parameter Sets This section will detail how to set up parameter (PSETS) sets for assembly by using the KDM. There are two methods of programming a PSET—Quick Start or Configure. QUICK START: Quick Start Mode only requires the user to select the desired parameter set and target torque. All other values are set according to the system defaults (further explained in the ADMIN section—see Page 17). CONFIGURE: Configure Mode allows the operator to set up a new parameter set or edit all programmable operating functions for an existing parameter set. 12 Using the Optional Keypad Display Module (KDM) Accessing Quick Start Parameter Sets From the MAIN MENU, press 1 for SETUP PSET Press 1 for QUICK START The following text will be displayed on the KDM display screen: Choose from EDIT PSET or CONFIG PSET. See the following sections for instructions on editing or configuring Quick Start parameter sets. Editing Quick Start Parameter Sets Depending on the number of Parameter Sets that have previously been programmed into the iEC Controller, the user will have the option of choosing from 1 to 8 parameter sets to edit. Press the number of the Parameter Set that is to be edited. The following text will be displayed on the KDM display screen: To change the target torque value in .1 unit increments press To change the target torque value in 1.0 unit increments press After the target torque is entered correctly, press 2 SHIFT or 8 + 2 or SHIFT + 8 SEND Verify that the correct parameter set is active by observing the PSET Indicator on the Main Display Panel. If the desired parameter set is not active, press CHANGE PSET to cycle through the available parameter sets until the appropriate set is displayed. The tool is now ready to be run to the appropriate target torque value. 13 Using the Optional Keypad Display Module (KDM) Configuring New Quick Start Parameter Sets Depending on the number of Parameter Sets that have previously been programmed into the iEC Controller, the new parameter set will automatically be assigned a value from 2 through 8. Press the number on the KDM that corresponds to the number for the next parameter set to be configured. For example, if the following text were to be displayed in the Quick Start screen: the user would press 4 on the keypad to configure a new Quick Start Pset. The following text will be displayed on the KDM display screen: To change the target torque value in 0.1 unit increments press 2 To change the target torque value in 1.0 unit increments press SHIFT After the target torque is entered correctly, press 8 or + 2 or SHIFT + 8 SEND Verify that the correct parameter set is active by observing the PSET Indicator on the Main Display Panel. If the desired parameter set is not active, press CHANGE PSET to cycle through the available parameter sets until the appropriate set is displayed. The tool is now ready to be run to the appropriate target torque value. ! When exiting from Quick Start mode, all torque values are cleared from the KDM. Upon re-entering Quick Start mode, target torque values for all parameters will be set to the value determined by applying the default percentage to the tool that is connected to the controller. Configuring a Complete Parameter Set For a detailed explanation of each of the programmable functions within a parameter set see the list of key terms in Parameter Set Terms on page 11. From the MAIN MENU, press 1 for SETUP PSET Press 2 for CONFIGURE The following text will be displayed on the KDM display screen: 14 Using the Optional Keypad Display Module (KDM) Depending on the number of Parameter Sets that have previously been programmed into the iEC Controller, the user will have the option of choosing from 1 to 8 parameter sets to edit. If the user chooses to configure a new parameter, the next set will be assigned the next available PSet value, up to 8. Press the button on the KDM corresponding to the PSET that will be edited or configured. The following text will be displayed on the KDM display screen: ! If editing a parameter set, the Control Strategy (definitions on page 11) of the PSET will be identified by an asterisk. Press the button on the KDM corresponding to the desired Control Strategy. The following text will briefly be displayed on the KDM display screen: followed by the following text: The PS# text in the bottom-right corner of the display is for the users reference and identifies the PSET that is being configured or edited. Entering / Editing Values in the KDM The flashing cursor highlights which field can be changed. Two possibilities exist for entering values into a field, depending on which function is being programmed: For numeric values, press the appropriate key on the KDM. For YES or NO entries, press < SHIFT 1 + YES > or SHIFT + 3 NO and/or symbol appears in the upper-right corner of the KDM display, this notifies the user When an that additional functions may be accessed by scrolling to the previous or next page of text. To scroll to one of these pages, press SHIFT + 4 or SHIFT + 6 15 Using the Optional Keypad Display Module (KDM) To move to and modify the next or previous function, press + 2 SHIFT or SHIFT + 8 The cursor will then highlight the field that can be modified. To clear a mistakenly entered value, press SHIFT + DEL When all functions have been modified appropriately, press SEND Verify that the correct parameter set is active by observing the PSET Indicator on the Main Display Panel. If the desired parameter set is not active, press CHANGE PSET to cycle through the available parameter sets until the appropriate set is displayed. The tool is now ready to be run to the appropriate target torque value. ! ! The AUTO-SET function is under development for future versions of the iEC controller. If the user exits the CONFIGURE mode before pressing SEND all edits and modifications that have been entered will be lost and the entries will revert back to the previous value. Main Menu: 2) Calibration The Auto Cal is non functional for the user. 16 Using the Optional Keypad Display Module (KDM) Main Menu: 3) Administration Functions Parameter Set Defaults Parameter set defaults are the values used to calculate control parameters when using either Quick Start or Auto Set. This is also the area where units of measurement for all parameters is set. To access the Parameter Set Default function: From the MAIN MENU, press 3 for ADMIN Press 1 for SETUP PSET The following text will be displayed on the KDM display screen: Navigation and value-entry is the same as described in the section Setting Up Parameter Sets on pages 12—16. All programmable default values are described below: TQTARGET%: The default torque target shown when entering quick programming. The value entered is a percentage of the maximum torque of the tool. For example, if the value entered is 80 and the maximum torque of the tool is 30 Nm, the default target torque when entering quick programming will be 27.0 Nm. TQ+/-%: The default percentage used for high and low torque limit. The value entered is a percentage of target torque. TQTHOLD%: The default torque threshold. The value entered is a percentage of target torque. TQDSHIFT%: The default setting for torque downshift point. The value entered is a percentage of target torque. CYCCOMP%: The default setting for cycle complete torque. The value entered is a percentage of target torque. RPMFREE%: The default setting for RPM free speed. The value entered is a percentage of maximum output speed in revolutions per minute (RPM). 3000 series AcraDyne tools operating at 120V will run at 1/2 of the programmed speed. RPMDOWN%: The default setting for spindle speed after crossing the downshift torque level. The value entered is a percentage of maximum output spindle speed in revolutions per minute (RPM). UNITS: The default engineering units for operation. The KDM is only capable of using one engineering unit for all parameter sets. Changing the units in this section will affect all parameters sets. 17 Using the Optional Keypad Display Module (KDM) Security The security function allows the user to set up a password in order to prevent unauthorized persons from altering the programming of the iEC controller. Once the password function is activated, the user will be prompted to enter the correct password whenever attempting to navigate past the Main Menu. ! If the user changes the password and then loses or forgets the new password, the Factory Default password will still allow the user to access all menus and functions. Please call your AIMCO sales representative for assistance in entering the Factory Default Password. To access the ADMIN SECURITY function: From the MAIN MENU, press 3 for ADMIN Press 2 for SECURITY The following text will be displayed on the KDM display screen: If the password function is already enabled, the text will read 1) DISABLE PWORD To activate the password function, press 1) ENABLE PWORD To enter a new password, press 2) CHANGE PWORD The following text will be displayed on the KDM display screen: Enter a 4-digit password. Once the four digits are entered, the user will automatically be prompted to confirm the password. When the correct password is confirmed, the following text will briefly be displayed on the KDM display screen: 18 Using the Optional Keypad Display Module (KDM) Tool Information This section of the ADMIN menu provides the user with useful information regarding the tool that is currently connected to the iEC controller. This information may be needed for reference when setting up parameter sets or calibrating the tool. The items that can be viewed in TOOL INFO are: ID: The serial number for the tool Tq: The maximum torque rating of the tool, in the units that are selected in PSET DEFAULTS Speed: The maximum output-spindle speed of the tool in revolutions per minute (RPM) CAL: The scaled value that correlates the voltage signal of the transducer to a torque value To access the ADMIN SECURITY function: From the MAIN MENU, press 3 for ADMIN Press 3 for TOOL INFO Reset Factory Defaults The RESET DEFAULTS menu allows the user to quickly reset the iEC Controller setting to the original factory default values. The values that can be reset are: 1) TOOL CAL VALUE 2) LOGIC I/O 3) PARAMETER SETS To access the RESET DEFAULTS MENU: From the MAIN MENU, press 3 for ADMIN Press 4 for RESET DEFAULTS (this choice can also be viewed by scrolling to the next text page to view the additional ADMIN MENU options) The following text will be displayed on the KDM display screen: The user can then select the values to reset by pressing the corresponding number on the keypad. 19 Using the Optional Keypad Display Module (KDM) The user will be prompted to confirm the desire to reset values with the following text: To select Y and confirm the desire to reset the values, press SHIFT + 1 YES To cancel the reset process, press SHIFT + 3 NO Error Codes By default, the iEC Controller only displays Error Codes in the Primary and Secondary Display Fields of the Main Display Panel (Figures 1 & 4). These errors will display automatically when recorded. Error codes are listed in Appendix A in this users guide. For additional information on Error Codes contact AcraDyne Technical Support or your AIMCO representative. Filter Frequency The Filter Frequency is non functional for the user. 20 Using the Optional Keypad Display Module (KDM) Adaptive Control ADAPTIVE CONTROL provides the user with a function to allow the iEC Controller to adapt to the joint dynamics of a particular application and to adjust the target torque accordingly in order to provide accurate and repeatable performance. ADAPTIVE CONTROL works only in Torque Control or Torque Control / Angle Monitor Strategies. The user may access the ADAPTIVE CONTROL function by following these steps: From the MAIN MENU, press 3 for ADMIN Press 7 for ADAPTIVE CONTROL The following text will be displayed on the KDM display screen: The currently active choice is noted by an asterisk to the right of the option. The Factory Default setting for ADAPTIVE CONTROL is 1) OFF. To enable or disable ADAPTIVE CONTROL, press the number on the keypad corresponding to the desired choice. There are two modes of operation for ADAPTIVE CONTROL: Adapt To 10 Rundowns: The Control Target Torque is adjusted by the difference between the mean of the first 10 rundowns and the hi/lo limit mean. Adapt To All Rundowns: The Control Target Torque is adjusted by a percentage of the difference between the mean of each consecutive 10 rundowns and the high/low limit mean. This percentage is programmable through advanced user access. ! ADAPTIVE CONTROL should be used only in specific situations. Please contact AcraDyne Technical Support or your AIMCO representative for information on using and adjusting ADAPTIVE CONTROL. 21 Networking The controller has several networking options available including Ethernet and hardwired field bus. All parameters pertaining to networking are configured in the web interface via its Ethernet. Ethernet Each Ethernet connection can be configured to communicate with most popular plant equipment including data collection servers, laptop software, and PLCs. Ethernet ports by default are set to an IP address of 10.10.30.150 and need to be changed before being put into service. To gain initial access to the controller: • Configure a computer’s Ethernet port to an IP address of 10.10.30.xxx. Do not set it to 10.10.30.150 that address is assigned to the controller. 10.10.30.99 works in most cases. • Connect an Ethernet crossover cable from the computer to the controller. • Launch the computers web browser. Type the controller IP address (10.10.30.150) into its address bar. • Navigate to the communications page. • Set the desired IP Address, IP Mask, and Gateway. • Cycle power on the controller and connect it to the network. Web Interface The controller’s web interface is available from any computer on that has access on the local network. To access the web interface launch a browser and type the controller IP address into its address bar. From the interface you will have access to the controller’s status, internal data files, and parameters. The pages do not automatically refresh but selecting refresh from the browser will reload the latest information from the controller. Data files will be standard ASCII text in CSV (comma separated variables) format that can be opened in Microsoft Excel and other programs. On pages with parameters there will be a submit button to apply any changes. All parameters on the page are submitted when the button is hit. When submitted each parameter will get range checked against allowable limits. If a parameter is outside of its range it will be limited to its minimum or maximum value. When the page is redrawn the edit fields will contain each parameters final value. Security The web interface has an option to add a user password for security. A password is never required to view the web pages on the controller. It is only required to make a change to a parameter. If the controller password is not set (a zero length string) the user will not be prompted to enter a password for any changes. The controller is shipped from the factory without a password. 22 Networking The security feature utilizes the authentication built into the browser. When a change to a parameter is made the controller checks the programmed password. If a password is required the controller will request it from the browser and in turn the browser will prompt the user. The browser will request a “User name” and “password”. Since the controller only contains one password (one user) the “User name” can be left blank. Once the password is entered it is returned to the controller were it will be checked and if it is correct the parameters are saved. If it is incorrect the controller will request it from the browser again. After a password has been entered most browsers will cache it and return on subsequent request without prompting the user. So as long as the browser is not closed it would not be necessary to enter the password on every change to the parameters. To remove a password from the controller it just needs to be set to a zero length string and saved via the submit button. Of course this action requires the existing password. If the password is lost or unknown contact your AIMCO representative for a method of retrieval. FTP The controller has the ability to provide an FTP server to allow the transfer of stored rundown data. For security reason it is turned off by default. Changing the setting to from off to on or on to off will not take effect till power is cycled on the controller. Once enabled the FTP server will allow anonymous logins. The only files available are the rundown results in CSV and TXT format. These can be transferred to the client and deleted. No other FTP server features are supported. Toolsnet The controller has the ability to send rundown data to a ToolsNet server. Once the controller is on the local network there are five parameters that must be set to store data correctly on the server. 1. Server IP Address: This is the IP address of the Toolsnet server. If the server is on another subnet you will also have to verify the gateway in the Ethernet settings. 2. Server Port Number: This is the TCP port the server is listening on for a new connection. The default for this is 6547 but it should be verified with the local Toolsnet server administrator. 3. Station Id: This is used to identify the data in the Toolsnet database. Work with your local Toolsnet server administrator to set this correctly. 4. System Number: This is used to identify the data in the Toolsnet database. Work with your local Toolsnet server administrator to set this correctly. 5. Station Number: This is used to identify the data in the Toolsnet database. Work with your local Toolsnet server administrator to set this correctly. PFCS The controller has the ability to communicate over the Chrysler PFCS protocol over Ethernet or one of the serial ports. Once the controller is connect to the desired network there are several parameters used to configure it’s behavior on the PFCS network. 1. Server IP Address: This is the IP address of the PFCS server. If the server is on another subnet you will also have to verify the gateway in the Ethernet settings. This parameter is not used for a serial connection to PFCS. 2. Server Port Number: This is the TCP port the server is listening on for a new connection. This parameter is not used for a serial connection to PFCS. 3. Ack Time Out (sec): The amount of time the controller will wait for an acknowledge from the PFCS server. 4. No. Retries: The number of times the controller will retry a message if it is not answered by the PFCS server. 5. Reconnect Time Out (sec): The amount of time the controller will wait before attempting to reconnect to the PFCS server. 6. Connection Inactivity Time (sec): The amount of time the controller will wait before send a keep alive message. 7. Auto Machine Id: If set to a 1 the controller will request a machine ID from PFCS. If it is a 0 it will use the programmed one from each parameter set. 23 Networking Open Protocol The controller has the ability to accept an “Open” protocol connection. This connection is available over Ethernet and/or the standard serial ports. Through this connection you can enable/disable the tool, set the active parameter set, collect rundown data, and much more. 1. Port Number: The TCP port number the controller listens on to accept an Open protocol connection via Ethernet. The default port is 4545 but can be changed if required. 2. Cable Loss Detection: Only used for a serial Open protocol connection. If set to 1 the controller will close the connection on a time-out. If it is set to 0 the controller will not close the connection. See the latest Open protocol specification for details on time-outs and keep alive messages. 3. Cell ID: Optional variable that is passed through the Open protocol connection. 4. Channel ID: Optional variable that is passed through the Open protocol connection. 5. Controller Name: Optional variable that is passed through the Open protocol connection. To set up a serial port for Open protocol set the function on the desired COM port to “Open Protocol” and cycle the power on the controller. 24 Networking The Controller supports the following MIDs. See the latest Open protocol specification for details on each MID. MID Description Note 0001 Communication start 0003 Communication stop 0010 Parameter set numbers upload request 0012 Parameter set data upload request 0013 Parameter set data upload reply 0018 Select Parameter set 0020 Reset Parameter set batch size 0040 Upload tool data 0042 Disable tool 0043 Enable tool 0050 Vehicle Id Number download request 0051 Vehicle Id Number upload subscribe 0054 Vehicle Id Number upload unsubscribe 0060 Last tightening result data subscribe 0063 Last tightening result data unsubscribe 0070 Alarm subscribe 0073 Alarm Unsubscribe 0080 Read time upload request 0082 0150 Set Time in the Torque Controller Identifier download request 214-215 IO device status messages 216-219 Relay function subscription Relays 1 ,2, 5-8, 11, 19-22, 24 only 220-223 Digital In function subscription Input 1, 3, 8, 9, 16-18, 53 only 9999 Keep alive message Rev 1 and 2 supported Rev 1-2 and 999 supported 25 Networking Chrysler PFCS The controller has the ability to connect to the Chrysler PFCS network. Once the controller is on the local network there are several parameters that must be set to work correctly. 1. Server IP Address: This is the IP address of the Chrysler server. If the server is on another subnet you will also have to verify the gateway in the Ethernet settings. 2. Server Port Number: This is the TCP port the server is listening on for a new connection. 3. Ack Time Out: This is the amount of time the controller will wait for an acknowledge message from the server. The default is 3 seconds. 4. No. Retries: The number of retries the controller will attempt before disconnecting. The default value is 3. 5. Reconnect Time Out: The amount of time the controller will wait before attempting to re-connect to the server. The default value is 20 seconds. 6. Connection Inactivity Time: The amount of time the controller will wait between connection attempts. The default value is 120 seconds. 7. Auto Machine Id: If set to “Yes” (default) the machine ID will be provided by the Chrysler PFCS server upon connection. If set to “No” the machine ID is entered per parameter set on the “Advanced” tab on the web interface. This will result in each parameter set having its own ID. 26 Networking AIMCO Database The controller has the ability to send rundown data to an AIMCO data collection server. Once the controller is on the local network there are two parameters that must be set to store data correctly on the server. 1. Server IP Address: This is the IP address of the AIMCO data collection server. If the server is on another subnet you will also have to verify the gateway in the Ethernet settings. 2. Server Port Number: This is the TCP port the server is listening on for a new connection. See your local AIMCO data collection server administrator for the correct port number. 27 Networking Modbus TCP The controller will accept a connection from a Modbus TCP master. Controller Outputs The Controller’s outputs are located at address 0 and contain one status word. Address 0 15 Handshake Bit 14 13 12 Job Complete Controller Outputs Bits 11 10 9 8 Healthy Running Name 7 6 5 4 3 2 1 Process number 0 Function 0-7 Process Number Process number echo. Latched while it is in a job. 8 Running Indicates the tool is running. 9 Healthy Indicates the controller has no faults. 10 Not used 11 Not used 12 Job Complete 13 Not used 14 Not used 15 Handshake Indicates the job is complete. Will go off when Enable input goes off. Echo of the Handshake input Controller Inputs The Controller inputs are located at address 1024 and 1036. Address 1024 contains one control word and 1036 contains the 20 character VIN. 15 Address 1024 14 13 12 11 Controller Inputs Bits 10 9 8 7 Handshake Bit name 6 Abort Enable 5 4 3 2 1 0 Process number Function Process number input. The enable must be off to change the Process Number. On a change to the Process Number the batch is also reset. 0-7 Process Number 8 Enable On the rising edge of Enable the tool will be enabled. 9 Abort If Abort is on the tool will be disabled. 10 Not used 11 Not used 12 Not used 13 Not used 14 Not used 15 Handshake Will be echoed to the Handshake output 28 Networking Profibus/DeviceNET The controller can have an optional Profibus or DeviceNET interface. These interfaces are accomplished through the use of a serial bridge. The serial bridge is provided by MKS Instruments, Inc . See the latest MKS documentation for details on sending and receiving messages. Logical I/O The controller has five status bytes of outputs. 7 6 Controller Outputs Bit 4 3 5 2 Bypass Batch Complete Msg Received 1 Tool Ready Status NOK Red Red Flashing Yellow Yellow Flashing Green Green Flashing Blue Blue Flashing 0 1 Byte 2 3 Buzz Slow Buzz Fast 4 Byte 0 1 2 3 4 Pause Bit Name 0 Tool Enable 1 Tool Ready 2-7 Not used 0 Status OK 1 Status NOK 2 Msg Received 3 Batch Complete 4 Bypass 5-7 Not used Status OK White White Flashing Function The enabled state of the tool. On if the tool is ready to run. Will be off if tool is disabled or there is a fault on the controller. Rundown status on for an accept. This bit is timed and will be on for ½ second. Rundown status on for a reject. This bit is timed and will be on for ½ second. On to indicate a message has been received from the MKS module and the inputs have changed. This bit is timed and will be on for ½ second. Indicates the batch is complete. Will go off when batch is reset or when the tool enable is turned off. State of the bypass input. 0-7 Not used 0-6 Light Tower Status 7 0 Tool Enable Bitwise status of the Light Tower lights. Not used 0-5 6-7 Light Tower Status Not used Bitwise status of the Light Tower lights. Controller Inputs Bit 7 6 5 4 3 0 Byte 1 2 1 0 PSET PLC Enable White Flash Pause 2-11 12-31 Sequence Number Serial Number 29 Tool Enable Networking Byte Bit 0 0-7 Name Function PSET Set the active parameter set of 1-32. If 0 the active parameter set is left unchanged. If PLC Enable is 0 this input is ignored. If PLC Enable is 1 this bit can be used to enable or disable the tool. Tool Enable 0 Not used 1-3 Pause 4 1 Setting Pause to 1 cause the light stack to strobe. Setting it to 0 put the light stack back into its normal operation. Setting White Flash to 1 cause the light stack to flash the white light. Setting it to 0 put the light stack back into its normal operation. Setting PLC Enable to 1 allows the Tool Enable bit. Setting it to 0 disables the Tool Enable function. White Flash 5 PLC Enable 6 Not used 7 2-11 0-7 Sequence Number 10 character Sequence Number. 12-31 0-7 Serial Number 20 character Serial Number. Ethernet/IP The controller will accept a connection from an Ethernet/IP master. The controller has two connection assemblies. One for the controller’s output image (Assembly Instance 100). The default size of this is 34 bytes. If fastening results are not included then the size is 2 bytes. And one for the controller’s input image (Assembly Instance 112) with a size of 32 bytes. Logic I/O The controller has two status bytes of outputs (Assembly instance 100). Controller Outputs Bit 7 6 5 4 3 Bypass Batch Complete 0 Byte 1 30 2 1 Tool Ready Status NOK 0 Tool Enable Status OK Networking Optionally the controller can include the fastening results in the output image. Including the fastening results increases the output size to thirty four bytes of data. Controller Outputs Bit 7 6 5 4 3 0 Batch Complete Final Torque (Real) Torque Low Limit (Real) Torque Target (Real) Torque High Limit (Real) Final Angle (Real) Angle Low Limit (Real) Angle Target (Real) Angle High Limit (Real) 1 Bypass 2-5 6-9 10-13 14-17 18-21 22-25 26-29 30-33 Byte 2 1 Tool Ready 0 Tool Enable Status NOK Status OK Each value will be sent as a real (IEEE 754 float) and can be configured as little or big endian to match the receiving equipment. Byte Bit 0 0 1 2-7 0 1 1 2 3 Name Function Tool Enable The enabled state of the tool. Tool Ready On if the tool is ready to run. Will be off if tool is disabled or there is a fault on the controller. Not used Status OK Status NOK Rundown status on for an accept. This bit is timed and will be on for ½ second. Rundown status on for a reject. This bit is timed and will be on for ½ second. Not used Batch Complete 4 Bypass 5-7 Not used Indicates the batch is complete. Will go off when batch is reset or when the tool enable is turned off. State of the bypass input. 31 Networking The reading of the results data should be done at the rising edge of the “Status OK” and “Status NOK”. This will insure the correct results are captured consistently. All the results are zeroed after the “Status OK” and “Status NOK” are turned off. The controller consumes thirty two bytes of inputs (Assembly instance 112). Controller Inputs Bit 7 6 5 4 0 PLC Enable White Flash Bit 0 0-7 0 1-3 4 1 5 6 7 1 0 Tool Enable Pause 2-11 12-31 Byte 2 PSET 1 Byte 3 Sequence Number Serial Number Name PSET Tool Enable Function Set the active parameter set of 1-32. If 0 the active parameter set is left unchanged. If PLC Enable is 0 this input is ignored. If PLC Enable is 1 this bit can be used to enable or disable the tool. Not used Pause White Flash PLC Enable Setting Pause to 1 cause the light stack to strobe. Setting it to 0 put the light stack back into its normal operation. Setting White Flash to 1 cause the light stack to flash the white light. Setting it to 0 put the light stack back into its normal operation. Setting PLC Enable to 1 allows the Tool Enable bit. Setting it to 0 disables the Tool Enable function. Not used 2-11 0-7 Sequence Number 10 character Sequence Number. 12-31 0-7 Serial Number 20 character Serial Number. 32 Error Proofing Barcode Reader The max length of a barcode is 20 characters if it is longer the leading characters will be lost and the last 20 will be used. Since barcode readers send their characters in burst there is no need to program in a length. The software just waits for the reader to stop sending. Once the barcode is read the results are stored as the VIN. Barcode Options When a good barcode is received it can optionally reset the batch and/or enable the tool. A good barcode is determined by the VIN Pattern Matching option. If the barcode matches one of the parameter sets VIN matching patterns it will be considered a good read. Reset Batch on Good Barcode scan If enabled, controller will reset the batch count on a good barcode scan. Enable Tool on Good Barcode scan If enabled, controller will enable the tool on a good barcode scan. VIN Pattern Matching All new VINs from barcode readers, Profibus, DeviceNET, Ethernet/IP or protocols are checked against for a VIN match against each PSET (starting from #1 and through #8). If a match is found the PSET is changed. In order to qualify as a match the received barcode must be at least as long as the match string. The match string can contain “don’t care” characters (‘.’) as a wild card. In the example below a barcode of “Abc123” selects PSET #1, “abc567” selects PSET #2, “def” selects PSET #4, “ABc” selects PSET #5, and “AB” does nothing. 33 APPENDIX A: Error Codes & Descriptions Error Code # Fault Description AUT1 1 32 64 128 256 512 2048 4096 TID Timeout Tool GND Power On Throttle Button Timeout Button State Undefined Voltage Tool Update Req’d. Illegal Tool Tool ID board communication timeout Ground circuit problem between controller and tool RUN command on during power up Button (run, fwd, rev) communication timeout Illegal button state (example fwd and rev) Tool voltage parameter undefined Tool parameter file is not compatible with controller version Tool type is not compatible with controller CYC1 1 2 4 8 64 512 1024 Free Run Timeout Load Run Timeout Hall Error Tool Offset Tool Level Locked Rotor Drive Fault Tool has run below threshold level with no load for 5+ seconds Tool has run above threshold level for 15+ seconds Motor communication signal error Tool cannot reach target torque due to transducer error Tool transducer output beyond electrical limits Motor has stalled for 100+ milliseconds Motor drive shut down or not responding EXT1 1 8 32 4096 PSet Value TID Param Value TID Param Timeout Target Value Fault Illegal parameter set value Tool ID board communication error Tool ID board communication error Torque target out of range of tool capabilities EXT2 1 2 4 8 TID EE Write Drive Comm Vbus Drive Update Req Communication timeout while writing to tool memory Communication timeout reading / writing to motor drive Measured controller voltage is not within required limits Drive firmware not compatible with low speed control NOTE—Multiple Error Codes will be displayed as the sum of each error code number indicated in the table above; for example, AUT1: 129 represents AUT1: 128 and AUT1: 1, which would be a tool ID board timeout and a button timeout 34 Appendix B: KDM Menu Structures Main Menu Structure Parameter Set-up Menu 35 APPENDIX B: KDM Menu Structures Administration Menu 36 APPENDIX C: I/O Diagram & Definitions iEC2, iEC3 and iEC4 series controllers have a range of Input / Output (I/O) capabilities. By referencing the diagram below , the user can access the controllers I/O functions for a variety of line control and error proofing functions. A connector kit is available (PT # 23490) from AIMCO to make connection to the I/O port on the iEC controller easier; contact your AIMCO sales representative for ordering information. 1 13 1 2 14 3 15 4 16 5 17 6 18 7 19 8 20 10 9 21 22 11 23 12 24 13 25 25 14 Pin # 1 2 3 4 5 Definition Output—Accept Output—Reject Output—In Cycle Output—Torque High Output—1-4 Common Pin # 14 15 16 17 18 Definition Output—Torque Low Output—Angle High Output—Angle Low Output—Batch Complete Output—5-8 Common 6 7 8 9 10 11 12 13 Input—Run Forward Input—Run Reverse Input—Disable Tool Input—PSET Bit 1 Input—PSET Bit 2 Input—PSET Bit 3 Input—Reset Batch Input—Decrement Batch 19 20 Input—Analog 1 Input—Analog 2 21 22 23 24 25 GND GND +24VDC +24VDC +24VDC 37 APPENDIX C: I/O Diagram & Definitions LOGIC I/O CONNECTIONS NOTE: Turn off the system before connecting to the LOGIC I/O port. There may be risk of damaging the controller. 24Vdc Supply: The internal 24Vdc power can supply up to 2 amps. Inputs: The inputs are a sinking configuration with the common connected to the ground pins. 24Vdc is logic ON and 0Vdc is logic OFF. LOGIC I/O CONNECTIONS Outputs: The outputs are normally open relay contacts. The relays are rated for 24Vdc, 1 amp. Note: If the outputs are driving an inductive load such as a solenoid or large relay, it is recommended to add a diode in parallel with the load to prevent voltage surges. 38 APPENDIX C: I/O Diagram & Definitions I/O Definitions Output 1, Accept DB25 pin 1. The relay closes after achieving the target torque or target angle. The output is programmable for latched or timed operation using ToolWare. Output 2, Reject DB25 pin 2. The relay closes if the final torque or angle is outside of the High/Low limits. The output is programmable for latched or timed operation using ToolWare. Output 3, In Cycle DB25 pin 3. The relay is programmable for operating at threshold torque or on throttle pull. The relay closes when the torque level passes the threshold torque value when setup for “at threshold”. The relay closes when the throttle is pulled when setup for “at throttle”. Output 4, Torque High DB25 pin 4. The relay closes if the final torque exceeds the torque high level. The output is programmable for latched or timed operation using ToolWare. Output 5, Torque Low DB25 pin 14. The relay closes if the final torque falls below the torque low level. The output is programmable for latched or timed operation using ToolWare. Output 6, Angle High DB25 pin 15. The relay closes if the final angle exceeds the angle high level. The angle is measured from the torque threshold level. The output is programmable for latched or timed operation using ToolWare. Output 7, Angle Low DB25 pin 16. The relay closes if the final angle falls below the angle low level. The angle is measured from the torque threshold level. The output is programmable for latched or timed operation using ToolWare. Output 8, Batch Done DB25 pin 17. The relay closes after completing the batch count. The output is programmable for latched or timed operation using ToolWare. The batch count is also set using ToolWare. Output 1-4 Common DB25 pin 5. Connects to the common pins of output relays 1-4. Output 5-8 Common DB25 pin 18. Connects to the common pins of output relays 5-8. Analog In 1 DB25 pin 19. Analog input 1, for future use. 39 APPENDIX C: I/O Diagram & Definitions Analog In 2 DB25 pin 20. Analog input 2, for future use. Input 1, Run Forward DB25 pin 6. Runs tool forward. Buttons from I/O must be selected using ToolWare. Input 2, Run Reverse DB25 pin 7. Runs tool reverse. Buttons from I/O must be selected using ToolWare. Input 3, Disable Tool DB25 pin 8. Prevents the tool from running. Input 4, Pset Bit 1 DB25 pin 9. Binary bit one for selecting parameter sets. See chart below. Input 5, Pset Bit 2 DB25 pin 10. Binary bit two for selecting parameter sets. See chart below. Input 6, Pset Bit 3 DB25 pin 11. Binary bit three for selecting parameter sets. See chart below. Input 7, Reset Batch DB25 pin 12. Sets the batch count to zero. Input 8, Decrement Batch DB25 pin 13. Decreases the batch count by one. GND DB25 pins 21 and 22. 0VDC. +24VDC DB25 pins 23-25. +24VDC Parameter selection chart Pset 1 Pset 2 Pset 3 Pset 4 Pset 5 Pset 6 Pset 7 Pset 8 Bit 1 0 1 0 1 0 1 0 1 Bit 2 0 0 1 1 0 0 1 1 Bit 3 0 0 0 0 1 1 1 1 40 APPENDIX D: Light Assignment for Light Tower and Key Bypass Light Color Judgment Green Accept Red High Torque Red Flashing Low Torque Yellow High Angle Yellow Flashing Low Angle Blue Bypass White Tool Enabled White Flashing Assignable Lights Strobe Assignable APPENDIX E: Dual Trigger Lever Functionality for Gen 3-4 tools • • • • • • • Tool will not run unless both switches are pressed within 1 second of each other. If the 1 second timer times out, both switches must be released to reset the timer. If either trigger is released the tool stops. To restart the tool, both switches must be released and pressed within 1 second of each other again. Note: Logic I/O Run Forward and Run Reverse commands bypass the second trigger functionality. Note: Exceptions to second trigger function exist for Tube Nut Homing sequence. Note: The latching throttle feature is prevented in tools with dual triggers. 41 APPENDIX F: TUBE NUT Homing Sequence • Tubenut Homing Option: Home on Release and Repress of Trigger: • If Single Trigger Lever: • Once the rundown is complete, releasing the lever and pressing it again is required to return the socket to home. • The tool will stop if the lever is released during homing, and will continue when the lever is again pressed. • Once the homing is complete, releasing the lever and pressing it again is required to start the next rundown cycle. • If Dual Trigger Levers are Installed: • Once the rundown is complete, releasing one of the levers, and pressing it again is required to return the socket to home. • Both levers must be pressed and held to return to home. • If either lever is released before the homing is complete the tool will stop. Homing will continue when both levers are again pressed. • Once the homing is complete, releasing both levers and pressing them again (within 1 second of each other) is required to start the next rundown cycle. • Arming Note: • If the arming timer times out the tool must be re-armed before homing can continue • Tubenut Homing Option: Auto Home on Release of Trigger: • If Single Trigger Lever • Once the cycle is complete releasing the lever is required to return the socket to home. • Homing will continue until complete, regardless of lever position. • Once the homing is complete, releasing the lever and pressing it again is required to start the next rundown cycle. • If Dual Trigger Levers are Installed • Once the cycle is complete releasing either lever is required to return the socket to home. • Homing will continue until complete, regardless of either lever position. • Once the homing is complete, releasing both levers and pressing them again (within 1 second of each other) is required to start the next rundown cycle. Tubenut Homing Option: Do Not Home: • Once the cycle is complete the tool will not home and the tool is ready for the next cycle • Releasing the lever and pressing it again is required to start the next rundown cycle. • Notes: Using Logic I/O to run a Tubenut Tool. • Once the rundown is complete, the run signal will need to be toggled in order to start homing. • Once the homing is complete, the run signal will need to be toggled in order to start the next rundown cycle. • Lever positions are ignored when using logic IO 42 APPENDIX G: FAQ’S Q: HOW CAN I IMPROVE THE TOOL’S REPEATABILITY? Generally speaking, slowing the tool down will improve its repeatability. Reducing the RPM FREE% value will give the tool more time to react as it approaches the target torque. Reducing the DOWNSHIFT TQ and/or RPM DOWN% may also have the same effect. Keep in mind that tool’s RPM and Downshift points can affect ergonomics and overall productivity also; testing and running the tool on an application are the only ways to verify that the parameter set meets all requirements of the manufacturing process. Consistency of the joint characteristics must also be considered. Q: HOW SHOULD I ADJUST THE SETTINGS FOR HARD JOINTS? Because of how quickly torque rises upon reaching threshold torque, the tool should slow down to minimize overshooting the target torque. Two speed adjustments may be necessary. Maintain a reasonable RPM FREE% and RPM DOWN% d u ri n g th e rundown. Reduce the DWNSHIFT (downshift torque) setting to give the tool more time to react once hitting the threshold torque. A value slightly above the THOLD (threshold torque) is recommended. Q: HOW SHOULD I ADJUST THE SETTINGS FOR SOFT JOINTS? A softer joint requires more tightening time. You can afford to increase the speed during the rundown and still maintain acceptable repeatability. Increase the DWNSHIFT (downshift torque) setting a little at a time to decrease cycle time while still meeting the torque limit requirements. Q: THE TOOL DOESN’T OPERATE WHEN I PRESS THE LEVER. One common cause of this is choosing the improper tool for the parameter set; if the target torque value is above the tool’s maximum rating then the tool will not run and “FLT EXT1 4096” will be displayed on the Main Display Panel. Another common reason for this problem is that the control ring on the tool is in a position that is programmed as NEUTRAL, the MFB button has been programmed for a non running scenario or the tool is running off I/O. Refer to the ToolWare Users Guide to correct this situation. Q: HOW DO I CHANGE THE UNITS OF MEASURE? The units of measure for torque is a universal setting for all parameter sets. To change the units, go to the Admin menu on the KDM and choose Pset Defaults. Keep in mind that the controller does not convert values for you. If you have a parameter setting of 10 Nm and you change the units to ft-lbs, the new setting is 10 ft-lbs. Changing the units of measure using Toolware allow for calculation of values. Refer to the Toolware users guide for more details. Lastly, being a universal setting, all parameter sets will use the same unit of measure. Q: SHOULD I USE ERGO MODE? At higher torque settings, using the Ergo Mode may seem more comfortable for some operators. The Ergo Mode releases the torque over a longer period of time, resulting in more gentle torque reaction. It’s a personal preference; some operators prefer the Ergo Mode and some prefer to disable it. Ergo Mode is only enabled with AcraDyne tools and may have a negative effect on cPk calculations. 43 2000 series APPENDIX G: FAQ’S Q: ANGLE MEASUREMENT SEEMS TOO HIGH. The controller starts to measure angle of rotation during the rundown when THOLD (threshold torque) is reached. If the threshold torque setting is below the prevailing torque of the joint, the tool will start measuring angle before the fastener is seated, resulting in a higher angle reading than anticipated. Ensure that the threshold torque value is above any anticipated prevailing torque of the joint. Q: HOW CAN I RESET TO ALL THE FACTORY SETTINGS? There are three groups of settings that can be reset - parameter sets, logic inputs/ outputs, and calibration value. Within the ADMIN menu of the KDM, select RESET DEFAULTS. Resetting the parameter sets will erase all existing parameter set values. Resetting logic inputs/outputs will revert to the factory installed settings. Resetting the calibration value will revert the tool’s calibration value to the factory setting burned into the tool’s identification board. Resetting defaults is easily done using Toolware as well. Refer to the Toolware users guide for details. Q: WHAT IS ADAPTIVE CONTROL? Upon reaching target torque, the controller signals the tool to shut off and the tool stops. Depending on the speed of the tool and the joint rate, the final torque output may be higher than the target torque. This difference in torque is called “overshoot”. Adaptive Control averages and centers the final torque readings around the target torque value. It averages the overshoot torque on 10 consecutive rundowns. After that, it pre-targets the tool to shut off before reaching the target so that the final reading is closer to your target torque setting. For example, if the target torque is 10 Nm, and the average of 10 readings is 10.2 Nm, using adaptive control will calculate the average overshoot torque of 0.2 Nm (10.2 - 10.0) and the tool will shut off at 9.8 Nm, so that the final torque reading is 10.0 Nm. Because of the way Cpk is measured, having more readings above the target torque decreases the Cpk value. Using Adaptive Control will result in a higher Cpk value since the range of the final torque readings is more centered on your target torque setting. Q: WHAT IS THE CAL VALUE? The cal value of an AcraDyne tool is based on a scale of 0 - 256 points. By adjusting this value, the torque values generated by the tool’s transducer can be correlated with a torque value as determined by a master calibration transducer. Using the Calibrate Torque or Calibrate Angle features in Toolware with a Master Transducer can insure that your AcraDyne tool is operating in specification against the Master Transducer in your facility. Refer to the Toolware user’s guide for details Q: WHAT OTHER METHODS EXIST FOR PROGRAMMING THE iEC CONTROLLER? By connecting the controller to a computer through the CAN connection or an existing Ethernet system, ToolWare can be used to conduct a wide range of programming, diagnostic and analytical procedures. For more information on ToolWare, refer to the ToolWare Users Guide section of this manual or contact your AIMCO sales representative. 44 ToolWare Operations Manual for PC Software Package to Interact with iEC AcraDyne Tool Control Systems Version 3 PO Box 16460, Portland OR 97292-0460 • 800-852-1368 • Fax 800-582-9015 www.aimco-global.com Introduction ToolWare Version 3 is the software package designed for communicating with AcraDyne DC Electric Tool Controllers. ToolWare provides an easy-to-use, Windows-based platform that can be used for: ■ Tightening strategy programming ■ Collection and viewing of rundown data ■ Statistical analysis ■ Rundown curve analysis ■ I/O monitoring and configuration ■ Maintenance and calibration alert programming ■ Controller configuration programming ■ Tool calibration ■ Batch programming ■ Network communication configuration This version of ToolWare is designed to be fully compatible with all iEC series AcraDyne Tool Controllers and the iControl AcraDyne Tool Systems. In addition, this software compliments and enhances features and benefits of AcraDyne 1000, 2000, 3000 and 8000 (HT) series tools that are connected to and used with AcraDyne controllers. While past versions of AcraDyne’s ToolWare software have been completely backwards compatible, version 2.1.0.0 marks the first version that is no longer compatible with the discontinued Evolution series controllers. Should you require software to run the older Evolution or iControl controllers, please visit www.aimco-global.com and look to the “Downloads” tab. There you will find older versions of ToolWare that will function with the Evolution or iControl controllers and are downloadable free of charge. Contents Contents......................................................................................................................................... 1 1. Getting Started with ToolWare ........................................................................................... 3 1.1 Terminology and Abbreviations................................................................................... 3 1.2 Introduction to ToolWare .............................................................................................. 3 1.2.1 About this document .............................................................................................. 3 1.2.2 ToolWare Overview ............................................................................................... 3 1.3 ToolWare Installation .................................................................................................... 4 1.3.1 PC Requirements ................................................................................................... 4 1.3.2 Installing ToolWare ................................................................................................ 4 1.4 Introduction to ToolWare User Interface .................................................................... 5 1.4.1 ToolWare Menu Structure ..................................................................................... 6 1.4.2 Lower Menu Bar ..................................................................................................... 7 1.4.3 Status Bar ................................................................................................................ 7 1.5 Connecting IEC Controller with PC ................................................................................ 8 1.5.1 Connecting to USB port ...................................................................................... 10 1.5.2 Connecting to Ethernet Port ............................................................................... 10 1.5.3 Connecting to the network .................................................................................. 10 2. Working with ToolWare ......................................................................................................... 10 2.1 Connecting PC with the Controller............................................................................ 10 2.1.1 Setting up USB Connection ................................................................................ 10 2.1.2 Setting up Ethernet Connection ......................................................................... 11 2.2 Setting Parameters...................................................................................................... 13 2.2.1 Parameter Entry Fields........................................................................................ 14 2.2.2 Parameter Sets ..................................................................................................... 17 2.3 CurveWare.................................................................................................................... 18 2.4 Monitoring I/O ............................................................................................................... 19 2.5 File Menu ...................................................................................................................... 20 2.5.1 Connection ............................................................................................................ 20 2.5.2 Open ....................................................................................................................... 21 2.5.3 Save ....................................................................................................................... 21 2.5.4 Print ........................................................................................................................ 21 2.5.5 Login ....................................................................................................................... 21 2.5.6 Language ............................................................................................................... 21 2.5.7 Logoff ..................................................................................................................... 21 2.5.8 Exit .......................................................................................................................... 21 2.6 Controller ...................................................................................................................... 22 2.6.1 View Firmware Rev .............................................................................................. 22 2.6.2 Edit Configuration Parameters ........................................................................... 22 2.6.3 Angle Offset Calibration ...................................................................................... 33 2.6.4 View/Edit Date Time ............................................................................................ 33 2.7 Tool ................................................................................................................................ 34 2.7.1 View ........................................................................................................................ 34 2.7.2 Edit.......................................................................................................................... 34 1 2.7.3 Calibrate................................................................................................................. 36 2.8 Rundowns ..................................................................................................................... 38 2.9 Log Info ......................................................................................................................... 40 2.10 Statistics .................................................................................................................... 41 2.11 AcraVision ................................................................................................................. 45 2.12 System ....................................................................................................................... 46 2.12.1 Serial Test .......................................................................................................... 46 3. Addendum ............................................................................................................................... 46 3.1 Fault codes ................................................................................................................... 46 3.2 Trouble Shooting ......................................................................................................... 47 2 1. Getting Started with ToolWare 1.1 Terminology and Abbreviations Terminology and abbreviations used in this manual are described in the table below. Table 1.1 Terminology and Abbreviations Term/Abbreviation Explanation Tool AcraDyne Nut runners including Pistol, Straight and Tubenut wrench Controller AcraDyne iEC Controller CIM Controller Interface Module is an adapter between the Controller CAN bus and PC USB port Rundown A complete tightening cycle SCC Spindle Control Card CNC Communications Network Card Gen 1 Tool with Light Ring Gen 3 / 4 Tool with Multi-Function Button (MFB) 1.2 Introduction to ToolWare 1.2.1 About this document This document is a manual for using ToolWare software. It consists of three parts: Chapter 1: “Getting Started with ToolWare” introduces the software and gives step-by-step instructions on using it to run AcraDyne tools. Chapter 2: “Working with ToolWare” gives detailed explanation of the software features and functions. Chapter 3: “Addendum” provides reference information needed for troubleshooting and general knowledge. 1.2.2 ToolWare Overview ToolWare is a software program designed for configuring AcraDyne electric tools and controllers directly from PC for threaded assembly applications. The ToolWare version in use must be compatible with the firmware of the Controller which consists of DSP firmware and CNC (Communication Network Card) firmware. ToolWare compatibility with Torque Tool Controller Firmware ToolWare Version 3.x.x.x Compatible Firmware Release DSP CNC card 3.x.x 6.xx Note. If you wish to update your controller software, please contact your AIMCO sales representative. 3 1.3 ToolWare Installation 1.3.1 PC Requirements ToolWare requires a PC with 1GB or higher RAM and Windows XP or later version OS. 1.3.2 Installing ToolWare To install ToolWare: • Insert the installation CD and installation will start automatically. You can also manually start it by double clicking on “Setup.exe”. • Follow instructions on screen to complete installation. • User should have Administrative Privileges to install ToolWare. It is recommended to have your ToolWare CD files or Download files stored on your Hard Drive. 4 1.4 Introduction to ToolWare User Interface When ToolWare is initially opened, the selection box shown in Figure 1.4.1 will appear, if not connected to the controller. Figure 1.4.1 Dialog box for selection of controller platform being used The ToolWare interface is similar to the workspace of most MS Windows applications. Figure 1.4.2 shows the main screen and structure consisting of two menu bars. Figure 1.4.2 Main Screen of ToolWare 5 1.4.1 ToolWare Menu Structure Menu Level Supported Functionality Connection Open Save Print File LogIn LANGUAGE LogOff Controller Tool Rundowns Log Info Exit View Firmware Rev. Edit Configuration Parameters View / Edit Date/Time Reset Controller to Defaults Tool Parameters Torque Cal Value RPM’s View Cycle Count Motor Temp Edit Tool Setup Torque Buttons and LED’s Calibrate Service and Calibration Log Usage Statistics AcraVision System Main Functions Serial Test Fault Codes Parameter Sets CurveWare Statistics Monitor I/O Fault Codes Help About ToolWare ToolWare Help 6 Establish Connection with the Controller Open a file Save a file Prints screen graphic or data file Login to the program to access appropriate menu items Switch Language Locale Program remains open, some menu items not accessible Close the program Returns controller’s Servo & firmware version Modify controller configuration Set the date & time in the Controller Restore factory values of controller parameters View tool parameters View the tool calibration value View tool output drive rotations / minute View number of cycles run by tool View motor temp from tool Set up tool parameters Calibrate the tool to a master transducer Program and test buttons and LED’s Set alerts for tool service and calibration Display rundown data in a tabular format View tool and controller usage information Performs statistical analysis of a previously saved rundown-data file Displays real-time rundown information in fullscreen view Used for testing of serial data string information. Displays a list of fault codes for the controller and tool. Opens the parameter set programming window. Displays rundown graphs for analysis Performs statistical analysis of a previously saved rundown-data file Displays the status of I/O signals Displays a list of fault codes of the controller and tool. Displays the latest version of the ToolWare. Opens a PDF Help file 1.4.2 Lower Menu Bar Lower Menu Bar is a shortcut to the frequently used Upper Menu items located under <Main Functions> submenu. These frequently used functions include: • Parameter Sets • CurveWare • Monitor I/O 1.4.3 Status Bar Status Bar is combined with the Lower Menu Bar. Information displayed on the status bar is listed in the Table 1.4.3 Table 1.4.3 Status Item Status Bar Contents Display Options N*m Lbs*ft Lbs*in KgCm KgM Offline USB Ethernet Torque Units Connection 7 1.5 Connecting IEC Controller with PC ToolWare supports –2 options of connecting Controller to PC depending on the interface and the model of AcraDyne Controller: • USB port through the CIM adapter (P/N # AEC-CIM) • Ethernet port through the Ethernet crossover cable or standard cable Figure 1.5.1 and Figure 1.5.2 show the Communication / Connection interface panels of iEC Controller. CAN RS232 KDM/ Factory Use I/O Port 8in/8out Future Use Custom Cable USB Cable CIM Figure 1.5.1 iEC Controller Bottom panel 8 Tool Cable COM1 RS232 Ethernet Port2 Ethernet Port1 COM2 Bar Code Scanner RJ45 CAT 5E Regular Cable Straight through pin out Figure 1.5.2 iEC controller electrical interface, top panel (Some connections available on iEC3 and iEC4 models only 9 1.5.1 Connecting to USB port IEC Controller AEC-CIM P/N 23112 (Includes P/N 23217/22940) CAN port Cable PN: 23217 PC USB port Cable PN: 22940 1.5.2 Connecting to Ethernet Port RJ45 cable /cross over IEC Controller Ethernet port PC Ethernet port 1.5.3 Connecting to the network IEC Controller Cable PN: 20403 Ethernet port Network Router Ethernet port RJ45 CAT5E 2. Working with ToolWare 2.1 Connecting PC with the Controller 2.1.1 Setting up USB Connection Follow the steps below to set up USB connection. • Turn on the computer. • Plug the USB cable (PN: 22940) into your computer’s USB Port or USB Hub and the other end to the CIM Module (PN: 23112). • Plug the 23217 cable into the connector on the CIM and the other end of the cable to either of the CAN ports in the controller. 10 • Launch ToolWare and configure it for USB connection by selecting File/Connection/USB. 2.1.2 Setting up Ethernet Connection Make physical connection Connection options: • Use Ethernet crossover or standard cable to connect Controller to PC directly. • Use Ethernet crossover or standard cable to connect Controller to network router. Specify the IP Address of controller in the PC • Open Control Panel by clicking <Start/Settings/Control Panel>. • Select <Network Connections> for configuration. • Double click <Local Area Connection> to open its Status Window. • Click on <Properties> button to open Properties Window. • Scroll the list of connections to find <Internet Protocol (TCP/IP)> and double click it to open Internet Protocol Properties window. • Click on <Use the following IP address> and enter the IP address of 10.10.30.155 • Set the subnet mask to 255.255.255.0. • Click on <OK> button to exit <Internet Protocol Properties> window. • Click on <OK> button to exit <Local Area Connection Area Properties> window. • Click on <OK> button to exit <Local Area Connection Area Status> window. • Exit <Control Panel> window. Configure ToolWare for connection with PC: • Launch ToolWare program. • Click on <File/Connection/TCP/IP> to open <TCP/IP Connection Setup> window. • Specify IP address of controller (10.10.30.150 by default) • Click on <Connect> button to establish connection. • Verify communication by reading DSP firmware version: Select <DSP/View/Revision>; Verify the DSP firmware version returned successfully. 11 Successful Connection A successful Ethernet connection will be indicated by the following text on the main screen of the ToolWare program: 12 2.2 Setting Parameters In ToolWare, select <Main Functions/Parameter Sets> from the top menu or select <Parameter Sets> directly from the lower menu to open <Parameter Sets View/Edit> window shown in the Figure 2.2. ToolWare can send and receive up to 32 Parameter sets to the controller. Figure 2.2 Parameter Sets View/Edit Window 13 2.2.1 Parameter Entry Fields Strategy - Select one of four fastening strategy options. o Tc - Torque Control strategy uses torque as the only control parameter. The Tool stops when Tq Target is reached. Rundown is considered to be successful (Accept) if the final torque value falls within the range specified by Tq High Limit and Tq Low Limit parameters. o Tc-Am - Torque Control/Angle Monitoring strategy is convenient for detection of cross threaded or stripped fasteners. Rundown is considered to be successful (Accept) if the final torque value falls within the range specified by Tq High Limit and Tq Low Limit and final angle value falls within the range specified by Angle High Limit and Angle Low Limit parameters. o Tm-Ac - Torque Monitoring / Angle Control strategy. The tool stops when Angle Target is reached or Tq High Limit is exceeded. Rundown is considered to be successful (Accept) if the final torque value falls within the range specified by torque upper and lower limits. o Tc-Ac - Torque Control / Angle Control strategy. The tool stops if target torque or target angle is reached, whichever happens first. Rundown is considered to be successful (Accept) if both the final torque value and final angle value fall within their respective high and low limits. Direction - defines fastening direction. It should be clock-wise (CW) for rightthreaded fasteners and counter-clock-wise (CCW) for left-threaded fasteners. Tq High Limit - used for Accept / Reject decision. Rundown does not pass if the measured torque exceeds this limit. Tq Target - the target torque value. Tq Low Limit - used for Accept / Reject decision. Rundown does not pass if the torque measured at the end of rundown is below this limit. Tq ± % - high and low torque limits are automatically and symmetrically set around the target value. Tq Downshift - the torque value at which the tool changes the speed from Freespeed RPM to Downshift RPM, in order to provide better accuracy of a final torque Tq Threshold - specifies torque threshold value as a start point for the rundown cycle data acquisition. Cycle Complete - the torque value that defines the completion of a fastening cycle. The cycle is complete if, after rising above the Tq Threshold value, torque drops below the Cycle Complete value. 14 Angle High Limit - is used for Accept / Reject decision. Rundown does not pass if the measured final angle exceeds this limit. Angle Target - the target angle value Angle Low Limit - used for Accept / Reject decision. Rundown does not pass if the final angle is below this limit. Rpm Freespeed % - specifies initial tool output-drive speed. The parameter is expressed as a percentage of the tool’s maximum rated speed. Rpm Downshift % - specifies the speed of the tool after the Tq Downshift value is reached. The value is expressed as a percentage of the tool‘s maximum rated speed. Ergo Mode - activates tool power ramping-down mode when fastening achieves Target Torque or Target Angle value. This feature reduces torque reaction in the hand-held tool as final torque or angle is achieved. Soft Start - activates tool power ramping-up from zero to Rpm Freespeed% value. This allows for slower engagement of the fastener into the application. Linked PSets – creates a group of sequential Parameter Sets actuated by a single trigger pull. To define the last Parameter Set in the group, unselect “Link PSet” by placing a 0 in the field. Link Delay - used to add a delay time between the linked steps. Running a Linked PSet rundown: • • • • • • • To run a Linked PSet group, select the first PSet in the group as the “Current PSet”. (Via the CHANGE PSET button on the controller, or using Logic IO, or using the “Current” PSet selection in Toolware) Link the PSets by selecting the next PSet in the Current PSet’s “Link PSet” Drop down. If you want to have a delay between the rundowns enter that in the “Link Delay” Drop Down box. If you want to link more PSets then repeat this step. Run the tool as usual by pressing and holding the throttle. The tool will sequence thru each PSet in the Linked PSet group. At the completion of last the PSet of the group, the controller will signify the Linked PSet rundown is complete by lighting the cycle accept (or reject) led and turning off the blue In-cycle led. The current PSet will automatically reset to the first PSet in the group to ready for the next rundown. A release and repress of the trigger is necessary to start the next Linked PSet rundown. 15 Linked PSet Results Reporting: The angle count is reset to 0 at the end of each linked step of a Linked PSet rundown. RBR Combined with a Linked PSet Rundown Note: The RBR, RB, and RBsp, options are only preformed at the end of the last step of a Linked PSet rundown Results Reporting: The results of the last PSet Step in the group are used to report. If the trigger is released before the rundown sequence is complete, the results from the step that the controller was currently running, before being interrupted, are reported. The controller reports curve data from the last rundown step and any linked previous steps if not separated by a delay time. Batch Processing: ToolWare allows the user to specify PSets for the sequence of rundowns. During the batch process the controller monitors each rundown and switches PSets automatically. We can control the actions of the controller as each step in the batch is completed. When PSets are linked only the last PSet has batch settings. Count Preset – defines the number of accepted (ACCEPT) rundowns that must be completed for the associated parameter set Action At Preset Count Complete - The choice of options for end-of-batch events is: Act1 - Reset count and output batch complete Act2 - Hold count and output batch complete Act3 - Disable tool – Hold count and output batch complete Act4 - Go to next PSet & do not output batch complete Act5 - Go to next PSet and output batch complete Next PSet – determines the parameter set that is automatically activated when the count for the associated PSet is reached 16 2.2.2 Parameter Sets Parameter Enable - check boxes allow the user to generate up to 32 different sets of parameters. Each set can be used individually or sets can be arranged into batch sequence. If the box is unchecked and the parameters are sent to the controller it deletes the parameter set. Copy - button allows the user to copy one set of parameters into another. The user must specify the destination parameter set number. Delete - removes parameter from overall set. Receive - downloads parameters from the iEC Controller to PC. Downloaded parameters are displayed but not saved in the PC. Send - uploads the current parameters from ToolWare to the controller. The controller will automatically switch to Parameter Set #1 after all parameter sets have been loaded. New - allows the user to create a new set of parameters, regardless of what set is selected as currently active in the Controller or in the ToolWare. Open - opens a saved Parameter file stored in the computer and displays it in the ToolWare Screen. Parameter set must be SENT to the controller to be used. Save - saves the parameter sets displayed on the ToolWare screen as a file to a designated location on the computer. Reset to Factory Defaults - resets the controller’s parameters to the factory settings. • If Reset To Factory Defaults is selected while tool is connected to controller, three parameter sets will be configured at 30%, 40% and 60% of the tool’s maximum rated torque • If Reset To Factory Defaults is selected while tool is disconnected from controller, eight parameters sets will be configured at 10 Nm, 20Nm, 30 Nm, 40 Nm, 50 Nm 60 Nm, 70 Nm and 80 Nm Change units - changes the torque units in the ToolWare. Select SEND to change units in the Controller also. Convert Units in Controller and ToolWare - if checked, automatically converts units in controller and ToolWare to new units when new unit of measurement is selected. If Rundown-Backoff-Rundown or Low Speed Control are active in the controller, User will be notified on this screen. 17 2.3 CurveWare In ToolWare, select <Main Functions/CurveWare> from the top menu or select <CurveWare> directly from the lower menu to open <CurveWare> window shown in the Figure 2.3. Only rundown information after most recent Power On of the controller can be graphed. Figure 2.3 CurveWare example Max Torque - is the upper torque limit of the rundown Max Angle - is the upper angle limit of the rundown No. of Data Points - is the number of data points that should be used in the plot. Maximal number of acquired data points is 4000. Current Plot - the Nth rundown that has been recorded is highlighted in the graph. Receive – downloads last rundown data from the Controller. 18 Save - saves data points of all curves in the plot in ASCII file. Remove - removes the currently selected plot from the graph. Receive/View - Receive/View allows the user to choose the display features of the graph. Torque – downloads and displays torque data points. Angle – downloads and displays angle data points. PSet - displays markers indicating parameter set values. View Controls Pan - reposition the view in the drawing area. Pan/Zoom – change magnification. View All – return to the original dimensions. Show All Plots - displays all the plots. Cursor mode - restricts cursor locations to curve data points. Plot Axis - allows user to choose between Torque/Angle Vs Time and Torque Vs Angle. The axes of the graph will change accordingly. Plot Name – allows the user to rename the plot. By default, the plot name is formed by using the date and time at which the plot was created. CurveWare allows for 10 sequential curves to be overlaid upon each other for analysis purposes. 2.4 Monitoring I/O In ToolWare, select <Main Functions/Monitor I/O> from the top menu or select <Monitor I/O> directly from the lower menu to open <Monitor I/O> window shown in the Figure 2.4. The I/O function is only available in iEC2, iEC3 and iEC4 models. A connector kit is available from AIMCO that allows the user to connect and route wiring to a variety of devices, including light-towers, socket trays, audible signals and PLC modules. The part number is #23490. Contact your AIMCO representative for this item. This screen allows the user to activate and display the operation of the input and output signals to the controller. Off Delays of outputs in this screen and send it to the controller or receive the same from the controller. For testing and setting purposes the physical outputs and logical inputs can be forced ON/OFF temporally. This screen also shows the state of the physical I/O. We can temporally change the control source between Tool buttons and Logic I/O port. Selection of PSets through IO is limited to PSets 1-8. Selection of entire 32 PSets library requires network connectivity. 19 Figure 2.4 Monitor I/O screen Off Delay - specifies how long the output signal will be ON before turning OFF. Each of the 8 input fields corresponds to the output field. Example: If 200 is the value in the first field that the output signal for Accept will be ON for duration of 200 mSec. If the value is 0, then the corresponding output will remain ON indefinitely or until the next rundown starts. Control Source – allows user to choose the source that controls the tool operation Buttons From Tool – Normal operating condition; tool lever and control ring control tool operation Buttons From I/O – For testing purposes; allows the tool lever and control ring to be over-ridden by buttons on the Monitor I/O screen Force Enable – When Buttons From I/O is selected, this field selects which inputs and outputs can be forced through the Monitor I/O screen Function/State – When Buttons From I/O is selected and the operation is selected by checking Force Enable, clicking on this field will force the respective operation to take place, regardless of tool button positions. This field will be red when the operation is off and will turn green when the operation is on. I/O Connector Physical States - this diagram is a real time display of the I/O connector. Each position corresponds to the indicated terminal on the 25-pin I/O connector on the bottom of the controller. 2.5 File Menu In ToolWare, select <File> from the top menu. File Menu enables us to select the Connection type with which we want the ToolWare to connect to the Controller. 2.5.1 Connection This enables the user to specify how ToolWare will connect with and communicate to the Controller. The options are as follows: 20 USB - is used if the computer is connected with the controller using the USB connection in the computer. Ethernet - can be selected to set the IP address the connection should use. Offline mode - gives the user the opportunity to -edit parameter files and configuration files to save without being connected to the controller 2.5.2 Open Enables the user to select the file to open 2.5.3 Save Saves the file to the PC in the specified directory 2.5.4 Print Print the Screen or the Data. 2.5.5 Login Login is not required for general access, though advanced features are not available in this mode. On occasion, when advanced features need to be accessed, a password will be given and can be entered here. An AcraDyne technician or an AIMCO salesperson can create a temporary password to give to a customer. This password will be valid for the day it is given. This can be used when a customer needs to access technical areas on a temporary basis. It is based on the calendar date and will be valid until midnight of that date. Contact your AIMCO sales representative to get more information on passwords for use with ToolWare. 2.5.6 Language User can change language and locale either for the particular session or set it as default for the system. The application switches to the language the User selects. 2.5.7 Logoff Log out of the user level the user is in. 2.5.8 Exit Exits ToolWare 21 2.6 Controller 2.6.1 View Firmware Rev Displays the current DSP revision and Servo Rev 2.6.2 Edit Configuration Parameters The user can Edit the controller configuration from this screen. The screen is shown in Figure 2.6.2. Figure 2.6.2 Edit Controller Parameter screen Adaptive Control Enable - Adaptive control is a useful option when a high CPK (Process Capability) is chosen as the most important variable. This is done by adjusting the control to ensure the average applied torque is centered between the upper and lower control limit. This feature has three options, which are explained below. 22 Off - Turns adaptive control off. The tool will produce torque until the target torque is achieved. Therefore, all results will be equal to or greater than the target. This will cause the average torque to be greater than the target torque, thus making it extremely difficult to produce a high CPK. First Ten - Takes an average of the first ten readings in a new parameter set and adjusts the control to make the average torque correspond with the target torque. Therefore, there will be readings both above and below the target torque, thus maximizing CPK. • All - Similar to above, but continually adjusts the control based on the average of the previous ten readings in an attempt to maximize CPK. Pct Adjustment: % Adjustment - Determines how much of a correction adaptive control will try to make. The higher the number, the greater the correction adaptive control will make. In Cycle Configuration At Threshold – the tool status is switched to <In Cycle> when torque reaches torque threshold set point. At Throttle – the tool status is switched to <In Cycle> immediately when rundown is triggered. Note: In Cycle Configuration “At Throttle” and Rehit Reject are mutually exclusive selections. Rehit Reject This feature prevents operator from attempting to tighten the fastener that has already been tightened. If this feature is enabled, the rundown will stop if the angle of rotation between cycle complete and threshold torque is less than a specified number of degrees. Rehit Reject On/Off - If Enabled will abort the attempt to fasten a pre-tightened fastener. The default setting for this option is off. Rehit Reject Angle - Used to determine if a fastener is already tightened. If the angles of rotation between cycles complete torque and cycle threshold torque is less than the programmed angle, then the fastener is assumed tightened and no pass/reject will be reported. Note: Rehit Reject and In Cycle Configuration “At Throttle” are mutually exclusive selections. 23 Rundown-Backoff-Rundown This feature includes three modes that engage reverse rotation of the tool. Enable – activates the feature. There are four options available when the feature is enabled. • Rundown Backoff SP - Tool will rundown to selected PSet torque, reverse the fastener a set number of degrees defined by Back Off Degrees. Reports the Torque and Angle from the rundown. • Rundown-Backoff-Rundown – Rundown to the 1st Rundown torque (specified below) then reverse the fastener a set number of degrees and retighten the fastener to the target torque established in the parameter set. Reports the Torque and Angle at end of cycle. • Rundown-Backoff - Tool will rundown to 1st Rundown Torque, reverse the fastener a set number of degrees. Reports the Torque and Angle at end of cycle. • Off - Switches the Rundown-Backoff or Rundown-Backoff-Rundown to off mode 1st Rundown (in-lbs) - The initial rundown torque, measured in (in-lbs). Dwell Time before Back Off - Dwell time [ms] between first rundown and the start of back off. Back Off Degree - The amount of rotational degrees the fastener is backed off after reaching 1st rundown torque. Back Off Torque Limit – This is the backoff torque limit, measured in (in-lbs) Dwell Time before Second Rundown - Dwell time [ms] between back off and the start of second rundown. Soft Start This feature allows the user to set the speed and timing of how quickly the tool ramps up to Freespeed RPM Dwell (ms) - the amount of time that the tool will rotate at slow speed before progressing to the Freespeed RPM (default 500 ms) Dwell (RPM) - the RPM at which the tool will run during soft start period (default 90) 24 Ramp (ms) - the amount of time from the end of the soft start period until the tool reaches the Freespeed RPM (default 600 ms) Start Delay Start Delay On/Off - When enabled, the tool will ignore programmed torque parameters until the timer runs out. This is often used in jobs with prevailing torque that exceeds target torque. The default setting is disabled Start Delay (ms) - The amount of time at the beginning of the fastening cycle, measured in milliseconds, which the tool will ignore programmed torque parameters. (default 500 ms) Time Controls Free Run Timeout – The amount of time, in seconds, the tool is allowed to run free without the load (before reaching cycle threshold). This is a safety feature in case the tool is placed down on the throttle. The default setting is 5 seconds. Load Timeout - The amount of time the tool is allowed to run after crossing cycle threshold. The default setting is 15 seconds. Cycle Complete - The amount of time, in ms, the torque must remain below cycle complete before the event is counted as a cycle and the final torque is displayed (default 200 ms). Locked Rotor - Safety feature which shuts off the tool when it has reached a stalled condition. The amount of time, which the tool can remain in a stalled condition, is programmed (in milliseconds). The default setting is 100 ms. Gen 1 Tool Button Configuration This feature allows the user to program the functionality of the light ring. The default setting for this section is • CW - Forward; • Center - Reverse • CCW - Auxiliary Control Source allows user to choose the source that controls the tool operation Buttons from Tool/IO - Determines the source of the Trigger, Forward, Reverse, and Aux Commands. 25 Gen3 / 4 Tool Button Configuration Multi-Function Button (MFB) • Tap action: triggered if button held less than hold time. • Hold action: triggered if button held to hold time or longer. • Hold Time: Amount of time required to hold the MFB until Hold Action is triggered. • Arming Timeout: Amount of time after the tool is armed, that the tool will automatically disarm. Tap MFB Function Options Actions will commence upon release of the MFB button on the tool as programmed • • • • Arming (TubeNut Tool Default): Tapping MFB button arms (activates) the start function but does not start the tool. Blue status light illuminates to indicate tool is Armed. Arming will reset in 3 seconds if tool start is not initiated. Change PSET: Tapping MFB button toggles between PSET A and PSET B. Status lights flash indicating PSET A is selected or twice if PSET B is selected Reset Reject Tone: Tapping MFB button silences reject tone Tap Disabled: Tapping MFB button has no effect on tool Hold MFB Function Options Actions will commence after Hold timer preset time has elapsed (Adjustable in Hold Time window) Default value is 1 second. • • • • Arming (TubeNut Tool Default): Holding MFB button arms (activates) the start function but does not start the tool. Blue status light illuminates to indicate tool is Armed. Arming will reset in 3 seconds if tool start is not initiated. Change PSET: Holding MFB button toggles between PSET A and PSET B. Status lights flash indicating PSET A is selected or twice if PSET B is selected Reset Reject Tone: Holding MFB button silences reject tone Hold Disabled (Default): Holding MFB button has no effect on tool Push to Start Operation Choices are: • Both Push to Start (PTS) and Trigger must be depressed for tool start • Either PTS or Trigger may be pressed for tool start (Default) Control Source allows user to choose the source that controls the tool operation Buttons from Tool/IO - Determines the source of the Trigger, Forward, Reverse, and Aux Commands. 26 Gen1 Tube Nut Homing Type - There are three options • No Home • Home on release and repress of main trigger • Auto Home on release of Main trigger Tube Nut Back off RPM - The speed, expressed in RPM, which a tube nut tool will return to the open position upon release of throttle. The default setting for this is 100 RPM. Reverse Dwell - The amount of time before the output tries to return to home, after the throttle is released (default 500 ms). Home Dwell - The amount of time that the output is held at home position (default 500 ms). WARNING: If Latching Throttle is Enabled and Tubenut Homing Option is set to “Auto Home on Release of Main Trigger”, the Tubenut will attempt to home prematurely. Gen 4 Tubenut Multi-Function Button (MFB) • Tap action: triggered if button held less than hold time. • Hold action: triggered if button held to hold time or longer. • Hold Time: Amount of time required to hold the MFB until Hold Action is triggered. • Arming Timeout: Amount of time after the tool is armed, that the tool will automatically disarm. Tap MFB Function Options Actions will commence upon release of the MFB button on the tool as programmed • • • • Home Retry: Tapping the MFB button puts the tool into homing mode. All LEDs will flash and the horn will beep to signal the tool is in homing mode. Pressing the throttle(s) will start the homing move. After the homing is complete and the throttle(s) released, the tool will return to fastening mode. LEDs and horn will return to the previous state. ‘Tool disable’ will be ignored during the retry homing cycle. Arming (TubeNut Tool Default): Tapping MFB button arms (activates) the start function but does not start the tool. Blue status light illuminates to indicate tool is Armed. Arming will reset in 3 seconds if tool start is not initiated. Change PSET: Tapping MFB button toggles between PSET A and PSET B. Status lights flash indicating PSET A is selected or twice if PSET B is selected Reset Reject Tone: Tapping MFB button silences reject tone 27 • Tap Disabled: Tapping MFB button has no effect on tool Hold MFB Function Options Actions will commence after Hold timer preset time has elapsed (Adjustable in Hold Time window) Default value is 1 second. • • • • • Home Retry: Holding the MFB button puts the tool into homing mode. All LEDs will flash and the horn will beep to signal the tool is in homing mode. Pressing the throttle(s) will start the homing move. After the homing is complete and the throttle(s) released, the tool will return to fastening mode. LEDs and horn will return to the previous state. ‘Tool disable’ will be ignored during the retry homing cycle. Arming (TubeNut Tool Default): Holding MFB button arms (activates) the start function but does not start the tool. Blue status light illuminates to indicate tool is Armed. Arming will reset in 3 seconds if tool start is not initiated. Change PSET: Holding MFB button toggles between PSET A and PSET B. Status lights flash indicating PSET A is selected or twice if PSET B is selected Reset Reject Tone: Holding MFB button silences reject tone Hold Disabled (Default): Holding MFB button has no effect on tool Homing Type - There are three options • No Home • Home on release and repress of main trigger • Auto Home on release of Main trigger Tube Nut Back off RPM - The speed, expressed in RPM, which a tube nut tool will return to the open position upon release of throttle. The default setting for this is 100 RPM. Reverse Dwell - The amount of time before the output tries to return to home, after the throttle is released (default 500 ms). Home Dwell - The amount of time that the output is held at home position (default 500 ms). Note: If Latching Throttle is Enabled and Tubenut Homing Option is set to “Auto Home on Release of Main Trigger” ; the Tubenut will attempt to home prematurely. Latching Throttle Pull trigger and tool finishes cycle automatically. A second trigger tap stops tool. Tool will unlatch automatically at the end of the rundown. Latching Throttle Options: • Latch by Using the MFB Option 28 • • 1. Press and hold trigger 2. Press and hold MFB 3. Release trigger 4. Release MFB Press and Hold Option 1. Hold trigger down for x seconds to latch throttle. No Latch Option (Default) Serial Output Format This function allows the user to select the format of the information in the ASCII character string packet that is sent out of the controller via the RS232 Port. a) Standard Output : Format: O P HHHHH LLLLL TTTTT P HHHHH LLLLL AAAAA CR CR O: Overall Pass/Fail P: Tq Pass/Fail HHHHH: Tq High Limit LLLLL: Tq Low Limit TTTTT: Tq Result P: Angle Pass/Fail HHHHH: Angle High Limit LLLLL: Angle Low Limit AAAAA: Angle Result CR CR b) Profibus Output: Format: %CAN 1 O P HHHHH LLLLL TTTTT P HHHHH LLLLL AAAAA NAC% CRLF %CAN: Msg Start 1: PSet ( “1” – “9”) for PSets 1-9, (“A” – “W”) for PSets 10-32 O: Overall Pass/Fail P: Tq Pass/Fail HHHHH: Tq High Limit LLLLL: Tq Low Limit TTTTT: Tq Result P: Angle Pass/Fail 29 HHHHH: Angle High Limit LLLLL: Angle Low Limit AAAAA: Angle Result NAC%: Msg End CR LF c) Standard Output with CR/LF Format: O P HHHHH LLLLL TTTTT P HHHHH LLLLL AAAAA 1 CR LF O: Overall Pass/Fail P: Tq Pass/Fail HHHHH: Tq High Limit LLLLL: Tq Low Limit TTTTT: Tq Result P: Angle Pass/Fail HHHHH: Angle High Limit LLLLL: Angle Low Limit AAAAA: Angle Result 1: PSet ( “1” – “9”) for PSets 1-9, (“A” – “W”) for PSets 10-32 CR LF d) UEC Serial Format: # P 1 BB TTT.T AAAA 0000 0000 J (Notice that there is a decimal point next to the least significant T) P: parameter set ( “1” – “9”) for PSets 1-9, (“A” – “W”) for PSets 10-32 B: batch count T: torque result A: angle result J: judgment (@=overall pass, H=low torque, I (eye)=hi torque, J=low angle, K=hi angle) 30 Statistics Minimum Stats - Number of rundowns that need to be preformed before the statistics will be calculated and displayed on the controller. Stat Samples - Maximum number of rundowns used for calculating and displaying statistical data on the iEC controller. Statistical Outliers - The statistical outliers’ parameter is a code that is used to determine if the data from a rundown will be excluded from the data set being used in the static calculations that are displayed on the iEC controller. The exclusions are based on the results of the rundowns. The following are the codes for each exclusion type: 2 - Final Torque Result Above High Limit 4 - Final Torque Result Below Low Limit 8 - Final Angle Result Above High Limit 16 - Final Angle Result Below High Limit 128 - Re-Hit To exclude any combination of the above list add up the code values. Example: To exclude all rundowns where the final torque was above the high limit (2) or the angle was below the low limit (16), Set the value for statistical outliers to 2 +16 = 18 Lock on Reject When enabled, this prevents the tool from starting a new rundown if the result of the last rundown was a reject. The tool remains locked until reverse is selected on the tool or from the Logic IO Reverse Input. The Default setting is off. Batch Hold Reset Batch Control Reset Options for: “Disable Tool – Hold Count & Output Batch Complete” The following are options to re-enable the tool after it has been disabled in batch control: • Option 1: Re-enable the tool by toggling the RESET_BATCH Logic I/O input (default). • Option 2: Re-enable the tool by selecting a new PSET or by toggling the RESET_BATCH input. (This option gives the operator that ability to manually reenable the tool from the Controller front panel by pressing the CHANGE PSET button.) Low Speed Control Mode: Low Speed Control mode is designed to allow a tool to apply torque energy more consistently to a joint at lower RPM’s. The feature precisely manages power delivery to the tool motor from the servo insuring the rotation of the fastener is done at a constant velocity 31 even when the desired RPM is extremely slow. IEC controllers are able to run this feature assuming the servo in the controller is REVB or higher and SCC code is 1.16 or higher. SCC installed code and Servo REV level is indicated each time the controller is powered on. This information is visible on the LED display. Controllers capable of Low Speed Control mode default to standard control unless selection of Low Speed Control is consciously made. Confirmation of Low Speed Control being in effect is shown in red type on the Parameter Set screen whenever it is in use. Low Speed Control is a feature that applies across all PSETs globally. Selection of Low Speed Control ON or OFF requires a Power Cycling of the IEC control for the change to become effective. Prompts will indicate to the user this requirement and the LED on the IEC controller will change to OFF indicating that a Power Cycle is required. While Low Speed Control has many benefits and is not inherently negative to tool performance when left in use, it does apply slightly higher power levels to the tool motor and in high duty cycle applications where it is not necessary, this feature should be turned off. Specific Information Related to Low Speed Control: • RPM range of tools when used with Low Speed Control activated is 4%-100% of the tool’s normal speed rating • TubeNut tools may not home accurately in Low Speed Control Mode. • Ergo Mode is not usable when using Low Speed Control • Low Speed Control is effective on all 1000 Series, 2000 Series and 3000 Series tools up to 90NM (larger tools are unable to use this feature) Disable Tool when SVC/CAL Due • Option to select(Default) – Disable tool in preset Service or Calibration period exceeded (date or time) LED warning appears on IEC Tool re-enabling accomplished by (to be determined) • Option de-selected – Tool remains enabled, LED warning appears on IEC Angle Count Configuration • This option determines when the angle count is started. Start angle count at threshold (default): The angle count is started when the tool crosses threshold torque, • Start angle count on throttle.: The angle count is started when the tool is activated. Gen 3 / 4 Buzzer and Headlight Buzzer ON -When enabled, the Buzzer serves two purposes: o In disassembly mode, the buzzer beeps. When a rundown is rejected the buzzer also beeps. 32 o If a rundown is rejected, the beeping can be stopped by making a successful rundown or using the MFB option "Stop Reject Tone". Headlight ON - Enables or Disables the Headlight. 2.6.3 Angle Offset Calibration Angle Calibration Value: • The value for this will determine how much to add or subtract to the angle measured and reported by the iEC controller. • The offset is added at the start of threshold. • The default value for this is 100. The range is 1 to 200. • The units are (value - 100) = degrees of correction. • Examples: • A value of 100 = No correction. This is the default value. • A value of 90 = 10 degrees added to iEC angle measurement. • A value of 110 = 10 degrees subtracted from iEC angle measurement. Reset to Factory Calibration: The angle calibration value will be set to 100 = No correction. Angle Offset Calibration Routine: Toolware will automaticity calculate and send the angle offset calibration value to the controller. 2.6.4 View/Edit Date Time Sets the date and time in the Controller 2.6.5 Reset Controller to Defaults This option resets the Controller configuration to its factory default state. 33 2.7 Tool 2.7.1 View Tool Parameters Reads all the tool parameters and displays on the screen Torque Cal Value Shows the current calibration value of the tool as well as the factory calibration RPM’s Performing this test will determine the actual RPM of the tool. Cycle Count Displays the total number of rundowns on the tool good or bad 2.7.2 Edit Tool Setup Each tool has a special parameter file that defines the tool. You can view the parameter file for that tool and how it differs from what is in the tool. The tool Information such as Tool Id, Tool Model number, Tool cycle count and Tool Multiplier value are displayed. The User can change the Tube nut Parameters according to their application need and send it to the tool. 34 Figure 2.7.2 Tool Configuration and tubenut tool setup Multiplier - Configures the tool to include gearing added to the base model. Units: Gear Ratio * 100. a. Example: Adding a multiplier with a gear ratio of 5:1, Multiplier setting = 5. Obstruction Torque - In 1st 90° degrees of rotation in the tightening direction cycle will be aborted if this torque is exceeded. If the tool rotates 90° degrees and stops without any obstruction, the value is too low. 35 Open Loop - After reaching the open position, this open loop torque prevents the socket from bouncing to a partially closed position. This torque should be set to a value slightly less than the tube nut home torque. Home - In the reverse direction, reaching this torque indicates to the controller the socket is in the open position. If the socket does not attempt to return to the open position or returns at an extremely fast rate this value is too low. AcraDyne recommends starting at about 12 in-lbs. 2.7.3 Calibrate Torque This is used to calibrate the tool. calibrate the Tool 1. 2. 3. 4. 5. Following are the steps that need to be followed to Press the “Start To Test” Button Run the Tool to Final Torque Put the External transducer value in the Measured Torque box. Press “Send to Tool” Button. The new Cal value is calculated automatically and assigned to the tool. Figure 2.7.3 Tool calibration screen 36 Buttons and LED’s Calibrate Buttons - After a tool has been worked on, it is possible the relationship between hall sensors and magnet have changed. Using the Tool Button Calibration screen calibrates the field between the two. Test Trigger, Ccw, Center and Cw positions and send the values to the Tool. LED States - Turns the tool lights on, off, or flashes. Used for testing of the Tool Figure 2.7.4 LED programming and button calibration Service and Calibration Log The Service Parameters are stored in the memory of the Tool and they can be viewed in this screen. The Next Service cycle or Next Service date in this screen will turn red if they exceed the value the service is due. 37 2.7.5 Tool Service and Calibration Log 2.8 Rundowns Data for rundowns in all or selected Parameter Sets can be displayed in a tabular format. This information can then be saved as a “Ms.csv” File. • You can print the rundown results by using File ->Print in the menu. • Rundowns must be saved to a file before the statistics function can be used to evaluate the data. • Controller memory can be cleared by clicking the “Clear iEC Rundown Memory” button 2.8.1 Download Data • • If rundown data is to be analyzed with the Statistics function, select All Data If no statistical analysis is to be applied, select Results Only. This will significantly decrease the time taken to download the data from the controller to the PC. 38 2.8.2 Select Parameter Set • To view results of all saved rundowns, regardless of Parameter Set, select zero (0) • To view results of rundowns for a specific Parameter Set, select the appropriate Parameter Set number • To select the colums you want to see, select custom and choose the columns from the selection menu • You can restrict the number of rundowns you want to see by selecting the Max. Rows (0 means all) • The Rundowns are ordered by latest first. So the Recent Rundown will be the first record to be downloaded. You can stop download at any time and analyse the records that are downloaded. To begin rundown data download, click “Start Rundown Receive” Note: Statistics functionality requires “All Data” to be selected. 39 Figure 2.8 Rundown Log example 2.9 Log Info Log info describes the usage of the Controller and the tools that have been used with that controller. POR Counts - Number of times the controller power has been cycled. Controller Cycles - Number of rundown the controller has completed. Tool Log - Displays history of tools that have been previously connected to the controller. Monthly Usage - Displays history of the number of rundowns the controller has preformed divided in to months and years. Note: Serial/Model number entries in usage log are abbreviated for functionality will legacy tools. 40 Figure 2.9 Tool / controller Log Info example 2.10 Statistics The statistics page takes a collection of final torque samples from a rundown file then calculates and displays statistical information about the collection. In addition, a histogram is plotted, and the final torque for each rundown is displayed graphically. The maximum number of rundowns that can be evaluated is 2048. If more data is stored in the file, then data for only first 2048 rundowns are used. Torque values are displayed in the units shown on the Main Window toolbar. Rundown Files are saved using Toolware with *.MS.csv extension. This file type can be generated in the Rundowns page by receiving rundown data, then saving the data to a type *.MS.csv file. We can open this using the File -> Open option. 41 Figure 2.10 Statistics screen example PSet Selection (Parameter Set): a. Only rundowns with the PSet selected are used in the collection. In addition, Only Rundowns with settings for Torque High Limit, Torque Low Limit, and Target that match the first rundown are used in the collection. b. If 0 is selected for the PSet, all rundowns in the file will be used in the collection. 42 Stats: • POP: Population; The total number of observations used to calculate the statistical data. • Mean: (Sum of All Readings) / (Number of Readings) • CP: Overall capability, which is the ratio of 6 sigma to the tolerance. The equation for CP is: (Torque High Limit – Torque Low Limit) / 6 Sigma • CPK: Process capability, which takes both sigma and mean into account. The equation for CPK is the smaller of: (Torque High Limit – Mean) / 3 Sigma or (Mean – Torque Low Limit) / 3 Sigma • 6 Sigma: The standard deviation multiplied by 6. A total range of 6 sigma will include 99.7% of all data. The equation for six sigma is as follows: 6σ = 6 X • Range: The difference between the maximum and minimum reading. • Min Tq: The maximum torque reading. • Max Tq: The minimum torque reading. 43 Histogram of Final Torque Samples The histogram shows the frequency count of the number of times that a specified interval, or bin, occurs in the collection of final torque samples. The range of the histogram is equally divided in to a specified number bins using the following equations: • The width • of the frequency bin is o o Where: • m is the selected Number of Bins. max is the upper ceiling for the torque range to be evaluated (Range Ceiling) min is the lower floor for the torque range to be evaluated (Range Floor) The center points of each bin are set according to the following equation: o For reference, the Parameter Set values for Torque Hi, Torque Low, and Torque Target are taken from the first rundown in the collection and plotted as horizontal lines. Histogram adjustment: The width, center point, and number of bins can be adjusted by selecting different values for Range Ceiling, Range Floor and the Number of Bins. • Number of Bins Selection: The histogram initially uses the number of rundowns in the collection for the number of bins. If there are more than 200 rundowns, then the number of bins is set to 200. The number of bins can be adjusted from 2 to the number of rundowns + 1. • Range Ceiling Adjustment: This value is initially set to the maximum torque sample rounded up to the next higher integer. This can be adjusted in increments of 0.1 • Range Floor Adjustment: This value is initially set to the minimum torque sample rounded down to the next lower integer. This can be adjusted in increments of 0.1 Bin width and center points will be updated on a change to these values. 44 Final Torque Sample Graph The Final Torque Sample graph shows the final torque of each rundown in the collection. For reference, the Parameter Set values for Torque Hi, Torque Low, and Torque Target are taken from the first rundown in the collection and plotted as vertical lines. 2.11 AcraVision AcraVision displays the current rundown information in an easy to read screen. If there is a failure in the tightening the Torque/Angle is displayed in red. Use Record Rundowns to save the Rundown information straight to the Computer memory. You can use View saved rundowns to see the saved rundowns. Figure 2.11 AcraVision Screen example 45 2.12 System 2.12.1 Serial Test Hyper-terminal like screen that can be used to monitor the serial output messages from the iEC controller 3. Addendum 3.1 Fault codes Fault codes are displayed to inform the operator about what is happening in the Controller and why something doesn’t behave as expected. Figure Add.3.1 Fault Codes 46 3.2 Trouble Shooting Fault Description TID Timeout: No Communication between the tool and controller. This fault condition is usually caused by a problem in the tool ID board. Try connecting another tool to the controller Tool GND: The tool ground loop is broken. This fault condition is usually caused by a problem in the controller or tool. Try the tool and cable on another controller. The fault can be intermittent. Power on Throttle: The System thinks that the throttle is being activated or the run command through logic I/O is turned on. You can verify this by monitoring the tool buttons in toolware. Make sure that the throttle is completely returning home completely after being released. Button Timeout: The button signals from the tool are not being received by the controller in a certain amount of time. Try connecting another tool to the system. Button State: An illegal light ring state has occurred. Two or more direction halls are enabled. You can verify this by monitoring buttons using ToolWare. Try recalibrating the buttons using ToolWare (CW, Center, and CCWorTrigger and MFB button Undefined Voltage: Either the controller voltage configuration or the tool voltage parameter are undefined. Try the tool on another system. Incompatible Voltage: The controller is not compatible with the tool. Illegal tool: A tubenut tool is connected to a system setup for multiples. Free Run Timeout: The tool has run for a period of time before seeing the threshold torque. The throttle must be released and pressed again before the tool will run again. This time is adjustable using ToolWare. The default value is 5 seconds. Load Run Timeout: The tool has run for a period of time after seeing the threshold torque. The throttle must be released and pressed again before the tool will run again. This time is adjustable using ToolWare. The default value is 15 seconds. Hall Error: The motor hall sensors (for commutation) have achieved an illegal state a specific number of times. If the tool does not run at all or the square drive has to be rotated before the tool will run the motor is probably damaged. Run this tool on a different controller to determine where the problem lies. Tool Offset: Based on the offset value of the transducer during re-zero and the tool cal value, the tool cannot mathematically reach the target torque. This problem can occur if the cal value has been drastically changed and the target torque in near the max torque of the tool. Try resetting the cal value to defaults and calibrating the tool using an approved rotary transducer. 47 Tool Level: The tool transducer output voltage has exceeded the maximum or minimum allowable value. Try the tool on another system. Locked rotor: The controller has not sensed hall transitions from the motor for a period of time. This is possible if the tool is trying to achieve a high torque at a low speed. Increase the rundown speeds and make sure the tool is calibrated properly. It is also possible that the controller is faulty. If the tool does not run at all try connecting it to a different controller. Drive Fault: The servo drive is not trying to run the tool. Try the tool on another controller. PSet Value: An illegal rundown parameter set has been sent to the controller. Try resetting the parameter sets back to factory defaults. TID Parameter Value: The tool sent an illegal parameter to the controller. Try cycling power to the system. Also, try the tool on another system. TID Parameter Timeout: The tool did not respond to a requested parameter for a period of time. Try cycling power to the system. Also, try the tool on another system. Target Value Fault: The target torque is set higher than the capacity of the tool. No Direction Hall: The tool was told to start running either from the throttle or through logic I/O but it wasn’t told what direction to go. Use ToolWare to monitor the buttons. Make sure the wiring to the I/O is correct if running the tool remotely. Xdcr Level: The tool transducer output voltage has exceeded the maximum or minimum allowable level. 48 Notes: ______________________________________________________________________________ ______________________________________________________________________________ ______________________________________________________________________________ ______________________________________________________________________________ ______________________________________________________________________________ ______________________________________________________________________________ ______________________________________________________________________________ ______________________________________________________________________________ ______________________________________________________________________________ ______________________________________________________________________________ ______________________________________________________________________________ ______________________________________________________________________________ ______________________________________________________________________________ ______________________________________________________________________________ ______________________________________________________________________________ ______________________________________________________________________________ ______________________________________________________________________________ ______________________________________________________________________________ ______________________________________________________________________________ ______________________________________________________________________________ ______________________________________________________________________________ ______________________________________________________________________________ ______________________________________________________________________________ ______________________________________________________________________________ ______________________________________________________________________________ ______________________________________________________________________________ ______________________________________________________________________________ ______________________________________________________________________________ ______________________________________________________________________________ ______________________________________________________________________________ ______________________________________________________________________________ ______________________________________________________________________________ Corporate Headquarters 10000 SE Pine Street Portland, OR 97216 800-852-1368 FAX 800-582-9015 www.aimco-global.com Ave. Cristóbal Colon 14529 Chihuahua, Chihuahua. 31125 Mexico 011-52-(614) 380-1010 FAX 011-52-(614) 380-1019 LIT-MAN921 Printed in USA Rev. 10/2012 ©2012 AIMCO