1
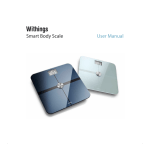
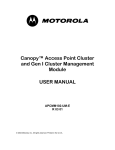
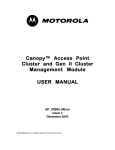
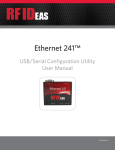
MOTORCYCLE QUICK START 1 Remove the master cylinder cap and extract fluid from reservoir 2 Turn handle bar so that master cylinder is near level. Level Master Cylinder 3 If the banjo fitting is higher than the master cylinder it will trap air. 5 Check handle/pedal for proper operation. Repeat procedure if handle is soft. It is not uncommon to require two applications of RFI™ procedure. Make sure your Injector is also compatible for DOT 5 brake fluid. Look at the piston O’Ring (See exploded view in Manual), if it is orange it is rated for DOT 3 and DOT 4. If the O’Ring is black, the Injector is rated for DOT 3, 4, and 5 brake fluids. HOW RFI WORKS S RISE AIR LUID IN F Prepare the Injector for RFI™ bleeding. See manual. Open bleeder valve and inject fluid into caliper bleeder valve. It may be necessary to use Pulse Generator™ technique or aggressive injection strokes (See manual). If bleeder valve blows off injection pressure is too high. Use reservoir cap as a splash shield or Phoenix Systems CapAdap™ to direct fluid into a capture container. CAUTION: WEAR EYE PROTECTION 7 o Tilt cycle on kick stand to help level the master cylinder. 4 6 Helpful Info After performing RFI™, prior to closing bleeder valve, make sure to “burp” the caliper of any air that may be present in the top of the caliper. Simply remove the hose or bleeder adapter and make sure a steady stream of fluid is leaking from caliper bleeder valve. The complete brake system can be bled by one person - usually in under 10 minutes - by injecting the brake fluid through the low points, the wheel caliper bleeder valves. Reverse Fluid Injection (RFI™) takes advantage of the “Laws of Physics” : air rises in fluid. The calipers, brake lines and master cylinder are bled by pushing the air up through the master cylinder reservoir. *THE CAPADAP CapAdap Master cylinder reservoir Bungee cord to secure CapAdap™ to top of master cylinder Tubing Capture Bottle The CapAdap™ will direct reservoir overflow into a capture bottle. This prevents the need to empty the reservoir during continued RFI™. * Purchased separately DUAL CALIPER TECHNIQUE 1. Follow the general guidelines described in this document and User Manual for setup and prep. Remove fluid from the reservoir, then attach a rubber band or cable tie around the brake lever to depress the handle approximately half way (this prevents the fluid from returning to the master cylinder). 2. Open the bleeder valve on caliper #2 and attach the capture assembly. Black side of check valve to bottle. 3. Prepare the Injector for RFI™ bleeding, open the bleeder valve on caliper #1 and attach the proper bleeder adapter to the bleeder valve. 4. Squeeze the Injector handle to force fluid from the Injector into caliper #1, through the brake lines to caliper #2 and finally into the capture container. Repeat this procedure until no air is noticed in the clear tube attached to caliper #2. 5. Now remove the device which is depressing the brake lever and start injecting fluid as in step 4. Fluid will now flow to the master cylinder in addition to caliper #2. 6. Allow caliper #1 to “burp” and close the bleeder valves and check for proper operation. Repeat if necessary. For difficult systems, after following previous steps, reverse the procedure and Master cylinder inject fluid from caliper #2 to caliper #1. Depress lever with rubber band or cable tie Inject fluid into #1 bleeder valve Brake lines Caliper #1 Caliper #2 REAR BRAKES WITH REMOTE RESERVOIR 1. Remove fluid from the reservoir, then remove tubing from the remote reservoir that attaches to the master cylinder. Prepare the Injector for RFI™ bleeding. 2. Insert bleeder adapter #6 (attached to Injector outlet tube) into Taper Adapter #13 3. Now insert Taper Adapter into tubing that was attached to reservoir. See drawing. 4. Open the bleeder valve on rear caliper and attach the capture assembly. Black side of check valve to bottle. 5. Squeeze the Injector handle to force fluid from the Injector into the tube, through the master cylinder, caliper, out the bleeder valve and into the capture container. 6. Close the bleeder valve and check pedal for proper operation. Repeat if necessary. 7. Reattach the tubing to the remote reservoir and fill the reservoir to the proper level. Rear Caliper Bleeder valve actually sits higher than Rear caliper master cylinder Remote reservoir Master cylinder Attach capture container to bleeder valve Adapter #6 Adapter #13 Insert Taper Adapter into tube removed from remote reservoir MOTORCYCLE SUPPLEMENT