1
Destiny 2 Integrated Amplifier
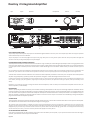
Tape
Inputs
Speakers
Headphones
Volume
Standby
Phones
Active
Power
Switch
AC Mains Input
& Mains Fuse
Speakers
A
Speakers
B
AV
Input
Pwr Amp Pre
In
Out
Tape Tape
Out In
Inputs
Ground
Post
PRE/ POWER CONNECTIONS
The pre-amp output and the power amp inputs are available through RCA sockets on the rear panel. This is helpful if you wish to bi-amp your speakers
with another Destiny 2 or drive a subwoofer.
The pre-amp output is not electrically buffered. Therefore running long cables from it or driving another product which has low input impedance will affect the
volume level and may also degrade the performance of the amplifier.
LOUDSPEAKER CONNECTION AND SWITCHING
The loudspeakers should be connected to the terminals marked 'A' using a suitable pair of cables designed specifically for audio use. High grade terminals
on the rear panel allow for plugs, spade lugs or bare wire to be connected. Tighten the terminal fully after fitting the speaker wire. To select Loudspeakers
A, use the push button on the front panel or remote handset. A blue LED will light next to the button. Please consult your dealer for advice if you are
unsure.
It is very important to connect the loudspeakers to the loudspeaker terminals in the correct phase. Cables are normally polarised with a line or a raised bump on the
positive side. If one channel is not connected in the same fashion as the other, a severe loss of bass performance and a spreading of the stereo image will result.
A second set of terminals marked 'B' allows the user to select from the Loudspeaker push buttons on the front panel. The options also include speakers
off (when using headphones), speakers A, speakers B or speakers A + B together. A blue LED will light next to the button in use.
It is NOT recommended to use loudspeakers of less than 4 Ohms resistance or more than two pairs of 8 Ohm speakers running in parallel from the amplifier at one
time. However, bi-wiring of one pair of speakers, using the four terminal posts per channel, can improve the sound of your system. (Consult your dealer for more
details).
Important - If it is necessary to move or change the location of the loudspeakers, make sure that you first switch off the amplifier from the mains, deselect the speakers, or select Standby.
HEADPHONES
There is a 1/4” (6mm) jack socket on the front panel to enable a wide range of headphones to be used, from low to high impedance. Remember that the
higher the impedance, the lower the level will be. To listen to headphones without the speakers, press the loudspeaker button in use with the LED lit next
to it. That will turn off the speakers and allow the headphones to always be used. Note that there is no delay to the switch on to headphone output, so
when the amplifier is switched out of Standby, keep the volume to a minimum. There may be a noise which can be avoided by pushing the headphone
plug into the socket after the amplifier is powered.
VOLUME LEVEL
The large volume control knob, situated on the right hand side of the front panel, is used to alter the relative level of the sound output from the amplifier.
Turn clockwise to increase the level. It does this by attenuating the incoming signal.
The maximum power of the amplifier is available only if the level of signal available from the line level equipment is sufficient to drive it to maximum power
(clipping). The volume control is necessary to adjust the overall level and relative level from one piece of equipment to another. It does not increase the power of the
amplifier and if it is found necessary to have the volume control set to a position which is considered to be high, (greater than 12 o’clock) before the desired level of
volume is obtained, do not worry, it does not necessarily mean that the amplifier has to work "flat-out".
ACTIVE AND PASSIVE OPERATION
If the source component does not have sufficient output level to drive the Destiny 2 to full power, or you require the volume control to be less high in
operation, press the button on the front panel marked Active.
Page Two