1
User’s Manual
TopAccess Guide
Preface
Thank you for purchasing Multifunctional Digital Systems.
This manual describes remote setup and remote management which operated from the web based management utility
TopAccess.
Read this manual before using your Multifunctional Digital Systems. Keep this manual within easy reach, and use it to
configure an environment that makes the best use of the functions.
Operations on some items are restricted depending on the privileges assigned to the TopAccess user.
This manual supports the following models.
MB760dnfax, MB770dn, MB770dnfax, MB770dfnfax, ES7170dn MFP, ES7170dfn MFP, MB760, MB770, MB770f,
MPS5502mb, MPS5502mbf
How to read this manual
Symbols in this manual
In this manual, some important items are described with the symbols shown below. Be sure to read these items before
using this equipment.
Indicates a potentially hazardous situation which, if not avoided, could result in death, serious
injury, or serious damage, or fire in the equipment or surrounding objects.
Indicates a potentially hazardous situation which, if not avoided, may result in minor or moderate
injury, partial damage to the equipment or surrounding objects, or loss of data.
Indicates information to which you should pay attention when operating the equipment.
Other than the above, this manual also describes information that may be useful for the operation of this equipment with
the following signage:
Describes handy information that is useful to know when operating the equipment.
Pages describing items related to what you are currently doing. See these pages as required.
Screens
y The details on the touch panel menus may differ depending on how the equipment is used, such as the status of the
installed options.
y The illustration screens used in this manual are for paper in the A/B format. If you use paper in the LT format, the
display or the order of buttons in the illustrations may differ from that of your equipment.
About the defaults shown in this manual
y The defaults shown in this manual are the values in the standard operating environment. The values may have been
changed from these defaults.
y The default for the list item is shown underlined.
Trademarks
The official name of Windows XP is Microsoft Windows XP Operating System.
The official name of Windows Vista is Microsoft Windows Vista Operating System.
The official name of Windows 7 is Microsoft Windows 7 Operating System.
The official name of Windows 8 is Microsoft Windows 8 Operating System.
The official name of Windows Server 2003 is Microsoft Windows Server 2003 Operating System.
The official name of Windows Server 2008 is Microsoft Windows Server 2008 Operating System.
The official name of Windows Server 2012 is Microsoft Windows Server 2012 Operating System.
Microsoft, Windows, and the brand names and product names of other Microsoft products are trademarks of Microsoft
Corporation in the US and other countries.
y Apple, AppleTalk, Macintosh, Mac, Mac OS, Safari, and TrueType are trademarks of Apple Inc. in the US and other
countries.
y
y
y
y
y
y
y
y
Preface
1
y Adobe, Acrobat, Reader, and PostScript are either registered trademarks or trademarks of Adobe Systems
Incorporated in the United States and/or other countries.
y Mozilla, Firefox and the Firefox logo are trademarks or registered trademarks of Mozilla Foundation in the U.S. and
other countries.
y IBM, AT and AIX are trademarks of International Business Machines Corporation.
y NOVELL, NetWare, and NDS are trademarks of Novell, Inc.
y TopAccess is a trademark of Toshiba Tec Corporation.
y Other company and product names given in this manual or displayed in this software may be the trademarks of their
respective companies.
Security Precautions
y To prevent the configuration settings from being changed illegally or similar, change the initial administrator password
at the time of shipping before you use this product. Also, the administrator password should be altered periodically.
y Be sure to log out when leaving your computer while changing TopAccess settings for security purposes.
y For security purposes, do not access any other site while you are logged in to TopAccess.
2
Preface
CONTENTS
Preface....................................................................................................................................... 1
Chapter 1
Overview
TopAccess Overview ............................................................................................................... 8
TopAccess Conditions............................................................................................................. 9
Accessing TopAccess ........................................................................................................... 10
Accessing TopAccess by entering URL .............................................................................. 10
Accessing TopAccess from Network Map
(Windows Vista/Windows 7/Windows Server 2008)............................................................ 12
TopAccess Screen Descriptions........................................................................................... 21
Access Policy Mode ............................................................................................................... 22
Chapter 2
[Device] Tab Page
[Device] Item List.................................................................................................................... 26
Displayed Icons ...................................................................................................................... 27
Chapter 3
[Job Status] Tab Page
[Job Status] Tab Page Overview........................................................................................... 30
[Print Job] Item list ............................................................................................................... 30
[Fax/InternetFax Job] Item list ............................................................................................. 32
[Scan Job] Item list .............................................................................................................. 33
[Job Status] How to Set and How to Operate ...................................................................... 34
Displaying print jobs ............................................................................................................ 34
Deleting jobs........................................................................................................................ 35
Deleting private print jobs and hold print jobs...................................................................... 35
Releasing print jobs ............................................................................................................. 36
Checking recovery information ............................................................................................ 36
Chapter 4
[Logs] Tab Page
[Logs] Tab Page Overview..................................................................................................... 38
[View Logs] Item list............................................................................................................. 38
[Export Logs] Item list <access policy mode> ..................................................................... 44
[Log Settings] Item list <access policy mode>..................................................................... 45
[Logs] How to Set and How to Operate ................................................................................ 47
Displaying job logs............................................................................................................... 47
Exporting logs...................................................................................................................... 48
Chapter 5
[Registration] Tab Page
[Registration] Tab Page Overview ........................................................................................ 50
[Template] Item list .............................................................................................................. 50
[Address Book] Item list....................................................................................................... 76
[Inbound FAX routing] Item list ............................................................................................ 81
[Registration] How to Set and How to Operate.................................................................... 86
Managing templates ............................................................................................................ 86
CONTENTS
3
Managing address book ...................................................................................................... 94
Managing mailboxes.......................................................................................................... 100
Chapter 6
[Counter] Tab Page
[Counter] Tab Page Overview ............................................................................................. 104
[Counter] Item list .............................................................................................................. 104
[Counter] How to Set and How to Operate......................................................................... 110
Viewing counters ............................................................................................................... 110
Chapter 7
[User Management] Tab Page
[User Management] Tab Page Overview ............................................................................ 114
[User Accounts] Item list <access policy mode> ............................................................... 114
[Group Management] Item list <access policy mode>....................................................... 121
[Role Management] Item list <access policy mode> ......................................................... 123
[Department Management] Item list <access policy mode>.............................................. 128
[Export/Import] Item list <access policy mode> ................................................................. 131
Chapter 8
[Administration] Tab Page
[Setup] Item List ................................................................................................................... 136
General settings ................................................................................................................ 136
Network settings ................................................................................................................ 143
Copier settings................................................................................................................... 183
Fax settings ....................................................................................................................... 186
Save as File settings ......................................................................................................... 189
Email settings .................................................................................................................... 198
InternetFax settings ........................................................................................................... 200
Printer/e-Filing settings...................................................................................................... 201
Printer settings................................................................................................................... 202
Print Service settings......................................................................................................... 206
Print Data Converter settings ............................................................................................ 210
Embedded Web Browser settings ..................................................................................... 211
Off Device Customization Architecture settings ................................................................ 213
Version .............................................................................................................................. 214
[Setup] How to Set and How to Operate............................................................................. 215
Setting up General settings ............................................................................................... 215
Setting up Network settings............................................................................................... 217
SNMP V3 settings ............................................................................................................. 219
Setting up Copier settings ................................................................................................. 225
Setting up Fax settings ...................................................................................................... 227
Setting up Save as file settings ......................................................................................... 229
Setting up E-mail settings.................................................................................................. 231
Setting up InternetFax settings.......................................................................................... 233
Setting up Printer/e-Filing settings..................................................................................... 235
Setting up Printer settings ................................................................................................. 236
Setting up Print Service settings........................................................................................ 239
Setting up Print Data Converter settings ........................................................................... 241
Configuring the EWB function ........................................................................................... 243
Setting up Off Device Customization Architecture settings ............................................... 245
Displaying version information........................................................................................... 246
[Security] Item List ............................................................................................................... 247
4
CONTENTS
Authentication settings ...................................................................................................... 247
Certificate management settings ....................................................................................... 256
Password Policy settings................................................................................................... 260
[Security] How to Set and How to Operate ........................................................................ 263
Installing a device certificate.............................................................................................. 263
Creating/Exporting a client certificate ................................................................................ 270
Installing CA certificate ...................................................................................................... 272
[Maintenance] Item List........................................................................................................ 274
Create Clone File settings ................................................................................................. 274
Install Clone File settings................................................................................................... 276
Import settings ................................................................................................................... 277
Export settings................................................................................................................... 279
Delete Files settings .......................................................................................................... 280
Directory Service settings.................................................................................................. 281
Notification settings ........................................................................................................... 283
Languages settings ........................................................................................................... 286
System Updates settings................................................................................................... 288
Reboot settings ................................................................................................................. 289
[Maintenance] How to Set and How to Operate................................................................. 290
About the maintenance functions ...................................................................................... 290
Deleting the data from local folder..................................................................................... 291
Managing directory service................................................................................................ 292
Setting up notification ........................................................................................................ 294
Importing and exporting..................................................................................................... 296
Rebooting the equipment .................................................................................................. 301
[Registration] ([Administration] tab) Item List ................................................................... 302
Public Template settings ................................................................................................... 302
Public Menu....................................................................................................................... 304
Fax Received Forward and InternetFAX Received Forward settings................................ 307
Extended Field Definition................................................................................................... 317
XML Format File ................................................................................................................ 321
[Registration] ([Administration] tab) How to Set and How to Operate ............................ 322
Registering public templates ............................................................................................. 322
Registering Fax and Internet Fax received forward........................................................... 328
Chapter 9
[My Account] Tab Page
[My Account] Tab Page Overview....................................................................................... 336
[My Account] Item list ........................................................................................................ 336
Chapter 10 Functional Setups
Setting up Meta Scan Function ........................................................................................... 342
Procedure for using Meta Scan ......................................................................................... 342
Checking Meta Scan Enabler ............................................................................................ 342
Editing XML format file ...................................................................................................... 343
Registering XML format file ............................................................................................... 347
Registering Extended Field Definition ............................................................................... 348
Registering templates for Meta Scan ................................................................................ 351
Meta Scan ......................................................................................................................... 354
Checking logs of Meta Scan.............................................................................................. 354
Using the Attribute of the External Authentication as a Role of the MFP ....................... 355
CONTENTS
5
Exporting the role information setting file .......................................................................... 355
Defining the role information setting file ............................................................................ 355
Importing the role information setting file........................................................................... 356
Enabling the role base access setting ............................................................................... 356
Chapter 11 APPENDIX
Installing Certificates for a Client PC ................................................................................. 358
Index..................................................................................................................................................................... 365
6
CONTENTS
Overview
1.
This chapter provides an overview of the TopAccess functions.
TopAccess Overview ............................................................................................................... 8
TopAccess Conditions............................................................................................................. 9
Accessing TopAccess ........................................................................................................... 10
Accessing TopAccess by entering URL................................................................................................................10
Accessing TopAccess from Network Map (Windows Vista/Windows 7/Windows Server 2008)...........................12
TopAccess Screen Descriptions........................................................................................... 21
Access Policy Mode............................................................................................................... 22
1 Overview
TopAccess Overview
TopAccess is a management utility that allows you to check device information of this equipment and job status, and to
carry out device setting and maintenance through a web browser.
TopAccess has an "end-user mode" and a "access policy mode".
End-user mode
End users can:
y Display general device information, including status, tray/accessory configuration, and paper supply information.
y Display and manage the status of print jobs, fax/Internet Fax transmission jobs, and scan jobs submitted by the user.
(The Fax Unit is required to display and manage the fax transmission jobs)
y Display the job logs for print, fax/Internet Fax transmission, fax/Internet Fax reception, and scan. (The Fax Unit is
required to display the fax transmission and fax reception job logs.)
y Register and modify templates.
y Add or modify contacts and groups in the address book.
y Register and modify mailboxes. (The Fax Unit is required.)
y Display counter logs.
y Download client software.
P.10 “Accessing TopAccess”
Access policy mode
Operation privileges and displayed items vary depending on the user account you used to log in to TopAccess.
Details of operations and displays vary depending on the management on roles and departments to where the user
account is assigned.
P.22 “Access Policy Mode”
8
TopAccess Overview
1 Overview
TopAccess Conditions
Your device should be connected to the network and TCP/IP is correctly configured to operate TopAccess.
When TCP/IP is correctly configured, you can access TopAccess via a web browser.
Supported browsers
Windows
y Internet Explorer 6.0 or later
(Internet Explorer 7.0 or later when IPv6 is used)
y Firefox 3.5 or later
Macintosh
y Safari 4.0 or later
UNIX
y Firefox 3.5 or later
y Because TopAccess uses cookies to store information on the user's system, these must be enabled in the browser.
y If TopAccess does not display the correct information in any page, delete the cookies and try again.
y When using the e-Filing box Web utility from TopAccess, it is necessary to disable the pop-up blocking function of
your Web browser.
TopAccess Conditions
9
1 Overview
Accessing TopAccess
You can access TopAccess by entering its URL in the address box of the web browser. To access it under a Windows
Vista/Windows 7/Windows 8/Windows Server 2008/Windows Server 2012 environment, confirm the network connection
status on the Network Map with the LLTD (Link Layer Topology Discovery) feature of Windows Vista/Windows 7/Windows
8/Windows Server 2008/Windows Server 2012, and then click the displayed icon of this equipment.
P.10 “Accessing TopAccess by entering URL”
P.12 “Accessing TopAccess from Network Map (Windows Vista/Windows 7/Windows Server 2008)”
Accessing TopAccess by entering URL
1
Launch a web browser and enter the following URL in the address box.
http://<IP Address> or http://<Device Name>
For example
When the IP address of your device "10.10.70.120" (when IPv4 used):
http://10.10.70.120
When the IP address of your device is "3ffe:1:1:10:280:91ff:fe4c:4f54" (when IPv6 used):
3ffe-1-1-10-280-91ff-fe4c-4f54.ipv6-literal.net
or
http://[3ffe:1:1:10:280:91ff:fe4c:4f54]
When your device name is "mfp-04998820":
http://mfp-04998820
When SSL for the HTTP network service is enabled, an alert message may appear when you enter the URL in
the address box. In that case, click [Continue to this website (not recommended).] to proceed.
10
Accessing TopAccess
1 Overview
2
The TopAccess website appears.
You can also access TopAccess using the TopAccessDocMon link. For instructions on accessing TopAccess
from TopAccessDocMon, refer to the Help for TopAccessDocMon.
Accessing TopAccess
11
1 Overview
Accessing TopAccess from Network Map
(Windows Vista/Windows 7/Windows Server 2008)
Confirm the network connection status on the [Network Map] with the LLTD feature of Windows Vista/Windows 7/Windows
8/Windows Server 2008/Windows Server 2012, and then click the displayed icon of this equipment.
P.12 “With Unidentified Network (Windows Vista)”
P.15 “With Unidentified Network (Windows 7)”
P.18 “Accessing TopAccess from Network Map”
You can install the driver required for web services by right-clicking the icon and selecting [Install]. For the driver
required for web services, refer to the User’s Manual Basic Guide.
y Before using the LLTD (Link Layer Topology Discovery) feature, enable the LLTD setting.
P.169 “Setting up LLTD Session”
y Before beginning the installation of the driver required for web services, enable the Web Services setting.
P.168 “Setting up Web Services Setting”
With Unidentified Network (Windows Vista)
1
Click the [Start] icon and select [Control Panel].
The [Control Panel] window appears.
2
Click [Network and Internet].
The [Network and Internet] window appears.
12
Accessing TopAccess
1 Overview
3
Click [Network and Sharing Center].
The [Network and Sharing Center] window appears.
4
Click [Customize] of [Unidentified network (Public network)].
The [Set Network Location] window appears.
Accessing TopAccess
13
1 Overview
5
Select [Private] of [Location type], and then click [Next].
y The [User Account Control] dialog box appears.
y If the user account control is disabled, the [Set Network Location - Successfully set network settings] window
appears. Go to step 7.
14
6
Click [Continue] in the [User Account Control] dialog box.
7
Click [Close].
The [Set Network Location - Successfully set network settings] window appears.
Accessing TopAccess
1 Overview
With Unidentified Network (Windows 7)
1
Click the [Start] icon and select [Control Panel].
The [Control Panel] window appears.
2
Click [Network and Internet].
The [Network and Internet] window appears.
3
Click [Network and Sharing Center].
The [Network and Sharing Center] window appears.
Accessing TopAccess
15
1 Overview
4
Click [Choose homegroup and sharing options].
The [HomeGroup] window appears.
5
Click [What is a network location?].
The [Set Network Location] window appears.
16
Accessing TopAccess
1 Overview
6
Click [Work network].
The [Set Network Location] confirmation window appears.
7
Click [Close].
Accessing TopAccess
17
1 Overview
Accessing TopAccess from Network Map
1
Click the [Start] icon and select [Control Panel].
The [Control Panel] window appears.
2
Click [Network and Internet].
The [Network and Internet] window appears.
3
Click [Network and Sharing Center].
The [Network and Sharing Center] window appears.
18
Accessing TopAccess
1 Overview
4
Click [View full map]/[See full map] in the [Network and Sharing Center] window.
Mapping of devices connected on the network appears in the [Network Map] window.
5
Click the icon of this equipment.
y The name, IP address and MAC address of the devices appear when you place the pointer over each icon.
y If the equipment has the Finisher installed, its icon is displayed together with the Finisher icon. If not, it is
displayed by itself.
Accessing TopAccess
19
1 Overview
6
20
The TopAccess website appears.
Accessing TopAccess
1 Overview
TopAccess Screen Descriptions
1
2
3
4
5
Item name
Description
1
Function tab
Features are grouped under each tab. This provides access to the main pages of
TopAccess for each function.
2
Menu bar
This provides access to each menu page under the selected function tab.
3
Submenu bar
This provides access to each submenu page under the selected menu and function tab.
4
Top link
Click this to display the top of the page currently displayed.
5
Help link
Click this to display Online Help.
TopAccess Screen Descriptions
21
1 Overview
Access Policy Mode
The access policy mode enables different operation privileges and displayed items to be applied depending on the user
account you used to log in to TopAccess.
In the access policy mode, the details of operations and displays differ depending on the roles and department assigned to
the given user account.
1
Access TopAccess.
2
Click [Login].
P.10 “Accessing TopAccess by entering URL”
The Login page is displayed.
3
Enter the user name and password and click [Login].
y Enter the user name and password that comply with TopAccess access policies.
y The Setup page is displayed.
y Failing to enter the correct password for a number of times at login will be considered unauthorized access
and you may not be able to log in for a certain period of time. If you are displayed a “User account is locked”
or “The User Name and Password are not recognized.” message and cannot log in, contact your
administrator.
y The password input is displayed in the blank symbols.
y After login, you will be automatically logged out when the time specified in the [Session Timer] elapses.
y Enter "admin" in User Name and "123456" in Password to log in for the first time.
y Lockout setting for user accounts can be set with [Administration] - [Security] - [Password Policy].
P.260 “Password Policy settings”
y The [Session Timer] can be set with [Administration] - [Setup] - [General] - [WEB General Setting].
22
Access Policy Mode
1 Overview
4
Click the menu and submenu to display the desired page.
You can log out by clicking the [Logout] link at the top right of the page.
Access Policy Mode
23
1 Overview
24
Access Policy Mode
[Device] Tab Page
2.
This chapter describes the [Device] tab page in the TopAccess end-user mode.
[Device] Item List.................................................................................................................... 26
Displayed Icons ...................................................................................................................... 27
2 [Device] Tab Page
[Device] Item List
TopAccess opens the [Device] tab which includes a picture indicating the device status. At any time, the end user may
click [REFRESH] to update the TopAccess status information.
This tab shows the following information about the device:
1
2
3
4
Item name
Description
1
Device Information
The Paper list shows the tray status.
y Status — Displays the device status.
y Name — Displays the name of this equipment.
y Location — Displays the equipment's location.
y Copier Model — Displays the model name of this equipment.
y Serial Number — Displays the serial number of this equipment.
y MAC Address — Displays the MAC address of this equipment.
y Main Memory Size — Displays the main memory size.
y Page Memory Size — Displays the page memory size.
y Save as File & e-Filing Space Available — Displays the total available space in the
local folder and e-Filing on your equipment.
y Fax Space Available — Displays the available space for sending and receive fax data.
y Contact Information — Displays the contact name of the person responsible for
managing this device.
y Phone Number — Displays the phone number of the person responsible for managing
this device.
y Message — Displays administrative messages.
y Alerts — Displays alert messages.
2
Options
The following information is displayed.
y Finisher — Displays whether the Finisher is installed.
y Fax — Displays whether the Fax Unit is installed.
y Optional Function kit — Displays whether the optional function kit is installed.
3
Paper
The following information is displayed.
y Tray — Displays a list of the installed trays.
y Size — Displays the paper size set for each tray.
y Thickness — Displays the thickness of the paper set in each tray.
y Attribute — Displays the purpose of the paper set in each tray.
y Capacity — Displays the maximum paper capacity that can be set for each tray.
y Status — Displays the remaining amount of paper for each tray.
The paper size for each tray cannot be set from TopAccess. Set it from the touch panel of the equipment. For instructions on
how to set the paper size for each tray, refer to the User’s Manual Basic Guide.
4
26
Toner
[Device] Item List
Displays the amount of toner remaining in the toner cartridge in the equipment.
2 [Device] Tab Page
Displayed Icons
When the equipment requires maintenance or when an error occurs with the equipment, icons indicating the status
information appear near the graphic image of the equipment on the TopAccess [Device] tab. The following are the icons
displayed and their descriptions.
Printer Error 1
This icon indicates that a non-recommended toner cartridge is being used, and that the
equipment has stopped printing. For information on resolving the error, refer to "Replacing a
Toner Cartridge" in the User’s Manual Troubleshooting Guide.
Printer Error 2
This icon indicates one of the following:
y You need to remove paper from the receiving tray.
y You need to remove paper from the Finisher tray.
y You need to remove the staples jammed in the Finisher. For information on resolving the
error, refer to "Staple Jam in the Finisher" in the User’s Manual Troubleshooting Guide.
y A non-recommended toner cartridge is being used. For information on resolving the error,
refer to "Replacing a Toner Cartridge" in the User’s Manual Troubleshooting Guide.
y The equipment cannot eject the paper to the output bin.
Cover Open
This icon indicates a cover such as the front cover or Automatic Duplexing Unit Cover is open.
Tray Open
This icon indicates the tray is open.
Toner Empty
This icon indicates no toner is left. For information on resolving the error, refer to "Replacing the
Toner Cartridge" in the User’s Manual Troubleshooting Guide.
Waste Toner Full
This icon indicates the waste toner box is full and requires replacing. For information on
resolving the error, refer to "Replacing the Waste Toner Box" in the User’s Manual
Troubleshooting Guide.
Paper Empty
This icon indicates no paper is left in a tray. For information on resolving the error, refer to the
User’s Manual Setup Guide.
Paper Misfeed
This icon indicates a paper misfeed occurred. It also indicates the location of the paper misfeed.
For information on resolving the error, refer to "When a Paper Jam Occurs" in the User’s
Manual Troubleshooting Guide.
Staples Empty
This icon indicates no staples are left in the Finisher. For information on resolving the error, refer
to "Refilling the Staples" in the User’s Manual Troubleshooting Guide.
Call for Service
Contact your service representative to have the equipment inspected.
Displayed Icons
27
2 [Device] Tab Page
28
Displayed Icons
[Job Status] Tab Page
3.
Using TopAccess, end users can display and delete print jobs, fax/internetfax jobs, and scan jobs released by end users.
[Job Status] Tab Page Overview ........................................................................................... 30
[Print Job] Item list ................................................................................................................................................30
[Fax/InternetFax Job] Item list ..............................................................................................................................32
[Scan Job] Item list ...............................................................................................................................................33
[Job Status] How to Set and How to Operate ...................................................................... 34
Displaying print jobs .............................................................................................................................................34
Deleting jobs.........................................................................................................................................................35
Deleting private print jobs and hold print jobs ......................................................................................................35
Releasing print jobs..............................................................................................................................................36
Checking recovery information .............................................................................................................................36
3 [Job Status] Tab Page
[Job Status] Tab Page Overview
You can display and delete print jobs, fax/internetfax jobs, and scan jobs. You can also print print jobs immediately.
When user authentication is enabled, you can operate on jobs associated with the user account you used to log in.
However, a user account with administrator privileges can operate on all jobs.
P.30 “[Print Job] Item list”
P.32 “[Fax/InternetFax Job] Item list”
P.33 “[Scan Job] Item list”
[Print Job] Item list
The Print Job page displays the following information for each print job.
1
2
3
6
7
8
9
10
11
12
13
14
The following screen is displayed if you are logged in with a user account which is granted administrator privileges in the
access policy mode.
1
2
3
4
5
6
7
Item name
30
8
9
10
11
12
13
14
Description
1
[Delete] button
If the selected print job is owned by a user who is logged in to TopAccess, the job is
deleted.
2
[Release] button
If the selected print job is in the print queue, the job is printed.
3
[Recovery Information] button
If the selected print job was skipped while the job skip feature was enabled, the recovery
information screen is displayed.
P.31 “[Recovery Information] screen”
P.139 “Setting up Job Skip Control”
4
[Delete All Private Print Jobs]
button
This item is displayed if you are logged in with a user account which is granted
administrator privileges in the access policy mode.
You can delete all private print jobs displayed in the list.
5
[Delete All Hold Print Jobs] button
This item is displayed if you are logged in with a user account which is granted
administrator privileges in the access policy mode.
You can delete all hold print jobs displayed in the list.
[Job Status] Tab Page Overview
3 [Job Status] Tab Page
3.[Job Status] Tab Page
Item name
Description
6
Document Name
Displays the document name of the print job.
Document names are displayed using 10 asterisks (*) when the Confidentiality Setting is
enabled.
P.139 “Setting up Confidentiality Setting”
7
Date Time
Displays the date and time when the print job was released from the client computers.
They are displayed using "year, month, day, hour, minute, and second".
For example: 2012/12/24 12:34:56
8
Type
Displays the print job set in the printer driver.
Possible values of print job are: [Normal Print], [Scheduled Print], [Private Print], [Proof
Print], and [Hold Print].
9
Status
Displays the status of the print job.
Possible values of status are: [Paused], [Wait], [Suspend], [Skipped], [Process], [Printing],
and [Scheduled].
10
Paper
Displays the paper size of the print jobs.
11
Pages
Displays the number of pages of the print job.
12
Sets
Displays the number of copies set for the print jobs.
13
User Name
Displays the user account name of the owner of the print job.
14
Domain Name/LDAP Server
Displays the domain name or LDAP server of the user account who is the owner of the print
job.
y Print jobs that have finished being printed are displayed in the [Logs] tab.
y Click a table heading item to refresh the page and reorder the print job list in the specified order.
[Recovery Information] screen
The Recovery Information screen displays the conditions for resuming printing.
1
2
3
4
5
6
Item name
Description
1
[Close] button
Closes the [Recovery Information] screen.
2
Cause
Displays the cause of the print interruption.
3
Recovery Condition
Displays the procedure for resuming printing.
4
Paper Size
Displays the paper size set for the interrupted print job.
5
Paper Type
Displays the paper type set for the interrupted print job.
6
Tray
Displays the paper source set for the interrupted print job.
[Job Status] Tab Page Overview
31
3 [Job Status] Tab Page
[Fax/InternetFax Job] Item list
The Fax/InternetFax Job page displays the following information for each fax transmission job.
1
2
3
4
5
6
7
8
Item name
9
10
Description
1
[Delete] button
The selected fax job is deleted.
2
File No.
Displays the file number (001 to 100) to identify the fax transmission job.
3
TO(Name)
Displays the destination name set for the fax transmission job.
4
TO(Fax No./Email)
Displays the fax number or E-mail address of the destination.
5
Date Time
Displays the date and time when the fax transmission job is released from the touch panel
or client computer using the N/W-Fax driver.
They are displayed using "year, month, day, hour, minute, and second".
For example: 2012/12/24 12:34:56
6
Pages
Displays the number of pages of the fax transmission job.
7
Delay Time
Displays the delayed time set for the fax transmission job.
8
Status
Displays the status of the fax transmission job.
Possible values of status are: [Delayed], [Wait], [Line1], [Line2], and [Network].
9
User Name
Displays the user account name of the owner of the fax transmission job.
10
Domain Name/LDAP Server
Displays the domain name or LDAP server of the user account who is the owner of the fax
transmission job.
y Transmission jobs that have finished their transmission are displayed in the [Logs] tab.
y Click a table heading item to refresh the page and reorder the print job list in the specified order.
32
[Job Status] Tab Page Overview
3 [Job Status] Tab Page
3.[Job Status] Tab Page
[Scan Job] Item list
The Scan Job page displays the following information for each scan job.
1
2
3
4
5
6
7
Item name
1
[Delete] button
8
10
9
Description
The selected scan job is deleted.
2
TO(Name)
Displays the destination (name) to where the scanned document is sent via an E-mail.
3
TO(Email)
Displays the destination (E-mail address) to where the scanned document is sent via an Email.
4
File Name
When the job performs the Scan to File or USB or Scan to e-Filing, it displays the document
name to be stored.
File names are displayed using 10 asterisks (*) when the Confidentiality Setting is enabled.
P.139 “Setting up Confidentiality Setting”
5
Agent
Displays the agent of the scan job.
Possible values of agent are: [Email], [Save as file], [Store to e-Filing], and [Store to USB
Media].
6
Date Time
Displays the date and time when the scan job is released from the touch panel.
They are displayed using "year, month, day, hour, minute, and second".
For example: 2012/12/24 12:34:56
7
Pages
Displays the number of pages of the scan job.
8
Status
Displays the status of the scan job.
Possible values of status are: [Wait], [Suspended], [Processing], and [Scanning]
9
User Name
Displays the user account name who is the owner of the scan job.
10
Domain Name/LDAP Server
Displays the domain name or LDAP server of the user account who is the owner of the
scan job.
y Scan jobs that have finished being scanned are displayed in the [Logs] tab.
y Click a table heading item to refresh the page and reorder the print job list in the specified order.
[Job Status] Tab Page Overview
33
3 [Job Status] Tab Page
[Job Status] How to Set and How to Operate
P.34 “Displaying print jobs”
P.35 “Deleting jobs”
P.35 “Deleting private print jobs and hold print jobs”
P.36 “Releasing print jobs”
P.36 “Checking recovery information”
Displaying print jobs
1
Click the [Job Status] tab and click the [Print Job], [Fax/InternetFax Job], or [Scan Job]
menu.
The Job page is displayed.
2
If jobs are not displayed in the list, click the [REFRESH] icon at the upper right of the
page.
See the following for details on displayed items:
P.30 “[Print Job] Item list”
P.32 “[Fax/InternetFax Job] Item list”
P.33 “[Scan Job] Item list”
Completed jobs are displayed in the [Logs] tab.
34
[Job Status] How to Set and How to Operate
3 [Job Status] Tab Page
3.[Job Status] Tab Page
Deleting jobs
1
Click the [Job Status] tab and click the [Print], [Fax/InternetFax], or [Scan] menu.
2
Select the check box next to the job that you want to delete.
3
Click [Delete].
The Job page is displayed.
The selected job is deleted.
Click the [REFRESH] icon at the upper right of the page to confirm the deletion.
You cannot use the Print Job page to delete fax/Internet Fax jobs and E-mail reception print jobs.
Deleting private print jobs and hold print jobs
You can delete private print jobs and hold print jobs if you are logged in with a user account which is granted administrator
privileges in the access policy mode.
1
Click the [Job Status] tab and click the [Print] menu.
2
Click the [Delete All Private Print Jobs] or [Delete All Hold Print Jobs] button.
The Print Job page is displayed.
Private print jobs or hold print jobs are deleted.
It may take a while to delete all private or hold jobs.
[Job Status] How to Set and How to Operate
35
3 [Job Status] Tab Page
Releasing print jobs
You can print jobs that are stored in the queue.
Private print jobs and hold print jobs cannot be released from TopAccess.
1
Click the [Job Status] tab and click the [Print] menu.
2
Select the check box next to the job that you want to print.
3
Click [Release].
The Print Job page is displayed.
The selected print job is immediately printed.
Checking recovery information
You can check the conditions to restart a print job which has been skipped while the job skip feature was enabled.
For the job skip feature, see the following:
P.139 “Setting up Job Skip Control”
36
1
Click the [Job Status] tab and click the [Print] menu.
2
Select the check box next to the print job whose job status is “Skipped”.
3
Click [Recovery Information].
The Print Job page is displayed.
The conditions to restart the print job are displayed.
[Job Status] How to Set and How to Operate
[Logs] Tab Page
4.
Using TopAccess, end users can display print job logs, transmission journals, reception journals, and scan job logs.
[Logs] Tab Page Overview..................................................................................................... 38
[View Logs] Item list..............................................................................................................................................38
[Export Logs] Item list <access policy mode> ......................................................................................................44
[Log Settings] Item list <access policy mode> .....................................................................................................45
[Logs] How to Set and How to Operate................................................................................ 47
Displaying job logs ...............................................................................................................................................47
Exporting logs.......................................................................................................................................................48
4 [Logs] Tab Page
[Logs] Tab Page Overview
You can check the job history.
Check the logs periodically to ensure that there is no unauthorized access to the equipment as a result of spoofing.
y Logs are recorded from the moment the equipment is turned on until it is shut down. Log recording continues also
after entering the Sleep mode.
y Up to 100 logs are displayed in chronological order with the most recent first. You can check up to 5,000 logs in
Print Job Log Export, Fax Transmission Journal Export, Fax Reception Journal Export, and Scan Log Export, and
up to 10,000 logs in Messages Log Export by exporting them. The oldest logs are deleted when the number of logs
exceeds the maximum limit.
y The default Administrator and Auditor roles can check all logs. For more information on default roles and privileges,
see the following:
P.123 “Default roles and privileges”
y When user authentication is enabled, you can check the logs associated with the user account you used to log in.
Furthermore, a user account to which the default Administrator or Auditor role have been assigned can check all
logs.
P.38 “[View Logs] Item list”
P.44 “[Export Logs] Item list <access policy mode>”
P.45 “[Log Settings] Item list <access policy mode>”
[View Logs] Item list
P.38 “Print Log”
P.39 “Transmission Journal”
P.40 “Reception Journal”
P.41 “Scan Log”
P.43 “Message Log <access policy mode>”
Print Log
The Print Log page displays the following information for each print job log.
1
2
3
4
5 6 7
Item name
38
8
9
Description
1
Document Name
Displays the document name of the print job.
Document names are displayed using 10 asterisks (*) when the Confidentiality Setting is
enabled.
P.139 “Setting up Confidentiality Setting”
2
Date Time
Displays the date and time that the print job was released from the client computers.
3
Type
Displays the print job type.
4
Paper
Displays the paper size of the print jobs.
[Logs] Tab Page Overview
4 [Logs] Tab Page
4.[Logs] Tab Page
Item name
Description
5
Pages
Displays the number of pages of the print job.
6
Sets
Displays the number of copies set for print jobs.
7
Status
Displays the status of the print log.
8
User Name
Displays the user account name of the owner of the print job.
9
Domain Name/LDAP Server
Displays the domain name or LDAP server of the user account who was the owner of the
print job.
Click a table heading item to refresh the page and reorder the print log list in the specified order.
Transmission Journal
The Transmission Journal page displays the following information for each transmission journal.
1
2
3
4
5
6
7
8
9
Item name
*
10
11
12
13
Description
1
No.
Displays the serial number of the journals.
2
File No.
Displays the file number to identify the received job.
3
Date Time
Displays the date and time the transmission job was performed.
4
Duration
Displays the time length taken for the transmissions. If it takes more than 1 hour, “59:59” is
indicated.
5
Pages
Displays the number of pages of the transmission job.
6
TO(Name)
Displays the destination name set for the transmission job.
7
TO(Fax No./Email)
Displays the fax number or E-mail address of the destination for the transmission job.
8
Dept
Displays the department code if department management is enabled.
9
Mode
Displays the transmission mode*.
10
Status
Displays the result of the transmission.
11
Line
Displays the line used.
12
User Name
Displays the user account name of the owner of the transmission job.
13
Domain Name/LDAP Server
Displays the domain name or LDAP server of the user account who was the owner of the
transmission job.
The transmission mode is displayed by a combination of a 2-digit letter code, a 3-digit numeric code, and up to a 4-digit supplemental code.
For example: EC 603
2-digit letter code
(Communication
Mode)
EC: ECM
G3: G3
ML: E-mail
1st numeric
code
(bps)
0: 2400
1: 4800
2: 7200
3: 9600
4: 12000
5: 14400
6: V.34
2nd numeric code
(Resolution)
0: 8x3.85
1: 8x7.7
2: 8x15.4
4: 16x15.4
8: 300 dpi
B: 600 dpi
D: 150 dpi
3rd numeric
code
(Mode)
0: MH
1: MR
2: MMR
3: JBIG
Up to 4 digit
supplemental code
P: Polling
SB: Mailbox
SR/R: Relay mailbox
SF/F: Forward mailbox
ML: Internet Fax
I: N/W-Fax
O: Offramp Gateway
[Logs] Tab Page Overview
39
4 [Logs] Tab Page
Click a table heading item to refresh the page and reorder the transmission journal list in the specified order.
Reception Journal
The Reception Journal page displays the following information for each reception journal.
1
2
3
4
5
6
7
8
Item name
*
9
10
11 12
13
Description
1
No.
Displays the serial number of the journals.
2
File No.
Displays the file number to identify the received job.
3
Date Time
Displays the date and time of receiving the job.
4
Duration
Displays the time taken for the receptions. If it takes more than 1 hour, “59:59” is indicated.
5
Pages
Displays the number of pages of the received job.
6
From(Name)
Displays the sender's name of the received job.
7
From(Fax No./Email)
Displays the fax number or E-mail address of the sender for the received job.
8
Dept
Displays the department code if the department management is enabled.
9
Mode
Displays the reception mode*.
10
Status
Displays the result of the reception.
11
Line
Displays the line used.
12
User Name
Displays the user account name of the owner of the received job.
13
Domain Name/LDAP Server
Displays the domain name or LDAP server of the user account who was the owner of the
received job.
The reception mode is displayed by a combination of a 2-digit letter code, a 3-digit numeric code, and up to a 4-digit supplemental code.
For example: EC 603
2-digit letter code
(Communication
Mode)
EC: ECM
G3: G3
ML: E-mail
1st numeric
code
(bps)
0: 2400
1: 4800
2: 7200
3: 9600
4: 12000
5: 14400
6: V.34
2nd numeric code
(Resolution)
0: 8x3.85
1: 8x7.7
2: 8x15.4
4: 16x15.4
8: 300 dpi
B: 600 dpi
D: 150 dpi
3rd numeric
code
(Mode)
0: MH
1: MR
2: MMR
3: JBIG
Up to 4 digit
supplemental code
P: Polling
SB: Mailbox
SR/R: Relay mailbox
SF/F: Forward mailbox
ML: Internet Fax
I: N/W-Fax
O: Onramp Gateway
Click a table heading item to refresh the page and reorder the reception journal list in the specified order.
40
[Logs] Tab Page Overview
4 [Logs] Tab Page
4.[Logs] Tab Page
Scan Log
The Scan Log page displays the following information for each scan job log.
1
2
3
4
5
6 7
8
Item name
9
10
Description
1
TO(Name)
Displays the destination (name) to where the scanned document was sent via an E-mail.
2
TO(Email)
Displays the destination (E-mail address) to where the scanned document was sent via an
E-mail.
3
File Name
Displays the file name stored in a shared folder or e-Filing.
This item may not be displayed depending on the access policies.
File names are displayed using 10 asterisks (*) when the Confidentiality Setting is enabled.
P.139 “Setting up Confidentiality Setting”
4
Agent
Displays the agent of the scan job.
5
Date Time
Displays the date and time when the scan job was released from the control panel.
6
Pages
Displays the number of pages of the scan job.
7
Mode
Displays the transmission mode using 6-letter codes*.
8
Status
Displays the detailed result status of the scan job.
9
User Name
Displays the user account name of the owner of the scan job.
10
Domain Name/LDAP Server
Displays the domain name or LDAP server of the user account who was the owner of the
scan job.
* Codes are displayed in the following format.
Code format: AA B C D E
AA: This describes the job type.
CA
Copy and File
Copy and Store to e-Filing
CT
Copy to e-Filing (without printing)
FS
Relay Mailbox Transmission
FF
Fax Received Forward
FE
Internet Fax Received Forward
ST
Scan to File or USB
Scan to e-Filing
Scan to Email
FA
Fax and Save as File
PA
Print and e-Filing
PT
Print to e-Filing
IA
N/W-Fax and Save as File
[Logs] Tab Page Overview
41
4 [Logs] Tab Page
BE
e-Filing to Email
RS
Remote Scan or Web Services Scan
MS
Meta Scan
EN
E-mail notification
B: This describes the transmission type.
0
e-Filing
1
Email (SMTP)
2
FTP
3
SMB
4
Save in a local folder
5
NetWare IPX/SPX
6
USB
7
NetWare TCP/IP
8
FTPS
9
Remote Scan or Web Services Scan
C: This describes the resolution.
0
100 dpi
1
150 dpi
2
200 dpi
3
300 dpi
4
400 dpi
5
600 dpi
A
8 x 3.85 (line/mm) (203 x 98)
B
8 x 7.7 (line/mm) (203 x 196)
C
8 x 15.4 (line/mm) (203 x 391)
D
16 x 15.4 (line/mm) (400 x 391)
D: This describes the file format.
0
e-Filing
1
TIFF (Multi)
2
TIFF (Single)
3
PDF (Multi) or Encrypted PDF (Multi)
4
JPEG
5
PDF (Single) or Encrypted PDF (Single)
6
Slim PDF (Multi)
7
Slim PDF (Single)
8
XPS (Multi)
9
XPS (Single)
A
DIB
E: This describes the file color mode.
B
Black
G
Gray Scale
C
Color
M
Mix
The file format is recorded as DIB in the scan log if the data are scanned in BMP, JPEG, TIFF, or PNG format using the
WIA (Windows Image Acquisition) driver.
Click a table heading item to refresh the page and reorder the scan log list in the specified order.
42
[Logs] Tab Page Overview
4 [Logs] Tab Page
4.[Logs] Tab Page
Message Log <access policy mode>
The Message Log page displays errors which have occurred.
y Displays only when you are logged in with a user account which is granted administrator privileges or display
privilege in the access policy mode.
y The default Administrator and Auditor roles can check all message logs. For more information on default roles and
privileges, see the following:
P.123 “Default roles and privileges”
1
2
3
4
5
Item name
6
Description
1
Date Time
Displays the date and time of the error.
2
Error Level
Displays the error level.
Error — Error that user and administrator may not be recoverable.
Warning — Error that administrator is recoverable.
Information — Error that end user is recoverable or that event is not error.
3
Message
Displays the message if available.
4
Status
Displays the error code.
5
User Name
Displays the user account name related to the message.
6
Domain Name/LDAP Server
Displays the domain name or LDAP server of the user account related to the message.
For details on error codes and error messages, refer to “Checking the Equipment Status with TopAccess” in the User’s
Manual Troubleshooting Guide.
[Logs] Tab Page Overview
43
4 [Logs] Tab Page
[Export Logs] Item list <access policy mode>
You can erase logs or export them in a file.
y Displays only when you are logged in with a user account which is granted administrator or display privileges in the
access policy mode.
y The exported data file can be either CSV format or XML format. [CSV] is set as the default.
y You can export up to 5,000 logs in Print Job Log Export, Fax Transmission Journal Export, Fax Reception Journal
Export, and Scan Log Export, and up to 10,000 logs in Messages Log Export. The oldest logs are deleted when the
number of logs exceeds the maximum limit.
1
2
3
4
5
Item name
44
Description
1
Print Job Log Export
You can erase print logs or export (download) them in a file.
Create New File & Clear Log — Creates a file according to the file format of the export
data. Erases logs after a file has been created. You can display or download by clicking the
created file.
Clear Log — Erases logs.
Create New File — Creates a file according to the file format of the export data.
You can display or download by clicking the created file.
2
Fax Transmission Journal Export
You can erase the transmission journal or export (download) it to a file.
Create New File & Clear Log — Creates a file according to the file format of the export
data. Erases logs after a file has been created. You can display or download by clicking the
created file.
Clear Log — Erases logs.
Create New File — Creates a file according to the file format of the export data.
You can display or download by clicking the created file.
3
Fax Reception Journal Export
You can erase the reception journal or export (download) it to a file.
Create New File & Clear Log — Creates a file according to the file format of the export
data. Erases logs after a file has been created. You can display or download by clicking the
created file.
Clear Log — Erases logs.
Create New File — Creates a file according to the file format of the export data.
You can display or download by clicking the created file.
[Logs] Tab Page Overview
4 [Logs] Tab Page
4.[Logs] Tab Page
Item name
Description
4
Scan Log Export
You can erase scan logs or export (download) them in a file.
Create New File & Clear Log — Creates a file according to the file format of the export
data. Erases logs after a file has been created. You can display or download by clicking the
created file.
Clear Log — Erases logs.
Create New File — Creates a file according to the file format of the export data.
You can display or download by clicking the created file.
5
Messages Log Export
You can erase message logs or export (download) them in a file.
Create New File & Clear Log — Creates a file according to the file format of the export
data. Erases logs after a file has been created. You can display or download by clicking the
created file.
Clear Log — Erases logs.
Create New File — Creates a file according to the file format of the export data.
You can display or download by clicking the created file.
[Log Settings] Item list <access policy mode>
P.45 “Log Authentication”
P.46 “Log size”
Displays only when you are logged in with a user account which is granted administrator or display privileges in the
access policy mode.
Log Authentication
You can specify whether or not to use log authentication.
1
2
3
Item name
Description
1
[Save] button
Saves log authentication settings.
2
[Cancel] button
Cancels the settings.
3
Enable Log Authentication
Enables log authentication.
When log authentication is enabled, the log display for users will be restricted according to
access policies.
y Enable — Enables log authentication. Display will be restricted according to access
policies.
y Disable — Disables log authentication. Logs for all users will be displayed.
[Logs] Tab Page Overview
45
4 [Logs] Tab Page
Log size
Log size displays the log size.
1
2
3
4
5
Item name
46
Description
1
Print Log
Displays the log size of print jobs.
2
Transmission Journal
Displays the log size of transmission journals.
3
Reception Journal
Displays the log size of reception journals.
4
Scan Log
Displays the log size of scan jobs.
5
Message Log
Displays the log size of message logs.
[Logs] Tab Page Overview
4 [Logs] Tab Page
[Logs] How to Set and How to Operate
P.47 “Displaying job logs”
P.48 “Exporting logs”
Displaying job logs
You can display logs for jobs which are performed on this equipment. Up to 100 logs are displayed in chronological
order with the most recent first. When the number exceeds 100, logs are deleted, beginning with the oldest ones.
1
2
Click the [Logs] tab and click the [View Logs] menu.
Click [Print Log], [Transmission Journal], [Reception Journal], [Scan Log], or [Message
Log].
The log page is displayed.
3
Click the [REFRESH] icon at the upper right of the page to update the information.
Click a table heading item to refresh the page and reorder the list in the specified order.
[Logs] How to Set and How to Operate
47
4 [Logs] Tab Page
Exporting logs
You must be logged in to the access policy mode to export logs.
For information on logs that can be exported, see the following:
P.44 “[Export Logs] Item list <access policy mode>”
1
Log in to TopAccess in access policy mode.
2
Click the [Logs] tab and then click the [Export Logs] menu.
P.22 “Access Policy Mode”
File sizes are displayed in bytes.
3
4
5
6
48
Select the file format (CSV/XML) for the log you want to export.
Create the file by clicking the [Create New File] button for the log you want to export.
Click the file name.
Save the log file.
Your browser will display a confirmation dialog box. Select the process for saving the log as a file and follow the
displayed instructions.
[Logs] How to Set and How to Operate
[Registration] Tab Page
5.
This chapter contains instructions on how to register templates, the address book, and mailboxes.
[Registration] Tab Page Overview ........................................................................................ 50
[Template] Item list ...............................................................................................................................................50
[Address Book] Item list........................................................................................................................................76
[Inbound FAX routing] Item list .............................................................................................................................81
[Registration] How to Set and How to Operate ................................................................... 86
Managing templates .............................................................................................................................................86
Managing address book .......................................................................................................................................94
Managing mailboxes ..........................................................................................................................................100
5 [Registration] Tab Page
[Registration] Tab Page Overview
You can register templates, the address book, and inbound fax routing.
P.50 “[Template] Item list”
P.76 “[Address Book] Item list”
P.81 “[Inbound FAX routing] Item list”
[Template] Item list
P.50 “[Template Groups] screen”
P.53 “[Group Properties] screen”
P.54 “[Private Templates] screen”
P.55 “[Change Group Password] screen”
P.56 “[Template Properties] screen”
P.57 “Private template settings”
[Template Groups] screen
You can check the template registration status.
You can save agent settings for copy, fax/Internet Fax, and scan operated from the control panel on your device into a
template. Users can select the template when they copy, fax/Internet Fax, or scan from the control panel, for easy
operation.
Templates are managed in groups and up to 60 templates can be saved in a group.
There can be one public template group, and up to 200 private template groups.
Group type
50
Description
Max.
templates
saved
Max. number
of groups
Public Template
Groups
The public template group can be created and maintained only by
users who are granted administrator privileges in the access policy
mode.
Registered templates are available for all users.
1
60
Private Template
Groups
Users can create templates in private template groups. Users can
also set passwords on groups and registered templates to restrict the
use of them. Groups and templates without a password are available
to all users.
200
60
[Registration] Tab Page Overview
5 [Registration] Tab Page
5.[Registration] Tab Page
Public Template Groups
1
2
3
Item name
Description
1
No.
Displays "Public" for the public template group.
2
Name
Displays "Public Template Groups" for the public template group.
You can click to check the registered templates.
P.93 “Displaying public templates”
3
User Name
−
Templates in the public template group are created and managed by users who are granted administrator privileges in
the access policy mode. See the following description for registering public template groups:
P.322 “Registering public templates”
[Registration] Tab Page Overview
51
5 [Registration] Tab Page
Private Template Groups
1
2
3
Item name
Description
1
No.
Displays the group number.
2
Name
Displays the group name.
Click the name of a registered template to check and edit the registered templates.
P.86 “Registering and editing private template groups”
Click [Undefined] to register templates.
P.53 “[Group Properties] screen”
3
User Name
Displays the group owner name.
Click the name of a registered user name to check and edit the registered templates.
P.86 “Registering and editing private template groups”
Click [Undefined] to register templates.
P.53 “[Group Properties] screen”
y Click [All Groups] or [Defined Groups] to change how private template groups are displayed.
y See the following descriptions for how to register private template groups and how to create templates:
P.86 “Registering and editing private template groups”
P.89 “Registering or editing templates”
52
[Registration] Tab Page Overview
5 [Registration] Tab Page
5.[Registration] Tab Page
[Group Properties] screen
You can register a new private template group.
1
2
3
4
5
6
7
8
Item name
Description
1
[Save] button
Creates a private template group with the entered data.
The [Private Templates] screen is displayed and you can edit the template you are
registering.
P.54 “[Private Templates] screen”
2
[Cancel] button
Cancels the settings.
3
Number
Displays the private group number.
4
Name
Enter the name of the private group.
5
User Name
Enter the owner name of the private group.
6
Notification
Enter the E-mail address to be displayed as the default recipient when notification is
enabled in any template. You can select whether notification will be sent or not for each
template.
7
Password
Enter the password if setting a password to the private group. You can enter up to 20
characters including numbers, sharp marks (#), and asterisks (*).
8
Retype Password
Enter the same password again for a confirmation.
[Registration] Tab Page Overview
53
5 [Registration] Tab Page
[Private Templates] screen
You can edit the template you are registering.
1
2
3
4
5
6
Group Information
Item name
Description
1
[Edit] button
Allows you to edit the private template group information.
P.53 “[Group Properties] screen”
2
[Change Password] button
Allows you to change the password for the private template group.
P.55 “[Change Group Password] screen”
3
[Reset] button
Resets registration of the private template group.
4
No.
Displays the number of the private template group.
5
Name
Displays the name of the private group.
6
User Name
Displays the owner of the private template group.
Template list
You can display the template list. You can change the view by clicking [Panel View] or [List View].
Panel View
1
2
Item name
54
Description
1
Image
Displays icons of the templates.
Click [Undefined] to register a new template.
P.53 “[Group Properties] screen”
2
Name 1/Name 2
Displays the names registered on the touch panel.
P.57 “Panel Setting (Private template)”
[Registration] Tab Page Overview
5 [Registration] Tab Page
5.[Registration] Tab Page
List View
1
2
3
Item name
Description
1
Name
Displays the names registered on the touch panel.
P.57 “Panel Setting (Private template)”
Click [Undefined] to register a new template.
P.53 “[Group Properties] screen”
2
User Name
Displays the user name registered on the panel setting.
Click [Undefined] to register a new template.
P.53 “[Group Properties] screen”
3
Agent
Displays the agent registered to the template.
Click [Undefined] to register a new template.
P.53 “[Group Properties] screen”
[Change Group Password] screen
You can change the password of a private template group.
1
2
3
4
5
Item name
Description
1
[Save] button
Saves the new password.
2
[Cancel] button
Cancels the password change.
3
Old Password
Enter the current password.
4
New Password
Enter the new password.
5
Retype Password
Enter the same password again for a confirmation.
[Registration] Tab Page Overview
55
5 [Registration] Tab Page
[Template Properties] screen
You can set the template you are registering.
1
2
3
4
5
6
7
8
9 10 11
Item name
56
Description
1
[Save] button
Saves the template contents.
2
[Cancel] button
Cancels the operation.
3
[Select Agent] button
Allows you to set the selected agent.
You can set the template details when creating a new agent.
P.57 “Private template settings”
4
Copy
You can create a template which copies the document. Select this agent if you want to print
a copy when you are sending a document to another destination. You can also specify the
[Save as file] agent or [Store to e-Filing] agent at the same time.
5
Fax / InternetFax
You can create a template for fax or Internet Fax transmission. You can also specify the
[Save as file] agent at the same time.
6
Scan
You can create a template for a scan. You need to select either the [Email] agent, [Save as
file] agent, [Store to e-Filing] agent, or [Save to USB Media] agent at the same time. You can
specify up to two agents for a scan template.
7
Meta Scan
This agent is enabled when the meta scan option is installed.
You can create a template for the meta scan option.
Refer to the document provided by the vendor of the application which supports meta scan
option for details.
8
Email
You can transmit the document as an E-mail attachment.
9
Save as file
You can save the document in a shared folder.
10
Store to e-Filing
You can store the document in the e-Filing.
11
Save to USB Media
You can save the document in USB media.
[Registration] Tab Page Overview
5 [Registration] Tab Page
5.[Registration] Tab Page
Private template settings
You can set details of a template.
P.57 “Panel Setting (Private template)”
P.58 “Destination Setting (Private template)”
P.64 “InternetFax Setting (Private template)”
P.64 “Fax Setting (Private template)”
P.66 “Email Setting (Private template)”
P.68 “Save as file Setting (Private template)”
P.71 “Box Setting (Private template)”
P.71 “Store to USB Device Setting (Private template)”
P.73 “Scan Setting (Private template)”
P.75 “Extended Field settings”
P.75 “Extended Field Properties”
P.75 “Password Setting”
Panel Setting (Private template)
In the Panel Setting page, specify how the icon for the template is displayed in the touch panel, and the notification
settings for the template.
1
2
3
4
5
6
7
8
Item name
Description
1
Picture
This indicates the icon that will be displayed in the touch panel. The icon is automatically
designated according to the agent that you select.
2
Caption1
Enter the text that will be displayed next to the icon in the touch panel. You can enter up to
11 alphanumerical characters.
3
Caption2
Enter the text that will be displayed next to the icon in the touch panel. You can enter up to
11 alphanumerical characters.
4
User Name
Enter the owner name of the template. You can enter up to 30 alphanumerical characters.
5
Automatic Start
Select whether the automatic start function is enabled or disabled. When this is enabled, the
operation will be automatically started when you press the template button from the
TEMPLATE menu on the touch panel without pressing the [START] button or [SCAN].
If the user names or passwords of the User Authentication for Scan to E-mail and the User Management Setting are different,
or only the User Authentication for Scan to E-mail is enabled, you need to enter the user name and password of the User
Authentication for Scan to E-mail also when recalling the template with the automatic start function enabled.
6
Notification — Send Email when an
error occurs
Select this to send a notification message to the specified E-mail address when an error
occurs.
7
Notification — Send Email when
job is completed
Select this to send a notification message to the specified E-mail address when a job is
completed.
[Registration] Tab Page Overview
57
5 [Registration] Tab Page
Item name
8
Notification — Email to
Description
Enter a recipient E-mail address for the notification message. You can either select an
option to send it to the E-mail address set in a private group or specify an E-mail address.
When you enable the Notification setting, make sure to set up the E-mail settings in the [Email] submenu of the [Setup] menu
in the TopAccess access policy mode. For instructions on how to set up the E-mail settings, see the following section:
P.231 “Setting up E-mail settings”
Destination Setting (Private template)
In the Recipient List page, you can specify the destinations to which the Fax, Internet Fax, or Scan to E-mail document will
be sent.
When you are setting up the destinations for the Scan to Email agent, you can only specify the E-mail addresses for the
destinations.
When you are setting up the destinations for the Fax/InternetFax agent, you can specify both fax numbers and E-mail
addresses for the destinations.
When Creating a Fax/Internet Fax agent:
When Creating an Email agent:
The Fax Unit must be installed in this equipment to specify the fax numbers of the destinations.
You can specify the destinations by entering their E-mail addresses or fax numbers manually, selecting destinations from
the address book, selecting destination groups from the address book, or searching for destinations in the LDAP server.
P.59 “Entering the destinations manually”
P.60 “Selecting the destinations from the address book”
P.61 “Selecting the groups from the address book”
P.62 “Searching for destinations in the LDAP server”
P.63 “Removing the contacts from the Recipient List”
58
[Registration] Tab Page Overview
5 [Registration] Tab Page
5.[Registration] Tab Page
Entering the destinations manually
You can add a destination manually to the Recipient List.
You cannot enter destinations if [Restriction Setting for Destination] is enabled.
P.254 “Restriction Setting for Destination”
1
Click [Destination Setting] (when creating a Fax/Internet Fax agent) or [TO: Destination
Setting] / [CC: Destination Setting] / [BCC: Destination Setting] (when creating an Email
agent) to open the Recipient List page.
2
Click [New].
The Contact Property page is displayed.
3
Enter the E-mail address or fax number of the destination, in the [Destination] box.
You can specify the fax number for the destination only when the Fax Unit is installed.
4
Click [OK].
5
Repeat steps 2 to 4 to add all additional destinations that you require.
The destination is added to the Recipient List page.
You can remove the destinations you added to the Recipient List before saving the destination settings.
P.63 “Removing the contacts from the Recipient List”
6
Click [Save].
The contacts are added as destinations.
[Registration] Tab Page Overview
59
5 [Registration] Tab Page
Selecting the destinations from the address book
You can select destinations from the address book in this equipment.
You cannot select destinations from the address book if [Restriction Setting for Destination] is enabled.
P.254 “Restriction Setting for Destination”
1
2
Click [Destination Setting] to open the Recipient List page.
Click [Address Book].
The Address Book page is displayed.
3
Select the [Email] check boxes of users you want to add as the E-mail recipients or
Internet Fax recipients, and select the [Fax] check boxes of users you want to add as
the Fax recipients.
y When you are creating a Scan to E-mail template, only the [Email] check boxes are displayed in the
Address Book page.
y You can specify the fax number for the destination only when the Fax Unit is installed.
If you want to sort the Recipient List by a specific group, select the desired group name in the [Group] box.
4
Click [Add].
The selected destinations are added to the Recipient List page.
You can remove the destinations you added to the Recipient List before saving the destination settings.
P.63 “Removing the contacts from the Recipient List”
5
Click [Save].
The contacts are added as destinations.
60
[Registration] Tab Page Overview
5 [Registration] Tab Page
5.[Registration] Tab Page
Selecting the groups from the address book
You can select groups from the address book.
You cannot select destinations from the address group if [Restriction Setting for Destination] is enabled.
P.254 “Restriction Setting for Destination”
1
2
Click [Destination Setting] to open the Recipient List page.
Click [Address Group].
The Address Group page is displayed.
3
Select the [Group] check boxes that contain the desired destinations.
4
Click [Add].
All recipients in the selected groups are added to the Recipient List page.
You can remove the destinations you added to the Recipient List before saving the destination settings.
P.63 “Removing the contacts from the Recipient List”
5
Click [Save].
The contacts are added as destinations.
[Registration] Tab Page Overview
61
5 [Registration] Tab Page
Searching for destinations in the LDAP server
You can search for destinations in the registered LDAP server and in the address book.
The LDAP server used for the search must be registered by a user who is granted administrator privileges in access
policy mode.
P.292 “Managing directory service”
1
2
Click [Destination Setting] to open the Recipient List page.
Click [Search].
The Search Contact page is displayed.
3
Select the directory service name that you want to search for in the [Directory Service
Name] box, and enter the search terms in the boxes that you want to search.
y If you select the model name of this equipment at the [Directory Service Name] box, you can search for
destinations in the address book of this equipment.
y TopAccess will search for destinations who match the entries.
y Leaving the box blank allows wild-card searching. However, you must specify at least one.
4
Click [Search].
5
Select the [Email] check boxes of users you want to add as the E-mail recipients or
Internet Fax recipients, and select the [Fax] check boxes of users you want to add as
Fax recipients.
TopAccess will start searching for destinations in the LDAP server and the Search Address List page will display
the results.
Click [Research] to return to step 3 so that you can change the search criteria and execute the search again.
y You can specify the fax number for the destination only when the Fax Unit is installed.
y The value of [company] and [department] will depend on the settings made by the user who is granted
administrator privileges in the access policy mode.
62
[Registration] Tab Page Overview
5 [Registration] Tab Page
5.[Registration] Tab Page
6
Click [Add].
The selected destinations are added to the Recipient List page.
You can remove the destinations you added to the Recipient List before saving the destination settings.
P.63 “Removing the contacts from the Recipient List”
7
Click [Save].
The contacts are added as destinations.
Removing the contacts from the Recipient List
1
2
Click [Destination Setting] to open the Recipient List page.
Select the check boxes of the destinations that you want to remove from the Recipient
List, and click [Delete].
The selected destinations are removed from the Recipient List.
[Registration] Tab Page Overview
63
5 [Registration] Tab Page
InternetFax Setting (Private template)
In the InternetFax Setting page, you can specify the content of the Internet Fax to be sent.
1
2
3
4
5
6
Item name
Description
1
Subject
This sets the subject of the Internet Faxes. Select [Scanned from (Device Name) [(Template
Name)] (Date) (Time)] to automatically apply the subject, or enter the desired subject in the
box. If you enter manually, the subject will be [(Subject) (Date) (Time)].
2
From Address
Enter the E-mail address of the sender. When the recipient replies to a received document,
the message will be sent to this E-mail address. You can enter up to 140 alphanumerical
characters.
3
From Name
Enter the sender name of the Internet Fax. You can enter up to 64 characters.
4
Body
Enter the body message of the Internet Fax. You can enter up to 1000 characters (including
spaces).
5
File Format
Select the file format of the scanned image. Only [TIFF-S] (TIFF-FX (Profile S)) format can
be selected.
6
Fragment Page Size
Select the size of the message fragmentation. [No Fragmentation] is set as the default.
Fax Setting (Private template)
In the Fax Setting page, you can specify how the fax will be sent.
1
2
3
4
5
6
7
8
9
10
11
12
13
14
Item name
1
64
Preview
[Registration] Tab Page Overview
Description
Select whether or not to preview before sending a fax.
y ON — Select this to preview.
y OFF — Select this not to preview.
5 [Registration] Tab Page
5.[Registration] Tab Page
Item name
Description
2
Resolution
Select the resolution for sending faxes.
y Standard — Select the Standard mode as the normal resolution. This mode is suitable
when you are frequently transmitting text documents with normal size characters.
y Fine — Select the Fine mode as the normal resolution. This mode is suitable when you
are transmitting documents with small size characters or fine drawings.
y Ultra Fine — Select the Ultra Fine mode as the normal resolution. This mode is suitable
when you are transmitting documents with very small size characters or detailed
drawings.
3
Original Mode
Select the image quality mode for sending faxes.
y Text — Select the Text mode as the normal image quality mode. This mode is suitable
when you are transmitting text documents.
y Text/Photo — Select the Text/Photo mode as the normal image quality mode. This
mode is suitable when you are transmitting documents which contain both texts and
photos.
y Photo — Select the Photo mode as the normal image quality mode. This mode is
suitable when you are transmitting photo documents.
4
Exposure
Select the exposure for sending faxes.
Select [Auto] to automatically apply the ideal contrast, or adjust the contrast manually in 11
stages.
5
Transmission Type
Select the send mode.
y Memory Transmit — Select the Memory TX mode to automatically send the document
after it has been temporarily stored to memory. This mode is useful if you want to return
original files immediately. You can also send the same originals to two or more remote
faxes.
y Direct Transmit — Select the Direct TX mode to send the original as it is being
scanned. This mode is useful if you want confirmation from the remote party. Originals
are not stored to memory, and you can specify only one remote fax at a time.
You can select [Direct Transmit] when you have created a template for Fax/InternetFax (not for Saved as file).
When Fax/InternetFax and [Save as file setting] are combined, this item will be unselectable and will not be displayed.
6
ECM
Enable or disable the ECM (Error Correction Mode) to automatically resend any portion of
the document affected by phone line noise or distortion.
7
Quality Transmit
Select this to send a document in the Quality TX mode. This feature sends a document at a
slower speed than normal so the transmission will be less affected by line conditions.
8
SUB/SEP
Enter the SUB number or SEP number if you want to set the mailbox transmission.
9
SID/PWD
Enter the password for SUB or SEP if required.
10
Polling
Select this to set Polling communications.
y (Blank) — Select the blank box when you do not want to perform polling.
y Transmission — Select this to perform Polling Reservation that allows users to store
the document in the memory.
y Received — Select this to perform Turnaround Polling that allows users to poll another
fax after transmitting documents to the remote fax on the same phone call.
You can select [Transmission] when you have created a template for Fax/InternetFax (not to be Saved as file).
When Fax/InternetFax and [Save as file setting] are combined, this item will be unselectable and will not be displayed.
11
Password
Enter the 4-digit security code for the document to be stored or received.
12
Fax Number(Security)
When you select [Transmission] at the [Polling] box, enter the security fax number that
allows polling of stored document.
When you select [Received] at the [Polling] box, enter the security fax number to poll the
documents from remote faxes.
13
Delayed Transmit
If you enable the delayed communications for this agent, enter the day and time to send a
document. Delayed transmission is disabled when the date is set to "0".
14
Priority Transmit
Select whether the document will be sent prior to other jobs.
[Registration] Tab Page Overview
65
5 [Registration] Tab Page
Email Setting (Private template)
In the Email Setting page, you can specify the content of the Scan to Email document to be sent.
1
2
3
4
5
6
7
8
Item name
1
Subject
Description
This sets the subject of the E-mail.
Use Email Setting in Administration Setting — Select this to set the subject specified in
[Administration] - [Setup] - [Email] as subject.
Send data from (Device Name)[(Template Name)] — Select this to set the [(Template
Name)] data sent from (Device Name) as subject.
<Entry box> — Enter the text to set as subject.
Add the date and time to the Subject — Select this to append date and time to the subject
selected above.
When [Meta Scan] is selected, you can use a variable as the subject.
For more information on variables, see the following:
P.343 “Variables of XML format files”
66
2
From Address
This sets the E-mail address of the sender. When the recipient replies to a received
document, the message will be sent to this E-mail address.
Use From Address Setting set by Administrator — Select this to use the E-mail address
specified in [Administration] - [Setup] - [Email]. When User Authentication or Email
Authentication is enabled, select this to use the E-mail address specified in [Administration]
- [Security] - [Authentication] - [Email Address Setting].
<Entry box> — Specify the sender address using up to 140 alphanumeric characters.
3
From Name
This sets the sender name of the E-mail document.
Use From Name Setting set by Administrator — Select this to use the sender name
specified in [Administration] - [Setup] - [Email]. When User Authentication or Email
Authentication is enabled, select this to use the sender name specified in [Administration] [Security] - [Authentication] - [Email Address Setting].
<Entry box> — Specify the sender name using up to 64 characters.
4
Body
Enter the body message of the Scan to Email documents. You can enter up to 1000
characters (including spaces).
[Registration] Tab Page Overview
5 [Registration] Tab Page
5.[Registration] Tab Page
Item name
5
File Format
Description
Select the file format of the scanned image.
y TIFF(Multi) — Select this to save scanned images as a Multi-page TIFF file.
y TIFF(Single) — Select this to save scanned images separately as Single-page TIFF
files.
y PDF(Multi) — Select this to save scanned images as a Multi-page PDF file.
y PDF(Single) — Select this to save scanned images separately as Single-page PDF
files.
y Slim PDF(Multi) — Select this to save scanned images as Multi-page slim PDF files.
Select this when you give priority to minimizing the file size over the quality of the image.
y Slim PDF(Single) — Select this to save scanned images separately as Single-page
slim PDF files. Select this when you give priority to minimizing the file size over the
quality of the image.
y XPS(Multi)— Select this to save scanned images as a Multi-page XPS file.
y XPS(Single) — Select this to save scanned images separately as Single-page XPS
files.
y JPEG — Select this to save scanned images as JPEG files.
y If the Forced Encryption setting is enabled, only the PDF (Multi) and the PDF (Single) are selectable for a file format. For
the Forced Encryption function, refer to the User’s Manual Advanced Guide.
y Files saved in an XPS format can be used in Windows Vista/Windows 7/Windows 8/Windows Server 2012/Windows
Server 2008 SP1, or Windows XP SP2/Windows Server 2003 SP1 or later versions with Net Framework 3.0 installed.
6
Encryption
Set this for encrypting PDF files if you have selected [PDF (Multi)] or [PDF (Single)] in the
File Format setting.
Encryption — Select this if you want to encrypt PDF files.
User Password — Enter a password for opening encrypted PDF files.
Master Password — Enter a password for changing PDF encryption settings.
Encryption Level — Select an encryption level.
y 40-bit RC4 — Select this to set an encryption level to the one compatible with Acrobat
3.0, PDF V1.1.
y 128-bit RC4 — Select this to set an encryption level to the one compatible with Acrobat
5.0, PDF V1.4.
y 128-bit AES — Select this to set an encryption level to the one compatible with Acrobat
7.0, PDF V1.6.
Authority — Select the desired authority items on encrypted PDF files.
y Printing — Select this to authorize users to print documents.
y Change of Documents — Select this to authorize users to change documents.
y Content Copying or Extraction — Select this to authorize users to copy and extract
the contents of documents.
y Content Extraction for accessibility — Select this to enable the accessibility feature.
y If the Forced Encryption setting is enabled, you cannot clear the [Encryption] check box. For the Forced Encryption
function, refer to the User’s Manual Advanced Guide.
y The user password and the master password are not set at the factory shipment.
y Passwords must be from 1 to 32 one-byte alphanumerical characters.
y The user password must differ from the master password.
These passwords can be re-entered only by an authorized user. Users cannot change the settings of the [Encryption Level]
box and the [Authority] box noted below if they are not authorized to change the master password. For the details of the
encryption setting, refer to the User’s Manual Advanced Guide. Ask the administrator for resetting these passwords.
7
File Name
Select how the scanned file will be named. Select [DocYYMMDD] to name it as described,
or enter the desired file name in the box.
When you want to add the date and time in the file name, select the [Add the date and time
to a file name] check box.
When [Meta Scan] is selected, if you select [Add the date and time to a file name] in [File Name], it is also applied to the meta
data file name.
8
Fragment Message Size
Select the size of the message fragmentation. [No Fragmentation] is set as the default.
[Registration] Tab Page Overview
67
5 [Registration] Tab Page
Save as file Setting (Private template)
In the Save as file Setting page, you can specify how and where a scanned file will be stored.
1
2
3
4
5
6
Item name
1
File Format
Description
Select the file format for the scanned file to be stored.
y TIFF(Multi) — Select this to save scanned images as a Multi-page TIFF file.
y TIFF(Single) — Select this to save scanned images separately as Single-page TIFF
files.
y PDF(Multi) — Select this to save scanned images as a Multi-page PDF file.
y PDF(Single) — Select this to save scanned images separately as Single-page PDF
files.
y Slim PDF(Multi) — Select this to save scanned images as Multi-page slim PDF files.
Select this when you give priority to minimizing the file size over the quality of the image.
y Slim PDF(Single) — Select this to save scanned images separately as Single-page
slim PDF files. Select this when you give priority to minimizing the file size over the
quality of the image.
y XPS(Multi)— Select this to save scanned images as a Multi-page XPS file.
y XPS(Single) — Select this to save scanned images separately as Single-page XPS
files.
y JPEG — Select this to save scanned images as JPEG files.
y If the Forced Encryption setting is enabled, only the PDF (Multi) and the PDF (Single) are selectable for a file format. For
the Forced Encryption function, refer to the User’s Manual Advanced Guide.
y Files saved in an XPS format can be used in Windows Vista/Windows 7/Windows 8/Windows Server 2012/Windows
Server 2008 SP1, or Windows XP SP2/Windows Server 2003 SP1 or later versions with Net Framework 3.0 installed.
68
[Registration] Tab Page Overview
5 [Registration] Tab Page
5.[Registration] Tab Page
Item name
2
Encryption
Description
Set this for encrypting PDF files if you have selected [PDF (Multi)] or [PDF (Single)] in the
File Format setting.
Encryption — Select this if you want to encrypt PDF files.
User Password — Enter a password for opening encrypted PDF files.
Master Password — Enter a password for changing PDF encryption settings.
Encryption Level — Select an encryption level.
y 40-bit RC4 — Select this to set an encryption level to the one compatible with Acrobat
3.0, PDF V1.1.
y 128-bit RC4 — Select this to set an encryption level to the one compatible with Acrobat
5.0, PDF V1.4.
y 128-bit AES — Select this to set an encryption level to the one compatible with Acrobat
7.0, PDF V1.6.
Authority — Select the desired authority items on encrypted PDF files.
y Printing — Select this to authorize users to print documents.
y Change of Documents — Select this to authorize users to change documents.
y Content Copying or Extraction — Select this to authorize users to copy and extract
the contents of documents.
y Content Extraction for accessibility — Select this to enable the accessibility feature.
y If the Forced Encryption setting is enabled, you cannot clear the [Encryption] check box. For the Forced Encryption
function, refer to the User’s Manual Advanced Guide.
y The user password and the master password are not set at the factory shipment.
y Passwords must be from 1 to 32 one-byte alphanumerical characters.
y The user password must differ from the master password.
These passwords can be re-entered only by an authorized user. Users cannot change the settings of the [Encryption Level]
box and the [Authority] box noted below if they are not authorized to change the master password. For the details of the
encryption setting, refer to the User’s Manual Advanced Guide. Ask the administrator for resetting these passwords.
3
Destination — Use local folder
Select this to save a scanned file to the “FILE_SHARE” folder.
When [Meta Scan] is selected, you can only specify one destination.
[Registration] Tab Page Overview
69
5 [Registration] Tab Page
Item name
70
Description
4
Destination — Remote 1
Select this check box to save the scanned file to a network folder. How you can set this item
depends on how the user with administrator privileges configured Remote 1 in the [Save as
file] submenu under the [Setup] menu.
When you select [Allow the following network folder to be used as a destination], you can
only select [Use Administrator Setting]. The protocol and the network path are displayed
below this item.
When you select [Allow user to select network folder to be used as a destination], you can
select [Use User Setting] and enter the following items to specify where to save the file.
If you are allowed to specify a network folder, select [Use User Setting] and enter the
following items to specify where to save the file.
Protocol
Select the protocol to be used for uploading a scanned file to the network folder.
y SMB — Select this to send a scanned file to the network folder using the SMB protocol.
y FTP — Select this to send a scanned file to the FTP server.
y FTPS — Select this to send a scanned file to the FTP server using FTP over SSL.
y NetWare IPX/SPX — Select this to send a scanned file to the NetWare file server using
the IPX/SPX protocol.
y NetWare TCP/IP — Select this to send a scanned file to the NetWare file server using
the TCP/IP protocol.
Server Name
When you select [FTP] as the protocol, enter the FTP server name or IP address where a
scanned file will be sent. For example, to send a scanned file to the “ftp://192.168.1.1/user/
scanned” FTP folder in the FTP server, enter “192.168.1.1” in this box.
When you select [NetWare IPX/SPX] as the protocol, enter the NetWare file server name or
Tree/Context name (when NDS is available).
When you select [NetWare TCP/IP] as the protocol, enter the IP address of the NetWare file
server. You can enter up to 64 alphanumerical characters and symbols.
Port Number(Command)
Enter the port number to be used for controls if you select [FTP] as the protocol. Generally “” is entered for the control port. When “-” is entered, the default port number, that is set for
FTP Client by an administrator, will be used. If you do not know the default port number for
FTP Client, ask your administrator and change this option if you want to use another port
number. You can enter a value in the range from 0 to 65535 using numbers and hyphens (-).
Hyphen (-) is set as the default.
Network Path
When you select [SMB] as the protocol, enter the network path to the network folder. For
example, to specify the “users\scanned” folder in the computer named “Client01”, enter
“\\Client01\users\scanned\”.
When you select [FTP] as the protocol, enter the directory in the specified FTP server. For
example, to specify the “ftp://192.168.1.1/user/scanned” FTP folder in the FTP server, enter
“user/scanned”.
When you select “NetWare IPX/SPX” or “NetWare TCP/IP” as the protocol, enter the folder
path in the NetWare file server. For example, to specify the “sys\scan” folder in the NetWare
file server, enter “\sys\scan”.
You can enter up to 128 alphanumerical characters and symbols.
Login User Name
Enter the login user name to access an SMB server, FTP server, or NetWare file server, if
required. When you select [FTP] as the protocol, an anonymous log in is assumed if you
leave this box blank. You can enter up to 32 alphanumerical characters and symbols.
Password
Enter the password to access an SMB server, FTP server, or NetWare file server, if required.
You can enter up to 32 alphanumerical characters, symbols, and spaces. A single space
only can also be entered.
Retype Password
Enter the same password again for a confirmation.
5
Destination — Remote 2
Select this check box to save the scanned file to a network folder. How you can set this item
depends on how the user with administrator privileges configured Remote 2 in the [Save as
file] submenu under the [Setup] menu.
If the user with administrator privileges specified Remote 2 to use only the specified network
folder, you can only select [Use Administrator Setting]. The protocol and the network path
are displayed below this item.
If the Remote 2 allows you to specify a network folder, you can specify the network folder
settings. See the description of the Remote 1 option for each item.
[Registration] Tab Page Overview
5 [Registration] Tab Page
5.[Registration] Tab Page
Item name
6
File Name
Description
Select how the scanned file will be named. Select [DocYYMMDD] to name it as described,
or enter the desired file name in the box.
When you want to add the date and time in the file name, select the [Add the date and time
to a file name] check box.
When [Meta Scan] is selected, if you select [Add the date and time to a file name] in [File Name], it is also applied to the meta
data file name.
Box Setting (Private template)
In the Box Setting page, you can specify how scanned images will be stored in the Box.
1
2
3
Item name
Description
1
Destination
Specify the destination box number for e-Filing.
Box Number — Select the box number to store the scanned image.
Password — Enter the password if the specified box is set with a password.
Retype Password — Enter the same password again for a confirmation.
2
Folder Name
Enter the name of the folder where scanned images will be stored. If the specified named
folder does not exit, the folder will be created automatically. You can enter up to 64
characters.
3
Document Name
Select how the scanned file will be named. Select [DocYYMMDD] to name it as described,
or enter the desired file name in the box.
Store to USB Device Setting (Private template)
On the Store to USB Setting page, you can set the method for saving templates in USB media.
1
2
3
[Registration] Tab Page Overview
71
5 [Registration] Tab Page
Item name
1
File Format
Description
Select the file format of the scanned image.
y TIFF(Multi) — Select this to save scanned images as a Multi-page TIFF file.
y TIFF(Single) — Select this to save scanned images separately as Single-page TIFF
files.
y PDF(Multi) — Select this to save scanned images as a Multi-page PDF file.
y PDF(Single) — Select this to save scanned images separately as Single-page PDF
files.
y Slim PDF(Multi) — Select this to save scanned images as Multi-page slim PDF files.
Select this when you give priority to minimizing the file size over the quality of the image.
y Slim PDF(Single) — Select this to save scanned images separately as Single-page
slim PDF files. Select this when you give priority to minimizing the file size over the
quality of the image.
y XPS(Multi)— Select this to save scanned images as a Multi-page XPS file.
y XPS(Single) — Select this to save scanned images separately as Single-page XPS
files.
y JPEG — Select this to save scanned images as JPEG files.
y If the Forced Encryption setting is enabled, only the PDF (Multi) and the PDF (Single) are selectable for a file format. For
the Forced Encryption function, refer to the User’s Manual Advanced Guide.
y Files saved in an XPS format can be used in Windows Vista/Windows 7/Windows 8/Windows Server 2012/Windows
Server 2008 SP1, or Windows XP SP2/Windows Server 2003 SP1 or later versions with Net Framework 3.0 installed.
2
Encryption
Set this for encrypting PDF files if you have selected [PDF (Multi)] or [PDF (Single)] in the
File Format setting.
Encryption — Select this if you want to encrypt PDF files.
User Password — Enter a password for opening encrypted PDF files.
Master Password — Enter a password for changing PDF encryption settings.
Encryption Level — Select an encryption level.
y 40-bit RC4 — Select this to set an encryption level to the one compatible with Acrobat
3.0, PDF V1.1.
y 128-bit RC4 — Select this to set an encryption level to the one compatible with Acrobat
5.0, PDF V1.4.
y 128-bit AES — Select this to set an encryption level to the one compatible with Acrobat
7.0, PDF V1.6.
Authority — Select the desired authority items on encrypted PDF files.
y Printing — Select this to authorize users to print documents.
y Change of Documents — Select this to authorize users to change documents.
y Content Copying or Extraction — Select this to authorize users to copy and extract
the contents of documents.
y Content Extraction for accessibility — Select this to enable the accessibility feature.
y If the Forced Encryption setting is enabled, you cannot clear the [Encryption] check box. For the Forced Encryption
function, refer to the User’s Manual Advanced Guide.
y The user password and the master password are not set at the factory shipment.
y Passwords must be from 1 to 32 one-byte alphanumerical characters.
y The user password must differ from the master password.
These passwords can be re-entered only by an authorized user. Users cannot change the settings of the [Encryption Level]
box and the [Authority] box noted below if they are not authorized to change the master password. For the details of the
encryption setting, refer to the User’s Manual Advanced Guide. Ask the administrator for resetting these passwords.
3
File Name
Select how the scanned file will be named. Select [DocYYMMDD] to name it as described,
or enter the desired file name in the box.
When you want to add the date and time in the file name, select the [Add the date and time
to a file name] check box.
When [Meta Scan] is selected, if you select [Add the date and time to a file name] in [File Name], it is also applied to the meta
data file name.
72
[Registration] Tab Page Overview
5 [Registration] Tab Page
5.[Registration] Tab Page
Scan Setting (Private template)
In the Scan Setting page, you can specify how originals are scanned for the Scan to File, Scan to Email, and Scan to
e-Filing agent.
1
2
3
4
5
6
7
8
9
10
11
12
13
14
15
16
Item name
Description
1
Preview
Select whether to display the scanned image on the control panel after the scanning an
original.
y OFF — Select this not to display the scanned image.
y ON — Select this to display the scanned image.
2
Single/2-Sided Scan
Select whether to scan one side or both sides of an original. Available only when the
Reversing Automatic Document Feeder is installed.
y Single — Select this to scan one side of an original.
y Duplex Book — Select this to scan both sides of originals when the pages are printed
vertically in the same direction and bound along the vertical side of the paper.
y Duplex Tablet — Select this to scan both sides of originals with a vertical reversal to be
bound along the horizontal side of the paper.
3
Rotation
Select how the scanned images will be rotated.
4
Color Mode
Select the color mode for scanning.
y Black — Select this to scan in the black mode.
y Gray — Select this to scan in the gray scale mode.
y Full Color — Select this to scan in the full color mode.
y Auto Color — Select this to scan in the auto color mode.
y The [Color Mode] option cannot be set when [Slim PDF (Multi)] or [Slim PDF (Single)] is selected in the [File Format]
option in the Save as File Settings and that in the Email Setting.
y When [Auto Color] is selected, you cannot select JPEG or TIFF (Multi) for the file format. Also when [Black] is selected,
JPEG is not allowed.
5
Resolution
Select the resolution for scanning.
The [Resolution] option cannot be set when [Slim PDF (Multi)] or [Slim PDF (Single)] is selected in the [File Format] option in
the Save as File Settings and that in the Email Setting.
6
Compression
Select the compression for scanning.
y This cannot be set when [Black] is selected at the [Color Mode] box.
y The [Compression] option cannot be set when [Slim PDF (Multi)] or [Slim PDF (Single)] is selected in the [File Format]
option in the Save as File Settings and that in the Email Setting.
[Registration] Tab Page Overview
73
5 [Registration] Tab Page
Item name
7
Original Mode
8
Exposure
Description
Select the document type of the originals.
Text — Select this to set the Text mode as the default original mode.
Text/Photo — Select this to set the Text/Photo mode as the default original mode. This
can be selected only when [Black] is selected in the [Color Mode] box.
Photo — Select this to set the Photo mode as the default original mode.
This cannot be set when [Gray] is selected in the [Color Mode] box.
Select the exposure for scanning.
Select [Auto] to automatically apply the best contrast for the document. You can also
manually adjust the exposure in 11 stages. The farther to the right that you set the value, the
darker the density of the scanned image will become.
[Auto] is not available when [Gray], [Full Color], or [Auto Color] is selected at the [Color Mode] box. In that case, set the
exposure manually.
9
Original Size
Select the original size.
If this is set to [Auto], the size is automatically detected. Select [Mixed Original Sizes] to
scan a document with mixed sizes. You can also specify the original size.
10
Background
Select the density level of the background of the scanned image. Density can be adjusted in
9 levels. The farther to the right that you set the value, the darker the density of the
background will become.
11
Contrast
Select the contrast level of the scanned image. Contrast can be adjusted in 9 levels. The
farther to the right that you set the value, the higher the contrast level will become.
This is not available when [Black] or [Gray] is selected at the [Color Mode] box.
12
Sharpness
Select the sharpness level of the scanned image. Sharpness can be adjusted in 9 levels.
The farther to the right that you set the value, the sharper the scanned image will become.
13
Saturation
Select the saturation level of the scanned image. Saturation can be adjusted in 7 levels. The
farther to the right you set the value, the more vivid the scanned image will become.
14
RGB Adjustment
This is not available when [Black] or [Gray] is selected at the [Color Mode] box.
Select the RGB density level of the scanned image. RGB density can be adjusted in 9 levels
for each color. The farther to the right you set the value, the darker the density of the
selected color will become.
This is not available when [Black] or [Gray] is selected at the [Color Mode] box.
74
15
Omit Blank Page
Select whether to automatically omit a blank page in the scanned image if it is included in
originals.
OFF — The blank page is not omitted.
ON — The blank page is omitted.
16
Outside Erase
Select whether to erase a shade that appears outside of the scanned image when an
original is placed on the document glass while the Original Cover is left open. The erased
shade will be whitened.
If you want to erase it, you can select the criteria in 7 levels for judging if it is an area to be
erased. The farther to the right you select, the larger the area that will be erased. [OFF] is
selected by default.
[Registration] Tab Page Overview
5 [Registration] Tab Page
5.[Registration] Tab Page
Extended Field settings
You can set extended fields for meta data.
Set the field you have registered in [Administration] - [Registration] - [Extended Field Definition].
1
Item name
1
Extended Field Definition No.
Description
Allows you to select a registered extended field definition.
Extended Field Properties
[Extended Field Properties] set under the selected extended field definition are displayed.
Values set in this screen are used as the default values for [Extended Field Properties] displayed on the control panel
when using Meta Scan.
Items with an asterisk (*) attached at the beginning of the [Extended Field Properties] name are mandatory entry fields.
Password Setting
In the Password Setting page, you can set a password for the private template.
1
2
Item name
Description
1
Password
Enter a password.
2
Retype Password
Enter the same password again for a confirmation.
[Registration] Tab Page Overview
75
5 [Registration] Tab Page
[Address Book] Item list
P.76 “[Address Book] screen”
P.77 “[Contact Property] screen”
P.78 “[Fax Setting] screen”
P.79 “[Search Contact] screen”
P.79 “[Search Address List] screen”
P.80 “[Group Properties] screen”
[Address Book] screen
You can manage a contact list to be used in E-mail, Internet Fax, and fax transmissions.
y Click [Contacts] or [Groups] to switch the display between the list of addresses and the list of groups where
contacts are assigned.
y Address Book can be also managed using the control panel. Refer to the User’s Manual Advanced Guide.
Contacts
1
2
3
4
5
6
7
Item name
76
Description
1
[Add Address] button
Allows you to add a new contact in the address book.
P.77 “[Contact Property] screen”
2
[Search] button
Allows you to search a contact from the address book.
P.79 “[Search Contact] screen”
3
Group
Select a group to display in the address list.
y All Groups — Displays all the groups.
y Registered Groups — Displays the registered groups only.
4
ID
Displays the registered ID of the contact.
P.77 “[Contact Property] screen”
5
Name
Displays the name registered to the contact.
P.77 “[Contact Property] screen”
6
Email Address
Displays the E-mail address registered to the contact.
P.77 “[Contact Property] screen”
7
Fax Number
Displays the fax number registered to the contact.
P.77 “[Contact Property] screen”
[Registration] Tab Page Overview
5 [Registration] Tab Page
5.[Registration] Tab Page
Group
1
2
3
4
Item name
Description
1
[New] button
Allows you to add a new group.
P.80 “[Group Properties] screen”
2
ID
Displays the registered ID of the group.
P.80 “[Group Properties] screen”
3
Group Name
Displays the registered name of the group.
P.80 “[Group Properties] screen”
4
Contacts
Displays how many address books are registered in the group.
[Contact Property] screen
1
2
3
4
5
6
7
8
9
10
11
12
13
Item name
1
Description
[Save] button
Saves the entered information.
2
[Cancel] button
Cancels adding or editing a contract.
3
[Reset] button
Erases information entered in the given box.
4
[Delete] button
Deletes the displayed contact.
5
[Fax Setting] button
Registers the contact for fax transmission.
P.78 “[Fax Setting] screen”
6
First Name
Enter the first name of the contact. You can enter up to 32 characters. Invalid characters are
replaced with "!".
7
Last Name
Enter the last name of the contact. You can enter up to 32 characters. Invalid characters are
replaced with "!".
8
Email Address
Enter the E-mail address of the contact. You can enter up to 192 characters.
9
Fax Number
Enter the fax number of the contact. You can enter up to 128 characters.
10
2nd Fax Number
Enter the second fax number of the contact. You can enter up to 128 characters.
11
Company
Enter the company name of the contact. You can enter up to 64 characters. Invalid
characters are replaced with "!".
[Registration] Tab Page Overview
77
5 [Registration] Tab Page
Item name
Description
12
Department
Enter the department name of the contact. You can enter up to 64 characters. Invalid
characters are replaced with "!".
13
Keyword
Enter the comments on the contact. You can enter up to 256 characters. Invalid characters
are replaced with "!".
y You must specify either the [First Name] or [Last Name] box and either the [Email Address] or [Fax Number] box to
register the contact.
y If you enter “-” in the [Fax Number] and [2nd Fax Number], a three-second pause is added for dialing the fax
number.
y To perform fax transmission, the Fax Unit is required. If the Fax Unit is not installed, you cannot perform the fax
transmission even if you specify the fax number.
[Fax Setting] screen
1
2
3
4
5
6
7
8
9
10
Item name
78
Description
1
[Save] button
2
[Reset] button
Restores fax settings set for the contact to the default status.
3
SUB
Enter the mailbox number if you want to send a fax to the contact's fax mailbox. You can
enter up to 20 characters using numbers, #, and *.
4
SID
Enter the password to send a fax to the contact's fax mailbox. You can enter up to 20
characters using numbers, #, and *.
5
SEP
Enter the mailbox number if you want to retrieve a document from the contact's fax mailbox.
You can enter up to 20 characters using numbers, #, and *.
6
PWD
Enter the password to retrieve a document from the contact's fax mailbox. You can enter up
to 20 characters using numbers, #, and *.
7
ECM
Select whether to enable or disable ECM (Error Correction Mode). If [ON] is selected, it
facilitates error free communications by automatically resending any portion of the
document affected by phone line noise or distortion.
8
Line Select
Select whether specifying the line to be used. If this is set to [Auto], this equipment
automatically selects the line to be used. However, [Line 2] can be applicable only when the
2nd Line for Fax Unit is installed.
9
Quality Transmit
Select whether to send a document in the Quality TX mode. If [ON] is selected, this
equipment sends documents at a slower speed than normal so that the transmission will be
less affected by line condition.
10
Transmission Type
Select whether the document will be sent in [Memory Transmit] mode or [Direct Transmit]
mode.
[Registration] Tab Page Overview
Saves the entered information.
5 [Registration] Tab Page
5.[Registration] Tab Page
[Search Contact] screen
You can search for contacts in the LDAP server and add them to the address book.
In order to use the LDAP search, the directory service must be set up by a user who has been granted administrator
privileges in the access policy mode. Before operating the LDAP search, ask your administrator if the Directory Service
has been configured.
1
2
3
4
5
6
7
8
9
Item name
Description
1
[Search] button
Searches contacts with the entered conditions.
P.79 “[Search Address List] screen”
2
[Cancel] button
Cancels the contact search.
3
Directory Service Name
Select the LDAP server for the search.
4
First Name
Enter the search condition.
5
Last Name
6
Email Address
7
Fax Number
8
Company
9
Department
y If you select [MFP LOCAL] at the [Directory Service Name] box, you can search for destinations in the address
book of this equipment.
y TopAccess will search for destinations that contain the text entered in each item.
y Leaving the box blank allows wild-card searching. However, you must specify at least one.
[Search Address List] screen
Select from the search address list and add to the address book.
1
2
3
4
5
6
7
8
Item name
Description
1
[Add] button
Adds the contact selected in the search address list into the address book.
2
[Cancel] button
Cancels the search address list display.
[Registration] Tab Page Overview
79
5 [Registration] Tab Page
Item name
Description
3
[Research] button
Returns to the [Search Contact] screen to change the search criteria and execute the search
again.
4
Number of Search Result
Displays the number of found contacts.
5
Check box
Select contacts to be registered to the address book.
6
Name
Displays the search result.
7
Email Address
8
Fax Number
[Group Properties] screen
You can create groups that contain multiple recipients.
This enables you to specify a group as the destination when sending an E-mail, Internet Fax, or fax to multiple recipients.
1
2
3
4
5
6
7
8
9
10
11
Item name
80
Description
1
[OK] button
Registers the selected contacts as a group.
2
[Cancel] button
Cancels the group registration.
3
[Reset] button
Resets the contents.
4
[Delete] button
Deletes the displayed group.
5
Group Name
Enter the group name. You can enter up to 20 characters.
6
ID
Displays the registered ID of the contact.
7
Email
Select the check box to register E-mail address into the group when the contact has E-mail
information.
8
Fax
Select the check box to register fax number into the group when the contact has fax number
information.
9
Name
Displays the last name and first name registered to the contact.
10
Email Address
Displays the E-mail address registered to the contact.
11
Fax Number
Displays the fax number registered to the contact.
[Registration] Tab Page Overview
5 [Registration] Tab Page
5.[Registration] Tab Page
[Inbound FAX routing] Item list
ITU-T communications function between fax devices with ITU-T support and enable fax transmission to and retrieval from
mailboxes.
The type of mailboxes for ITU-T communications must be set in advance to either confidential, bulletin board, or forward.
You can specify a password on any mailbox to secure confidentiality.
y Mailboxes can be managed only when the Fax Unit is installed.
y The Internet/Fax (Relay) agent cannot be used to forward an inbound fax routed via Inbound FAX Routing.
Mailboxes can be managed using the control panel.
P.81 “[Inbound FAX routing] screen”
P.82 “[MailBox Properties] screen”
P.83 “MailBox Setting (Mailbox)”
P.84 “Destination Setting (Mailbox)”
P.84 “InternetFax Setting (Mailbox)”
P.84 “Relay End Terminal Report (Mailbox)”
P.85 “Save as file Setting (Mailbox)”
P.85 “Email Setting (Mailbox)”
P.85 “Box Setting (Mailbox)”
[Inbound FAX routing] screen
You can manage mailboxes used for ITU-T communications.
1
2
3
4
5
Item name
Description
1
[New] button
Creates a mailbox for F-code communications.
P.82 “[MailBox Properties] screen”
2
Box Number
Displays the registered mailbox number.
3
User Name
Displays the user name of the registered mailbox.
4
Agent
Displays the agent assigned to the mailbox.
5
Comment
Displays the registered comment.
[Registration] Tab Page Overview
81
5 [Registration] Tab Page
[MailBox Properties] screen
You can set a mailbox.
1
2
3
4
5
6
7 8 9 10
Item name
Description
1
[Save] button
Saves the mailbox.
2
[Cancel] button
Cancels the mailbox settings.
3
[Select Agent] button
Set the agent to apply to the forward mailbox.
4
Confidential
Creates a confident mailbox.
The Confidential Box allows a one-time document retrieval from the mailbox. Once a
document is retrieved, it is cleared. If a new document is sent to the same box number
where another document is stored, it is added to the existing box.
P.83 “MailBox Setting (Mailbox)”
5
Bulletin Board
Creates a bulletin board mailbox.
The Bulletin Board Box allows multiple document retrievals from the same mailbox. Once a
document is retrieved, it is not cleared. If a new document is sent to the same Box, it
replaces the existing one.
P.83 “MailBox Setting (Mailbox)”
6
Forward
Creates a multiple transmission relay mailbox. When you select this, select the agent from
[Internet/Fax(Relay)], [Save as file], [Email], or [Store to e-Filing].
Use the forward mailbox when you want to forward a fax document to specified destinations
automatically.
7
Internet/Fax(Relay)
Creates a multiple transmission relay mailbox for the Internet Fax or fax. This agent can be
combined with the Save as file agent or Store to e-Filing agent.
P.83 “MailBox Setting (Mailbox)”
P.84 “Destination Setting (Mailbox)”
P.84 “InternetFax Setting (Mailbox)”
P.84 “Relay End Terminal Report (Mailbox)”
The Internet/Fax (Relay) agent cannot be used to forward an inbound fax routed via Inbound FAX Routing.
82
8
Save as file
Creates a shared folder forwarding mailbox. This agent can be combined with the Internet/
Fax(Relay), Email, or Store to e-Filing agent.
P.83 “MailBox Setting (Mailbox)”
P.85 “Save as file Setting (Mailbox)”
9
Email
Creates an E-mail forwarding mailbox. This agent can be combined with the Save as file
agent or Store to e-Filing agent.
P.83 “MailBox Setting (Mailbox)”
P.85 “Email Setting (Mailbox)”
10
Store to e-Filing
Creates an e-Filing forwarding mailbox. This agent can be combined with the Internet/
Fax(Relay) agent, Save as file agent, or Email agent.
P.83 “MailBox Setting (Mailbox)”
P.85 “Box Setting (Mailbox)”
[Registration] Tab Page Overview
5 [Registration] Tab Page
5.[Registration] Tab Page
MailBox Setting (Mailbox)
In the MailBox Setting page, specify the general information of the mailbox such as the box number, password, owner,
comment, and notification.
y The [Notification] and [Document Print] options are not available when creating the Confidential mailbox or Bulletin
Board mailbox.
y Mailbox communication is disabled if the settings on this equipment and information registered for the destination
do not match. Check how the box number and the fax number of the destination are registered on the journal
before entering the box number.
1
2
3
4
5
6
Item name
1
Box Number
Description
Enter the box number of the mailbox. You can enter up to 20 characters including numbers,
sharp marks (#), and asterisks (*).
You can also specify the sender’s fax number to enable the Inbound Fax routing when
registering a Forward mailbox. If you specify the sender’s fax number here, the faxes that
are received from the specified fax number will be routed according to the mailbox settings.
y The Inbound Fax routing is available only for a Forward mailbox. If you select [Confidential] or [Bulletin Board] as an
agent, you cannot specify the fax number.
y When a fax is sent from the specified fax number with a box number (or sub address), the Inbound Fax routing will not
apply to the transmission and it is processed according to the specified box number (or sub address) settings.
2
Password
Enter the box password if you want to protect the mailbox by the password. You can enter
up to 20 characters including numbers, sharp marks (#), and asterisks (*).
3
User Name
Enter the user name of this mailbox. You can enter up to 30 characters.
4
Comment
Enter the comment. You can enter up to 30 characters.
5
Notification
This specifies how the notification message will be sent if an error occurs.
Send Email when an error occurs — Transmits a notification message to the specified
E-mail address when an error occurs.
Send Email when job is completed — Transmits a notification message to the specified
E-mail address when a job is completed.
Email Address — Enter the E-mail address for the notification messages. You can enter up
to 192 alphanumerical characters.
When you enable the Notification setting, make sure to set up the E-mail settings in the [Email] submenu of the [Setup] menu
in the TopAccess access policy mode. For instructions on how to set up the E-mail settings, see the following section:
P.231 “Setting up E-mail settings”
6
Document Print
Select whether to print a document sent to this mailbox.
y Always — Always prints documents sent to this mailbox.
y ON ERROR — Prints the document if all specified forwarding has failed.
[Registration] Tab Page Overview
83
5 [Registration] Tab Page
Destination Setting (Mailbox)
In the Recipient List page, you can specify the destinations of the Internet/Fax (Relay), or Email agent.
When you are setting up the destinations for the Email agent, you can only specify the E-mail addresses for the
destinations.
When you are setting up the destinations for the Internet/Fax (Relay) agent, you can specify both fax numbers and E-mail
addresses for the destinations.
You can specify the destinations by entering their E-mail addresses or fax numbers manually, selecting recipients from the
address book, selecting destination groups from the address book, or searching for destinations in the LDAP server.
The methods of entering the destinations manually and searching for the destinations in the LDAP server are not
available if you are setting the destination for the Internet/Fax (Relay) agent.
Operations are the same as the following procedure.
P.58 “Destination Setting (Private template)”
InternetFax Setting (Mailbox)
In the InternetFax Setting page, you can specify the content of the Internet Fax to be sent.
Operations are the same as the following procedure.
P.64 “InternetFax Setting (Private template)”
Relay End Terminal Report (Mailbox)
On the Relay End Terminal Report page, you can specify a destination to which the transmission result list will be sent.
1
2
3
4
5
Item name
Description
1
[Add] button
Adds settings to transmit the relay end terminal report.
2
[Cancel] button
Cancels the settings.
3
[Reset] button
Resets the settings.
4
Entry box
Enter the E-mail address or fax number of the recipient.
5
Recipient list
Displays the registered destinations. Select the E-mail address or fax number of the
destination.
You cannot specify more than 1 destination for the destination of the Relay End Terminal Report.
84
[Registration] Tab Page Overview
5 [Registration] Tab Page
5.[Registration] Tab Page
Save as file Setting (Mailbox)
In the Save as file Setting page, you can specify how and where a received fax will be stored.
Instructions on how to do the Save as file setting for the mailbox are the same as for the Save as file setting for a private
template.
Operations are the same as the following procedure.
P.68 “Save as file Setting (Private template)”
You cannot specify USB media as the storage in the Save as file Setting Page.
Email Setting (Mailbox)
In the Email Settings page, you can specify the content of E-mail document to be sent.
Instructions on how to do the E-mail setting for the mailbox are the same as for the E-mail setting for a private template.
Operations are the same as the following procedure.
P.66 “Email Setting (Private template)”
Box Setting (Mailbox)
In the Box Setting page, you can specify how a received fax will be stored in the Box.
Operations are the same as the following procedure.
P.71 “Box Setting (Private template)”
[Registration] Tab Page Overview
85
5 [Registration] Tab Page
[Registration] How to Set and How to Operate
P.86 “Managing templates”
P.94 “Managing address book”
P.100 “Managing mailboxes”
Managing templates
P.86 “Registering and editing private template groups”
P.89 “Registering or editing templates”
P.93 “Displaying public templates”
Registering and editing private template groups
Before registering private templates, you have to register the private template group. You can classify the private
templates according to every department, every user, and use by registering the private template groups.
Also each private template group can be protected by a password.
y You can define up to 200 private template groups. To define the private template groups, you can specify the group
name, owner, and E-mail notification setting.
y The required template may have already been created by a user who is granted administrator privileges in access
policy mode, or other user. Check the existing templates to see if they can be used before creating a new template
or group.
1
Click the [Registration] tab and the [Template] menu.
2
Click the [Undefined] group link to create a new private group. Click the defined group
name link to edit the group information.
The Template Groups page is displayed.
y If you select the private template group that has not been defined, the Group Properties page is displayed. Skip
to step 5.
y If you select the defined private template group that is not protected by a password, the Private Templates page
is displayed. Skip to step 4.
y If you select the defined private template group that is protected by a password, the Input Group Password
page is displayed. Go to the next step.
y The page displays all 200 private template groups in default page view. You can display only defined private
template groups by clicking on the [Defined Groups] link.
y If you know which private template group you want to define or edit, click the number of the private template
group in the [Jump to] links.
86
[Registration] How to Set and How to Operate
5 [Registration] Tab Page
5.[Registration] Tab Page
3
When the Input Group Password page is displayed, enter the password for the selected
private template group and click [OK].
The Group Properties page is displayed.
4
Click [Edit], [Change Password], or [Reset].
If you select [Reset], you can reset the unnecessary private group and restore it to an undefined private group. Skip
to step 7.
If you reset the group information, all private templates registered in the group will be deleted.
5
Enter the items below as required.
You can configure the following settings in this page:
P.53 “[Group Properties] screen”
[Registration] How to Set and How to Operate
87
5 [Registration] Tab Page
You can configure the following settings in this page:
P.55 “[Change Group Password] screen”
88
6
Click [Save] to apply changes.
7
Click [OK].
This step is not required if you have selected [Edit] in step 4.
[Registration] How to Set and How to Operate
5 [Registration] Tab Page
5.[Registration] Tab Page
Registering or editing templates
In each private template group, you can create up to 60 templates. To define the private template, specify the panel
settings that will be displayed in the control panel and agent settings. Each private template can also be protected by a
password.
Each template can be created in combination of the following agents:
y Copy template can be combined with the Save as file or Store to e-Filing agent.
y Fax/Internet Fax template can be combined with the Save as file agent.
y Scan template can be created with up to two agents in a combination of the Save as file, Email, and Store to eFiling agents.
1
Click the [Registration] tab and the [Template] menu.
2
Click the group name link where you want to register or edit the private template.
The Template Groups page is displayed.
y If you select the defined private template group that is not protected by a password, the Private Templates page
is displayed. Skip to step 4.
y If you select the defined private template group that is protected by a password, the Input Group Password
page is displayed. Go to the next step.
y The page displays all 200 private template groups in default page view. You can display only defined private
template groups by clicking on the [Defined Groups] link.
y If you know which private template group you want to define or edit, click the number of the private template
group in the [Jump to] links.
[Registration] How to Set and How to Operate
89
5 [Registration] Tab Page
3
When the Input Group Password page is displayed, enter the password for the selected
private template group and click [OK].
The Private Templates page is displayed.
4
From the templates list, click the [Undefined] icon to register a new template, or click
defined icon to edit the template.
y If the templates list is displayed in the List view, click the [Undefined] template name to register new template,
or click the defined template name to edit the template.
y If you select the private template that has not been defined, the Template Properties page to select agents is
displayed. Skip to step 7.
y If you select the defined private template that is not protected by a password, the Template Properties page is
displayed. Skip to step 6.
y If you select the defined private template that is protected by a password, the Input Template Password page is
displayed. Go to the next step.
y You can change the template list view by clicking on either [Panel View] or [List View].
y If you know which private template you want to define or edit, click the number of the private template in the
[Jump to] links.
90
[Registration] How to Set and How to Operate
5 [Registration] Tab Page
5.[Registration] Tab Page
5
When the Input Template Password page is displayed, enter the password for the
selected private template and click [OK].
The Template Properties page is displayed.
6
On the [Template Properties] page, click either [Edit], [Change Password], or [Reset
Template].
If you select [Reset Template], you can reset an unnecessary private template and restore it to an undefined
template. Skip to step 10.
7y
Enter the items below as required.
If you have selected [Edit] in step 6, select the agent and click [Select Agent].
You can configure the following settings in this page:
P.56 “[Template Properties] screen”
[Registration] How to Set and How to Operate
91
5 [Registration] Tab Page
y If you have selected [Change Password] in step 6, enter the following items and skip to step 9.
You can configure the following settings in this page:
P.55 “[Change Group Password] screen”
8
9
10
92
Click each button displayed in the page to specify or edit the associated template
properties.
[Panel Setting]
Specify icon settings of the template.
P.57 “Panel Setting (Private template)”
[Destination Setting]
Specify the destination to be sent. This can be set only when creating the Fax/Internet
Fax agent or Scan to Email agent.
P.58 “Destination Setting (Private template)”
[InternetFax Setting]
Specify how the Internet Fax is transmitted. This can be set only when creating a Fax/
Internet Fax agent.
P.64 “InternetFax Setting (Private template)”
[Fax Setting]
Specify how the documents are faxed. This can be set only when creating a Fax/Internet
Fax agent.
P.64 “Fax Setting (Private template)”
[Email Setting]
Specify how the documents are transmitted as E-mail messages. This can be set only
when creating a Scan to Email agent.
P.66 “Email Setting (Private template)”
[Save as file Setting]
Specify how the documents are saved in a shared folder on this equipment, USB media,
or a network folder. This can be set only when creating a Save as file agent.
P.68 “Save as file Setting (Private template)”
[Box Setting]
Specify how the documents are saved in e-Filing. This can be set only when creating a
Scan to e-Filing agent.
P.71 “Box Setting (Private template)”
[Store to USB Setting]
Specify how the document is saved in USB media.
P.71 “Store to USB Device Setting (Private template)”
[Scan Setting]
Specify how the documents are scanned. This can be set only when creating the Save as
file agent, Scan to Email agent, and Scan to e-Filing agent.
P.73 “Scan Setting (Private template)”
[Extended Field settings]
Set extended field definition information and extended field settings.
P.75 “Extended Field settings”
[Password Setting]
Set a password for the private template.
P.75 “Password Setting”
Click [Save].
Click [OK].
This step is not required if you have selected [Edit] in step 6.
[Registration] How to Set and How to Operate
5 [Registration] Tab Page
5.[Registration] Tab Page
Displaying public templates
End users can also display the templates list in the public group so that users can see what templates are available.
Displaying templates in the public group
1
Click the [Registration] tab and the [Template] menu.
2
Click the group name link for the Public Template Groups list.
3
The templates list in the public group is displayed.
The Template Groups page is displayed.
y You can change the template list view by clicking on either [Panel View] or [List View].
y If you know which public template you want to view, click the number of the public template in the [Jump to]
links.
[Registration] How to Set and How to Operate
93
5 [Registration] Tab Page
Managing address book
P.94 “Managing contacts in the Address Book”
P.98 “Managing groups in the Address Book”
Managing contacts in the Address Book
There are two ways to manage contacts in the Address Book:
y Adding, editing, and deleting contacts manually
P.94 “Adding, editing, and deleting contacts manually”
y Add new contact searching for a recipient from the LDAP server.
P.97 “Adding new contacts from the LDAP server”
Adding, editing, and deleting contacts manually
You can add or edit a contact by entering recipient information manually. You can also delete the contact from the Address
Book.
1
Click the [Registration] tab and the [Address Book] menu.
2
Click [Add Address] and add a new contact. Or click the corresponding link to the
contact which you want to edit or delete in the contact list.
The Address Book page is displayed.
The Contact Property page is displayed.
94
[Registration] How to Set and How to Operate
5 [Registration] Tab Page
5.[Registration] Tab Page
3
Enter the following items to specify the contact property. Click [Delete] to delete the
contact from the address book.
You can configure the following settings in this page:
P.77 “[Contact Property] screen”
4
When registering a fax contact, click [Fax Setting]. Otherwise, skip to Step 6.
5
Enter the following items according to the capabilities of destination facsimile, and
click [Save].
The Fax Settings page is displayed.
You can configure the following settings in this page:
P.78 “[Fax Setting] screen”
[Registration] How to Set and How to Operate
95
5 [Registration] Tab Page
6
96
In the Contact Property page, click [Save] to add a new contact.
[Registration] How to Set and How to Operate
5 [Registration] Tab Page
5.[Registration] Tab Page
Adding new contacts from the LDAP server
You can search for contacts in the LDAP server and add them to the Address Book. In order to use the LDAP search, the
directory service must be set up by a user who is granted administrator privileges in the access policy mode. Before
operating the LDAP search, ask your administrator if the Directory Service has been configured.
Add a new contact from the LDAP server.
1
Click the [Registration] tab and the [Address Book] menu.
2
Click [Search].
The Address Book page is displayed.
The Search Contact page is displayed.
3
Select the directory service name that you want to search for in the [Directory Service
Name] box, and enter the search terms in the boxes that you want to search.
y If you select the model name of this equipment at the [Directory Service Name] box, you can search for
destinations in the address book of this equipment.
y TopAccess will search for destinations that contain the text entered in each item.
y Leaving the box blank allows wild-card searching. However, you must specify at least one.
4
Click [Search].
TopAccess will start searching for recipients in the LDAP server and the Search Address List page will display the
results.
[Registration] How to Set and How to Operate
97
5 [Registration] Tab Page
5
Select the check boxes of contacts that you want to add to the Address Book.
Click [Research] to return to step 3 so that you can change the search criteria and execute the search again.
You can select all users in the list by clicking on the
button.
The value of [company] and [department] will depend on the settings made by the user who is granted
administrator privileges in access policy mode.
6
Click [Add].
Selected contacts are added to the Address Book.
Managing groups in the Address Book
You can create groups that contain the multiple recipients. This enables you to specify the groups for the destinations
instead of specifying each recipient separately when operating Scan to Email, or Fax or Internet Fax transmission. You
can also delete groups.
1
Click the [Registration] tab and the [Address Book] menu.
2
Click the [Groups] submenu.
3
Click [New] to add a new group. Or, click the corresponding link to the group which you
want to edit or delete in the group list.
The Address Book page is displayed.
The groups list is displayed.
The Group Properties page is displayed.
98
[Registration] How to Set and How to Operate
5 [Registration] Tab Page
5.[Registration] Tab Page
4
Enter the group name in the [Group Name] column. Click [Delete] to delete the selected
group.
y You can clear the entered values in each field by clicking [Reset].
y You can cancel adding or editing a group by clicking [Cancel].
5
Select the [Email] check boxes of users to add Internet Fax recipients, and select the
[Fax] check boxes of users to add Fax recipients.
To perform fax transmission, the Fax Unit is required. If the Fax Unit is not installed, you cannot perform the fax
transmission even if you specify the fax number.
6
Click [OK].
The group is created.
[Registration] How to Set and How to Operate
99
5 [Registration] Tab Page
Managing mailboxes
Mailboxes can be managed only when the Fax Unit is installed.
Mailboxes can be managed using the control panel. Refer to the User’s Manual Advanced Guide.
This equipment supports ITU-T communications and allows documents to be transmitted and retrieved from mailboxes
created by the mailbox hub in advance.
Setting up mailboxes.
To carry out ITU-T communications, you must first set up an Open Mailbox in the mailbox hub. You can set up a maximum
of 300 mailboxes.
You can also delete mailboxes.
If you want to delete an Open Mailbox, the document must first be retrieved, printed, or canceled from the Open
Mailbox.
1
Click the [Registration] tab and the [Inbound FAX routing] menu.
2
Click [New] to set up a new mailbox. Or, click the box number link which you want to
edit or delete in the mailbox list.
The Inbound FAX routing page is displayed.
y If you click [New], skip to step 5.
y If you click the box number link that is not protected by a password, skip to step 4.
y If you click the box number link that is protected by a password, go to the next step.
3
100
Enter the password for the mailbox and click [OK].
[Registration] How to Set and How to Operate
5 [Registration] Tab Page
5.[Registration] Tab Page
4
Click [Edit] or [Delete].
If you have clicked [Delete], the delete confirmation dialog box is displayed. Click [OK].
5
Select agents and click [Select Agent].
You can configure the following settings in this page:
P.82 “[MailBox Properties] screen”
6
Click each button displayed in the page to set the template properties.
MailBox Setting
Specify mailbox settings.
P.83 “MailBox Setting (Mailbox)”
[Destination Setting]
Specify the destination to be sent. This can be set only when creating an Internet/
Fax(Relay) agent or Email agent.
P.84 “Destination Setting (Mailbox)”
[InternetFax Setting]
Specify how the document is transmitted as an Internet Fax. This can be set only when
creating an Internet/Fax(Relay) agent.
P.84 “InternetFax Setting (Mailbox)”
The Internet/Fax (Relay) agent cannot be used to forward an inbound fax routed via
Inbound FAX Routing.
7
[Relay End Terminal Report]
Specify the destination for the relay end terminal report when forwarding has been
performed. This can be set only when creating an Internet/Fax(Relay) agent.
P.84 “Relay End Terminal Report (Mailbox)”
[Email Setting]
Specify how the document is transmitted as an E-mail message. This can be set only
when creating an Email agent.
P.85 “Email Setting (Mailbox)”
[Save as file Setting]
Specify how the document is saved on your computer hard disk or a network folder. This
can be set only when creating a Save as file agent.
P.85 “Save as file Setting (Mailbox)”
[Box Setting]
Specify how the document is saved in a mailbox. This can be set only when creating a
Store to e-Filing agent.
P.85 “Box Setting (Mailbox)”
After configuring the desired mailbox properties, click [Save].
The mailbox properties are registered.
[Registration] How to Set and How to Operate
101
5 [Registration] Tab Page
102
[Registration] How to Set and How to Operate
[Counter] Tab Page
6.
This chapter explains the [Counter] tab page in TopAccess.
[Counter] Tab Page Overview ............................................................................................. 104
[Counter] Item list ...............................................................................................................................................104
[Counter] How to Set and How to Operate......................................................................... 110
Viewing counters ................................................................................................................................................ 110
6 [Counter] Tab Page
[Counter] Tab Page Overview
You can check the number of pages printed, copied, and scanned in the [Counter] tab page.
P.104 “[Counter] Item list”
[Counter] Item list
P.104 “[Total Count] screen”
P.106 “[Department Management] screen”
P.106 “[Department Counter] screen <access policy mode>”
P.107 “[Department Information] screen”
P.108 “[User Counter] screen <access policy mode>”
P.109 “[User Information] screen <access policy mode>”
[Total Count] screen
You can display total counters of the printer counter and scan counter, and total counters for small size and large size
paper.
1
2
Counter type
104
Description
1
Print Counter
Displays the total output count value.
2
Scan Counter
Displays the total scanned count value.
[Counter] Tab Page Overview
6 [Counter] Tab Page
6.[Counter] Tab Page
Print Counter/Print Counter(small paper)/Print Counter(large paper)
1
2
3
4
Counter
Description
1
Copy Counter
Displays the number of pages printed by copy operations.
2
Fax Counter
Displays the number of pages printed by fax reception.
3
Printer Counter
Displays the number of pages printed by print operations and E-mail reception (Internet Fax
reception).
4
List Counter
Displays the number of pages printed by system page print operations.
Scan Counter/Scan Counter(small paper)/Scan Counter(large paper)
1
Counter
2
3
Description
1
Copy Counter
Displays the number of pages scanned by copy operations.
2
Network Counter
Displays the number of pages scanned by scan operations.
3
Fax Counter
Displays the number of pages scanned by fax reception.
[Counter] Tab Page Overview
105
6 [Counter] Tab Page
[Department Management] screen
This screen displays total counter information for each department.
1
2
3
4
5
6
7
Item name
8
Description
1
Department Code
Enter the department code which you want to check and click the [Enter] button.
2
Number
Displays the registered department number.
3
Department Name
Displays the department name.
Click a department name link to check the information.
P.107 “[Department Information] screen”
4
Dept Code
Displays the department code.
5
Total Printing
Displays the number of pages printed by copy operations.
6
Total Scanning
Displays the number of pages scanned by scan operations.
7
Fax Transmission
Displays the number of pages transmitted via fax.
8
Fax Reception
Displays the number of pages received via fax.
[Department Counter] screen <access policy mode>
1
2
3
4
5
6
Item name
106
7
Description
1
Number
Displays the registered department number.
2
Department Name
Displays the department name.
Click a department name link to check the information.
P.107 “[Department Information] screen”
3
Dept Code
Displays the department code.
4
Total Printing
Displays the number of pages printed by copy operations.
5
Total Scanning
Displays the number of pages scanned by scan operations.
6
Fax Transmission
Displays the number of pages transmitted via fax.
7
Fax Reception
Displays the number of pages received via fax.
[Counter] Tab Page Overview
6 [Counter] Tab Page
6.[Counter] Tab Page
[Department Information] screen
1
2
3
4
5
6
7
Item name
Description
1
[Close] button
Closes the [Department Information] screen.
2
Department Number
Displays the registered department number.
3
Department Name
Displays the department name.
4
Department Code
Displays the department code.
5
Print Counter
Displays the number of pages printed by print operations and E-mail reception (Internet Fax
reception).
6
Scan Counter
Displays the number of pages scanned by scan operations.
Values for the small size and large size are displayed according to the paper size specified
on your device.
7
Fax Communication Counter
Displays the communication record.
[Counter] Tab Page Overview
107
6 [Counter] Tab Page
[User Counter] screen <access policy mode>
This screen displays total counter information for each user who is logged in to TopAccess.
Total counters for all users are displayed when you are logged in as the Administrator.
1
3
2
4
5
6
7
Item name
108
Description
1
Number
Displays the registered user number.
2
User Name
Displays the user name.
Click a user name to check the information.
P.109 “[User Information] screen <access policy mode>”
3
Domain Name/LDAP Server
Displays the domain name or LDAP server of the user account.
4
Total Printing
Displays the number of pages printed by copy operations.
5
Total Scanning
Displays the number of pages scanned by scan operations.
6
Fax Transmission
Displays the number of pages transmitted via fax.
7
Fax Reception
Displays the number of pages received via fax.
[Counter] Tab Page Overview
6 [Counter] Tab Page
6.[Counter] Tab Page
[User Information] screen <access policy mode>
1
2
3
4
5
6
7
8
9
10
11
12
13
14
Item name
Description
1
[Close] button
Closes the [User Information] screen.
2
User Name
Displays the user name.
3
Domain Name/LDAP Server
Displays the registered domain name or LDAP server.
4
Authentication Method
Displays the user authentication method.
5
Password
You cannot display the password.
Reset the password in the [User Accounts] item when changing the password.
P.117 “[Enter Password] screen”
6
Role Assignment
Displays the registered roles.
7
Group Assignment
Displays the registered groups.
8
Department Number
Displays the registered departments.
9
PanelUI Language
Displays the registered display languages of the touch panel.
10
PanelUI Keyboard Layout
Displays the registered keyboard patterns for the touch panel.
11
Quota Setting
y OFF — No output restriction.
y ON — Restricts output.
Quota
Displays the remaining number for output.
Default Quota
Displays the default number assigned for the user.
12
Print Counter
Displays the number of pages printed by print operations and E-mail reception (Internet Fax
reception).
13
Scan Counter
Displays the number of pages scanned by scan operations.
Values for the small size and large size are displayed according to the paper size specified
on your device.
14
Fax Communication Counter
Displays the communication record.
[Counter] Tab Page Overview
109
6 [Counter] Tab Page
[Counter] How to Set and How to Operate
P.110 “Viewing counters”
Viewing counters
This equipment maintains a set of counters that keep track of the number of pages printed, copied and scanned. These
statistics can be displayed in totals or broken down by department. This section explains how to display the statistics and
manage the department counters.
P.110 “Displaying the total counter”
P.111 “Displaying the department counter”
Neither an end user nor an administrator can reset counters from TopAccess. However, users who are granted
administrator privileges in the access policy mode can reset the counter from the control panel. Refer to the User’s
Manual Advanced Guide.
Displaying the total counter
In the [Total] menu, you can display the total counter information for the copy/print counter for small paper, copy/print
counter for large paper, and scan counter.
110
1
Click the [Counter] tab and the [Total] menu.
2
You can check the total counter in this page.
The Total Count page is displayed.
[Counter] How to Set and How to Operate
6 [Counter] Tab Page
6.[Counter] Tab Page
Displaying the department counter
In the [Department] menu, you can display the counter information of a specific department. If you want to display the
department counter, you must enter the department code.
1
Click the [Counter] tab and the [Department] menu.
2
Enter the code for the department you want to check in [Department Code] and click
[Enter].
The Department management page is displayed.
The department counter for the specified department is displayed.
3
Click the department name link to display the detailed counters for the department.
4
The Department Information page opens.
[Counter] How to Set and How to Operate
111
6 [Counter] Tab Page
112
[Counter] How to Set and How to Operate
[User Management] Tab Page
7.
This section describes how to manage users in TopAccess.
[User Management] Tab Page Overview ............................................................................ 114
[User Accounts] Item list <access policy mode> ................................................................................................ 114
[Group Management] Item list <access policy mode> .......................................................................................121
[Role Management] Item list <access policy mode> ..........................................................................................123
[Department Management] Item list <access policy mode>...............................................................................128
[Export/Import] Item list <access policy mode> ..................................................................................................131
7 [User Management] Tab Page
[User Management] Tab Page Overview
P.114 “[User Accounts] Item list <access policy mode>”
P.121 “[Group Management] Item list <access policy mode>”
P.123 “[Role Management] Item list <access policy mode>”
P.128 “[Department Management] Item list <access policy mode>”
P.131 “[Export/Import] Item list <access policy mode>”
[User Accounts] Item list <access policy mode>
You can search and set user accounts if you are logged in to the access policy mode.
P.115 “[Search User Account] screen”
P.116 “[Create User Information] screen”
P.117 “[Enter Password] screen”
P.118 “[User Information] screen”
P.120 “[Role Assignment] screen”
P.120 “[Group Assignment] screen”
1
2
3
4
5
6
7
8
9
10
11
Item name
114
14
13
12
Description
1
[Search] button
Searches registered users.
P.115 “[Search User Account] screen”
2
[New] button
Registers new users.
P.116 “[Create User Information] screen”
3
[Delete] button
Deletes the user selected in the user account list.
However, you cannot delete the default users.
4
[Delete All] button
Deletes all registered users. (Except default users)
5
[Unlock] button
Unlocks a locked user selected in the user account list.
6
[Reset Password] button
Resets the password of the user selected in the user account list.
P.117 “[Enter Password] screen”
7
[Set Registered Quota] button
Initializes the registered quota for the user selected in the user account list.
8
[Set Registered All Quotas] button
Initializes all registered quotas.
9
[Reset Counters] button
Resets counters for the user selected in the user account list.
10
[Reset All Counters] button
Resets counters for all departments.
11
Number
Displays the registration number of the user.
10001 to 10007 are assigned to default users.
[User Management] Tab Page Overview
15
7 [User Management] Tab Page
7.[User Management] Tab Page
Item name
Description
12
User Name
Displays the user name.
Undefined, Admin, Service, Auditor, Faxope, Guest, and Printope are default users.
You can check the user information by clicking the user name.
P.118 “[User Information] screen”
13
Domain Name/LDAP Server
Displays the domain name or LDAP server registered in the user information.
14
Department Number
Displays the department number registered in the user information.
15
Status
Displays the user status.
[Search User Account] screen
You can search registered users.
Select items to be searched and enter or select the search conditions.
1
2
3
4
5
Item name
1
Description
Number
Enter the user number you want to search.
The search condition should be in the range from 1 to 10000.
2
Department Number
Select the department number you want to search.
3
User Name
Enter the user name you want to search.
A prefix search is performed with the entered character string.
4
Domain Name/LDAP Server
Enter the domain name or LDAP server you want to search.
5
[Search] button
Searches contacts with the entered and selected conditions.
[User Management] Tab Page Overview
115
7 [User Management] Tab Page
[Create User Information] screen
You can register new user information.
1
2
3
4
5
6
7
8
9
10
11
12
13
Item name
Description
1
[Save] button
Saves the entered user information.
2
[Cancel] button
Cancels creating user information.
3
User Name
Enter the user name.
You can enter up to 128 alphanumerical characters and symbols (! # $ % & - . @ ^ _ ' ( ) ` { }
~).
4
Domain Name/LDAP Server
Select the domain name or LDAP server.
5
Authentication Method
Select the user authentication method.
y MFP Local Authentication — Use MFP local authentication on your equipment.
y Windows Domain Authentication — Use network authentication managed by the
Windows domain.
y LDAP Authentication — Use network authentication managed by LDAP.
6
Password
Enter the password. You can enter up to 64 alphanumerical characters and symbols (! # ( ) *
+ , - . / : ; = ? @ \ ^ _ ` { | } ~).
7
PIN Code
Enter the PIN code for the user authentication.
y The PIN code is up to 32 figures (0 - 9) long. The minimum length is specified on [User Authentication Setting].
P.249 “Setting up User Authentication Setting”
y If you change any settings, the changes will be reflected from the next time you log in.
116
8
Role Assignment
This can be configured when [MFP Local Authentication] is selected in [Authentication
Method].
Select from the registered roles. Click the [Edit] button and select roles from the displayed
screen.
P.120 “[Role Assignment] screen”
9
Group Assignment
This can be configured when [MFP Local Authentication] is selected in [Authentication
Method].
Select from the registered groups. Click the [Edit] button and select groups from the
displayed screen.
P.120 “[Group Assignment] screen”
10
Department Number
Select from the registered departments.
P.128 “[Department Management] Item list <access policy mode>”
11
PanelUI Language
Select the display language for the touch panel.
12
PanelUI Keyboard Layout
Select the keyboard pattern displayed on the touch panel.
[User Management] Tab Page Overview
7 [User Management] Tab Page
7.[User Management] Tab Page
Item name
13
Quota Setting
Description
y OFF — No output restriction.
y ON — Restricts output.
Quota
Displays the remaining number for output. The number entered in [Default Quota]
decreases each time a page is printed, and output is prohibited when it reaches 0. You can
manually change the remaining number of outputs to a desired value.
Default Quota
Enter the default number assigned for the user. Up to 99,999,999 can be entered.
[Enter Password] screen
You can display the [Enter Password] screen by selecting the check box of the user whose password you want to change
in the [User Accounts] item list and clicking the [Reset Password] button.
1
2
3
Item name
Description
1
[OK] button
Saves the entered password.
2
[Cancel] button
Cancels the password change.
3
Password
Enter the new password.
[User Management] Tab Page Overview
117
7 [User Management] Tab Page
[User Information] screen
You can update registered user information.
1
2
3
4
5
6
7
8
9
10
11
12
13
14
15
16
17
18
Item name
Description
1
[Save] button
Saves the entered user information.
2
[Cancel] button
Cancels changing user information.
3
[Delete] button
Deletes the displayed user from the user account.
4
[Reset Counters] button
Resets counters.
5
User Name
Displays the user name.
6
Domain Name/LDAP Server
Displays the registered domain name or LDAP server. Select this item if you want to
change.
You can select this item only when the authentication method is [Windows Domain
Authentication] or [LDAP Authentication].
7
Authentication Method
Displays the user authentication method.
y MFP Local Authentication — Use MFP local authentication on your equipment.
y Windows Domain Authentication — Use network authentication managed by the
Windows domain.
y LDAP Authentication — Use network authentication managed by LDAP.
8
Password
You can change the password only when the authentication method is [MFP Local
Authentication].
If you change any settings, the changes will be reflected from the next time you log in.
If you change any settings, the changes will be reflected from the next time you log in.
118
[User Management] Tab Page Overview
7 [User Management] Tab Page
7.[User Management] Tab Page
Item name
9
PIN Code
Description
Displays the PIN code for the user authentication. You can set this item only when the
authentication method is [MFP Local Authentication].
y The PIN code is up to 32 figures (0 - 9) long. The minimum length is specified on [User Authentication Setting].
P.249 “Setting up User Authentication Setting”
y If you change any settings, the changes will be reflected from the next time you log in.
10
Role Assignment
This can be configured when [MFP Local Authentication] is selected in [Authentication
Method].
Displays the registered roles. Click the [Edit] button and select roles from the displayed
screen.
P.120 “[Role Assignment] screen”
11
Group Assignment
12
Department Number
Displays the registered departments. Select this item if you want to change.
P.128 “[Department Management] Item list <access policy mode>”
13
PanelUI Language
Displays the registered display languages of the touch panel. Select this item if you want to
change.
14
PanelUI Keyboard Layout
Displays the registered keyboard patterns for the touch panel. Select this item if you want to
change.
15
Quota Setting
If you change any settings, the changes will be reflected from the next time you log in.
This can be configured when [MFP Local Authentication] is selected in [Authentication
Method].
Displays the registered groups. Click the [Edit] button and select groups from the displayed
screen.
P.120 “[Group Assignment] screen”
If you change any settings, the changes will be reflected from the next time you log in.
y OFF — No output restriction.
y ON — Restricts output.
Quota
Displays the remaining number for output. The number entered in [Default Quota]
decreases each time a page is printed, and output is prohibited when it reaches 0. You can
manually change the remaining number of outputs to a desired value.
Default Quota
Enter the default number assigned for the user. Up to 99,999,999 can be entered.
16
Print Counter
Displays the number of pages printed by print operations and E-mail reception (Internet Fax
reception).
17
Scan Counter
Displays the number of pages scanned by scan operations.
18
Fax Communication Counter
Displays the communication record.
[User Management] Tab Page Overview
119
7 [User Management] Tab Page
[Role Assignment] screen
You can select roles to be assigned.
1
2
3
4
Item name
Description
1
[OK] button
Saves the assigned roles.
2
[Cancel] button
Cancels assigning roles.
3
Available Role
Displays a list of registered roles.
Select the role to be assigned and click the [Add] button.
4
Assigned Role
Displays a list of the assigned roles.
Select the role to be removed from the assignment and click the [Delete] button.
[Group Assignment] screen
You can select groups to be assigned.
1
2
3
4
Item name
120
Description
1
[OK] button
Saves the assigned groups.
2
[Cancel] button
Cancels assigning groups.
3
Available Group
Displays a list of registered groups.
Select the group to be assigned and click the [Add] button.
4
Assigned Group
Displays a list of the assigned groups.
Select the group to be removed from the assignment and click the [Delete] button.
[User Management] Tab Page Overview
7 [User Management] Tab Page
7.[User Management] Tab Page
[Group Management] Item list <access policy mode>
You can manage the registered roles as groups if you are logged in to the access policy mode.
P.121 “[Create Group Information] screen”
P.122 “[Group Information] screen”
1
2
3
4
Item name
Description
1
[New] button
Allows you to add a new group.
P.121 “[Create Group Information] screen”
2
[Delete] button
Deletes the group selected in the group list.
3
[Delete All] button
Deletes all groups.
4
Group Name
Displays the group name.
You check group information by clicking the group name.
P.122 “[Group Information] screen”
[Create Group Information] screen
You can register new groups.
1
2
3
4
Item name
Description
1
[Save] button
Saves the entered group information.
2
[Cancel] button
Cancels creating group information.
3
Group Name
Enter the group name.
You can enter up to 128 alphanumerical characters and symbols other than ", ‘ (back quote),
(, ), *, +, /, :, ; (semicolon), <, =, >, ?, [, \, ], ’ (apostrophe), {, |, }, ~, and , (comma).
4
Role Assignment
You can select roles to be assigned to the group. Click the [Edit] button and select roles from
the displayed screen.
P.120 “[Role Assignment] screen”
[User Management] Tab Page Overview
121
7 [User Management] Tab Page
[Group Information] screen
You can check roles registered to the group.
1
2
3
4
Item name
122
Description
1
[Save] button
Saves the entered group information.
2
[Cancel] button
Cancels creating group information.
3
Group Name
Displays the group name.
4
Role Assignment
Displays the roles assigned to the group. Click the [Edit] button and select roles from the
displayed screen.
P.120 “[Role Assignment] screen”
[User Management] Tab Page Overview
7 [User Management] Tab Page
7.[User Management] Tab Page
[Role Management] Item list <access policy mode>
You can manage and register roles if you are logged in to the access policy mode.
P.123 “Default roles and privileges”
P.125 “[Create New Role] screen”
P.127 “[Edit Role] screen”
1
2
3
Item name
Description
1
[New] button
Allows you to add a new role.
P.125 “[Create New Role] screen”
2
[Delete] button
Deletes the role selected in the role list.
However, you cannot delete the default roles.
3
Role Name
Displays the role name.
For more information on default roles, see the following:
P.123 “Default roles and privileges”
You can check role information by clicking the role name.
P.127 “[Edit Role] screen”
Default roles and privileges
The following table describes privileges granted to default roles.
The functions listed in “Privileges” and “Permitted operations (functions)” below are displayed in “6 Function list” on the
[Create New Role] screen.
P.125 “[Create New Role] screen”
Default role names
Administrator
Privileges
Scan Function
*1
e-Filing
Permitted operations (functions)
Store to e-Filing
e-Filing Access
e-Filing Deletion
Device Setting
Device Setting
User/Department Management
User/Department Management
Log Management
Read
Export
Job Management
Job Operation
AccountManager
User/Department Management
User/Department Management
CopyOperator
Copy Function
Copy Job
[User Management] Tab Page Overview
123
7 [User Management] Tab Page
Default role names
ScanOperator
Print
PrintOperator
eFilingOperator
Privileges
Store to Local File Share
Store to Remote Server
Send Email
RemoteScan/WSScan(Pull)
Local File Share
Store to Local Storage
Store to USB Device
Remote
Send Email
Store to Remote Server
WS Scan(Push)
Print Job
Print Function *1
Print Function
*1
Scan Function
*1
Print Management
Store to e-Filing
e-Filing
e-Filing Access
FaxOperator
Fax/iFax Function
Internet Fax Transmission
Fax Transmission
Auditor
Log Management *1
Read
Guest
(No privilege settings)
(No settings)
User
Copy Function
Copy Job
Store to Local File Share
Store to Remote Server
Store to e-Filing
Print Function *1
Print Job
Store to e-Filing
Scan Function
Store to Local File Share
Store to Remote Server
Send Email
Store to e-Filing
RemoteScan/WSScan(Pull)
Fax/iFax Function *1
Internet Fax Transmission
Fax Transmission
Store to Local File Share
Store to Remote Server
Local File Share
Store to Local Storage
Store to USB Device
Remote
Send Email
Store to Remote Server
WS Scan(Push)
e-Filing
Fax
Fax/iFax Function
*1 Part of operations (functions) is permitted.
124
Permitted operations (functions)
Scan Function
[User Management] Tab Page Overview
e-Filing Access
*1
Internet Fax Transmission
Fax Transmission
7 [User Management] Tab Page
7.[User Management] Tab Page
[Create New Role] screen
You can register a new role.
1
2
3
4
5
6
Item name
Description
1
[Save] button
Saves the entered role information.
2
[Cancel] button
Cancels creating the role.
3
Role Name
Enter the role name.
You can enter up to 128 characters.
4
Base Role
Select a role which is used as a base of the new role.
You can select any registered roles or default roles (CopyOperator, ScanOperator, Print,
PrintOperator, eFilingOperator, FaxOperator, Guest, User, Fax) as the base role.
[User Management] Tab Page Overview
125
7 [User Management] Tab Page
Item name
5
MFP Function
Copy Function
Copy Job
Print Function
Assigns all print functions.
Assigns the print job function.
Print Management
Assigns the print management function.
Remote Scan/
WSScan(Pull)
FAX/iFAX Function
Assigns all scan functions.
Assigns the Remote Scan or Web Services Scan function.
Assigns all fax/ifax functions.
Internet Fax
Transmission
Assigns all Internet Fax transmission functions.
Fax Transmission
Assigns the fax transmission function.
Fax Received Print
Assigns the fax/Internet Fax received print function.
Local File Share
Assigns all local file share functions.
Store to Local Storage
Assigns all local file storage functions.
Store to USB Device
Assigns all storage to USB device functions.
Remote
Send Email
Assigns all remote functions.
Assigns scan to function.
Store to Remote Server
Assigns all storage to remote server functions.
WS Scan(Push)
Assigns the WS scan (push) function.
e-Filing
e-Filing Access
126
Assigns all copy functions.
Assigns the copy job function.
Print Job
Scan Function
6
Description
Allows you to select the privileges to be assigned to the role.
Function list
Assigns all e-Filing functions.
Assigns the e-Filing access functions.
Displays operations (functions) enabled/disabled by privileges assigned to the role selected
from “MFP Function”. Even if one item is selected from “MFP Function”, more than one
function may be enabled.
Example: If you select the [Send Email] check box in [Remote] from “MFP Function”, [Send
Email] in [Remote] and that in [Scan Function] on the “Function list” will be enabled.
[User Management] Tab Page Overview
7 [User Management] Tab Page
7.[User Management] Tab Page
[Edit Role] screen
You can confirm and edit roles.
However, you cannot edit the default roles.
1
2
3
4
6
5
Item name
Description
1
[Save] button
Saves the edited role information.
2
[Cancel] button
Cancels editing the role.
3
Role Name
Enter if changing the role name.
You can enter up to 128 alphanumerical characters and symbols other than ", ‘ (backquote),
(, ), *, +, /, :, ; (semicolon), <, =, >, ?, [, \, ], ' (apostrophe), {, |, }, ~, and , (comma).
4
MFP Function
Allows you to select the MFP function to be assigned to the group. Select from the following
functions.
See the following for details:
P.125 “[Create New Role] screen”
5
Device Management
Displays device management privileges assigned to default roles. (Default roles only)
P.123 “Default roles and privileges”
6
Function list
Displays functions assigned to the role.
See the following for details:
P.125 “[Create New Role] screen”
[User Management] Tab Page Overview
127
7 [User Management] Tab Page
[Department Management] Item list <access policy mode>
You can manage departments if you are logged in to the access policy mode.
P.129 “[Department Information] screen”
P.130 “[Department Information] (Edit) screen”
1
2
3
4
5
6
7
8
9
10
Item name
128
11
Description
1
[New] button
Allows you to add a new department.
P.129 “[Department Information] screen”
2
[Reset All Counters] button
Resets counters for all departments.
3
[Set Registered All Quotas] button
Initializes quotas for all departments.
4
[Delete All] button
Deletes the registered department.
5
Number
Displays the registration number of the department.
6
Department Name
Displays the department name.
Click a department name link to check the department management information.
P.130 “[Department Information] (Edit) screen”
7
Dept Code
Displays the department code.
8
Total Printing
Displays the total number of printed pages of the department.
9
Total Scanning
Displays the total number of scanned pages of the department.
10
Fax Transmission
Displays the total number of transmitted fax pages of the department.
11
Fax Reception
Displays the total number of received fax pages of the department.
[User Management] Tab Page Overview
7 [User Management] Tab Page
7.[User Management] Tab Page
[Department Information] screen
You can register a new department.
1
2
3
4
5
Item name
Description
1
[Save] button
Saves the entered department information.
2
[Cancel] button
Cancels creating the department.
3
Department Name
Enter the department name.
You can enter up to 20 characters.
4
Department Code
Enter the department code.
You can enter up to 63 characters.
5
Quota Setting
y OFF — No output restriction.
y ON — Restricts output.
Quota
Displays the remaining number for output. The number entered in [Default Black Quota]
decreases each time a page is printed, and output is prohibited when it reaches 0. You can
manually change the remaining number of outputs to a desired value.
Default Quota
Enter the default number assigned for the department. Up to 99,999,999 can be entered.
[User Management] Tab Page Overview
129
7 [User Management] Tab Page
[Department Information] (Edit) screen
You can confirm and edit department information.
1
2
3
4
5
6
7
8
9
10
11
Item name
130
Description
1
[Save] button
Saves the entered department information.
2
[Cancel] button
Cancels creating the department.
3
[Reset Counters] button
Resets counters.
4
[Delete] button
Deletes the displayed department.
5
Department Number
Displays the registration number of the department.
6
Department Name
Enter if changing the department name.
You can enter up to 20 characters.
7
Department Code
Enter if changing the department code.
You can enter up to 63 characters.
8
Quota Setting
y OFF — No output restriction.
y ON — Restricts output.
Quota
Displays the remaining number for output. The number entered in [Default Quota]
decreases each time a page is printed, and output is prohibited when it reaches 0.
Default Quota
Enter the default number assigned for the department. Up to 99,999,999 can be entered.
9
Print Counter
Displays the number of pages printed by print operations and E-mail reception (Internet Fax
reception).
10
Scan Counter
Displays the number of pages scanned by scan operations.
11
Fax Communication Counter
Displays the communication record.
[User Management] Tab Page Overview
7 [User Management] Tab Page
7.[User Management] Tab Page
[Export/Import] Item list <access policy mode>
You can export and import your device settings if you are logged in to the access policy mode.
P.131 “Export”
P.133 “Import”
Export
1
2
3
4
5
6
7
8
9
Item name
Description
1
User Information (Small/Large
Counter)
You can create an export file for user information (small/large counter).
Click the [Create New File] button to create the file.
The file name, file size, and created date are displayed if you have already created a file.
Click the file name and follow the displayed dialog messages when exporting.
2
User Information
You can create an export file for user information.
Click the [Create New File] button to create the file.
The file name, file size, and created date are displayed if you have already created a file.
Click the file name and follow the displayed dialog messages when exporting.
[User Management] Tab Page Overview
131
7 [User Management] Tab Page
Item name
Description
3
User Information(All Counter)
You can create an export file for user information (all counter).
Click the [Create New File] button to create the file.
The file name, file size, and created date are displayed if you have already created a file.
Click the file name and follow the displayed dialog messages when exporting.
4
Combined(User Information + Role
+ Group)
You can create an export file for combined information (user information + role + group).
Click the [Create New File] button to create the file.
The file name, file size, and created date are displayed if you have already created a file.
Click the file name and follow the displayed dialog messages when exporting.
5
Combined(User Information(All
Counter) + Role + Group)
You can create an export file for combined information (all counter + role + group).
Click the [Create New File] button to create the file.
The file name, file size, and created date are displayed if you have already created a file.
Click the file name and follow the displayed dialog messages when exporting.
6
LDAP Role
You can create an export file for LDAP roles. When the role information setting file has been
imported, the imported file is created.
Click the [Create New File] button to create the file.
The file name, file size, and created date are displayed if you have already created a file.
Click the file name and follow the displayed dialog messages when exporting.
P.355 “Using the Attribute of the External Authentication as a Role of the MFP”
7
Department Information(Small/
Large Counter)
You can create an export file for department information (small/large counter).
Click the [Create New File] button to create the file.
The file name, file size, and created date are displayed if you have already created a file.
Click the file name and follow the displayed dialog messages when exporting.
8
Department Information
You can create an export file for department information.
Click the [Create New File] button to create the file.
The file name, file size, and created date are displayed if you have already created a file.
Click the file name and follow the displayed dialog messages when exporting.
9
Department Information(All
Counters)
You can create an export file for department information (all counter).
Click the [Create New File] button to create the file.
The file name, file size, and created date are displayed if you have already created a file.
Click the file name and follow the displayed dialog messages when exporting.
The exported file can be used to import the department codes and the department counters in [Import] – [Department Code].
P.133 “Import”
132
[User Management] Tab Page Overview
7 [User Management] Tab Page
7.[User Management] Tab Page
Import
1
2
3
4
Item name
Description
1
User Information
You can import user information from a file.
Click the [Browse...] button to select the file to import and click [Open].
Check the file name and click the [Import] button.
2
Combined(User Information + Role
+ Group)
You can import combined information (user information + role + group) from a file.
Click the [Browse...] button to select the file to import and click [Open].
Check the file name and click the [Import] button.
3
LDAP Role
Use this item to import the role information setting file for Windows domain authentication
and LDAP authentication.
Click the [Browse...] button to select the file to import and click [Open].
Check the file name and click the [Import] button.
4
Department Code
You can import department code from a file.
Click the [Browse...] button to select the file to import and click [Open].
Select the import method among [Overwrite], [Addition] or [Addition and Clear Counter], and
then click the [Import] button.
[User Management] Tab Page Overview
133
7 [User Management] Tab Page
134
[User Management] Tab Page Overview
[Administration] Tab Page
8.
This section describes administrative functions which allow you to configure devices and network, and manage users and
groups from TopAccess access policy mode.
[Setup] Item List ................................................................................................................... 136
[Setup] How to Set and How to Operate ............................................................................ 215
[Security] Item List ............................................................................................................... 247
[Security] How to Set and How to Operate ........................................................................ 263
[Maintenance] Item List ....................................................................................................... 274
[Maintenance] How to Set and How to Operate................................................................. 290
[Registration] ([Administration] tab) Item List................................................................... 302
[Registration] ([Administration] tab) How to Set and How to Operate ............................ 322
8 [Administration] Tab Page
[Setup] Item List
Users who are granted administrator privileges in access policy mode can access the [Setup] menu from the
[Administration] tab.
See the following pages for how to access it:
P.22 “Access Policy Mode”.
P.136 “General settings”
P.143 “Network settings”
P.183 “Copier settings”
P.186 “Fax settings”
P.189 “Save as File settings”
P.198 “Email settings”
P.200 “InternetFax settings”
P.201 “Printer/e-Filing settings”
P.202 “Printer settings”
P.206 “Print Service settings”
P.210 “Print Data Converter settings”
P.211 “Embedded Web Browser settings”
P.213 “Off Device Customization Architecture settings”
P.214 “Version”
General settings
You can configure the general settings such as device information, energy save, date and time, and web general setting.
The [General] submenu can be accessed from the [Setup] menu on the [Administration] tab.
See the following pages for how to access it and information on the [Setup] menu:
P.22 “Access Policy Mode”
P.136 “[Setup] Item List”
136
P.137 “Setting up Device Information”
P.139 “Setting up Confidentiality Setting”
P.138 “Setting up Functions”
P.140 “Setting up Energy Save”
P.138 “Long File Name Setting”
P.140 “Setting up Date & Time”
P.139 “Setting up e-Filing Notification Events”
P.141 “Setting up SNTP Service”
P.139 “Setting up Job Skip Control”
P.141 “Setting up Daylight Savings Time Setting”
P.139 “Setting up Restriction on Address Book Operation by
Administrator”
P.142 “Setting up WEB General Setting”
[Setup] Item List
8 [Administration] Tab Page
8.[Administration] Tab Page
Setting up Device Information
You can set the device information displayed in the [Device] tab page.
1
2
3
4
5
6
7
8
9
10
11
12
Item name
Description
1
Name
Displays the device name of your equipment.
2
Copier Model
Displays the model name of your equipment.
3
Serial Number
Displays the serial number of your equipment.
4
MAC Address
Displays the MAC address of your equipment.
5
Save as File & e-Filing Space
Available
Displays the available space for save as file and e-Filing on your equipment.
6
Fax Space Available
Displays the available space for fax transmission and reception for your equipment.
7
Data Cloning Function
Enable this item when migrating settings on your equipment on to another device.
8
USB Direct Print
Select whether the USB Direct Print function is enabled or disabled.
9
Location
Enter the installed location of your equipment. This is displayed in the [Device] tab page that
appears first when accessing the TopAccess website for users.
10
Contact Information
Enter the name of the person who is responsible for this equipment. This is displayed in the
[Device] tab page that appears first when accessing the TopAccess website for users.
11
Service Phone Number
Enter the telephone number of the person who is responsible for servicing this equipment.
This is displayed in the [Device] tab page that appears first when accessing the TopAccess
website for users.
12
Administrative Message
Enter the message to the users about this equipment. This is displayed in the [Device] tab
page that appears first when accessing the TopAccess website for users.
[Setup] Item List
137
8 [Administration] Tab Page
Setting up Functions
Some items may not be changeable depending on the installed options and their settings.
1
2
3
4
5
6
7
8
9
10
11
12
13
14
15
Item name
1
Save as Local HDD
Description
Select whether to enable or disable the function to save on the local HDD.
2
e-Filing
Select whether to enable or disable the e-Filing function.
3
Email Send
Select whether to enable or disable the function to transmit E-mails.
4
Save as FTP
Select whether to enable or disable the function to save using FTP.
5
Save as FTPS
Select whether to enable or disable the function to save using FTPS.
6
Save to USB Media
Select whether to enable or disable the use of USB media.
7
Save as SMB
Select whether to enable or disable the function to save using SMB.
8
Save as Netware
Select whether to enable or disable the function to save using Netware.
9
iFax Send
Select whether to enable or disable the function to send Internet Faxes.
10
Fax Send
Select whether to enable or disable the function to send faxes.
11
Network iFax
Select whether to enable or disable the network iFax function.
12
Network Fax
Select whether to enable or disable the network fax function.
13
Web Services Scan
Select whether to enable or disable the web scanning service function.
14
Twain Scanning
Select whether to enable or disable the Twain scanning function.
15
Scan to External Controller
Select whether to enable or disable the function to scan to an external controller.
Long File Name Setting
The control panel of this equipment may not be able to fully display a file name when the name is long, for example, in
private print jobs due to its restriction. You can specify how to display file names in Long File Name Setting.
1
Item name
1
138
Long File Name Expression
(Display)
[Setup] Item List
Description
Select how to display file names.
y First Portion — The file name is displayed from the beginning and "..." is used to
indicate that part of the name is not displayed.
y Last Portion — The file name is displayed in the way where the end of the name can be
seen.
y First and Last Portions — The file name is displayed in the way where the beginning
and the end of the file name can be seen.
y Non-Abbreviation — The file name is displayed from the beginning up to the number of
displayable characters.
8 [Administration] Tab Page
8.[Administration] Tab Page
Setting up e-Filing Notification Events
You can set E-mail conditions for notifying you that the expiration date of data in e-Filing boxes is approaching.
1
Item name
1
Advance automatic delete
notification
Description
Select when an E-mail notifying you of the approaching of the expiration date of data in eFiling boxes is to be sent. You can select how many days before the expiration date from 0
(not notified) to 99 days.
Setting up Job Skip Control
1
Item name
1
Job Skip Control
Description
You can select whether to enable or disable the function to skip jobs which do not match the
printing conditions.
Setting up Restriction on Address Book Operation by Administrator
1
2
Item name
Description
1
No Restriction
All users can operate on the address book.
2
Can be operated by Administrator
only
Only users whose access policy is set as an administrator can operate on the address book.
Setting up Confidentiality Setting
You can set whether to hide or not document names displayed in jobs and logs using asterisks (*).
1
Item name
1
Document Name
Description
Select whether to hide or not the document name in jobs and logs using 10 asterisks (*).
y Enable — Select this to hide the document name.
y Disable — Select this to show the document name.
[Setup] Item List
139
8 [Administration] Tab Page
Setting up Energy Saver Mode
You can set Energy Saver mode for your equipment.
For information on types of Energy Saver mode and how to enter the mode, see the User’s Manual Setup Guide.
1
2
3
4
Item name
Description
1
Auto Clear
Select how long your equipment can remain inactive before the touch panel automatically
returns to the default display.
2
Auto Power Save
Select how long your equipment can remain inactive before entering Power Save mode.
3
Sleep Timer
Select how long your equipment can remain inactive before it automatically enters the Sleep
mode/the Super Sleep mode.
4
Sleep Mode
Select the Auto, Sleep, or Shut off mode after the specified [Sleep Timer] time.
The following network settings are required for this equipment to enter the Super Sleep mode.
Select [Disable] for [Enable IPv6] or select [Manual] for [Link Local Address] in the IPv6 setting.
P.147 “Setting up IPv6”
Select [Disable] for [Enable IPX/SPX] in the IPX/SPX setting.
P.148 “Setting up IPX/SPX”
Select [Disable] for [Enable Apple Talk] in the Apple Talk setting.
P.149 “Setting up AppleTalk”
Specify one of the following in [POP3 Network Service].
- [Disable] for [Enable POP3 Client].
- No entry for [POP3 Server Address].
- No entry for [Account Name].
- 0 for [Scan Rate].
P.161 “Setting up POP3 Network Service”
Disable IEEE 802.1X authentication.
For the IEEE 802.1X authentication method under the wired LAN environment, refer to the following chapter in the
User’s Manual Advanced Guide.
Chapter 2: "SETTING ITEMS (ADMIN) - IEEE 802.1X Authentication Setting"
See the following page for network access settings for your equipment in the Super Sleep mode.
P.170 “Setting up Wake Up Setting”
If the wireless LAN option is mounted to the device used, super sleep is not triggered regardless of the network settings.
Setting up Date & Time
You can set the date, time, time zone, and date format.
[Date & Time] settings are not available if the SNTP function is enabled.
1
2
3
Item name
140
Description
1
Year/Month/Date/Time
Select the year and month in designated boxes. Also, enter the date and time in designated
boxes.
2
Time Zone
Select the time zone where this equipment is located.
3
Date Format
Select the date format.
[Setup] Item List
8 [Administration] Tab Page
8.[Administration] Tab Page
Setting up SNTP Service
In SNTP Service, you can specify the SNTP server to refresh the time settings of this equipment using SNTP service.
1
2
3
4
5
6
Item name
1
Enable SNTP
Description
Select whether to enable or disable SNTP (Simple Network Time Protocol). When this is
enabled, the time settings of this equipment can be adjusted using the SNTP service.
[Date & Time] settings are not available if enabled.
2
Primary SNTP Address
Enter the IP address or FQDN (Fully Qualified Domain Name) of the Primary SNTP Server
Address when [Enable SNTP] is enabled.
3
Secondary SNTP Address
Enter the IP address or FQDN (Fully Qualified Domain Name) of the Secondary SNTP
Server Address when [Enable SNTP] is enabled as required.
When the [Obtain a SNTP Server Address automatically] option is enabled in the TCP/IP settings, the SNTP server address
can be obtained using the DHCP server.
P.143 “Setting up TCP/IP”
4
Scan Rate
Enter how often this equipment should access the SNTP server to check the time.
5
Port Number
Enter the port number for the SNTP service. Generally "123" is used.
6
NTP Authentication
Select whether to enable or disable NTP authentication.
Setting up Daylight Savings Time Setting
Make the required settings for daylight savings time.
1
2
3
Item name
Description
1
Daylight Savings Time
Select [Enable] to shift the clock to the daylight savings time. [Disable] is set as the default.
2
Offset
Select the desired offset (time difference) from the local standard time. You can select from
between -2 and +2 hours, excluding 0 hour, in 30-minute increments. [+1:00] is set as the
default.
3
Dates
Select the applicable period for the daylight savings time.
y Start — Select or enter the start date and time of daylight savings time.
y End — Select or enter the end date and time of daylight savings time.
y If you change the settings during the daylight saving time period, the changes will be reflected to the equipment's
clock. If you disable the settings during the applicable period, the equipment's clock will shift to the standard time.
y If the equipment is turned off at the start or end date and time, the equipment will shift the clock the next time it is
turned on.
y After the clock shifts, the daylight saving time will also apply to the weekly timers.
[Setup] Item List
141
8 [Administration] Tab Page
y Select the Start and the End dates and times based on the time set for the equipment.
P.140 “Setting up Date & Time”
y If the same month is specified for the Start and the End dates, the equipment does not shift the clock automatically.
Setting up WEB General Setting
You can set the session timer for TopAccess.
1
Item name
1
Session Timer
Description
Enter how long you want this equipment to preserve the session data of TopAccess. You
can enter any integer between 5 to 999. This setting also applies to the session data of the
e-Filing web utility. "10" is set as the default.
When logged in the access policy mode, you will be automatically logged out if the session timer elapses without any
operation being performed.
142
[Setup] Item List
8 [Administration] Tab Page
8.[Administration] Tab Page
Network settings
You can configure the network settings such as TCP/IP, Filtering, IPX/SPX, AppleTalk, Bonjour, LDAP Session, DNS
Session, DDNS Session, SMB Session, NetWare Session, HTTP Network Service, SMTP Client, SMTP Server, POP3
Network Service, SNTP Service, FTP Client, FTP Server, SNMP Network Service, and Security Service.
The [Network] submenu can be accessed from the [Setup] menu on the [Administration] tab.
See the following pages for how to access it and information on the [Setup] menu:
P.22 “Access Policy Mode”
P.136 “[Setup] Item List”
P.143 “Setting up TCP/IP”
P.158 “Setting up SMTP Client”
P.145 “Setting up Filtering”
P.160 “Setting up SMTP Server”
P.147 “Setting up IPv6”
P.161 “Setting up POP3 Network Service”
P.148 “Setting up IPX/SPX”
P.162 “Setting up FTP Client”
P.149 “Setting up AppleTalk”
P.163 “Setting up FTP Server”
P.149 “Setting up Bonjour”
P.164 “Setting up SLP Session”
P.150 “Setting up LDAP Session”
P.165 “Setting up SNMP Network Service”
P.151 “Setting up DNS Session”
P.168 “Setting up Web Services Setting”
P.152 “Setting up DDNS Session”
P.169 “Setting up LLTD Session”
P.154 “Setting up SMB Session”
P.170 “Setting up Wake Up Setting”
P.156 “Setting up NetWare Session”
P.172 “Setting up IP Security”
P.157 “Setting up HTTP Network Service”
Setting up TCP/IP
You can set the TCP/IP protocol to enable communication over TCP/IP. The TCP/IP must be configured to enable
TopAccess, SMB printing, Raw TCP or LPR printing, IPP printing, Scan to Email, and Internet Fax.
1
2
3
4
5
6
7
8
9
10
11
12
13
Item name
1
Ethernet Speed Duplex Mode
Description
Select the ethernet speed. [AUTO (-100MB)] or [AUTO] is set as the default.
y When you select a specific ethernet speed, you must select the same one as set in the connected network. If you do not
know the ethernet speed that must be used, select [AUTO (-100MB)] or [AUTO].
y If the network is not stable, power OFF the equipment then ON.
2
Host Name
Enter the host name of your equipment. You can enter up to 63 alphanumerical characters
including “-” (hyphens).
You cannot use a "-" (hyphen) as the first and last character. The MFP name is set as the
default.
[Setup] Item List
143
8 [Administration] Tab Page
Item name
Description
3
Address Mode
Select how to set the IP address.
y Static IP — Select this to assign the static IP address manually. When this is selected,
enter the static IP address in the [IP Address] box.
y Dynamic — Select this to assign the IP address using the DHCP with Auto-IP
addressing enabled. The IP address, subnet mask, gateway address, primary WINS
server address, secondary WINS server address, POP3 server address, and SMTP
server address can be automatically acquired from the DHCP server if the network
supports DHCP. However, if the network does not support DHCP, use the AutoIP
function to assign an IP address.
y No AutoIP — Select this to assign the IP address using the DHCP with Auto-IP
addressing disabled. The IP address, subnet mask, gateway address, primary WINS
server address, secondary WINS server address, POP3 server address, and SMTP
server address can be automatically acquired from the DHCP server if the network
supports DHCP. If the communication with the DHCP cannot be established, the
previous IP address is used.
4
Obtain a Domain Name
automatically
Select [Enable] when you want to obtain a domain name automatically using the DHCP
server. This setting will apply only when [No AutoIP] or [Dynamic] is selected in the Address
Mode option. [Enable] is set as the default.
When the DHCP server does not have a domain name, the data are left blank in the domain name even if you set the correct
domain name manually in the DDNS Session. In that case, select [Disable] here and set the correct domain name in the
DDNS Session.
P.152 “Setting up DDNS Session”
5
Obtain a Domain Server Address
automatically
Select [Enable] when you want to obtain a domain server address automatically using the
DHCP server. This setting will apply only when [No AutoIP] or [Dynamic] is selected in the
Address Mode option. [Enable] is set as the default.
When the DHCP server does not have a primary and secondary DNS server addresses, the data are left blank in the primary
and secondary DNS server addresses, even if you set the correct primary and secondary DNS server addresses manually in
the DNS Session. In that case, select [Disable] here and set the correct primary and secondary DNS server address in the
DNS Session.
P.151 “Setting up DNS Session”
6
Obtain a WINS Server Address
automatically
Select [Enable] when you want to obtain a primary or secondary WINS server address
automatically using the DHCP server. This setting will apply only when [No AutoIP] or
[Dynamic] is selected in the Address Mode option. [Enable] is set as the default.
When the DHCP server does not have a primary and secondary WINS server addresses, the data are left blank in the primary
and secondary WINS server addresses, even if you set the correct primary and secondary WINS server addresses manually
in the SMB Session. In that case, select [Disable] here and set the correct primary and secondary WINS server address in the
SMB Session.
P.154 “Setting up SMB Session”
7
Obtain a SMTP Server Address
automatically
Select [Enable] when you want to obtain a SMTP server address automatically using the
DHCP server. This setting will apply only when [No AutoIP] or [Dynamic] is selected in the
Address Mode option. [Disable] is set as the default.
When the DHCP server does not have a SMTP server address, the data are left blank in the SMTP server address even if you
set the correct SMTP server address manually in the SMTP Client. In that case, select [Disable] here and set the correct
SMTP server address in the SMTP Client.
P.158 “Setting up SMTP Client”
8
Obtain a POP3 Server Address
automatically
Select [Enable] when you want to obtain a POP3 server address automatically using the
DHCP server. This setting will apply only when [No AutoIP] or [Dynamic] is selected in the
Address Mode option. [Disable] is set as the default.
When the DHCP server does not have a POP3 server address, the data are left blank in the POP3 server address even if you
set the correct POP3 server address manually in the POP3 Network Service. In that case, select [Disable] here and set the
correct POP3 server address in the POP3 Network Service.
P.161 “Setting up POP3 Network Service”
144
[Setup] Item List
8 [Administration] Tab Page
8.[Administration] Tab Page
Item name
9
Obtain a SNTP Server Address
automatically
Description
Select [Enable] when you want to obtain a SNTP server address automatically using the
DHCP server. This setting will apply only when [No AutoIP] or [Dynamic] is selected in the
Address Mode option. [Disable] is set as the default.
When the DHCP server does not have a SNTP server address, the data are left blank in the SNTP server address even if you
set the correct SNTP server address manually in the SNTP Network Service. In that case, select [Disable] here and set the
correct SNTP server address in the SNTP Network Service.
P.141 “Setting up SNTP Service”
10
IP Conflict Detect
Specify whether or not to detect IP address conflicts. Select [Enable] to display a message
on the control panel when an IP address conflict is detected. [Enable] is set as the default.
11
IP Address
Enter the static IP address for your equipment when [Static IP] is selected in the [Address
Mode] box. Specify within the range from 0 0 0 0 to 255 255 255 255.
However, you cannot set 0.0.0.0 and 255.255.255.255.
12
Subnet Mask
Enter the subnet mask if required when [Static IP] is selected in the [Address Mode] box.
Specify within the range from 0 0 0 0 to 255 255 255 255.
However, you cannot set 0.0.0.0 and 255.255.255.255.
13
Default Gateway
Enter the gateway address if required when [Static IP] is selected in the [Address Mode]
box. Specify within the range from 0 0 0 0 to 255 255 255 255.
However, you cannot set 0.0.0.0 and 255.255.255.255.
Setting up Filtering
You can set filtering in order to restrict access from client computers to this equipment. Filtering can be specified with an IP
address or a MAC address.
MAC address filtering is given priority over IP address filtering.
1
2
3
4
5
6
[Setup] Item List
145
8 [Administration] Tab Page
Item name
1
Enable IP Filtering
Description
Select [Enable] for IP address filtering. When [Enable] is selected, access from devices on a
network to which the IP address (specified in [IP Filtering]) is set is restricted under
conditions set in [IP Filtering Rule]. [Disable] is set as the default.
IP filtering is valid only in a network environment implemented with IPv4. It is not available in an IPv6 network environment. If
you need to use IP address filtering under IPv6 environment, select MAC address filtering.
2
IP Filtering Rule
Select IP address filtering rules.
y Permit — Select this to permit access from devices on a network to which the IP
address (specified in [IP Filtering]) is set.
y Deny — Select this to deny access from devices to which the specified IP address is
set.
3
IP Filtering
Enter the starting IP address and the ending IP address of a target client computer for IP
filtering. Up to 10 addresses can be specified.
Only IPv4 addresses are available. An IPv6 address cannot be specified.
146
4
Enable MAC Address Filtering
Select [Enable] for MAC address filtering. When [Enable] is selected, access from devices
on a network to which the MAC address (specified in [MAC Address Filtering]) is set is
restricted under conditions set in [MAC Address Filtering Rule]. [Disable] is set as the
default.
5
MAC Address Filtering Rule
Select MAC address filtering rules.
y Permit — Select this to permit access from devices on a network to which the MAC
address (specified in [MAC Address Filtering]) is set.
y Deny — Select this to deny access from devices to which the specified MAC address is
set.
6
MAC Address Filtering
Enter the MAC address of a target client computer for MAC address filtering. Up to 10
addresses can be specified.
[Setup] Item List
8 [Administration] Tab Page
8.[Administration] Tab Page
Setting up IPv6
You can set the IPv6 protocol to enable the communication over IPv6.
1
2
3
4
5
6
Item name
Description
1
Enable IPv6
Select whether the IPv6 protocol is enabled or disabled. [Disable] is set as the default.
2
LLMNR
If IPv6 is enabled, select whether LLMNR is enabled or disabled. [Disable] is set as the
default.
3
Link Local Address
The automatically generated unique IP Address used for the IPv6 is displayed.
4
Manual
You assign the IPv6 address, prefix and default gateway manually. In this mode, you can
assign one IPv6 address to this equipment.
IP Address — Assign the IPv6 address for this equipment. Specify within the range from
1:1:1:1:1:1:1:1 to ffff:ffff:ffff:ffff:ffff:ffff:ffff:ffff.
Prefix Length — Assign the prefix length for the IPv6 address. Specify within the range
from 0 to 128. “0” is set as the default.
Gateway — Assign the default gateway address. Specify within the range from
1:1:1:1:1:1:1:1 to ffff:ffff:ffff:ffff:ffff:ffff:ffff:ffff.
Use DHCPv6 Server for options — Select this check box to use the optional information
(IPv6 address for the DNS server, etc.) which is issued from the DHCPv6 server.
y When [Manual] is selected, a stateful address cannot be set.
y If the selected IPv6 address is already assigned, DAD (Duplicate Address Detection) detects it and notifies you on the
touch panel of this equipment.
[Setup] Item List
147
8 [Administration] Tab Page
Item name
5
Use Stateless Address
Description
Use the IPv6 addresses (Stateless addresses) issued from routers.
y Use DHCPv6 Server for IP Address(M flag) — Use the IPv6 address issued from the
DHCPv6 server in the stateless network environment.
y Use DHCPv6 Server for options(O flag) — Use the optional information (IPv6 address
for the DNS server, etc.) issued from the DHCPv6 server in the stateless network
environment.
y FQDN Option — The FQDN option is available if Use DHCPv6 Server for IP Address
is selected. Select [Server] or [Client] for [Update Method] if using the FQDN option.
[Server] is set as the default.
y IP Address — Stateless Addresses obtained from routers are displayed. Up to 7 IPv6
addresses can be retained.
When this equipment receives a router advertisement (RA) from a router, of which M flag configuration is "0", the DHCPv6
function is disabled. If you change a router advertisement (RA) M flag configuration from "0" to "1", it is necessary to reboot
this equipment to enable the DHCPv6 function.
6
Use Stateful Address
Use the Stateful address issued from DHCPv6 server.
y Use DHCPv6 Server for IP Address — Select whether or not the IPv6 address which
is issued from the DHCPv6 server is used for this equipment.
y Use DHCPv6 Server for options — Select whether or not the optional information
(IPv6 address for the DNS server, etc.) except the IPv6 address for this equipment,
which is issued from the DHCPv6 server is used on this equipment.
y FQDN Option — The FQDN option is available if Use DHCPv6 Server for IP Address
is selected. Select [Server] or [Client] for [Update Method] if using the FQDN option.
[Server] is set as the default.
y IP Address — A stateful address, Prefix Length and Gateway obtained from DHCPv6
Server are displayed.
Setting up IPX/SPX
You can set the IPX/SPX protocol to enable the communication over IPX/SPX. The IPX/SPX must be configured to enable
Novell printing with NetWare server 5.1, 6.0, 6.5 over IPX/SPX.
1
2
3
Item name
148
Description
1
Enable IPX/SPX
Select whether the IPX/SPX protocol is enabled or disabled. Enable this when configuring
Novell printing over the IPX/SPX network.
[Disable] is set as the default.
2
Frame Type
Select the desired frame type for IPX/SPX.
y Auto Sense — Select this to use an appropriate frame type that the equipment found
first.
y IEEE 802.3/Ethernet II/IEEE 802.3 Snap/IEEE 802.2 — Instead of [Auto Sense], select
the frame types to be used from these options.
3
Actual Frame
Displays the actual frame type of the equipment.
[Setup] Item List
8 [Administration] Tab Page
8.[Administration] Tab Page
Setting up AppleTalk
You can set the protocol to enable communication over AppleTalk. AppleTalk must be configured to enable AppleTalk
printing from Macintosh computers.
1
2
3
Item name
Description
1
Enable Apple Talk
Select whether the AppleTalk protocol is enabled or disabled. Enable this when configuring
AppleTalk printing. [Disable] is set as the default.
2
Device Name
Enter the device name of the equipment that will be displayed in the AppleTalk network. You
can enter up to 32 alphanumerical characters and symbols other than =, ; (semicolon), #,
and \ (backslash).
3
Desired Zone
Enter the zone name where the equipment will connect — if required. You can enter up to 32
alphanumerical characters and symbols other than =, ; (semicolon), #, and \ (backslash).
The equipment will connect to the default zone if you enter "*".
Setting up Bonjour
In Bonjour, you can enable or disable the Bonjour networking that is available for Mac OS X.
1
2
3
Item name
Description
1
Enable Bonjour
Select whether Bonjour is enabled or disabled. [Enable] is set as the default.
2
Link-Local Host Name
Enter the DNS host name of this equipment. You can enter up to 127 alphanumerical
characters and symbols other than =, ; (semicolon), #, and \ (backslash).
3
Service Name
Enter the device name of this equipment that will be displayed in the Bonjour network. You
can enter up to 63 alphanumerical characters and symbols other than =, ; (semicolon), #,
and \ (backslash).
[Setup] Item List
149
8 [Administration] Tab Page
Setting up LDAP Session
In LDAP Session, you can enable or disable the LDAP directory service.
1
2
3
4
Item name
150
Description
1
Enable LDAP
Select whether the LDAP directory service is enabled or disabled. [Enable] is set as the
default.
2
Attribute 1
Enter the name of the schema corresponding to the LDAP server configuration. You can
enter up to 22 alphanumerical characters and symbols other than =, ; (semicolon), #, and \
(backslash).
3
Attribute 2
Enter the name of the schema corresponding to the LDAP server configuration. You can
enter up to 22 alphanumerical characters and symbols other than =, ; (semicolon), #, and \
(backslash).
4
Search Method
Select search conditions for LDAP searching.
y Partial match — Select this to search information partially matching the search
conditions.
y Prefix match — Select this to search information that starts with contents matching the
search conditions.
y Suffix match — Select this to search information that ends with contents matching the
search conditions.
y Full match — Select this to search information fully matching the search conditions.
[Setup] Item List
8 [Administration] Tab Page
8.[Administration] Tab Page
Setting up DNS Session
In DNS Session, you can specify the DNS server to enable the FQDN (Fully Qualified Domain Name) rather than the IP
address on specifying each server address such as SMTP server, POP3 server, and LDAP server.
When the DNS service is enabled and the DNS server supports the dynamic DNS service, Set the DDNS Session as
well.
P.152 “Setting up DDNS Session”
1
2
3
4
5
Item name
Description
1
Enable DNS
Select whether the DNS server is enabled or not. [Enable] is set as the default.
2
Primary DNS Server Address
Specify the IP address of the primary DNS server when the DNS service is enabled. Specify
within the range from 0 0 0 0 to 255 255 255 255.
3
Secondary DNS Server Address
Specify the IP address of the secondary DNS server when the DNS service is enabled, as
you require. Specify within the range from 0 0 0 0 to 255 255 255 255.
4
Primary DNS Server Address(IPv6)
Specify the IP address of the primary DNS server when the DNS service is enabled in IPv6.
Specify within the range from 1:1:1:1:1:1:1:1 to ffff:ffff:ffff:ffff:ffff:ffff:ffff:ffff.
5
Secondary DNS Server
Address(IPv6)
Specify the IP address of the secondary DNS server when the DNS service is enabled in
IPv6, as required. Specify within the range from 1:1:1:1:1:1:1:1 to ffff:ffff:ffff:ffff:ffff:ffff:ffff:ffff.
When the [Obtain a Domain Server Address automatically] option is enabled in the TCP/IP settings, the server address
of the primary and secondary DNS server addresses can be obtained using the DHCP server.
P.143 “Setting up TCP/IP”
[Setup] Item List
151
8 [Administration] Tab Page
Setting up DDNS Session
In DDNS Session, you can enable the Dynamic DNS service if the DNS server supports the dynamic DNS.
y When using the security in DDNS, if the difference between the time set in the server, in which Windows DNS
record is to be updated, and the one set in the equipment exceeds the time stated in the account policy of the
server, the DNS update using the security will fail. Check the time set for the DNS server and match it with the one
set for the equipment.
When using DDNS and the IP address is assigned using DHCP, enable "006 DNS Servers" and "015 DNS Domain
Name" in the DHCP Server's Scope Options or Server Options.
y When using DDNS, make sure the "Dynamic updates" option is set to "Nonsecure and secure" (for Windows
Server 2003/Windows Server 2008) for the Forward Lookup Zones and Reversed Lookup Zones.
If the setting of Windows Server 2003/Windows Server 2008 is other than "Nonsecure and secure" for this DDNS
function, you need to set the correct primary login name and primary password to update the DNS server by
DDNS.
If you do not want to use DDNS such as managed by a primary and secondary login name and password, you
need to add the equipment's host name manually in the Forward and Reversed Lookup Zone.
Forward Lookup Zones
Reversed Lookup Zones
(Windows 2008 Server)
(Windows 2008 Server)
152
[Setup] Item List
8 [Administration] Tab Page
8.[Administration] Tab Page
1
2
3
4
5
6
7
8
9
Item name
Description
1
Enable DDNS
Select whether the dynamic DNS service is enabled or disabled. [Enable] is set as the
default.
2
Domain Name
Enter the domain name that will be added to the DNS server using DDNS. You can enter up
to 96 alphanumerical characters and symbols other than =, ; (semicolon), #, and \
(backslash).
When the [Obtain a Domain Name automatically] option is enabled in the TCP/IP settings, the domain name can be obtained
using the DHCP server.
P.143 “Setting up TCP/IP”
3
Security Method
Enter the security method.
y None
Select this to perform a non-secure DDNS update.
y GSS-TSIG
Select this to perform a secure DDNS session using GSS-TSIG. You must set a log-in
name and a password. If both are not set, the secure DDNS session will not be
available.
y TSIG
Select this to perform a secure DDNS session using TSIG. To select this, you must
upload a key file and a private key file. If any of them is not uploaded, the security
setting will be disabled.
y SIG(0)
Select this to perform a secure DDNS session using SIG(0). To select this, you must
upload a key file and a private key file. If any of them is not uploaded, the security
setting will be disabled.
4
Primary Login Name
Enter the primary login name if the security method selected in the above setting is GSSTSIG. You can enter up to 128 alphanumerical characters and symbols other than =, ;
(semicolon), #, and \ (backslash).
5
Primary Password
Enter the primary password if the security method selected in the above setting is GSSTSIG. You can enter up to 128 alphanumerical characters and symbols other than =, ;
(semicolon), #, and \ (backslash).
6
Secondary Login Name
Enter the secondary login name if the security method selected in the above setting is GSSTSIG. You can enter up to 128 alphanumerical characters and symbols other than =, ;
(semicolon), #, and \ (backslash).
7
Secondary Password
Enter the secondary password if the security method selected in the above setting is GSSTSIG. You can enter up to 128 alphanumerical characters and symbols other than =, ;
(semicolon), #, and \ (backslash).
8
TSIG/SIG(0) Key file
Use this setting to upload or delete a key file to be used for TSIG and SIG(0).
To upload it, click [Browse..] and specify a private key file to be uploaded, and then click
[Upload].
To delete it, click [Delete].
[Setup] Item List
153
8 [Administration] Tab Page
Item name
9
TSIG/SIG(0) Private Key file
Description
Use this setting to upload or delete a private key file to be used for TSIG and SIG(0).
To upload it, click [Browse..] and specify a private key file to be uploaded, and then click
[Upload].
To delete it, click [Delete].
Setting up SMB Session
In SMB Session, you can specify the SMB network properties to access this equipment through a Microsoft Windows
Network and enable SMB printing. When you enable the SMB, users can also browse the local folder in the equipment.
You can also specify the WINS server when the WINS server is used to enable the Windows print sharing and Windows
file sharing services between the different subnets.
1
2
3
4
5
6
7
8
9
10
11
12
Item name
Description
1
SMB Server Protocol
Select whether the SMB protocol is enabled or disabled.
y Enable — Select this to enable SMB.
y Disable — Select this to disable SMB.
2
Restriction
Specify restrictions on SMB.
y None — Select this to not specify restrictions on SMB.
y Print Share — Select this to enable the file sharing service using SMB, but disable SMB
printing.
y File Share — Select this to enable SMB printing, but disable the file sharing service
using SMB.
3
NetBIOS Name
Enter the NetBIOS name of this equipment. The equipment uses "MFP<NIC Serial
Number>" as the default NetBIOS name.
You can enter only alphanumerical characters and "-" (a hyphen) for NetBIOS names. If you use any other characters, a
warning message will be displayed.
4
Logon
Enter the workgroup or domain that this equipment joins.
y Workgroup — To include the equipment in the workgroup, enter the workgroup name.
All client computers can access this equipment without a user name and password.
y Domain — Select this and enter the domain name when the equipment will log on in the
domain. Any client computers which are not members of the domain will need a valid
user name and password to access this equipment. Use this to enhance access security
to this equipment.
For workgroup and domain names, you can use only alphanumerical characters and symbols other than the following:
;:"<>+=\|?,*#
If you use any other characters, a warning message will be displayed.
154
[Setup] Item List
8 [Administration] Tab Page
8.[Administration] Tab Page
Item name
Description
5
Primary Domain Controller
Specify the server name or IP address of the primary domain controller when this equipment
will log on the domain network. You can enter up to 128 alphanumerical characters and
symbols other than =, ; (semicolon), #, and \ (backslash).
6
Backup Domain Controller
Specify the server name or IP address of the backup domain controller when this equipment
will log on the domain network, if required. If the Primary Domain Controller is unavailable,
the Backup Domain Controller will be used to log on. You can enter up to 128
alphanumerical characters and symbols other than =, ; (semicolon), #, and \ (backslash).
If the wrong primary or backup domain controller is specified, the NETWORK INITIALIZING message will be displayed for up
to 4 minutes while the equipment searches for the primary or backup domain controller. In that case, correct the primary or
backup domain controller setting after the NETWORK INITIALIZING message disappears.
7
Logon User Name
Enter a valid user name to log on to the specified domain. You can enter up to 128
alphanumerical characters and symbols other than =, ; (semicolon), and #.
8
Password
Enter the password for the specified log on user name to log on the domain network. You
can enter up to 128 alphanumerical characters and symbols other than =, ; (semicolon), #,
and \ (backslash).
9
Primary WINS Server
Specify the IP address of the primary WINS server when the WINS server is used to provide
the NetBIOS name in your local area network. This option would be more useful to access
this equipment using the NetBIOS Name from a different subnet.
When the [Obtain a WINS Server Address automatically] option is enabled in the TCP/IP settings, the primary and secondary
WINS server address can be obtained using the DHCP server.
P.143 “Setting up TCP/IP”
10
Secondary WINS Server
Specify the IP address of the secondary WINS server as you require when the WINS server
is used to provide NetBIOS name in your local area network. If the Primary WINS Server is
unavailable, the Secondary WINS Server will be used.
When the [Obtain a WINS Server Address automatically] option is enabled in the TCP/IP settings, the primary and secondary
WINS server address can be obtained using the DHCP server.
P.143 “Setting up TCP/IP”
If "0.0.0.0" is entered for the Primary WINS Server and Secondary WINS Server, this equipment will not use the WINS server.
11
SMB Signing of SMB Server
Select whether SMB Signing is enabled or disabled when a client accesses this equipment
using SMB, such as when a client accesses the shared folder in this equipment.
y If client agrees,digital signature is done for the communication. — Select this to
use the digital signature to secure communication only when a client accesses this
equipment with a digital signature. Even if a client accesses this equipment without a
digital signature, the communication is allowed without the digital signature.
y Digital signature is always done for the communication on the server side. —
Select this to allow the communication only when a client accesses this equipment with
a digital signature. When a client accesses this equipment without a digital signature,
the communication is not allowed.
y Digital signature isn't done for the communication for the server. — Select this to
allow the communication only when a client accesses this equipment without a digital
signature. When a client is set to always access an SMB server with a digital signature,
the communication is not allowed.
If you do not know whether the SMB Signing of SMB Client is enabled or disabled in the client computers, it is recommended
to select [If client agrees,digital signature is done for the communication.]. If this is set incorrectly, the SMB communication
may become unavailable.
[Setup] Item List
155
8 [Administration] Tab Page
Item name
12
SMB Signing of SMB Client
Description
Select whether SMB Signing is enabled or disabled when this equipment accesses the
clients using SMB, such as when this equipment stores the scanned data in the network
folder using SMB.
y If server agrees, digital signature is done for the communication. — Select this to
use the digital signature to secure the communication to an SMB server only when the
SMB Signing of SMB Server that this equipment accesses is enabled. If the SMB
Signing of SMB Server is disabled in an SMB server, the communication is performed
without the digital signature.
y Digital signature is always done for the communication on the client side. —
Select this to make this equipment always access an SMB server with a digital
signature. When the SMB Signing of SMB Server is disabled in an SMB server, the
communication is not allowed.
y Digital signature isn't done for the communication for the client. — Select this to
communicate to an SMB server without the digital signature. If the SMB Signing of SMB
Server is always enabled in an SMB server, the communication is not allowed.
y If you do not know whether the SMB Signing of SMB Server is enabled or disabled in the SMB servers, it is recommended
to select [If server agrees, digital signature is done for the communication.]. If this is set incorrectly, the SMB
communication may become unavailable.
y The digital signature is always done for the communication on the server side as the default on Windows Server 2003/
Windows Server 2008. Therefore specify "If server agrees, digital signature is done for the communication." or "Digital
signature is always done for the communication on the client side." for SMB communications with a Windows Server
2003/Windows Server 2008.
Setting up NetWare Session
In NetWare Session, you can set the NetWare Bindery or NDS service. This must be set when configuring a Novell
printing environment.
1
2
3
4
5
6
Item name
156
Description
1
Enable NetWare
Select whether NetWare is enabled or disabled.
y Enable — Enables NetWare.
y Disable — Disables NetWare.
2
Enable Bindery
Select whether the NetWare Bindery mode for Novell printing is enabled or disabled. When
you configure a Novell printing environment with the NetWare server in the bindery mode,
you must enable this.
3
Enable NDS
Select whether the NetWare NDS mode for Novell printing is enabled or disabled. When you
configure a Novell printing environment with the NetWare server in NDS mode, you must
enable this. When this is enabled, you should also specify the context and tree for the NDS.
4
Context
Enter the NDS context where the NetWare print server for this equipment is located.
5
Tree
Enter the NDS tree.
6
Preferred File Server
Enter the NetWare server name in which this equipment preferentially searches for the
queues.
[Setup] Item List
8 [Administration] Tab Page
8.[Administration] Tab Page
Setting up HTTP Network Service
In HTTP Network Service, you can enable or disable Web-based services such as TopAccess and e-Filing web utility.
1
2
3
4
5
Item name
Description
1
Enable HTTP Server
Select whether the Web-based services such as TopAccess and e-Filing web utility are
enabled or disabled. [Enable] is set as the default.
2
Enable SSL
Select whether the SSL (Secure Socket Layer) is enabled or disabled. When this is enabled,
the data transferred between the equipment and client computers will be encrypted using a
private key when operating TopAccess and e-Filing web utility. [Disable] is set as the default.
3
Primary Port Number
Enter the port number for the NIC HTTP server. You can enter a value in the range from 1 to
65535. Generally the default value "80" is used.
4
Secondary Port Number
Enter the port number for TopAccess and the e-Filing web utility. You can enter a value in
the range from 1 to 65535. Generally the default value "8080" is used.
Not all operating systems support SSL for all protocols.
If you specify a duplicate port number with one of the other network settings to the secondary port number while SSL on HTTP
is disabled, you will not be able to access TopAccess and the e-Filing web utility. If you make a mistake, use the control panel
of the equipment to change the HTTP setting and enter the correct port number.
5
SSL Port Number
Enter the port number for the SSL. You can enter a value in the range from 1 to 65535.
Generally the default value "10443" is used.
If you specify a duplicate port number with one of the other network settings to the SSL port number in HTTP settings while
SSL on HTTP is enabled, you will not be able to access TopAccess and the e-Filing web utility. If you make a mistake, use the
control panel of the equipment to change the HTTP setting and enter the correct port number.
[Setup] Item List
157
8 [Administration] Tab Page
Setting up SMTP Client
In SMTP Client, you can enable or disable SMTP transmission for sending the Internet Fax and E-mails.
A From Address setting is also required to send Internet Fax and E-mails. For information about the From Address
setting, see the following sections:
P.231 “Setting up E-mail settings”
P.233 “Setting up InternetFax settings”
The From Address can be also determined automatically when the User Management Setting is enabled. For more
information about User Management Setting, see the following section:
P.135 “[Administration] Tab Page”
1
2
3
4
5
6
7
8
9
10
11
Item name
Description
1
Enable SMTP Client
When this is enabled, this equipment sends an Internet Fax and an E-mail to the specified
SMTP server for transmission over the Internet. [Enable] is set as the default.
2
Enable SSL
Select whether the SSL (Secure Sockets Layer) is enabled or disabled for SMTP
transmission.
y Disable — Select this to disable the SSL for SMTP transmission.
y Verify with imported CA certification(s) — Select this to enable the SSL using the
imported CA certificate.
y Accept all certificates without CA — Select this to enable the SSL without using
imported CA certificate.
y When [Verify with imported CA certification(s)] is selected, you must import the CA certificate in this equipment.
P.263 “[Security] How to Set and How to Operate”
y Not all operating systems support SSL for all protocols.
3
SSL/TLS
Select the protocol for the SSL when the [Enable SSL] option is enabled.
y STARTTLS — Select this to send a message in TLS (Transport Layer Security) using
STARTTLS that is the extension command for SMTP transmission.
y Over SSL — Select this to send a message in SSL (Secure Socket Layer).
When you select [Over SSL], make sure to change the port number correctly. Generally, "465" port is used for the Over SSL
instead of "25" port.
4
SMTP Server Address
Enter the IP address or FQDN (Fully Qualified Domain Name) of the SMTP server when
[Enable SMTP Client] is enabled. You can enter up to 128 alphanumerical characters and
symbols other than =, ; (semicolon), #, and \ (backslash).
If you use FQDN to specify the SMTP server, you must configure the DNS server and enable the DNS in the DNS Session.
When the [Obtain a SMTP Server Address automatically] option is enabled in the TCP/IP settings, the SMTP server address
can be obtained using the DHCP server.
P.143 “Setting up TCP/IP”
158
[Setup] Item List
8 [Administration] Tab Page
8.[Administration] Tab Page
Item name
Description
5
POP Before SMTP
Select whether the POP Before SMTP authentication is enabled or disabled. [Disable] is set
as the default.
6
Authentication
Select the type of authentication to access the SMTP server.
y Disable — Select this to access the SMTP server using no authentication.
y Plain — Select this to access the SMTP server using plain authentication.
y Login — Select this to access the SMTP server using the log-in authentication.
y CRAM-MD5 — Select this to access the SMTP server using CRAM-MD5
authentication.
y Digest-MD5 — Select this to access the SMTP server using Digest-MD5 authentication.
y Kerberos — Select this to access the SMTP server using Kerberos authentication.
y NTLM(IWA) — Select this to access the SMTP server using NTLM (IWA) authentication.
y AUTO — Select this to access the SMTP server using the appropriate authentication
that this equipment detects.
7
Login Name
Enter the log-in name to access the SMTP server if the SMTP authentication is enabled.
You can enter up to 64 alphanumerical characters and symbols other than =, ; (semicolon),
#, and \ (backslash).
8
Password
Enter the password to access the SMTP server if the SMTP authentication is enabled. You
can enter up to 64 alphanumerical characters and symbols other than =, ; (semicolon), #,
and \ (backslash).
9
Maximum Email / InternetFax Size
Select the maximum size that this equipment is allowed to send using the SMTP. Specify
within the range from 2 to 100 MB.
10
Port Number
Enter the port number for accessing the SMTP server when [Enable SMTP Client] is
enabled. The port number depends on the port setting in the SMTP server. You can enter a
value in the range from 1 to 65535. Generally the default value "25" is used.
When the same port number as the secondary one in the HTTP setting (SSL port number when SSL in the HTTP setting is
enabled) is selected, you cannot access TopAccess or the e-Filing web utility. If you set it by mistake, use the control panel of
the equipment to change the HTTP setting and enter the correct port number.
11
SMTP Client Connection
Timeout(1-180)
Enter a timeout period for quitting communication when no response is received from the
SMTP server. Specify within the range from 1 to 180 seconds. “30” is set as the default.
[Setup] Item List
159
8 [Administration] Tab Page
Setting up SMTP Server
In SMTP Server, you can enable or disable SMTP transmission for receiving the Internet Fax and E-mails. This function is
usually set when you want to enable the Offramp Gateway feature.
1
2
3
4
5
6
Item name
Description
1
Enable SMTP Server
Select whether this equipment works as an SMTP server or not. This must be enabled when
you use the Offramp Gateway feature. When this is enabled, this equipment can receive
Internet Faxes or E-mails that are forwarded through the SMTP to the domain of this
equipment. [Enable] is set as the default.
2
Port Number
Enter the port number to transmit an Internet Faxes or E-mails. Generally "25" is used.
When the same port number as the secondary one in the HTTP setting (SSL port number when SSL in the HTTP setting is
enabled) is selected, you cannot access TopAccess or the e-Filing web utility. If you make a mistake, use the control panel of
the equipment to change the HTTP setting and enter the correct port number.
160
3
Email Address
Enter the E-mail address of this equipment. When this equipment works as an SMTP server,
it can receive all Internet Faxes and E-mails that contain its domain name. If the E-mail
address of the received document matches the address you set here, this equipment prints
it. You can enter up to 70 alphanumerical characters and symbols other than =, ;
(semicolon), #, and \ (backslash).
4
Enable OffRamp Gateway
Select whether the OffRamp Gateway transmission is enabled or disabled. [Disable] is set
as the default.
5
OffRamp Security
Select whether the Offramp Security is enabled or disabled. When this is enabled, this
equipment cancels the offramp gateway transmissions that are forwarding to the fax
numbers not registered in the Address Book of this equipment. This can prevent the
unauthorized offramp gateway transmission. [Enable] is set as the default.
6
OffRamp Print
Select whether this equipment should print documents sent using the offramp gateway
transmission. When this is enabled, this equipment automatically prints documents sent
using offramp gateway transmission, so that they can be confirmed. [Enable] is set as the
default.
[Setup] Item List
8 [Administration] Tab Page
8.[Administration] Tab Page
Setting up POP3 Network Service
In POP3 Network Service, you can specify the POP3 server to receive an Internet Fax and E-mails.
1
2
3
4
5
6
7
8
9
10
11
Item name
Description
1
Enable POP3 Client
Select whether retrieving an Internet Fax and an E-mail from the POP3 server is enabled or
disabled. [Enable] is set as the default.
2
Enable SSL
Select whether the SSL (Secure Sockets Layer) is enabled or disabled for POP3
transmission.
y Disable — Select this to disable the SSL for POP3 transmission.
y Verify with imported CA certification(s) — Select this to enable the SSL using the
imported CA certificate.
y Accept all certificates without CA — Select this to enable the SSL without using
imported CA certificate.
y When [Verify with imported CA certification(s)] is selected, you must import the CA certificate in this equipment.
P.263 “[Security] How to Set and How to Operate”
y Not all operating systems support SSL for all protocols.
3
POP3 Server Address
Enter the IP address or FQDN (Fully Qualified Domain Name) of the POP3 server when
[Enable POP3 Client] is enabled. You can enter up to 128 alphanumerical characters and
symbols other than =, ; (semicolon), #, and \ (backslash).
If you use FQDN to specify the POP3 server, you must configure the DNS server and enable the DNS in the DNS Session.
When the [Obtain a POP3 Server Address automatically] option is enabled in the TCP/IP settings, you can obtain the POP3
server address from the DHCP server.
P.143 “Setting up TCP/IP”
4
Authentication
Enable or disable the authentication for accessing the POP3 server.
y Disable — Select this to disable the authentication.
y NTLM/SPA — Select this to access the POP3 server using the NTLM/SPA
authentication.
y Kerberos — Select this to access the POP3 server using the Kerberos authentication.
5
Type POP3 Login
Select the POP3 login type.
y AUTO — Select this to automatically designate the POP3 log-in type of the POP3
server.
y POP3 — Select this to use the general POP3 log-in type.
y APOP — Select this to use the APOP log-in type. APOP allows users to access the
POP3 server by encrypting the user name and password.
If it is not possible to log in to the mail server using [Auto], manually set the type of POP3 log in to either [POP3] or [APOP].
[Setup] Item List
161
8 [Administration] Tab Page
Item name
6
Account Name
Description
Enter the account name for this equipment to access the POP3 server. You can enter up to
96 alphanumerical characters and symbols other than =, ; (semicolon), #, and \ (backslash).
Enter the account name without the domain name when [NTLM/SPA] or [Kerberos] is selected in the [Authentication] option.
7
Password
Enter the password for this equipment to access the POP3 server. You can enter up to 96
alphanumerical characters and symbols other than =, ; (semicolon), #, and \ (backslash).
8
Scan Rate
Enter how often this equipment should access the POP3 server for new messages. You can
enter a value in the range from 0 to 4096. “5” is set as the default.
9
Port Number
Enter the port number to access the POP3 server. The SSL port number depends on the
port setting in the POP3 server. You can enter a value in the range from 1 to 65535.
Generally the default value “110” is used.
10
SSL Port Number
Enter the port number to access the POP3 server using SSL. The SSL port number
depends on the port setting in the POP3 server. Generally "995" is used.
11
POP3 Client Connection
Timeout(1-180)
Enter a timeout period for quitting communication when no response is received from the
POP3 server. Specify within the range from 1 to 180 seconds. “30” is set as the default.
Setting up FTP Client
In FTP Client, you can specify the default port number used for the Save as file using the FTP protocol.
1
2
Item name
162
Description
1
SSL Setting
Specify the certificate used in the SSL.
y Disable — Select this to disable the SSL.
y Verify with imported CA certification(s) — Select this to use the registered
certificate(s).
y Accept all certificates without CA — Select this to use all certificates.
2
Default Port Number
Enter the port number to access the FTP site. The port number depends on the port setting
in the FTP site. You can enter a value in the range from 1 to 65535. Generally the default
value "21" is used.
[Setup] Item List
8 [Administration] Tab Page
8.[Administration] Tab Page
Setting up FTP Server
In FTP Server, you can enable or disable the FTP server functions.
1
2
3
4
Item name
Description
1
Enable FTP Server
Select whether the FTP server is enabled or disabled. Select [Enable] to enable the
following functions.
y FTP printing
y Reading/writing the address book data using the Address Book Viewer
y Backing up/Restoring the e-Filing data using the e-Filing Backup/Restore Utility
[Enable] is set as the default.
2
Enable SSL
Select whether the SSL (Secure Sockets Layer) is enabled or disabled for the FTP server.
[Disable] is set as the default.
3
Default Port Number
Not all operating systems support SSL for all protocols.
Enter the port number for the FTP server. You can enter a value in the range from 1 to
65535. Generally the default value "21" is used.
When the same port number as the secondary one in the HTTP setting (SSL port number when SSL in the HTTP setting is
enabled) is selected, you cannot access TopAccess or the e-Filing web utility. If you set it by mistake, use the control panel of
the equipment to change the HTTP setting and enter the correct port number.
4
SSL Port Number
Enter the port number that is used to access this equipment using FTP with SSL. The port
number depends on the port setting in the FTP server. You can enter a value in the range
from 1 to 65535. Generally the default value "990" is used.
When the same port number as the secondary one in the HTTP setting (SSL port number when SSL in the HTTP setting is
enabled) is selected, you cannot access TopAccess or the e-Filing web utility. If you set it by mistake, use the control panel of
the equipment to change the HTTP setting and enter the correct port number.
[Setup] Item List
163
8 [Administration] Tab Page
Setting up SLP Session
When SLP is enabled, this equipment becomes a Service Agent that responds to requests from a User Agent for
searching particular services and registers services to a Directory Agent.
The SLP setting only supports the print services shown below.
Raw TCP print, LPD print, IPP print, WSD print, SMB print, FTP print
About the "printer-location" attribute of SLP
SLP has an attribute called "printer-location" as one of the services provided. The information of "printer-location" is
the device setting information on the [General] submenu of the [Setup] menu on the [Administration] tab page, and that
of the [Location] field of [Device Information] on the [Device] tab page. Turn the equipment off and on if you have
changed [Location] from TopAccess. The change is reflected in "printer-location" of SLP after the equipment is
restarted.
1
2
3
Item name
164
Description
1
Enable SLP
Select whether SLP service is enabled or disabled. [Enable] is set as the default.
2
TTL
Set TTL (Time To Live, a scope in the network that provides SLP service).
This is to enable the communication among User Agents and Directory Agents located on
different networks.
3
Scope
Set this for specifying the scope of groups that provide SLP services. The default value is
"DEFAULT".
Set this for specifying the scope of groups that provide SLP services.
y
y
y
y
More than one group can be entered for [Scope] by separating them with a comma.
Characters ( ) \ ! < = > ~ ; * + cannot be entered in the scope.
Do not leave this field blank or the SLP setting will be disabled.
You can search a particular service using Konqueror (SUSE Linux) or SLPSNOOP utility (Novell client) which is a User
Agent (UA).
[Setup] Item List
8 [Administration] Tab Page
8.[Administration] Tab Page
Setting up SNMP Network Service
In SNMP Network Service, you can enable or disable the SNMP to monitor the device status using a network monitoring
utility. If an administrator wants to monitor the device status with a monitoring utility, programmed to match the MIB, you
must enable the SNMP and SNMP Traps.
1
2
3
4
5
6
7
8
9
10
11
12
13
14
15
16
Item name
Description
1
Enable SNMP V1/V2
Select whether SNMP V1/V2 monitoring with MIB is enabled or disabled. This must be
enabled to allow users to connect using TopAccessDocMon, TWAIN driver, File
Downloader, or the Address Book Viewer. [Enable] is set as the default.
2
Read Community
Enter the SNMP read community name for the SNMP access. You can enter up to 31
alphanumerical characters and symbols other than =, ; (semicolon), #, and \ (backslash).
“public” is set as the default.
y It is recommended to change the default Read Community name for security reasons.
y If changing the Read Community name, match the setting with the applications in use. Otherwise, applications that use
MIB (TopAccess, TWAIN driver, File Downloader, and AddressBook Viewer) will become unavailable. The SNMP
communication of the printer driver also will be unavailable, so that obtaining the configurations, confirming the
department code, and obtaining the available boxes in e-Filing will be disabled.
y When you leave the [Read Write Community] option blank, the SNMP communication between the SNMP Browser of the
Client computer and this equipment will be disabled.
3
Read Write Community
Enter the SNMP Read Write community name for the SNMP access. You can enter up to 31
alphanumerical characters and symbols other than =, ; (semicolon), #, and \ (backslash).
“private” is set as the default.
y It is recommended to change the default Read Write Community name for security reasons.
y If changing the Read Write Community name, match the setting with the applications in use. Otherwise, applications that
use MIB (TopAccess, TWAIN driver, File Downloader, and AddressBook Viewer) will become unavailable. The SNMP
communication of the printer driver also will be unavailable, so that obtaining the configurations, confirming the
department code, and obtaining the available boxes in e-Filing will be disabled.
4
Enable SNMP V3
Select whether SNMP V3 monitoring with MIB is enabled or disabled. This must be enabled
to allow users to connect using TopAccessDocMon, TWAIN driver, File Downloader and the
AddressBook Viewer.
[Setup] Item List
165
8 [Administration] Tab Page
Item name
Description
5
Create SNMP V3 User Information
SNMP V3 user information registered into this equipment is displayed in a list. SNMP V3
user information can be registered, edited, deleted or exported. For the details, see the
following:
P.219 “Registering or editing SNMP V3 user information”
P.221 “Exporting SNMP V3 user information”
P.223 “Deleting SNMP V3 user information”
6
Enable SNMP V3 Trap
Select whether SNMP V3 Trap is sent or not. [Disable] is set as the default.
7
SNMP V3 Trap User Name
Enter an SNMP V3 Trap User Name. You can enter up to 31 alphanumerical characters and
symbols.
8
SNMP V3 Trap Authentication
Protocol
Select an authentication protocol.
y HMAC-MD5 — Select this to use HMAC-MD5.
y HMAC-SHA — Select this to use HMAC-SHA.
9
SNMP V3 Trap Authentication
Password
Enter an authentication password. You can enter up to 31 alphanumerical characters and
symbols.
10
SNMP V3 Trap Privacy Protocol
Select a protocol for data encryption.
y None — Select this not to encrypt data.
y CBC-DES — Select this to use CBC-DES.
y CFB-AES-128 — Select this to use AES-128 (CFB mode).
11
SNMP V3 Trap Privacy Password
Enter a privacy password. You can enter up to 31 alphanumerical characters and symbols.
12
Enable Authentication Trap
Select whether to send SNMP Traps when this equipment is accessed using SNMP V1/V2
from a different read community. [Enable] is set as the default.
13
Enable Alerts Trap
Select whether to send SNMP V1/V2 Traps when an alert condition occurs. [Enable] is set
as the default.
14
IP Trap Address 1 to 10
Enter the IP address where the SNMP Traps will be sent. You can specify up to 10
addresses. Specify within the range from 0 0 0 0 to 255 255 255 255.
15
IP Trap Community
Enter the trap community name for the IP Traps. You can enter up to 31 alphanumerical
characters and symbols. “public” is set as the default.
16
IPX Trap Address
Enter the IPX address where the SNMP Traps will be sent. You can enter up to 20
alphanumerical characters and symbols.
When you want to use a user name registered in the SNMP V3 User Information list as an SNMP V3 Trap User Name, you
must enter the same protocols and passwords registered for the authentication protocol, authentication password (not
displayed on the list), privacy protocol and password (not displayed on the list) into the fields such as [SNMP V3 Trap
Authentication Protocol], [SNMP V3 Trap Authentication Password], [SNMP V3 Trap Privacy Protocol] and [SNMP V3 Trap
Privacy Password].
If they do not match, information registered in the list will be adopted.
166
[Setup] Item List
8 [Administration] Tab Page
8.[Administration] Tab Page
[Create SNMP V3 User Information] screen
You can display this screen by clicking the [New] button in the Create SNMP V3 User Information page.
1
2
3
4
5
6
7
Clicking [Save] on the [Create SNMP V3 User Information] screen instantly registers the SNMP V3 user information,
enabling the registered user to access this equipment via SNMP over a network.
Item name
Description
1
Context Name
Displays the context name.
2
User Name
Enter the user name. You can enter up to 31 alphanumerical characters and symbols.
3
Authentication Protocol
Select an authentication protocol.
y HMAC-MD5 — Select this to use HMAC-MD5.
y HMAC-SHA — Select this to use HMAC-SHA.
4
Authentication Password
Enter the password when the Authentication option is enabled. You can enter up to 31
characters.
5
Privacy Protocol
Select a protocol for data encryption.
y None — Select this not to encrypt data.
y CBC-DES — Select this to use CBC-DES.
y CFB-AES-128 — Select this to use AES-128 (CFB mode).
6
Privacy Password
Enter the password for the user information. You can enter up to 31 alphanumerical
characters and symbols.
7
Permissions Level
Select the access permission level of the SNMP V3 user.
y General User — Select this to permit only the reading of data.
y Administrator — Select this to permit both the reading and writing of data.
[Setup] Item List
167
8 [Administration] Tab Page
Setting up Web Services Setting
In Web Services Print and Web Services Scan, you can set the Web Services Setting. The Web Services Print operations
and Web Services Scan operations are performed on client computers with Windows Vista/Windows 7/Windows 8/
Windows Server 2008/Windows Server 2012 through a network.
1
2
3
4
5
6
7
8
9
Item name
Description
1
Enable SSL
Specify whether or not to use SSL in Web Service.
y Enable — Select this to use SSL.
y Disable — Select this no to use SSL.
2
Friendly Name
Assign the friendly name for this equipment. You can enter up to 127 characters and
symbols other than =, ; (semicolon), #, /, \ (backslash), :, *, ?, ", >, <, |, !, and , (comma).
3
Web Services Print
Select whether the Web Services Print is enabled or disabled.
y Enable — Select this to enable the Web Services Print.
y Disable — Select this to disable the Web Services Print.
To enable Web Services Print using SSL, a certificate must be installed in this equipment or a client computer. For the details,
see the following pages:
P.263 “[Security] How to Set and How to Operate”
168
4
Printer Name
Assign the printer name for this equipment. You can enter up to 127 characters and symbols
other than =, ; (semicolon), #, /, \ (backslash), :, *, ?, ", >, <, and |. “MFP model name-Serial
number” is set as the default.
5
Printer Information
Assign the printer information for this equipment. You can enter up to 127 characters other
than =, ; (semicolon), #, and \ (backslash).
6
Web Services Scan
Select whether the Web Services Scan is enabled or disabled.
y Enable — Select this to enable the Web Services Scan.
y Disable — Select this to disable the Web Services Scan.
7
Scanner Name
Assign the scanner name for this equipment. You can enter up to 127 characters and
symbols other than =, ; (semicolon), #, /, \ (backslash), :, *, ?, ", >, <, and |. “MFP model
name-Serial number” is set as the default.
8
Scanner Information
Assign the scanner information for this equipment. You can enter up to 127 characters other
than =, ; (semicolon), #, and \ (backslash).
9
Authentication for PC Initiated
Scan
Specify whether to enable user authentication before accepting a scan from a client PC.
y Do not accept any job — Select this not to accept any jobs regardless of the result of
user authentication.
y Accept the job if user name is valid — Select this to accept jobs only after successful
user authentication.
y Accept any job — Select this to accept any jobs regardless of the result of user
authentication.
[Setup] Item List
8 [Administration] Tab Page
8.[Administration] Tab Page
Setting up LLTD Session
Enable this setting for confirming the device connection status, installing devices or accessing the TopAccess. This setting
also allows you to discover the desired device over the local network and view device information such as location, IP
address, MAC address or profile on the Network Map under the Windows Vista/Windows 7/Windows 8/Windows Server
2008/Windows Server 2012 environment.
1
2
Item name
Description
1
Enable LLTD
Select whether the LLTD setting is enabled or disabled.
y Enable — Enables the LLTD.
y Disable — Disables the LLTD.
2
Device Name
Enter a device name to be displayed on the Network Map.
You can enter up to 16 characters and symbols other than =, ; (semicolon), #, and
\ (backslash).
[Setup] Item List
169
8 [Administration] Tab Page
Setting up Wake Up Setting
This section describes how to set network access during the Super Sleep mode.
Use this setting for a case such as when you want to recover this equipment from the Super Sleep mode by searching
this equipment over a network.
1
Item name
1
Protocol
Description
Select protocols to be used for recovering this equipment from the Sleep mode. Up to 4
protocols can be selected.
ARP
Select this to enable address resolution when this equipment is used under IPv4
environment.
SNMP for IPv4
Select this to search this equipment over the network with SNMP protocol when Client
Utilities is used under IPv4 environment.
SNMP for IPv6
Select this to search this equipment over the network with SNMP protocol when Client
Utilities is used under IPv6 environment.
SMB
Select this to enable domain name resolution when NetBIOS name is used under IPv4
environment.
Bonjour
Select this to search this equipment over the network with Bonjour protocol.
Neighbor Discovery(Link Local Address)
Select this to enable address resolution when this equipment is used under IPv6
environment.
Neighbor Discovery(Manual)
Select this to enable address resolution when this equipment is used under IPv6
environment.
LLMNR
Select this to enable domain name resolution when NetBIOS name is used under IPv6
environment.
LLTD
Select this to search this equipment over the network with Nmap display when Network
Mapper is used.
SLP
Select this to enable service discovery when SLP is used.
Web Services for IPv4
Select this to search this equipment over the network with WS-Discovery under IPv4
environment.
Web Services for IPv6
Select this to search this equipment over the network with WS-Discovery under IPv6
environment.
170
[Setup] Item List
8 [Administration] Tab Page
8.[Administration] Tab Page
The protocol selecting list of the Wake Up setting is made to select the desired protocols regardless of whether the
selected protocol is enabled or disabled on each protocol setting. If the selected protocol is disabled on its protocol
setting, however, the Wake Up setting is disabled either and therefore this equipment will not be recovered from the
Super Sleep mode.
When no response is returned from this equipment after you access the network even if a protocol selected on this
setting is used, retry the access.
If any of the following protocols is selected, this equipment can be recovered from the Super Sleep mode even if the
Wake Up setting is not set.
- IPP
- FTP
- HTTP
- SMTP
- RAW9100
- LPD
- WebService
[Setup] Item List
171
8 [Administration] Tab Page
Setting up IP Security
With the IP security function, you can enable data encryption communication using IPsec (IP Security Protocol).
With the [Flush Connections] button, if the keys for IPsec communication are leaked or a security violation occurs, you
can manually delete (flush) the current session with the flush connection function and start a new session. If you want
to delete the information of SAD (Security Association Database) for any reason, you can delete it in the same way.
1
2
3
4
5
6
7
8
Item name
172
Description
1
[Return] button
Closes the [IP Security] screen.
2
Enable IPsec
Specify whether or not to enable IPsec.
y Enable — Enables IPsec.
y Disable — Disables IPsec.
3
Policy
Select a policy to use in IPsec.
To enable data encryption communication using IPsec, you must first create IPsec policies
according to your system environment.
P.182 “[Add Policy] / [Modify Policy] screen”
4
Filter
Creates a filter for the IPsec environment.
[Add] button — You can add a filter on the [Add Filter] screen.
P.174 “[Add Filter] / [Modify Filter] screen”
[Delete] button — Select filters to delete and click the [Delete] button to delete them.
Filter Name — Click a registered filter name to modify its content.
P.174 “[Add Filter] / [Modify Filter] screen”
Filter Action — Displays the action of the registered filter.
5
Manual Key
Set the IPsec manual key.
[Add] button — You can add a manual key on the [Add Manual Key] screen.
P.176 “[Add Manual Key] / [Modify Manual Key] screen”
[Delete] button — Select manual keys to delete and click the [Delete] button to delete
them.
Manual Key Name — Click a registered manual key name to modify its content.
P.176 “[Add Manual Key] / [Modify Manual Key] screen”
Encryption Algorithm — Displays the registered encryption algorithms.
6
IKE Key
Set the IPsec IKE key.
[Add] button — You can add an IKE key on the [Add IKE] screen.
P.178 “[Add IKE] / [Modify IKE] screen”
[Delete] button — Select keys to delete and click the [Delete] button to delete them.
Key Name — Click a registered key name to modify its content.
P.178 “[Add IKE] / [Modify IKE] screen”
IKE Type — Displays the registered IKE types.
7
Profile
First create a filter and a manual key or IKE key according to your IPsec environment, and
then create profiles by combining them.
[Add] button — You can add a profile on the [Add Profile] screen.
P.180 “[Add Profile] / [Modify Profile] screen”
[Delete] button — Select profiles to delete and click the [Delete] button to delete them.
Profile Name — Click a registered profile name to modify its content.
P.180 “[Add Profile] / [Modify Profile] screen”
Profile Mode — Displays the registered profile mode.
[Setup] Item List
8 [Administration] Tab Page
8.[Administration] Tab Page
Item name
8
Policy
Description
Create a policy to use in IPsec by combining the registered profiles.
[Add] button — You can add a policy on the [Add Policy] screen.
P.182 “[Add Policy] / [Modify Policy] screen”
[Delete] button — Select policies to delete and click the [Delete] button to delete them.
Policy Name — Click a registered policy name to modify its content.
P.182 “[Add Policy] / [Modify Policy] screen”
[Setup] Item List
173
8 [Administration] Tab Page
[Add Filter] / [Modify Filter] screen
You can display this screen by clicking the [Add] button for Filter or a registered filter name.
You can create a filter to use in IPsec.
1
2
3
4
5
6
7
8
9
10
11
1
2
3
4
5
6
7
8
9
10
11
Item name
174
Description
1
[OK] button
Saves the folder setting.
2
[Cancel] button
Cancels registration of the folder.
3
[Reset] button
Returns the settings to the defaults.
4
Filter Name
Enter a filter name. You can enter up to 63 alphanumerical characters and symbols other
than #, %, &, +, \ (backslash), ' (apostrophe), ; (semicolon), , (comma), ", and =.
5
Internet Protocol Version
Select the IP version for IPsec.
y IPv4 — Select this to use IPsec under the IPv4 environment.
y IPv6 — Select this to use IPsec under the IPv6 environment.
6
Source Address
The IP address of this equipment is set as the source address to which the filter is applied.
[My IP Address] is displayed in this box. This item cannot be changed.
7
Destination Address
Specify the destination address for the communication to which the filter is applied.
y Specific IP Address — Set a specific IP address. Enter the IP address in the address
input box.
y Subnet / Prefix — Set the destination with its IP address and subnet mask. Enter the IP
address and the prefix of the subnet mask directly in the address input box.
y FQDN — Sets FQDN for the destination. Enter FQDN in the address input box. You can
enter up to 255 alphanumerical characters including hyphen (-) and period (.). However,
neither hyphen (-) nor period (.) can be used as first or last character.
y Any IP Address — Set any IP address.
8
Protocol Type
Select a protocol for the filter.
y Any — Set any protocol.
y TCP — Select this to use TCP only.
y UDP — Select this to use UDP only.
y ICMP — Select this to use ICMP only.
[Setup] Item List
8 [Administration] Tab Page
8.[Administration] Tab Page
Item name
Description
9
Source Port
Specify the source port number. This setting is available only if you selected TCP or UDP in
the protocol type setting.
y Any — Set any source port.
y Port Number — Set the port number of the sender. Enter the port number in the port
number input box.
10
Destination Port
Set the destination port number. This setting is available only if you selected TCP or UDP in
the protocol type setting.
y Any — Set any destination port.
y Port Number — Set the port number of the destination. Enter the port number in the
port number input box.
11
Filter Action
Set the operation of the filter.
y Permit — Select this to permit access from the specified destination.
y Block — Select this to block access from the specified destination.
y Negotiate Security — IPsec communication is performed with the specified
destination. When this item is set, you must select the security protocol type to be used
in IPsec communication from the following:
- ESP — Select this to use ESP (Encapsulating Security Payload).
- AH — Select this to use AH (Authentication Header).
[Setup] Item List
175
8 [Administration] Tab Page
[Add Manual Key] / [Modify Manual Key] screen
You can display this screen by clicking the [Add] button for Manual Key or a registered manual key name.
You can set a manual key to use in IPsec.
1
2
3
4
5
6
7
8
1
2
3
4
5
6
7
8
Item name
1
176
Description
[OK] button
Saves the key setting.
2
[Cancel] button
Cancels registration of the key.
3
[Reset] button
Returns the settings to the defaults.
4
Manual Key Name
Enter the name of the manual key. You can enter up to 63 alphanumerical characters
and symbols other than #, %, &, +, \ (backslash), ' (apostrophe), ; (semicolon), ,
(comma), ", and =.
5
Encryption Algorithm
Select an encryption algorithm.
y None — Select this not to perform data encryption.
y AES-256-CBC — Select this to use AES-CBC (256 bits).
y AES-192-CBC — Select this to use AES-CBC (192 bits).
y AES-128-CBC — Select this to use AES-CBC (128 bits).
y 3DES-CBC — Select this to use 3DES-CBC.
y DES-CBC — Select this to use DES-CBC.
6
Hash Algorithm
Select a hash algorithm.
y SHA1 — Select this to use SHA1.
y MD5 — Select this to use MD5.
y AES-XCBC-MAC — Select this to use AES-XCBC-MAC.
[Setup] Item List
8 [Administration] Tab Page
8.[Administration] Tab Page
Item name
7
8
Inbound Key
Description
Select a key for the receiving side.
Security Parameter Index
Specify a security parameter index (SPI) for identification.
You can enter a value in the range from 256 to 4095.
ESP Encryption Key
Enter an ESP (Encapsulating Security Payload) encryption key.
ESP Authentication Key
Enter an ESP (Encapsulating Security Payload) authentication key.
AH Authentication Key
Enter an AH (Authentication Header) authentication key.
Outbound Key
Select a key for the destination.
Security Parameter Index
Specify a security parameter index (SPI) for identification.
You can enter a value in the range from 256 to 4095.
ESP Encryption Key
Enter an ESP (Encapsulating Security Payload) encryption key.
ESP Authentication Key
Enter an ESP (Encapsulating Security Payload) authentication key.
AH Authentication Key
Enter an AH (Authentication Header) authentication key.
[Setup] Item List
177
8 [Administration] Tab Page
[Add IKE] / [Modify IKE] screen
You can display this screen by clicking the [Add] button for IKE Key or a registered key name.
You can set an IKE key to use in IPsec.
1
2
3
4
5
6
7
1
2
3
4
5
6
7
Item name
178
Description
1
[OK] button
Saves the key setting.
2
[Cancel] button
Cancels registration of the key.
3
[Reset] button
Returns the settings to the defaults.
[Setup] Item List
8 [Administration] Tab Page
8.[Administration] Tab Page
Item name
4
IKE Key Name
5
IKE Type:
Description
Enter the name of the IKE key. You can enter up to 63 alphanumerical characters and
symbols other than #, %, &, +, \ (backslash), ' (apostrophe), ; (semicolon), , (comma),
", and =.
Up to 30 IKE keys can be created.
IKEv1 (Main Mode)
Select this to use IKEv1.
Certificate — Select this to use an electronic certificate. To select this, IPsec
certificate must be installed in this equipment in advance.
Preshared Key — Select this to perform authentication by sharing key information
with the recipient of the communication in advance. Enter key information to be shared
in the entry box. You can enter up to 128 alphanumerical characters and symbols
other than &, <, and ".
If you register more than one Preshared Key for IKEv1, only the one that you
registered last will be valid.
IKEv2
6
Session Key Settings:
Generate a new key after
7
Select this to use IKEv2.
Certificate — Select this to use an electronic certificate. To select this, IPsec
certificate must be installed in this equipment in advance.
Preshared Key — Select this to perform authentication by sharing key information
with the recipient of the communication in advance. Enter key information to be shared
in the entry box. You can enter up to 128 alphanumerical characters and symbols
other than &, <, and ".
y Local ID — Select among IP Address, FQDN, Email and Key-ID. When you have
selected the Key-ID, enter the value to the corresponding item. You can enter up
to 128 alphanumerical characters and symbols other than &, <, and ".
y Remote ID — Select among IP Address, FQDN, Email and Key-ID. When you
selected FQDN, Email or Key-ID, enter a value corresponding to the item you
selected. When you selected Key-ID, enter the corresponding value. You can
enter up to 128 alphanumerical characters and symbols except the following: & <
". When you selected Email, you can enter up to 192 alphanumerical characters.
When you selected FQDN, you can enter up to 255 alphanumerical characters
including hyphen (-) and period (.). However, neither hyphen (-) nor period (.) can
be used as first or last character.
Enter the interval between generating key information for IPsec communications in
seconds. Set the interval period for regenerating key information for IPsec
communication from 60 seconds to 604,800 seconds (7 days).
Enable PFS — Select the check box when using the PFS (Perfect Forward Secrecy)
function in IKE.
FilterIKE Transforms:
Integrity
Select the authentication algorithm to be used in IKE.
y SHA1 — Select this to use SHA1.
y MD5 — Select this to use MD5.
y AES-XCBC-MAC — Select this to use AES-XCBC-MAC.
Encryption
Select the encryption algorithm to be used in IKE.
y AES-256-CBC — Select this to use AES-CBC (256 bits).
y AES-192-CBC — Select this to use AES-CBC (192 bits).
y AES-128-CBC — Select this to use AES-CBC (128 bits).
y AES-CTR — Select this to use AES-CTR.
y 3DES-CBC — Select this to use 3DES-CBC.
y DES-CBC — Select this to use DES-CBC.
Diffie-Hellman algorithm
Select the Diffie-Hellman group to be used in IKE.
y MODP 768 (Group 1) — Select this to use the MODP group in 768 bits.
y MODP 1024 (Group 2) — Select this to use the MODP group in 1024 bits.
y MODP 2048 (Group 14) — Select this to use the MODP group in 2048 bits.
y Elliptic Curve P-256 (Group 19) — Select this to use Elliptic Curve P-256.
y Elliptic Curve P-384 (Group 20) — Select this to use Elliptic Curve P-384.
y Elliptic Curve P-521 (Group 21) — Select this to use Elliptic Curve P-521.
[Setup] Item List
179
8 [Administration] Tab Page
[Add Profile] / [Modify Profile] screen
You can display this screen by clicking the [Add] button for Profile or a registered profile name.
You can create a profile for an IPsec environment by combining the registered filter and either a manual key or an IKE key.
1
2
3
4
5
6
7
8
1
2
3
4
5
6
7
8
Item name
180
Description
1
[OK] button
Saves the profile setting.
2
[Cancel] button
Cancels registration of the profile.
3
[Reset] button
Returns the settings to the defaults.
[Setup] Item List
8 [Administration] Tab Page
8.[Administration] Tab Page
Item name
4
Profile Name
Description
Enter the profile name. You can enter up to 63 alphanumerical characters, including
hyphen (-) and underscore (_).
Up to 30 profiles can be created.
5
6
Tunnel Settings:
Tunnel mode
Select whether or not to use tunnel mode for IPsec communications.
y Yes — Select this to use the tunnel mode.
y No — Select this not to use the tunnel mode. (The transport mode will be used
instead.)
IPv4/IPv6 Address
Enter the IP address for the gateway which encrypts and decrypts data in tunnel
mode.
Key Selection:
Key
7
8
Displays the IKE key settings registered in the equipment. IKE keys already registered
in this equipment are displayed.
Proposals:
ESP Transforms
Specify the transform for ESP.
y Integrity — Selects the authentication algorithm to be used in ESP.
- SHA1 — Select this to use SHA1.
- MD5 — Select this to use MD5.
- AES-XCBC — Select this to use AES-XCBC.
y Encryption — Selects the encryption algorithm to be used in ESP.
- AES-256-CBC — Select this to use AES-CBC (256 bits).
- AES-192-CBC — Select this to use AES-CBC (192 bits).
- AES-128-CBC — Select this to use AES-CBC (128 bits).
- AES-CTR — Select this to use AES-CTR.
- 3DES-CBC — Select this to use 3DES-CBC.
- DES-CBC — Select this to use DES-CBC.
- None — Select this not to perform data encryption.
AH Transforms
Specify the transform for AH.
y Integrity — Selects the authentication algorithm to be used in AH.
- SHA1 — Select this to use SHA1.
- MD5 — Select this to use MD5.
- AES-XCBC — Select this to use AES-XCBC.
Session Key Settings
Specify the session key for IPsec communications.
y Session Key Settings — Sets an interval for regenerating the session key. The
interval can be set in time or the amount of data. Select the desired check box and
then key in the value in the entry box.
- Generate a new key after [ ]/Seconds — Specify the interval between key
generations in seconds. Specify within the range from 180 to 86,400 seconds
(24 hours).
- Generate a new key after [ ]/KBytes — Specify the data volume between key
generations in Kbytes. Specify within the range from 20,480 to 214,783,647
Kbytes.
IPCOMP Transform
Select if using the IPCOMP transform.
IP Filter
You can display a list of filter settings registered in this equipment. Select the check
box for the filter to be applied to the profile. If more than one filter is registered, you can
change their order in the list. Click [Move] for the desired filter, and then click [Move
Up] or [Move Down] to move the filter.
[Setup] Item List
181
8 [Administration] Tab Page
[Add Policy] / [Modify Policy] screen
You can display this screen by clicking the [Add] button for Policy or a registered policy name.
You can create a policy to use in IPsec by combining the registered profiles.
1
2
3
4
1
2
3
4
Item name
Description
1
[OK] button
Saves the profile setting.
2
[Cancel] button
Cancels registration of the profile.
3
Policy Name
Enter the policy name. You can enter up to 63 alphanumerical characters and symbols
other than #, %, &, +, \ (backslash), ‘ (single quotation), ; (semicolon), , (comma), “
(double quotation) and =.
4
Profile Name
Up to 10 policies can be created.
182
[Setup] Item List
Select profiles to apply to the policy.
You can select multiple profiles.
8 [Administration] Tab Page
8.[Administration] Tab Page
Copier settings
You can specify copier settings.
The [Copier] submenu can be accessed from the [Setup] menu on the [Administration] tab.
See the following pages for how to access it and information on the [Setup] menu:
P.22 “Access Policy Mode”
P.136 “[Setup] Item List”
P.183 “Setting up Default setting”
P.185 “Setting up Copy Job Enforcement Continue”
Setting up Default setting
In Default setting, you can set the default copier settings that apply for copy operation from the touch panel.
1
2
3
4
5
6
7
8
Item name
Description
1
Original Mode
Select the default original mode for black and white originals.
y Text/Photo — Originals with text and photographs mixed.
y Text — Originals with text (or text and line art) only.
y Photo — Originals with photographs.
2
Exposure
Select the type of image density for black and white copies.
y Auto — Select this to set the Auto mode as the default exposure for black and white
copies. The Auto mode automatically detects the density of the original to make copies
at the optimum exposure.
y Manual — Select this to set the Manual mode as the default exposure for black and
white copies. The manual mode allows you to manually specify the density of the
original.
3
MPT
Select the default paper type for the MPT.
4
Magazine Sort
Select the default page arrangement for magazine sort copies. Available only when the
Automatic Duplexing Unit is installed.
y Open from left — Select this to create a booklet that can be read from the left page.
y Open from right — Select this to create a booklet that can be read from the right page.
5
2in1 / 4in1
Select the default page arrangement for 2in1/4in1 copies.
y Write Laterally — Select this to copy two pages or four pages from left to right or top to
bottom. When the portrait originals are copied using 2in1 or 4in1, this equipment copies
them from left to right. When the landscape originals are copied using 2in1 or 4in1, this
equipment copies them from top to bottom.
y Write Vertically — Select this to copy each two pages or four pages from right to left or
top to bottom. When the portrait originals are copied using 2in1 or 4in1, this equipment
copies them from right to left. When the landscape originals are copied using 2in1 or
4in1, this equipment copies them from top to bottom.
6
Maximum Copies
Select the maximum numbers of pages that users can specify for copying. You can select
from [999], [99] or [9].
[Setup] Item List
183
8 [Administration] Tab Page
Item name
184
Description
7
Auto 2-sided Mode
Select how the 2-sided mode initially applies to copy settings when originals are set in the
Reversing Automatic Document Feeder. Available only when the Reversing Automatic
Document Feeder and the Automatic Duplexing Unit are installed.
y OFF — Select this to initially apply [1->1 SIMPLEX] when originals are set in the
Reversing Automatic Document Feeder.
y One-sided/Double-sided — Select this to initially apply [1->2 DUPLEX] when originals
are set in the Reversing Automatic Document Feeder.
y Double-sided/Double-sided — Select this to initially apply [2->2 DUPLEX] when
originals are set in the Reversing Automatic Document Feeder.
y User Selection — Select this to initially display the screen to select the 2-sided mode
when originals are set in the Reversing Automatic Document Feeder.
8
Sort Mode Priority
Select the default sort mode for copying.
y Non-Sort — Copies exit without sorting.
y Staple — Copies exit with their corner stapled.
y Sort — Copies exit in the same page order as the originals one set after another.
y Group — Copies grouped by page exit.
[Setup] Item List
8 [Administration] Tab Page
8.[Administration] Tab Page
Setting up Copy Job Enforcement Continue
1
2
3
Item name
Description
1
Automatic Change Of Paper
Source
Specify whether or not to change the paper source automatically when the size of the
original and the paper in the paper source do not match.
y ON — Select this to change the paper source and continue processing the job.
y OFF — Select this to stop the job.
2
Auto output bin Change (Cascade
Print)
Specify whether or not to switch the receiving tray automatically.
y ON — Select this to continue processing the job by switching the receiving tray.
y OFF — Select this to stop the job.
3
Suspend Printing if Stapler Empty
Specify whether to stop printing when staples run out.
y ON — Select this to stop printing when staples run out.
y OFF — Select this not to stop printing when staples run out.
[Setup] Item List
185
8 [Administration] Tab Page
Fax settings
You can specify fax settings.
The [Fax] submenu can be accessed from the [Setup] menu on the [Administration] tab.
See the following pages for how to access it and information on the [Setup] menu:
P.22 “Access Policy Mode”
P.136 “[Setup] Item List”
Setting up Fax Setting
In Fax Setting, you can set the default fax settings that apply to fax operations from the touch panel.
1
2
3
4
5
6
7
8
9
10
11
12
13
14
15
16
17
18
19
20
21
22
23
Item name
186
Description
1
Terminal ID
Enter the terminal ID name (company name) to identify this equipment. The name will be
printed at the leading edge of all documents transmitted.
2
Fax Number
Enter the fax number of this equipment. This fax number will be printed at the leading edge
of all documents transmitted from Line 1.
3
Ringer Volume
Select the ringer volume.
4
Monitor Volume
Select the volume of the line monitor during transmission.
5
Completion Tone Volume
Select the volume of the line monitor when completing the printing of a received fax.
[Setup] Item List
8 [Administration] Tab Page
8.[Administration] Tab Page
Item name
Description
6
Reception Mode
Select how this equipment activates when a fax is received.
y Auto — Select this to automatically receive incoming originals when the bell rings.
Select this when the line is being used exclusively by the fax transmission.
y Manual — Select this to manually receive incoming originals after pressing the [Start]
button on the control panel.
y TEL/FAX — Select this to automatically detect whether the incoming call is a telephone
call or a fax transmission. Select this option when connecting this equipment to a line
which is also used as a telephone line.
7
Dial Type
Select the dial type for Line 1.
y DP — Select this to use the Dial Pulse type for Line 1.
y MF — Select this to use Multi-frequency type for Line 1.
The following items are displayed for some models.
- 10PPS — Select this to use the Dial Pulse type for 10PPS.
- 20PPS — Select this to use the Dial Pulse type for 20PPS.
- PB — Select this to use a tone type push phone line.
8
Resolution
Select the default resolution for sending faxes.
y Standard — Select this to use the standard mode as the default resolution. This mode
is suitable when you are frequently transmitting text documents with normal size
characters.
y Fine — Select this to use the fine mode as the default resolution. This mode is suitable
when you are transmitting documents with small size characters or fine drawings.
y Ultra Fine — Select this to use the ultra fine mode as the default resolution. This mode
is suitable when you are transmitting documents with very small size characters or
detailed drawings.
9
Original Mode
Select the default image quality mode for sending faxes.
y Text — Select this to set the Text mode as the default image quality mode appropriate
for sending text originals.
y Text/Photo — Select this to set the Text/Photo mode as the default image quality mode
appropriate for sending originals containing both text and photos.
y Photo — Select this to set the Photo mode as the default image quality mode
appropriate for sending photo originals.
10
Exposure
Select the default exposure for sending faxes.
Select [Auto] to automatically apply the ideal contrast according to the original or select the
contrast manually in 11 stages.
11
TTI
Switch the TTI recording ON or OFF. To enable this feature, the Terminal ID must be
registered to this equipment in advance.
y ON — Select this to set to add the source information to the TTI.
y OFF — Select this to set not to add the source information.
12
RTI
Select whether to print a reception header (RTI) on received faxes to clearly identify the
time, date, and page count of received faxes.
13
ECM
Select whether to enable or disable the ECM (Error Correction Mode) to automatically resend any portion of the document affected by phone line noise or distortion.
14
Discard
Select whether to discard the lower portion of the received fax image if it is larger than the
recording paper.
15
Reduction
Select whether to reduce the received fax image if it is larger than the effective printing area
of the recording paper.
16
Duplex Print
Select whether to print the received fax images on both sides of the recording paper.
Available only when the Automatic Duplexing Unit is installed.
17
Recovery Transmit
Select whether to re-transmit a fax after failing the initially specified number of redial
attempts. When this is enabled, select the stored time length from 1 to 24 hours.
18
Journal Auto Print
Select whether to automatically print a transmission and reception journal after every
transmission completed.
19
Memory Transmission Report
Select how to print a result report after a memory transmission.
y OFF — Select this to not print a memory transmission report.
y Always — Select this to print a memory transmission report with all page images for
each memory transmission completed.
y ON ERROR — Select this to print a memory transmission report with all page images
only when the memory transmission is not successfully completed.
y Always(Print 1st Page Image) — Select this to print a memory transmission report with
the 1st page image for each memory transmission completed.
y ON ERROR(Print 1st Page Image) — Select this to print a memory transmission report
with the 1st page image only when the memory transmission is not successful.
[Setup] Item List
187
8 [Administration] Tab Page
Item name
188
Description
20
Multi Transmission Report
Select how to print a result report after a multi-address transmission.
y OFF — Select this to not print a multi-address transmission report.
y Always — Select this to print a multi-address transmission report with all page images
for each multi-address transmission completed.
y ON ERROR — Select this to print a multi-address transmission report with all page
images only when the multi-address transmission is not successfully completed.
y Always(Print 1st Page Image) — Select this to print a multi-address transmission
report with the 1st page image for each multi-address transmission completed.
y ON ERROR(Print 1st Page Image) — Select this to print a multi-address transmission
report with the 1st page image only when the multi-address transmission is not
successful.
21
Polling Report
Select how to print a result report after a multi-polling reception.
y OFF — Select this to not print a multi-polling report.
y Always — Select this to print a multi-polling report for each multi-polling reception.
y ON ERROR — Select this to print a multi-polling report only when the multi-polling
reception is not successful.
22
Relay Originator
Select how to print a result report after a relay transmission.
y OFF — Select this to not print a relay station report.
y Always — Select this to print a relay station report with all page images for each relay
transmission completed.
y ON ERROR — Select this to print a relay station report with all page images only when
the relay transmission is not successful.
y Always(Print 1st Page Image) — Select this to print a relay station report with the 1st
page image for each relay transmission completed.
y ON ERROR(Print 1st Page Image) — Select this to print a relay station report with the
1st page image only when the relay transmission is not successful.
23
Secure Receive
You can set the Secure Receive function to store received fax jobs in the equipment without
printing them.
With this function, you can prevent the leaking of confidential information in a fax received
when no people are present in your office, such as nighttime or holidays, or when an
unspecified number of people visit your office.
y Enable — Enables the Secure Receive function.
To print the fax jobs the Secure Receive function received, you must set [Line1 :
Password] and [Retype Password]. For the password, you can enter up to 20
alphanumerical characters and symbols (# $ ( ) * + , - . / : ; = ? @ \ ^ _ ` { | } ~).
y Disable — Disables the Secure Receive function.
y Weekly Schedule — Sets whether the Secure Receive function is enabled or disabled
for each day of the week. You can set the time to enable and disable the Secure
Receive function (24-hour display).
- For a day on which you want to enable the Secure Receive function all day, specify
"00:00" for "Disable" and "00:00" for Enable.
- For a day on which you want to disable the Secure Receive function all day, specify
"00:00" for "Disable" and "24:00" for Enable.
To print the fax jobs the Secure Receive function received, you must set [Line1 :
Password] and [Retype Password]. For the password, you can enter up to 20
alphanumerical characters and symbols (# $ ( ) * + , - . / : ; = ? @ \ ^ _ ` { | } ~).
[Setup] Item List
8 [Administration] Tab Page
8.[Administration] Tab Page
Save as File settings
You can configure the Save as file settings that apply to the Save as file operations.
The [Save as file] submenu can be accessed from the [Setup] menu on the [Administration] tab.
See the following pages for how to access it and information on the [Setup] menu:
P.22 “Access Policy Mode”
P.136 “[Setup] Item List”
P.189 “Setting up Local Storage Path”
P.190 “Setting up Storage Maintenance”
P.190 “Setting up Destination”
P.190 “Setting up Folder Name”
P.191 “Setting up Format”
P.191 “Setting up Single Page Data Saving Directory”
P.192 “Setting up File Composition”
P.192 “Setting up User Name and Password at User Authentication for Save as File”
P.192 “Setting up Searching Interval”
P.193 “Setting up Remote 1 and Remote 2”
P.196 “Setting up N/W-Fax Destination”
P.196 “Setting up N/W-Fax Folder”
Setting up Local Storage Path
You can see the folder path where files are stored by the Save as file to local folder. You can open the local folder by
browsing this equipment from a Windows network.
1
2
3
Item name
Description
1
Storage Path
Displays the local storage path where files are stored when files are saved to the local folder
by the Save as file functions.
2
Send scanned documents to a sub
folder in the storage path.
Select this to save the files in the sub folder that is named as "Group Number-Group NameTemplate Name".
3
Send scanned documents directly
to the storage path.
Select this to save the files directly in the storage path.
[Setup] Item List
189
8 [Administration] Tab Page
Setting up Storage Maintenance
In Storage Maintenance, you can select how to delete files stored in the local folder.
The folder that was created when storing the files in the local folder will be deleted automatically when all files in the
folder are deleted.
1
2
Item name
Description
1
Do not delete documents
automatically
Select this to delete files stored in the local folder manually. If you select this option, files
saved in the shared folder will not be deleted automatically.
2
Delete documents after [ ] day(s)
Select this to automatically delete files stored in the local folder after a specified number of
days. When this is selected, enter the number of days that the files are to remain. [30days]
is set as the default.
Setting up Destination
You can specify whether a network folder can be used for Save as file.
1
2
3
Item name
Description
1
Do not allow any network folder to
be used as a destination
You can specify that a network folder cannot be used for Save as file. When this is selected,
users can only save a file in the local folder or USB media.
2
Use Network Folder Destination
You can specify that a network folder can be used for Save as file. When this is selected, set
the Remote 1 and Remote 2 Settings to specify how users can select the network folders for
Save as file destinations.
3
Default file path
Select the destination that will be set as the default destination when performing Save as file
from the control panel.
y Use local folder — Select this to save in a local folder.
y Remote 1 — Select this to save in the folder set in Remote 1.
y Remote 2 — Select this to save in the folder set in Remote 2.
Setting up Folder Name
You can select whether to add information related to this equipment or users to the name of a folder created automatically
when you save files.
1
Item name
1
190
Folder Name Setting
[Setup] Item List
Description
Select additional information of the name of a folder created when you save files.
y Disable — Select this not to add any information.
y Add MachineName — Select this to add the NetBIOS name of this equipment.
y Add UserName — Select this to add a user name set in user authentication.
8 [Administration] Tab Page
8.[Administration] Tab Page
Setting up Format
You can set how to name files of the scanned images when you save them into the "FILE_SHARE" folder of this
equipment or USB.
1
2
3
4
Item name
Description
1
File Name Format
Select the format of the file name. Information such as file name, date and time or page
number is added according to the selected format. The added information will also be
applied to file names attached to E-mails.
y [FileName]-[Date]-[Page]
y [FileName]-[Page]-[Date]
y [Date]-[FileName]-[Page]
y [Date]-[Page]-[Filename]
y [Page]-[FileName]-[Date]
y [Page]-[Date]-[FileName]
y [FileName]_[Date]-[Page]
2
Date Format
Select how you add "date and time" of the file name selected in [File Name Format]. The
added information will also be applied to file names attached to E-mails.
y [YYYY][MM][DD][HH][mm][SS] — Year (4 digits), month, day, hour, minute and second
are added.
y [YY][MM][DD][HH][mm][SS] — Year (2 digits), month, day, hour, minute and second
are added.
y [YYYY][MM][DD] — Year (4 digits), month, and day are added.
y [YY][MM][DD] — Year (2 digits), month, and day are added.
y [HH][mm][SS] — Hour, minute and second are added.
y [YYYY][MM][DD][HH][mm][SS][mm0] — Year (4 digits), month, day, hour, minute,
second and random number (2 digits and "0") are added.
3
Page Number Format
Select the number of digits of a page number applied to "Page" of the file name selected in
[File Name Format] from 3 to 6. The added information will also be applied to file names
attached to E-mails. [4digits] is set as the default.
4
Sub ID Format
This equipment automatically adds a sub ID (identification number) to the name of a file that
you are saving the same file name exists. You can select the number of digits of this sub ID
from 4 to 6 or [AUTO]. [AUTO] is selected by default. If [AUTO] is selected, a sub ID (4 to 6
digits, selected randomly) is added according to the status of the file name.
Setting up Single Page Data Saving Directory
If [SINGLE] is selected in [MULTI/SINGLE PAGE] on the scan menu of this equipment, the scanned data are saved as a
single-page file. This setting is to select whether a subfolder is created or not when you are saving a single-page file.
1
2
Item name
Description
1
Save under a subfolder
A subfolder is created in a specified directory and you can save the file into it.
2
Save without creating a subfolder
A subfolder is not created and the file is saved in a specified directory.
[Setup] Item List
191
8 [Administration] Tab Page
Setting up File Composition
If [SINGLE] is selected in [MULTI/SINGLE PAGE] on the scan menu of this equipment, the scanned data are saved as a
single-page file. This setting is to select a page configuration of a single-page file to be saved. The added information will
also be applied to file names attached to E-mails.
1
2
Item name
Description
1
Scanning 1 page makes 1 file. (2sided originals become 2 files.)
When 1 page of an original is scanned, the scanned data are saved as 1 file. When you
scan 1 sheet of a 2-sided original, for example, the data of its front side are saved as 1 file
and those of its back side are also saved as 1 file.
2
Make to the file like a scanned
manuscript. (2-sided originals
become 1 files.)
When 1 page of an original is scanned, the scanned data are saved as 1 file. When you
scan 1 sheet of a 2-sided original, for example, the data of both the front and back sides (= 2
pages) are saved as 1 file.
Setting up User Name and Password at User Authentication for Save as File
If user authentication is enabled, you can select whether a user name and a password used for user authentication are
automatically applied to [LOGIN USER NAME] and [PASSWORD] to be used for saving files into a network folder
(specified in REMOTE 1/2) or not. This setting is applied only when [Use Network Folder Destination] of the Destination
setting for the Remote 1 or the Remote 2 is checked.
1
2
3
Item name
Description
1
User name and password of the
device
User names and passwords being logged in will not be applied. Enter [LOGIN USER NAME]
and [PASSWORD] as required when scanning originals.
2
Login User Name and Password
(Template registration User Name
and Password is prioritized to
expand template)
A user name and a password being logged in will be automatically applied. When a template
is used, a user name and a password registered there will be automatically applied.
3
Login User Name and Password
(Login User Name and Password is
prioritized to expand template)
A user name and a password being logged in will be automatically applied. When a template
is used, the user name and password being logged in will be applied.
Setting up Searching Interval
Select the interval for searching expired files in the "FILE_SHARE" folder. The content of this setting will also be applied to
files in e-Filing boxes.
1
Item name
1
Deleting Expired File [ ] Hour(s)
Description
This equipment searches expired files every time a specified period of time has passed. The
period can be selected from 1 to 24 hours. 12 hours is set by default.
You can set the expiration date of each file in the "FILE_SHARE" folder or whether to delete expired files or not using the items
below.
P.190 “Setting up Storage Maintenance”
192
[Setup] Item List
8 [Administration] Tab Page
8.[Administration] Tab Page
Setting up Remote 1 and Remote 2
In Remote 1 and Remote 2, you can specify how users can select the network folders for Save as file destination when
you select [Use Network Folder Destination] in the Destination setting. You can specify two network folders; Remote 1 and
Remote 2. The setting items are the same for both Remote 1 and Remote 2.
The network folder as a destination must be set to be shared by all users.
1
2
3
4
5
6
7
8
9
10
Item name
Description
1
[Remote 1]/[Remote 2]
Select the remote network folder you want to use.
2
Allow the following network folder
to be used as a destination
Select this to restrict users to select only the network folder that you have specified.
Otherwise, select [Allow user to select network folder to be used as a destination].
[Remote Setting List] button — Sets a list of network folders for Save as file destination,
which can be selected from Remote 1 and Remote 2. To select the specified setting list from
the control panel, you must select [Allow user to select network folder to be used as a
destination].
P.194 “[Remote Setting List] screen”
3
Protocol
Select the protocol to be used for uploading a file to the network folder.
y SMB — Select this to send a file to the network folder using the SMB protocol.
y FTP — Select this to send a file to the FTP server.
y FTPS — Select this to send a file to the FTP server using FTP over SSL.
y NetWare IPX/SPX — Select this to send a scanned file to the NetWare file server using
the IPX/SPX protocol.
y NetWare TCP/IP — Select this to send a scanned file to the NetWare file server using
the TCP/IP protocol.
4
Server Name
When you select [FTP] as the protocol, enter the FTP server name or IP address where a
scanned file will be sent. For example, to send a scanned file to the "ftp://192.168.1.1/user/
scanned" FTP folder in the FTP server, enter "192.168.1.1" in this box.
When you select [NetWare IPX/SPX] as the protocol, enter the NetWare file server name or
Tree/Context name (when NDS is available).
When you select [NetWare TCP/IP] as the protocol, enter the IP address of the NetWare file
server.
You can enter up to 64 alphanumerical characters and symbols.
5
Port Number(Command)
Enter the port number to be used for controls if you select [FTP] as the protocol. Generally "" is entered for the control port. When "-" is entered, the default port number, that is set for
FTP Client by an administrator, will be used. If you do not know the default port number for
FTP Client, ask your administrator and change this option if you want to use another port
number.
You can enter a value in the range from 0 to 65535 using numbers and hyphens (-). “-” is set
as the default.
6
Network Path
When you select [SMB] as the protocol, enter the network path to the network folder. For
example, to specify the "users\scanned" folder in the computer named "Client01", enter
"\\Client01\users\scanned".
When you select [FTP] as the protocol, enter the directory in the specified FTP server. For
example, to specify the "ftp://192.168.1.1/user/scanned" FTP folder in the FTP server, enter
"user/scanned".
When you select [NetWare IPX/SPX] or [NetWare TCP/IP] as the protocol, enter the folder
path in the NetWare file server. For example, to specify the "sys\scan" folder in the NetWare
file server, enter "\sys\scan".
You can enter up to 128 alphanumerical characters and symbols.
7
Login User Name
Enter the log-in user name to access an SMB server, an FTP server, or a NetWare file
server, if required. When you select [FTP] as the protocol, an anonymous log-in is assumed
if you leave this box blank.
You can enter up to 32 alphanumerical characters and symbols.
[Setup] Item List
193
8 [Administration] Tab Page
Item name
8
Description
Password
Enter the password to access an SMB server, an FTP server, or a NetWare file server, if
required. You can enter up to 32 alphanumerical characters, symbols, and spaces. A single
space only can also be entered.
9
Retype Password
Enter the same password again for a confirmation.
10
Allow user to select network folder
to be used as a destination
Select this to allow users to specify a network folder as a destination. When the list of Save
as file destinations has been set in [Remote Setting List], you can select a network folder
from the list. Otherwise, select [Allow the following network folder to be used as a
destination].
If you want to allow users to specify either Remote 1 or Remote 2, select the one that is not set for the network folder as a
destination and select [Allow user to select network folder to be used as a destination] of the selected folder.
[Remote Setting List] screen
In this screen, you can set a list of network folders for Save as file destination, which can be selected from Remote 1 and
Remote 2.
1
2
3
4
5
6
7
8
Item name
194
Description
1
[OK] button
Registers the remote setting list.
2
[Cancel] button
Cancels the registration of the remote setting list.
3
[New] button
Sets a new remote setting.
P.195 “[Remote Setting] screen”
4
[Edit] button
Edits the item selected in the remote setting list.
P.195 “[Remote Setting] screen”
5
[Delete] button
Deletes the item selected in the remote setting list.
6
Name
Displays the name of the remote setting.
7
Protocol
Displays the protocol of the remote setting.
8
Network Path
Displays the network path of the remote setting.
[Setup] Item List
8 [Administration] Tab Page
8.[Administration] Tab Page
[Remote Setting] screen
In this screen, you can set the network folders for Save as file destination that are to be registered in the list.
1
2
3
4
5
6
7
8
9
10
Item name
Description
1
[Save] button
Saves the specified network folder for Save as file destination.
2
[Cancel] button
Cancels the settings.
3
Name
Enter the name of the network folder for Save as file destination.
4
Protocol
Select the protocol to be used for uploading a file to the network folder.
y SMB — Select this to send a file to the network folder using the SMB protocol.
y FTP — Select this to send a file to the FTP server.
y FTPS — Select this to send a file to the FTP server using FTP over SSL.
y NetWare IPX/SPX — Select this to send a scanned file to the NetWare file server using
the IPX/SPX protocol.
y NetWare TCP/IP — Select this to send a scanned file to the NetWare file server using
the TCP/IP protocol.
5
Server Name
When you select [FTP] as the protocol, enter the FTP server name or IP address where a
scanned file will be sent. For example, to send a scanned file to the "ftp://192.168.1.1/user/
scanned" FTP folder in the FTP server, enter "192.168.1.1" in this box.
When you select [NetWare IPX/SPX] as the protocol, enter the NetWare file server name or
Tree/Context name (when NDS is available).
When you select [NetWare TCP/IP] as the protocol, enter the IP address of the NetWare file
server.
You can enter up to 64 alphanumerical characters and symbols.
6
Port Number(Command)
Enter the port number to be used for controls if you select [FTP] as the protocol. Generally "" is entered for the control port. When "-" is entered, the default port number, that is set for
FTP Client by an administrator, will be used. If you do not know the default port number for
FTP Client, ask your administrator and change this option if you want to use another port
number.
You can enter a value in the range from 0 to 65535 using numbers and hyphens (-). “-” is set
as the default.
7
Network Path
When you select [SMB] as the protocol, enter the network path to the network folder. For
example, to specify the "users\scanned" folder in the computer named "Client01", enter
"\\Client01\users\scanned".
When you select [FTP] as the protocol, enter the directory in the specified FTP server. For
example, to specify the "ftp://192.168.1.1/user/scanned" FTP folder in the FTP server, enter
"user/scanned".
When you select [NetWare IPX/SPX] or [NetWare TCP/IP] as the protocol, enter the folder
path in the NetWare file server. For example, to specify the "sys\scan" folder in the NetWare
file server, enter "\sys\scan".
You can enter up to 128 alphanumerical characters and symbols.
8
Login User Name
Enter the log-in user name to access an SMB server, an FTP server, or a NetWare file
server, if required. When you select [FTP] as the protocol, an anonymous log-in is assumed
if you leave this box blank.
You can enter up to 32 alphanumerical characters and symbols.
9
Password
Enter the password to access an SMB server, an FTP server, or a NetWare file server, if
required. You can enter up to 32 alphanumerical characters, symbols, and spaces. A single
space only can also be entered.
[Setup] Item List
195
8 [Administration] Tab Page
Item name
10
Retype Password
Description
Enter the same password again for a confirmation.
Setting up N/W-Fax Destination
You can configure a network folder to store documents that are sent using the N/W-Fax driver with the Save as file option
enabled.
1
2
Item name
Description
1
Do not allow any network folder to
be used as a destination
Select this to not allow any network folders to be used as Save as file destinations for N/WFaxes documents. When selected, users can only save an N/W-Fax document with the
Save as file option enabled to local storage.
2
Use Network Folder Destination
Select this to allow network folders to be used as Save as file destinations for N/W-Fax
documents. When selected, set the N/W-Fax Folder settings to specify which network folder
to use.
Setting up N/W-Fax Folder
In the N/W-Fax Folder, you can specify in which network folder N/W-Fax documents are saved.
1
2
3
4
5
6
7
8
Item name
196
Description
1
Check box
Select the check box so that the popup prompts you to enter the network path or the server
name if you try to save the settings without it.
2
Protocol
Select the protocol for uploading an N/W-Fax document to a network folder.
y SMB — Select this to send an N/W-Fax document to the network folder using the SMB
protocol.
y FTP — Select this to send a file to the FTP server.
y FTPS — Select this to send a file to the FTP server using FTP over SSL.
y NetWare IPX/SPX — Select this to send a scanned file to the NetWare file server using
the IPX/SPX protocol.
y NetWare TCP/IP — Select this to send a scanned file to the NetWare file server using
the TCP/IP protocol.
3
Server Name
When you select [FTP] as the protocol, enter the FTP server name or IP address where an
N/W-Fax document will be sent. For example, to send an N/W-Fax document to the "ftp://
192.168.1.1/user/scanned" FTP folder in the FTP server, enter "192.168.1.1" in this box.
When you select [NetWare IPX/SPX] as the protocol, enter the NetWare file server name or
Tree/Context name (when NDS is available).
When you select [NetWare TCP/IP] as the protocol, enter the IP address of the NetWare file
server.
4
Port Number(Command)
Enter the port number to be used for controls if you select [FTP] as the protocol. Generally "" is entered for the control port. When "-" is entered, the default port number, that is set for
FTP Client by an administrator, will be used. If you do not know the default port number for
FTP Client, ask your administrator and change this option if you want to use another port
number.
[Setup] Item List
8 [Administration] Tab Page
8.[Administration] Tab Page
Item name
Description
5
Network Path
When you select [SMB] as the protocol, enter the network path to the network folder. For
example, to specify the "users\scanned" folder in the computer named "Client01", enter
"\\Client01\users\scanned".
When you select [FTP] as the protocol, enter the directory in the specified FTP server. For
example, to specify the "ftp://192.168.1.1/user/scanned" FTP folder in the FTP server, enter
"user/scanned".
When you select [NetWare IPX/SPX] or [NetWare TCP/IP] as the protocol, enter the folder
path in the NetWare file server. For example, to specify the "sys\scan" folder in the NetWare
file server, enter "\sys\scan".
6
Login User Name
Enter the login user name to access an SMB server, an FTP server, or a NetWare file server,
if required. When you select [FTP] as the protocol, an anonymous login is assumed if you
leave this box blank.
7
Password
Enter the password to access an SMB server, an FTP server, or a NetWare file server, if
required. The space can be entered.
8
Retype Password
Enter the same password again for a confirmation.
[Setup] Item List
197
8 [Administration] Tab Page
Email settings
You can configure the E-mail settings that are needed for Scan to Email operations. This section describes necessary
settings for E-mail transmissions.
The [Email Setting] submenu can be accessed from the [Setup] menu on the [Administration] tab.
See the following pages for how to access it and information on the [Setup] menu:
P.22 “Access Policy Mode”
P.136 “[Setup] Item List”
Some settings may not be reflected on the touch panel immediately after saving them. The settings will be updated by
pressing the [RESET] button on the control panel or after an Auto Clear time period.
Setting up Email Setting
You can specify the file format, fragment message size, and default body strings that apply to the Scan to Email
documents.
1
2
3
4
5
6
7
8
9
10
11
12
13
14
15
Item name
1
From Address
Description
Enter the E-mail address of this equipment.
The [From Address] must be entered to enable E-mail transmission. However, the E-mail address of the user who is logged in
to this equipment will be automatically set if any user management settings apart from MFP local authentication are enabled.
For more information about User Management Setting, see the following section:
P.135 “[Administration] Tab Page”
198
2
From Name
Enter the name of this equipment.
3
Message Header (Inbound FAX
Routing)
Select TTI to be used as a subject when the received Internet Fax is forwarded.
4
File Format(Black)
Select the file format of files to be sent when scanning in black mode.
y TIFF (Multi) — Select this to save scanned images as a Multi-page TIFF file.
y TIFF (Single) — Select this to save scanned images separately as Single-page TIFF
files.
y PDF (Multi) — Select this to save scanned images as a Multi-page PDF file.
y PDF (Single) — Select this to save scanned images separately as Single-page PDF
files.
y XPS (Multi) — Select this to save scanned images as a Multi-page XPS file.
y XPS (Single) — Select this to save scanned images separately as Single-page XPS
files.
[Setup] Item List
8 [Administration] Tab Page
8.[Administration] Tab Page
Item name
5
File Format(Color)
Description
Select the file format of files to be sent when scanning in color mode.
y TIFF (Multi) — Select this to save scanned images as a Multi-page TIFF file.
y TIFF (Single) — Select this to save scanned images separately as Single-page TIFF
files.
y PDF (Multi) — Select this to save scanned images as a Multi-page PDF file.
y PDF (Single) — Select this to save scanned images separately as Single-page PDF
files.
y Slim PDF (Multi) — Select this to save scanned images as Multi-page slim PDF files.
Select this when you give priority to minimizing the file size over quality of image.
y Slim PDF (Single) — Select this to save scanned images separately as Single-page
slim PDF files. Select this when you give priority to minimizing the file size over quality of
image.
y XPS (Multi) — Select this to save scanned images as a Multi-page XPS file.
y XPS (Single) — Select this to save scanned images separately as Single-page XPS
files.
y JPEG — Select this to save scanned images as JPEG files.
Files saved in an XPS format can be used in Windows Vista/Windows 7/Windows 8/Windows Server 2012/Windows Server
2008 SP1, or Windows XP SP2/Windows Server 2003 SP1 or later versions with Net Framework 3.0 installed.
6
Number of Retry
Enter the number of times to try sending scanned images when it fails. “3” is set as the
default.
7
Retry interval
Enter the interval to try sending scanned images when it fails. [1minutes] is set as the
default.
When the [Number of Retry] and [Retry interval] options are changed, the [Number of Retry] and [Retry interval] options in the
Internet Fax settings are also changed.
P.200 “Setting up InternetFax Setting”
8
Fragment Message Size
Select the size of the message fragmentation.
9
Default Subject
Select whether to set the E-mail subject to the factory default or a desired string.
y Factory Default — Select this to display the BCC address entry column.
y <Entry box> — Enter the desired subject.
10
Add the date and time to the
Subject
Select whether to append or not date and time to the E-mail subject. This is set as a default.
y Enable — Select this to append date and time to the subject.
y Disable — Select this to not append date and time to the subject.
11
Editing of Subject
Select whether to allow or not editing of the E-mail subject.
y Enable — Select this to allow the user to edit the E-mail subject.
y Disable — Select this to not allow the user to edit the E-mail subject.
12
Default Body Strings
Enter the body text that will be automatically entered in the [Body] box when users operate
Scan to Email from the touch panel. This sets only the default body text, so that it can be
changed on each operation by users.
13
Body Strings Transmission
Select whether the body strings will be sent or not.
14
BCC Address Display
Select whether or not to display the BCC address entry column.
y ON — Select this to display the BCC address entry column.
y OFF — Select this not to display the BCC address entry column.
15
From Address cannot be edited in
Scan to Email.
Select this item to prohibit modification of the From Address.
[Setup] Item List
199
8 [Administration] Tab Page
InternetFax settings
You can specify Internet Fax settings. This section describes necessary settings for Internet Fax transmissions.
The [InternetFax] submenu can be accessed from the [Setup] menu on the [Administration] tab.
See the following pages for how to access it and information on the [Setup] menu:
P.22 “Access Policy Mode”
P.136 “[Setup] Item List”
Some settings may not be reflected on the touch panel immediately after saving them. The settings will be updated by
pressing the [RESET] button on the control panel or after an Auto Clear time period.
Setting up InternetFax Setting
You can specify the fragment page size and default body strings that apply to the Internet Faxes.
1
2
3
4
5
6
7
8
Item name
1
From Address
Description
Enter the E-mail address of this equipment.
The [From Address] must be entered to enable Internet Fax transmission. However, the E-mail address of the user who is
logged in to this equipment will be automatically set if any user management settings apart from MFP local authentication are
enabled. For more information about User Management Setting, see the following section:
P.135 “[Administration] Tab Page”
2
From Name
Enter the name of this equipment.
3
Message Header (Inbound FAX
Routing)
Select TTI to be used as a subject when the received Internet Fax is forwarded.
4
Number of Retry
Enter the number of times to try sending the Internet Faxes when it fails. “3” is set as the
default.
5
Retry interval
Enter the interval to try sending the Internet Faxes when it fails. [1minutes] is set as the
default.
When the [Number of Retry] and [Retry interval] options are changed, the [Number of Retry] and [Retry interval] options in the
E-mail settings are also changed.
P.198 “Email settings”
200
6
Fragment Message Size
Select the size of the message fragmentation.
7
Default Body Strings
Enter the body text that will be automatically entered in the [Body] box when users operate
Scan to Internet Fax from the touch panel. This sets only the default body text, so that it can
be changed on each operation by users.
8
Body String Transmission
Select whether the body strings will be sent or not.
[Setup] Item List
8 [Administration] Tab Page
8.[Administration] Tab Page
Printer/e-Filing settings
The [Printer/e-Filing] submenu can be accessed from the [Setup] menu on the [Administration] tab.
See the following pages for how to access it and information on the [Setup] menu:
P.22 “Access Policy Mode”
P.136 “[Setup] Item List”
Setting up Printer/e-Filing Job Enforcement Continue
1
2
3
4
Item name
Description
1
Automatic Change Of Paper
Source
Specify whether or not to change the paper source automatically when the size of the
original and the paper in the paper source do not match.
y ON — Select this to change the paper source and continue processing the job.
y OFF — Select this to stop the job.
2
Enforcement Continue (Illegal
Paper)
Specify whether or not to continue processing the job forcibly when the specified output bin
is incorrect.
y ON — Select this to print to the specified output bin.
y OFF — Select this to stop the job.
3
Auto output bin Change (Cascade
Print)
Specify whether or not to switch the receiving tray automatically.
y ON — Select this to continue processing the job by switching the receiving tray.
y OFF — Select this to stop the job.
4
Suspend Printing if Stapler Empty
Specify whether to stop printing when staples run out.
y ON — Select this to stop printing when staples run out.
y OFF — Select this not to stop printing when staples run out.
[Setup] Item List
201
8 [Administration] Tab Page
Printer settings
You can configure how the printer works and the printer options needed for the raw print jobs.
The [Printer] submenu can be accessed from the [Setup] menu on the [Administration] tab.
See the following pages for how to access it and information on the [Setup] menu:
P.22 “Access Policy Mode”
P.136 “[Setup] Item List”
P.202 “Setting up General Setting”
P.203 “Setting up Default Raw Job Setting”
P.204 “Setting up Raw Job Setting”
Setting up General Setting
In General Setting, you can specify the printer related options.
1
2
3
4
Item name
202
Description
1
Period of time to save
Private,Hold,Proof and invalid Jobs
Select how long the private, hold, and test print jobs are kept. You can select in the range
from 1 to 12 hours, or from 1 to 30 days. Select [Indefinite] to retain all jobs in the queues
until a user manually deletes them. [14 Days] is set as the default.
2
LT<-->A4
Select whether to print a document intended for one paper size can be printed on paper of a
different size. For example, you can print a document set up for Letter size on A4 paper.
When disabled, this equipment will prompt users for the correct paper size. [Enable] is set
as the default.
3
Wide A4 Mode (for PCL)
Select whether the width of the printable area of copy paper is widened or not when you are
printing a PCL print job on A4 paper. Select [Enable] to widen it for approx. 3.5 mm / 0.14
inch (when in a portrait direction) and approx. 1.5 mm / 0.06 inch (when in a landscape
direction). Thus more data can be printed for each line. [Disable] is set as the default.
4
Restriction for Print Job
Select whether or not to restrict printing certain print jobs.
y None — Select this to print all data.
y Only Private — Select this to print private print jobs only.
y Only Hold — Select this to print hold print jobs only.
y Only Private/Hold — Select this to print private and hold print jobs only.
[Setup] Item List
8 [Administration] Tab Page
8.[Administration] Tab Page
Setting up Default Raw Job Setting
In Default Raw Job Setting, you can specify the default raw job setting, which applies to a raw job for which no queue
name is specified or for which a specified queue name does not exist.
You can also add LPR queue names and specify the raw job setting for each queue.
P.204 “Setting up Raw Job Setting”
1
2
3
4
5
6
7
8
9
10
11
12
13
14
15
Item name
Description
1
Raw Jobs - Duplex Printing
Select whether a raw job will be printed on both sides of the paper.
2
Raw Jobs - Default Paper Size
Select the default paper size that applies to a raw job.
3
Raw Jobs - Default Paper Type
Select the default paper type that applies to a raw job.
4
Raw Jobs - Default Orientation
Select the default orientation that applies to a raw job.
5
Raw Jobs - Default Stapling
Select whether a raw job will be stapled.
6
Raw Jobs - Default Output Bin
Select the default output bin that applies to a raw job. A banner page that is created by
NetWare, UNIX, and Windows operating systems also will be outputted to the tray set here.
7
PCL Form Line
Enter the number of lines printed per page.
8
PCL Font Pitch
Enter the font pitch when the selected font number represents a fixed pitch scalable font.
The font pitch indicates the number of ANK characters per inch. 10 pitch prints 10 ANK
characters within an inch.
9
PCL Font Point Size
Enter the font size when the selected font number represents a proportionally spaced
scalable font. The Font Size option allows you to determine the point size (height) of the
default font.
10
PCL Font Number
Enter the font number of the internal PCL font to be used as the default font for printing. You
can check the font numbers and internal PCL fonts in the Internal PCL Font List. Refer to the
User’s Manual Advanced Guide for the font number and internal PCL fonts.
11
PCL Line Termination
Select the type of the line termination.
12
Symbol set
Select the symbol set that applies to a raw job.
13
Paper Source
Select the paper source that applies to a raw job.
14
Do not Print Blank Pages
Select whether blank pages are printed or not.
When printing is performed using the UNIX filters or CUPS, this setting is not reflected. If you do not want to print blank pages
in these printings, enable [Do not Print Blank Pages] in the UNIX filter command or CUPS setting. For the setting instructions,
refer to the User’s Manual Basic Guide or User’s Manual Advanced Guide.
15
Letterhead Print Mode
Select whether the last page (odd page number) is printed on the same side as the other
odd-number pages when printing both sides of a Raw print job whose total page number is
odd. Select [ON] to print the last page on the same side (back) as the other odd-number
pages. Select [OFF] to print it on the same side (front) as even-number pages.
[Setup] Item List
203
8 [Administration] Tab Page
Setting up Raw Job Setting
In Raw Job Setting, you can add up to 16 LPR queue names and specify the raw job setting for each queue. These queue
names can be used when printing without a printer driver, such as printing from UNIX workstation.
1
2
3
4
Item name
Description
1
[Add] button
Select this to add a LPR queue.
P.204 “[Add New LPR Queue]/[Edit] screen”
2
[Edit] button
Select this to edit the LPR queue selected in the LPR queue list.
P.204 “[Add New LPR Queue]/[Edit] screen”
3
[Delete] button
Select this to delete the LPR queue selected in the LPR queue list.
4
LPR queue list
Select this to display the list of registered LPR queues.
[Add New LPR Queue]/[Edit] screen
1
2
3
4
5
6
7
8
9
10
11
12
13
14
15
16
Item name
204
Description
1
Queue Name
Enter the queue name with up to 31 alphanumerical characters. The queue name is case
sensitive so that "Queue1" and "queue1" will be added as different queues.
2
Duplex Printing
Select whether a raw job will be printed on both sides of the paper.
3
Paper Size
Select the default paper size that applies to a raw job.
4
Paper Type
Select the default paper type that applies to a raw job.
5
Orientation
Select the default orientation that applies to a raw job.
6
Stapling
Select whether a raw job will be stapled.
7
Output Bin
Select the default output bin that applies to a raw job. A banner page that is created by
NetWare, UNIX, and Windows operating systems also will be outputted to the tray set here.
8
PCL Form Line
Enter the number of lines printed per page.
9
PCL Font Pitch
Enter the font pitch when the selected font number represents a fixed pitch scalable font.
The font pitch indicates the number of ANK characters per inch. 10 pitch prints 10 ANK
characters within an inch.
10
PCL Font Point Size
Enter the font size when the selected font number represents a proportionally spaced
scalable font. The Font Size option allows you to determine the point size (height) of the
default font.
[Setup] Item List
8 [Administration] Tab Page
8.[Administration] Tab Page
Item name
11
Description
PCL Font Number
Enter the font number of the internal PCL font to be used as the default font for printing. You
can check the font numbers and internal PCL fonts in the Internal PCL Font List. Refer to the
User’s Manual Advanced Guide for the font number and internal PCL fonts.
12
PCL Line Termination
Select the type of the line termination.
13
Symbol set
Select the symbol set that applies to a raw job.
14
Paper Source
Select the paper source that applies to a raw job.
15
Do not Print Blank Pages
Select whether blank pages are printed or not.
When printing is performed using the UNIX filters or CUPS, this setting is not reflected. If you do not want to print blank pages
in these printings, enable [Do not Print Blank Pages] in the UNIX filter command or CUPS setting. For the setting instructions,
refer to the User’s Manual Basic Guide or User’s Manual Advanced Guide.
16
Letterhead Print Mode
Select whether the last page (odd page number) is printed on the same side as the other
odd-number pages when printing both sides of a Raw print job whose total page number is
odd. Select [ON] to print the last page on the same side (back) as the other odd-number
pages. Select [OFF] to print it on the same side (front) as even-number pages.
[Setup] Item List
205
8 [Administration] Tab Page
Print Service settings
You can configure such print services as Raw TCP Print, LPD Print, IPP Print, FTP Print, NetWare Print, and Email Print.
The [Print Service] submenu can be accessed from the [Setup] menu on the [Administration] tab.
See the following pages for how to access it and information on the [Setup] menu:
P.22 “Access Policy Mode”
P.136 “[Setup] Item List”
Some settings may not be reflected on the touch panel immediately after saving them. The settings will be updated by
pressing the [RESET] button on the control panel or after an Auto Clear time period.
P.206 “Setting up Raw TCP Print”
P.208 “Setting up FTP Print”
P.206 “Setting up LPD Print”
P.208 “Setting up NetWare Print”
P.207 “Setting up IPP Print”
P.209 “Setting up Email Print”
Setting up Raw TCP Print
In Raw TCP Print, you can enable or disable the Raw TCP print service.
1
2
3
Item name
Description
1
Enable Raw TCP
Enable or disable Raw TCP print service. [Enable] is set as the default.
2
Port Number
If enabling the Raw TCP, enter the Raw TCP port number for the Raw TCP print. You can
enter a value in the range from 1024 to 32767. Generally the default value "9100" is used.
When the same port number as the secondary one in the HTTP setting (SSL port number when SSL in the HTTP setting is
enabled) is selected, you cannot access TopAccess or the e-Filing web utility. If you set it by mistake, use the control panel of
the equipment to change the HTTP setting and enter the correct port number.
3
Enable Raw bi-directional
Enable or disable Raw bi-directional communication. [Disable] is set as the default.
Setting up LPD Print
In LPD Print, you can set the LPD print options to enable the LPD/LPR print service.
1
2
3
Item name
Description
1
Enable LPD
Enable or disable LPD print service. [Enable] is set as the default.
2
Port Number
Enter the port number for LPR printing. You can enter a value in the range from 1 to 65535.
Generally the default value "515" is used.
When the same port number as the secondary one in the HTTP setting (SSL port number when SSL in the HTTP setting is
enabled) is selected, you cannot access TopAccess or the e-Filing web utility. If you set it by mistake, use the control panel of
the equipment to change the HTTP setting and enter the correct port number.
3
206
Banners
[Setup] Item List
Select whether to print a banner page for each print job using LPR printing. [OFF] is set as
the default.
8 [Administration] Tab Page
8.[Administration] Tab Page
Setting up IPP Print
In IPP Print, you can set the IPP Print options to enable the IPP print service.
1
2
3
4
5
6
7
8
9
10
11
Item name
Description
1
Enable IPP
Enable or disable the IPP print service. [Enable] is set as the default.
2
Port80 Enable
Enable or disable Port80 for IPP printing. Port631 is usually used for IPP access so users
must specify the IPP port to the URL, i.e. "http://<IP address or DNS name>:631/Print", for
the IPP port. When this is enabled, this equipment allows IPP access through the Port80,
which is the default port for the HTTP access so users do not have to specify the port
number in the IPP port, i.e. "http://<IP address or DNS name>/Print". [Disable] is set as the
default.
3
Port Number
If enabling the IPP, enter the IPP port number. You can enter a value in the range from 1 to
65535. Generally the default value "631" is used.
When the same port number as the secondary one in the HTTP setting (SSL port number when SSL in the HTTP setting is
enabled) is selected, you cannot access TopAccess or the e-Filing web utility. If you set it by mistake, use the control panel of
the equipment to change the HTTP setting and enter the correct port number.
4
URL
Display the URL for IPP printing. You cannot change the SSL URL for IPP printing. This SSL
URL should be set as the print port when users set up the printer driver for IPP printing if the
SSL for IPP printing is enabled.
5
Enable SSL
Enable or disable SSL for IPP printing. [Disable] is set as the default.
y When the SSL is enabled, users can print to the IPP print port using the SSL. To print to the IPP print port using the SSL,
specify the following URL for the IPP print port.
https://<IP Address>:<SSL Port Number>/Print
Example: https://192.168.53.204:443/Print
y Not all operating systems support SSL for all protocols.
6
SSL Port Number
Enter the port number for SSL. You can enter a value in the range from 1 to 65535.
Generally the default value "443" is used.
When the same port number as the secondary one in the HTTP setting (SSL port number when SSL in the HTTP setting is
enabled) is selected, you cannot access TopAccess or the e-Filing web utility. If you make a mistake, use the control panel of
the equipment to change the HTTP setting and enter the correct port number.
7
SSL URL
Display the SSL URL for IPP printing. You cannot change the SSL URL for IPP printing. This
SSL URL should be set as the print port when users set up the printer driver for IPP printing
if the SSL for IPP printing is enabled.
8
Printer Name
Enter the printer name for IPP printing. You can enter up to 127 alphanumerical characters
and symbols other than =, ; (semicolon), #, and \ (backslash). The MFP name is set as the
default.
9
Authentication
Enable or disable the authentication for creating the IPP queue on the client computers.
When this is enabled, the dialog box to enter a user name and password will be displayed
when a user creates the IPP print port.
y Disable — Select this to disable the authentication.
y Basic — Select this to enable the authentication.
When IPP printing is used for printing from a Macintosh computer, do not enable the authentication. The Mac OS does not
support the authentication for IPP printing.
[Setup] Item List
207
8 [Administration] Tab Page
Item name
Description
10
User Name
Enter the user name when the Authentication option is enabled. Users must enter this user
name to create an IPP queue on the client computers. You can enter up to 127
alphanumerical characters and symbols other than =, ; (semicolon), #, and \ (backslash).
11
Password
Enter the password when the Authentication option is enabled. Users must enter this
password to create an IPP queue on the client computers. You can enter up to 127
alphanumerical characters and symbols other than =, ; (semicolon), #, and \ (backslash).
“password” is set as the default.
Setting up FTP Print
In FTP Print, you can set the FTP Print options to enable the FTP print service.
1
2
3
Item name
Description
1
Enable FTP Printing
Enable or disable FTP print service. [Enable] is set as the default.
2
Print User Name
Enter the user name if you want to request the log-in user name from someone who
attempts FTP printing. You can enter up to 31 alphanumerical characters and symbols other
than =, ; (semicolon), #, and \ (backslash). If you leave this box blank, the default user name
"Print" is used.
3
Print Password
Enter the password if you want to request the log-in password of users who attempt FTP
printing. You can enter up to 31 alphanumerical characters and symbols other than =, ;
(semicolon), #, and \ (backslash).
Setting up NetWare Print
In NetWare Print, you can set the NetWare print options to enable the Novell print service.
1
2
3
Item name
208
Description
1
Print Server Name
Enter the print server name that is created in the NetWare file server. You can enter up to 47
alphanumerical characters and symbols other than =, ; (semicolon), #, and \ (backslash).
The MFP name is set as the default.
2
Password
Enter the password that is set to the print server, if required. You can enter up to 31
alphanumerical characters and symbols other than =, ; (semicolon), #, and \ (backslash).
3
Print Queue Scan Rate
Enter how frequently to scan the print queues for print jobs. This should be entered in
seconds. You can enter between 1 to 255. “30” is set as the default.
[Setup] Item List
8 [Administration] Tab Page
8.[Administration] Tab Page
Setting up Email Print
In Email Print, you can set how the E-mail print jobs are printed.
1
2
3
4
5
6
7
8
9
Item name
Description
1
Enable Print Header
Select whether to print the E-mail header when receiving E-mail print jobs. [Disable] is set
as the default.
2
Enable Print Message Body
Select whether to print the body message when receiving E-mail print jobs. [Enable] is set
as the default.
3
Maximum Email Body Print
Enter the maximum number of pages to print the body strings of the received E-mail print
job. You can enter between 1 to 99. “5” is set as the default.
4
Enable Print Email Error
Select whether to print the report when an error occurs for E-mail printing. [Enable] is set as
the default.
5
Enable Email Error Forward
Select whether to send an error message to an administrative E-mail address when E-mail
printing cannot be completed. [Disable] is set as the default.
6
Email Error Transfer Address
If enabling the Email Error Forward, enter an administrative E-mail address where the error
message is sent. You can enter up to 192 alphanumerical characters and symbols other
than =, ; (semicolon) , #, and \ (backslash).
7
Enable Partial Email
Select whether to print E-mail jobs that are partially received. [Disable] is set as the default.
8
Partial Wait time
Enter how long this equipment should wait before printing a partial E-mail job. Specify within
the range from 1 to 24 hours. “24” is set as the default.
9
MDN Reply
Select whether to send an MDN message reply or not when the equipment receives an
E-mail print job with an MDN request. [Disable] is set as the default.
[Setup] Item List
209
8 [Administration] Tab Page
Print Data Converter settings
For the details of the print data converter, contact your service representative or your service technician.
The [Print Data Converter] submenu can be accessed from the [Setup] menu on the [Administration] tab.
See the following pages for how to access it and information on the [Setup] menu:
P.22 “Access Policy Mode”
P.136 “[Setup] Item List”
1
2
3
Item name
Description
1
Print Data Converter
Select whether the print data converter function is enabled or disabled.
You cannot enable the function if the converter setting file has not been imported.
2
Import New Converter
Import the converter setting file.
Click the [Browse...] button to select the file to import and click [Open].
Check the file name and click the [Import] button.
3
210
Current Converter
[Setup] Item List
Display the imported converter setting file.
8 [Administration] Tab Page
8.[Administration] Tab Page
Embedded Web Browser settings
You can set the EWB (Embedded Web Browser) function to display a web page on the touch panel.
The [EWB] submenu can be accessed from the [Setup] menu on the [Administration] tab.
See the following pages for how to access it and information on the [Setup] menu:
P.22 “Access Policy Mode”
P.136 “[Setup] Item List”
The External Interface Enabler is required to use the EWB (Embedded Web Browser) function.
P.211 “Setting up Home Page Setting”
P.211 “Setting up Proxy Setting”
P.212 “Setting up Server Registration Setting”
P.212 “Setting up URL List for Menu Screen and Hard Button”
P.212 “[Add New URL] screen”
Setting up Home Page Setting
You can specify the home page for the EWB function.
1
Item name
1
Home Page
Description
Enter the URL of the home page.
Setting up Proxy Setting
You can set the proxy for the EWB function.
1
2
3
4
5
Item name
Description
1
Host Name
Enter the host name of the proxy server.
2
Port Number
Enter the port number of the proxy server.
3
Exception URL
Enter URLs which do not use the proxy server delimited with a semicolon (;).
4
Use automatic configuration script
Enable or disable the automatic configuration script.
5
URL
Specify the location of the PAC file by URL for the automatic configuration script.
Note the following points for the PAC file.
y Be sure to enter the protocol.
y Do not use functions.
[Setup] Item List
211
8 [Administration] Tab Page
Setting up Server Registration Setting
You can register the address of the server used for the EWB function.
1
2
3
4
Item name
Description
1
[Add] button
Registers the server address entered in the entry column into the list.
2
Entry column
Enter the server address.
3
[Delete] button
Deletes the selected server address from the list.
4
Server Address list
Lists the registered server addresses.
Setting up URL List for Menu Screen and Hard Button
You can register URLs to be displayed in the menu screen on the control panel and the hard buttons that start the EWB
function.
1
2
3
Item name
Description
1
[Add] button
Registers a URL to be displayed on the control panel and a hard button that starts the EWB
function.
P.212 “[Add New URL] screen”
2
[Delete] button
Deletes the URL and the hard button for the EWB function that you have selected from the
URL list (the menu screen and the hard button assignment).
3
URL list
Lists URLs which are displayed on the control panel and the names of the hard buttons that
start the EWB function.
[Add New URL] screen
1
2
3
4
5
Item name
212
Description
1
[Save] button
Registers the entered URL name and URL.
2
[Cancel] button
Cancels adding a URL.
3
URL Name
Enter the URL name to be registered.
4
URL
Enter the URL to be registered.
5
Assignment for Hard Button
Select a hard button on the control panel that starts the EWB function.
[Setup] Item List
8 [Administration] Tab Page
8.[Administration] Tab Page
Off Device Customization Architecture settings
Set ODCA (Off Device Customization Architecture) when you are linking external application software to services provided
by this equipment.
For details, refer to the application software manual.
The [ODCA] submenu can be accessed from the [Setup] menu on the [Administration] tab.
See the following pages for how to access it and information on the [Setup] menu:
P.22 “Access Policy Mode”
P.136 “[Setup] Item List”
P.213 “Setting up Network”
P.213 “Setting up Configuration”
Setting up Network
1
2
3
4
Item name
Description
1
Enable Port
Select whether the external connection is enabled or disabled.
2
Port Number
Specify the port number where the external connection is enabled.
3
Enable SSL Port
Select whether SSL is enabled or disabled for the external connection.
4
SSL Port Number
Specify the SSL port number where the external connection is enabled.
Setting up Configuration
1
Item name
1
Session Timeout(60-99999)
Description
Specify the duration to maintain the connection.
[Setup] Item List
213
8 [Administration] Tab Page
Version
Displays version information of your equipment.
The [Version] submenu can be accessed from the [Setup] menu on the [Administration] tab.
See the following pages for how to access it and information on the [Setup] menu:
P.22 “Access Policy Mode”
P.136 “[Setup] Item List”
1
2
3
4
Item name
214
Description
1
Printer Manufacture
2
Copier Firmware Version
Displays the firmware version of your equipment.
3
Copier Main ROM Version
Displays the main ROM version information of your equipment.
4
Copier Scanner ROM Version
Displays the copier scanner ROM version information of your equipment.
[Setup] Item List
Displays the manufacturer name of your equipment.
8 [Administration] Tab Page
8.[Administration] Tab Page
[Setup] How to Set and How to Operate
This section describes how to set up the equipment using TopAccess.
P.215 “Setting up General settings”
P.217 “Setting up Network settings”
P.219 “SNMP V3 settings”
P.225 “Setting up Copier settings”
P.227 “Setting up Fax settings”
P.229 “Setting up Save as file settings”
P.231 “Setting up E-mail settings”
P.233 “Setting up InternetFax settings”
P.235 “Setting up Printer/e-Filing settings”
P.236 “Setting up Printer settings”
P.239 “Setting up Print Service settings”
P.241 “Setting up Print Data Converter settings”
P.243 “Configuring the EWB function”
P.245 “Setting up Off Device Customization Architecture settings”
P.246 “Displaying version information”
The paper size for each tray cannot be set from TopAccess. Set from the touch panel of the equipment. For
instructions on how to set the paper size for each tray, refer to the User’s Manual Setup Guide.
Setting up General settings
You can configure general settings such as Device Information, Energy Save, Date & Time, and Web General Setting from
the [General] submenu under the [Setup] menu.
Some settings may not be reflected on the touch panel immediately after saving them. The settings will be updated by
pressing the [RESET] button on the control panel or after an Auto Clear time period.
Setting the General settings
1
Start TopAccess access policy mode.
2
3
Click the [Administration] tab.
P.22 “Access Policy Mode”
Click the [Setup] menu and [General] submenu.
The General submenu page is displayed.
[Setup] How to Set and How to Operate
215
8 [Administration] Tab Page
4
In the General submenu page, set the General settings as required.
You can set the following in this page.
P.137 “Setting up Device Information”
P.140 “Setting up Energy Save”
P.138 “Setting up Functions”
P.140 “Setting up Date & Time”
P.139 “Setting up e-Filing Notification Events”
P.141 “Setting up SNTP Service”
P.139 “Setting up Job Skip Control”
P.141 “Setting up Daylight Savings Time Setting”
P.139 “Setting up Restriction on Address Book Operation
by Administrator”
P.142 “Setting up WEB General Setting”
P.139 “Setting up Confidentiality Setting”
5
Click [Save].
The confirmation dialog box appears.
When you click [Cancel] before saving the setting changes, they will not be saved and will return to the current
settings. Note that they will not be returned to the factory default by clicking [Cancel]. This can only clear the
changes and restore the current settings before saving the changes.
6
Click [OK] to apply the changes.
The setting value may not be reflected on the screen even after changing the setting by clicking [Save] if you are using
Internet Explorer; however, the new setting is properly applied. In such a case, click the submenu to refresh the screen
and display the current setting status.
216
[Setup] How to Set and How to Operate
8 [Administration] Tab Page
Setting up Network settings
You can configure TCP/IP, Filtering, IPX/SPX, AppleTalk, Bonjour, LDAP, DNS, DDNS, SMB, NetWare, HTTP, SMTP
Client, SMTP Server, POP3, SNTP Settings, FTP Client, FTP Server, SNMP, Security Setting, and others from the
[Network] submenu under the [Setup] menu.
Setting the network settings
1
Start TopAccess access policy mode.
2
3
Click the [Administration] tab.
P.22 “Access Policy Mode”
Click the [Setup] menu and [Network] submenu.
The Network submenu page is displayed.
4
In the Network submenu page, click link or scroll the page to find the setting table, and
click the button of the setting to set the network settings as required.
You can set the following in this page.
P.143 “Setting up TCP/IP”
P.157 “Setting up HTTP Network Service”
P.145 “Setting up Filtering”
P.158 “Setting up SMTP Client”
P.147 “Setting up IPv6”
P.160 “Setting up SMTP Server”
P.148 “Setting up IPX/SPX”
P.161 “Setting up POP3 Network Service”
P.149 “Setting up AppleTalk”
P.162 “Setting up FTP Client”
P.149 “Setting up Bonjour”
P.163 “Setting up FTP Server”
P.150 “Setting up LDAP Session”
P.164 “Setting up SLP Session”
P.151 “Setting up DNS Session”
P.165 “Setting up SNMP Network Service”
P.152 “Setting up DDNS Session”
P.168 “Setting up Web Services Setting”
P.154 “Setting up SMB Session”
P.169 “Setting up LLTD Session”
[Setup] How to Set and How to Operate
217
8 [Administration] Tab Page
P.156 “Setting up NetWare Session”
5
P.172 “Setting up IP Security”
Click [Save].
The confirmation dialog box appears.
When you click [Cancel] before saving the setting changes, they will not be saved and will return to the current
settings. Note that they will not be returned to the factory default by clicking [Cancel]. This can only clear the
changes and restore the current settings before saving the changes.
6
Click [OK] to apply the changes.
This equipment starts initializing the network interface card to apply the changes.
During the initialization of the network interface card, the network will not be available. TopAccess will display
“Please restart after waiting a few minutes.” The touch panel will display “NETWORK INITIALIZING”. When this
message disappears, TopAccess will once again be available.
218
[Setup] How to Set and How to Operate
8 [Administration] Tab Page
8.[Administration] Tab Page
SNMP V3 settings
P.219 “Registering or editing SNMP V3 user information”
P.221 “Exporting SNMP V3 user information”
P.223 “Deleting SNMP V3 user information”
Registering or editing SNMP V3 user information
1
Click the [SNMP Network Service] button from the [Network] submenu under the
[Setup] menu.
2
Click [New] to create new SNMP V3 user information, or click the desired user name on
the list to edit SNMP V3 user information already registered.
The Create SNMP V3 User Information page is displayed.
3
Specify the following items and click [Save].
You can set the following in this page.
P.167 “[Create SNMP V3 User Information] screen”
The Create SNMP V3 User Information page is closed and the newly created user information is registered on the
SNMP V3 user information list.
The confirmation dialog box appears.
Clicking [Save] on the [Create SNMP V3 User Information] screen instantly registers the SNMP V3 user information,
enabling the registered user to access this equipment via SNMP over a network.
4
Click [OK].
5
Click [OK] to close the SNMP Network Service page.
6
Click [OK].
The specified or modified content is registered.
The confirmation dialog box appears.
The specified or modified content is registered.
[Setup] How to Set and How to Operate
219
8 [Administration] Tab Page
7
Click [Save] on the Network submenu page.
The confirmation dialog box appears.
When you click [Cancel] before saving the setting changes, they will not be saved and will return to the current
settings. Note that they will not be returned to the factory default by clicking [Cancel]. This can only clear the
changes and restore the current settings before saving the changes.
8
Click [OK] to apply the changes.
This equipment starts initializing the network interface card to apply the changes.
During the initialization of the network interface card, the network will not be available. TopAccess will display
“Please restart after waiting a few minutes.” The touch panel will display “NETWORK INITIALIZING”. When this
message disappears, TopAccess will once again be available.
220
[Setup] How to Set and How to Operate
8 [Administration] Tab Page
8.[Administration] Tab Page
Exporting SNMP V3 user information
1
Click the [SNMP Network Service] button from the [Network] submenu under the
[Setup] menu.
2
Select the check box of SNMP V3 user information that you want to export from the
corresponding list, and then click [Export].
The Export page is displayed.
When “Please save the Network settings before exporting the user information” appears, click [Save] on the
Network submenu page, and then export.
3
Right-click the link for the file name of user information to be exported, and then select
[Save Target As].
The [Save As] dialog box appears.
[Setup] How to Set and How to Operate
221
8 [Administration] Tab Page
4
Select the file location and click [Save].
5
Close the Export SNMP V3 User Information page.
The export operation may be unstable if administrators are accessing this equipment from multiple computers
simultaneously in the access policy mode to export information. Be sure that the administrator accesses this
equipment from only one computer when exporting.
222
[Setup] How to Set and How to Operate
8 [Administration] Tab Page
8.[Administration] Tab Page
Deleting SNMP V3 user information
1
Click the [SNMP Network Service] button from the [Network] submenu under the
[Setup] menu.
2
Select the check box of SNMP V3 user information that you want to delete from the
SNMP V3 user information list, and then click [Delete].
Click [Delete All] to delete all the SNMP V3 user information.
The confirmation dialog box appears.
3
Click [OK].
The SNMP V3 user information is deleted.
4
Click [OK] to close the SNMP Network Service page.
5
Click [OK].
6
Click [Save] on the Network submenu page.
The confirmation dialog box appears.
The specified or modified content is registered.
The confirmation dialog box appears.
When you click [Cancel] before saving the setting changes, they will not be saved and will return to the current
settings. Note that they will not be returned to the factory default by clicking [Cancel]. This can only clear the
changes and restore the current settings before saving the changes.
[Setup] How to Set and How to Operate
223
8 [Administration] Tab Page
7
Click [OK] to apply the changes.
This equipment starts initializing the network interface card to apply the changes.
During the initialization of the network interface card, the network will not be available. TopAccess will display
“Please restart after waiting a few minutes.” The touch panel will display “NETWORK INITIALIZING”. When this
message disappears, TopAccess will once again be available.
224
[Setup] How to Set and How to Operate
8 [Administration] Tab Page
8.[Administration] Tab Page
Setting up Copier settings
You can configure copy operation settings from the [Copier] submenu under the [Setup] menu.
Some settings may not be reflected on the touch panel immediately after saving them. The settings will be updated by
pressing the [RESET] button on the control panel or after an Auto Clear time period.
Setting the copier setting
1
Start TopAccess access policy mode.
2
3
Click the [Administration] tab.
P.22 “Access Policy Mode”
Click the [Setup] menu and [Copier] submenu.
The Copier submenu page is displayed.
4
In the Copier submenu page, set the copier settings as required.
You can set the following in this page.
P.183 “Setting up Default setting”
P.185 “Setting up Copy Job Enforcement Continue”
5
Click [Save].
The confirmation dialog box appears.
When you click [Cancel] before saving the setting changes, they will not be saved and will return to the current
settings. Note that they will not be returned to the factory default by clicking [Cancel]. This can only clear the
changes and restore the current settings before saving the changes.
[Setup] How to Set and How to Operate
225
8 [Administration] Tab Page
6
Click [OK] to apply the changes.
The setting value may not be reflected on the screen even after changing the setting by clicking [Save] if you are using
Internet Explorer; however, the new setting is properly applied. In such a case, click the submenu to refresh the screen
and display the current setting status.
226
[Setup] How to Set and How to Operate
8 [Administration] Tab Page
8.[Administration] Tab Page
Setting up Fax settings
You can configure the fax device and fax operation settings from the [Fax] submenu under the [Setup] menu.
y Some settings may not be reflected on the touch panel immediately after saving them. The settings will be updated
by pressing the [RESET] button on the control panel or after an Auto Clear time period.
y The [Fax] submenu in the [Setup] menu is available only when the Fax Unit is installed.
Setting the fax settings
1
Start TopAccess access policy mode.
2
3
Click the [Administration] tab.
P.22 “Access Policy Mode”
Click the [Setup] menu and [Fax] submenu.
The Fax submenu page is displayed.
4
In the Fax submenu page, set the fax settings as required.
You can set the following in this page.
P.186 “Setting up Fax Setting”
5
Click [Save].
The confirmation dialog box appears.
When you click [Cancel] before saving the setting changes, they will not be saved and will return to the current
settings. Note that they will not be returned to the factory default by clicking [Cancel]. This can only clear the
changes and restore the current settings before saving the changes.
[Setup] How to Set and How to Operate
227
8 [Administration] Tab Page
6
Click [OK] to apply the changes.
The setting value may not be reflected on the screen even after changing the setting by clicking [Save] if you are using
Internet Explorer; however, the new setting is properly applied. In such a case, click the submenu to refresh the screen
and display the current setting status.
228
[Setup] How to Set and How to Operate
8 [Administration] Tab Page
8.[Administration] Tab Page
Setting up Save as file settings
You can configure file saving operations and the Save as File function by the N/W-Fax driver from the [Save as file]
submenu under the [Setup] menu.
Some settings may not be reflected on the touch panel immediately after saving them. The settings will be updated by
pressing the [RESET] button on the control panel or after an Auto Clear time period.
Setting the Save as file settings
1
Start TopAccess access policy mode.
2
3
Click the [Administration] tab.
P.22 “Access Policy Mode”
Click the [Setup] menu and [Save as file] submenu.
The Save as file submenu page is displayed.
4
In the Save as file submenu page, set the Save as file settings as required.
You can set the following in this page.
P.189 “Setting up Local Storage Path”
P.190 “Setting up Storage Maintenance”
P.190 “Setting up Destination”
P.190 “Setting up Folder Name”
P.191 “Setting up Format”
P.191 “Setting up Single Page Data Saving Directory”
P.192 “Setting up File Composition”
P.192 “Setting up User Name and Password at User Authentication for Save as File”
P.192 “Setting up Searching Interval”
P.193 “Setting up Remote 1 and Remote 2”
P.196 “Setting up N/W-Fax Destination”
P.196 “Setting up N/W-Fax Folder”
[Setup] How to Set and How to Operate
229
8 [Administration] Tab Page
5
Click [Save].
The confirmation dialog box appears.
When you click [Cancel] before saving the setting changes, they will not be saved and will return to the current
settings. Note that they will not be returned to the factory default by clicking [Cancel]. This can only clear the
changes and restore the current settings before saving the changes.
6
Click [OK] to apply the changes.
When using Internet Explorer, the changes may not be reflected on the Save as file page immediately after changing
the settings and clicking [Save]. If that happens, click the [Save as file] submenu to refresh the page.
230
[Setup] How to Set and How to Operate
8 [Administration] Tab Page
8.[Administration] Tab Page
Setting up E-mail settings
You can configure E-mail transmission operations from the [E-mail] submenu under the [Setup] menu.
Some settings may not be reflected on the touch panel immediately after saving them. The settings will be updated by
pressing the [RESET] button on the control panel or after an Auto Clear time period.
Setting the E-mail settings
1
Start TopAccess access policy mode.
2
3
Click the [Administration] tab.
P.22 “Access Policy Mode”
Click the [Setup] menu and [Email] submenu.
The Email submenu page is displayed.
4
In the Email submenu page, set the E-mail settings as required.
You can set the following in this page.
P.198 “Email settings”
5
Click [Save].
The confirmation dialog box appears.
When you click [Cancel] before saving the setting changes, they will not be saved and will return to the current
settings. Note that they will not be returned to the factory default by clicking [Cancel]. This can only clear the
changes and restore the current settings before saving the changes.
[Setup] How to Set and How to Operate
231
8 [Administration] Tab Page
6
Click [OK] to apply the changes.
The setting value may not be reflected on the screen even after changing the setting by clicking [Save] if you are using
Internet Explorer; however, the new setting is properly applied. In such a case, click the submenu to refresh the screen
and display the current setting status.
232
[Setup] How to Set and How to Operate
8 [Administration] Tab Page
8.[Administration] Tab Page
Setting up InternetFax settings
You can configure Internet Fax operations from the [InternetFax] submenu under the [Setup] menu.
Some settings may not be reflected on the touch panel immediately after saving them. The settings will be updated by
pressing the [RESET] button on the control panel or after an Auto Clear time period.
Setting the Internet Fax settings
1
Start TopAccess access policy mode.
2
3
Click the [Administration] tab.
P.22 “Access Policy Mode”
Click the [Setup] menu and [InternetFax] submenu.
The InternetFax submenu page is displayed.
4
In the InternetFax submenu page, set the Internet Fax settings as required.
You can set the following in this page.
P.200 “Setting up InternetFax Setting”
5
Click [Save].
The confirmation dialog box appears.
When you click [Cancel] before saving the setting changes, they will not be saved and will return to the current
settings. Note that they will not be returned to the factory default by clicking [Cancel]. This can only clear the
changes and restore the current settings before saving the changes.
[Setup] How to Set and How to Operate
233
8 [Administration] Tab Page
6
Click [OK] to apply the changes.
The setting value may not be reflected on the screen even after changing the setting by clicking [Save] if you are using
Internet Explorer; however, the new setting is properly applied. In such a case, click the submenu to refresh the screen
and display the current setting status.
234
[Setup] How to Set and How to Operate
8 [Administration] Tab Page
8.[Administration] Tab Page
Setting up Printer/e-Filing settings
You can configure how to continue print jobs and e-Filing jobs from the [Printer/e-Filing] submenu under the [Setup] menu.
Some settings may not be reflected on the touch panel immediately after changing them. The settings will be updated
by pressing the [RESET] button on the control panel or after an time period.
Setting the Printer/e-Filing settings
1
Start TopAccess access policy mode.
2
3
Click the [Administration] tab.
P.22 “Access Policy Mode”
Click the [Setup] menu and [Printer/e-Filing] submenu.
The Printer/e-Filing submenu page is displayed.
4
In the Printer/e-Filing submenu page, set the Printer/e-Filing settings as required.
You can set the following in this page.
P.201 “Setting up Printer/e-Filing Job Enforcement Continue”
5
Click [Save].
The confirmation dialog box appears.
When you click [Cancel] before saving the setting changes, they will not be saved and will return to the current
settings. Note that they will not be returned to the factory default by clicking [Cancel]. This can only clear the
changes and restore the current settings before saving the changes.
6
Click [OK] to apply the changes.
[Setup] How to Set and How to Operate
235
8 [Administration] Tab Page
The setting value may not be reflected on the screen even after changing the setting by clicking [Save] if you are using
Internet Explorer; however, the new setting is properly applied. In such a case, click the submenu to refresh the screen
and display the current setting status.
Setting up Printer settings
You can configure printer operations and printer options for RAW print jobs from the [Printer] submenu under the [Setup]
menu.
P.237 “Setting up Raw Job Setting”
Setting the Printer settings
1
Start TopAccess access policy mode.
2
3
Click the [Administration] tab.
P.22 “Access Policy Mode”
Click the [Setup] menu and [Printer] submenu.
The Printer submenu page is displayed.
4
In the Printer submenu page, set the Printer settings as required.
You can set the following in this page.
P.202 “Setting up General Setting”
P.203 “Setting up Default Raw Job Setting”
P.204 “Setting up Raw Job Setting”
236
[Setup] How to Set and How to Operate
8 [Administration] Tab Page
8.[Administration] Tab Page
5
Click [Save].
The confirmation dialog box appears.
When you click [Cancel] before saving the setting changes, they will not be saved and will return to the current
settings. Note that they will not be returned to the factory default by clicking [Cancel]. This can only clear the
changes and restore the current settings before saving the changes.
6
Click [OK] to apply the changes.
The setting value may not be reflected on the screen even after changing the setting by clicking [Save] if you are using
Internet Explorer; however, the new setting is properly applied. In such a case, click the submenu to refresh the screen
and display the current setting status.
Setting up Raw Job Setting
In Raw Job Setting, you can add up to 16 LPR queue names and specify the raw job setting for each queue. These queue
names can be used when printing without a printer driver, such as printing from UNIX workstation. You can add, edit, or
delete an LPR queue.
P.237 “Adding or editing an LPR queue”
P.238 “Deleting an LPR queue”
Adding or editing an LPR queue
1
To add a new LPR queue, click [Add] in Raw Job Setting.
To edit an existing LPR queue, select a radio button of a queue that you want to edit
and click [Edit].
The Add New LPR Queue page is displayed.
[Setup] How to Set and How to Operate
237
8 [Administration] Tab Page
2
Enter the following items as required.
You can set the following in this page.
P.204 “Setting up Raw Job Setting”
3
Click [Save].
The queue name is added to the list.
Deleting an LPR queue
1
Select a radio button of a queue that you want to delete and click [Delete].
The confirmation dialog box appears.
2
Click [OK].
The selected queue is deleted.
238
[Setup] How to Set and How to Operate
8 [Administration] Tab Page
8.[Administration] Tab Page
Setting up Print Service settings
You can configure print services such as Raw TCP Print, LPD Print, IPP Print, FTP Print, NetWare Print, and Email Print
from the [Print Service] submenu under the [Setup] menu.
Some settings may not be reflected on the touch panel immediately after saving them. The settings will be updated by
pressing the [RESET] button on the control panel or after an Auto Clear time period.
Setting the Print Service settings
1
Start TopAccess access policy mode.
2
3
Click the [Administration] tab.
P.22 “Access Policy Mode”
Click the [Setup] menu and [Print Service] submenu.
The Print Service submenu page is displayed.
4
In the Print Service submenu page, set the Print Service settings as required.
You can set the following in this page.
P.206 “Setting up Raw TCP Print”
P.206 “Setting up LPD Print”
P.207 “Setting up IPP Print”
P.208 “Setting up FTP Print”
P.208 “Setting up NetWare Print”
P.209 “Setting up Email Print”
5
Click [Save].
The confirmation dialog box appears.
When you click [Cancel] before saving the setting changes, they will not be saved and will return to the current
settings. Note that they will not be returned to the factory default by clicking [Cancel]. This can only clear the
changes and restore the current settings before saving the changes.
[Setup] How to Set and How to Operate
239
8 [Administration] Tab Page
6
Click [OK] to apply the changes.
The setting value may not be reflected on the screen even after changing the setting by clicking [Save] if you are using
Internet Explorer; however, the new setting is properly applied. In such a case, click the submenu to refresh the screen
and display the current setting status.
240
[Setup] How to Set and How to Operate
8 [Administration] Tab Page
8.[Administration] Tab Page
Setting up Print Data Converter settings
For information on Print Data Converter, contact your service representative or your service technician.
You can configure Print Data Converter from the [Print Data Converter] submenu under the [Setup] menu.
Some settings may not be reflected on the touch panel immediately after changing them. The settings will be updated
by pressing the [RESET] button on the control panel or after an Auto Clear time period.
Setting the Print Data Converter settings
1
Start TopAccess access policy mode.
2
3
Click the [Administration] tab.
P.22 “Access Policy Mode”
Click the [Setup] menu and [Print Data Converter] submenu.
The Print Data Converter submenu page is displayed.
4
In the Print Data Converter submenu page, set the Print Data Converter settings as
required.
You can set the following in this page.
P.210 “Print Data Converter settings”
5
Click [Save].
The confirmation dialog box appears.
When you click [Cancel] before saving the setting changes, they will not be saved and will return to the current
settings. Note that they will not be returned to the factory default by clicking [Cancel]. This can only clear the
changes and restore the current settings before saving the changes.
[Setup] How to Set and How to Operate
241
8 [Administration] Tab Page
6
Click [OK] to apply the changes.
The setting value may not be reflected on the screen even after changing the setting by clicking [Save] if you are using
Internet Explorer; however, the new setting is properly applied. In such a case, click the submenu to refresh the screen
and display the current setting status.
242
[Setup] How to Set and How to Operate
8 [Administration] Tab Page
8.[Administration] Tab Page
Configuring the EWB function
You can configure the EWB (Embedded Web Browser) function which displays web pages on the control panel from the
[EWB] submenu under the [Setup] menu.
The EWB function is available only when the External Interface Enabler is installed on this equipment.
P.243 “Registering a server”
P.244 “Deleting a server”
Registering a server
1
Start TopAccess access policy mode.
2
3
Click the [Administration] tab.
P.22 “Access Policy Mode”
Click the [Setup] menu and [EWB] submenu.
The EWB submenu page is displayed.
4
To register a server for the EWB function, enter the server address and then click
[Add].
The server is registered.
To register more than one server, repeat this procedure.
5
Click [Save] on the [EWB] submenu.
[Setup] How to Set and How to Operate
243
8 [Administration] Tab Page
Deleting a server
1
Start TopAccess access policy mode.
2
3
Click the [Administration] tab.
P.22 “Access Policy Mode”
Click the [Setup] menu and [EWB] submenu.
The EWB submenu page is displayed.
4
To delete a server registered for the EWB function, select the server that you want to
delete, and then click [Delete].
5
Click [OK].
The server is deleted.
6
244
Click [Save] on the [EWB] submenu.
[Setup] How to Set and How to Operate
8 [Administration] Tab Page
8.[Administration] Tab Page
Setting up Off Device Customization Architecture settings
For the details of ODCA (Off Device Customization Architecture), contact your service representative or your service
technician.
You can configure ODCA (Off Device Customization Architecture) from the [ODCA] submenu under the [Setup] menu.
Some settings may not be reflected on the touch panel immediately after changing them. The settings will be updated
by pressing the [RESET] button on the control panel or after an Auto Clear time period.
Setting the Off Device Customization Architecture settings
1
Start TopAccess access policy mode.
2
3
Click the [Administration] tab.
P.22 “Access Policy Mode”
Click the [Setup] menu and [ODCA] submenu.
The ODCA submenu page is displayed.
4
In the ODCA submenu page, set the Off Device Customization Architecture settings as
required.
You can set the following in this page.
P.213 “Setting up Network”
P.213 “Setting up Configuration”
5
Click [Save].
The confirmation dialog box appears.
When you click [Cancel] before saving the setting changes, they will not be saved and will return to the current
settings. Note that they will not be returned to the factory default by clicking [Cancel]. This can only clear the
changes and restore the current settings before saving the changes.
[Setup] How to Set and How to Operate
245
8 [Administration] Tab Page
6
Click [OK] to apply the changes.
The setting value may not be reflected on the screen even after changing the setting by clicking [Save] if you are using
Internet Explorer; however, the new setting is properly applied. In such a case, click the submenu to refresh the screen
and display the current setting status.
Displaying version information
You can check the system software version information of this equipment from the [Version] submenu under the [Setup]
menu.
Displaying the version information
1
Start TopAccess access policy mode.
2
3
Click the [Administration] tab.
P.22 “Access Policy Mode”
Click the [Setup] menu and [Version] submenu.
The Version submenu page is displayed.
4
246
In the Version submenu page, you can confirm the version information of the system
software.
[Setup] How to Set and How to Operate
8 [Administration] Tab Page
8.[Administration] Tab Page
[Security] Item List
Users who are granted administrator privileges in access policy mode can access the [Security] menu from the
[Administration] tab.
See the following pages for how to access it:
P.22 “Access Policy Mode”
P.247 “Authentication settings”
P.256 “Certificate management settings”
P.260 “Password Policy settings”
Authentication settings
You can restrict user operations using the authentication function of your equipment.
The [Authentication] submenu can be accessed from the [Security] menu on the [Administration] tab.
See the following pages for how to access it and information on [Security] menu:
P.22 “Access Policy Mode”
P.247 “[Security] Item List”
P.248 “Setting up Department Setting”
P.249 “Setting up User Authentication Setting”
P.252 “Setting up Email Authentication”
P.253 “Setting up Email Address Setting”
P.254 “Restriction Setting for Destination”
P.255 “Setting up Single Sign On Setting”
[Security] Item List
247
8 [Administration] Tab Page
Setting up Department Setting
When you want to manage the counters for every department, enable department management. If this is done, the
department code input screen will be displayed on the computer and the touch panel when copying, scanning, faxing,
faxing via the Internet, and operating on e-Filing to enable you to manage operations by departments.
The following applications can access your equipment regardless of the department setting.
- AddressBook Viewer
- Backup/Restore Utility
- TWAIN Driver
- File Downloader
1
2
3
4
5
6
7
8
Item name
Description
1
Department Code
Select whether or not to enable department management. [Disable] is set as the default.
2
Require Department Code in User
Registration
Select whether or not to register the department code when registering a user. [Disable] is
set as the default.
3
Invalid Department Code Print Job
Select whether or not to print jobs without a department code or with an invalid department
code when department management is enabled.
y Store to invalid job list — Select this to register print jobs which failed authentication in
the invalid job list.
y Print — Select this to print jobs with an invalid department code.
y Delete — Select this to delete jobs with an invalid department code.
If the Invalid Department Code Print Job is set to Store to invalid job list and the SNMP communication is enabled in the printer
driver, the user will be prompted to enter the correct department code if an invalid department code was entered in the printer
driver.
*
248
4
Department Management (Copy)
When this function is enabled, the following counters are managed in each department.
- Number of copied sheets
- Number of originals scanned while copying
[Enable] is set as the default.
5
Department Management (FAX)
When this function is enabled, the following counters are managed in each department.
- Number of transmitted fax pages
- Number of original pages scanned while transmitting faxes
- Number of received fax pages
- Number of received fax pages which are printed*
[Enable] is set as the default.
6
Department Management (Print)
When this function is enabled, the number of outputs in printing (for printing, received E-mail
and Internet Fax) is managed in each department.
[Enable] is set as the default.
7
Department Management (Scan)
When this function is enabled, the number of originals scanned such as when they are
stored in the shared folder is managed in each department.
[Enable] is set as the default.
8
Department Management (List)
When this function is enabled, the number of system page outputs is managed in each
department.
[Enable] is set as the default.
The number of outputs are only counted for received faxes, in which the department code needs to be entered, such as manual reception,
polling reception or the printing of originals stored in the confidential mailbox and the bulletin mailbox.
[Security] Item List
8 [Administration] Tab Page
8.[Administration] Tab Page
Setting up User Authentication Setting
You can configure user authentication to access your equipment.
1
2
3
4
5
6
7
8
Item name
1
User Authentication
2
Authentication failed print job/Raw
Print Job
Description
Select whether or not to enable user authentication. [Disable] is set as the default.
You cannot configure "E-mail authentication" if you enable user authentication.
Select whether or not to print jobs which have failed user authentication.
y Hold — Select this to register in the hold print job.
y Print — Select this to print jobs which failed authentication.
y Delete — Select this to delete jobs which failed authentication.
y When the N/W-Fax driver is used, selecting [Hold] deletes the job.
y When a color copy is set, selecting [Print] deletes the job.
3
Auto Release on Login
Specify whether to process private jobs and hold jobs at login.
y Disable — Select this not to print at login.
y Enable — Select this to print at login.
4
Use Password Authentication for
Print Job
Enables the password authentication for print jobs. The user name and password are
required to execute printing.
5
Enable Guest User
Enables operations by the guest user.
6
Authentication Type
Select the authentication method.
y MFP Local Authentication
You can manage network users with the MFP local authentication of your equipment
when you do not have a user authentication system in your environment.
When MFP local authentication is enabled, users must enter the user name and
password that is registered in the equipment to operate the touch panel.
y Windows Domain Authentication
You can manage network users with Windows domain authentication when you already
manage your network using Windows domains.
When Windows domain authentication is enabled, users must enter the user name and
password that is registered in the Windows domain to operate the touch panel.
P.250 “Windows Domain Authentication”
y LDAP Authentication
You can manage network users with LDAP authentication when you already manage
your network using LDAP. When LDAP authentication is enabled, users must enter the
user name and password that is registered in the LDAP server to operate the touch
panel.
P.251 “LDAP Authentication”
7
PIN Code Authentication
Select the PIN code authentication method.
y Disable — Select this no to use the PIN code authentication. Use the user name and
password for authentication.
y Enable — Select this to use the PIN code authentication. Instead of the PIN code, it is
possible to use the user name and password for authentication.
8
Minimum PIN Code Length
Enter a figure that specifies the minimum digits for the PIN code.
[Security] Item List
249
8 [Administration] Tab Page
Windows Domain Authentication
1
2
3
4
5
6
7
Item name
Description
1
Create User Information
Automatically
Select whether or not to register user information automatically to this equipment. [Enable]
is set as the default.
2
Use NT Domain Server
Select this check box if you are managing the domain using the NT domain controller.
3
Domain 1 - Domain 16
Specify the domain you want to use for Windows domain authentication.
Click one of the domains and specify the following items in the displayed screen to register
the domain.
Domain Name — Enter the domain name.
PDC — Enter the server name or IP address of the Primary Domain Controller (PDC). You
can enter up to 128 alphanumerical characters and symbols.
BDC — Enter the server name or IP address of the Backup Domain Controller (BDC) as
required. You can enter up to 128 alphanumerical characters and symbols.
If the wrong primary or backup domain controller is specified, the [OK] in the user authentication screen on the touch panel is
highlighted while this equipment searches for the primary or backup domain controller for 2 to 4 minutes.
250
4
Connection Timeout
Enter the timeout period for quitting communication when no response is received from the
PDC or BDC server. Specify within the range from 1 to 180 seconds.
5
Role Based Access Setting
Configure role based access using an LDAP server.
Role Based Access using LDAP server — Select whether enable or disable role based
access. [Disable] is set as the default.
LDAP Server — Select the LDAP server that manages the Role Based Access Control.
[Security] Item List
8 [Administration] Tab Page
8.[Administration] Tab Page
Item name
Description
6
PIN Code Authentication Setting
PIN Code Authentication — Select the PIN code authentication method.
y Disable — Select this no to use the PIN code authentication. Use the user name and
password for authentication.
y Enable — Select this to use the PIN code authentication. Instead of the PIN code, it is
possible to use the user name and password for authentication.
Minimum PIN Code Length — Enter a figure that specifies the minimum digits for the PIN
code.
7
LDAP Server1 - LDAP Server3
Set the following items for LDAP Server1 when you use the LDAP authentication:
Windows Server — Select this when LDAP is running on a Windows server.
LDAP Server (Other than Windows Server) — Select this when the LDAP is running on a
server other than a Windows one.
Attribute type of "User Name" — Enter the attribute type of “User Name” for “LDAP Server
(Other than Windows Server)”.
Attribute type of "PIN" — Enter the attribute type of “PIN” for the PIN code authentication.
When you use more than one LDAP server, select [Enable] for LDAP Server2 and/or LDAP
Server3 and set up the LDAP server as necessary. See the settings for LDAP Server1.
Select [Disable] for unused LDAP servers.
LDAP Authentication
1
2
3
4
5
Item name
Description
1
Create User Information
Automatically
Select whether or not to register user information automatically to this equipment. [Enable]
is set as the default.
2
LDAP Server1 - LDAP Server16
Select the LDAP server you want to use for LDAP authentication.
Click one of the LDAP servers and specify the following items in the displayed screen to
register the LDAP server.
Windows Server — Select this when LDAP is running on a Windows server.
LDAP Server (Other than Windows Server) — Select this when the LDAP is running on a
server other than a Windows one.
3
Role Based Access Setting
Configure role based access using an LDAP server.
Role Based Access using LDAP server — Select whether enable or disable role based
access. [Disable] is set as the default.
LDAP Server — Select the LDAP server that manages the Role Based Access Control.
[Security] Item List
251
8 [Administration] Tab Page
Item name
Description
4
PIN Code Authentication Setting
PIN Code Authentication — Select the PIN code authentication method.
y Disable — Select this no to use the PIN code authentication. Use the user name and
password for authentication.
y Enable — Select this to use the PIN code authentication. Instead of the PIN code, it is
possible to use the user name and password for authentication.
Minimum PIN Code Length — Enter a figure that specifies the minimum digits for the PIN
code.
5
LDAP Server1 - LDAP Server3
Set the following items for LDAP Server1 when you use the LDAP authentication:
Windows Server — Select this when LDAP is running on a Windows server.
LDAP Server (Other than Windows Server) — Select this when the LDAP is running on a
server other than a Windows one.
Attribute type of "User Name" — Enter the attribute type of “User Name” for “LDAP Server
(Other than Windows Server)”.
Attribute type of "PIN" — Enter the attribute type of “PIN” for the PIN code authentication.
When you use more than one LDAP server, select [Enable] for LDAP Server2 and/or LDAP
Server3 and set up the LDAP server as necessary. See the settings for LDAP Server1.
Select [Disable] for unused LDAP servers.
Setting up Email Authentication
When E-mail authentication is enabled, users must enter the user name and password before performing Scan to Email.
1
Item name
1
Email Authentication
Description
Select whether or not to enable E-mail authentication.
y SMTP:
You can use SMTP authentication of the equipment to manage user authentication.
When SMTP authentication is enabled, users must enter the user name and password
that is registered in the SMTP server to perform Scan to Email from the touch panel.
P.252 “SMTP”
y LDAP:
You can manage network users with LDAP authentication when you already manage
your network using LDAP.
When LDAP authentication is enabled, users must enter the user name and password
that is registered in the LDAP server to perform Scan to Email from the touch panel.
P.253 “LDAP”
You must carry out "E-mail address setting" to use E-mail authentication.
P.253 “Setting up Email Address Setting”
SMTP
1
2
3
Item name
252
Description
1
Internet Fax Not Allowed
Select this check box to prohibit Internet Fax transmissions.
This will disable Internet Fax transmission for all users.
2
SMTP Server Address
Enter the IP address or FQDN of the SMTP server used for E-mail authentication.
[Security] Item List
8 [Administration] Tab Page
8.[Administration] Tab Page
Item name
3
Authentication
Description
Select the authentication method.
y Plain — Select this to access the SMTP server using the plain authentication.
y Login — Select this to access the SMTP server using the login authentication.
y CRAM-MD5 — Select this to access the SMTP server using the CRAM-MD5
authentication.
y Digest-MD5 — Select this to access the SMTP server using the Digest-MD5
authentication.
y Kerberos — Select this to access the SMTP server using the Kerberos authentication.
y NTLM(IWA) — Select this to access the SMTP server using the NTLM (IWA)
authentication.
y Auto — Select this to access the SMTP server using the appropriate authentication that
this equipment detects.
LDAP
1
2
3
Item name
1
Description
Internet Fax Not Allowed
Select this check box to prohibit Internet Fax transmissions.
This will disable Internet Fax transmission for all users.
2
LDAP Server
Select the LDAP server you want to use for LDAP authentication.
3
LDAP Server (Other than Windows
Server)
Select if LDAP is running on a server other than a Windows server.
When this is selected, you have to specify the attribute type of ‘User Name’.
Setting up Email Address Setting
You can configure the E-mail address when E-mail authentication is enabled.
1
2
3
Item name
1
From Address
Description
Specify the From Address.
From Address of Email Setting:
Select this to set the From Address in E-mail settings.
User Name + @ + Mail Domain Name:
Select this to specify the From Address in the "User Name + @ + Mail Domain Name"
format.
The authenticated user name is employed as the "User Name".
The domain name specified in the [Domain Name] box is used as the "Mail Domain Name".
When this is selected, enter the domain name in the [Domain Name] box.
User Name of LDAP:
Select this to set the From Address as the E-mail address found in the LDAP server.
Select the LDAP server in the [LDAP Server] box, enter the schema to search the user
name in the [Attribute type of "User Name"] box, the E-mail address schema to set as
sender address in the [Attribute type of "Email Address"], and the domain name used when
the user name is not found in the [Domain Name] box.
The equipment searches the authenticated user name in [Attribute type of "User Name"] of
the LDAP server.
If the registered user name has been found in the specified schema, the schema value set in
[Attribute type of "Email Address"] becomes the sender address. If the registered user name
has not been found in the specified schema, the format set in [User Name + @ + Mail
Domain Name] becomes the sender address.
From Address cannot be edited in Scan to Email.:
Select this check box if you do not want to allow users to edit the From Address.
[Security] Item List
253
8 [Administration] Tab Page
Item name
Description
2
From Name
Specify the From Name.
Account Name of From Address + From Name of Email Setting:
Select this to specify the From Name in the "Account Name of From Address + From Name
of Email Setting" format.
From Name of Email setting:
Select this to set the From Name which has been specified in E-mail settings.
User Name of LDAP:
Select this to set the From Name as the E-mail address found in the LDAP server.
Select the LDAP server in the [LDAP Server] box, enter the schema to search the user
name in [Attribute type of "User Name"] and the schema of the from address to set as the
From Name in [Attribute type or "From Name"].
The equipment searches user name authenticated in [Attribute type of "User Name"] of the
LDAP server.
If the user name authenticated has been found in the specified schema, the schema value
set in the [Attribute type of "From Name"] becomes the sender name.
If the user name authenticated has not been found in the specified schema, the format set in
[Account Name of From Address + From Name of Email Setting] becomes the sender
name.
3
Restriction setting for Email
Destination
When User Authentication or Email Authentication is enabled, select whether to set the
Email address of the authenticated user as a destination.
y None — Not used as a destination.
y Fixed To — Only the Email address of the authenticated user is used for "To".
y To — The Email address of the authenticated user is added to "To".
y Cc — The Email address of the authenticated user is added to "Cc".
y Bcc — The Email address of the authenticated user is added to "Bcc".
Restriction Setting for Destination
You can restrict the destination of the From Address to the one registered in the LDAP server when transmitting via fax,
internet fax or E-mail.
1
2
Item name
254
Description
1
Restriction Setting for Destination
Enable: Select this to restrict the destination of the From Address to the one registered in
the LDAP server when transmitting via fax, internet fax or E-mail.
Disable: Select this not to restrict the destination of the From Address when transmitting via
fax, internet fax or E-mail.
2
LDAP Server1
LDAP Server2
LDAP Server3
This field is displayed when the Restriction Setting for Destination is enabled.
Three LDAP servers to search the destination are displayed. To register the LDAP server,
click an item name.
P.255 “[Restriction Setting for Destination] screen”
[Security] Item List
8 [Administration] Tab Page
8.[Administration] Tab Page
[Restriction Setting for Destination] screen
You can register an LDAP server to be used to search the destination.
1
2
3
Item name
Description
1
[OK] button
Select this to register the LDAP server which has been set.
2
[Cancel] button
Select this to cancel the registration of the LDAP server.
3
Restriction Setting for Destination
Select this to set an LDAP server to be used to search the destination.
You can register up to three LDAP servers.
Setting up Single Sign On Setting
Normally users are required to enter the user name and password for E-mail authentication and Scan to Email; however,
you can enable the single sign on setting to eliminate these operations.
1
Item name
1
Single Sign On for Scan to Email
Description
Select whether or not to enable single sign on. [Enable] is set as the default.
Setting up Home Directory Setting
You can configure the home directory when home directory is enabled.
1
2
Item name
Description
1
Home Directory
Select whether or not to enable home directory.
2
Home Directory Server
Specify the home directory server.
y Use User Authentication Server — Select this to use the user authentication server as
the home directory server.
y Use User Authentication Server(Use specific server for Card Authentication) —
Select this to use the user authentication server as the home directory server. However,
use the specified server as the home directory server in the case of Card Authentication.
y User Specific Server — Select this to specify the home directory server.
If you select “Use User Authentication Server (Use specific server for Card Authentication)”
or “User Specific Server”, the LDAP server list appears on the screen. You can set up to 3
servers. Click the “Primary” button to select the primary server.
Click the LDAP server name on the list to open the Home Directory Server Setting screen.
Select the home directory server for each server name. If you do not specify the server,
select “Disable”.
[Security] Item List
255
8 [Administration] Tab Page
Certificate management settings
You can manage device certificates and client certificates.
The [Certificate Management] submenu can be accessed from the [Security] menu on the [Administration] tab.
See the following pages for how to access it and information on the [Security] menu:
P.22 “Access Policy Mode”
P.247 “[Security] Item List”
P.256 “Setting up Device Certificate”
P.257 “Setting up Client Certificate”
P.258 “Setting up Certificate Setting”
P.259 “Setting up CA Certificate”
P.259 “Setting up Certificate Files”
Setting up Device Certificate
You can configure the device certificate for encrypted communications using wireless LAN, IEEE 802.1X authentication,
IPsec, or SSL.
1
2
3
Item name
256
Description
1
self-signed certificate
Creates a certificate for encrypted communications using SSL on your device.
[Create] button — Displays the [Create self-signed certificate] screen. Specify items
necessary for the certificate to create the self-signed certificate.
P.257 “[Create self-signed certificate] screen”
[Export] button — Exports the created self-signed certificate.
2
Import
Import the certificate for encrypted communications using wireless LAN, IEEE 802.1X
authentication, IPsec, or SSL.
[Browse] button — Allows you to select the certificate file.
[Upload] button — Uploads the selected certificate file.
[Delete] button — Deletes the registered certificate file.
3
SCEP(Automatic)
Automatically acquires the certificate for encrypted communications using IP sec or SSL.
CA Server Address (Primary) — Enter the IP address of FQDN of the CA server. You can
enter up to 128 alphanumerical characters and symbols.
CA Server Address (Secondary) — Enter the IP address of FQDN of the CA server. You
can enter up to 128 alphanumerical characters and symbols.
MFP's Address in Common Name in the Certificate — Select whether you use the IP
address or FQDN as the address of this equipment to be entered in the [Common Name]
box of the certificate. [IP Address] is set as the default.
Timeout — Enter a timeout period for quitting communication when no response is received
from the CA server. Specify within the range from 1 to 120 seconds. “10” is set as the
default.
CA Challenge — Enter the password for the CA challenge. You can enter up to 16
alphanumerical characters.
Signature Algorithm — Select SHA1 or MD5 as the signature algorithm.
Poll Interval — Specify the polling interval. [1 Minute] is set as the default.
Maximum Poll Duration — Specify the polling duration. [8 Hours] is set as the default.
[Request] button — Click this button to request the certificate.
[Delete] button — Deletes the registered certificate.
[Security] Item List
8 [Administration] Tab Page
8.[Administration] Tab Page
[Create self-signed certificate] screen
1
2
3
4
5
6
7
8
9
10
Item name
Description
1
[Save] button
Saves the self-signed certificate.
2
[Cancel] button
Cancels creating the certificate.
3
Country/Region Name
Enter the country or region name using two alphanumerical characters and symbols.
(Example: JP)
4
State or Province Name
Enter the state or province name with alphanumerical characters and symbols. You can
enter up to 128 characters.
5
Locality Name
Enter the city or town name with alphanumerical characters and symbols. You can enter up
to 128 characters.
6
Organization Name
Enter the organization name with alphanumerical characters and symbols. You can enter up
to 64 characters.
7
Organizational Unit Name
Enter the organizational unit name with alphanumerical characters and symbols. You can
enter up to 64 characters.
8
Common Name
Enter the FQDN or IP address of this equipment with alphanumerical characters and
symbols. You can enter up to 64 characters.
9
Email Address
Enter the E-mail address with alphanumerical characters and symbols. You can enter up to
64 characters.
10
Validity Period
Enter the number of months in the validity period of the self-signed certificate.
Setting up Client Certificate
1
Item name
1
Client Certificate
Description
Creates the client certificate.
[Create] button — Displays the [Create Client Certificate] screen. Specify items necessary
for the certificate to create the client certificate.
P.258 “[Create Client Certificate] screen”
[Security] Item List
257
8 [Administration] Tab Page
[Create Client Certificate] screen
1
2
3
4
5
6
7
8
9
10
Item name
Description
1
[Save] button
Saves the Client certificate.
2
[Cancel] button
Cancels creating the certificate.
3
Country/Region Name
Enter the country or region name using two alphanumerical characters and symbols.
(Example: JP)
4
State or Province Name
Enter the state or province name with alphanumerical characters and symbols. You can
enter up to 128 characters.
5
Locality Name
Enter the city or town name with alphanumerical characters and symbols. You can enter up
to 128 characters.
6
Organization Name
Enter the organization name with alphanumerical characters and symbols. You can enter up
to 64 characters.
7
Organizational Unit Name
Enter the organizational unit name with alphanumerical characters and symbols. You can
enter up to 64 characters.
8
Common Name
Enter the FQDN or IP address of this equipment with alphanumerical characters and
symbols. You can enter up to 64 characters.
9
Validity Period
Enter the number of months in the validity period of the self-signed certificate.
10
Password
Enter the password of the certificate with alphanumerical characters and symbols. You can
enter up to 64 characters.
Setting up Certificate Setting
1
2
Item name
258
Description
1
Signature Algorithm
Select the signature algorithm to be used in Certificate.
SHA1 — Select this to use SHA1.
SHA256 — Select this to use SHA256.
SHA384 — Select this to use SHA384.
SHA512 — Select this to use SHA512.
2
Public Key
Select the public key to be used in Certificate.
RSA1024 — Select this to use RSA1024.
RSA2048 — Select this to use RSA2048.
[Security] Item List
8 [Administration] Tab Page
8.[Administration] Tab Page
Setting up CA Certificate
When you want to enable SSL and verify with a CA certificate for the SMTP Client, POP3 Network Service, FTP Client, or
Directory Service, you must install the CA certificate. You can install up to 10 CA certificates in this equipment.
1
2
Item name
Description
1
CA Certificate(PEM)
Selects the certificate in the PEM format.
[Upload] button — Uploads the certificate.
[Delete] button — Deletes the registered certificate.
2
CA certificate (DER)
Selects the certificate in the DER format.
[Upload] button — Uploads the certificate.
[Delete] button — Deletes the registered certificate.
Setting up Certificate Files
You can display a list of registered certificate files.
[Security] Item List
259
8 [Administration] Tab Page
Password Policy settings
You can configure policies for the password to register.
The [Password Policy] submenu can be accessed from the [Security] menu on the [Administration] tab.
See the following pages for how to access it and information on [Security] menu:
P.22 “Access Policy Mode”
P.247 “[Security] Item List”
P.260 “Setting up Policy for Users”
P.261 “Setting up Policy for Administrator,Auditor”
P.262 “Setting up Policy for e-Filing Boxes, Template Groups, Templates, SecurePDF, SNMPv3, Cloning”
Setting up Policy for Users
You can configure policies for user registration.
1
2
3
4
Item name
Description
1
Minimum Password Length
Specify the minimum number of digits for the password. Specify within the range from 0 to
64. “0” is set as the default.
2
Requirements to Apply
Select [Enable] to set restrictions on the character strings that can be used in passwords.
[Disable] is set as the default.
Restrictions
y The user name and password cannot be the same.
y The same password cannot be used again.
y A password consisting of sequences of the same characters cannot be used.
y A password containing the characters entered in the restricted character text box cannot
be used.
3
Lockout Setting
Specify whether or not to enable the lockout setting when the user failed to supply the
correct password. [Enable] is set as the default.
Number of Retry — Specify the number of retries before lockout. Specify within the range
from 1 to 30 times. “10” is set as the default.
Lockout Time — Specify the duration to lock out the user. Specify within the range from 1 to
1440 minutes. “1” is set as the default.
4
Available Period
Select [Enable] to specify how long the password is valid before its expiry. [Disable] is set as
the default.
Expiration day(s) — Specify how long the password is valid before its expiry. Specify within
the range from 1 to 999 days. “180” is set as the default.
When the number of days set in [Expiration day(s)] elapses, a screen that prompts the user to change the password will
appear the next time the user logs in.
260
[Security] Item List
8 [Administration] Tab Page
8.[Administration] Tab Page
Setting up Policy for Administrator,Auditor
You can configure policies for administrator and auditor registration.
1
2
3
4
Item name
Description
1
Minimum Password Length
Specify the minimum number of digits for the password. Specify within the range from 6 to
64. “6” is set as the default.
2
Requirements to Apply
Select [Enable] to set restrictions on the character strings that can be used in passwords.
[Disable] is set as the default.
Restrictions
y The user name and password cannot be the same.
y The same password cannot be used again.
y A password consisting of sequences of the same characters cannot be used.
y A password containing the characters entered in the restricted character text box cannot
be used.
3
Lockout Setting
Specify whether or not to enable the lockout setting when the user failed to supply the
correct password. [Enable] is set as the default.
Number of Retry — Specify the number of retries before lockout. Specify within the range
from 1 to 30 times. “10” is set as the default.
Lockout Time — Specify the duration to lock out the user. Specify within the range from 1 to
1440 minutes. “1” is set as the default.
4
Available Period
Select [Enable] to specify how long the password is valid before its expiry. [Disable] is set as
the default.
Expiration day(s) — Specify how long the password is valid before its expiry. Specify within
the range from 1 to 999 days. “180” is set as the default.
When the number of days set in [Expiration day(s)] elapses, a screen that prompts the user to change the password will
appear the next time the user logs in.
[Security] Item List
261
8 [Administration] Tab Page
Setting up Policy for e-Filing Boxes, Template Groups, Templates,
SecurePDF, SNMPv3, Cloning
You can configure policies for passwords for operations and applications on your equipment.
1
2
3
Item name
Description
1
Minimum Password Length
Specify the minimum number of digits for the password. Specify within the range from 0 to
20.*1 “0” is set as the default.
2
Requirements to Apply
Select [Enable] to set restrictions on the character strings that can be used in passwords.
[Disable] is set as the default.
Restrictions
y The user name and password cannot be the same.*2
y The same password cannot be used again.
3
Lockout Setting*3
Specify whether or not to enable the lockout setting when the user failed to supply the
correct password. [Enable] is set as the default.
Number of Retry — Specify the number of retries before lockout. Specify within the range
from 1 to 30 times. “10” is set as the default.
Lockout Time — Specify the duration to lock out the user. Specify within the range from 1 to
1440 minutes. “1” is set as the default.
*1 With SNMPv3, a password of at least one character is required.
*2 With Cloning, you can also register the same password as the file name.
*3 The Lockout Setting is enabled only when you are using e-Filing Boxes.
262
[Security] Item List
8 [Administration] Tab Page
8.[Administration] Tab Page
[Security] How to Set and How to Operate
In the Security Service page, you can install a wireless LAN certificate for authentication with the RADIUS server, install
and export a device certificate to enable SSL and set up its SCEP (automatic installation), install CA certificate, and install
certificates for IEEE 802.1X authentication and set up its SCEP.
P.263 “Installing a device certificate”
P.270 “Creating/Exporting a client certificate”
P.272 “Installing CA certificate”
Installing a device certificate
To enable SSL for HTTP setting, FTP server setting, IPP Print Service, Web Services Print, or Off Device Customization
Architecture settings, you must install a device certificate for each.
To install these device certificates, you need to create a self-signed certificate, install them from an authentication agency
or the CA server. You can also install them automatically from the CA server using SCEP.
P.264 “Creating/exporting a self-signed certificate”
P.266 “Installing an imported device certificate”
P.267 “Deleting an imported device certificate”
P.268 “Installing a device certificate automatically”
P.269 “Deleting a device certificate installed automatically”
When you want to enable SSL for HTTP setting, FTP Server, IPP Print, Web Services Print, or Off Device
Customization Architecture settings, the certificates required to install to the equipment and the client PC are as
follows:
Use SSL for...
Required Certificate for this equipment
Device Certificate
Required Certificate for Client PC
CA Certificate
Self-signed
Certificate
Client
Certificate
CA
Certificate
Self-signed
Certificate
Device certificates
installed from
authentication agency
/ CA server
HTTP, FTP, IPP
Print, Off Device
Customization
Architecture*1
Required
-
-
(Required)*2
-
-
-
Required
-
-
-
(Required)*2
Web Service
Print
-
Required
Required
-
Required
Required
Required
-
-
Required
-
-
*1 In the HTTP Network Service, FTP Server, IPP Print, and Off Device Customization Architecture settings, if you create a self-signed
certificate for the equipment, you need to install the self-signed certificate to the client PC. If you select to install an imported device
certificate to the equipment, also install the CA certificate to the client PC.
*2 For Windows Vista/XP, you can enable SSL by installing certificates only in the equipment. In this case, the following message appears
when you operate the system. Select the specified item.
"There is a problem with this website's security certificate" appears. If you are using Windows Vista, select [Continue to this website (not
recommended)].
"The security certificate presented by this website was issued by a company you have not chosen to trust. Do you want to proceed?"
appears if you are using Windows XP. Select [Yes].
If you want to further enhance the security, install certificates also in the client PC.
P.272 “Installing CA certificate”
When you install the User Certificate in this equipment, it is recommended to connect this equipment and a client
computer using a crossing cable for ensuring security.
[Security] How to Set and How to Operate
263
8 [Administration] Tab Page
Creating/exporting a self-signed certificate
1
Start TopAccess access policy mode.
2
3
Click the [Administration] tab.
P.22 “Access Policy Mode”
Click the [Security] menu and [Certificate Management] submenu.
The Certificate Management page is displayed.
4
Select [self-signed certificate] under [Device Certificate] and click [Create].
The Create self-signed certificate page is displayed.
5
Enter the following items and click [Save].
You can set the following in this page.
P.257 “[Create self-signed certificate] screen”
6
264
Click [OK].
[Security] How to Set and How to Operate
8 [Administration] Tab Page
8.[Administration] Tab Page
7
A self-signed certificate is created. Click the [Export] button if you are exporting.
8
Right-click the link for the file name of the certificate to be exported, and then select
[Save Target As].
The [Save As] dialog box appears.
9
10
Specify a directory to which the certificate is to be saved and then click [Save].
Click [Save] on the [Certificate Management] submenu.
You can improve the security level of a client computer by installing the exported certificate into the computer.
[Security] How to Set and How to Operate
265
8 [Administration] Tab Page
11
Then you can enable SSL for the following network settings.
P.150 “Setting up LDAP Session”
P.157 “Setting up HTTP Network Service”
P.158 “Setting up SMTP Client”
P.161 “Setting up POP3 Network Service”
P.163 “Setting up FTP Server”
P.168 “Setting up Web Services Setting”
P.207 “Setting up IPP Print”
P.213 “Off Device Customization Architecture settings”
Installing an imported device certificate
1
Start TopAccess access policy mode.
2
3
Click the [Administration] tab.
P.22 “Access Policy Mode”
Click the [Security] menu and [Certificate Management] submenu.
The Certificate Management page is displayed.
4
Click [Browse] of [Import] in [Device Certificate] to select a device certificate file, and
then click [Upload].
The alert message dialog box appears.
5
Enter the password for the device certificate, and then click [OK].
The device certificate is imported.
6
266
Click [Save] on the [Certificate Management] submenu.
[Security] How to Set and How to Operate
8 [Administration] Tab Page
8.[Administration] Tab Page
7
Then you can enable SSL for the following network settings.
P.150 “Setting up LDAP Session”
P.157 “Setting up HTTP Network Service”
P.158 “Setting up SMTP Client”
P.161 “Setting up POP3 Network Service”
P.163 “Setting up FTP Server”
P.168 “Setting up Web Services Setting”
P.207 “Setting up IPP Print”
P.213 “Off Device Customization Architecture settings”
Deleting an imported device certificate
1
Start TopAccess access policy mode.
2
3
Click the [Administration] tab.
P.22 “Access Policy Mode”
Click the [Security] menu and [Certificate Management] submenu.
The Certificate Management page is displayed.
4
Click [Delete] of [Import] in [Device Certificate].
The confirmation dialog box appears.
If no device certificate has been imported, you cannot delete it.
5
Click [OK].
The device certificate is deleted.
6
Click [Save] on the [Certificate Management] submenu.
[Security] How to Set and How to Operate
267
8 [Administration] Tab Page
Installing a device certificate automatically
1
Start TopAccess access policy mode.
2
3
Click the [Administration] tab.
P.22 “Access Policy Mode”
Click the [Security] menu and [Certificate Management] submenu.
The Certificate Management page is displayed.
4
Enter the following items in [SCEP(Automatic)] of [Device Certificate], and then click
[Request].
CA Server Address (Primary)
Enter the IP address or FQDN of the CA server. You can enter up to 128 characters.
CA Server Address (Secondary)
Enter the IP address or FQDN of the CA server. You can enter up to 128 characters.
MFP's Address in Common
Name in the Certificate
Select whether to use the IP address or FQDN as the address of this equipment to be
entered in the [Common Name] box of the certificate.
Timeout
Enter a timeout period for quitting communication when no response is received from the
CA server.
CA Challenge
Enter the CA challenge.
Signature Algorithm
Select SHA1 or MD5 as the signature algorithm.
Poll Interval
Specify the polling interval.
Maximum Poll Duration
Specify the polling duration.
y If FQDN is used in [CA Server address], you need to configure a DNS server and enable DNS settings.
y If [FQDN] is selected in [MFP’s Address in Common Name in the Certificate], the IP address of this
equipment must be registered in the DNS server.
A device certificate is installed.
A CA certificate is installed automatically as well as a device certificate. If a CA certificate is already installed,
delete the existing one by clicking [DELETE] of SCEP in [Device Certificate]. Then click [Request] to install a
new CA certificate.
5
268
Click [Save] on the [Certificate Management] submenu.
[Security] How to Set and How to Operate
8 [Administration] Tab Page
8.[Administration] Tab Page
6
Then you can enable SSL for the following network settings.
P.150 “Setting up LDAP Session”
P.157 “Setting up HTTP Network Service”
P.158 “Setting up SMTP Client”
P.161 “Setting up POP3 Network Service”
P.163 “Setting up FTP Server”
P.168 “Setting up Web Services Setting”
P.207 “Setting up IPP Print”
P.213 “Off Device Customization Architecture settings”
P.281 “Directory Service settings”
Deleting a device certificate installed automatically
1
Start TopAccess access policy mode.
2
3
Click the [Administration] tab.
P.22 “Access Policy Mode”
Click the [Security] menu and [Certificate Management] submenu.
The Certificate Management page is displayed.
4
Select [SCEP(Automatic)] in [Device Certificate], and then click [Delete].
The confirmation dialog box appears.
y A CA certificate already installed automatically will be deleted as well as the device certificate.
y Deleting is disabled when no device certificate has been installed automatically.
5
Click [OK].
The device certificate is deleted.
6
Click [Save] on the [Certificate Management] submenu.
[Security] How to Set and How to Operate
269
8 [Administration] Tab Page
Creating/Exporting a client certificate
1
Start TopAccess access policy mode.
2
3
Click the [Administration] tab.
P.22 “Access Policy Mode”
Click the [Security] menu and [Certificate Management] submenu.
The Certificate Management page is displayed.
4
Click [Create] under [Client Certificate].
The Create Client Certificate page is displayed.
5
Enter the following items and click [Save].
You can set the following in this page.
P.258 “[Create Client Certificate] screen”
6
270
Click [OK].
[Security] How to Set and How to Operate
8 [Administration] Tab Page
8.[Administration] Tab Page
7
Right-click the link for the file name of the certificate to be exported, and then select
[Save Target As].
The [Save As] dialog box appears.
If you have not installed a client certificate, enter the password in [Password] and click [Create] to create a
certificate.
8
Specify a directory to which the certificate is to be saved and then click [Save].
9
Click [Save] on the [Certificate Management] submenu.
You can improve the security level of a client computer by installing the exported certificate into the computer.
[Security] How to Set and How to Operate
271
8 [Administration] Tab Page
Installing CA certificate
When you want to enable SSL and verify with a CA certificate for the SMTP Client, POP3 Network Service, FTP Client, or
Directory Service, you must install the CA certificate. You can install up to 10 CA certificates in this equipment.
P.272 “Installing CA certificate”
P.273 “Deleting CA certificate”
Installing CA certificate
1
Start TopAccess access policy mode.
2
3
Click the [Administration] tab.
P.22 “Access Policy Mode”
Click the [Security] menu and [Certificate Management] submenu.
The Certificate Management page is displayed.
4
Select the encryption of CA certificate and click [Browse] to select a CA certificate file.
Then click [Upload].
The CA certificate is installed.
5
6
Click [Save] on the [Certificate management] submenu.
Then you can enable SSL by selecting [Verify with imported CA certification(s)] for the
following network settings.
P.158 “Setting up SMTP Client”
P.161 “Setting up POP3 Network Service”
P.162 “Setting up FTP Client”
P.168 “Setting up Web Services Setting”
P.213 “Off Device Customization Architecture settings”
P.281 “Directory Service settings”
272
[Security] How to Set and How to Operate
8 [Administration] Tab Page
8.[Administration] Tab Page
Deleting CA certificate
1
Start TopAccess access policy mode.
2
3
Click the [Administration] tab.
P.22 “Access Policy Mode”
Click the [Security] menu and [Certificate Management] submenu.
The Certificate Management page is displayed.
4
Select the CA certificate file that you want to delete in the [Certificate Files] list, and
click [Delete].
The confirmation dialog box appears.
5
Click [OK].
The CA certificate is deleted.
6
Click [Save] on the [Certificate Management] submenu.
[Security] How to Set and How to Operate
273
8 [Administration] Tab Page
[Maintenance] Item List
Users who are granted administrator privileges in access policy mode can access the [Maintenance] menu from the
[Administration] tab.
See the following pages for how to access it:
P.22 “Access Policy Mode”
P.HIDDEN “Upload Software settings”
P.HIDDEN “Remove Software settings”
P.274 “Create Clone File settings”
P.276 “Install Clone File settings”
P.277 “Import settings”
P.279 “Export settings”
P.280 “Delete Files settings”
P.281 “Directory Service settings”
P.283 “Notification settings”
P.286 “Languages settings”
P.288 “System Updates settings”
P.289 “Reboot settings”
Create Clone File settings
You can create a clone file of the environment on your equipment.
You can implement a cloned environment by installing the created clone file on another equipment.
The [Create Clone File] submenu can be accessed from the [Maintenance] menu on the [Administration] tab.
See the following pages for how to access it and information on the [Maintenance] menu:
P.22 “Access Policy Mode”
P.274 “[Maintenance] Item List”
P.274 “Setting up Clone File”
P.275 “Setting up Category Setting”
1
Item name
1
[Create] button
Description
Creates the clone file of the category selected in the category setting.
When you click this button, a screen is displayed to set a password on the clone file.
Setting up Clone File
1
2
3
4
Item name
274
Description
1
Device Name
Displays the device name of the created clone file.
Click the device name to download the clone file.
2
Copier Model
Displays the copier model of the created clone file.
3
Version
Displays the system ROM version of the created clone file.
[Maintenance] Item List
8 [Administration] Tab Page
8.[Administration] Tab Page
Item name
4
Date Created
Description
Displays the created date of the clone file.
Setting up Category Setting
Select the category for the clone file.
The clone file will include the settings listed in “Description” that make up the category you select.
1
2
3
4
5
6
Item name
Description
1
Security
Includes secure erase and authentication settings in the clone file.
2
Default Settings
Includes the general, copy, scan, fax, ifax, E-mail, save as file, printer, notification, log
settings, EWB settings, and Fax/InternetFax Received Forward in the clone file.
3
User Management
Includes the user, group, role, quota, department code, and my menu with template/address
book in the clone file.
4
Network/Print Service
Includes network settings, print service, wireless LAN, Bluetooth, and directory service
settings in the clone file.
5
Address Book
Includes the address book in the clone file.
6
Address Book + Template + Mail
Boxes
Includes the address book, template, and mail boxes in the clone file.
[Maintenance] Item List
275
8 [Administration] Tab Page
Install Clone File settings
You can install the created clone file.
You can implement a cloned environment by installing the clone file created on another equipment.
The [Install Clone File] submenu can be accessed from the [Maintenance] menu on the [Administration] tab.
See the following pages for how to access it and information on the [Maintenance] menu:
P.22 “Access Policy Mode”
P.274 “[Maintenance] Item List”
P.276 “Setting up File Upload”
P.276 “Setting up Clone File Information”
P.277 “Setting up Setting data included in Clone File”
1
Item name
1
[Install] button
Description
Installs the selected clone file.
When you click this button, a dialog box is displayed to prompt you to enter the password
you specified when creating the clone file.
Setting up File Upload
1
2
Item name
Description
1
[Browse] button
Select a clone file.
2
[Upload] button
Displays information on the selected clone file and what is included in the clone file.
Setting up Clone File Information
1
2
3
4
Item name
276
Description
1
Device Name
Displays the device name of the created clone file.
2
Copier Model
Displays the copier model of the created clone file.
3
Version
Displays the system ROM version of the created clone file.
4
Date Created
Displays the created date of the clone file.
[Maintenance] Item List
8 [Administration] Tab Page
8.[Administration] Tab Page
Setting up Setting data included in Clone File
1
2
3
4
5
6
Item name
Description
1
Security
Displays if security level, secure erase, self test, encryption, and authentication settings are
included.
2
Default Settings
Displays if the general, copy, scan, fax, ifax, E-mail, save as file, printer, notification, log
settings, and EWB settings are included.
3
User Management
Displays if the user, group, role, quota, department code, and my menu with template/
address book are included.
4
Network/Print Service
Displays if network settings, print service, wireless LAN, Bluetooth, and directory service
settings are included.
5
Address Book
Displays if the address book is included.
6
Address Book + Template + Mail
Boxes
Displays if the address book, template, and MailBox are included.
Import settings
You can import address book data and department code information exported from another equipment.
The [Import] submenu can be accessed from the [Maintenance] menu on the [Administration] tab.
See the following pages for how to access it and information on the [Maintenance] menu:
P.22 “Access Policy Mode”
P.274 “[Maintenance] Item List”
P.277 “Setting up Address Book”
P.278 “Setting up MailBoxes”
P.278 “Setting up Template”
P.278 “Setting up Combined (Template + Address Book + MailBoxes)”
Before importing data, check that there are no jobs being processed, and there are no private jobs, scheduled jobs, or
test print jobs. You cannot import data if there are these jobs. If import is taking too long, try importing data after your
equipment has entered sleep mode.
Setting up Address Book
1
2
Item name
Description
1
Import Method
Specify the import method of the address book.
Addition — Select this to append the imported information to the existing data.
Overwrite — Select this to replace the existing data with the imported information.
2
File Name
Select the address book file to be imported.
[Browse] button — Allows you to select the address book file.
[Import] button — Imports the selected address book file.
[Maintenance] Item List
277
8 [Administration] Tab Page
Setting up MailBoxes
1
Item name
1
File Name
Description
Select the mailbox file to be imported.
[Browse] button — Allows you to select the mailbox file.
[Import] button — Imports the selected mailbox file.
Setting up Template
1
2
Item name
Description
1
Import Method
Specify the import method of the template.
Addition — Select this to append the imported information to the existing data.
Overwrite — Select this to replace the existing data with the imported information.
2
File Name
Select the template file to be imported.
[Browse] button — Allows you to select the template file.
[Import] button — Imports the selected template file.
Setting up Combined (Template + Address Book + MailBoxes)
1
Item name
1
278
File Name
[Maintenance] Item List
Description
Select the combined (template + address book + mailboxes) file to be imported.
[Browse] button — Allows you to select the combined file.
[Import] button — Imports the selected combined file.
8 [Administration] Tab Page
8.[Administration] Tab Page
Export settings
You can export the address book, mailboxes, templates and so on.
The [Export] submenu can be accessed from the [Maintenance] menu on the [Administration] tab.
See the following pages for how to access it and information on the [Maintenance] menu:
P.22 “Access Policy Mode”
P.274 “[Maintenance] Item List”
P.279 “Setting up Address Book”
P.279 “Setting up MailBoxes”
P.280 “Setting up Template”
P.280 “Setting up Combined (Template + Address Book + MailBoxes)”
Setting up Address Book
1
2
3
4
5
Item name
Description
1
File Name
Displays the file name of the created export files.
Click a file name to download.
2
File Size
Displays the file size of the created export files.
3
Date Created
Displays the created date of the export files.
4
Export Data Format
Select the file format of the export file.
CSV — Select this to create the file in the CSV format.
XML — Select this to create the file in the XML format.
5
[Create New File] button
Creates the export file.
Setting up MailBoxes
1
2
3
4
Item name
Description
1
File Name
Displays the file name of the created export files.
Click a file name to download.
2
File Size
Displays the file size of the created export files.
3
Date Created
Displays the created date of the export files.
4
[Create New File] button
Creates the export file.
[Maintenance] Item List
279
8 [Administration] Tab Page
Setting up Template
1
2
3
4
Item name
Description
1
File Name
Displays the file name of the created export files.
Click a file name to download.
2
File Size
Displays the file size of the created export files.
3
Date Created
Displays the created date of the export files.
4
[Create New File] button
Creates the export file.
Setting up Combined (Template + Address Book + MailBoxes)
1
2
3
4
Item name
Description
1
File Name
Displays the file name of the created export files.
Click a file name to download.
2
File Size
Displays the file size of the created export files.
3
Date Created
Displays the created date of the export files.
4
[Create New File] button
Creates the export file.
Delete Files settings
You can delete information such as scanned data, transmission data, and reception data that are stored in the local folder
using the Save as file function. It is recommended to delete the stored data periodically to maintain the hard disk.
The [Delete Files] submenu can be accessed from the [Maintenance] menu on the [Administration] tab.
See the following pages for how to access it and information on the [Maintenance] menu:
P.22 “Access Policy Mode”
P.274 “[Maintenance] Item List”
1
2
3
Item name
280
Description
1
Scan
Deletes all scan data stored in the shared folder.
2
Transmission
Deletes all fax/ifax transmission data stored in the shared folder.
3
Reception
Deletes all fax/ifax reception data and mailbox/fax/ifax forwarding data in the shared folder.
[Maintenance] Item List
8 [Administration] Tab Page
8.[Administration] Tab Page
Directory Service settings
You can register the directory service properties of the LDAP (Lightweight Directory Access Protocol) server. When a new
directory service is added, the users can search destinations using the LDAP server.
The [Directory Service] submenu can be accessed from the [Maintenance] menu on the [Administration] tab.
See the following pages for how to access it and information on the [Maintenance] menu:
P.22 “Access Policy Mode”
P.274 “[Maintenance] Item List”
1
2
Item name
Description
1
[New] button
Registers the LDAP server that provides a directory service.
P.281 “[Directory Service Properties] screen”
2
Directory Service List
Displays a list of registered LDAP servers.
You can edit the registered details by clicking a directory service name.
P.281 “[Directory Service Properties] screen”
[Directory Service Properties] screen
You can display this screen by clicking a directory service name in the directly service list or the [New] button.
1
2
3
4
5
6
7
8
9
10
Item name
Description
1
Directory Service Name
Enter the directory service name to identify the directory service. You can enter up to 64
alphanumerical characters and symbols other than =, ; (semicolon), #, and \ (backslash).
2
Server IP Address
Enter the IP address or FQDN of the LDAP server. You can enter up to 128 alphanumerical
characters and symbols.
3
Port Number
Enter the port number to access the LDAP server. You can enter a value in the range from 1
to 65535. Generally the default value “389” is used to access the LDAP server without SSL.
When the SSL is required, generally the “636” port is used to access the LDAP server.
[Maintenance] Item List
281
8 [Administration] Tab Page
Item name
Description
4
Authentication
Select the SASL authentication protocol. If you do not know the authentication type, select
[Auto].
y Auto — Select this to access the LDAP server using the appropriate authentication that
this equipment detects.
y Kerberos — Select this to access the LDAP server using the Kerberos authentication.
y Digest-MD5 — Select this to access the LDAP server using the Digest-MD5
authentication.
y CRAM-MD5 — Select this to access the LDAP server using the CRAM-MD5
authentication.
y Login — Select this to access the LDAP server using the login authentication.
y Plain — Select this to access the LDAP server using the plain authentication.
y Simple Bind — Select this to access the LDAP server using the Simple Bind
authentication.
5
Search Base
Enter the search base. When you configure the Active Directory in Windows server, make
sure to enter this option. You can enter up to 256 alphanumerical characters and symbols
other than ; (semicolon), #, and \ (backslash).
6
User Name
Enter the log-in user name if a user name is required to access the directory service. You
can enter up to 256 alphanumerical characters and symbols.
7
Password
Enter the password if required to access the directory service. You can enter up to 32
alphanumerical characters and symbols.
8
Search Timeout
Select the timeout period for quitting communication when no response is received from the
LDAP server. Specify within the range from 1 to 5. “1” is set as the default.
9
Enable SSL
Select whether the SSL (Secure Sockets Layer) is enabled or disabled for communicating
the LDAP directory service.
y Disable — Select this to disable the SSL for communicating the LDAP directory service.
y Verify with imported CA certification(s) — Select this to enable the SSL using the
imported CA certificate.
y Accept all certificates without CA — Select this to enable the SSL without using
imported CA certificate.
y When [Verify with imported CA certification(s)] is selected, you must import the CA certificate in this equipment.
P.263 “[Security] How to Set and How to Operate”
y If at least one of the registered LDAP directory services requires the SSL, you must enable the [Enable SSL] option. When
the [Enable SSL] option is enabled, this equipment will connect the registered LDAP directory services using SSL first.
Then if the connection fails using SSL, this will connect to the registered LDAP directory service without using SSL.
Therefore, even if you enable the [Enable SSL] option, this equipment can also connect to an LDAP directory service that
does not require the SSL.
y Not all operating systems support SSL for all protocols.
10
282
SSL Port Number
[Maintenance] Item List
Enter the port number to access the LDAP server using SSL. You can enter a value in the
range from 1 to 65535. Generally the default value “636” is used.
8 [Administration] Tab Page
Notification settings
You can receive information on your equipment by E-mail.
The [Notification] submenu can be accessed from the [Maintenance] menu on the [Administration] tab.
See the following pages for how to access it and information on the [Maintenance] menu:
P.22 “Access Policy Mode”
P.274 “[Maintenance] Item List”
P.283 “Setting up Email Setting”
P.284 “Setting up System Message Notification Events”
P.285 “Setting up Job Notification Events”
1
Item name
1
[Save] button
Description
Stores settings for transmitting the report to the registered E-mail address.
Setting up Email Setting
1
2
3
Item name
1
Notify administrator at Email
Address 1
2
Notify administrator at Email
Address 2
3
Notify administrator at Email
Address 3
Description
Register E-mail addresses for administrators who receive the notification.
The notification is sent to the selected administrators by E-mail.
[Maintenance] Item List
283
8 [Administration] Tab Page
Setting up System Message Notification Events
1
2
3
4
5
6
7
You can select the events to be notified of.
Item name
284
Description
1
Device
Paper Misfeed — Select this to be notified of paper misfeeds.
Tray Out of Paper — Select this to be notified when you are out of paper.
Door/Tray Open — Select this to be notified when a cover or tray is open.
Print Needs Attention — Select this to be notified when a job is printed.
Toner Empty — Select this to be notified when a toner is empty.
Used toner container is Full — Select this to be notified when the waste toner box is full.
Power Status — Select this to be notified when the power source status changes such as a
power cut.
H/W Option Attachment History — Select this to be notified when a hardware option is
installed.
2
Maintenance
Change Settings — Select this to be notified of setting changes.
Maintenance User Data — Select this to be notified when user information is edited.
Export/Import — Select this to be notified of an export or import.
Cloning — Select this to be notified when a clone is made.
System Updates — Select this to be notified of system updates.
Factory Default — Select this to be notified when the equipment is restored with the factory
default.
Log Full — Select this to be notified when the log has reached the maximum size.
3
Network
Error — Select this to be notified of network errors.
4
Security
Error — Select this to be notified of security errors.
Warning — Select this to be notified of security warnings.
Information — Select this to be notified of security information.
5
Received Fax/InternetFax
Error — Select this to be notified of fax/Internet Fax reception errors.
Warning — Select this to be notified of the periodical deletion of received faxes and Internet
Faxes is successfully completed.
Information — Select this to be notified of the deletion of received faxes and Internet Faxes
by the [Delete Files] function under the [Maintenance] menu is successfully completed.
6
Scan
Warning — Select this to be notified of the periodical deletion of scanned files is
successfully completed.
Information — Select this to be notified of the deletion of scanned files by the [Delete Files]
function under the [Maintenance] menu is successfully completed.
[Maintenance] Item List
8 [Administration] Tab Page
8.[Administration] Tab Page
Item name
7
e-Filing
Description
Warning — Select this to be notified when the available space in the e-Filing box is low or
the preservation period of documents in the e-Filing box is expiring soon.
Information — Select this to be notified when the e-Filing box is initialized.
Use the e-Filing box web utility and specify in the property screen for each box if you want to notify whether e-Filing box
operations are successfully completed. For information on how to set, see the e-Filing Guide.
Setting up Job Notification Events
1
2
3
4
You can select jobs to be notified.
Item name
Description
1
Scan
Send E-mail when an error occurs
Send E-mail when job is completed
2
Received Fax/InternetFax
Send E-mail when an error occurs
Send E-mail when job is completed
3
Fax Received Forward
Send E-mail when an error occurs
Send E-mail when job is completed
4
InternetFAX Received Forward
Send E-mail when an error occurs
Send E-mail when job is completed
[Maintenance] Item List
285
8 [Administration] Tab Page
Languages settings
You can specify the language for the touch panel of your equipment.
The [Languages] submenu can be accessed from the [Maintenance] menu on the [Administration] tab.
See the following pages for how to access it and information on the [Maintenance] menu:
P.22 “Access Policy Mode”
P.274 “[Maintenance] Item List”
P.286 “Setting up Install Language Pack”
P.287 “Setting up Current Language Pack List”
P.287 “Setting up Default Setting for PanelUI”
1
Item name
1
[Save] button
Description
Saves the registered language.
Setting up Install Language Pack
1
Item name
1
286
File Name
[Maintenance] Item List
Description
Select the language pack file to be installed.
[Browse] button — Allows you to select the language pack file.
[Import] button — Imports the selected language pack file.
8 [Administration] Tab Page
8.[Administration] Tab Page
Setting up Current Language Pack List
Displays a list of installed language packs. You can delete unnecessary language packs.
1
2
3
4
Item name
1
[Delete] button
Description
Select unnecessary language packs and click the [Delete] button to delete them.
You cannot delete [English(US)] or the language selected in [PanelUI Language].
2
Name
Displays the name of the language pack.
3
Version
Displays the version of the language pack.
4
Date
Displays the installed date of the language pack.
Setting up Default Setting for PanelUI
Select the display language for the touch panel.
1
2
Item name
Description
1
PanelUI Language
Select the display language for the touch panel.
2
PanelUI Keyboard Layout
Select the panel keyboard layout displayed on the touch panel.
[Maintenance] Item List
287
8 [Administration] Tab Page
System Updates settings
You can update the system on your equipment.
The [System Updates] submenu can be accessed from the [Maintenance] menu on the [Administration] tab.
See the following pages for how to access it and information on the [Maintenance] menu:
P.22 “Access Policy Mode”
P.274 “[Maintenance] Item List”
P.288 “Setting up Install Software Package”
P.288 “Setting up Current Software List”
Setting up Install Software Package
1
Item name
1
File Name
Description
Select the software pack file to be installed.
[Browse] button — Allows you to select the software pack file.
[Install] button — Installs the selected software pack file.
Setting up Current Software List
Displays a list of installed System Firmware.
1
2
3
4
Item name
288
Description
1
Name
Displays the name of the System Firmware.
2
Version
Displays the version of the System Firmware.
3
Date Created
Displays the Created date of the System Firmware.
4
Date Installed
Displays the installed date of the System Firmware.
[Maintenance] Item List
8 [Administration] Tab Page
8.[Administration] Tab Page
Reboot settings
You can reboot your equipment.
The [Reboot] submenu can be accessed from the [Maintenance] menu on the [Administration] tab.
See the following pages for how to access it and information on the [Maintenance] menu:
P.22 “Access Policy Mode”
P.274 “[Maintenance] Item List”
[Maintenance] Item List
289
8 [Administration] Tab Page
[Maintenance] How to Set and How to Operate
This section details procedures for maintaining this equipment. It covers backing up and restoring files, deleting files
stored in this equipment, and updating the software on TopAccess.
P.290 “About the maintenance functions”
P.HIDDEN “Uploading the client software”
P.HIDDEN “Removing the client software”
P.291 “Deleting the data from local folder”
P.292 “Managing directory service”
P.294 “Setting up notification”
P.296 “Importing and exporting”
P.301 “Rebooting the equipment”
About the maintenance functions
You can carry out the following maintenance tasks in the [Maintenance] menu of the TopAccess access policy mode.
y Backing up data in the hard disk
An administrator can create backup files of the address book, mailboxes, and templates in the hard disk. This
maintenance feature is used to create backup files before updating the system software or hard disk replacement, etc.
P.279 “Export settings”
y Restoring data from backup files
An administrator can restore the address book, mailboxes, and templates data from the backup files. This
maintenance feature is used to restore the data after updating the system software or hard disk replacement, etc.
P.277 “Import settings”
y Deleting files stored in the hard disk
An administrator can delete scanned data, transmission data, and reception data in the hard disk. This maintenance
feature must be operated periodically to maintain hard disk space for future operation.
P.291 “Deleting the data from local folder”
y Registering directory service
An administrator can register the directory service properties of the LDAP (Lightweight Directory Access Protocol)
server.
P.292 “Managing directory service”
y Setting up notification
An administrator can enable the E-mail notification function. The administrator can also specify which events to be
notified of.
P.294 “Setting up notification”
y Importing or exporting address book data
An administrator can import address book data in a CSV file or XML file created by different applications. An
administrator can also export address book data in a CSV file or XML file for other applications.
P.296 “Importing and exporting”
y Rebooting the equipment
An administrator can reboot the equipment.
P.301 “Rebooting the equipment”
290
[Maintenance] How to Set and How to Operate
8 [Administration] Tab Page
8.[Administration] Tab Page
Deleting the data from local folder
An administrator can delete information such as scanned data, transmission data, and reception data that are stored in the
local folder using the Save as file function. It is recommended to delete the stored data periodically to maintain the hard
disk.
Deleting data
1
Start TopAccess access policy mode.
2
3
Click the [Administration] tab.
P.22 “Access Policy Mode”
Click the [Maintenance] menu and [Delete Files] submenu.
The Delete Files submenu page is displayed.
4
Select the check box of data that you want to delete and click [Delete Files].
You can set the following in this page.
P.280 “Delete Files settings”
The data are deleted.
[Maintenance] How to Set and How to Operate
291
8 [Administration] Tab Page
Managing directory service
An administrator can register the directory service properties of the LDAP (Lightweight Directory Access Protocol) server
using TopAccess. When a new directory service is added, the users can search destinations using the LDAP server.
Setting up the directory service
1
Start TopAccess access policy mode.
2
3
Click the [Administration] tab.
P.22 “Access Policy Mode”
Click the [Maintenance] menu and [Directory Service] submenu.
The Directory Service submenu page is displayed.
4
Click [New] to add a new directory service, or click a directory service name to edit an
existing directory service.
The Directory Service Properties page is displayed.
292
[Maintenance] How to Set and How to Operate
8 [Administration] Tab Page
8.[Administration] Tab Page
5
Enter the following items as required.
You can set the following in this page.
P.281 “[Directory Service Properties] screen”
y If you use FQDN to specify the LDAP server, you must configure the DNS server and enable the DNS in the
DNS Session.
y Specify a user who is a member of the Domain Admin or Account Operator group in the Windows Server
when you are enabling user management settings and performing role based access to the Windows
Server.
y You can clear the entered values by clicking [Reset].
y You can delete the Directory Service by clicking [Delete] when you edit the Directory Service.
6
Click [OK].
7
Select a radio button of the directory service that you want to set as default server.
The entered Service Directory is added to the Directory Service List.
The default server will be used for an LDAP search from the control panel. If you select this equipment as the
default server, no default server will be set.
[Maintenance] How to Set and How to Operate
293
8 [Administration] Tab Page
Setting up notification
An administrator can configure notification to receive E-mail (mobile terminal can also be used) notifications when an error
occurred or a job is complete.
To enable the E-mail notification, the E-mail settings in the [Setup] menu page must be configured correctly.
P.231 “Setting up E-mail settings”
Setting up the notifications of system errors and events
1
Start TopAccess access policy mode.
2
3
Click the [Administration] tab.
P.22 “Access Policy Mode”
Click the [Maintenance] menu and [Notification] submenu.
The Notification submenu page is displayed.
4
294
In Email Setting, select the check box [Notify administrator at Email Address 1 to 3] to
enable the notifications, and enter the administrator’s E-mail address where the
notifications are to be sent.
[Maintenance] How to Set and How to Operate
8 [Administration] Tab Page
8.[Administration] Tab Page
5
Select the check boxes of events you want to be notified in [System Message
Notification Events] or [Job Notification Events].
See the following for details of each event:
P.284 “Setting up System Message Notification Events”
P.285 “Setting up Job Notification Events”
6
Click [Save].
[Maintenance] How to Set and How to Operate
295
8 [Administration] Tab Page
Importing and exporting
You can import and export Address Book, MailBoxes, Template, and Combined (Template + Address Book + MailBoxes).
This section describes how to import and export Address Book. You can follow the same procedure to import and export
MailBoxes, Template, and Combined (Template + Address Book + MailBoxes) except where you specify the file format of
the export data.
P.296 “Importing the address book data”
P.299 “Exporting the address book data”
Importing the address book data
You can import address information exported from an address book on another equipment or a different address book
program in the CSV or XML format.
The importing method of address book data is either adding imported data to the address book already registered in this
equipment or deleting all the address book data already registered and replacing them with the imported data.
It is recommended that you export an address book in the CSV or XML format and edit it when creating address book
data.
You cannot import an address book when it exceeds the number of characters specified on each item.
Invalid characters are replaced with "!".
- Last Name: 64 characters
- First Name: 64 characters
- Email Address: 192 alphanumerical characters
- Phone Number: 128 numbers
- Tel Number 2: 128 numbers
- Company: 128 characters
- Department: 128 characters
The group data are not included in the imported address book data.
Importing address book data in the CSV/XML format
Before importing the address book data, confirm that there is no waiting print job, scan job, or fax job. The address
book data cannot be imported if there are any jobs that have not been processed. If importing the address book data
takes a long time, restore the data after the equipment turns into the Sleep/Auto Shut Off mode.
1
Start TopAccess access policy mode.
2
3
Click the [Administration] tab.
P.22 “Access Policy Mode”
Click the [Maintenance] menu and [Import] submenu.
The Import submenu page is displayed.
296
[Maintenance] How to Set and How to Operate
8 [Administration] Tab Page
8.[Administration] Tab Page
4
Select the import method in the Address Book area.
Addition — Select this to add the imported address book data into the address book already registered in this
equipment.
Overwrite — Select this to delete all the address book data registered in this equipment and replace them with the
imported address book data.
The Import Method page is closed.
5
Click [Browse] in the Address Book area.
The Choose file dialog box appears.
6
Select the CSV/XML file that contains address book data and click [Open].
[Maintenance] How to Set and How to Operate
297
8 [Administration] Tab Page
7
Click [Import].
The data are imported to the address book.
298
[Maintenance] How to Set and How to Operate
8 [Administration] Tab Page
Exporting the address book data
You can export address information for use in another TopAccess address book or another address book program.
The group data are not included in the exported address book data.
Exporting address book data in the CSV/XML format
1
Start TopAccess access policy mode.
2
3
Click the [Administration] tab.
P.22 “Access Policy Mode”
Click the [Maintenance] menu and [Export] submenu.
The Export submenu page is displayed.
4
Select the file format of the address book.
5
Click [Create New File] in the Address Book area.
CSV — Select this to create the file in the CSV format
XML — Select this to create the file in the XML format.
The exported file information is displayed.
If you previously exported address book data, the exported file link and information are displayed in the
Address Book area. You can click the link to save the previously exported file.
[Maintenance] How to Set and How to Operate
299
8 [Administration] Tab Page
6
Right-click the [File Name] link and select [Save Target As].
The [Save As] dialog box appears.
300
7
Select the file location and select [All Files] in the [Save as type] box.
8
Click [Save].
The CSV/XML file that contains the address book data is saved in the selected location.
[Maintenance] How to Set and How to Operate
8 [Administration] Tab Page
8.[Administration] Tab Page
Rebooting the equipment
An administrator can reboot the equipment. If rebooting is performed, warming-up may take longer than normally.
Rebooting the equipment
1
Start TopAccess access policy mode.
2
3
Click the [Administration] tab.
P.22 “Access Policy Mode”
Click the [Maintenance] menu and [Reboot] submenu.
The Reboot submenu page is displayed.
4
Click [Reboot] to reboot the equipment.
The confirmation dialog box appears.
5
Click [OK].
The equipment is restarted.
While the equipment is being restarted, the network will not be available. TopAccess will display “Please restart
after waiting a few minutes.”. The touch panel will display “NETWORK INITIALIZING”. When this “NETWORK
INITIALIZING” message disappears, TopAccess will once again be available.
[Maintenance] How to Set and How to Operate
301
8 [Administration] Tab Page
[Registration] ([Administration] tab) Item List
Users who are granted administrator privileges in access policy mode can access the [Registration] menu from the
[Administration] tab.
See the following pages for how to access it:
P.22 “Access Policy Mode”
P.302 “Public Template settings”
P.304 “Public Menu”
P.307 “Fax Received Forward and InternetFAX Received Forward settings”
P.317 “Extended Field Definition”
P.321 “XML Format File”
Public Template settings
You can edit panel settings and destination settings from the [Public Template] submenu page under the [Registration]
menu.
Instructions on how to set up for public templates are the same for setting for private templates.
The [Public Template] submenu can be accessed from the [Registration] menu on the [Administration] tab.
See the following pages for how to access it and information on the [Registration] menu:
P.22 “Access Policy Mode”
P.302 “[Registration] ([Administration] tab) Item List”
P.302 “Setting up Panel Setting (Public template)”
P.303 “Setting up Save as file Setting (Public template)”
P.302 “Setting up Destination Setting (Public template)”
P.303 “Setting up Box Setting (Public template)”
P.302 “Setting up InternetFax Setting (Public template)”
P.303 “Setting up Store to USB Device Setting (Public template)”
P.303 “Setting up Fax Setting (Public template)”
P.303 “Setting up Scan Setting (Public template)”
P.303 “Setting up Email Setting (Public template)”
P.303 “Setting up Extended Field Settings”
Setting up Panel Setting (Public template)
You can specify how the template icons are displayed on the touch panel in the panel setting page. You can also configure
the template notification function.
P.57 “Panel Setting (Private template)”
Setting up Destination Setting (Public template)
In the Recipient List page, you can specify the destinations to which the fax, Internet Fax, or Scan to Email document will
be sent.
When you are setting destinations for an E-mail agent, you can only specify the E-mail addresses for the destinations.
When you are setting destinations for a Fax/Internet Fax agent, you can specify both fax numbers and E-mail addresses
for the destinations.
The Fax Unit must be installed in this equipment to specify the fax numbers for the destinations.
You can specify the destinations by entering their E-mail addresses or fax numbers manually, selecting destinations from
the address book, selecting destination groups from the address book, or searching for destinations in the LDAP server.
P.58 “Destination Setting (Private template)”
Setting up InternetFax Setting (Public template)
In the InternetFax Setting page, you can specify the content of the Internet Fax to be sent.
P.64 “InternetFax Setting (Private template)”
302
[Registration] ([Administration] tab) Item List
8 [Administration] Tab Page
8.[Administration] Tab Page
Setting up Fax Setting (Public template)
In the Fax Setting page, you can specify how the fax will be sent.
P.64 “Fax Setting (Private template)”
Setting up Email Setting (Public template)
In the Email Setting page, you can specify the content of the Scan to Email document to be sent.
P.66 “Email Setting (Private template)”
Setting up Save as file Setting (Public template)
In the Save as file Setting page, you can specify how and where a scanned file will be stored.
P.68 “Save as file Setting (Private template)”
Setting up Box Setting (Public template)
In the Box Setting page, you can specify how scanned images will be stored in the Box.
P.71 “Box Setting (Private template)”
Setting up Store to USB Device Setting (Public template)
On the Store to USB Device Setting page, you can set the method for saving templates in USB media.
P.71 “Store to USB Device Setting (Private template)”
Setting up Scan Setting (Public template)
In the Scan Setting page, you can specify how originals are scanned for the Save as file, Email, and Store to e-Filing
agent.
P.73 “Scan Setting (Private template)”
Setting up Extended Field Settings
P.75 “Extended Field settings”
[Registration] ([Administration] tab) Item List
303
8 [Administration] Tab Page
Public Menu
In the public menu, you can set the menu screen that is displayed when you press the [Menu] button.
You can register frequently used templates and template groups, and External Interface Enabler shortcuts.
The [Public Menu] submenu can be accessed from the [Registration] menu on the [Administration] tab.
See the following pages for how to access it and information on the [Registration] menu:
P.22 “Access Policy Mode”
P.302 “[Registration] ([Administration] tab) Item List”
P.305 “[Select Menu Type] screen”
P.305 “[Select Template Group] screen”
P.306 “[Select Template] screen”
P.306 “[Select URL] screen”
1
2
3
4
5
Item name
Description
1
[Cancel] button
Cancels the operation.
2
[Delete] button
Deletes the selected public menu.
3
No.
The public menu number is displayed.
In the public menu, you can register 64 types.
304
4
Name
The templates registered in the public menu or the registered names of the External
Interface Enabler are displayed.
Click a registered name to check and edit a registered public menu.
P.305 “[Select Template Group] screen”
P.306 “[Select URL] screen”
Click [Undefined] to register a new public menu.
P.305 “[Select Menu Type] screen”
5
Type
The public menu type is displayed.
[Registration] ([Administration] tab) Item List
8 [Administration] Tab Page
8.[Administration] Tab Page
[Select Menu Type] screen
Select a menu type to add to the public menu.
1
2
Item name
Description
1
[Template] button
Adds a template to the public menu.
P.305 “[Select Template Group] screen”
2
[Extension] button
Adds an External Interface Enabler URL to the public menu.
P.306 “[Select URL] screen”
[Select Template Group] screen
Displays a list of templates that can be selected in the public menu.
1
2
3
4
5
Item name
Description
1
[Save] button
Registers the selected template group.
2
[Cancel] button
Cancels registration of the template group.
3
No.
The numbers of the template groups that can be selected are displayed.
4
Name
The names of the template groups are displayed.
Click a name to display the Select Template screen. If templates can be selected, a list of
templates that can be selected is displayed.
P.306 “[Select Template] screen”
5
User Name
The user names of the template groups are displayed.
[Registration] ([Administration] tab) Item List
305
8 [Administration] Tab Page
[Select Template] screen
1
2
3
Item name
Description
1
[Save] button
Registers the selected template.
2
[Cancel] button
Cancels registration of the template.
3
Template list
A list of the templates that can be selected is displayed.
Select a template to use.
[Select URL] screen
Select a URL registered in [URL List for Menu Screen and Hard Button].
P.212 “Setting up URL List for Menu Screen and Hard Button”
1
2
3
4
Item name
306
Description
1
[Save] button
Registers the selected URL.
2
[Cancel] button
Cancels registration of the URL.
3
Name
The registered URL name is displayed.
4
URL
The registered URL is displayed.
[Registration] ([Administration] tab) Item List
8 [Administration] Tab Page
8.[Administration] Tab Page
Fax Received Forward and InternetFAX Received Forward settings
The [Fax Received Forward]/[InternetFAX Received Forward] submenu can be accessed from the [Registration] menu
on the [Administration] tab.
See the following pages for how to access it and information on the [Registration] menu:
P.22 “Access Policy Mode”
P.302 “[Registration] ([Administration] tab) Item List”
y [Fax Received Forward] is available only when the Fax Unit is installed on this equipment.
y Two lines become available in [Fax Received Forward] by installing the 2nd Line for FAX Unit in the FAX Unit. It is
possible to set the reception setting in each line.
P.307 “Setting up Document Print (Fax/InternetFax Received Forward)”
P.308 “Setting up Destination Setting (Fax/Internet Fax Received Forward)”
P.309 “Setting up InternetFax Setting (Fax/Internet Fax Received Forward)”
P.310 “Setting up Save as file Setting (Fax/InternetFAX Received Forward)”
P.314 “Setting up Email Setting (Fax/InternetFAX Received Forward)”
P.316 “Setting up Box Setting (Fax/InternetFAX Received Forward)”
Setting up Document Print (Fax/InternetFax Received Forward)
You can configure printing of forwarded documents.
1
Item name
1
Document Print
Description
y Always — Select this to always print forwarded document.
y ON ERROR — Select this to print the received document when an error occurred on all
forwarding destinations. (For example, the document is not printed when the E-mail
transmission only failed in a combined setting of Save as File and E-mail.)
[Registration] ([Administration] tab) Item List
307
8 [Administration] Tab Page
Setting up Destination Setting (Fax/Internet Fax Received Forward)
You can specify the destinations to which the received faxes or Internet Faxes are forwarded. You can only specify E-mail
addresses as the destination.
You can specify the destination when you have selected [InternetFax] as the forwarding agent.
Recipient List
1
2
4
3
8
5
6
7
9
Item name
Description
1
[Save] button
Saves recipient settings.
2
[Cancel] button
Cancels the settings.
3
[New] button
Displays a screen where you can register an E-mail address as the recipient.
P.77 “[Contact Property] screen”
4
[Address Book] button
Allows you to select a recipient from the address book.
5
[Address Group] button
Allows you to select an address book group as a destination.
6
[Search] button
Allows you to search a recipient from the address book.
P.79 “[Search Contact] screen”
7
[Delete] button
Deletes the selected recipient.
8
Name
Displays the names registered to the address book.
9
Destination
Displays the E-mail addresses.
[Contact Property] screen
You can specify an E-mail address as the recipient.
3
4
2
1
Item name
308
Description
1
Destination
Enter the E-mail address.
2
[OK] button
Saves the recipient.
3
[Cancel] button
Cancels the settings.
4
[Reset] button
Deletes the entered E-mail address.
[Registration] ([Administration] tab) Item List
8 [Administration] Tab Page
8.[Administration] Tab Page
Setting up InternetFax Setting (Fax/Internet Fax Received Forward)
In the InternetFax Setting page, you can specify the content of the Internet Fax to be sent.
You can specify the destination when you have selected [InternetFax] as the forwarding agent.
1
2
3
4
5
6
Item name
Description
1
Subject
This sets the subject of the Internet Faxes. Select [Scanned from (Device Name) [(Template
Name)] (Date) (Time)] to automatically apply the subject, or enter the desired subject in the
box. If you manually enter the subject, the subject will be "(Subject) (Date)" by automatically
adding the date.
2
From Address
Enter the E-mail address of the sender. When the recipient replies to a received document,
the message will be sent to this E-mail address.
3
From Name
Enter the sender name of the Internet Fax.
4
Body
Enter the body message of the Internet Fax. You can enter up to 1000 characters (including
spaces).
5
File Format
Select the file format of the scanned image. Only [TIFF-S] (TIFF-FX (Profile S)) format can
be selected.
6
Fragment Page Size
Select the size of the message fragmentation.
[Registration] ([Administration] tab) Item List
309
8 [Administration] Tab Page
Setting up Save as file Setting (Fax/InternetFAX Received Forward)
In the Save as file Setting page, you can specify how and where a received document will be stored.
You can specify the destination when you have selected [InternetFax] as the forwarding agent.
1
2
3
4
5
6
Item name
1
File Format
Description
Select the file format to which the received document will be saved.
y TIFF (Multi) — Select this to save scanned images as a Multi-page TIFF file.
y TIFF (Single) — Select this to save scanned images separately as Single-page TIFF
files.
y PDF (Multi) — Select this to save scanned images as a Multi-page PDF file.
y PDF (Single) — Select this to save scanned images separately as Single-page PDF
files.
y XPS (Multi) — Select this to save scanned images as a Multi-page XPS file.
y XPS (Single) — Select this to save scanned images separately as Single-page XPS
files.
y If the Forced Encryption setting is enabled, only PDF (Multi) and PDF (Single) are selectable for a file format. For the
Forced Encryption function, refer to the User’s Manual Advanced Guide.
y Files saved in XPS format can be used in Windows Vista/Windows 7/Windows 8/Windows Server 2012/Windows Server
2008 SP1, or Windows XP SP2/Windows Server 2003 SP1 or later versions with Net Framework 3.0 installed.
310
[Registration] ([Administration] tab) Item List
8 [Administration] Tab Page
8.[Administration] Tab Page
Item name
2
Encryption
Description
Set this to encrypt PDF files if you have selected [PDF (Multi)] or [PDF (Single)] in the File
Format setting.
Encryption
Select this if you want to encrypt PDF files.
User Password
Enter a password for opening encrypted PDF files.
Master Password
Enter a password for changing the Encrypt PDF setting.
Encryption Level
Select the desired encryption level.
y 40-bit RC4 — Select this to set an encryption level to one compatible with Acrobat 3.0,
PDF V1.1.
y 128-bit RC4 — Select this to set an encryption level to one compatible with Acrobat 5.0,
PDF V1.4.
y 128-bit AES — Select this to set an encryption level to one compatible with Acrobat 7.0,
PDF V1.6.
Authority
Select the desired types of authority for Encrypt PDF.
y Printing — Select this to authorize users to print documents.
y Change of Documents — Select this to authorize users to change documents.
y Content Copying or Extraction — Select this to authorize users to copy and extract
the contents of documents.
y Content Extraction for accessibility — Select this to enable the accessibility feature.
y If the Forced Encryption setting is enabled, you cannot clear the [Encryption] check box. For the Forced Encryption
function, refer to the User’s Manual Advanced Guide.
y The user password and the master password are not set at the factory shipment.
y Passwords must be from 1 to 32 one-byte alphanumerical characters.
y The user password must differ from the master password.
These passwords can be re-entered only by an authorized user. Users cannot change the settings of the [Encryption Level]
box and the [Authority] box if they are not authorized to change the master password. For the details of the encryption setting,
refer to the User’s Manual Advanced Guide. Ask the administrator for resetting these passwords.
3
Destination — Use local folder
Select this to save a received document to the “FILE_SHARE” folder.
[Registration] ([Administration] tab) Item List
311
8 [Administration] Tab Page
Item name
312
Description
4
Destination — Remote 1
Select this check box to save a received document to Remote 1. How you can set this item
depends on how you have set Remote 1 up in the [Save as file] submenu under the [Setup]
menu.
If you have selected [Allow the following network folder to be used as a destination], you can
only select [Use Administrator Setting]. The protocol and the network path are displayed
below this item.
If you have selected [Allow user to select network folder to be used as a destination], select
[Use User Setting] and enter the following items to configure the destination to save files.
Protocol
Select the protocol to be used for uploading a received document to the network folder.
y SMB — Select this to send a received document to the network folder using the SMB
protocol.
y FTP — Select this to send a received document to the FTP server.
y FTPS — Select this to send a scanned file to the FTP server using FTP over SSL.
y NetWare IPX/SPX — Select this to send a scanned file to the NetWare file server using
the IPX/SPX protocol.
y NetWare TCP/IP — Select this to send a scanned file to the NetWare file server using
the TCP/IP protocol.
Server Name
When you select [FTP] as the protocol, enter the FTP server name or IP address to which a
received document will be sent. For example, to send a received document to the “ftp://
192.168.1.1/user/scanned” FTP folder in the FTP server, enter “192.168.1.1” in this box.
When you select [NetWare IPX/SPX] as the protocol, enter the NetWare file server name or
Tree/Context name (when NDS is available).
When you select [NetWare TCP/IP] as the protocol, enter the IP address of the NetWare file
server.
Port Number(Command)
Enter the port number to be used for controls if you select [FTP] as the protocol. Generally “” is entered for the control port. When “-” is entered, the default port number, that is set for
FTP Client by an administrator, will be used. If you do not know the default port number for
FTP Client, ask your administrator and change this option if you want to use another port
number.
Network Path
When you select [SMB] as the protocol, enter the network path to the network folder. For
example, to specify the “users/scanned” folder in the computer named “Client01”, enter
“\\Client01\users\scanned”.
When you select [FTP] as the protocol, enter the directory in the specified FTP server. For
example, to specify the “ftp://192.168.1.1/user/scanned” FTP folder in the FTP server, enter
“user/scanned”.
When you select [NetWare IPX/SPX] or [NetWare TCP/IP] as the protocol, enter the folder
path in the NetWare file server. For example, to specify the “sys\scan” folder in the NetWare
file server, enter “\sys\scan”.
Login User Name
Enter the login user name to access an SMB server, an FTP server, or a NetWare server, if
required. When you select [FTP] as the protocol, an anonymous login is assumed if you
leave this box blank.
Password
Enter the password to access an SMB server, an FTP server, or a NetWare server, if
required.
Retype Password
Enter the same password again for a confirmation.
5
Destination — Remote 2
Select this check box to save a received document to Remote 2. How you can set this item
depends on how the 2nd Folder has been set up in the [Save as file] submenu in the [Setup]
menu. If Remote 2 does not allow you to specify a network folder, you can only select [Use
Administrator Setting]. The protocol and the network path are displayed below this item. If
the Remote 2 allows you to specify a network folder, you can specify the network folder
settings. See the description of the Remote 1 option for each item.
[Registration] ([Administration] tab) Item List
8 [Administration] Tab Page
8.[Administration] Tab Page
Item name
6
File Name
Description
Format
Select the format of the file name. Information such as file name, date and time or page
number is added according to the selected format.
y [FileName]-[Date]-[Page]
y [FileName]-[Page]-[Date]
y [Date]-[FileName]-[Page]
y [Date]-[Page]-[Filename]
y [Page]-[FileName]-[Date]
y [Page]-[Date]-[FileName]
y [FileName]_[Date]-[Page]
Comment
Enter the comment on the file.
Date
Select how you add "date and time" of the file name selected in [Format].
y [YYYY][MM][DD][HH][mm][SS] — Year (4 digits), month, day, hour, minute and second
are added.
y [YY][MM][DD][HH][mm][SS] — Year (2 digits), month, day, hour, minute and second
are added.
y [YYYY][MM][DD] — Year (4 digits), month, and day are added.
y [YY][MM][DD] — Year (2 digits), month, and day are added.
y [HH][mm][SS] — Hour, minute and second are added.
y [YYYY][MM][DD][HH][mm][SS][mm0] — Year (4 digits), month, day, hour, minute,
second and random number (2 digits and "0") are added.
y [None] — Date is not added.
Page
Select the number of digits of a page number applied to "Page" of the file name selected in
[Format] from 3 to 6. [4digits] is set as the default.
Sub ID
This equipment automatically adds a sub ID (identification number) to the name of a file that
you are saving the same file name exists. You can select the number of digits of this sub ID
from 4 to 6 or [AUTO]. [AUTO] is selected by default. If [AUTO] is selected, a sub ID (4 to 6
digits, selected randomly) is added according to the status of the file name.
Add line information to File Name
Select this check box to add the incoming line information (Line 1, Line 2, and Internet Fax)
to the file name. The “Add line information to File Name” check box is [ON] as the default.
Up to 999 files that are sent from the same sender can be stored in the same destination. If 999 files that are sent from
the same sender have already been stored in the specified destination, this equipment will print the received document
from the same sender instead of storing them as files.
[Registration] ([Administration] tab) Item List
313
8 [Administration] Tab Page
Setting up Email Setting (Fax/InternetFAX Received Forward)
In the Email Setting page, you can specify the content of the E-mail document to be sent.
You can specify the destination when you have selected [InternetFax] as the forwarding agent.
1
2
3
4
5
6
7
8
Item name
Description
1
Subject
This sets the subject of the E-mail documents. Select [Scanned from (Device Name)
[(Template Name)](Date)(Time)] to automatically apply the subject, or enter the desired
subject in the box. If you manually enter the subject, the subject will be "(Subject) (Date)" by
automatically adding the date.
2
From Address
Enter the E-mail address of the sender. When the recipient replies, the message will be sent
to this E-mail address.
3
From Name
Enter the sender name of the E-mail document.
4
Body
Enter the body message of the E-mail document. You can enter up to 1000 characters
(including spaces).
5
File Format
Select the file format to which the received document will be converted.
y TIFF (Multi) — Select this to save scanned images as a Multi-page TIFF file.
y TIFF (Single) — Select this to save scanned images separately as Single-page TIFF
files.
y PDF (Multi) — Select this to save scanned images as a Multi-page PDF file.
y PDF (Single) — Select this to save scanned images separately as Single-page PDF
files.
y XPS (Multi) — Select this to save scanned images as a Multi-page XPS file.
y XPS (Single) — Select this to save scanned images separately as Single-page XPS
files.
y If the Forced Encryption setting is enabled, only the PDF (Multi) and the PDF (Single) are selectable for a file format. For
the Forced Encryption function, refer to the User’s Manual Advanced Guide.
y Files saved in an XPS format can be used in Windows Vista/Windows 7/Windows 8/Windows Server 2012/Windows
Server 2008 SP1, or Windows XP SP2/Windows Server 2003 SP1 or later versions with Net Framework 3.0 installed.
314
[Registration] ([Administration] tab) Item List
8 [Administration] Tab Page
8.[Administration] Tab Page
Item name
6
Encryption
Description
Set this to encrypt PDF files if you have selected [PDF (Multi)] or [PDF (Single)] in the File
Format setting.
Encryption
Select this if you want to encrypt PDF files.
User Password
Enter a password for opening encrypted PDF files.
Master Password
Enter a password for changing the Encrypt PDF setting.
Encryption Level
Select the desired encryption level.
y 40-bit RC4 — Select this to set an encryption level to one compatible with Acrobat 3.0,
PDF V1.1.
y 128-bit RC4 — Select this to set an encryption level to one compatible with Acrobat 5.0,
PDF V1.4.
y 128-bit AES — Select this to set an encryption level to one compatible with Acrobat 7.0,
PDF V1.6.
Authority
Select the desired types of authority for Encrypt PDF.
y Printing — Select this to authorize users to print documents.
y Change of Documents — Select this to authorize users to change documents.
y Content Copying or Extraction — Select this to authorize users to copy and extract
the contents of documents.
y Content Extraction for accessibility — Select this to enable the accessibility feature.
y If the Forced Encryption setting is enabled, you cannot clear the [Encryption] check box. For the Forced Encryption
function, refer to the User’s Manual Advanced Guide.
y The user password and the master password are not set at the factory shipment.
y Passwords must be from 1 to 32 one-byte alphanumerical characters.
y The user password must differ from the master password.
These passwords can be re-entered only by an authorized user. Users cannot change the settings of the [Encryption Level]
box and the [Authority] box if they are not authorized to change the master password. For the details of the encryption setting,
refer to the User’s Manual Advanced Guide. Ask the administrator for resetting these passwords.
7
File Name
Format
Select the format of the file name. Information such as file name, date and time or page
number is added according to the selected format.
y [FileName]-[Date]-[Page]
y [FileName]-[Page]-[Date]
y [Date]-[FileName]-[Page]
y [Date]-[Page]-[Filename]
y [Page]-[FileName]-[Date]
y [Page]-[Date]-[FileName]
y [FileName]_[Date]-[Page]
Comment
Enter the comment on the file.
Date
Select how you add "date and time" of the file name selected in [Format].
y [YYYY][MM][DD][HH][mm][SS] — Year (4 digits), month, day, hour, minute and second
are added.
y [YY][MM][DD][HH][mm][SS] — Year (2 digits), month, day, hour, minute and second
are added.
y [YYYY][MM][DD] — Year (4 digits), month, and day are added.
y [YY][MM][DD] — Year (2 digits), month, and day are added.
y [HH][mm][SS] — Hour, minute and second are added.
y [YYYY][MM][DD][HH][mm][SS][mm0] — Year (4 digits), month, day, hour, minute,
second and random number (2 digits and "0") are added.
y [None] — Date is not added.
Page
Select the number of digits of a page number applied to "Page" of the file name selected in
[Format] from 3 to 6. [4digits] is set as the default.
Sub ID
This equipment automatically adds a sub ID (identification number) to the name of a file that
you are saving the same file name exists. You can select the number of digits of this sub ID
from 4 to 6 or [AUTO]. [AUTO] is selected by default. If [AUTO] is selected, a sub ID (4 to 6
digits, selected randomly) is added according to the status of the file name.
8
Fragment Message Size
Select the size of the message fragmentation.
[Registration] ([Administration] tab) Item List
315
8 [Administration] Tab Page
Setting up Box Setting (Fax/InternetFAX Received Forward)
In the Box Setting page, you can specify how a received document will be stored in the Box.
You can specify the destination when you have selected [InternetFax] as the forwarding agent.
1
2
3
Item name
316
Description
1
Destination
Specify the destination box number for e-Filing.
Box Number
Enter the Box number where a received document will be stored.
Password
Enter the password if the specified Box number requires a password.
Retype Password
Enter the same password again for a confirmation.
2
Folder Name
Enter the name of the folder where a received document will be stored.
3
Document Name
Display how the received document will be named. You cannot change the document name.
[Registration] ([Administration] tab) Item List
8 [Administration] Tab Page
8.[Administration] Tab Page
Extended Field Definition
You can set meta data which is attached to images scanned with the Meta Scan function.
You can register up to 100 extended field definitions.
The [Extended Field Definition] submenu can be accessed from the [Registration] menu on the [Administration] tab.
See the following pages for how to access it and information on the [Registration] menu:
P.22 “Access Policy Mode”
P.302 “[Registration] ([Administration] tab) Item List”
The Meta Scan Enabler is required to use the Meta Scan function. For the details, contact your distributor.
P.318 “[Extended Fields] screen”
P.318 “Setting up Definition Information”
P.318 “Setting up Extended Field settings”
P.319 “[Extended Fields Properties] screen”
P.320 “[Definition Properties] screen”
1
2
Item name
Description
1
No.
Displays the extended field definition number.
2
Name
Displays the extended field definition name.
Click a registered name to check and edit the existing extended field definition.
P.318 “[Extended Fields] screen”
Click [Undefined] to register a new extended field definition.
P.320 “[Definition Properties] screen”
[Registration] ([Administration] tab) Item List
317
8 [Administration] Tab Page
[Extended Fields] screen
You can set the information entered from the control panel when using meta scan.
P.348 “Registering Extended Field Definition”
Setting up Definition Information
1
2
3
4
Item name
1
Description
[Edit] button
Allows you to edit the extended field definition.
P.320 “[Definition Properties] screen”
2
[Reset] button
Allows you to delete the extended field definition.
3
No.
Displays the extended field definition number.
4
Name
Displays the extended field definition name.
Setting up Extended Field settings
1
2
3
4
5
6
Item name
318
7
8
9
10 11
Description
1
[New] button
Allows you to add a extended field property.
P.319 “[Extended Fields Properties] screen”
2
Field Number
Displays the extended field property number.
3
Field Name
Displays the extended field property name.
4
Display Name
Displays the caption of the extended field property for the display on the control panel.
5
Mandatory Input
Displays whether the extended field property is a mandatory entry or not.
6
Hidden Attribute
Displays whether the extended field property is a hidden item on the control panel.
7
Input Method
Displays the type of the extended field property.
8
Minimum Value
Displays the minimum value for the extended field property.
9
Maximum Value
Displays the maximum value for the extended field property.
10
Default Value
Displays the default value for the extended field property.
11
Date
Displays the default date for the extended field property.
[Registration] ([Administration] tab) Item List
8 [Administration] Tab Page
8.[Administration] Tab Page
[Extended Fields Properties] screen
You can register up to 25 extended field properties.
P.351 “Registering templates for Meta Scan”
1
2
3
4
5
6
7
8
9
10
11
12
13
Item name
Description
1
[Save] button
Creates an extended field property with the entered data.
2
[Cancel] button
Cancels the settings.
3
Field Name
Specify the extended field name.
4
Display
Specify how to display the extended field on the control panel.
Name
Enter the caption of the extended field name for the display on the control panel. You can
enter up to 256 characters. Enter the Box number where a received document will be
stored.
Mandatory Input
Select this check box if the extended field is a mandatory entry item.
Hidden Attribute
Select this check box if the extended field is a hidden item on the control panel.
5
Input Method *
Select the type of an extended field.
y Numerical — Select this to create an extended field as an integer value.
y Decimal — Select this to create an extended field as a decimal value.
y Text — Select this to create an extended field as a character string.
y List — Select this to create an extended field as a list selection.
y Address — Select this to create an extended field as an address.
y Password — Select this to create an extended field as a password.
y Date — Select this to create an extended field as a date.
6
List Items
Specify list items to be selected for the extended field. The registered list items are listed in
the List items. When you register a list item, enter [Name] and [Value], and then click [Add].
If you select an item and click [Move Up], the selected item moves up in the list. Click [Move
Down] to move it down. Select an item and click [Delete] to delete an unnecessary item from
the list.
Name
Enter the name of the item.
Value
Enter a value or text to be applied for the selected item.
y You cannot exceed the total number of characters displayable in the List Items (127).
y You cannot use a semicolon in [Name] or [Value].
7
Minimum Length
Specify the minimum number of characters that can be entered in the extended field if the
field is a character string.
[Registration] ([Administration] tab) Item List
319
8 [Administration] Tab Page
Item name
Description
8
Maximum Length
Specify the maximum number of characters that can be entered in the extended field if the
field is a character string.
9
Minimum Value
Specify the minimum numerical value that can be entered in the extended field if the field is
a numerical value.
10
Maximum Value
Specify the maximum numerical value that can be entered in the extended field if the field is
a numerical value.
11
Default Value
Specify the default value for the extended field.
12
Password
Specify the default password for the extended field if the field is a password.
13
Date
Specify the default date for the extended field if the field is a date.
*
The following shows the types and settable items of an extended field for each [Input Method]. (*) is displayed for mandatory setting items.
Input method
(Extended field type)
Mandatory setting items
Optional setting items
Numerical value
[Maximum Value], [Minimum Value]
Settable value: -999,999,999,999 to 999,999,999,999
[Default Value]
Decimal value
[Maximum Value], [Minimum Value]
Settable value: -999,999,999,999.999999 to
999,999,999,999.999999
[Default Value]
Text
[Maximum Length], [Minimum Length]
Settable value: 0 to 256
[Default Value]
List
[List Items]
You can register up to 256 [List Items].
[Default Value]
Select from the registered selection
items.
You can set from 1 to 126 characters in [Name].
You can set from 1 to 126 characters in [Value].
However, the total number of characters set in [Name] and
[Value] must be from 2 to 127.
Address
None
[Default Value]
Password
None
Settable value: 0 to 256
[Default Value]
Date
None
[Default Value]
[Definition Properties] screen
1
2
3
4
5
Item name
1
320
Description
[Save] button
Creates an extended field definition with the entered data.
2
[Cancel] button
Cancels adding new.
3
Number
Displays the extended field definition number.
4
Name
Specify the extended field definition name.
5
XML Format File
Select the XML format file for meta data.
P.321 “XML Format File”
[Registration] ([Administration] tab) Item List
8 [Administration] Tab Page
8.[Administration] Tab Page
XML Format File
Meta data, which is attached to images scanned with the Meta Scan function, is defined in an "XML format file".
You can register “XML format files”, which are customized to be processed by a workflow server or some other means.
The [XML Format File] submenu can be accessed from the [Registration] menu on the [Administration] tab.
See the following pages for how to access it and information on the [Registration] menu:
P.22 “Access Policy Mode”
P.302 “[Registration] ([Administration] tab) Item List”
P.321 “Setting up Import XML Format File”
P.321 “Setting up Delete XML Format File”
Setting up Import XML Format File
1
Item name
1
File Name
Description
Select the XML format file to be imported.
[Browse] button — Allows you to select the XML format file.
[Import] button — Imports the selected the XML format file.
Setting up Delete XML Format File
1
Item name
2
3
Description
1
File Name
Select the XML format file to be deleted.
2
File Size
Displays the file size of the XML format file.
3
Date
Displays the imported date of the XML format file.
[Registration] ([Administration] tab) Item List
321
8 [Administration] Tab Page
[Registration] ([Administration] tab) How to Set and How to Operate
You can register public templates, and relay transmissions of received faxes/Internet Faxes in the [Registration] menu in
the TopAccess access policy mode.
y Public Template
An administrator can create public templates to register to the public template group. This template group can be
accessed by all users in the network.
P.322 “Registering public templates”
y Fax Received Forward, Internet Fax Received Forward
An administrator can register an agent which forwards all received faxes/Internet Faxes to a specified destination. This
enables the administrator to check all faxes received by this equipment.
P.328 “Registering Fax and Internet Fax received forward”
The Fax Received Forward can be registered only when the Fax Unit is installed.
y Extended Field Definition
P.317 “Extended Field Definition”
y XML format file
P.343 “Editing XML format file”
P.347 “Registering XML format file”
Registering public templates
An administrator can create and maintain public templates and manage the public template group. Users can display and
use public templates but cannot modify them.
The public group can contain up to 60 public templates. Typically, these are general-purpose templates available to all
users.
An administrator can perform the following public template management operations in TopAccess access policy mode.
P.322 “Creating or editing public templates”
P.325 “Resetting public templates”
Creating or editing public templates
Use the Templates page to create or modify templates.
Creating or editing public templates
1
Start TopAccess access policy mode.
2
3
Click the [Administration] tab.
P.22 “Access Policy Mode”
Click the [Registration] menu and [Public Template] submenu.
The Public Template submenu page is displayed.
322
[Registration] ([Administration] tab) How to Set and How to Operate
8 [Administration] Tab Page
8.[Administration] Tab Page
4
Display in the Panel View. Click an undefined blank icon to create a new template, or
click a defined icon with an image to edit an existing template.
y If the templates list is displayed in the List view, click the [Undefined] template name to register a new template.
Click the defined template name to edit an existing template.
y If you click an icon that has not been defined, the Template Properties page to select agents is displayed. Skip
to step 6.
y If you click a defined icon, the Template Properties page is displayed. Go to the next step.
y You can change the template list view by clicking on either [Panel View] or [List View].
y If you know which public template you want to define or edit, click the number of the public template in the
[Jump to] links.
5
When you select a defined template icon, the Template Properties will be displayed.
Click [Edit].
The Template Properties page to select agents is displayed.
[Registration] ([Administration] tab) How to Set and How to Operate
323
8 [Administration] Tab Page
6
Select agents to be combined, and click [Select Agent].
You can select one of the following templates:
7
8
324
Copy
Creates a copy agent. This agent can copy documents. Usually, this is selected to print
copies as well as sending originals to other destinations. This agent can also be
combined with the Save as file agent or Store to e-Filing agent.
Fax / InternetFax
You can create a template for fax or Internet Fax transmission. This agent can be
combined with the Save as file agent.
Scan
Create a scan template by combining the E-mail, Save as file, Store to e-Filing, or
Save to USB Media agents. When you select this, select the agent from [Email], [Save
as file], [Store to e-Filing], or [Save to USB Media]. You can specify up to two agents
for a scan template.
Meta Scan
You can create a template for the meta scan option. You can only select only one
among [Email], [Save as file], and [Save to USB Media], except for [Email] and [Save
as file], which can be selected simultaneously.
Refer to the document provided by the vendor of the application which supports the
meta scan option for details.
Click each button displayed in the page to specify or edit the associated template
properties.
[Panel Setting]
Specify the icon settings of the template.
P.302 “Setting up Panel Setting (Public template)”
[Destination Setting]
Specify the destination. This can be set only when creating a Fax/Internet Fax agent or
Email agent.
P.302 “Setting up Destination Setting (Public template)”
[InternetFax Setting]
Specify how the Internet Fax is transmitted. This can be set only when creating a Fax/
Internet Fax agent.
P.302 “Setting up InternetFax Setting (Public template)”
[Fax Setting]
Specify how the documents are faxed. This can be set only when creating a Fax/Internet
Fax agent.
P.303 “Setting up Fax Setting (Public template)”
[Email Setting]
Specify how the documents are transmitted as E-mail messages. This can be set only
when registering the Email agent.
P.303 “Setting up Email Setting (Public template)”
[Save as file Setting]
Specify how documents are saved in a local hard disk, USB media, or a network folder.
This can be set only when registering the Received to File agent.
P.303 “Setting up Save as file Setting (Public template)”
[Box Setting]
Specify how the documents are saved in e-Filing. This can be set only when registering
the Store to e-Filing agent.
P.303 “Setting up Box Setting (Public template)”
[Store to USB Setting]
Specify how the document is saved in USB media.
[Scan Setting]
Specify how the documents are scanned. This can be set only when creating a Save as
file agent, Email agent, or Store to e-Filing agent.
P.303 “Setting up Scan Setting (Public template)”
[Extended Field settings]
Specify extended field definition information and extended field settings.
P.303 “Setting up Extended Field Settings”
[Password Setting]
Specify the password to the template if it is newly created.
After configuring the desired template properties, click [Save].
The template properties are registered.
[Registration] ([Administration] tab) How to Set and How to Operate
8 [Administration] Tab Page
8.[Administration] Tab Page
Resetting public templates
You can reset a public template that you have registered.
You can reset a public template that you selected, or you can reset all public templates that are registered in the public
template groups.
P.325 “Resetting a public template”
P.327 “Resetting all public templates”
Resetting a public template
To reset an unnecessary public template, perform the following procedure.
1
Start TopAccess access policy mode.
2
3
Click the [Administration] tab.
P.22 “Access Policy Mode”
Click the [Registration] menu and [Public Template] submenu.
The Public Template submenu page is displayed.
4
From the templates list, click the template icon that you want to reset.
y If the templates list is displayed in the List view, click the template name that you want to reset.
y The Template Properties page is displayed.
y You can change the template list view by clicking on either [Panel View] or [List View].
y If you know which public template you want to define or edit, click the number of the public template in the
[Jump to] links.
[Registration] ([Administration] tab) How to Set and How to Operate
325
8 [Administration] Tab Page
5
Click [Reset Template].
The confirmation dialog box appears.
6
Click [OK].
The template setting is reset and the template will be returned to an undefined one.
326
[Registration] ([Administration] tab) How to Set and How to Operate
8 [Administration] Tab Page
8.[Administration] Tab Page
Resetting all public templates
To reset all public templates, perform the following procedure.
1
Start TopAccess access policy mode.
2
3
Click the [Administration] tab.
P.22 “Access Policy Mode”
Click the [Registration] menu and [Public Template] submenu.
The Public Template submenu page is displayed.
4
Click [Reset].
The confirmation dialog box appears.
5
Click [OK].
All public templates are reset.
[Registration] ([Administration] tab) How to Set and How to Operate
327
8 [Administration] Tab Page
Registering Fax and Internet Fax received forward
You can forward received faxes and Internet Faxes to a specified address using fax received forward and Internet Fax
received forward functions. You can check all faxes and Internet Faxes received by this equipment using these functions.
P.328 “Registering the Fax or Internet Fax received forward”
P.330 “Setting up Destination Setting (Fax/Internet Fax Received Forward)”
y You can also forward using the F-code communications function on this equipment when communicating with a fax
which supports the F-code communications function. You need to create a mailbox in advance. Also, you can use
the TSI (sender information) forwarding function by making the counterpart fax number as a box number and
forwarding documents in the box (mailbox) to a specified saving location.
P.100 “Managing mailboxes”
y The Fax Received Forward can be registered only when the Fax Unit is installed.
y When the 2nd line board is installed, the received faxes are forwarded to the specified destinations according to the
Fax Received Forward setting regardless of whether the faxes are received through line 1 or line 2.
The received fax and Internet Faxes can be transmitted to the following destinations:
y Other Internet Fax devices
y Local folder in this equipment or network folders
y E-mail addresses
y Box in this equipment
Registering the Fax or Internet Fax received forward
The procedures to register the Fax Received Forward and Internet Fax Received Forward are almost the same. This
section describes how to register in both cases.
1
Start TopAccess access policy mode.
2
3
Click the [Administration] tab.
P.22 “Access Policy Mode”
Click the [Registration] menu. Click the [Fax Received Forward] submenu to register
the Fax Received forward, or click the [InternetFAX Received Forward] submenu to
register the Internet Fax Received forward.
y When you click the [Fax Received Forward] submenu, the Fax Received Forward submenu page is displayed.
y When you click the [InternetFax Received Forward] submenu, the Internet Fax Received Forward submenu
page is displayed.
328
[Registration] ([Administration] tab) How to Set and How to Operate
8 [Administration] Tab Page
8.[Administration] Tab Page
4
Select the [Forward] check box, select the desired agents, and click [Select Agent].
To disable the Fax Received Forward or Internet Fax Received Forward, clear the [Forward] check box and
click [Select Agent], and then click [Save].
InternetFax
Forwards received faxes or received Internet Faxes to another Internet Fax device.
This agent can be combined with the Save as file agent or Store to e-Filing agent.
Save as file
Forwards received faxes or received Internet Faxes to a shared folder on the
equipment or a network folder. This agent can be combined with another agent.
Email
Forwards received faxes to an E-mail address. This agent can be combined with the
Save as file agent or Store to e-Filing one.
Store to e-Filing
Forwards received faxes to e-Filing on the equipment. This agent can be combined
with another one.
The image quality of the file that is stored by Save as file, E-mail, and Store to e-Filing is different from the
output of the received fax when it is printed.
5
Select whether or not to print the forwarded documents in the [Document Print] box.
Always
Select this always to print forwarded documents.
ON ERROR
Select this to print the received document when an error has occurred on all
forwarding destinations. (For example, the document is not printed when E-mail
transmission only failed in a combined setting of save as file and E-mail.)
[Registration] ([Administration] tab) How to Set and How to Operate
329
8 [Administration] Tab Page
6
7
Click each button displayed in the page to specify or edit the associated properties.
[Destination Setting]
[TO: Destination Setting]
[CC: Destination Setting]
[BCC: Destination Setting]
Specify the destination. This can be set only when registering the Internet Fax, or Email
agent.
P.330 “Setting up Destination Setting (Fax/Internet Fax Received Forward)”
[InternetFax Setting]
Specify how the Internet Fax is transmitted. This can be set only when registering the
Internet Fax agent.
P.309 “Setting up InternetFax Setting (Fax/Internet Fax Received Forward)”
[Email Setting]
Specify how the documents are transmitted as E-mail messages. This can be set only
when registering the Email agent.
P.314 “Setting up Email Setting (Fax/InternetFAX Received Forward)”
[Save as file Setting]
Specify how the documents are saved in a shared folder on this equipment or a network
folder. This can be set only when registering the Received to File agent.
P.310 “Setting up Save as file Setting (Fax/InternetFAX Received Forward)”
[Box Setting]
Specify how the documents are saved in e-Filing. This can be set only when registering
the Store to e-Filing agent.
P.316 “Setting up Box Setting (Fax/InternetFAX Received Forward)”
After configuring the desired properties, click [Save].
The Fax or Internet Fax Received Forward properties are registered.
Setting up Destination Setting (Fax/Internet Fax Received Forward)
In the Recipient List page, you can specify the destinations to which the received faxes or Internet Faxes will be
transmitted. You can only specify an E-mail address as the destination.
You can specify the destinations by entering E-mail addresses manually, selecting destinations from the address book,
selecting destination groups from the address book, or searching for destinations in the LDAP server.
P.330 “Entering the destinations manually”
P.331 “Selecting the destinations from the address book”
P.332 “Selecting the groups from the address book”
P.333 “Searching for destinations in the LDAP server”
P.334 “Removing the destinations from the Recipient List”
Entering the destinations manually
Using this method, you can add a destination manually to the Recipient List.
1
2
Click [Destination Setting] to open the Recipient List page.
Click [New].
The Contact Property page is displayed.
3
Enter the E-mail address of the destination, in the [Destination] box.
4
Click [OK].
5
Repeat step 2 to 4 to add all destinations you require.
Entered destination is added to the Recipient List page.
You can remove destinations that you have added to the Recipient List before saving the destination settings.
P.334 “Removing the destinations from the Recipient List”
330
[Registration] ([Administration] tab) How to Set and How to Operate
8 [Administration] Tab Page
8.[Administration] Tab Page
6
Click [Save].
The contacts are added as destinations.
Selecting the destinations from the address book
By this method, you can select destinations from the address book.
1
2
Click [Destination Setting] to open the Recipient List page.
Click [Address Book].
The Address Book page is displayed.
3
Select the [Email] check boxes of users you want to add as the destinations.
If you want to sort the Recipient List by a specific group, select the desired group name in the [Group] box.
4
Click [Add].
The selected destinations are added to the Recipient List page.
You can remove destinations that you have added to the Recipient List before saving the destination settings.
P.334 “Removing the destinations from the Recipient List”
[Registration] ([Administration] tab) How to Set and How to Operate
331
8 [Administration] Tab Page
5
Click [Save].
The contacts are added as destinations.
Selecting the groups from the address book
By this method, you can select groups from the address book.
1
2
Click [Destination Setting] to open the Recipient List page.
Click [Address Group].
The Address Group page is displayed.
3
Select the [Group] check boxes that contain the desired destinations.
4
Click [Add].
All destinations in the selected groups are added to the Recipient List page.
You can remove destinations that you have added to the Recipient List before saving the destination settings.
P.334 “Removing the destinations from the Recipient List”
5
Click [Save].
The contacts are added as destinations.
332
[Registration] ([Administration] tab) How to Set and How to Operate
8 [Administration] Tab Page
8.[Administration] Tab Page
Searching for destinations in the LDAP server
You can search for destinations in the registered LDAP server. You can also search for destinations in the address book
on this equipment.
1
2
Click [Destination Setting] to open the Recipient List page.
Click [Search].
The Search Contact page is displayed.
3
Select the directory service name that you want to search for in the [Directory Service
Name] box, and enter the search terms in the boxes that you want to search.
Enter a search string in [Email Address] or [Fax Number] to search a destination using an LDAP server. A
search will not be carried out correctly if you enter a search string in other columns.
y If you select the model name of this equipment at the [Directory Service Name] box, you can search for
destinations in the address book of this equipment.
y TopAccess will search for destinations which match the entries.
y Leaving the box blank allows wild-card searching. (However, you must specify at least one.)
4
Click [Search].
5
Select the [Email] check boxes of users you want to add.
A search for the destination using the LDAP server starts. When the search is complete, the Search Address List
page will display the results.
Click [Research] to return to step 3 so that you can change the search criteria and execute the search again.
The value of [company] and [department] will depend on the settings determined by the administrator.
[Registration] ([Administration] tab) How to Set and How to Operate
333
8 [Administration] Tab Page
6
Click [Add].
The selected destinations are added to the Recipient List page.
You can remove destinations that you have added to the Recipient List before saving the destination settings.
P.334 “Removing the destinations from the Recipient List”
7
Click [Save].
The contacts are added as destinations.
Removing the destinations from the Recipient List
1
Select the check boxes of the destinations that you want to remove from the Recipient
List, and click [Delete].
The selected destinations are removed from the Recipient List.
2
334
Click [Save].
[Registration] ([Administration] tab) How to Set and How to Operate
[My Account] Tab Page
9.
Using TopAccess, end users can display their own account information
[My Account] Tab Page Overview....................................................................................... 336
[My Account] Item list .........................................................................................................................................336
9 [My Account] Tab Page
[My Account] Tab Page Overview
The [My Account] tab is displayed if [User Authentication] is enabled in the [Administration] tab under [Security] [Authentication] - [User Authentication Setting].
It displays the account information of the user who is accessing TopAccess. Also, you can change the display language
and keyboard layout on the control panel.
P.336 “[My Account] Item list”
[My Account] Item list
P.337 “[Change Password] screen”
P.338 “[Menu Setting] screen”
P.338 “[Select Menu Type] screen”
P.339 “[Select Template Group] screen”
P.339 “[Select Template] screen”
P.340 “[Select URL] screen”
P.340 “[Confirm Permission] screen”
1
2
3
4
5
6
7
8
9
10
11
12
13
14
15
Item name
1
336
Description
[Save] button
Saves the content of the account.
2
[Cancel] button
Cancels the operation.
3
[Change Password] button
Changes the password of the user who is accessing TopAccess.
P.337 “[Change Password] screen”
4
[Menu] button
Click the [Menu] button on the control panel and perform the settings on the menu
screen. In the [My Account] tab, set the menu screen of the user who is accessing
TopAccess.
P.338 “[Menu Setting] screen”
5
User Name
Displays the name of the user who is accessing TopAccess.
6
Domain Name/LDAP Server
Displays the domain name or LDAP server of the user who is accessing TopAccess.
[My Account] Tab Page Overview
9 [My Account] Tab Page
9.[My Account] Tab Page
Item name
Description
7
Role Assignment
Displays the role assigned to the user who is accessing TopAccess.
Click the [Confirm Permission] button to display the [Confirm Permission] screen and
check the detailed role information.
P.340 “[Confirm Permission] screen”
8
Group Assignment
Displays the group assigned to the user who is accessing TopAccess.
9
Department Number
Displays the department number registered by the user who is accessing TopAccess.
10
PanelUI Language
Select the display language for the control panel.
11
PanelUI Keyboard Layout
Select the keyboard layout on the control panel.
12
Quota Setting
Displays the output restriction settings of the user who is accessing TopAccess.
Quota
If the Black Quota Setting is ON, the remaining number that can be output is displayed.
Default Quota
If the Quota Setting is ON, the assigned default value is displayed.
13
Print Counter
Displays the number of pages printed by print operations and E-mail reception (Internet
Fax reception).
14
Scan Counter
Displays the number of pages scanned by scan operations.
Values for the small size and large size are displayed according to the paper size
specified on your device.
15
Fax Communication Counter
Displays the communication record.
[Change Password] screen
Changes the password of the user who is accessing TopAccess.
1
2
3
4
5
Item name
Description
1
[Save] button
Saves the password changes.
2
[Cancel] button
Cancels the operation.
3
Old Password
Enter the current password.
4
New Password
Enter the new password.
5
Retype Password
Enter the same password again for a confirmation.
[My Account] Tab Page Overview
337
9 [My Account] Tab Page
[Menu Setting] screen
You can set the menu screen of the user who is accessing TopAccess.
The menu screen is displayed by pressing the [Menu] button on the control panel. You can register frequently used
templates and template groups, and External Interface Enabler shortcuts.
1
2
3
4
5
Item name
Description
1
[Close] button
Closes the [Menu Setting] screen.
2
[Delete] button
Deletes the selected menu settings.
3
No.
The numbers of the menu setting are displayed.
In the menu settings, you can register 64 types.
4
Name
The templates registered in the menu settings or the registered names of the External
Interface Enabler are displayed.
Click a registered name to check and edit a registered menu setting.
P.339 “[Select Template Group] screen”
P.340 “[Select URL] screen”
Click [Undefined] to register a new menu setting.
P.338 “[Select Menu Type] screen”
5
Type
The menu setting type is displayed.
[Select Menu Type] screen
Select a menu type to add to the menu screen.
1
2
Item name
338
Description
1
[Template] button
Adds a template to the menu.
P.339 “[Select Template Group] screen”
2
[Extension] button
Adds an External Interface Enabler URL to the menu.
P.340 “[Select URL] screen”
[My Account] Tab Page Overview
9 [My Account] Tab Page
9.[My Account] Tab Page
[Select Template Group] screen
Displays a list of Template Group that can be selected on the [Menu Setting] screen.
1
2
3
4
5
Item name
Description
1
[Save] button
Registers the selected template group.
2
[Cancel] button
Cancels registration of the template group.
3
No.
The numbers of the template group that can be selected are displayed.
4
Name
The names of the template groups are displayed.
Click a name to display the [Select Template] screen. If templates can be selected, a list of
templates that can be selected is displayed.
P.339 “[Select Template] screen”
5
User Name
The user names of the template groups are displayed.
[Select Template] screen
You can select which template to use by clicking the template group name in the [Select Template Group] screen.
1
2
3
Item name
Description
1
[Save] button
Registers the selected template.
2
[Cancel] button
Cancels registration of the template.
3
Template list
A list of the templates that can be selected is displayed.
Select a template to use.
[My Account] Tab Page Overview
339
9 [My Account] Tab Page
[Select URL] screen
Select a URL registered in [URL List for Menu Screen].
P.212 “Setting up URL List for Menu Screen and Hard Button”
1
2
3
4
Item name
Description
1
[Save] button
Registers the selected URL.
2
[Cancel] button
Cancels registration of the URL.
3
Name
The registered URL name is displayed.
4
URL
The registered URL is displayed.
[Confirm Permission] screen
You can display granted permissions of the user who is accessing TopAccess.
1
2
Item name
340
Description
1
[OK] button
Closes the [Confirm Permission] screen.
2
Role Information
The role information assigned to the user who is accessing TopAccess is displayed.
[My Account] Tab Page Overview
Functional Setups
10.
This chapter contains the following contents.
Setting up Meta Scan Function........................................................................................... 342
Procedure for using Meta Scan ..........................................................................................................................342
Checking Meta Scan Enabler .............................................................................................................................342
Editing XML format file .......................................................................................................................................343
Registering XML format file ................................................................................................................................347
Registering Extended Field Definition ................................................................................................................348
Registering templates for Meta Scan .................................................................................................................351
Meta Scan ..........................................................................................................................................................354
Checking logs of Meta Scan...............................................................................................................................354
Using the Attribute of the External Authentication as a Role of the MFP....................... 355
Exporting the role information setting file ...........................................................................................................355
Defining the role information setting file .............................................................................................................355
Importing the role information setting file ...........................................................................................................356
Enabling the role base access setting ................................................................................................................356
10 Functional Setups
Setting up Meta Scan Function
The Meta Scan is a function to attach information (meta data) generated within the device to scanned images. The
attached meta data can be processed by workflow servers or other means to supplement the scanned image.
To use Meta Scan, select [E-MAIL], [Save as file] and [Save to USB Media] agents of Meta Scan for templates and register
them.
Meta data is managed by an XML file which defines the scheme to store the information.
This section describes the data structure using the XML file <defaultForm3.xml> registered as the default as an example.
The default XML file consists of two data areas; the “basic data area” and “extended data area”.
The “basic data area” records device information, scan parameters, and user information, while the “extended data area”
records information entered by the user on the control panel (maximum 25 items) when running Meta Scan.
The user can create fields in “extended data area” to store information entered from the control panel under [Extended
Field Definition] - [Extended Field Properties].
When using applications that interact with Meta Scan, follow the instructions of the application vendor to set the XML
format file and the extended field.
P.342 “Procedure for using Meta Scan”
P.342 “Checking Meta Scan Enabler”
P.343 “Editing XML format file”
P.347 “Registering XML format file”
P.348 “Registering Extended Field Definition”
P.351 “Registering templates for Meta Scan”
P.354 “Meta Scan”
P.354 “Checking logs of Meta Scan”
Procedure for using Meta Scan
Setup
Operation
Description
Reference
1
Checking the Meta Scan option
Check whether the Meta Scan option
can be used with your equipment.
P.342 “Checking Meta Scan Enabler”
2
Editing the XML format file
If necessary, edit the XML format file
for meta data.
P.343 “Editing XML format file”
3
Registering an XML format file
Register an XML format file for meta
data.
P.347 “Registering XML format file”
4
Registering an extended field
definition
If necessary, register an extended
field definition.
P.348 “Registering Extended Field Definition”
5
Registering a template for Meta Scan
Register a template for Meta Scan.
P.351 “Registering templates for Meta Scan”
Operation
Operation
Description
Reference
1
Meta Scan
Perform a meta scan using a template
for Meta Scan.
User’s Manual Advanced Guide "Using
Scan Templates"
2
Checking Meta Scan logs
Check the scan log to confirm if meta
data has been correctly created.
P.354 “Checking logs of Meta Scan”
Checking Meta Scan Enabler
The Meta Scan Enabler is required to use the Meta Scan function. For the details, contact your distributor.
You can check whether the Meta Scan option is set on your equipment as follows.
Meta Scan function is available if [Meta scan enabler] is registered under [ADMIN] - [GENERAL] - [LICENSE
MANAGEMENT].
342
Setting up Meta Scan Function
10 Functional Setups
10.Functional Setups
Editing XML format file
Edit XML format files in accordance with the applications that interact with Meta Scan. You can define variables in the XML
format file and the variables are replaced with the corresponding information (meta scan) during the Meta Scan operation.
Enter variables in XML format files using the ${variable name} format.
Variables of XML format files
Variables that can be defined in XML format files are shown below.
You can use variables for the subject of E-mail, the file name of Meta Scan image files, and the file name of meta data.
Variable (${variable name})
Data to be stored
Value
${MANUFACT}
Manufacturer name
OKI
${MODEL}
Model name
string
${FWVER}
Firmware version
string
${SERIAL}
Serial number for machine
string
${LOCATION}
Location set from TopAccess
string
${CONTACT}
Contact information set from TopAccess
string
${CONTACTTEL}
Contact telephone number set from TopAccess
string
${IP}
IP address
string
${IPV6}
IPV6 address
string
${NETBIOSNAME}
NetBIOS name
string
${FQDN}
Fully Qualified Domain Name
string
${RESOLUTION}
Scan resolution
HHHxVVVdpi
${FILEFORMAT}
File format
MultipleTIFF
singleTIFF
MultiplePDF
singlePDF
MultipleSLIMPDF
singleSLIMPDF
MultipleXPS
singleXPS
JPEG
${COLORMODE}
Color mode
BLACK
GRAY SCALE
FULLCOLOR
AUTOCOLOR
${NUMFILE}
Number of image files
string
${PAGES}
Number of pages
string
Save path of the image file
string
${FILE} *2
Image file name
string
${MYEMAIL}
Sender email address
string
${PATH}
*1 *2
${DATE}
Scanned date
YYYY-MM-DD
${YEAR}
Scanned year
YYYY
${MONTH}
Scanned month
MM
${DAY}
Scanned day
DD
${TIME}
Scanned time
HH:MM:DD.mmmTZD *3
${USER}
Login user name
string
${DOMAIN}
Login user‘s domain name
string
${DEPTCODE}
Login department code
string
${DEPTNAME}
Login department name
string
${TEMPGROUPNO}
Template group number
string
Setting up Meta Scan Function
343
10 Functional Setups
Variable (${variable name})
Value
Template group name
string
${TEMPGROUPUSER}
Template group user
string
${TEMPNO}
Template number
string
${TEMPNAME}
Template name
string
${TEMPUSER}
Template user
string
${FIELDNAMEn} *4
Extended field name
string
*4
Extended field name
string
${FIELDNAMEn}
*1
*2
*3
*4
344
Data to be stored
${TEMPGROUPNAME}
It cannot be used for the subject of E-mail.
It cannot be used for the file name of image files or the file name of meta data.
TZD is Time zone.
A field number (from 1 to 25) comes at "n". For details, refer to the next chapter.
Setting up Meta Scan Function
10 Functional Setups
10.Functional Setups
Default XML file format
Contents of the default XML format file <defaultForm3.xml> registered in this equipment are shown below. XML format
files must be in the UTF-8 XML format. During the Meta Scan operation, the equipment stores information corresponding
to the variable in each field of the XML format file and attaches it as meta data in the XML format.
<?xml version="1.0" encoding="UTF-8"?>
<!-- metadata version 3.1 -->
<mfp_metadata>
<metadata_version>
<major>3</major>
<minor>1</minor>
</metadata_version>
<device_info>
<ip_address>${IP}</ip_address>
<ipv6_address>${IPV6}</ipv6_address>
<fqdn>${FQDN}</fqdn>
<netbios_name>${NETBIOSNAME}</netbios_name>
<location>${LOCATION}</location>
<contact>${CONTACT}</contact>
<contact_tel>${CONTACTTEL}</contact_tel>
<FW_version>${FWVER}</FW_version>
<manufacture>${MANUFACT}</manufacture>
<model>${MODEL}</model>
<serial>${SERIAL}</serial>
<!-- deprecated tag start -->
<host_name>${NETBIOSNAME}</host_name>
<tempt_file_ver>1.0</tempt_file_ver>
<!-- deprecated tag end -->
</device_info>
<scan_info>
<template >
<template_group_no>${TEMPGROUPNO}</template_group_no>
<template_group_name>${TEMPGROUPNAME}</template_group_name>
<template_group_user>${TEMPGROUPUSER}</template_group_user>
<template_no>${TEMPNO}</template_no>
<template_name>${TEMPNAME}</template_name>
<template_user>${TEMPUSER}</template_user>
</template >
<scanned_date>${YEAR}-${MONTH}-${DAY}</scanned_date>
<scanned_time>${DATE}T${TIME}</scanned_time>
<color_mode>${COLORMODE}</color_mode>
<resolution>${RESOLUTION}</resolution>
<file_format>${FILEFORMAT}</file_format>
<no_of_files>${NUMFILE}</no_of_files>
<no_of_pages>${PAGES}</no_of_pages>
<file_path>${PATH}</file_path>
<file_name>${FILE}</file_name>
<sender_email>${MYEMAIL}</sender_email>
<!-- deprecated tag start -->
<workflow>${TEMPGROUPNAME} ${TEMPNAME}</workflow>
<!-- deprecated tag end -->
</scan_info>
<user_info>
<user_id>${USER}</user_id>
<user_domain>${DOMAIN}</user_domain>
<dept_code>${DEPTCODE}</dept_code>
<dept_name>${DEPTNAME}</dept_name>
<!-- deprecated tag start -->
<user_email>${MYEMAIL}</user_email>
<!-- deprecated tag end -->
</user_info>
<user_input>
<field1 name="${FIELDNAME1}">${VALUE1}</field1>
<field2 name="${FIELDNAME2}">${VALUE2}</field2>
<field3 name="${FIELDNAME3}">${VALUE3}</field3>
Setting up Meta Scan Function
345
10 Functional Setups
<field4 name="${FIELDNAME4}">${VALUE4}</field4>
<field5 name="${FIELDNAME5}">${VALUE5}</field5>
<field6 name="${FIELDNAME6}">${VALUE6}</field6>
<field7 name="${FIELDNAME7}">${VALUE7}</field7>
<field8 name="${FIELDNAME8}">${VALUE8}</field8>
<field9 name="${FIELDNAME9}">${VALUE9}</field9>
<field10 name="${FIELDNAME10}">${VALUE10}</field10>
<field11 name="${FIELDNAME11}">${VALUE11}</field11>
<field12 name="${FIELDNAME12}">${VALUE12}</field12>
<field13 name="${FIELDNAME13}">${VALUE13}</field13>
<field14 name="${FIELDNAME14}">${VALUE14}</field14>
<field15 name="${FIELDNAME15}">${VALUE15}</field15>
<field16 name="${FIELDNAME16}">${VALUE16}</field16>
<field17 name="${FIELDNAME17}">${VALUE17}</field17>
<field18 name="${FIELDNAME18}">${VALUE18}</field18>
<field19 name="${FIELDNAME19}">${VALUE19}</field19>
<field20 name="${FIELDNAME20}">${VALUE20}</field20>
<field21 name="${FIELDNAME21}">${VALUE21}</field21>
<field22 name="${FIELDNAME22}">${VALUE22}</field22>
<field23 name="${FIELDNAME23}">${VALUE23}</field23>
<field24 name="${FIELDNAME24}">${VALUE24}</field24>
<field25 name="${FIELDNAME25}">${VALUE25}</field25>
</user_input>
</mfp_metadata>
Setting for saving meta data
You can specify the location to save meta data and the file name by adding the following elements to the XML file.
Specifying the location to save meta data
Protocol
Format
SMB
<metadata_file_path>file://server name/path/</metadata_file_path>
FTP
<metadata_file_path>ftp://server name/path/</metadata_file_path>
FTPS
<metadata_file_path>ftps://server name/path/</metadata_file_path>
NetWare (Binary mode)
<metadata_file_path>server name/path/</metadata_file_path>
NetWare (NDS mode)
<metadata_file_path>Tree/Context/file_share/</metadata_file_path>
Example:
Protocol:
External server:
Save folder:
Format:
SMB
192.168.1.1
metadata
<metadata_file_path>file://192.168.1.1/metadata/</metadata_file_path>
Ensure that the protocol is the same as the protocol for saving the Meta Scan image file.
You can check the protocol for saving the Meta Scan image file in [Destination] of Save as file Setting, which is set for
the template.
Specifying a meta data file name
<metadata_file_name>file name.xml</metadata_file_name>
Example:
File name:
Format:
Sample_MetaData.xml
<metadata_file_name>Sample_MetaData.xml </metadata_file_name>
You can use an XML format file variable for the file name of the meta data.
Example using the date variables (${DATE}):
<metadata_file_name>Sample_MetaData_${DATE}.xml </metadata_file_name>
For more information on variables, see the following:
P.343 “Variables of XML format files”
346
Setting up Meta Scan Function
10 Functional Setups
10.Functional Setups
Registering XML format file
This section describes how to register a XML format file.
When using applications that interact with Meta Scan, follow the instructions of the application vendor to set the XML
format file and the extended field.
You can register up to 99 XML format files.
1
Start TopAccess access policy mode.
2
3
Click the [Administration] tab.
4
Click the [Browse] button under Import XML Format File.
5
Click the [Import] button to register.
P.22 “Access Policy Mode”
Click the [Registration] menu and [XML Format File] submenu.
Select the XML format file you want to register from the displayed dialog box.
The XML format file is registered.
Select an XML format file and click the [Delete] button to delete the registered XML format file.
Setting up Meta Scan Function
347
10 Functional Setups
Registering Extended Field Definition
You can register up to 100 "extended field definitions", select an "XML format file" for each of them, and set "extended field
properties" as necessary.
When using applications that interact with Meta Scan, follow the instructions of the application vendor to set the XML
format file and the extended field.
1
Start TopAccess access policy mode.
2
3
Click the [Administration] tab.
4
Click [Undefined] to register an extended field definition.
P.22 “Access Policy Mode”
Click the [Registration] menu and [Extended Field Definition] submenu.
Click a registered extended field name to display the edit screen for the extended field.
Skip to step 6.
5
348
Enter the field name, select an XML format file, and click the [Save] button.
Select a registered XML format file when you want to use a customized XML format file. Select "defaultForm3.xml"
if you do not have any customized XML format file.
Setting up Meta Scan Function
10 Functional Setups
10.Functional Setups
6
Click the [New] button under Extended Field settings when setting extended field
properties.
Click [Extended Field Definitions] in the upper part of the screen if you are not setting extended field properties.
7
Set the extended field properties.
Field Name
Specify the extended field name.
Display
Specify how to display the extended field on the control panel.
Name
Enter the caption of the extended field name for the display on the control panel. You can
enter up to 20 characters. Enter the Box number where a received document will be
stored.
Mandatory Input
Select this check box if the extended field is a mandatory entry item.
Hidden Attribute
Select this check box if the extended field is a hidden item on the control panel.
Input Method *
Select the type of an extended field.
y Numerical — Select this to create an extended field as an integer value.
y Decimal — Select this to create an extended field as a decimal value.
y Text — Select this to create an extended field as a character string.
y List — Select this to create an extended field as a list selection.
y Address — Select this to create an extended field as an address.
y Password — Select this to create an extended field as a password.
y Date — Select this to create an extended field as a date.
List Items
Specify list items to be selected for the extended field. The registered list items are listed
in the List Items. When you register a list item, enter [Name] and [Value], and then click
[Add]. If you select an item and click [Move Up], the selected item moves up in the list.
Click [Move Down] to move it down. Select an item and click [Delete] to delete an
unnecessary item from the list.
Name
Enter the name of the item.
Value
Enter a value or text to be applied for the selected item.
Setting up Meta Scan Function
349
10 Functional Setups
y You cannot exceed the total number of characters displayable in the List Items (127).
y You cannot use a semicolon in [Name] or [Value].
*
Minimum Length
Specify the minimum number of characters that can be entered in the extended field if
the field is a character string.
Maximum Length
Specify the maximum number of characters that can be entered in the extended field if
the field is a character string.
Minimum Value
Specify the minimum numerical value that can be entered in the extended field if the field
is a numerical value.
Maximum Value
Specify the maximum numerical value that can be entered in the extended field if the field
is a numerical value.
Default Value
Specify the default value for the extended field.
Password
Specify the default password for the extended field if the field is a password.
Date
Specify the default date for the extended field if the field is a date.
The following shows the types and settable items of an extended field for each [Input Method]. (*) is displayed for mandatory setting
items.
Input method
(Extended field type)
Mandatory setting items
Optional setting items
Numerical value
[Maximum Value], [Minimum Value]
Settable value: -999,999,999,999 to 999,999,999,999
[Default Value]
Decimal value
[Maximum Value], [Minimum Value]
Settable value: -999,999,999,999.999999 to
999,999,999,999.999999
[Default Value]
Text
[Maximum Length], [Minimum Length]
Settable value: 0 to 256
[Default Value]
List
[List Items]
You can register up to 256 [List Items].
[Default Value]
Select from the registered
selection items
You can set from 1 to 126 characters in [Name].
You can set from 1 to 126 characters in [Value].
However, the total number of characters set in [Name] and
[Value] must be from 2 to 127.
8
Address
None
[Default Value]
Password
None
Settable value: 0 to 256
[Default Value]
Date
None
[Default Value]
Click the [Save] button to register the extended field properties.
You can register up to 25 extended field properties.
The extended field properties are registered.
350
Setting up Meta Scan Function
10 Functional Setups
10.Functional Setups
Registering templates for Meta Scan
You must register a template for Meta Scan before using the Meta Scan function.
A template can be a “public template” which is registered by an administrator, or a “private template” which is registered by
a user or an administrator.
Both templates can be used to register a Meta Scan template.
The following procedure shows how to register a “private template”.
1
Click the [Registration] tab and the [Template] menu.
2
Click an [Undefined] group link.
3
Enter the group name and click the [Save] button.
Setting up Meta Scan Function
351
10 Functional Setups
4
Click an [Undefined] icon from the template list.
5
Select the check box for the [Meta Scan] under Template Properties, and then select the
agent and click [Select Agent].
To select [Meta Scan], the Meta Scan Enabler must be set up for use.
If it is not set up, you cannot select [Meta Scan].
For [Meta Scan], [Email], [Save as file], and [Save to USB Media] are to be selected individually, except for [Email]
and [Save as file], which can be selected simultaneously.
Email
You can transmit the document as an Email attachment.
y When [Meta Scan] is selected, you can use a variable as the subject
y Addresses specified in [From Address] are included in the meta data.
y When [Meta Scan] is selected, if you select [Add the date and time to a file name]
in [File Name], it is also applied to the meta data file name.
P.66 “Email Setting (Private template)”
Save as file
You can save the document in a shared folder.
y When [Meta Scan] is selected, you can only specify one destination.
y Protocols and network paths specified in the destination are included in the meta
data.
Example:
Protocol:
SMB
Network Path: \\192.168.1.1\ImageFolder
<file_path>file: //192.168.1.1/ImageFolder/</file_path>
y When [Meta Scan] is selected, if you select [Add the date and time to a file name]
in [File Name], it is also applied to the meta data file name.
P.68 “Save as file Setting (Private template)”
352
Store to e-Filing
You can store the document in the e-Filing.
Save to USB Media
You can save the document in USB media.
Setting up Meta Scan Function
10 Functional Setups
10.Functional Setups
6
Set the agent.
Setting operations are the same as for normal templates.
P.86 “Registering and editing private template groups”
The following describes how to set “Extended Field settings”.
7
Click the [Extended Field settings] button to set extended fields.
8
Select a registered extended field definition using [Extended Field Definition No.].
9
Enter the default value for the [Extended Field Properties].
10
This is displayed if [Extended Field Properties] are set for the selected extended field definition.
Values set in this screen are used as the default values for [Extended Field Properties] displayed on the control
panel when using Meta Scan.
Items with an asterisk (*) at the beginning of the [Extended Field Properties] name are mandatory entry fields.
Click the [Save] button to register the template.
The template for Meta Scan is registered.
Setting up Meta Scan Function
353
10 Functional Setups
Meta Scan
You can run Meta Scan using a Meta Scan template.
For the operational procedure, refer to the User’s Manual Advanced Guide.
If [Extended Field Definition] set in [Extended Field Settings] in the Meta Scan template is deleted, the default XML
format file <defaultForm3.xml> is used.
Checking logs of Meta Scan
You can check the scan log to confirm if meta data has been correctly created.
Check the following items in the scan log.
Check Item
Description
Mode
Displays "MSxxxx" (xxxx is in the code format) to indicate Meta Scan.
Status
Meta data is correctly created if no errors are displayed.
See the following for details of the scan log:
P.41 “Scan Log”
354
Setting up Meta Scan Function
10 Functional Setups
Using the Attribute of the External Authentication as a Role of the MFP
When the external authentication (Windows domain authentication and LDAP authentication) is enabled, associating the
role defined in this equipment with the attribute of the external authentication server is required in order to log in the
equipment from an external authentication server as an administrator. The role can be associated with the equipment by
importing the role information setting file in this equipment. The role information setting file is a file in which the attributes
of the external authentication server and corresponding MFP are defined in XML. You can edit the role information setting
file exported from the equipment and import it back to the equipment.
Exporting the role information setting file
See the following page for how to export the role information setting file.
P.131 “Export”
Defining the role information setting file
The role information setting file is written in XML format. The role of this equipment can be assigned to the attribute set in
the external server by defining the role information setting file in accordance with the external authentication server
setting. The three examples of the major definition method for this file are explained here. Alphanumeric characters can be
used for the content of each element. An asterisk (*) can be used as a wildcard for the <attributeValue> element.
The role of the user that does not correspond to the <RoleSet> element is defined in the <AnyOtherUser> element.
This element can only be used once.
When setting one role to one attribute
Attribute name set in the external authentication server
Department
Attribute value set in the external authentication server
ITDept
Role name to be set
Administrator
<RoleSetting>
<RoleSet>
<Condition>
<AttributeName>department</AttributeName>
<AttributeValue>ITDept</AttributeValue>
</Condition>
<Role>Administrator</Role>
</RoleSet>
<AnyOtherUser>User</AnyOtherUser>
</RoleSetting>
When setting multiple roles to one attribute
Attribute name set in the external authentication server
Department
Attribute value set in the external authentication server
ITDept
Role name to be set [1]
Administrator
Role name to be set [2]
PrintOperator
<RoleSetting>
<RoleSet>
<Condition>
<AttributeName>department</AttributeName>
<AttributeValue>ITDept</AttributeValue>
</Condition>
<Role>Administrator</Role>
</RoleSet>
<RoleSet>
<Condition>
<AttributeName>department</AttributeName>
<AttributeValue>ITDept</AttributeValue>
</Condition>
<Role>PrintOperator</Role>
</RoleSet>
Using the Attribute of the External Authentication as a Role of the MFP
355
10 Functional Setups
<AnyOtherUser>User</AnyOtherUser>
</RoleSetting>
When setting one role to multiple attributes
Attribute name set in the external authentication server [1]
Department
Attribute value set in the external authentication server [1]
Sales
Attribute name set in the external authentication server [2]
Title
Attribute value set in the external authentication server [2]
SeniorManager
Role name to be set
Print
<RoleSetting>
<RoleSet>
<Condition>
<AttributeName>department</AttributeName>
<AttributeValue>Sales</AttributeValue>
</Condition>
<Condition>
<AttributeName>title</AttributeName>
<AttributeValue>SeniorManager</AttributeValue>
</Condition>
<Role>Print</Role>
</RoleSet>
<AnyOtherUser>User</AnyOtherUser>
</RoleSetting>
Importing the role information setting file
See the following page for how to import the role information setting file.
P.133 “Import”
To change the setting, import the role information setting file again.
Enabling the role base access setting
In order to use the imported role information setting file, enabling the role base access setting is required. See the
following page for the procedure.
P.249 “Setting up User Authentication Setting”
356
Using the Attribute of the External Authentication as a Role of the MFP
APPENDIX
11.
This chapter contains the following contents.
Installing Certificates for a Client PC ................................................................................. 358
11 APPENDIX
Installing Certificates for a Client PC
Configuring the Microsoft Management Console
The following describes a configuration on Windows Vista. The procedure is the same when other versions of Windows
are used.
1
Open the command prompt, type “mmc” and press the Enter key.
2
From the [File] or [Console] menu of the window that appears, select [Add/Remove
Snap-in].
The [Add or Remove Snap-ins] dialog box appears.
3
From the list of [Available snap-ins:], select [Certificates] and click [Add].
For Windows XP, click [Add] to display the list and then select [Certificates].
The [Certificates snap-in] dialog box appears.
4
Select [Computer account] and click [Next].
The [Select Computer] dialog box appears.
358
Installing Certificates for a Client PC
11 APPENDIX
11.APPENDIX
5
Select [Local computer: (the computer this console is running on)] and click [Finish].
The [Select Computer] dialog box is closed.
6
Make sure that "Certificates (Local Computer)" is added under the [Console Root]
folder; click [OK].
7
Save the setting.
Installing Certificates for a Client PC
359
11 APPENDIX
Importing certificates to a client PC
The following describes an import on Windows Vista. The procedure is the same when other versions of Windows are
used.
y For Windows Vista, you must log in to Windows as a user who has the “Administrators” privilege.
y Before importing certificates, make sure that User Account Control (UAC) is turned off. From Control Panel > User
Accounts > Turn User Account Control On or Off, clear the check box for the [Use User Account Control (UAC) to
help protect your computer] option and click [OK].
1
On the MMC, select and right-click on the appropriate folder to store the certificate and
select [All Tasks] > [Import]
Select the appropriate folder according to the type of your certificate:
y Self-signed certificate (.crt): Console Root > Certificates (Local Computer) > Trusted Root Certification
Authorities
y Client certificate (.pfx): Console Root > Certificates (Local Computer) > Personal
y CA certificate (.cert): Console Root > Certificates (Local Computer)> Trusted Root Certification Authorities
The [Certificate Import Wizard] appears.
2
On the Certificate Import Wizard, click [Next].
For importing a client certificate, proceed to the next step. Otherwise, skip to step 5.
360
Installing Certificates for a Client PC
11 APPENDIX
11.APPENDIX
3
From [Browse], select the certificate to install, and click [Next].
4
Enter the password for the private key and click [Next].
5
Click [Next].
Do not change the certificate store using [Browse].
Installing Certificates for a Client PC
361
11 APPENDIX
6
Click [Finish].
If the following security warning message appears, click [Yes].
7
Click [OK] to complete the import.
If you are importing a client certificate (.pfx) to a Windows Vista PC, proceed to the next step. Otherwise, the
installation is complete.
If you need to install another certificate, repeat the steps from the beginning.
8
Double-click the imported client certificate.
The [Certificate] window appears.
362
Installing Certificates for a Client PC
11 APPENDIX
11.APPENDIX
9
10
Click the [Details] tab and select [Thumbprint] to check the 40-digit thumbprint.
Open the command prompt and execute the “netsh” command as shown below.
If you log in to Windows Vista as a user without the administrator privilege, open the command prompt by rightclicking the icon and selecting [Run as administrator.] This way, you can temporarily have the administrator
privilege to execute the command.
-
-
Using the thumbprint obtained in Step 9, type the following command:
netsh http add sslcert ipport=0.0.0.0:5358 certhash=(your 40-digit thumbprint) appid={00112233-44556677-8899-AABBCCDDEEFF}
When inputting the thumbprint, exclude the spaces.
When your client certificate is created with Certificate Revocation List (CRL), you need to check if the CA server
is accessible by FQDN (see the following figure).
If no FQDN connection is established, ask your administrator to perform either of the following options:
- In the “hosts” file accessible from the following folder path, add the IP address and the host name:
C:\WINNT\system32\drivers\etc
- Configure the DNS server to handle the name-to-address resolution.
Installing Certificates for a Client PC
363
11 APPENDIX
364
Installing Certificates for a Client PC
Index
A
About the maintenance functions ...............................290
Access policy mode .............................................. 8, 22
Accessing TopAccess ................................................10
Accessing TopAccess by entering URL ........................10
Accessing TopAccess from Network Map .............. 12, 18
Add a new contact from the LDAP server. ....................97
Add Filter ................................................................174
Add IKE ..................................................................178
Add Manual Key ......................................................176
Add New LPR Queue ...............................................204
Add New URL ..........................................................212
Add Policy ...............................................................182
Add Profile ..............................................................180
Adding new contacts from the LDAP server ..................97
Adding or editing an LPR queue ................................237
Adding, editing, and deleting contacts manually ............94
Address Book ............................................................76
Address Book Item list ................................................76
adfasf .....................................................................139
Administration Tab ...................................................135
Authentication settings .............................................247
B
Box Setting (Mailbox) .................................................85
Box Setting (Private template) .....................................71
C
Certificate management settings ................................256
Change Group Password ............................................55
Change Password ....................................................337
Checking logs of Meta Scan ......................................354
Checking Meta Scan Enabler ....................................342
Checking recovery information ....................................36
Configuring the EWB function ....................................243
Confirm Permission ..................................................340
Contact Property ............................................... 77, 308
Contacts ...................................................................76
Copier settings ........................................................183
Counter How to Set and How to Operate ....................110
Counter Item list ......................................................104
Counter Tab ............................................................103
Counter Tab Page Overview .....................................104
Create Client Certificate ............................................258
Create Clone File settings .........................................274
Create Group Information .........................................121
Create New Role .....................................................125
Create self-signed certificate .....................................257
Create SNMP V3 User Information ............................167
Create User Information ...........................................116
Creating or editing public templates ...........................322
Creating/Exporting a client certificate .........................270
Creating/exporting a self-signed certificate ..................264
D
Default roles and privileges .......................................123
Default XML file format .............................................345
Defining the role information setting file ......................355
Definition Properties .................................................320
Delete Files settings .................................................280
Deleting a device certificate installed automatically ......269
Deleting a server ......................................................244
Deleting an imported device certificate .......................267
Deleting an LPR queue .............................................238
Deleting CA certificate ..............................................273
Deleting data ...........................................................291
Deleting jobs ............................................................ 35
Deleting private print jobs and hold print jobs ............... 35
Deleting SNMP V3 user information .......................... 223
Deleting the data from local folder ............................. 291
Department Counter ................................................ 106
Department Information ................................... 107, 129
Department Information (Edit) ................................... 130
Department Management ........................................ 106
Department Management Item list ............................ 128
Destination Setting (Mailbox) ...................................... 84
Destination Setting (Private template) .......................... 58
Device Item list ......................................................... 26
Device Tab ............................................................... 25
Directory Service Properties ..................................... 281
Directory Service settings ........................................ 281
Displayed icons ......................................................... 27
Displaying job logs .................................................... 47
Displaying print jobs .................................................. 34
Displaying public templates ........................................ 93
Displaying templates in the public group ...................... 93
Displaying the department counter ............................ 111
Displaying the total counter ...................................... 110
Displaying version information .................................. 246
E
Edit ........................................................................ 204
Edit Role ................................................................ 127
Editing XML format file ............................................. 343
Email Setting (Mailbox) .............................................. 85
Email Setting (Private template) .................................. 66
Email settings ......................................................... 198
Embedded Web Browser settings ............................. 211
Enabling the role base access setting ........................ 356
End-user mode ........................................................... 8
Enter Password ...................................................... 117
Entering the destinations manually ...................... 59, 330
Export .................................................................... 131
Export Logs Item list .................................................. 44
Export settings ........................................................ 279
Export/Import Item list .............................................. 131
Exporting address book data
in the CSV/XML format ......................................... 299
Exporting logs ........................................................... 48
Exporting SNMP V3 user information ........................ 221
Exporting the address book data ............................... 299
Exporting the role information setting file ................... 355
Extended Field Definition ......................................... 317
Extended Field Properties .......................................... 75
Extended Field settings .............................................. 75
Extended Fields ...................................................... 318
Extended Fields Properties ...................................... 319
F
Fax Received Forward and
InternetFAX Received Forward settings .................. 307
Fax Setting ............................................................... 78
Fax Setting (Private template) .................................... 64
Fax settings ............................................................ 186
Fax/InternetFax Job Item list ...................................... 32
G
General settings ...................................................... 136
Group ...................................................................... 77
Group Assignment .................................................. 120
Group Information ............................................. 54, 122
Group Management Item list .................................... 121
Index
365
Group Properties ................................................ 53, 80
I
Import .....................................................................133
Import settings .........................................................277
Importing address book data
in the CSV/XML format ..........................................296
Importing and exporting ............................................296
Importing the address book data ................................296
Importing the role information setting file ....................356
Inbound FAX routing ..................................................81
Inbound FAX routing Item list ......................................81
Install Clone File settings ..........................................276
Installing a device certificate ......................................263
Installing a device certificate automatically ..................268
Installing an imported device certificate ......................266
Installing CA certificate .............................................272
InternetFax Setting (Mailbox) ......................................84
InternetFax Setting (Private template) ..........................64
InternetFax settings ..................................................200
J
Job Status How to Set and How to Operate ..................34
Job Status Tab ..........................................................29
Job Status Tab Page Overview ...................................30
L
Languages settings ..................................................286
LDAP Authentication ................................................251
List View ...................................................................55
Log Settings Item list ..................................................45
Log size ....................................................................46
Logs How to Set and How to Operate ..........................47
Logs Tab ...................................................................37
Logs Tab Page Overview ............................................38
Long File Name Setting ............................................138
M
MailBox Properties .....................................................82
MailBox Setting (Mailbox) ...........................................83
Maintenance How to Set and How to Operate .............290
Maintenance Item list ...............................................274
Managing address book .............................................94
Managing contacts in the Address Book .......................94
Managing directory service .......................................292
Managing groups in the Address Book .........................98
Managing mailboxes ................................................100
Managing templates ...................................................86
Menu Setting ...........................................................338
Message Log .............................................................43
Meta Scan ...............................................................354
Modify Filter ............................................................174
Modify IKE ..............................................................178
Modify Manual Key ..................................................176
Modify Policy ...........................................................182
Modify Profile ..........................................................180
My Account Item list .................................................336
My Account Tab .......................................................335
My Account Tab Page Overview ................................336
N
Network settings ......................................................143
Notification settings ..................................................283
O
Off Device Customization Architecture settings ...........213
366
Index
P
Panel Setting (Private template) ................................. 57
Panel View ............................................................... 54
Password Policy settings ......................................... 260
Password Setting ...................................................... 75
Print Counter .......................................................... 105
Print Data Converter settings .................................... 210
Print Job Item list ...................................................... 30
Print Service settings ............................................... 206
Printer settings ........................................................ 202
Printer/e-Filing settings ............................................ 201
Private Template Groups ........................................... 52
Private template settings ............................................ 57
Private Templates ..................................................... 54
Procedure for using Meta Scan ................................. 342
Public Menu ........................................................... 304
Public Template Groups ............................................ 51
Public Template settings .......................................... 302
R
Reboot settings ....................................................... 289
Rebooting the equipment ......................................... 301
Reception Journal ..................................................... 40
Recovery Information ................................................ 31
Registering a server ................................................ 243
Registering and editing private template groups ........... 86
Registering Extended Field Definition ........................ 348
Registering Fax and Internet Fax received forward ..... 328
Registering or editing SNMP V3 user information ....... 219
Registering or editing templates .................................. 89
Registering public templates ..................................... 322
Registering templates for Meta Scan ......................... 351
Registering the Fax or
Internet Fax received forward ................................ 328
Registering XML format file ...................................... 347
Registration How to Set and How to Operate ....... 86, 322
Registration Item list ................................................ 302
Registration Tab ....................................................... 49
Registration Tab Page Overview ................................. 50
Relay End Terminal Report (Mailbox) .......................... 84
Releasing print jobs ................................................... 36
Remote Setting ....................................................... 195
Remote Setting List ................................................. 194
Removing the contacts from the Recipient List ............. 63
Removing the destinations from the Recipient List ...... 334
Resetting a public template ...................................... 325
Resetting all public templates ................................... 327
Resetting public templates ....................................... 325
Role Assignment ..................................................... 120
Role Management Item list ....................................... 123
S
Save as file Setting (Mailbox) ..................................... 85
Save as file Setting (Private template) ......................... 68
Save as File settings ............................................... 189
Scan Counter ......................................................... 105
Scan Job Item list ...................................................... 33
Scan Log ................................................................. 41
Scan Setting (Private template) .................................. 73
Search Address List .................................................. 79
Search Contact ......................................................... 79
Search User Account ............................................... 115
Searching for destinations in the LDAP server ...... 62, 333
Security How to Set and How to Operate ................... 263
Security Item list ..................................................... 247
Select Menu Type ........................................... 305, 338
Select Template .............................................. 306, 339
Select Template Group .................................... 305, 339
Select URL ..................................................... 306, 340
Selecting the destinations
from the address book .................................... 60, 331
Selecting the groups from the address book ........ 61, 332
Setting for saving meta data ......................................346
Setting up Address Book ................................. 277, 279
Setting up AppleTalk ................................................149
Setting up Bonjour ...................................................149
Setting up Box Setting
(Fax/InternetFAX Received Forward) ......................316
Setting up Box Setting (Public template) .....................303
Setting up CA Certificate ...........................................259
Setting up Category Setting ......................................275
Setting up Certificate Files ........................................259
Setting up Certificate Setting .....................................258
Setting up Client Certificate .......................................257
Setting up Clone File ................................................274
Setting up Clone File Information ...............................276
Setting up Combined ....................................... 278, 280
Setting up Confidentiality Setting ...............................139
Setting up Configuration ...........................................213
Setting up Copier settings .........................................225
Setting up Copy Job Enforcement Continue ................185
Setting up Current Language Pack List ......................287
Setting up Date & Time .............................................140
Setting up Daylight Savings Time Setting ...................141
Setting up DDNS Session .........................................152
Setting up Default Raw Job Setting ............................203
Setting up Default setting ..........................................183
Setting up Default Setting for PanelUI ........................287
Setting up Definition Information ................................318
Setting up Delete XML Format File ............................321
Setting up Department Setting ...................................248
Setting up Destination ..............................................190
Setting up Destination Setting
(Fax/Internet Fax Received Forward) ............. 308, 330
Setting up Destination Setting (Public template) ..........302
Setting up Device Certificate .....................................256
Setting up Device Information ....................................137
Setting up DNS Session ...........................................151
Setting up Document Print
(Fax/InternetFax Received Forward) .......................307
Setting up e-Filing Notification Events ........................139
Setting up Email Address Setting ...............................253
Setting up Email Authentication .................................252
Setting up Email Print ...............................................209
Setting up Email Setting .................................. 198, 283
Setting up Email Setting
(Fax/InternetFAX Received Forward) ......................314
Setting up Email Setting (Public template) ..................303
Setting up E-mail settings .........................................231
Setting up Energy Save ............................................140
Setting up Extended Field Settings ............................303
Setting up Extended Field settings .............................318
Setting up Fax Setting ..............................................186
Setting up Fax Setting (Public template) .....................303
Setting up Fax settings .............................................227
Setting up File Composition ......................................192
Setting up File Upload ..............................................276
Setting up Filtering ...................................................145
Setting up Folder Name ............................................190
Setting up Format ....................................................191
Setting up FTP Client ...............................................162
Setting up FTP Print .................................................208
Setting up FTP Server ............................................. 163
Setting up Functions ................................................ 138
Setting up General Setting ....................................... 202
Setting up General settings ...................................... 215
Setting up Home Directory Setting ............................ 255
Setting up Home Page Setting .................................. 211
Setting up HTTP Network Service ............................. 157
Setting up Import XML Format File ............................ 321
Setting up Install Language Pack .............................. 286
Setting up Install Software Package .......................... 288
Setting up InternetFax Setting .................................. 200
Setting up InternetFax Setting
(Fax/Internet Fax Received Forward) ..................... 309
Setting up InternetFax Setting (Public template) ......... 302
Setting up InternetFax settings ................................. 233
Setting up IP Security .............................................. 172
Setting up IPP Print ................................................. 207
Setting up IPv6 ....................................................... 147
Setting up IPX/SPX ................................................. 148
Setting up Job Notification Events ............................. 285
Setting up Job Skip Control ...................................... 139
Setting up LDAP Session ......................................... 150
Setting up LLTD Session ......................................... 169
Setting up Local Storage Path .................................. 189
Setting up LPD Print ................................................ 206
Setting up MailBoxes ....................................... 278, 279
Setting up mailboxes. .............................................. 100
Setting up Meta Scan Function ................................. 342
Setting up N/W-Fax Destination ................................ 196
Setting up N/W-Fax Folder ....................................... 196
Setting up NetWare Print ......................................... 208
Setting up NetWare Session ..................................... 156
Setting up Network .................................................. 213
Setting up Network settings ...................................... 217
Setting up notification .............................................. 294
Setting up Off Device Customization
Architecture settings ............................................. 245
Setting up Panel Setting (Public template) ................. 302
Setting up Policy ..................................................... 262
Setting up Policy for Administrator,Auditor ................. 261
Setting up Policy for Users ....................................... 260
Setting up POP3 Network Service ............................. 161
Setting up Print Data Converter settings .................... 241
Setting up Print Service settings ............................... 239
Setting up Printer settings ........................................ 236
Setting up Printer/e-Filing Job
Enforcement Continue .......................................... 201
Setting up Printer/e-Filing settings ............................. 235
Setting up Proxy Setting .......................................... 211
Setting up Raw Job Setting .............................. 204, 237
Setting up Raw TCP Print ........................................ 206
Setting up Remote 1 and Remote 2 .......................... 193
Setting up Restriction on Address Book Operation by
Administrator ....................................................... 139
Setting up Save as file Setting
(Fax/InternetFAX Received Forward) ..................... 310
Setting up Save as file Setting (Public template) ......... 303
Setting up Save as file settings ................................. 229
Setting up Scan Setting (Public template) .................. 303
Setting up Searching Interval .................................... 192
Setting up Server Registration Setting ....................... 212
Setting up Setting data included in Clone File ............. 277
Setting up Single Page Data Saving Directory ............ 191
Setting up Single Sign On Setting ............................. 255
Setting up SLP Session ........................................... 164
Setting up SMB Session .......................................... 154
Index
367
Setting up SMTP Client ............................................158
Setting up SMTP Server ...........................................160
Setting up SNMP Network Service .............................165
Setting up SNTP Service ..........................................141
Setting up Store to USB Device Setting
(Public template) ...................................................303
Setting up System Message Notification Events ..........284
Setting up TCP/IP ....................................................143
Setting up Template ........................................ 278, 280
Setting up the directory service ..................................292
Setting up the notifications
of system errors and events ...................................294
Setting up URL List for Menu Screen and Hard Button .212
Setting up User Authentication Setting .......................249
Setting up User Name and Password
at User Authentication for Save as File ....................192
Setting up Wake Up Setting ......................................170
Setting up WEB General Setting ................................142
Setting up Web Services Setting ................................168
Setup How to Set and How to Operate .......................215
Setup Item list ..........................................................136
SNMP V3 settings ....................................................219
Store to USB Device Setting (Private template) .............71
Supported browsers .....................................................9
System Updates settings ..........................................288
T
Template Groups .......................................................50
Template Item list ......................................................50
Template list ..............................................................54
Template Properties ...................................................56
TopAccess Conditions ..................................................9
TopAccess Overview ....................................................8
TopAccess screen descriptions ...................................21
Total Count .............................................................104
Transmission Journal .................................................39
U
User Accounts Item list .............................................114
User Counter ...........................................................108
User Information ............................................. 109, 118
User Management Tab .............................................113
User Management Tab Page Overview ......................114
Using ......................................................................355
Using the attribute of the external authentication as a role of the
MFP ....................................................................355
V
Variables of XML format files .....................................343
Version ...................................................................214
View Logs Item list .....................................................38
Viewing counters .....................................................110
W
When setting multiple roles to one attribute .................355
When setting one role to multiple attributes .................356
When setting one role to one attribute ........................355
Windows Domain Authentication ...............................250
With Unidentified Network (Windows 7) ........................15
X
XML Format File ......................................................321
368
Index
September 2013
45611702EE Rev2


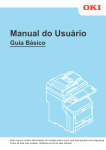

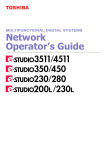

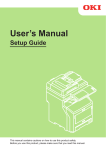


![4 Click [OK] - Toshiba America Business Solutions](http://vs1.manualzilla.com/store/data/005818130_1-6da0751aebf4d6c87686321c2c4e7e3a-150x150.png)