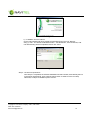
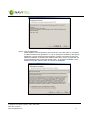
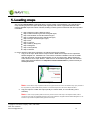
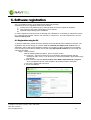
1
Navigation Software NAVITEL NAVIGATOR v3.2 User's Guide for PDA Copyright © "CNT" Joint Stock Company, 2007-2008. All rights reserved. The contents of this Guide, as well as any demo materials, which may be attached, are the sole proprietorship of the "CNT" Joint Stock Company. Any commercial usage of this Guide may be carried out with written permission from the "CNT" Joint Stock Company. The information in this document shall not be changed without prior notice given to the "CNT" Joint Stock Company. Copyright © Joint Stock Company "CNT", 2007-2008. Web: www.navitel.su Email: [email protected] 1 Summary This document represents a general user's guide for the navigation software "NAVITEL NAVIGATOR 3.2" (hereinafter referred to as the Software, NAVITEL or NAVITEL NAVIGATOR). The document is broken into chapters and subsections inside chapters. This document explains: 1. Software's purpose, basic underlying tools and concepts. 2. Registration and activation of the Software and of the navigation maps. 3. Elements of the user's interface. 4. Basic functionality of the system. 5. User's actions for routing, recording tracks etc. 6. Working with GPSMapEdit map editing software. There is a Glossary at the end of this document, describing the basic terms and definitions, and there are several relevant annexes too. Copyright © Joint Stock Company "CNT", 2007-2008. Web: www.navitel.su Email: [email protected] 2 Contents 1. 2. 3. 4. Introduction............................................................................................................................ 4 General info about the system............................................................................................... 5 Technical requirements ......................................................................................................... 7 Software installation............................................................................................................... 8 4.1. PDA Installation.................................................................................................................. 8 4.2. Installation through ActiveSync .......................................................................................... 9 5. Loading maps ......................................................................................................................13 6. Software registration............................................................................................................14 6.1. Registration using the PC.................................................................................................14 6.2. Registration from the PDA................................................................................................15 7. Maps activation....................................................................................................................17 8. Software interface................................................................................................................20 Page “Map”.............................................................................................................................23 Page “Dashboard”...................................................................................................................36 Page “Satellites” ......................................................................................................................37 Page “Route”...........................................................................................................................38 9. Program's functionality.........................................................................................................39 9.1. Routes..............................................................................................................................39 9.2. Tracks ..............................................................................................................................43 9.3. Waypoints ........................................................................................................................43 9.4. Traffic jams.......................................................................................................................44 9.5. Search..............................................................................................................................45 10. GPSMapEdit - map editing software ................................................................................52 11. Trademarks ......................................................................................................................53 12. Glossary...........................................................................................................................54 Information about the "CNT" company........................................................................................56 Copyright © Joint Stock Company "CNT", 2007-2008. Web: www.navitel.su Email: [email protected] 3 1. Introduction This document represents a user's guide on using the navigation software "NAVITEL NAVIGATOR 3.2". It contains descriptions of the user's interface, basic functions of the navigation software, as well as user's actions for performing generic operations. During the writing of this Guide the task posed was to gradually introduce the main principles of this Software's operation, so that upon reading it the user could immediately apply the knowledge in practice. Some insignificant details have been omitted. Copyright © Joint Stock Company "CNT", 2007-2008. Web: www.navitel.su Email: [email protected] 4 2. General info about the system GPS (Global Positioning system) – is a satellite system for high-precision determination of static and moving objects. To successfully use navigation software based on GPS technology, it is necessary to understand some peculiarities of this system. GPS system, also called NAVASTAR (NAVigation System using Timing And Ranging) is based on 24 satellites that move around the Earth rather quickly. Don not mix passive navigation system GPS with communication system. It means that you receive signals of system satellites but Your software transfers nothing. GPS satellites signal frequencies are: 1.227 and 1.575 GHz. What does it mean for the user? Metal surfaces (some plastics, wood, concrete) will not be transparent for electro wave with such frequency. Signal can pass through the glass. Leaves let the signal pass through weakening it. That is why it is impossible to catch the signal in building. You should go out and find a place with a large piece of open sky. Attention! The most precise results are got when the signal goes from an open area from more than 4 satellites at one time. Satellites should be uniformly placed on the sky and the navigator should be fixed. Quality of coordinates’ determination can vary, it depends on the set of satellites used by the Software. If the receiver has a choice from all variety of signals received, it will help in coordinates’ determination. In case the choice is limited, accuracy will suffer. Will the navigation system start working at once after GPS is switch on? Unfortunately, it is not like this. There are several switch on modes influencing the time for coordinates determination. AutoLocate or first switching on – in this mode the navigator does not have data about its position towards satellites constellation. It finds several visible satellites, determines position of all the other satellites on the sky and only after this it loads almanac, ephemeris and determines its current position. As the satellites transfer data rather slowly, determination time can reach 20-30 minutes. “Cold Start” – if the data of the current almanac became inexact (switched off GPS receiver was moved to the long distance and internal clock shows wrong time, etc), the receiver has to find “new sky” (i.e. download new almanac and ephemeris). It usually takes several minutes. “Warm Start” – if GPS receiver was switched off more than 30 minutes and then switched on, satellites search by almanac starts. Ephemeris data collection continues at that moment. When ephemeris of every satellite is received, the data got from the satellite are suitable for navigation. It usually takes about a minute. “Hot Start” – if GPS receiver was switched off less then 30 minutes, its initialization starts quickly. This is the shortest period of time before coordinates’ determination because the data about the last satellites position, current data of almanacs are already saved. One thing left is to receive a signal from satellites and calculate delays. Switching on time is 10 seconds. 3 constituents are necessary for using all basic functions of GPS: GPS- receiver, navigation software and location maps. NAVITEL NAVIGATOR 3.2 – is navigation software developed for Pocket PC PDAs and communicators/smartphones with touch screen, equipped with built-in or external GPS-receivers. Free map of Russia containing main highways with names of built – up areas and detailed maps of big cities of Russian Federation (Moscow, Saint-Petersburg, Yekaterinburg, Novosibirsk, etc.) is provided with the Software. Copyright © Joint Stock Company "CNT", 2007-2008. Web: www.navitel.su Email: [email protected] 5 The Software allows loading of detailed maps of cities and regions, containing house numbers, street names, metro stations and other important information. Among other things, the satellite navigation software supports voice guidance on a chosen route. The software is optimized for small PDA screen resolutions, it has fast map scaling and scrolling, as well as automatic switching between maps having various scales. The advantages of NAVITEL NAVIGATOR in comparison with other similar software are: 1. Quick map zooming and scrolling. 2. Automatic loading of different maps. 3. Two ways of map display - "Flat" and "Panoramic". 4. Intellectual system of vocal prompts "i-help". 5. Possibility to convert open source vector maps into Navitel format, as well as to create and edit maps, using the MapEdit software. The primary tasks carried out by the Software are: acquisition and display of the current position on the map, automatic and manual route generation, various types of objects search, calculation and display of lots of trip information, real track information display and recording, and many other things. The navigation software is bundled with GPSMapEdit map editor (demo version) which allows the user to create own maps and edit them. More information about this editor can be found at http://www.geopainting.com/. Copyright © Joint Stock Company "CNT", 2007-2008. Web: www.navitel.su Email: [email protected] 6 3. Technical requirements OS: Pocket PC 2003, 2003 SE, Windows Mobile 5, Windows Mobile 6 (including communicators/smartphones having a touch screen); From 1 to 10 MB of RAM (depending on the size of loaded map); Display: VGA mode (640x480), QVGA (240x320), portrait, landscape screen layouts, as well as square shaped screens 240х240 are supported; GPS-receivers: support of NMEA-0183, SiRF binary and Garmin protocols; external receivers can be connected through a serial port, USB, BlueTooth, CompactFlash, SDIO. Copyright © Joint Stock Company "CNT", 2007-2008. Web: www.navitel.su Email: [email protected] 7 4. Software installation Software installation can be carried out in two ways – from the PDA and through ActiveSync software (synchronization between PDA and Windows PCs). 4.1. PDA Installation The installation file for the PDA is called NaviTel-setup_*.cab (where * - is the language id and version number). You can download it from the main website (http://www.navitel.su/downloads) or You can also find it on the NAVITEL NAVIGATOR 3.2 CD in the "CNT" folder (in OS Windows series *.cab” file looks like archive and there is no need to extract it. To install the Software from the PDA the following steps are needed to be taken: 1. Copy the installation file to PDAs "SDMMC card" or "Storage Card". Fig. 1 2. Double-click on the file, starting it. 3. During the installation the Software may ask where to install it: on the device or on the memory card. We recommend you to install the Software onto the device, while the maps may be copied to the memory card. 4. Wait until the installation is finished. Copyright © Joint Stock Company "CNT", 2007-2008. Web: www.navitel.su Email: [email protected] 8 Fig. 2 Software is installed and ready to use. 4.2. Installation through ActiveSync The installation file for installing from a PC is called NaviTel-setup_*.exe (where * - is the language id and the version number). To install the Software using ActiveSync the following steps are needed to be taken: Step 1. "Connection". Connect the PDA to the PC and establish the connection using ActiveSync. Fig. 3 Step 2. "Installation start". a) If you have installation CD: Just insert the Software CD in the CD-ROM drive and once the disk automatically loads, a window will pop up with a menu – click on "Install NAVITEL NAVIGATOR 3.2 Software". Copyright © Joint Stock Company "CNT", 2007-2008. Web: www.navitel.su Email: [email protected] 9 Fig. 4 b) Installation from the Internet On the main website http://www.navitel.su/downloads click on the link “NaviTelsetup_ru.exe”. You will see a standard window – “File Download”, click “Download”, wait until downloading will be completed and then click “Start” Fig. 5 Step 3. "Technical requirements". Once step 2 is completed, the software installation will start. Please, read carefully the info on technical requirements. Then press the "Next" button to advance to the next step. Otherwise, to stop the installation press "Cancel". Copyright © Joint Stock Company "CNT", 2007-2008. Web: www.navitel.su Email: [email protected] 10 Fig. 6 Step 4. "License Agreement". Please read the License Agreement and choose one of the two options "I accept the conditions of this license agreement" or "I do not accept the conditions of this license agreement". Having read the license agreement, chose the first option to finish the Software installation, by pressing the "Finish" button. But if you do not agree with the license agreement then choose the second option - to cancel the installation of the Software. Press the "Cancel" button to exit from the installation. Fig. 7 Copyright © Joint Stock Company "CNT", 2007-2008. Web: www.navitel.su Email: [email protected] 11 Step 5. "Choose the folder". After you press the "Finish" button, the installer will ask whether to install the Software to the default folder. We recommend to press "Yes". Fig. 8 Copyright © Joint Stock Company "CNT", 2007-2008. Web: www.navitel.su Email: [email protected] 12 5. Loading maps Set of maps “Russia-2008” is delivered with the current version of the Software. It is a special set of maps including squares of maps of Russia (main highways with names of populated areas and the following detailed maps with names of streets, building numbers, places of interests and other important information: Map of Moscow and the Moscow region; Map of Saint-Petersburg and the Leningrad region; Map of Novosibirsk and the Novosibirsk region; Map of Yekaterinburg and the Sverdlovsk region; Map of Kurgan and the Kurgan region; Map of Ufa; Map of Tyumen; Map of Nizhniy Novgorod; Map of Belgorod; Map of Chelyabinsk; Map of Samara. In order to load the maps into the Software, the following actions are needed: 1. Copy a set of maps. Note that the maps must be in NM2 format. Maps can be copied from Navitel Navigator 3.2. installation CD. Just insert the software installation CD into CD-ROM. After the disc loads, a window appears where you can choose an item “Map of all Russia”. There will be a set of maps “Russia – 2008” that can be activated together with the Software. Other maps cab downloaded from http://www.navitel.su/download/ or painted manually at GPSMapEdit editor. Fig. 9 Note: On the site the maps of particular cities are encrypted and can be used in the Software only upon purchase of the map unlock key. More details about purchase of commercial maps are in the section "Maps activation". 2. Copy the maps to a folder with maps (usually it is “Atlas” folder, in a root directory of the Software). Note: In case of maps update, please remove the previous version of the maps in the respective folder, before copying the new maps. More detailed information about map updates for navigation software Navitel Navigator 3.2 can be read on http://navitel.su/update/navitel-ppc/instruction-maps/. Copyright © Joint Stock Company "CNT", 2007-2008. Web: www.navitel.su Email: [email protected] 13 6. Software registration The non-registered version of the Software has limited functionality. Restrictions of the non-registered version are as follows: At each start a nag window pops up warning about the need to register the Software. Only maps with size under 100 kilobytes can be opened. Automatic maps loading option is disabled. In order to register and unlock the full functionality of the Software, it is necessary to activate the license key. There are two activation options: from the PDA, or from the PC. The main requirement is to have access to the Internet. 6.1. Registration using the PC To start the registration, please launch the Software which has already been installed on the PDA. The registration nag window will pop up. Please, write or remember the PDA's serial number which is displayed in the top field of the registration window. It is required in order to register from the website. From an Internet connected PC please visit the web page http://activate.navitel.su and go through the activation procedure: Step 1. "Filling the form". After the following fields are filled in, press “Continue” button: a. License key – this is the license key for the Software, delivered together with the Software on CD in a box, or can be sent by e-mail if the Software is purchased through the Internet. b. Serial number of the PDA. Serial number of the PDA is determined by a program when unregistered version of the software is launched (left side of the figure). c. First name, middle initial, last name. d. Your e-mail address. Fig. 10 Copyright © Joint Stock Company "CNT", 2007-2008. Web: www.navitel.su Email: [email protected] 14 Step 2. "Activation results". If the information entered on the previous page is correct, the following page will display the activation key. Press the "Save activation key to file…" button in order to save the activation key to a file on your PC. Fig. 11 Note: If your Key is multi-purpose, i.e. it activates the software and the set of maps “Russia-2008”, it will look differently. It will contain a part of text beginning from a line «-----BEGIN UNLOCK KEY-----». Step 3. "Saving the key". Copy the resulting txt file from PC to PDA, to the folder where Navitel has been launched, by default it is: "Program Files/CNT/Navitel Navigator, and then restart the Software. 6.2. Registration from the PDA If the PDA is connected to the Internet (directly or through ActiveSync with the PC): 1. While launching the program, you will see a nag window with a serial number of the device. Here you can continue activation or enter demo version of the software. Press blue pointer “Next” for activation. 2. In the "License Activation" nag window enter the license key. The license key for the Software is delivered together with the Software on CD in a box, or will be sent by e-mail if the Software is purchased through the Internet. Licensed key for the current version of Navitel Navigator is called multi-purpose and activates simultaneously the Software and the set of maps “Russia 2008”. 3. Press the button "OK". 4. If a connection with the Internet is established, and the license key is valid, then a window saying about successful registration of the Software will pop up. In case if the license key is invalid, an error message will pop up. Copyright © Joint Stock Company "CNT", 2007-2008. Web: www.navitel.su Email: [email protected] 15 Fig. 12 Fig. 13 After closing the License Activation window the Software will start. If the GPS-receiver is connected, it will be automatically found and connected to the system. At the first start of the Software there will be a window with information on safety. Copyright © Joint Stock Company "CNT", 2007-2008. Web: www.navitel.su Email: [email protected] 16 7. Maps activation Activation of the set of maps “Russia – 2008” If you bought a disc with the set of maps “Russia-2008”, there is no need to activate maps!!! It is enough to activate the software itself and copy the key to the folder from where the software is launched, by default it is “Program Files/CNT/Navitel Navigator”. Adding maps to Navigator If the software is launched for the first time, then it searches for the maps in directory by default (folder)“Atlas” in root directory of the software or on Storage Card of PDA. In case it finds them, they are automatically added. If any other directory was chosen to store the maps, you should follow the directions of this documentation. Fig. 14 Step 1. “Atlas opening”. Enter Menu (lower right corner of the screen), chose item “Open Atlas”. If the list of atlases is empty, it is necessary to press “Open” button at the middle lower part of the screen, to find the folder with new maps in root directory. Copyright © Joint Stock Company "CNT", 2007-2008. Web: www.navitel.su Email: [email protected] 17 Fig. 15 Fig. 16 Step 2. “Indexation”. The program will launch the indexation process, i.e. the process of atlas creation. Please, wait the completion of this process. If the atlas was successfully created, confirm your choice. Fig. 17 Copyright © Joint Stock Company "CNT", 2007-2008. Web: www.navitel.su Email: [email protected] 18 Step 3. ”Opening process finishing” New atlas, opened by you, will appear after indexation. Select it and press “Back” button in the lower right corner. You will see “Map” page (after the first installation it will be an empty screen). Enter menu “Search” and find any street to see the map. Fig. 18 Fig. 19 So you can download any set of maps, buy the key for its activation, activate the maps on the site and add them to the Navitel Navigator existing atlas. The more detailed information about the maps and places of their purchase is presented on the website in “Products” section http://navitel.su/products/. Note! Atlas shows only suitable for its presenting maps and scales. So if the maps in the atlas are for minimum scaling 10 km, the map disappears after zooming and only way points rest. It is necessary to install map squares of all Russia to make the maps display in different zooming modes. They can be downloaded at http://www.navitel.su/download/overview-map/. Copyright © Joint Stock Company "CNT", 2007-2008. Web: www.navitel.su Email: [email protected] 19 8. Software interface Fig. 20 Fig. 20 shows the basic elements of the Software interface, as well as functions of the relevant PDA buttons. The PDA presented on the picture, is neither a standard, nor a recommended one. The Interface of your device may differ from the interface presented here, but the functionality should be the same. Name Compass 1 2 Sound 3 Information panel 4 Information panel 5 Tilt of a map Functions performed by the Software Map orientation switch ("North up", "Track up", "Route up") and map view switch (flat "2D" view, or Panoramic "3D" view). Short tap on the icon switches orientation, long tap - opens the context menu. While navigating a route, the compass is always pointing to the North. Turn on and turn off sound in the program. Shows the sign on next turn. On a dark blue background - various turns are shown. Color of the background becomes white when the last route segment is passed. Tap on the sign will stop the route navigation and show the route options menu. Distance before the next turn in meters or kilometers, Time before next turn, Route total length, The arrival time to a final point of a route. The arrow upwards increases a map tilt, in the maximum position of a tilt of a map passes in a kind pseudo-3D. An arrow downwards (at present it is not displayed in drawing as the tilt minimum) reduces a map tilt. The possible tilt Copyright © Joint Stock Company "CNT", 2007-2008. Web: www.navitel.su Email: [email protected] 20 of a map depends on zoom, the more zoom, the less time it is possible to tilt of a map. 6 GPS-pointer 7 Search 8 Instruments panel 9 PDA button 10 PDA button 11 PDA button 12 PDA button 13 PDA button 14 15, 16, 17 Menu Zoom buttons 18 Route 19 Waypoint 20 21 GPS Battery 22 Speed 23 Information panel Shows your current position, when the GPS mode is working. More details are available in the section "Map Page". The button opening the menu of search in various types to objects. The detailed information on search kinds is in section "Program functionality". The street name on which there is a route or current street. "Up" button. On the Map page this button increases the zoom level. On the Route page – it moves upwards through the list of points of a route. On Dashboard page it changes the number of displayed gauges. In the context menu – it moves up thorough the menu. Button "to left". It cycles through the pages ("Map", "Satellites", "Dashboard", "Route"). It goes one page up in the pages' list, when number of pages is more than 1. Button "Down". On page "Map" this button reduces zoom. On page "Route" movement down of the list of point. In the contextual menu movement on menu points downwards. "Action" button - the central button of the PDA. On Map page a short tap on this button turn on and off the full-screen mode. A long tap on Map page creates a waypoint. In the context menu this button helps to select the highlighted menu item. Button "To right". It cycles through the pages ("Map", "Satellites", "Dashboard", "Route"). It goes one page up in the pages' list, when number of pages is more than 1. Button "Menu". Open the main menu of a program. Zoom level increase, decrease and current value. Tab on button changes zoom level by a predetermined step. Active route, which is being currently navigated on. The icons on the map show custom user waypoints and various objects plotted ion the map (e.g. traffic lights, metro stations, fuel stops etc.). Long tap on a waypoint opens the context menu with various options applicable to it - "Route to waypoint", "Begin route", "Add to route", "Remove from route", "Move", "Delete" and "Waypoint properties". Button of connection with satelites. The button showing degree of charges of the accumulator of the device. At the mode «Turn on GPS», in the top right corner of a window of the program is displayed the panel with current value of speed of your movement. The next street name after the turn. Long tap will stop route navigation. Copyright © Joint Stock Company "CNT", 2007-2008. Web: www.navitel.su Email: [email protected] 21 Fig. 21 The figure above does not reflect some interface elements. You can have a look at them here: 1. Traffic jams from SMILink. This mark can be of 3 colors: green (there are traffic jams, updated list), yellow (there are traffic jams, not updated list) and red (traffic jams access problems, no connection or wrong login/password). If the fields “Use during the route creation” and “Show location on the map” are not marked in settings, traffic jam sign will not appear. 2. Point on the map. Short tap on the map gives a point. Such mark can be saved as a waypoint, added to the route, or have its properties investigated. 3. Guiding – small blue arrow indicating route directions reflected on the map. 4. Button that hides keypad for work with route points on the map. 5. Keypad to get instant access to objects properties and operations on the map – waypoints and routes. Keypad can change depending on object selection and route navigation status. Copyright © Joint Stock Company "CNT", 2007-2008. Web: www.navitel.su Email: [email protected] 22 Page “Map” Page “Map” displays downloaded electronic maps and your current position. It contains the most part of the route information. On this page it is possible to work with routes, road points, search for objects, etc. Fig. 22 GPS-Pointer GPS cursor is displayed when connection with satellites is established. It has two signs: ‘Moving” (green triangle) and “Stopped” (vinous circle).Sign “Moving” shows current course. If the current speed is less than 2,5 km/h, the cursor looks like “Stopped”. Cursor is not displayed in case the receiver is switched off or connection with satellites is not established. “Map” page elements control It is possible to view the map with stylus pen moving the object. Chose an object on the map and drag the map to the desired position using stylus pen. The increase and decrease of map's zoom level can be done by pressing the PDA's "Up" or "Down" buttons, or by pressing with the stylus pen the "+" and "-" green signs on the map screen to the right. Current map scale is displayed in the bottom left corner of the map screen. Pressing and holding the little compass icon in the left part of the screen, you can change the map's view between - 2D and 3D, and there you can also choose whether the map should rotate automatically ("Track Up", "Route Up") or not ("North Up"). There is voice guidance icon next to the compass icon. After you click on it using stylus pen, the voice appears or disappears. Then the buttons row for switching on and off GPS and track recording follow. There are 2 main buttons – “Search” and Menu” at the bottom of the screen. Copyright © Joint Stock Company "CNT", 2007-2008. Web: www.navitel.su Email: [email protected] 23 Fig. 23 Fig. 24 Information panel By default Information panel is minimized and placed at the top right corner of the map. In this case it is used as a dashboard showing the current speed. In case you follow the route, this panel pulls-down and shows information about the route: movement gauges shown like a turn sign, current speed, remaining distance, time to destination, time to the nearest via point. The name of the next street (or route point) is displayed on the top of the screen of this panel, while at the bottom of the screen the name of the current street is noted (or the name of the current route point). Menu with different route operations will open after pressing the maneuver icon. More detailed information on routes work can be found at “Program’s functionality” section. Copyright © Joint Stock Company "CNT", 2007-2008. Web: www.navitel.su Email: [email protected] 24 Fig. 25 Fig. 26 Day/night Mode By switching the screen from day mode to night mode the eyes strain is diminished during the night hours. Cycling between modes is done automatically (guided by times of sunrise and sunset for the given region), or it can be done manually through the menu. Mode and type of switching can be made in two ways: you can click a compass icon on the “Map” page or can choose a required mode in the menu, section “Settings”. “Auto” – automatic mode, “Day” – day mode, “Night” – night mode. Fig. 27 Fig. 28 Copyright © Joint Stock Company "CNT", 2007-2008. Web: www.navitel.su Email: [email protected] 25 Working with the Menu On the instruments panel there is a button "Menu", which opens Navitel's menu. In this section the main menu items and their destination will be considered. Fig. 29 1. “Route Guidance” This menu item helps to work with the route, its way points and characteristics of route movement, etc. It is convenient to work with this menu item not only during automatic route navigation but also when this option is switched off, for example, for viewing a list of way points. 1.1. “Stop Route Guidance” – this menu item allows disconnecting automatic route navigation. In case the maintenance is switched off, this item is unavailable. 1.2. “Go Next Via Point” – press this button to move to another route point if you missed the current point or wish to skip it. 1.3. “Jam in 1km”– during active route navigation this menu item indicates that there is a traffic jam ahead in 1 km from the current position. Navitel analyzes the situation and offers a shorter route. 1.4. “Demo route” – this menu item is available when GPS is switched off. It allows you to look the route, turns, and some information on the route. All this helps to find dangerous route sections and adjust the route in case of necessity. 1.5. “Routes” – a list of all route points on the map with possibility to filter by intermediate points and turns. The route can be imported or exported here. 2. “Pages” “Map”, “Route”, “Dashboard”, “Satellites” pages display. Copyright © Joint Stock Company "CNT", 2007-2008. Web: www.navitel.su Email: [email protected] 26 Fig. 30 Fig. 31 3. "Open Atlas" Opening of single maps or multiple maps at once (so called atlases). Fig. 32 If there is no atlas in the list of atlases, choose an atlas using the button with upward arrow situated at the bottom of the page. Copyright © Joint Stock Company "CNT", 2007-2008. Web: www.navitel.su Email: [email protected] 27 If there is an atlas having maps you want to open in the Software, click on it and press the button “Select” in the appeared window. If you made some changes in the atlas (for example, some maps were added or deleted), click on it and choose an item “Reindex” to index atlas maps. Atlas can be deleted from the list. 4. “Settings” This menu item contains various Software settings. Fig. 33 4.1. "Turn on/off GPS". This menu item should be selected (it has a green mark when it's on) in order to turn on the GPS-receiver. Repeated clicking will disconnect the GPS (and the icon will be with a blue minus sign). Additional information about the GPS-receiver is in the section called Satellites page. 4.2. "Start/Stop record track". This menu item should be selected (it has a green mark when it's on) in order to switch on the track recording. Repeated clicking will disconnect track recording (and the icon will be with a blue minus sign). More details about tracks can be found in the section "Track". 4.3. "Auto/Day skin/Night skin". Switching between the day and night view modes. This menu item allows you to choose different modes of the software. “Automatic” is a mode that changes map’s view depending on the sunrise and sunset time for the particular area. Map Day view, map Night view are the modes that cannot be changed themselves. 4.4. “Advanced”. These settings are rarely used in the Software. They are divided into several sections. Copyright © Joint Stock Company "CNT", 2007-2008. Web: www.navitel.su Email: [email protected] 28 Fig. 34 4.4.1. "GPS". Page for GPS-receiver's settings. The best way to set GPS-receiver is ”Autodetect settings”. Choose this menu item and wait until the GPS receiver suitable for your Software will be found. If auto determination was well done, confirm the source choice. If you doubt in your choice, try to click “Update” at the bottom of the screen. If automatic determination continues to work incorrectly, you can manually set the receiver. Press the “Next” button. Select the signal source - COM-ports or Demo track (to play an existing track) or OS (GPS API). There is a short description of the settings show at the bottom of the screen. NOTE! If you made any change to the COM-port settings, please switch off and then back on the GPS in Navitel Navigator – by pressing the respective button on the main map screen. If the "COM-ports" are chosen as signal source, press after pressing the arrow “Next” you arrive at the port adjustment page. All settings for this source take 4 pages. “Next” button in “COM-ports” source mode opens the page with various options for COM-ports selection, from the list of all ports supported by the Software. Click the “Next” button to move to the next page. On this page you can choose one or several GPS protocols (SIRF binary, NMEA-0183 and Garmin protocol). Press the “Next” button to move to the next page. Also, it is possible to select the data transmission speed and data reading method (aggressive, passive – any should do, usually) for the chosen COM-port(s). On the forth page it is possible to cancel log-file writing to reveal failures and set Blue Tooth turning before connection, if necessary. If you choose "Demo track", clicking the “Next” button will give a choice of track's file location and its parameters. In particular, this page allows you to open a demo track from your PDA memory, and you can select the speed of track playback, and the simulation starting point (in percent, length of the entire track is - 100%). Also, here you can enable the field “Looping”, so that the once the track's playback comes to an end, it can be repeated. Copyright © Joint Stock Company "CNT", 2007-2008. Web: www.navitel.su Email: [email protected] 29 Fig. 35 Fig. 36 Fig. 37 Fig. 38 After choosing the settings, click “OK” button to confirm them. You can also choose the last signals source – GPS API. There is no need to adjust this receiver, but you can record log-file to analyze failures. Copyright © Joint Stock Company "CNT", 2007-2008. Web: www.navitel.su Email: [email protected] 30 Fig. 39 4.4.2. "Map". Options for map display. There are 4 pages of these settings. "Map rotation" – choice for map orientation. Options: "North Up", "Track Up", "Route Up". "View" - by default a 2D view is enabled, but this option is checked, then a 2.5D map view (a panoramic view) will be enabled. "Map detail" setting: if you select "Low" detail, then the quality of the map shown will be worse, but it will render faster. If "High" detail is set, then it will be the other way round. Fig. 40 Fig. 41 Copyright © Joint Stock Company "CNT", 2007-2008. Web: www.navitel.su Email: [email protected] 31 To see the second page of map options, press the blue arrow “Next” at the bottom of the screen. "Visual effects" - improve the image on the screen ("Smooth zoom" and "Highlight objects"). If you enable this option, the time of maps rendering can increase. "Show latest 10,000 track points" – is a navigation option, which displays the last 10,000 track points onto the map. To see the third page of map options, press again the “Next” arrow at the bottom of the screen."Map balloon tips" – check the options that you would like to see. Forth page serves to display buttons settings page on the map. Here you can decide whether to hide menu and buttons or not, and if you decide to hide it in which period of time. Fig. 42 4.4.3. "Navigation". Options for navigating a route. The setting "Guidance prompt" allows to change voice prompts' release timing from "Farther" to "Shorter". You can enable lockon-road function, i.e. sticking the cursor to the mapped roads. It is possible to choose several options: “Lock on”, “not farther than 20 meters” and so on. Auto return option turns you back to your initial position on the map if you dragged it. On the next navigation settings page it is possible to set program's action when offroute. For this purpose choose the desired option: "Recalculate route automatically", "Manual recalculation", "Route guidance off" from the drop-down list. Automatic zooming can be made on the third page. For “Automatic zooming” place a flag if you want the Software to zoom automatically. “Restore auto zooming” allows you to define values for temporal period and change scaling after this period is over. Value can vary from “Never” to “in 20 seconds”. Maximum and minimum automatic zooming can be defined on this page. Next pages show route types undesirable for passing and your vehicle in the list of vehicles provided. Copyright © Joint Stock Company "CNT", 2007-2008. Web: www.navitel.su Email: [email protected] 32 4.4.4. Fig. 43 Fig. 44 Fig. 45 Fig. 46 "Keyboard". A choice of screen keyboards is offered: "ABCDEF" - letters are located alphabetically. "QWERTY, option 1" – is a standard keyboard layout. "QWERTY, option 2" – is a keyboard layout having alternating rows of even and odd letters. (Fig. 42). The next page contains a choice of screen keyboard for search including extra keyboard type “Telephone”. Arrow “Next” at the bottom of the screen moves you to the following Copyright © Joint Stock Company "CNT", 2007-2008. Web: www.navitel.su Email: [email protected] 33 page of keyboard settings. On the third page there are language keyboard layouts. Navitel Navigator 3.2 supports Russian, English, Ukrainian and Belorussian languages. Fig. 47 Fig. 48 4.4.5. "System". System options. Here you can enable or disable such options as - "Correct system clock using GPS time", "Update time zone automatically", "Keep power on when the application is active", "Keep backlight on when the application is active". Also, there is a screen orientation setting option. To see the second page of system options, press the “Next” arrow at the bottom of the screen. This page has one option: keep the volume, mark it, if necessary. On the third page it is possible to change the voice navigation language ("Voice pack"), postal address format, day and night skins, language interface. To see the following page of system options, press again the “Next” arrow at the bottom of the screen. A page for units of measure adjustment will open. It is possible to select the units of measure for the following parameters: distance, speed, height, depth, azimuth, area. You can also adjust the format for displaying the coordinates. There is button "Reset settings" on the latest page of system settings. 4.4.6. “SMILink”. This is information settings panel about traffic jams in Moscow from SMILink company. On this page you can set traffic jams display on the map for using it in auto routing. Click the “Next” button to move to the following page. Enter login and password on this page to get authorized access to information on traffic jams. It is possible to set the frequency of new information appearing (from 5 minutes to 24 hours). At the bottom there is a button for SMILink session dumping. Green “tick” serves for entered information confirmation, red cross serves for cancellation, and green arrow – for returning to the previous page. Copyright © Joint Stock Company "CNT", 2007-2008. Web: www.navitel.su Email: [email protected] 34 Fig. 49 Fig. 50 Fig. 51 Fig. 52 5. "Information". This menu item shows information about the Software version and copyrights, as well as information about the currently loaded map. Namely - name of the map file, map's name, date of a last update and copyrights. 6. "Exit". Exit from the program. Copyright © Joint Stock Company "CNT", 2007-2008. Web: www.navitel.su Email: [email protected] 35 Page “Dashboard” The dashboard displays navigation information. There are two ways to display the information here: for the standard portrait screen layout the data for 12 gauges can be displayed, and also data for 24 gauges (note that there is a different number of gauges for the landscape screen layout). Switching between modes (“Up” and “Down”) is done using joystick. Fig. 53 Fig. 54 Fig. 55 Copyright © Joint Stock Company "CNT", 2007-2008. Web: www.navitel.su Email: [email protected] 36 To select the appearance of a particular gauge, tap and hold the stylus pen on the gauge to be replaced, then the context menu will come out, from where you can do the following: choose another gauge from the list containing dozens of various gauges. For convenience, they are all sorted by categories; change the reading to zero for the current gauge; change the readings to zero for all gauges; set the gauges' layout to the default setting. Page “Satellites” The Satellites page serves for viewing the reception status of signals from the GPS satellites. It also shows the current arrangement of satellites on the sky. The top left part of the screen shows a graphical image of the satellites on the firmament, showing also the North, South, East and West. Fig. 56 The center of the hemisphere corresponds to the zenith, its edge marks the horizon line. When the GPS-receiver is connected, the satellites located in the visible hemisphere are displayed by conventional signs, showing also the number of each satellite. At the bottom the satellites information field is displayed, in the form of a graphical diagram. The level of satellites' signals are shown as bars, having the individual satellite number located below. The height of each bar is proportional to the quality of the signal received - the bigger it is, the higher quality of received signal is. Apart from that, the page displays the following information: current latitude and longitude data transmission protocol Copyright © Joint Stock Company "CNT", 2007-2008. Web: www.navitel.su Email: [email protected] 37 connection port with the GPS receiver number of satellites used (as detected by the GPS-receiver). Maximum number of satellites used. coordinates detection mode . Page “Route” This page shows detailed route information, particularly about various maneuvers on the route. It is shown during route navigation only. You can see here a list of all turns, U-turns etc. which should be passed along the route, with information about the distance and time left for each maneuver. Apart from that, this page shows the time of arrival to the final destination point. Fig. 57 To return back to the map screen, press the green arrow button at the bottom of the screen. Copyright © Joint Stock Company "CNT", 2007-2008. Web: www.navitel.su Email: [email protected] 38 9. Program's functionality 9.1. Routes In order to plan the forthcoming trip and check the route accuracy, the Software gives the possibility of route planning. There are two types of routes – manually created by the user and automatically calculated by the Software (autorouting). Autorouting This feature works on routable maps only, i.e. maps containing the autorouting information. In order to create a route automatically, from the current position to the destination point, tap and hold the stylus pen on the place on the map where the final point is, and in the context menu choose "Go to". The calculated route will be shown on the map in yellow color with highly visible dark border. Please, note that in case of non-routable maps, the route will represent a straight line to the destination point, ignoring the existing buildings, roads, etc. Autorouting also works while searching the objects. Select the desired object and click “Autorouting”. Program will create a route automatically from your current position to the destination point. Fig. 58 Fig. 59 Manual route creation Creation of manual routes can be done on any maps. To create the manual route, tap and hold the stylus pen on the map where the starting point for the trip is located, and from the context menu choose "Begin route". Then tap and hold the stylus on the next via point and from the context menu select "Add to route" and repeat this sequence for all the via points needed. To complete route creation, tap and hold the stylus pen on any point of the map except the route itself and then choose “ Route creation completion” in pull-down menu. Copyright © Joint Stock Company "CNT", 2007-2008. Web: www.navitel.su Email: [email protected] 39 Note that if the map supports autorouting then the route will be automatically generated, but passing through all the via points set. If the map is not routable, then all the via points will be connected with straight line segments. By default the inactive route is shown in dark red color. If you need to navigate the created route, tap and hold the stylus on this route and select "Navigate" from the context menu (alternatively you can select "Play route" to simulate it). When the route becomes active (ready for navigation) its color will change to yellow. Fig. 60 Fig. 61 Fig. 62 Fig. 63 Copyright © Joint Stock Company "CNT", 2007-2008. Web: www.navitel.su Email: [email protected] 40 Route editing “Follow route” – start following the route. “Demonstrate route” – program demonstrates route following, it is a cyclic process. Speed is maximally possible on each route area. "Insert waypoint to route" – used for adding a new via point to the existing route (the via point is taken from the place where the stylus points to on the map). Such a via point can be moved to another map location (selecting the respective context menu item), and, as a result, the route will change its path. “Continue route” – used to continue route even after “Route creation completion” item was chosen. The context menu appearing when tapping and holding on a route with the stylus pen, contains the commands needed to edit it: "Invert" – inverts the route's direction. "Delete route" – delete the current route. "Recalculate route" – use this after changing the route elements, e.g. by adding via points or after moving them etc. Te route will be fully recalculated to reflect the new layout better. "Route properties" - are the route properties, i.e. route' name, description and the list of key points. Fig. 64 Fig. 65 Editing route via points By pressing and holding with the stylus on a route via point, a context menu comes up, which has the options needed for editing the point’s properties: “Goto” – automatically route to the chosen waypoint. “Play route” – if the route is not active, the driving will start from this via point. “Add to route” – if the route is active (i.e. you are driving on it), then the current route will be recalculated, forcing the route to go through that via point. “Delete from route” – if the route is active, then it will be recalculated in order to exclude the routing through that waypoint. “Move” – if you choose this menu item, the waypoint will be cut from the route, and then will be pasted onto the place on map where you will click the stylus to. “Delete point” – regardless the status of the route (active/inactive) the waypoint will be deleted. “Properties” – properties of the waypoint. Copyright © Joint Stock Company "CNT", 2007-2008. Web: www.navitel.su Email: [email protected] 41 Fig. 66 Fig. 67 Route properties The Software allows basic route editing, e.g. changing route direction, showing it on the map, route recalculation, change route colour, its description and properties. If, under route properties, you press the blue arrow ("Next"), then you can have access to route's points – you can include and delete points from the route, edit route points, change the order of route points, you can preview the via points, turning via points, or all points of the route. Fig. 68 Copyright © Joint Stock Company "CNT", 2007-2008. Web: www.navitel.su Email: [email protected] 42 9.2. Tracks While driving, it is possible to record the actual track passed. This function is called "Track recording" and it can be switched on/off from the instruments panel. But it is possible to record tracks only having the GPS connected and locked on satellites. Just press the middle button on the instruments panel at the bottom of map screen and a checkmark on that button means that the track recording is on. In order to show the track on the map screen the option "Show latest 10,000 track points" should be activated under Navitel program settings. The tracks on the Map page are shown as thin magenta lines. Tracks are automatically saved as MPS files (in MapSource format) located in the "My documents/GPS Tracks and Waypoints" folder in PDA's main memory. A few other files are saved there too, they are needed by the Software and do not occupy much space. While the track display in map screen is limited by 10,000 points, the recorded track does not have any limitation by number of points – it is only limited by the amount of accessible PDA memory. Note that a track saved in PDA's memory can be later imported into a route, to allow navigation. Actually one can not only import tracks locally created by Navitel, but also any other MPS files can be imported too (e.g. tracks from OziExplorer, Garmin GPS Database). In order to perform this, press the "Import track" button in the Routes menu, and a window with all available tracks will open: Choose the needed track and press "Оk" (green tick). Then set the track import parameters – to navigate through it in actual or reversed direction. If a track file contains several tracks, then the program will ask to choose which tracks should be imported (or all of them). Afterwards, the imported track(s) will appear in the list of routes, named as "Track* ". You can manipulate it, just as with any other route. 9.3. Waypoints Waypoints allow to mark places having certain coordinates. They contribute to a better orientation in the field, and help us to record interesting places. There are several methods of entering waypoints in the program. In a case when it is needed to insert a waypoint at the place where the GPS-pointer is, simply press and hold the PDA's central button, or press the "Create waypoint" button on the instruments panel. Another method allow to create a waypoint anywhere on the map – just tab and hold the stylus pen on the desired spot on the map and in the context menu select "Create waypoint". As a result of the actions above, a window will pop up for editing waypoint's properties. Here you can set such parameters as waypoint's name and description, object type, and it's icon. Types of waypoints. Waypoints are sorted in groups (e.g. services, transportation, civil etc.) in order to simplify search for a particular waypoint type. To select the waypoint's type, click on the icon showing the current type and then the program will suggest more types from the last few types selected before. If these types are not suitable, then press the blue arrow at the bottom of the screen and choose the waypoint's type from the total list of waypoints, grouped by functionality. Once the selection is made, press the button at the bottom to the right. Copyright © Joint Stock Company "CNT", 2007-2008. Web: www.navitel.su Email: [email protected] 43 Finally, you can edit such waypoint data as latitude, longitude. At the bottom of the screen there are special tools which allow to delete a waypoint, or to create a route to it. Fig. 69 Fig. 70 9.4. Traffic jams Navitel Navigator allows working with traffic jams of Moscow roads using SMILink – free roads from SMILink company. In order to get a unique service number and pin-code, you should buy a connection card. Connect PDA to the Internet using modem, mobile phone, built-in GPRS module or other device. Enter menu “Settings”, sub menu “Traffic jams”, turn on “Show traffic jams on the map” option and then enter service number and pin-code on the next settings page. If pin code entered corresponds to your service number, green logo of SMILink company will appear at the upper left corner of the screen. If pin code is invalid, the logo will remain yellow. If Internet is disconnected, the Software will show error and logo will be red. Information reliability is evaluated in the following manner: For MKAD – 95% Center of the city within TTR (third transport ring) - 80% TTR and radial highways – 70% Rest of the city streets – 50-70% Information on traffic jams is actual 24 hours. Copyright © Joint Stock Company "CNT", 2007-2008. Web: www.navitel.su Email: [email protected] 44 Traffic jams can be seen on the screen in a form of colored ranges depending on the traffic density. As for main city highways, it depends on the speed: Less than 10-15 km/h – traffic jam is displayed in red color From 10-15 km/h – thigh traffic density is displayed in yellow color Up to 25-30 km/h - favorable road situation, it is not marked. Apart from that, status depends on the general area and the nearest highways traffic density, traffic lights work, construction works, emergency areas, accidents, and other constituents. Fig. 71 Fig. 72 When “Use in autorouting” option is switched on, information on traffic situation will play role during automatic routing creation. When traffic jams were taken into consideration, the route will be longer, but you will be offered the shortest route (according to SMILink data). The optimal route takes into consideration the speed maximally possible on different areas and your choice in route settings – the shortest way. 9.5. Search The Software provides an extended search functionality, based on various search criteria. Press the "Search" menu item. The object found can be viewed on the map or added to the route. Search criteria are defined using keyboard chosen from the settings. The button at the bottom of the screen helps to minimize and display it. Some searches give a number of objects corresponding to the search next to the entered name. When the number of such objects takes all space, the keyboard disappears automatically. Press the required object from the list given. If you made a mistake, press the “Back” arrow. Copyright © Joint Stock Company "CNT", 2007-2008. Web: www.navitel.su Email: [email protected] 45 Fig. 73 Postal address search "By Address" – will search for buildings, houses etc. if their address is known. There are three steps to follow here: Step 1. "Select the city". The city required for the last time appears in search results by default. City name is entered at the top of the page. In order to change search parameters, press “Back” next to the current city name. Choose a required city from the list using the keyboard. The keyboard can be minimized with the button at the bottom of the screen in case you do not need it. The keyboard disappears when only a page of cities is left. In order to select a city from the list, press on it by the stylus pen. Step 2. "Select the street". Using the keyboard provided, start entering the street name, until the needed one is shown. For convenience, the relevant letters will be highlighted. Note that the program will narrow the selection until it fully matches (the choice of available buttons on the keyboard will conveniently reduce too, reflecting the fact that fewer letters are left available for the set search criteria). When the search returns results that can fit on one page, the keyboard will disappear, leaving you the possibility to select the desired street from the list. Press blue arrow “Next” then. Step 3. "Select the building". Similarly, select the house number. If there is only one house with certain number, then proceed to the next step. Copyright © Joint Stock Company "CNT", 2007-2008. Web: www.navitel.su Email: [email protected] 46 Fig. 74 Fig. 75 Fig. 76 Fig. 77 Step 4. "Results". Once the object is found, it is possible to look at it on the map, or to make a route to it. If autorouting is switched on during the search, i.e the route is created on the map, the object found can be added as a route point. For this purpose, press on the object and select one of the Copyright © Joint Stock Company "CNT", 2007-2008. Web: www.navitel.su Email: [email protected] 47 options: “Visit”, an object will be placed between two nearest to it route points, or “Add to the route”, an object will be added to the end of the route. Fig. 78 "Waypoints" search – browses through a list of all searchable waypoints. The waypoints search looks for the specific waypoint name. The results page will show the searched waypoint name and the distance to it. Afterwards, you can show the waypoint on the map, or make a route to it. Also, it is possible to edit waypoint's properties from the same menu, delete the waypoint (or all waypoints), export and import waypoints. Copyright © Joint Stock Company "CNT", 2007-2008. Web: www.navitel.su Email: [email protected] 48 Fig. 79 Search for "Nearest Places" – will search for the nearest objects (relative to your current position if GPS is on, or relative to the current map position if GPS is off), within a set range. Apart from type of objects search, search history of the nearest objects is presented here. Such search is performed in two steps: Step 1: “Select control point”. “Control point” is the most important search criterion. Control point is a point regarding which the nearest objects of selected type will be searched. In order to change the control point, press a button with a flag at the bottom of the screen. The following control points will appear on the page: “City” – to search for the nearest ones to the defined city, “Address” – to search for the nearest ones to the address defined. “History” – one of the objects in general search history serves as control point, “Route Start”, “Route End” – these points appear only during route navigation, “Pointer” – the current pointer position on the map serves as a starting point. Step 2. "Select object type". There are several object types : “Useful objects” – catering establishments, medical institutions, shopping centers, etc ;“Geographical objects” – populated areas, streets, rivers, bridges, etc.; “Rest” – hotels, camping and fishing sites, cinemas, etc.; “Public transport” – buses, trolleybuses, aviation, ship navigation, etc.; “Auto transport”. Each object type menu has submenus. In order to search for all objects close to you, do not select any items on the page and press the “Next” arrow to continue. Step 3. "Object search". After the object’s type is selected, the page with all the required objects sorted out by the distance to control point opens. The nearest objects will be at the top of the list. There is search by name button at the bottom of the page. Enter object’s name letter by letter until you find the object needed. Copyright © Joint Stock Company "CNT", 2007-2008. Web: www.navitel.su Email: [email protected] 49 Fig. 80 Fig. 81 Step 3. "Results". Once the object is found, it is possible to look at it on the map, or to make a route to it. Also, it is possible to add the object to the route and visit it if route navigation works. Fig. 82 Fig. 83 Copyright © Joint Stock Company "CNT", 2007-2008. Web: www.navitel.su Email: [email protected] 50 "Cities" search - search for cities, settlements, villages, etc. by name (with population not less than 100000). Using the keyboard provided, start typing the settlement's name, until the needed one is shown. For convenience, the relevant letters will be highlighted. Note that the program will narrow the selection until it fully matches (the choice of available buttons on the keyboard will conveniently reduce too, reflecting the fact that fewer letters are left available for the set search criteria). When the search returns results that can fit on one page, the keyboard will disappear, leaving you the possibility to select the desired settlement. You can choose to have a look at it on the map, or to make a route to it. Fig. 84 Fig. 85 Search "History". Here are listed all the objects ever searched for using any type of search. This search sorts out the objects by search date and the latest objects are on the top. You can remove an object from this list, if are confident that you will not use it anymore, you can remove all the objects there, and you can also route to the chosen object or have it shown on the map. “Favorites” This search deals with the most frequently used objects. Unlike search “History”, objects are sorted out by number of use (not by the date of use) in this list. Copyright © Joint Stock Company "CNT", 2007-2008. Web: www.navitel.su Email: [email protected] 51 10. GPSMapEdit - map editing software 10.1. Description of the map editing software NAVITEL NAVIGATOR comes bundled with GPSMapEdit map editor (demo version), which allows the user to create own maps and edit them. More information about this editor can be read at http://www.geopainting.com/. There you can also purchase it, to unlock the full functionality. This map editing software is intended for WYSIWYG editing of GPS-maps in various formats: NAVITEL NAVIGATOR (navigation software for Pocket PCs). Garmin MapSource, "Polish format" (a text format for the cGPSmapper software), ALAN Map 500, Holux. The main feature of this editor with reference to NAVITEL NAVIGATOR is the possibility to open, edit, convert and save the maps in Navitel's NTM/NM2 format. This is a binary cartographical format elaborated by the Joint Stock Company "CNT", for the NAVITEL NAVIGATOR navigation software. Benefits of buying a full version license for GPSMapEdit: Loading of big raster maps (OziExplorer's MAP format) - more than 20-30 megapixels. Import in MapInfo MIF/MID format. Export to MapInfo MIF/MID format. Map slicing into smaller fragments (menu "Tools | Split map to files..."). Saving to CRD format (for ALAN Map 500 and Holux). NOTE: future updates will expand this list. Rendering restrictions: The most efficient graphics rendering can be experienced in Windows 2000 and Windows XP. Other OS versions have some limitations listed at http://www.geopainting.com/ (these are purely OS related limitations, and not of the GPSMapEdit software). 10.2. Example of map editor's deployment Maps conversion from the "Polish" format into Navitel's format. At present the most accessible and easy to use free maps are the maps in "Polish" format. Therefore, here is an example of map conversion using this format. Map conversion process can be conventionally split into 4 steps. Thus, in order to convert a map using GPSMapEdit from "Polish" format into Navitel's, it is needed to: 1. Open the map in "Polish" format. 2. From the menu "File" - "Map Properties", change the Typeset to "Navitel". 3. Go to the menu "File" - "Save Map As…" and under "file type" choose "Navitel Navigator 3.1" 4. Save the map. Afterwards the map is ready to use with NAVITEL NAVIGATOR 3.1 software. Copyright © Joint Stock Company "CNT", 2007-2008. Web: www.navitel.su Email: [email protected] 52 11. Trademarks Authors of this Guide do not intend to hide the copyrights on trademarks, registered trademarks, and corporate brands of other companies, mentioned in this Guide. Microsoft, Microsoft Windows logo, Pocket PC, Windows Mobile, Microsoft Windows, Windows 98, Windows ME, Windows NT, Windows 2000, Windows XP – are trademarks and registered trade marks belonging to Microsoft Inc. (as registered in the USA and in other countries). HP and iPAQ – are trademarks of Hewlett-Packard Co. CompactFlash – is a trademark of CompactFlash Association. Mitac, Mio – are trademarks of Mitac International Corporation. Garmin, MapSource – are trademarks and registered trademarks of Garmin Ltd. and affiliated companies. Holux – trademark of HOLUX Technology Inc. ALAN Map 500 – trademark of Joint Stock Company "ALAN-COMMUNICATION". NAVITEL, NAVITEL NAVIGATOR – are trademarks of Joint Stock Company "CNT" (in Russia). All other trademarks, registered trademarks and corporate brands, are the property of their owners. Joint Stock Company "CNT" refutes any ownership-like interests in relation to any other trademarks, registered trademarks and corporate brands. Copyright © Joint Stock Company "CNT", 2007-2008. Web: www.navitel.su Email: [email protected] 53 12. Glossary Accuracy – is a parameter which depends on various factors: number of visible satellites, quality of signal, interferences, reflected signals, speed of moving of the navigator itself etc. Most exact readings are expected when there is reception from more than 4 satellites, uniformly located in the sky, and the navigator stands still. The accuracy used for calculation of your current coordinates can be displayed on the screen. Active segment of the route – is a segment of a route which you are currently move on. Also, this is the distance between any of the two waypoints in a route. Almanac – these are data about the orbit parameters of all satellites. Each satellite transmits these data for all others. Unlike the ephimeris data, these data carry a general picture of satellites' location, and they are valid for several months. The almanac of satellites allows the GPS-receiver to rapidly find and receive the signals from satellites, without having to perform a cold start. Autorouting (automatic route navigation) – this is an important feature of the Software, allowing to produce a route to the destination point in automatic mode. It means, that it is enough for the user to just specify the destination point, and the Software will generate the shortest and most convenient route. To take advantage of the autorouting feature it is necessary to have routable maps. Azimuth – is the heading towards the destination point from the current position, measured in degrees and counted clockwise from the direction to the North. The azimuth can be graphically displayed on the PDA screen. Cold start – is when you switch on the GPS-receiver for the first time, or after it moved far away from its previous location. In such case the receiver does not have any almanac and ephimeris data, or these data must be updated. Hence, the GPS-receiver starts loading the almanac, then the ephimeris. This process takes time - several minutes or more. Datum – is a system of coordinates, based on ellipsoid. In such coordinates, when one specifies the latitude and longitude of some point in the area, this is actually referred to as the coordinates of the projection of this point on the ellipsoid. In different countries, a bit different ellipsoids are used. For this reason, it is not sufficient to specify the coordinates of some point in order to assess it's location exactly. It is also needed to specify in what datum are these coordinates set. A wrong datum can generally lead to errors from tens meters to a kilometer. Popular Russian maps, as a rule, are published in "Pulkovo-1942" coordinates system, while the GPS uses the datum WGS84. Distance – length (in miles, meters, feet, etc.) between two waypoints, or from your current position to some waypoint. Ephimeris – are the data used for precise correction of orbit parameters and time for each satellite. Each satellites transmits its own data only. These data quickly become outdated. Thus, the almanac gives to the navigator some general idea about the location of satellites, while the ephimeris provides very precise information. Estimated time of arrival – is an estimate of time of the day/night when you will arrive to the next waypoint or to the destination. It is possible to see this time on the GPS screen while moving. Copyright © Joint Stock Company "CNT", 2007-2008. Web: www.navitel.su Email: [email protected] 54 Estimated time of the trip – is an estimate of the time needed to reach a certain waypoint, or the next point in a route. It is possible to see this time on the GPS screen while moving. Calculation is made according to the current speed and heading. Go to – using this feature, the Software can guide you to the set point. While moving, the screen will show the remaining distance to the waypoint. GPS (Global Positioning System) – is a global system used for location identification. The navigation system uses the data received from the satellites, which are continuously transmitting the navigation signals. The purpose of GPS is to provide high precision data on navigation and time to mobile and stationary objects in the air, on ground and on water. Heading towards Northern magnetic pole – is the heading shown by a regular magnetic compass. Hot start – is the process of starting the GPS-receiver which had been disconnected for less than 30 minutes. The initialization of the navigator when it's switch on is done in a fast manner, because the receiver immediately starts to search for satellites using the almanac, and there is no need to collect the ephimeris data. Route – is a broken line, connecting an initial and final points, passing through some via points, where the direction changes. It is possible to include existing waypoints into a route, or to enter them directly from the map displayed on the screen. When calculating the route, the Software will automatically replace the current destination point, once it's reached, with the next waypoint. Stylus pen – is a tool, which looks like a pencil, used for interacting with PDA's display. Track – is the actual track passed, a path, or a log file, which is recorded by the GPS-receiver when it is on. The track consists of many points (their number shows how often the GPS-receiver marks the current position, usually it does it once per second, but the newer models may do it more precise). The number of points in a track (volume of track log) tells us about the maximum number of points that one track can have. Each point of a track contains information about the coordinates, altitude over ocean level, time and moving speed of the GPS-receiver. True heading towards North – is the direction from any point on Earth towards the geographical North Pole. Warm start – is the process of starting the GPS-receiver which had been disconnected for more than 30 minutes. It takes more time to initialize, because the ephimeris data are outdated and the GPS-receiver has to gather the ephimeris data from each satellite. Waypoint – is a point on Earth which has its coordinates recorded in PDA's memory. Coordinates of a point can be obtained either through a map calibration process, or by manual input of their values taken, for example, from a topographic paper map. Waypoint can be assigned a name by default (e.g. 001, 002 and so on) or you can choose a custom name (e.g. "House", "Work"), and a custom symbol (from the list provided). The navigator has a function to search through the waypoints (to find the nearest or to find points by name). Also, it is possible to plot the point on the map screen, or to see its coordinates. Copyright © Joint Stock Company "CNT", 2007-2008. Web: www.navitel.su Email: [email protected] 55 Information about the "CNT" company Joint Stock Company "CNT" – is an actively developing company, primarily focused on the markets of Russian Federation and CIS countries. The mission of our company – is to modernize, develop and disseminate modern solutions and products in the fields of IT and digital cartography. We strive to develop software meeting high requirements with respect to reliability, safety and ease of use. Joint Stock Company "CNT" devotes significant efforts to ensure a fast and qualified technical support for its clients. Our company aims at successful projects development and achievement of such results that are able to meet the requirements of our corporate clients and end users. The staff of our company are active, young people, who press towards developing their professional and personal qualities. We welcome and promote multiplication of skills and knowledge of our employees, because it ultimately leads to the most effective solutions for our projects. Contact information Our address is: ZAO "CNT" 4/1 Kosmodemyanskih Street Moscow, ZIP code: 125171 RUSSIAN FEDERATION Phone: (495) 787-66-80 Email: [email protected] Web: http://www.navitel.su Copyright © Joint Stock Company "CNT", 2007-2008. Web: www.navitel.su Email: [email protected] 56