1
„Your Trusty Navigation Buddy“
Software for GPS/Galileo Navigation System ‐ Operating Instructions ‐ Frontpage
picture ©2009 pixelio/ewm
Table of contents
TABLE OF CONTENTS............................................................................................................................................................ 3
HANDLING PRECAUTIONS ................................................................................................................................................... 7
ABOUT GPS/GALILEO NAVIGATION ................................................................................................................................. 9
FIRST USE .................................................................................................................................................................................. 9
UNDERSTANDING YOUR NAVIGATION SCREEN......................................................................................................... 11
MAP VIEW ............................................................................................................................................................................... 14
HOW TO START A TRIP ....................................................................................................................................................... 18
AUTO ROUTING ........................................................................................................................................................................ 18
AUTO ROUTING FROM SEARCH................................................................................................................................................. 19
MANUAL ROUTE CREATION ..................................................................................................................................................... 20
SEARCH .................................................................................................................................................................................... 21
SEARCH BY ADDRESS .............................................................................................................................................................. 21
SEARCH A POINT OF INTEREST (POI) ...................................................................................................................................... 24
SEARCH A CITY........................................................................................................................................................................ 27
ROUTE EDITING .................................................................................................................................................................... 29
TRACK RECORDING............................................................................................................................................................. 30
WAYPOINTS ............................................................................................................................................................................ 31
WORKING WITH THE MENU ............................................................................................................................................. 33
ROUTE OPTIONS ....................................................................................................................................................................... 33
PAGES MENU ........................................................................................................................................................................... 35
SETTINGS................................................................................................................................................................................. 38
MAP ......................................................................................................................................................................................... 39
NAVIGATION ............................................................................................................................................................................ 40
REGIONAL SETTINGS ............................................................................................................................................................... 41
UPDATE YOUR MAP.............................................................................................................................................................. 44
TROUBLESHOOTING............................................................................................................................................................ 45
&Note For visually impaired users, we have prepared a PDF file for download at: http://www.car‐navi.ph/pub/carnavi‐manual‐protv.pdf, this can be displayed on a big screen or read by screen‐reader software. Thank you for choosing a carNAVi product. Because we are genuinely concerned of your driving safety, we suggest you to go over the following important safety precautions. Please refer to the quick installation manual for correct placement of your unit. Â Do not block the driver's view or safety airbag on the passenger side. The manufacturer shall not assume any compensation or responsibility to product failure or other property loss or personal injury due to incorrect installation or usage of this product. Any use of our hardware, software or maps implies that you agree to the following terms: 1.
The carNAVi GPS/Galileo navigation unit is intended to be used as travel aid. It is the user’s responsibility to use it in a safe and prudent way, including the visual real‐time verification of streets, roads, road‐signs and directions as well as traffic conditions. carNAVi rejects any and all liabilities for any loss, injury or damage, be it direct or indirect and regardless if carNAVi was aware of the possibility of any such loss, injury or damage. 2.
The map data used in our devices are not endorsed by commercial organizations. We provide no warranty and bear no responsibility for any damage or loss due to any consequence of using of these maps. 3.
Your use of the carNAVi GPS/Galileo navigation device is limited to non‐commercial activities (e.g., naviga‐
tion on a leisure hiking). You may also use the navigation device as your aid, indirectly supporting your busi‐
ness activity (e.g., as the driver of a transportation business). 4.
Any other commercial use of carNAVi hardware or software including maps for business purposes is explicitly forbidden without the prior written permission from carNAVi. This includes, among others, including it in commercial products or commercially operated services. The satellite navigation system, as a high‐technology product, contains operating system and software . The manufacturer has spared no efforts in manufacturing the hardware and developing application software to en‐
sure this product runs perfectly. In case of malfunction, the manufacturer shall not assume any compensation or responsibility on property damage or property loss or personal injury except maintenance as specified according to quality assurance regulation. carNAVi does not assure or guarantee effectiveness, completeness or accuracy of the electronic map used in this navigation system, and shall not assume any compensation or responsibility on personal injury and property loss due to limitation of the electronic map. This navigation system is designed to be used in cars, for biking or walking. It is strictly prohibited to use the car‐
NAVi GPS as a primary navigation system for airplanes or any other aircraft. The use of the navigation system as a passenger in commercial aircrafts can be regulated differently. Please ask your flight crew if the airline allows the use of your GPS onboard a passenger airplane. Parts of the map used in our navigation systems are copyright by openstreetmap.org and distributed under the CCPL cc‐by‐sa License (http://creativecommons.org/licenses/by/3.0/legalcode). The navigation software in the navigation systems are protected by copyright laws. No part of any software or other non GPL code and maps included in our navigation devices may be reproduced, stored or transmitted in any form or by any means, elec‐
tronically or otherwise without the prior written permission of carNAVi. ©carNAVi Corporation, 2011 Handling precautions
To avoid hazards while driving and to make sure you have a reliable system please follow these basic steps: 1. Do not turn off the device while the navigation software is running. This may cause software failure and malfunction. The included carNAVi software license is valid only with the delivered unit, copying to an‐
other device is not possible. Your license label is located inside the unit’s box. 2. If you store the unit for a longer time, exit the navigation software and select power off. In stand‐by mode the device is still consuming power and the battery gets drained faster. 3. While installing the car charger take care that it is fitting properly and make sure, the cable is not disturb‐
ing any important controls of your car. Better fix the cable somewhere so that it can not be struggled with the gearbox switch or handbreak handle of your car. 4. Don’t park your car with the unit installed in direct sunlight. Extreme heat can destroy the TFT display, the battery and also the sensitive electronics. Make sure, before you leave your car, remove the unit and the windshield mount, store it in a safe and cool place or take it with you. This may also prevent the unit from theft. 5. While driving using the navigation device, always take care of road signs, traffic and weather conditions. The usage of a navigation device is not suggested if weather and/or traffic conditions are needing the full attention of the driver. If you need to make changes on the unit, do this only while the vehicle is stopped. 7 Notes for using the navigation device in the US State of California: Existing law prohibits any person, except as specified, from driving any motor vehicle with any object or material, placed, displayed, installed, affixed, or applied in or upon the vehicle which obstructs or re‐
duces the driver’s clear view through the windshield or side windows. The Senate Bill 1567 effective on 01. January 2009 would additionally exempt from these provisions a portable Global Positioning System (GPS), which may be mounted in a 7‐inch square in the right lower corner of the windshield farthest from the driver or in a 5‐inch square in the left lower corner of the windshield nearest to the driver, if specified conditions are met. All other countries/states except US State of New Jersey allow the usage of the windshield mount. But of course it’s the drivers responsibility to have always a clear view not disturbed by the installed navigation device. Notes for the using of POI information for overspeed warning: Some countries are forbidding any hardware or software to forewarn the driver about points with over‐
speeding control systems. This are i. e. points of interests stored in the units memory, where the driver can be informed that there’s a speed control point coming up the driven road. The use of those “anti speedcam” systems can be forbidden in some countries. It’s the users responsibilty to inform himself about such regional laws. carNAVi unit’s are able to but do not have any active speedcam warning information installed. If you just use the factory settings, the unit can be used lawfully in any country. 8 About GPS/Galileo navigation
GPS (Global Positioning System) is a satellite based navigation system for high‐precision position determination of static and moving objects. To use navigation devices and software based on GPS technology, it is necessary to understand some peculiarities of this system. GPS, also called NAVSTAR (NAVigation System using Timing And Ranging) is based on 29 satellites that move around the Earth in a medium orbit. Galileo is the European coun‐
terpart of GPS, the system is currently set‐up and will be in service in the near feature to provide higher accuracy. See more details about GPS and Galileo in the unit’s ebook section. Â Your GPS receiver is receiving signals from the satellites but your device transmits nothing. The high frequency low powered satellite signal can not go through metal surfaces, wood and concrete. Signal can pass through glass, but metal coated tint can lower the signal quality. That is why it is impossible to catch the signal in or between buildings or sometimes in a deep forrest. Quality of coordinates’ determination can vary, it depends on the set of satellites used by the software. First use
After switching on your navigation device there are several influences for the time it takes to calculate your initial position. Basically the unit is already searching for satellite signals, once you see the main menu. You can check the status of the satellite‐reception either within the navigation software (ref. figure 17 on page 37) or in the sys‐
tem settings. Instructions are given at the end of the hardware manual. 9 Switching on the first time In this mode the navigator does not have data about its position and the satellites constellation. It finds several visible satellites, determines their position and loads current satellites. As the satellites transmits data rather slowly, determination time can reach up to 20 minutes. Cold start
If the data of the current satellite positions becomes inaccurate (because the switched off navigation receiver was moved a long distance or if the internal clock shows wrong time, etc), the receiver has to find “new satellite locations” (download new position data). It usually takes only a few minutes to connect and update the position. Warm start
If the carNAVi is switched off for more than 30 minutes and then is switched on, the satellites search by almanac starts and the data collection continues in that moment. When the signal of every satellite is received, the data from the satellites will now be suitable for navigation. It usually takes less than a minute for the SiRF IV chipset. Hot start
If the carNAVi is switched off for less then 30 minutes, its initialization starts quickly. This is the fastest time for determining coordinates because the data from the last satellites position, the current data of postion etc. are already stored. One thing left is to receive a signal from satellites and calculate delays. The switching on time is less than 10 seconds for the units SiRF IV GPS/Galileo chipset. 10 Understanding your navigation screen1 1
2
3
18
4
17 5 6 16 7 14 8 13 Figure 1 10 12 9
11
1
Screen display on your actual unit may vary depending on screen size and resolution. 11 Function Details and special operations 1 COMPASS The icon shows north position and a short tap on the icon opens a context menu. Select map orientation ("North up", "Track up", "Route up"), map view mode (flat "2D" or Panoramic "3D") and “Day”, “Night”, “Auto” mode here. 2 SOUND Tab the icon to turn on and turn off sound in the navigation program. 3 GPS SIGNAL Shows GPS Signal status and a tab on the icon connect or disconnect with satellites. GREY – GPS is off, RED – GPS activated but no signal, YELLOW – GPS activated but signal is weak, GREEN – GPS activated with good signal. 4 BATTERY This icon shows the battery charging level. (some units only) 5 TURN SIGN Shows the sign on next turn. Various turns are shown. Tap on the sign will show the route options menu, for example to stop the route navigation. 6 INFO Distance before the next turn in meters or kilometers. (only in routing mode) 7 INFO Time to arrive, route total length and estimated arrival time to destination. 8 YOUR POSITION Shows your current position, when the GPS mode is activated. More details are available in the section "Map View". 12 9 SCALE INFO Shows current map scale (zoom level). 10 FIND/SEARCH The button opens the search menu. Find an address, Points of Interest, per‐
sonal Waypoints etc. here. More details in the "Search" section. 11 STREETNAME Displays the street name the user is driving along. 12 MENU BUTTON Button "Menu". Open the main menu of the program. 13, 14 MAP ZOOM Zoom level increase and decrease. Tab on the button to change the zoom level. 15 AUTOZOOM Turns back to Autozoom level, if map was manually zoomed. (optional) 16 MAP TILT BUTTONS The arrow upwards increases a map tilt, more tilt displays a 3D view. The ar‐
row downwards reduces a map tilt. The possible tilt of a map depends on the zoom‐factor, the more zoom, the less it is possible to tilt a map. 17 SPEED Displays your current speed, when GPS is activated and you are moving. 18 NEXT STREET In routing mode the display shows the target street name of the next turn. 13 Map view
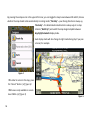
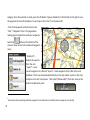
“Map view” displays the electronic map and your current position if the receiver is active. If you are moving with your car, the map shows actual speed and moving direction. It contains the most amount of map and routing re‐
lated information. On this page it is possible to program or follow routes, set and view waypoints, search, etc. GPS‐Pointer GPS pointer (ref. figure 2) is displayed when connection with satellites is established. It has two signs: ‘Moving” (blue triangle) and “Stopped” (blue circle). Figure 2
14 Â The “Moving” sign shows the current course you are driving. If the current speed is less than 2.5 km/h, the “Stopped” sign appears. The pointer disappears if the satellite receiver is off. “Map view” element controls
It is possible to move the map freely. Choose a place on the map and by pressing the screen drag the map to the desired position using your finger or stylus pen. The increasing and decreasing of map's zoom level can be done by pressing the zoom "+" or "‐" buttons. The current map scale is displayed in the middle bottom of the map screen. There are 2 main buttons – the “Find” button on the lower left corner and the “Menu” button on the lower right corner. There is a sound icon next to the compass icon. Clicking this icon will turns on or turn off the voice and sound effects. Figure 3
 If you tab once on the map or on a waypoint, the two buttons outlong the bottom of the screen between the search and menu button appears for selecting: Routing target ‐ (Cursor), or Save Waypoint ‐ (Save WP).
15 By pressing the compass icon in the upper left corner, you can toggle the map's view between 2D and 3D, choose whether the map should rotate automatically in routing mode ("Track Up" – your driving direction is always up, "Route Up" – the determined route direction is always up) or no map rotation ("North Up") and switch the map design template between day/night/automatic display mode. Auto display mode will also change to night mode during day if you pass a tunnel, for example. Figure 4 Â In order to return to the map, press the “Cancel” button. (ref. figure 4). Â 3D view is only available in a zoom level <500m. (ref. figure 5) 16 Figure 5
By switching the screen from day mode to night mode (ref. figure 6) the eyes strain is diminished during the night hours driving. Cycling between modes is done automatically (guided by times of sunrise and sunset for the given region), or it can be done manually through the menu. Mode and type of switching can be made in two ways: you can click the compass icon on the “Map” page or can choose a required mode in the menu, section “Settings” – “Interface” – “Skin”. You may select “Auto” – automatic mode, “Day” – day mode, “Night” – night mode. Information panel
By default the Information panel is minimized and placed at the top right corner of the map. In this case it is used as a dashboard showing the current speed. In case you follow a route (ref. figure 6), this panel appears on the left side showing information about the route: movement gauges shown like a turn sign, current speed, remaining distance, time to destination, time to the nearest via point. The name of the next street (or route point) is displayed at the top of the screen, while at the bottom of the screen the name of the current street is noted (or the name of the current route point). Figure 6
 A menu with route options will open after pressing the arrow‐icon in the left upper corner (“turn‐sign”). 17 How to start a trip
In order to plan an upcoming trip or check a route, the software gives the possibility of route planning. There are two types – by manually created start and destination points or automatically calculated from the current posi‐
tion to one or more destinations by the navigation software. Auto routing
In order to create a route automatically, from the current position to a destination point, browse the map and tap with the stylus pen on the place on the map where your target is located, and in the options buttons select the “Cursor” button. (ref. figure 3 on page 15) To set the selected point as a route target, select the “Go To” Flag on the left side. The route will be calculated and shown in the map as a blue line. 18 Auto routing from search.
Enter “Find” section, find the target for creating a route to, select it and choose “Go to”. Besides this, in case there is already an active route created on the map, there is “Insert” – to add a point between two route points of the existing route and “Add” – a new destination point is added to the end of the route. The former end‐point will become a via‐point automatically. The selected point is displayed in the map, you may select „Go To“ to set this point as your routing target. 19 Manual route creation
This type of route creation is also automatic; the difference is that it is possible to set start and final points. To create a manual route, make sure that the GPS function is disabled! Click on the satellite icon to disable the GPS/Galileo reciver (ref. #3 on page 11) and check, if it is gray. 1. Tap with the stylus pen on the map where the starting point for the trip is located, select “Cursor” and from the menu on the left choose “Start” (green flag). 2. Then tap with the stylus pen on the final point and from the target menu on the left select "Go To”. Figure 7 20 3. If start and end‐points are defined and you tab again to a new location, the “Cursor” menu offers new buttons to “Insert” a via‐point to the route (“yellow flag”), or to “Add” a new end‐point (“+flag with red arrow”). The former endpoint becomes a via‐point. In case the map area supports autorouting, the route will be automatically generated having the fastest way from the starting point to the final one. If the map is not routable, then all the via points will be connected with a straight line. Search
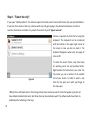
The Software provides an extended search functionality, based on various search criteria. Figure 8
Press the "Find" menu button. The searched object is viewed on the map and can be added to the route. Search criteria are defined using an onscreen keyboard. The button in the center lower screen helps to minimize and maximize the keyboard. Some searches give a number of objects corresponding to the search next to the entered name. When the number of such objects takes all space, the keyboard disappears automatically. Press the required object from the list given. If you made a mistake, press the “Back” arrow. (ref. figure 8). Â Street search function is not available for all areas! Cities without streetnames are grey in the city list. Search by Address
Search for an particular address if you look for a city and a streetname. There are three steps to follow here: 21 Step 1. "Select the city".
If you open “Find by address”, the software opens the street search screen with the last city you searched before. If you look for a street in that city, continue with step 2 by just typing in the desired streetname. In order to search a streetname in another city, select the current city and “type a new one”. Choose a required city from the list using the keyboard. The keyboard can be minimized with the button in the upper right corner of the screen in case you do not need it. The keyboard disappears when only one page of cities is left. Figure 9
To make the search faster, only those keys are working, what are next possible letters. Right beside the field where you enter the City name you see a number of all possible hits of your search. In order to select a city from the list, press on it with your finger ot the stylus pen. Â Only cities with black color in the listing contain street names to search. Cities that appear ‘grey’ do not have detailed residential streets. But those cities can be selected as well. The software will show them im‐
mediately after selecting in the map. 22 Step 2. "Select the street".
Use the onscreen keyboard and enter a part of the street name, until the desired one is displayed. For conven‐
ience, the relevant letters will be highlighted. Note that the program will narrow the selection until it fully matches (the choice of available keys on the key‐
board will conveniently reduce too, reflecting the fact that fewer letters are left available for the typed search criteria). When the search returns results that can fit on one page, the keyboard will disappear, leaving you the possibility to select the desired street from the list. Select the street from the list will continue. (ref. figure 10). Figure 10
Step 3. "Select the housenumber or
building".
Similarly, select the house number. If there is no certain house number, then select N/A and the software will proceed to the next step. 23 Step 4. "Results".
Once the target is selected, it is displayed on the map and you can create a route to it. If autorouting is already active (a route is programmed) while searching, the found target can be added as an additional via‐point or new route end‐point. For this purpose, select the object and choose one of the options: “Insert” ‐ a target will be placed between two route points as a via‐point, or “Add”, a target will be added to the end of the route and a former end point will be a via‐point now. (ref. page 19) Search a Point Of Interest (POI)
A point of interest, or POI, is a specific location that someone may find useful or interesting. An example is a point in a city showing the location of a famous museum or simply a point targeting to a resaurant, a gasoline sta‐
tion or just your office or home. The term is widely used in cartography, especially in electronic variants like GPS navigation software. POI are usually points stored in the units map database. Person‐
ally stored locations are often called Waypoints. A GPS point of interest specifies, at minimum, the latitude and longitude of the POI. A name or description for the POI is usually included, and other information such as altitude 24 or a telephone number may also be attached. GPS applications typically use icons to represent different catego‐
ries of POI on a map graphically. The database in the unit include thousands of POI. To search them, simply browse the menu or type in a part of the desired name. Use the keyboard to search for a particular POI name, to open or hide the keyboad press the “keyboard” icon in the middle of the screen bottom. The results page will show the searched POI name and the distance. Select the POI and afterwards you can display the POI on the map and create a route to it. Press the “All” button if you are not sure in which category the POI is located you are looking for. Also each main category has an “All” button to ease the finding of locations. Either type the name or part of the name or hide the keyboard and browse the list. Select type of POI There are several POI categories and types : “Trade” ‐ Shopping, Restaurants, medical institutions, shopping centers, etc ;“Geographical objects” – populated areas, streets, rivers, bridges, etc.; “Services” – hotels, camp‐
ing and fishing sites, cinemas, etc.; “Transport” – buses, trolleybuses, aviation, ship navigation, etc. 25 Each POI type menu has submenus. In order to search for all objects close to you, do not select any items on the page and press the “Next” arrow to continue. To scroll the list, just move the list with your finger. Select reference point where to search POI You can select the point from which the nearest POI of the selected type will be searched. In order to change the point of view regarding the POI search, press the button with the target symbol (see page 24) at the bottom of the screen in the POI menu. You can select between: “City” – to search for the nearest POI in the defined city, “Address” – to search for the nearest POI at the given address. “History” – select one of the objects in general search history, “Route Start”, “Route End” – these points appear only during route navigation, “Cursor” – the cur‐
rent position on the map serves as a reference point. Object search After the POI type is selected, the page with all the found POI ‐ sorted by the distance to the reference point ‐ opens. The nearest POI will be on the top of the list. To search by name open the onscreen keyboard with the button located at the lower middle of the screen. Enter target’s name letter by letter until you find the POI. Results Once a POI is selected, it is displayed on the map and you can create a route (“Go to”) to it. Also, it is possible to add the POI to a route as via point or new end point, if the routing function is active. 26 Search a City
Search for major cities worldwide by name. Use the onscreen keyboard, start typing the city’s name, until the desired one is shown. For convenience, the relevant letters will be highlighted. Note that the program will narrow the selection until it fully matches (the choice of available buttons on the keyboard will conveniently reduce too, reflecting the fact that fewer letters are left available for the set search criteria). When the search returns results that can fit on one page, the keyboard will disappear, leaving you the possibility to select the desired settlement. You can choose to view it on the map, or to create a route to the target city. You can also always switch off the key‐
borard by clicking here! Depending on the software version the botton can be located in right upper corner. 27 Search "History"
Here all the objects ever searched are listed for using any type of search. This search sorts out the objects by search date and the latest objects are on top. You can select an item from the list and it will be shown on the map to create a route (“Go to”) to the chosen destination or select it as your starting point (“Start”). Â Use the “menu” botton in the middle lower part of the screen to clear the history list. Search “Favorites”
This displays the most frequently used objects (streets, POI, own waypoints etc). Unlike search “History”, the ob‐
jects in this list are sorted out by how often you use them (not by the date of use). 28
Route editing
Press the “turn sign” (ref. no 5, page 11) on the upper left to select operations regarding route functions. The context menu has all basic commands for route editing. “Stop Route Guidance” Delete the route from the map and stop its navigation. “Jam in 1 km“ During active navigation this menu item enables the driver to inform the software that there is traffic jam in 1 km ahead. The software analyzes the situation and searches for the best detour around the traffic jam. This func‐
tion is probably most useful in city traffic. Alternativly you can simply leave the route and take another street. The software will re‐calculate a new route within a few seconds. “Demo route” This menu item is available when GPS is switched off. It simulates driving the route, turns and some general in‐
formation on the route. Route editing can be made using waypoints. During navigation press on any part of the map to create a point. Extra buttons will appear in the lower part of the page. “Show route” This function show an overview of the selected route in the map. 29 Track recording (for map updates or references)
While driving, it is possible to record the actual road passed. This function is called "Track recording" and it can be switched on/off from the settings menu. It is only possible to record tracks while the GPS is active. If track re‐
cording is activated, a small red tape icon appears beside the battery icon on the of the map view. In order to show the track on the map screen the option "Show latest 10,000 track points" should be selected in the program settings. Tracks on the Map page are shown as thin magenta lines. Tracks are automatically saved as GPX or MPS files located in the "Tracks" folder in the unit. Use a USB cable or a SD card reader to copy the track files to a PC. Files can be deleted afterwards, but don’t delete the folder itself, the software can not start without this folder existing! The recorded track does not have any limitation by number of points – it is only limited by the amount of accessible free memory on the SD card. 2 Use 3rd party software like Google EarthTM to view your recorded tracks (GPX files) on a computer. Â Please make sure, if you are removing the SD card, that the navigation software has been properly ended by selecting EXIT from the menu! 2
Read more information about contributing data, copying and deleting tracks on our FAQ pages at www.car‐navi.ph/faq. 30 Waypoints
Waypoints are personal markers to store places with coordinates. They help for better orientation in the field, and to remember interesting places. From the map view it’s easy to create your own waypoints. Created waypoint are named as running numbers in three‐digit format, this can be changed during waypoint creation. In order to create a waypoint anywhere on the map – just tap with the stylus pen on the desired spot on the map and in the context menu at the bottom select "Create WP". (ref. fig. 3 on page 15) As a result a window will pop up for editing waypoint's properties. Here you can set parameters as waypoint's name and description, the waypoint’s icon and change the point’s coordinates, if necessary. The waypoint’s type determines how the waypoint is displayed in the map. Optionally you can select the distance the software will signal before reaching this point. Waypoint icons are sorted in groups (e.g. outdoors, business, transportation, civil etc.) in order to simplify search for a particular waypoint type. To select the way‐
point's type, click on the icon showing the current type and then the program will suggest more types from the last few types selected before. To display more waypoint types, press the blue arrow at the bottom of the screen and choose from the total list of waypoints, grouped by 31 category. Once the selection is made, press the OK button (“green checkbox”) at the bottom to the right to save the waypoint to the unit’s database. To cancel press the (“red x”) to the lower left. A list of all waypoints can be found in menu “Find”, “Waypoints” item. This page allows making general operations with your waypoints. Select the button at the bottom of the screen to have access to the advanced waypoint menu. “delete all” – deletes all wayoints from the unit, “export” – saves current waypoints to a file and “import” – loads waypoints from a file to the units database.3 Points can be also deleted directly in the map. Select a point on the map and press on it with a stylus pen. Then select (“Remove WP”) from the menu at the bottom to delete the point 3
Read more about exporting collected waypoints for contribution to carNAVi online at www.car‐navi.ph/faq 32 Working with the Menu
On the map view there is a button "Menu", which opens the main menu (ref. no 12 in figure 1, page 11). In this section the main menu items and their functions will be considered. Route
This menu item helps to work with the route, its way points and characteristics of route movement, etc. It is convenient to work with this menu item not only during automatic route navigation but also when this option is switched off, for example, for viewing a list of waypoints. After selecting this item the “Route” menu (ref. figure 12) will appear with the following func‐
tions: Figure 11
Stop Route Guidance
This menu item allows to disable the automatic route navigation and is only available if the routing function is active. 33 Go Next Via Point
Press this button to move to another route point if you missed the current point or wish to skip it. Jam in 1km
During active route navigation this menu item indicates that there is a traffic jam ahead in 1 km from the current position. The software analyzes the situation and offers a shorter route. Demo route
This menu item is available when GPS is switched off. It allows you to simulate the route, turns, and voice guidance. This helps you to analyse the route sections and suggest beforehand to adjust the route. Figure 12
Route properties
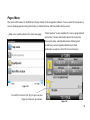
Display a list of all route points and via point with the possibility to filter by intermediate points and turns. The route can be imported or exported here to the SD card for further use by pressing the menu button at the center of the lower screen display. 34 Pages Menu This menu offers access to the different display modes of the navigation software. You can select the map view, a screen showing special routing information, a dashboard view and the satellite status screen. „Map view“ switches back to the main map page.
“Route options” is only available if a route is programmed and actice. It shows information about the route, like turn‐instructions, estimated duration of driving and arrival time, current speed and distance to final destination as well as a list of all turn instructions. Figure 14
To scroll the turn‐list (ref. fig. 14) just use your finger and move it up or down.
Figure 13
35 A click on Dashboard open a configurable dashboard screen, all the visible data fields can be customized and the order can be changed. Click on each field to change it’s contents or reset the values (ref. figure 15 and 16). Figure 16 Figure 15
The dashboard is collecting useful information regarding your traveling. Preconfigured with actual speed, bearing (nautical information about which direction you are traveling right now), Altitude, total odometer, trip odometer, average speed and distance and estimated travel time to your destination. 36 Satellite status
3
N14°43.764’ E121°03.341’ 3D, HDOP 3.0
Figure 17
This screen shows the status of the GPS satellites. You can see, from which particular GPS satellite the device is receiving data in the moment and the signal quality. Details about the number of satellites, your current geographical position and navigation status is displayed. The globe shows the relative positioning of the satellites in the sky from your position. If you would like to know where each satellite is stationed, arrange the navigation unit to north. Satellites to the center of the globe are mostly on top of you, satellite more to the end of the globe are near the horizon and sometimes having recep‐
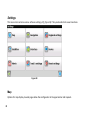
tion problem due to trees, buildings etc. The bargraph shows the status and signal strenght of each satellite. Green is an established connection, yellow means weak signal. The number show the satellite’s number. Click back to return to pervious menue or click on the globe to return to the map view. 37 Settings
This menu item contains various software settings (ref. figure 18). They are divided into several sections.
Figure 18
Map
Options for map display. Several pages allow the configuration of map parameter and mapsets. 38 "Map detail" ‐ if you select "Low" detail, then the quality of the map shown will be less detailed, but it will render faster. If "High" detail is set, then the map will have more details but the display speed is slower. "Map rotation" – choice for map orientation. Options: "North Up", "Track Up", "Route Up". Noth up means no rotation, route up show always the targeted route up and track up shows the direction up you are really driving. (recommended setting is “Track up”). “Manage maps” ‐ Opening of single maps or mapsets. This menu can be used to switch between mapsets. NOTE: If upgraded map data or additional maps from the carNAVi website are installed, no change has to be done here. Please refer to map update and installation instructions on page 44. "Visual effects" – To improve the image quality on the screen. If you enable this options, the Figure 19
map display is better but the speed can be slower. (recommended is to enable “Highlight objects”, “Object boarder rendering” and “Show 3D models and roads”) “POI Filter” – Allows to select and configure which type of Points of Interest will be displayed in the map and at which zoom level. Also can be selected if a POI name will be displayed. If name is off, only the icon is visible. 39 Navigation
Options for navigating a route. Select the “vehicle type” according to your preference. The Settings under “Route” configure the routing style, “use routing” means to follow streets, use “direct routes“ is good for off‐road usage, then the routing show direct connections not following any streets from the map. Select the number “2” icon at the bottom of the screen to switch to the seconds route page, here you can configure to use or avoid U‐Turns, Toll roads and unpaved roads. Â Please do not avoid U‐Turn especially in the Philippines, this will make driving very difficult! The option “off route recalculation” should be on “automatic”, the other option switches off route recalculation. Otherwise the navi will not recalculate the programed route if you went off the predefined driving route. 40 “Zoom” configures the automatic zoom functions of the software. You can enable or disable the automisc zoom, select a smooth zoom (make map display slower) and can select the minimum and maximum zoom levels for autozoom. (Min: 30m and Max 2km are optimal settings for the slow moving traffic in Asian cities). The setting "Guidance prompt" let you select how ‘early’ you want to be informed about a turn. Put it from the middle one more to the left, to get turn info 20m earlier. You can disable the “lock‐on‐road” function, for example if you go offroad to a terrain was is not mapped and select the bahaviour when you are not following the calculated route (“off‐ route”). 4 “Reset position” configures the time till the navigation system will jump back to your actual position, if you have moved the map during navigation. Regional Settings
Select your prefered display language, the systems voice pack for direction information, the international key‐
board format and the national unit format here. Additional voices are available on the carNAVi homepage at http://www.car‐navi.ph in the support section. 4
We have some more detailed article on our FAQ pages online at www.car‐navi.ph/faq about off road usage. 41 Satellites
This menu show the configuration to the satellite chipset system and can not be configured. Interface
This menu configures the “Skin” (default skin should be carNAVi.ns2), under “Interface” you can choose which elements you would like to hide or display on the map view. “Hide Elements” configures the time when menu buttons and context menu should hide automatically from the map screen. Device
Here you can configure the sound volume (the setting should be not higher than 75%), better change the volume of the unit in the main menu of the carNAVi device. Also power related settings according to block the unit from switching off and going into standby and clock re‐
lated settings can be changed here. Alerts
The navigation software can alert the driver for speed limits and speed cameras. This option and the warning fea‐
tures can be configured here. 42 Tracks
Enable and Disable the Track‐Log function. Configures the data format of recorded tracks, the default folder of recorded tracks (should be //ResidentFlash/Tracks) and "Show latest 10,000 track points" – is a navigation option, which displays the last 10,000 track points on the map. (See more in the “Tracks” sections of this manual).5 Reset Settings
Restore factory settings. If you have forgotten a setting or the unit is no longer configured properly, use this func‐
tion or better run the “Restore ProTV Default Settings.exe” file located in the root folder of the unit’s flash mem‐
ory from a Windows PC. This program will set your device back to the optimal settings. Information
This menu item shows information about the software, as well as information about the currently loaded maps. To find out your current map version, display the area or country to be checked, select a zoom level <1.2km, press the ‘Menu button’, then ‘Information’ and ‘About Map’. 5
Visit our FAQ pages to learn more about how to contribute tracks and delete tracks from the device at faq.car‐navi.ph 43 Update your map
Visit the carNAVi website at http://www.car‐navi.ph/support for getting map updates. 1. For updating your mapsets please download the requested map from the download section of the carNAVi website and save the installer on your local harddisk, for example on your Desktop. 2. Connect your navigation unit via USB cable to a Windows PC. (after plug‐in the USB cable please select the ‘computer connection‘ icon on the units touch screen) 3. Open ‘My Computer’ and locate the drive letter of your units flash memory, you can see a removable media with the name “CARNAVI”. Please remember the drive letter, for example F: 4. Run the update program, read the instructions and click ‘next’. Enter or select the correct drive letter and path of your navigation unit, for example H:\Map. This path changes depending of your computers hardware setup. The update process takes several minutes, please be patient and make sure that especially a portable PC is connected to the main power, the update process should not be interrupted. Map updates are only designed for the stated version. To find out your map version, display the map area to be checked, select a zoom level <1.2km, press the ‘Menu button’, then ‘Information’ and ‘About Map’. 44 Getting additional maps
carNAVi offers optional maps for other countries in the carNAVi Store at http://store.car‐navi.ph To download such maps, simply add them to your shopping cart. You can add as much maps to your cart, as you need and purchase / download them together after you checkout from the store. Backup your carNAVi
carNAVi Backup is a tool that allows users to backup or restore system settings, waypoints, history information, recorded tracks and saved routes. This windows tool allows to create backups of the settings or the complete navigation system and archive them on your PC. A comfortable restore function is also included as well as restor‐
able default settings. How can I get it? Download the installer from the software download section at http://www.car‐navi.ph/support Troubleshooting
Visit http://faq.car‐navi.ph for troubleshooting tips and more. 45 Support
If you need support to your carNAVi device, please visit our support website at www.car‐navi.ph/support Warranty
carNAVi offers One (1) Year Limited Warranty carNAVi’s warranty obligations for carNAVi hardware products except (rechargable) batteries are limited to the terms set below: carNAVi Corporation (“carNAVi”) warrants the carNAVi‐branded hardware products against de‐
fects in materials and workmanship under normal use for a period of ONE (1) YEAR from the date of retail pur‐
chase by the original end‐user (“Warranty Period”). Read more in our warranty statement at http://www.car‐navi.ph/legal/warranty/ Additional Legal Rights for Consumers For consumers, who are covered by consumer protection laws or regulations in their country of purchase or, if different, their country of residence, the benefits conferred by carNAVi’s warranties are in addition to all rights and remedies conveyed by such consumer protection laws and regulations. 46 Copyright Notice: No part of this manual may be reproduced, transcribed, transmitted, or translated in any language, in any form or by any means, without written consent of carNAVi. Product and corporate names appearing in this manual may or may not be registered trademarks or copyrights of their respective companies, and are used only for identification or explanation and to the owners’ benefit, without intent to infringe. Disclaimer: Specifications and information contained in this manual are furnished for informational use only and subject to change without notice, and should not be constructed as a commitment by carNAVi. carNAVi assumes no responsibility for any errors or omissions that may appear in this manual. carNAVi does not provide warranty of any kind, either expressed or implied. In no event shall carNAVi be liable for any indirect, special, incidental, or consequential damages, even if carNAVi has been advised of the possibility of such damages arising from any defect or error in the manual or product. This device complies with Part 15 of the FCC Rules. Operation is subject to the following two conditions: (1) this device may not cause harmful interference, and (2) this device must accept any interference received, including interference that may cause undesired operation. CALIFORNIA, USA ONLY The rechargable Lithium Polymer battery adopted on this product contains Perchlorate, a toxic substance controlled in Perchlorate Best Management Prac‐
tices (BMP) regulations passed by the California Legislature. When you discard the Lithium battery in California, USA, please follow the related regulations in advance. “Perchlorate Material‐special handling may apply, see www.dtsc.ca.gov/hazardouswaste/perchlorate” European Battery Directive 2006/66/EC Your carNAVi product is designed and manufactured with high quality materials and components which can be recycled and/or reused. This means that rechargable batteries, at their end‐of‐life, should be disposed of separately from your household waste. In the European Union there are separate collection systems for used batteries and accumulators. Please dispose of batteries and accumulators correctly at your local community waste collection or recycling centre. Please help us to conserve the environment we live in. Printed in P.R.C. Version EN 3.1 for carNAVi PRO 500/TV Series
100% Acid free and elemental Chlorine free paper www.carnavi.ph