1
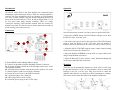
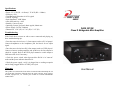
Specifications
• Power: 2 X 15 W (RL = 4 Ohms), 1 X 30 W (RL = 8 Ohms)
• Efficiency: 92%
• Total Harmonic Distortion: 0.015% typical
• Class D Topology
• Input Impedance: 100K Ohms
• Auto-On Sensitivity: <0.8V
• Stand-by Current: 0.6mA
• Operating Current, No-Load: 40mA typical, 80mA max
• Power Supply: 24 VDC, 2000mA
• Dimensions: 1-5/8" (H) x 4-7/16" (W) x 5-1/2" (D)
DA30 2X15W
Class D Bridgeable Mini Amplifier
Troubleshooting
If the DA30 does not turn on with a source connected and playing try
these troubleshooting tips:
• Does the source device have a 3.5mm output (such as a PC or laptop)?
Connect headphones to the headphone jack and check for an output
signal.
• Does the source device have RCA line output (such as a DVD player)?
Connect a known working amplifier and speakers to the line outputs to
check for a signal. Refer to the DVD player manual to switch output to
L&R stereo line level if necessary.
• Check the power switch, when depressed the DA30 is in "auto-on"
mode and the power indicator should be lit.
• Check the power supply; verify it is plugged into a working receptacle
and is firmly plugged into the 24 VDC power jack.
Warranty
User Manual
This product is warranted free from defects in material and workmanship for one
year from date of purchase. Warranty does not apply to misuse, abuse, neglect,
accident, improper use, etc. Contact your reseller for a Return Merchandise
Authorization.
4
Operation
Introduction
The Dayton Audio DA30 is the ideal amplifier for commercial audio
installations; such as classrooms, where a small, low wattage amplifier is
required. This Class D amplifier can sit on a desktop, or can be mounted
on a wall or under cabinets using the included mounting brackets. In
stereo mode the DA30 delivers 2 X 15 W and in bridged mode 1 X 30
W. Two stereo audio inputs increase versatility; 2-RCA or a single
3.5mm jack. Separate Treble and Bass controls allow the sound to be
tailored to the room. The DA30's Auto-on feature means the unit will not
sit idle wasting power when not in use.
Connection
Once all connections are made it is time to power on and use the DA30.
1
3b
4
• Depress the POWER button; the LED indicator will glow red to show
the DA30 is in the "Auto-On" state.
2a
3a
2b
• Turn on the source device and set the output level. The LED will glow
green to show the DA30 is in the "On" state. After 10 minutes of
inactivity the DA30 will return to the "Auto-On" state to conserve power.
• Adjust the DA30's VOLUME using the rotary volume control; turning
clock-wise till increase the volume level.
3
2
• Adjust the BASS and TREBLE to set the audio to a more realistic tone
using a small flat-blade screwdriver.
• Adjust the BALANCE so the sound is evenly distributed through the
room using a small flat-blade screwdriver.
1. Set the MODE switch to Bridge Mono or Stereo
2. Connect your Speakers using the detachable "Phoenix" connector
2a. for stereo operation connect the Left and Right speaker wires to the
corresponding terminals
2b. for bridge-mono operation connect the positive speaker wire to the
L+ and the negative speaker wire to the R+ terminals
3. Connect the source device to the INPUT terminals
3a. 3.5mm male plug to the 3.5mm jack
3b. 2-RCA plugs to the two RCA jacks
4. Connect the power supply to the 12 VDC input
2
Mounting
The DA30 can be permanently mounted to a desk, shelf, or wall using
the provided brackets. Use the 1/4" long machine screws to connect the
brackets to the case. Use the 9/16" long wood screws to attach the
amplifier and brackets to a wood desk or shelf. If mounting to a desktop,
first remove the feet from the bottom of the amplifier and discard.
3