1
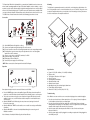
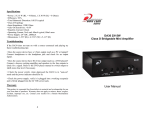
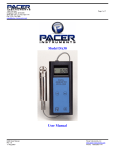
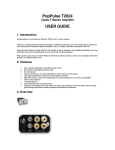
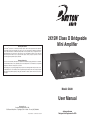
2X15W Class D Bridgeable
Mini Amplifier
Warranty Information
Dayton Audio® products are constructed by industry experts, and are thoroughly tested before shipment.
Dayton Audio products are warranted for the period of one year. This warranty is limited to manufacturer
defects, either in materials or workmanship. Dayton Audio is not responsible for any consequential on inconsequential damage to any other unit or component or the cost for installation or extraction of any component
of the audio system. In the rare case of a product failure, please contact your place of purchase or call our
Customer Support Department at (937) 743-8248.
Warranty Limitations
There are no other warranties, either express or implied, which extend the foregoing, and there are no warranties
of merchantability or fitness for any particular purpose. The warranty will not cover incidental or consequential
damage due to defective or improper use of products.
This warranty gives you specific legal rights and you may also have other rights which vary from state to state.
Non-Warranty Service: If non-warranty service is required, the product may be sent to the Company for repair/
replacement, transportation prepaid, by calling (937) 743-8248 for details, complete instructions, and service
fee charges.
Model: DA30
User Manual
daytonaudio.com
Designed and Engineered in USA
705 Pleasant Valley Drive • Springboro, OH • 45066 • Phone: (937) 743-8248
© Dayton Audio®
Last Revised: 11/21/2012
daytonaudio.com
Designed and Engineered in USA
The Dayton Audio DA30 is the ideal amplifier for commercial audio installations; such as classrooms,
where a small, low wattage amplifier is required. This Class D amplifier can sit on a desktop, or can be
mounted on a wall or under cabinets using the included mounting brackets. In stereo mode the DA30
delivers 2 X 15 W and in bridged mode 1 X 30 W. Two stereo audio inputs increase versatility; 2-RCA
or a single 3.5mm jack. Separate Treble and Bass controls allow the sound to be tailored to the room.
The DA30’s Auto-on feature means the unit will not sit idle wasting power when not in use.
Mounting
The DA30 can be permanently mounted to a desk, shelf, or wall using the provided brackets. Use
the 1/4" long machine screws to connect the brackets to the case. Use the 9/16" long wood screws
to attach the amplifier and brackets to a wood desk or shelf. If mounting to a desktop, first remove
the feet from the bottom of the amplifier and discard.
Connection
OF
PO
WER
F-AU
TO
ON BASS
DA
TR
EB
BA
30
L.
VO
LU
OF
PO
WER
F-AU
TO
ME
ON BASS
TR
DA
EB
BA
30
L.
VO
(1) Set the MODE switch to Bridge Mono or Stereo
(2) Connect your Speakers using the detachable “Phoenix” connector
(2a) For stereo operation connect the Left and Right speaker wires to the corresponding terminals
(2b) For bridge-mono operation connect the positive speaker wire to the L+ and the negative speaker wire to the R+ terminals
(3) Connect a source device to the INPUT terminals; 3.5 or RCA*
(3a) 3.5mm male plug to the 3.5mm jack
(3b) 2-RCA plugs to the two RCA jacks
(4) Connect the power supply to the 12 VDC input
LU
ME
ME
LU
VO
BA
EB
TR
BA
L.
30
DA
SS
*NOTE: When connected, the 3.5mm input will override the RCA inputs.
Operation
Specifications
DA30
●
Power: 2 X 15 W (RL = 4 Ohms), 1 X 30 W (RL = 8 Ohms)
Efficiency: 92%
● Total Harmonic Distortion: 0.015% typical
● Class D Topology
● Input Impedance: 100K Ohms
● Auto-On Sensitivity: <0.8V
● Stand-by Current: 0.6mA
● Operating Current, No-Load: 40mA typical, 80mA max
● Power Supply: 24 VDC, 2000mA
● Dimensions: 1-5/8" (H) x 4-7/16" (W) x 5-1/2" (D)
●
POWER
OFF - AUTO ON
BASS
TREB
BAL.
VOLUME
Once input and output connections are made it is time to use the DA30.
●
Press the POWER button to turn on the amplifier. A green LED indicator shows the amplifier is ready to use, a red LED indicator shows the amplifier is in the “Auto-On” state to conserve power.
● Turn on the source device and set the source output level. A green LED indicator shows the
amplifier is ready to use, a red LED indicator shows the amplifier is in the “Auto-On” state to conserve power.
● Adjust the VOLUME on the DA30 using the rotary volume control; turning clock-wise will
increase the volume level.
● Adjust the BASS and TREBLE to set the audio to a more realistic tone using a small flat-blade
screwdriver.
● Adjust the BALANCE so the sound is evenly distributed through the room using a small
flat-blade screwdriver.
After 10 minutes of inactivity the DA30 will go into the “Auto-On” state.
Troubleshooting
If the DA30 does not turn on with a source connected and playing try these troubleshooting tips:
●
Does the source device have a 3.5mm output (such as a PC or laptop)? Connect headphones to the headphone jack and check for an output signal.
● Does the source device have RCA line output (such as a DVD player)? Connect a known
working amplifier and speakers to the line outputs to check for a signal. Refer to the DVD player manual to switch output to L&R stereo line level if necessary.
● Check the power switch, when depressed the DA30 is in “auto-on” mode and the power
indicator should be lit.
● Check the power supply; verify it is plugged into a working receptacle and is firmly plugged into the 24 VDC power jack.