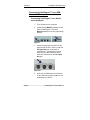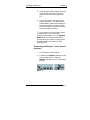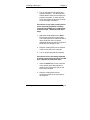
1
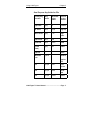
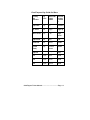
http://datadesktech.com
Users Guide
LittleFingers™ Users Manual
© 1999 Datadesk Technologies Inc.
All rights reserved worldwide.
Printed in the United States of America.
What Our Lawyers Made Us Say
Intent to Enforce
Datadesk Technologies Corporation intends
to aggressively enforce all patents,
trademarks, and copyrights, relating to the
Little Fingers™ keyboard to the fullest extent
allowed by law.
FCC Statement
This equipment generates and uses radio
frequency and if not installed and used
properly, that is in strict accordance with the
manufacturer’s instructions, may cause
interference to radio and television
reception. It has been type tested and found
to comply with the limits for Class B
computing devices in accordance with the
specifications in subpart B of part 15 of FCC
Rules, which are designed to provide
reasonable protection against such
interference in a residential installation. If
this equipment does cause interference to
radio or television reception, which can be
determined by turning the equipment off and
on, the user is encouraged to try to correct
the interference by one or more of the
following measures:
•
•
Reorient the receiving antenna
Relocate the computer with respect to
the receiver
• Move the computer away from the
receiver
_____________________________________________
LittleFingers™ Users Manual
Page i
Legal Notices
•
Plug the computer into a different outlet
so that the computer and receiver are on
different branch circuits.
If necessary, the user should consult the
dealer or an experienced radio/television
technician for additional suggestions. The
user may find the following booklet prepared
by the Federal Communications
Commission helpful: “How to Identify and
Resolve Radio-TV Interference Problems.”
This booklet, #004-000-00345-4, is available
from: U.S. Government Printing Office,
Washington, D.C., 20402
To meet FCC requirements, shielded cables
and power cords are required to connect the
device to a personal computer or other
Class B certified device.
Copyrights
This manual may not, in whole or in part, be
photocopied, reproduced, transcribed,
translated, or transmitted in whatsoever form
without the written consent of Datadesk
Technologies Corporation, except for copies
retained by the purchaser for personal
archival purpose.
Trademarks
LittleFingers™ is a trademark of Datadesk
Corporation. All other trademarks mentioned
in this manual are the registered property of
their respective owners.
_____________________________________________
Page ii
Little Fingers™ Users Manual
Legal Notices
Disclaimer
The information provided herein is provided
"as is" without warranty of any kind.
Datadesk Technologies Corporation
disclaims all warranties, either express or
implied, including the warranties of
merchantability and fitness for a particular
purpose. In no event shall Datadesk
Technologies Corporation or its suppliers be
liable for any damages whatsoever including
direct, indirect, incidental, consequential,
loss of business profits or special damages,
even if Datadesk Technologies Corporation
or its suppliers have been advised of the
possibility of such damages. Some states do
not allow the exclusion or limitation of liability
for consequential or incidental damages so
the foregoing limitation may not apply.
Information contained in this document is
subject to change without notice.
Companies, names, and data used in
examples herein are fictitious unless
otherwise noted.
_____________________________________________
LittleFingers™ Users Manual
Page iii
Table of Contents
ABOUT LITTLEFINGERS™ ................................................. 1
LITTLEFINGERS™ IS FOR SMALL HANDS ............................... 1
LITTLEFINGERS™ IS A COMPLETE KEYBOARD AND TRACKBALL
SOLUTION ............................................................................ 2
YOU CAN USE TWO KEYBOARDS AT ONCE ............................ 3
LITTLEFINGERS™ COMES READY TO INSTALL ....................... 4
INSTALLING LITTLEFINGERS™ ........................................ 5
PREVENTING DAMAGE TO EQUIPMENT .................................. 5
CONNECTING LITTLEFINGERS™ TO AN IBM-COMPATIBLE
COMPUTER .......................................................................... 6
CONNECTING LITTLEFINGERS™ TO A MACINTOSH COMPUTER
......................................................................................... 10
USING LITTLEFINGERS™ ................................................ 11
USING DUAL-PURPOSE KEYS ............................................. 11
USING THE TRACKBALL ...................................................... 15
USING LITTLEFINGERS™ COMFORTABLY ............................ 17
MAINTAINING LITTLEFINGERS™.................................... 18
CLEANING LITTLEFINGERS™ .............................................. 18
IF LITTLEFINGERS™ IS NOT W ORKING ............................... 21
INDEX______________________...................................... 23
_____________________________________________
LittleFingers™ Users Manual
Page v
About LittleFingers™
LittleFingers™ is for Small Hands
The LittleFingers™ design allows users with
small hands to touch type comfortably.
LittleFingers™ is for Children
Because small children cannot easily reach
all of the keys on regular keyboards, they
normally cannot learn to touch type.
LittleFingers™ allows children to touch-type
at a much younger age than previously
possible. Children who learn to use a
keyboard by touch-typing avoid developing
the troublesome hunt and peck habit.
Touch-typing can be of special benefit to
children whose handwriting skills lag behind
their verbal abilities.
Small children may begin to use
LittleFingers™ once they are mature enough
to use a keyboard responsibly or under
supervision.
LittleFingers™ is for Adults with Small
Hands
Adults with small hands quickly adjust to
LittleFingers™ comfortable size and design,
especially if they have previously used a
trackball.
Using LittleFingers™ may help prevent
some common keyboard related injuries.
_____________________________________________
LittleFingers™ Users Manual
Page 1
Chapter 1
About LittleFingers(tm)
LittleFingers™ is a Complete Keyboard
and Trackball Solution
LittleFingers™ is Fully Functional
LittleFingers™ provides full functionality. It
provides the same functionality as a regular
keyboard.
LittleFingers™ Doesn’t Require a
Separate Mouse
LittleFingers™ has an easy-to-use trackball
built into the keyboard. The trackball
provides the same tracking functions as a
mouse does. By using the trackball instead
of a mouse, users can type, point, and click
without moving their hands from the
keyboard.
LittleFingers™ is for PCs and Macs
LittleFingers™ can be used with IBMcompatible and Macintosh computers.
LittleFingers™ is Not a Toy
LittleFingers™ is a high-quality, durable
keyboard that will endure regular long-term
use. Please remember, however, that
LittleFingers™ is not a toy and must be
cared for as a regular keyboard. For more
information about caring for your
LittleFingers™ keyboard, see Chapter 4,
Maintaining LittleFingers™.
_____________________________________________
Page 2
LittleFingers™ Users Manual
About LittleFingers(tm)
Chapter 1
You Can Use Two Keyboards at Once
Two users can control the computer from
separate keyboards.
Two Keyboards Can Be Connected at
Once
LittleFingers™ can be connected to your
computer and in use at the same time as
another keyboard is connected and in use.
You do not have to turn off the computer or
disconnect one keyboard in order to use the
other keyboard.
Two Users Can Work Together
Two users may use the same computer by
taking turns controlling the computer. One
user controls the computer with
LittleFingers™ and its built-in trackball; then,
the other user controls the computer with
another LittleFingers™ keyboard or any
other keyboard and pointing device.
This dual-control feature can be helpful
when one user is instructing another user or
when two users are working or playing
together.
Please note that the computer receives input
from both keyboards and both pointing
devices as though only one keyboard and
pointing device were installed. While there
are two users providing input, the computer
cannot distinguish between one user and the
other. Therefore, this feature will not allow
two users to run two programs
_____________________________________________
LittleFingers™ Users Manual
Page 3
Chapter 1
About LittleFingers(tm)
simultaneously as though they were using
separate computers.
LittleFingers™ Comes Ready to Install
You do not need to buy separate cables or
pointing devices to use LittleFingers™.
Regular Packages Contain All Parts
Your LittleFingers™ package contains the
following parts:
•
•
•
•
LittleFingers™ keyboard
Macintosh (ADB) cable for use with all
Macintosh computers except Macintosh
Plus or iMac computers. (Mac version)
*Contact Datadesk about compatibility
with iMac computers.
Y-type cable and serial adapter for use
with IBM PC’s and compatible
computers (PC version)
This manual
For missing parts, contact the company who
sold you LittleFingers™.
Quantity Education Packages Contain
Parts as Ordered
LittleFingers™ packages purchased under
the Quantity Education Purchase program
usually contain fewer parts than regular
packages contain. Only the parts
specifically ordered are included. Please
reference your purchase order for details
_____________________________________________
Page 4
LittleFingers™ Users Manual
Installing LittleFingers™
Preventing Damage to Equipment
Read and follow these simple precautions
when installing LittleFingers™.
Turn off power BEFORE connecting or
disconnecting a keyboard.
Connecting or disconnecting a keyboard
while the power is on to your system may
damage your computer.
Slide each keyboard connector straight
into the receptacle. Do NOT twist.
Twisting keyboard connectors will break the
receptacle pins.
Never force a connector into a
receptacle.
Use a gentle push to insert a keyboard
connector. If a gentle push doesn’t work,
remove the connector. Make sure that you
are using the correct cable, the correct
connector, and the correct position. Then try
again.
----------------------------------------------------------------------------------------LittleFingers™ Users Manual
Page 5
Chapter 2
Installing LittleFingers(tm)
Connecting LittleFingers™ to an IBMCompatible Computer
Connecting LittleFingers™ as a Standalone Keyboard
1. Turn off power to the computer.
2. Locate the two MAC/PC switches on the
back of LittleFingers™. Set both
MAC/PC switches to the PC (right-hand)
position.
Figure 1
3. Locate the gray 8-pin connector on the
single end of the PC Y-cable. Locate the
PC kybrd Out port on the back of
LittleFingers™. Placing the flat end of
the gray 8-pin cable connector down,
insert the connector into the PC kybrd
Out port.
Figure 2.1
4. Insert the red PS/2 keyboard connector
on the double-end of the y-cable into the
keyboard port of the PC.
_____________________________________________
Page 6
LittleFingers™ Users Manual
Installing LittleFingers
Chapter 2
5. Insert the black PS/2 trackball connector
on the double end of the keyboard Ycable into the PS/2 mouse port of the
PC.
6. Turn on the power to the system and
start the computer. Test the keyboard
and trackball to make sure that they are
properly connected. If either does not
work, repeat these instructions carefully
to ensure proper connection.
7. If your system is running early versions
of Windows 95, it may not instantly
recognize the trackball. If so, run Add New
Hardware in your System Control Panel.
This will allow your system to recognize the
trackball as either a new serial or PS/2
pointing device.
Connecting LittleFingers™ and a Second
Keyboard
1. Turn off power to the computer.
2. Locate the two MAC/PC switches on the
back of LittleFingers™. Set both
MAC/PC switches to the PC (right-hand)
position.
Figure 1
_____________________________________________
LittleFingers™ Users Manual
Page 7
Chapter 2
Installing LittleFingers(tm)
3. Locate the gray 8-pin connector on the
single end of the PC Y-cable. Locate the
PC kybrd Out port on the back of
LittleFingers™. Placing the flat end of
the gray 8-pin cable connector down,
insert the connector into the PC kybrd
Out port.
Figure 2.1
4. Insert the red PS/2 keyboard connector
on the double-end of the y-cable into the
keyboard port of the PC.
5. Insert the black PS/2 trackball connector
on the double end of the keyboard Ycable into the PS/2 mouse port of the
PC.
6. Locate the PC kybrd In port on the back
of LittleFingers™. Plug the keyboard
cable from the second keyboard into this
port. (Adapter may be required with AT
style connectors)
Figure 2.2
_____________________________________________
Page 8
LittleFingers™ Users Manual
Installing LittleFingers
Chapter 2
7. Turn on the power to the system and
start the computer. Test the keyboard
and trackball to make sure that they are
properly connected. If either does not
work, repeat these instructions carefully
to ensure proper connection.
If the mouse or any other pointing device
for the secondary keyboard is already
connected to the PS/2 port, complete the
next three steps. Otherwise, skip these
steps.
1. Attach the serial adapter to the black
PS/2 mouse connector on the doubleend of the keyboard Y-cable and insert it
into a serial port on the computer.
(Additional serial card may be required if
serial ports are already in use)
2. Keep the existing PS/2 mouse inserted
in the mouse port on the computer.
3. Turn on power and start the computer.
If the mouse for the secondary keyboard
is already connected to the serial or COM
port, complete the next three steps.
1. Insert the black PS/2 mouse connector
at the double end of the keyboard Ycable into the PS/2 mouse port on the
back of the computer.
2. Keep the existing serial mouse
connector inserted in the serial port of
the computer.
_____________________________________________
LittleFingers™ Users Manual
Page 9
Chapter 2
Installing LittleFingers(tm)
3. Turn on power and start the computer. If
properly installed, both keyboards and
tracking devices will be active. If they
are not, check your installation.
Connecting LittleFingers™ to a
Macintosh Computer
To connect LittleFingers™ to a Mac, follow
these steps:
1. Turn off power to the system.
2. Locate the two MAC/PC switches on the
back of LittleFingers™. Set both
switches in the MAC (left-hand) position.
Figure 1
3. Locate the two ADB ports on the back of
LittleFingers™. Making sure that the flat
side of the cable connector is facing
down, insert either end of the Macintosh
cable into either one of the ADB ports.
4. Insert the other end of the Macintosh
cable into the ADB port of the Macintosh
computer.
5. Turn on the power to the system and
start the computer. Test the keyboard
and trackball to make sure that they are
properly connected. If either does not
work, repeat these instructions carefully
to ensure proper connection.
_____________________________________________
Page 10
LittleFingers™ Users Manual
Using LittleFingers™
Using Dual-Purpose Keys
LittleFingers™ provides full keyboard
functionality without requiring users to move
their hands.
Access the primary keys by simply pressing
the key you need. For example, to move the
cursor to the left, press the left arrow.
Access the secondary keys by pressing and
releasing the Right Shift key and then
pressing the dual purpose key whose
secondary function you need. For example,
to access the HOME key, press the Right
Shift key and then press the left arrow key.
Figure 3
Pressing the right shift key sets the keyboard
in dual-purpose mode and activates
secondary key functions. Pressing any key
that is not a dual-purpose key sets the
keyboard back to primary mode and
deactivates secondary key functions.
_____________________________________________
LittleFingers™ User Manual
Page 11
Chapter 3
Using LittleFingers
The following charts list the secondary
purpose of each dual-purpose key, the key
color, the secondary label if there is one, and
the secondary purpose of the key.
The first chart applies to LittleFingers™ in
use with an IBM-compatible computer.
The second chart applies to LittleFingers™
in use with a Macintosh computer.
Please note that some LittleFingers™ keys
are arranged differently than on a regular
keyboard to make the keys easier to reach.
_____________________________________________
Page 12
LittleFingers™ Users Manual
Using LittleFingers
Chapter 3
Dual Purpose Key Guide for PCs
Primary Key
Function
Key
Color
Secondar
y Key
Label
Secondary Key
Functio
n
right shift
gray
fn
function
up arrow
blue
Pgup
page up
down arrow
gray
Pg
page
down
right arrow
blue
end
end
left arrow
blue
home
home
\ (back
slash)
gray
del
delete
right alt
green
ins
insert
Windows
icon
yellow
F13
purple
print
print
screen
F14
purple
scroll
scroll
lock
F15
purple
pause
pause
dn
Window
s
application
_____________________________________________
LittleFingers™ Users Manual
Page 13
Dual Purpose Key Guide for Macs
Primary
Key
Function
Key
Color
Secondar
y Key
Label
Secondary Key
Functio
n
right shift
gray
fn
function
up arrow
blue
Pgup
page up
down arrow
gray
pg
page
down
right arrow
blue
end
end
left arrow
blue
home
home
\ (back
slash)
gray
reverse
delete
delete
right alt
green
help
help
F13
purple
print
none
F14
purple
scroll
none
F15
purple
pause
none
dn
_____________________________________________
LittleFingers™ User Manual
Page 14
Using the Trackball
LittleFingers™ comes with a built-in 3-button
trackball. The trackball provides the same
purpose as a mouse or separate trackball. It
allows you to point and click without moving
your hands from the keyboard.
Pointing
To point with the trackball, use your finger
tips to lightly roll the ball so that the arrow
points to where you want it on the screen.
Clicking
To click, press the wide lower trackball
button. (Figure 4.1)
Double Clicking with a Macintosh
To double click when using a Macintosh
computer, press the upper right trackball
button once. This function works the same
as clicking the left mouse button twice
quickly to open files or to launch an
application. (Figure 4.2)
Figure 4.1
Figure 4.2
_____________________________________________
LittleFingers™ User Manual
Page 15
Chapter 3
Using LittleFingers
Accessing Contextual Menus with a PC
To access contextual menus when using an
IBM-compatible computer, press the upper
right trackball button. (Figure 4.3)
Dragging and Dropping
In drag mode, you can drag objects without
holding down any buttons.
To drag an object, click on the object by
pressing the upper left button to activate
drag mode, roll the track ball to drag the
object, and click again to drop the object.
To turn drag mode on and off, press the
upper left trackball button. (Figure 4.4)
Figure 4.3
Figure 4.4
_____________________________________________
Page 16
LittleFingers™ Users Manual
Using LittleFingers
Chapter 3
Using LittleFingers™ Comfortably
To avoid discomfort using any keyboard,
follow these tips:
•
•
Position the keyboard low so that your
shoulders are relaxed, your elbows rest
naturally near your waist at a 90º angle,
and your wrists are not bent.
Take frequent breaks to stretch and rest.
_____________________________________________
LittleFingers™ Users Manual
Page 17
Maintaining LittleFingers™
Cleaning LittleFingers™
Before cleaning any part of LittleFingers™,
turn off power to the system and disconnect
LittleFingers™.
Cleaning the Keys
Clean the keys and trackball buttons by
dusting with a dry cloth or occasionally
cleaning the keys with a cloth lightly wetted
with rubbing alcohol.
Cleaning the Trackball
The LittleFingers™ trackball was designed
to be self-cleaning but may need very
occasional manual cleaning if small particles
or liquid spills get into the trackball.
Do not clean the trackball unless you see the
pointer motion on the screen is erratic.
To clean the trackball:
1. Remove the locking ring that surrounds
the trackball by sliding a thin flat object
(your fingernail will usually work) under
the ring and carefully pry it off.
Figure 5
_____________________________________________
LittleFingers™ User Manual
Page 18
Maintaining LittleFingers
Chapter 4
2. Remove the locking ring.
3. Tip LittleFingers™ until the trackball falls
out into your hand.
4. Clean the roller axles with sponge-tipped
swabs soaked in rubbing alcohol.
Cotton-tipped swabs may leave fibers on
the rollers.
Figure 6
5. Using a straight pin, carefully remove
any lint or hair wrapped around the roller
axles. Make sure the roller axles are
properly seated on the plastic bridges in
the trackball housing before inserting the
trackball. If the axles are not properly
seated, you can damage the trackball
unit when the ball is replaced.
6. If the trackball is clean but providing only
erratic pointer motion due to being worn
smooth, gently abrade the ball surface
with 220 grit sandpaper. Carefully
remove ALL sandpaper and roller ball
debris!
7. Replace trackball, line up slots in
underside of locking ring with slots on
trackball housing and gently snap down
into place.
_____________________________________________
LittleFingers™ Users Manual
Page 19
Chapter 4
Maintaining LittleFingers
Temporarily Improving Trackball
Performance Between Cleanings
If the trackball function is slightly less than
optimal in the middle of a project, you may
temporarily improve its function without
removing the trackball. However, you
should properly clean the trackball at your
earliest convenience.
To temporarily improve trackball function
between cleanings, clean the trackball from
the outside with camera lens paper or
sponge-tipped swabs lightly wetted with
rubbing alcohol.
_____________________________________________
Page 20
LittleFingers™ Users Manual
Maintaining LittleFingers
Chapter 4
If LittleFingers™ is Not Working
Before requesting service, make sure that
LittleFingers™ is properly installed.
Check Power
Check to see that the red power indicator
light is lit on LittleFingers™. If the power
indicator light is not lit, make sure the
keyboard cable is securely connected at
both ends of the cable. Check to see if the
cable has been damaged.
Check MAC/PC Switch
Check to see that the MAC/PC switches
are set to the correct position for your
computer type. If they are not, set them
properly and restart your computer.
If the “Other” Keyboard is Not
Functioning
If you have a second keyboard plugged into
LittleFingers™ and the second keyboard is
not working, make sure that it is properly
connected to LittleFingers™.
Check Connectors
The keyboard connector has pins that can
bend or break if used improperly. To check
pins:
1. Turn off power to the system.
2. Carefully remove and inspect all
keyboard connectors under a bright
light. All pins should be straight and
_____________________________________________
LittleFingers™ Users Manual
Page 21
Chapter 4
Maintaining LittleFingers
none should be touching each other,
bent, or damaged.
Contacting Datadesk for Service
If the preceding steps fail to solve your
problem, contact Datadesk using one of the
following methods:
Web site:
Go to the LittleFingers™ technical support
page at:
www.datadesktech.com/custsupp.htm
E-mail:
Send your questions to:
[email protected]
Fax:
206-842-9219
Phone:
206-842-5480, Extension 103.
_____________________________________________
Page 22
LittleFingers™ Users Manual
Index______________________
adult users, 2
avoiding discomfort, 23
broken keyboard, 27
care, 3
cautions, 9
children as users, 2
clean keyboard, 25
clean keys, 25
clean trackball, 25
clicking with trackball, 21
connecting to a Mac, 15
connecting to IBMs, 10
connecting two keyboards, 13
contact Datadesk, 28
contextual menus, accessing, 21
double-clicking with trackball, 21
dragging and dropping, 22
dual keyboard use, 4
dual keyboards, 13
dual purpose key guide for Macs, 20
dual purpose keys, 18
education packages, 5
e-mail manufacturer, 28
fax number for manufacturer, 28
fix keyboard, 24, 27
functionality, 3
IBM dual purpose key guide, 19
IBM, use with, 3
IBMs, connecting to, 10
installing, 8
Mac, use with, 3
Macs, connecting to, 15
maintenance, 24
malfunctioning keyboard, 27
mouse, 3
packing list, 5
parts, 5
_____________________________________________
LittleFingers™ User Manual
Page 23
Index
Using LittleFingers
phone number for manufacturer, 28
pointing with trackball, 21
preventing damage to equipment, 9
proper use to avoid discomfort, 23
service keyboard, 27
trackball, improve performance, 26
trackball, using, 21
tracking, 3
troubleshoot, 27
users, 2
using LittleFingers™, 17
web site for manufacturer, 28
_____________________________________________
Page 24
LittleFingers™ Users Manual
Warranty
LIMITED WARRANTY
Datadesk Technologies Corporation, a Washington
Corporation, having its principal place of business at 10598
Valley Road NE, Bainbridge Island, WA 98110
("Manufacturer") warrants its the LittleFingers™ computer
keyboard products (the "Products") as follows:
1. Limited Warranty.
Manufacturer warrants that the Products sold hereunder will
be free from defects in material and workmanship for a
period of three ( 3 ) years from the date of purchase. If the
Products do not conform to this Limited Warranty during the
warranty period (as herein above specified), Buyer shall
notify Manufacturer in writing of the claimed defects and
demonstrate to Manufacturer satisfaction that said defects
are covered by this Limited Warranty. If the defects are
properly reported to Manufacturer within the warranty period,
and the defects are of such type and nature as to be covered
by this warranty, Manufacturer shall, at its own expense,
furnish, replacement Products or, at Manufacturer's option,
replacement parts for the defective Products. Shipping and
installation of the replacement Products or replacement parts
shall be at Buyer's expense.
_____________________________________________
LittleFingers™ User Manual
Page 25
Index
Using LittleFingers
2. Other Limits.
THE FOREGOING IS IN LIEU OF ALL OTHER
WARRANTIES, EXPRESS OR IMPLIED, INCLUDING BUT
NOT LIMITED TO THE IMPLIED WARRANTIES OF
MERCHANTABILITY AND FITNESS FOR A PARTICULAR
PURPOSE.
Manufacturer does not warrant against damages or defects
arising out of improper or abnormal use of handling of the
Products; against defects or damages arising from improper
installation (where installation is by persons other than
Manufacturer), against defects in products or components
not manufactured by Manufacturer, or against damages
resulting from such non-Manufacturer made products or
components. Manufacturer passes on to Buyer the warranty
it received (if any) from the maker thereof of such nonManufacturer made products or components. This warranty
also does not apply to Products upon which repairs have
been effected or attempted by persons other than pursuant
to written authorization by Manufacturer.
3. Exclusive Obligation.
THIS WARRANTY IS EXCLUSIVE. The sole and exclusive
obligation of Manufacturer shall be to repair or replace the
defective Products in the manner and for the period provided
above. Manufacturer shall not have any other obligation with
respect to the Products or any part thereof, whether based
on contract, tort, strict liability or otherwise. Under no
circumstances, whether based on this Limited Warranty or
otherwise, shall Manufacturer be liable for incidental, special,
or consequential damages.
4. Other Statements.
Manufacturer's employees or representatives' ORAL OR
OTHER WRITTEN STATEMENTS DO NOT CONSTITUTE
WARRANTIES, shall not be relied upon by Buyer, and are
not a part of the contract for sale or this limited warranty.
_____________________________________________
Page 26
LittleFingers™ Users Manual
Using LittleFingers
Chapter 3
5. Entire Obligation.
This Limited Warranty states the entire obligation of
Manufacturer with respect to the Products. If any part of this
Limited Warranty is determined to be void or illegal, the
remainder shall remain in full force and effect.
If your keyboard proves to be defective during this warranty
period, you may return it to Datadesk for repair or
replacement. In order to qualify for repair or replacement
under warranty, you need to include proof-of-purchase, in the
form of a sales receipt or an invoice showing the purchase
date, when you return the keyboard. If your keyboard is no
longer under warranty, repairs will be made at your expense.
To return a defective LittleFingers™ keyboard:
1. Contact Datadesk Technical Support at 206-842-5480
Ext. 103. Support personnel will determine if the
problem necessitates a return. If your keyboard does
need to be returned, Support personnel will record your
name, address, and LittleFingers™ serial number, and
issue you a Return Merchandise Authorization (RMA).
2. Carefully pack your keyboard for shipping. If possible,
use the keyboard’s original box; if not, wrap the keyboard
in packing paper or bubble wrap and pack it in a sturdy
cardboard box. Include the RMA number on the
shipping label.
3. Send the keyboard to Datadesk via prepaid shipping. If
your keyboard is still under warranty, Datadesk will pay
the shipping when sending the keyboard back to you. If
the keyboard is no longer under warranty, the cost of
return shipping will be included in the repair expense.
_____________________________________________
LittleFingers™ Users Manual
Page 27